首页的页面结构
**目标**: 实现系统首页的页面结构
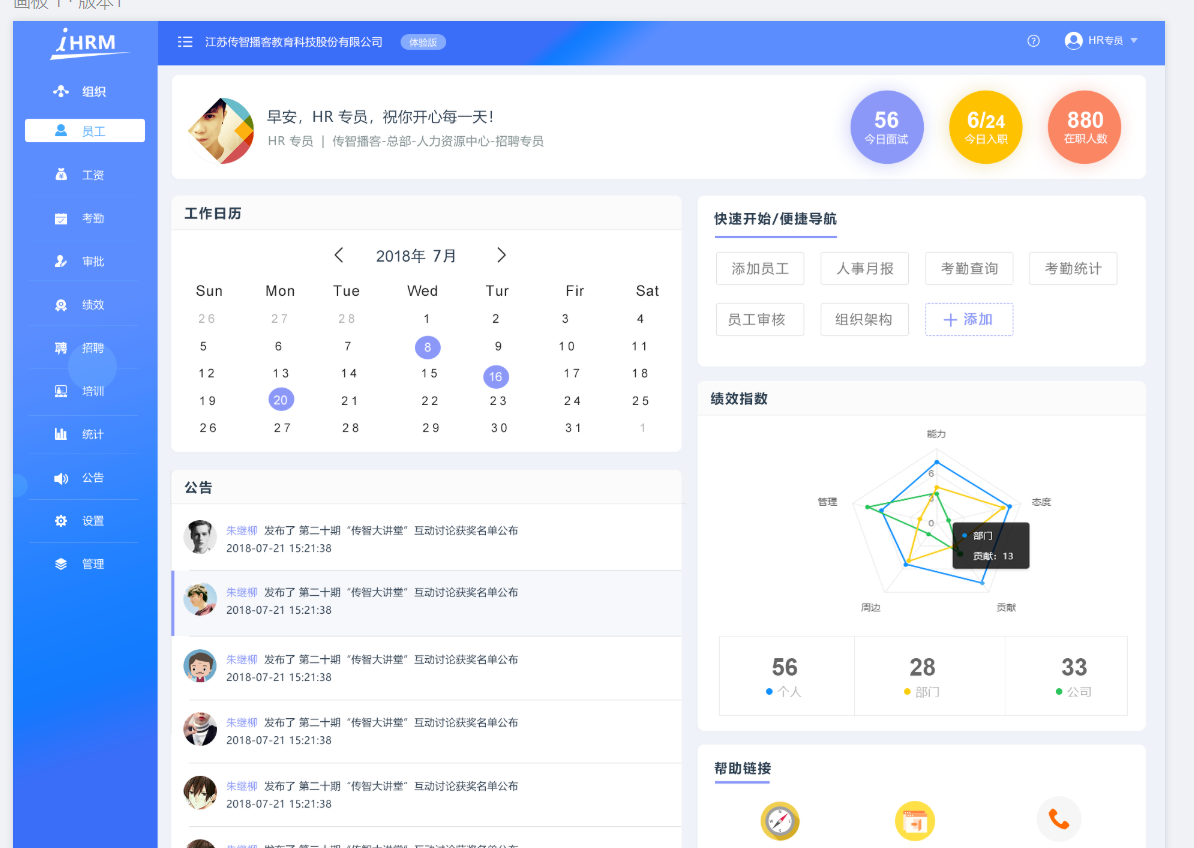
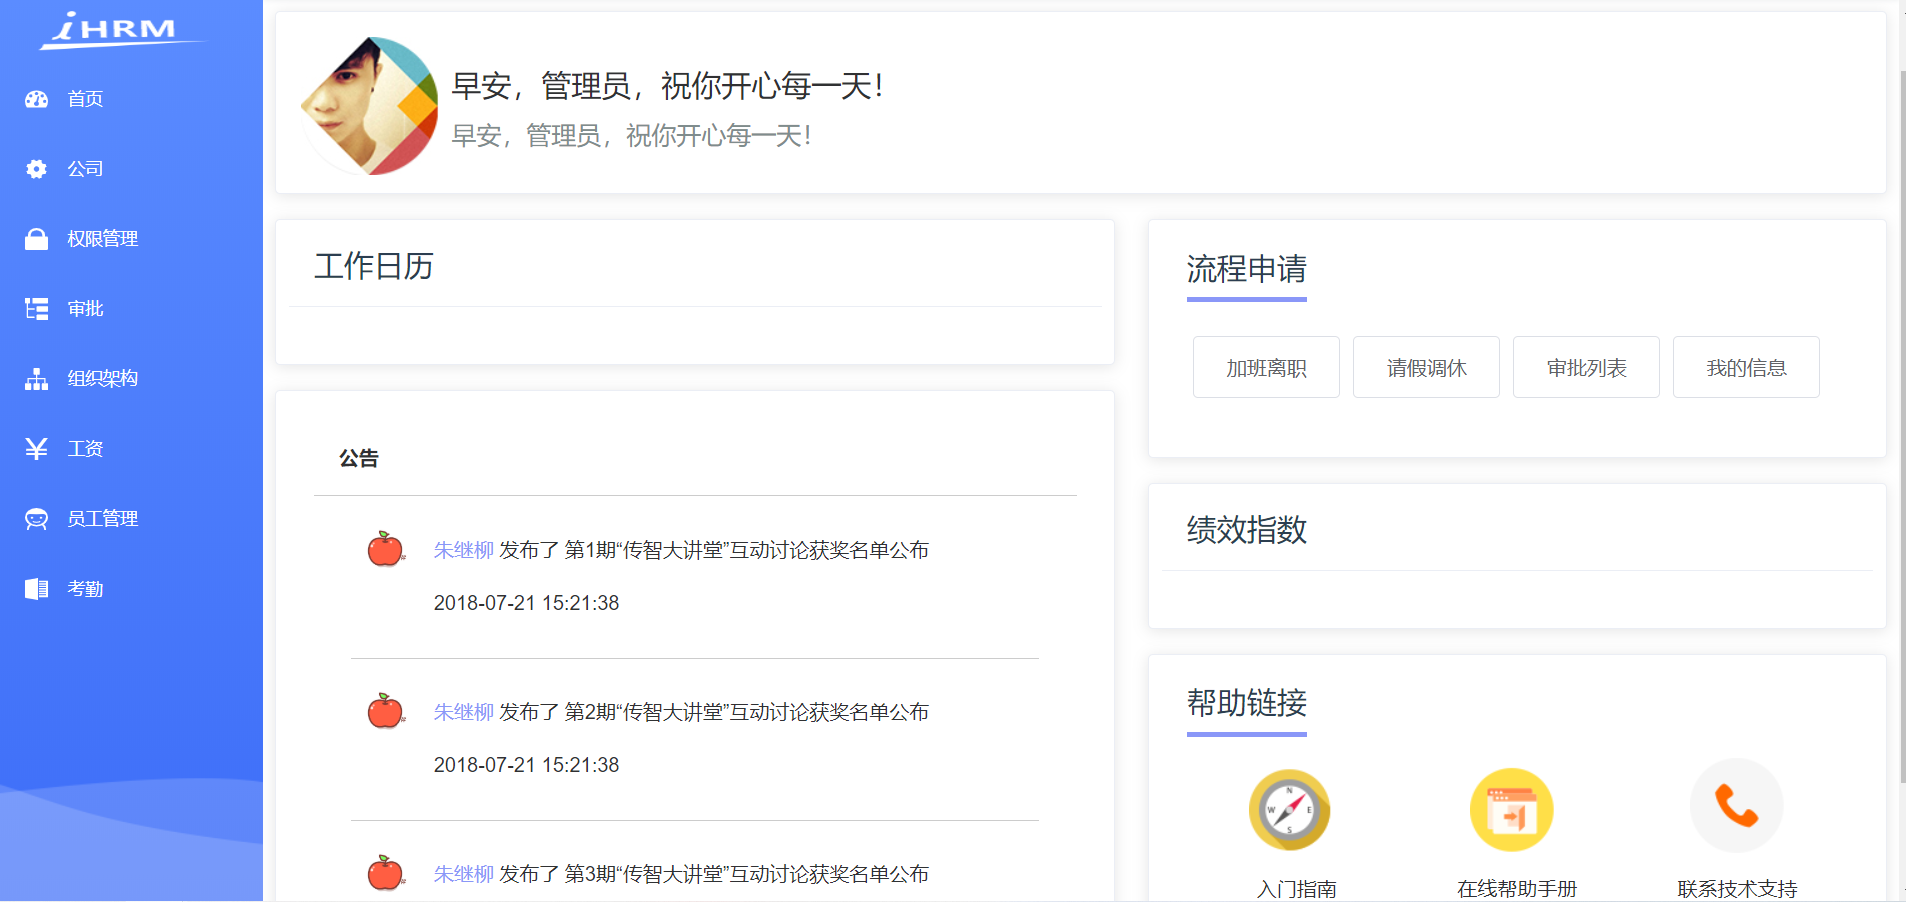
目前,我们的页面还剩下首页,这里我们可以按照如图实现一下的结构

首页页面结构,src/views/dashboard/index.vue
1
2
3
4
5
6
7
8
9
10
11
12
13
14
15
16
17
18
19
20
21
22
23
24
25
26
27
28
29
30
31
32
33
34
35
36
37
38
39
40
41
42
43
44
45
46
47
48
49
50
51
52
53
54
55
56
57
58
59
60
61
62
63
64
65
66
67
68
69
70
71
72
73
74
75
76
77
78
79
80
81
82
83
84
85
86
87
88
89
90
91
92
93
94
95
96
97
98
99
100
101
102
103
104
105
106
107
108
109
110
111
112
113
114
115
116
117
118
119
120
121
122
123
124
125
126
127
128
129
130
131
132
133
134
135
136
137
138
139
140
141
142
143
144
145
146
147
148
149
150
151
152
153
154
155
156
157
158
159
160
161
162
163
164
165
166
167
168
169
170
171
172
173
174
175
176
177
178
179
180
181
182
183
184
185
186
187
188
189
190
191
192
193
194
195
196
197
198
199
200
201
202
203
204
205
206
207
208
209
210
211
212
213
214
215
216
217
218
219
220
221
222
223
224
225
226
227
228
229
230
231
232
233
234
235
236
237
238
239
240
241
242
243
244
245
246
247
248
249
250
251
252
253
254
255
256
257
258
259
260
261
262
263
264
| <template>
<div class="dashboard-container">
<!-- 头部内容 -->
<el-card class="header-card">
<div>
<div class="fl headL">
<div class="headImg">
<img src="@/assets/common/head.jpg">
</div>
<div class="headInfoTip">
<p class="firstChild">早安,管理员,祝你开心每一天!</p>
<p class="lastChild">早安,管理员,祝你开心每一天!</p>
</div>
</div>
<div class="fr" />
</div>
</el-card>
<!-- 主要内容 -->
<el-row type="flex" justify="space-between">
<!-- 左侧内容 -->
<el-col :span="13" style="padding-right:26px">
<!-- 工作日历 -->
<el-card class="box-card">
<div slot="header" class="header">
<span>工作日历</span>
</div>
<!-- 放置日历组件 -->
</el-card>
<!-- 公告 -->
<el-card class="box-card">
<div class="advContent">
<div class="title"> 公告</div>
<div class="contentItem">
<ul class="noticeList">
<li>
<div class="item">
<img src="@/assets/common/img.jpeg" alt="">
<div>
<p><span class="col">朱继柳</span> 发布了 第1期“传智大讲堂”互动讨论获奖名单公布</p>
<p>2018-07-21 15:21:38</p>
</div>
</div>
</li>
<li>
<div class="item">
<img src="@/assets/common/img.jpeg" alt="">
<div>
<p><span class="col">朱继柳</span> 发布了 第2期“传智大讲堂”互动讨论获奖名单公布</p>
<p>2018-07-21 15:21:38</p>
</div>
</div>
</li>
<li>
<div class="item">
<img src="@/assets/common/img.jpeg" alt="">
<div>
<p><span class="col">朱继柳</span> 发布了 第3期“传智大讲堂”互动讨论获奖名单公布</p>
<p>2018-07-21 15:21:38</p>
</div>
</div>
</li>
</ul>
</div>
</div>
</el-card>
</el-col>
<!-- 右侧内容 -->
<el-col :span="11">
<el-card class="box-card">
<div class="header headTit">
<span>流程申请</span>
</div>
<div class="sideNav">
<el-button class="sideBtn">加班离职</el-button>
<el-button class="sideBtn">请假调休</el-button>
<el-button class="sideBtn">审批列表</el-button>
<el-button class="sideBtn">我的信息</el-button>
</div>
</el-card>
<!-- 绩效指数 -->
<el-card class="box-card">
<div slot="header" class="header">
<span>绩效指数</span>
</div>
<!-- 放置雷达图 -->
</el-card>
<!-- 帮助连接 -->
<el-card class="box-card">
<div class="header headTit">
<span>帮助链接</span>
</div>
<div class="sideLink">
<el-row>
<el-col :span="8">
<a href="#">
<span class="icon iconGuide" />
<p>入门指南</p>
</a>
</el-col>
<el-col :span="8">
<a href="#">
<span class="icon iconHelp" />
<p>在线帮助手册</p>
</a>
</el-col>
<el-col :span="8">
<a href="#">
<span class="icon iconTechnology" />
<p>联系技术支持</p>
</a>
</el-col>
</el-row>
</div>
</el-card>
</el-col>
</el-row>
</div>
</template>
<script>
import { mapGetters } from 'vuex'
export default {
name: 'Dashboard',
computed: {
...mapGetters([
'name'
])
}
}
</script>
<style lang="scss" scoped>
.dashboard-container {
margin: 10px;
li {
list-style: none;
}
.headImg {
float: left;
width: 100px;
height: 100px;
border-radius: 50%;
background: #999;
img {
width: 100%;
height: 100%;
border-radius: 50%;
}
}
.headInfoTip {
padding: 25px 0 0;
margin-left: 120px;
p {
padding: 0 0 15px;
margin: 0;
&.firstChild {
font-size: 24px;
}
&.lastChild {
font-size: 20px;
color: #7f8c8d;
}
}
}
}
.box-card {
padding: 5px 10px;
margin-top: 20px;
.header {
span {
color: #2c3e50;
font-size: 24px;
}
.item {
color: #97a8be;
float: right;
padding: 3px 0;
}
}
.headTit {
span {
border-bottom: 4px solid #8a97f8;
padding-bottom: 10px;
}
}
}
.header-card{
position: relative;
.header {
position: absolute;
right: 20px;
top: 15px;
z-index: 1;
}
}
.advContent {
background: #fff;
border-radius: 5px 5px 0px 0px;
.title {
font-size: 16px;
padding: 20px;
font-weight: bold;
border-bottom: solid 1px #ccc;
}
.contentItem {
padding: 0 30px;
min-height: 350px;
.item {
display: flex;
padding:18px 0 10px;
border-bottom: solid 1px #ccc;
.col {
color: #8a97f8;
}
img {
width: 56px;
height: 56px;
border-radius: 50%;
margin-right: 10px;
}
p{
padding: 0 0 8px;
}
}
}
}
.noticeList {
margin: 0;
padding: 0;
}
.sideNav,
.sideLink {
padding: 30px 0 12px;
.sideBtn {
padding: 16px 26px;
font-size:16px;
margin: 10px 5px;
}
}
.sideLink {
text-align: center;
.icon {
display: inline-block;
width: 76px;
height: 76px;
background: url('./../../assets/common/icon.png') no-repeat;
}
.iconGuide {
background-position: 0 0;
}
.iconHelp {
background-position: -224px 0;
}
.iconTechnology {
background-position: -460px 0;
}
}
</style>
|
通过上面的代码,我们得到了如下的页面

大家发现,我们预留了**工作日历和绩效指数**两个组件,我们会在后续的组件中进行开发
提交代码
首页用户资料显示
**目标**:将首页的信息换成真实的用户资料
直接获取Vuex的用户资料即可
1
2
3
4
5
6
7
8
9
10
11
12
13
14
15
| <script>
import { createNamespacedHelpers } from 'vuex'
const { mapState } = createNamespacedHelpers('user')
export default {
name: 'Dashboard',
data() {
return {
defaultImg: require('@/assets/common/head.jpg'),
}
},
computed: {
...mapState(['userInfo'])
}
}
</script>
|
在 vue视图中绑定
1
2
3
4
5
6
7
8
9
| <div class="fl headL">
<div class="headImg">
<img :src="userInfo.staffPhoto">
</div>
<div class="headInfoTip">
<p class="firstChild">早安,{{ userInfo.username }},祝你开心每一天!</p>
<p class="lastChild">{{ userInfo.username }} | {{ userInfo.companyName }}-{{ userInfo.departmentName }}</p>
</div>
</div>
|
除此之外,当我们加载图片失败的时候,图片地址存在,但是却不能显示,之前我们封装的图片错误指令可以应用
1
| <img :src="userInfo.staffPhoto" v-imageerror="defaultImg">
|
工作日历组件封装
**目标**封装一个工作日历组件在首页中展示
新建工作日历组件结构
工作日历的要求很简单,显示每个月的日期,可以设定日期的范围
我们可以基于Element组件el-calendar进行封装
代码如下 src/views/dashboard/components/work-calendar.vue
1
2
3
4
5
6
7
8
9
10
11
12
13
14
15
16
17
18
19
20
21
22
23
24
25
26
27
28
29
30
31
32
33
34
35
36
37
38
39
40
41
42
43
44
45
46
47
48
49
50
51
52
53
54
55
56
57
58
59
60
61
62
63
64
65
66
67
68
69
70
71
72
73
74
75
76
77
78
79
80
81
| <template>
<div>
<el-row type="flex" justify="end">
<el-select v-model="currentYear" size="small" style="width: 120px" @change="dateChange">
<el-option v-for="item in yearList" :key="item" :label="item" :value="item">{{ item }}</el-option>
</el-select>
<el-select v-model="currentMonth" size="small" style="width: 120px;margin-left:10px" @change="dateChange">
<el-option v-for="item in 12" :key="item" :label="item" :value="item">{{ item }}</el-option>
</el-select>
</el-row>
<el-calendar v-model="currentDate">
<template v-slot:dateCell="{ date, data }" class="content">
<div class="date-content">
<span class="text"> {{ data.day | getDay }}</span>
<span v-if="isWeek(date)" class="rest">休</span>
</div>
</template>
</el-calendar>
</div>
</template>
<script>
export default {
props: {
startDate: {
type: Date,
default: () => new Date()
}
},
data() {
return {
currentMonth: null, // 当前月份
currentYear: null, // 当前年份
currentDate: null,
yearList: []
}
}
}
</script>
<style scoped>
/deep/ .el-calendar-day {
height: auto;
}
/deep/ .el-calendar-table__row td,/deep/ .el-calendar-table tr td:first-child, /deep/ .el-calendar-table__row td.prev{
border:none;
}
.date-content {
height: 40px;
text-align: center;
line-height: 40px;
font-size: 14px;
}
.date-content .rest {
color: #fff;
border-radius: 50%;
background: rgb(250, 124, 77);
width: 20px;
height: 20px;
line-height: 20px;
display: inline-block;
font-size: 12px;
margin-left: 10px;
}
.date-content .text{
width: 20px;
height: 20px;
line-height: 20px;
display: inline-block;
}
/deep/ .el-calendar-table td.is-selected .text{
background: #409eff;
color: #fff;
border-radius: 50%;
}
/deep/ .el-calendar__header {
display: none
}
</style>
|
实现工作日历逻辑
1
2
3
4
5
6
7
8
9
10
11
12
13
14
15
16
17
18
19
20
21
22
23
24
25
26
27
28
29
30
31
32
33
34
35
36
37
38
39
40
41
42
43
44
45
| export default {
filters: {
getDay(value) {
const day = value.split('-')[2]
return day.startsWith('0') ? day.substr(1) : day
}
},
props: {
startDate: {
type: Date,
default: () => new Date()
}
},
data() {
return {
currentMonth: null,
currentYear: null,
currentDate: null,
yearList: []
}
},
created() {
this.currentMonth = this.startDate.getMonth() + 1
this.currentYear = this.startDate.getFullYear()
this.yearList = Array.from(Array(11), (value, index) => this.currentYear + index - 5 )
this.dateChange()
},
methods: {
isWeek(value) {
return value.getDay() === 6 || value.getDay() === 0
},
dateChange() {
const year = this.currentYear
const month = this.currentMonth
this.currentDate = new Date(`${year}-${month}-1`)
}
}
}
|
在主页中应用
1
2
| <!-- 放置日历组件 -->
<work-calendar />
|
提交代码
封装雷达图图表显示在首页
**目标**:封装一个echarts中的雷达图表显示在首页的绩效指数的位置
了解雷达图
封装雷达图插件
首页中,还有一个绩效指数的位置需要放置一个雷达图的图表,我们可以采用百度的echarts进行封装
第一步, 安装echarts图表
echarts是一个很大的包,里面包含了众多图形,假设我们只使用雷达图,可以做按需加载
第二步, 新建雷达图组件,**src/views/dashboard/components/radar.vue**
1
2
3
4
5
6
7
8
9
10
11
12
13
14
15
16
17
18
19
20
21
22
23
24
25
26
27
28
29
30
31
32
33
34
35
36
37
38
39
40
41
42
43
44
45
46
47
48
49
50
51
52
53
54
55
56
57
58
59
60
61
62
63
64
65
66
67
68
69
70
71
72
73
| <template>
<!-- 雷达图 图表必须给高和宽度-->
<div ref="myDiv" class="radar-echart" />
</template>
<script>
// 完成加载过程
// var echarts = require('echarts')
var echarts = require('echarts/lib/echarts') // 引入echarts主模块
require('echarts/lib/chart/radar') // 引入雷达图
// 引入提示框和标题组件
require('echarts/lib/component/tooltip')
require('echarts/lib/component/title')
export default {
// 页面渲染完毕事件
mounted() {
const myChart = echarts.init(this.$refs.myDiv) // 得到图表实例
myChart.setOption({
title: {
text: '基础雷达图'
},
tooltip: {},
legend: {
data: ['预算分配(Allocated Budget)', '实际开销(Actual Spending)']
},
radar: {
// shape: 'circle',
name: {
textStyle: {
color: '#fff',
backgroundColor: '#999',
borderRadius: 3,
padding: [3, 5]
}
},
// 每个区域的最高值
indicator: [
{ name: '工作效率', max: 100 },
{ name: '考勤', max: 100 },
{ name: '积极性', max: 100 },
{ name: '帮助同事', max: 100 },
{ name: '自主学习', max: 100 },
{ name: '正确率', max: 100 }
]
},
series: [{
name: '预算 vs 开销(Budget vs spending)',
type: 'radar',
// areaStyle: {normal: {}},
data: [
{
value: [10, 1, 100, 5, 100, 0],
name: '张三'
},
{
value: [50, 50, 50, 50, 50, 10],
name: '李四'
}
]
}]
})
}
}
</script>
<style>
.radar-echart {
width: 600px;
height: 400px;
}
</style>
|
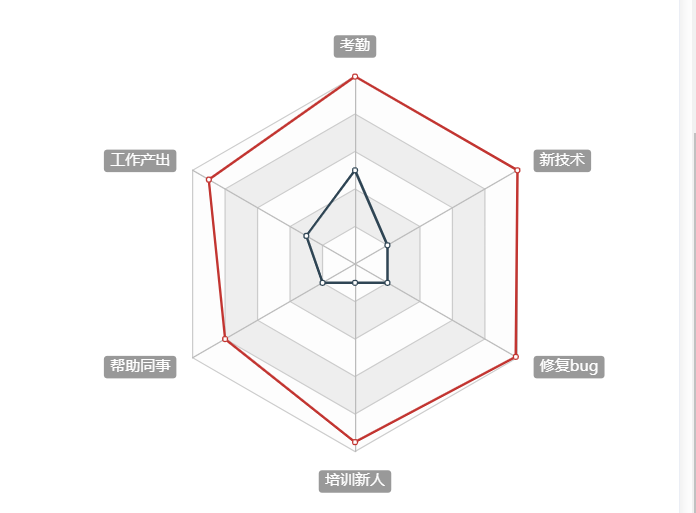
我们得到一个雷达图,对绩效指数进行统计

**注意**:相关数据的缺失,所以这里我们进行的是模拟数据
在主页中引入使用
1
2
| import Radar from './components/radar'
|
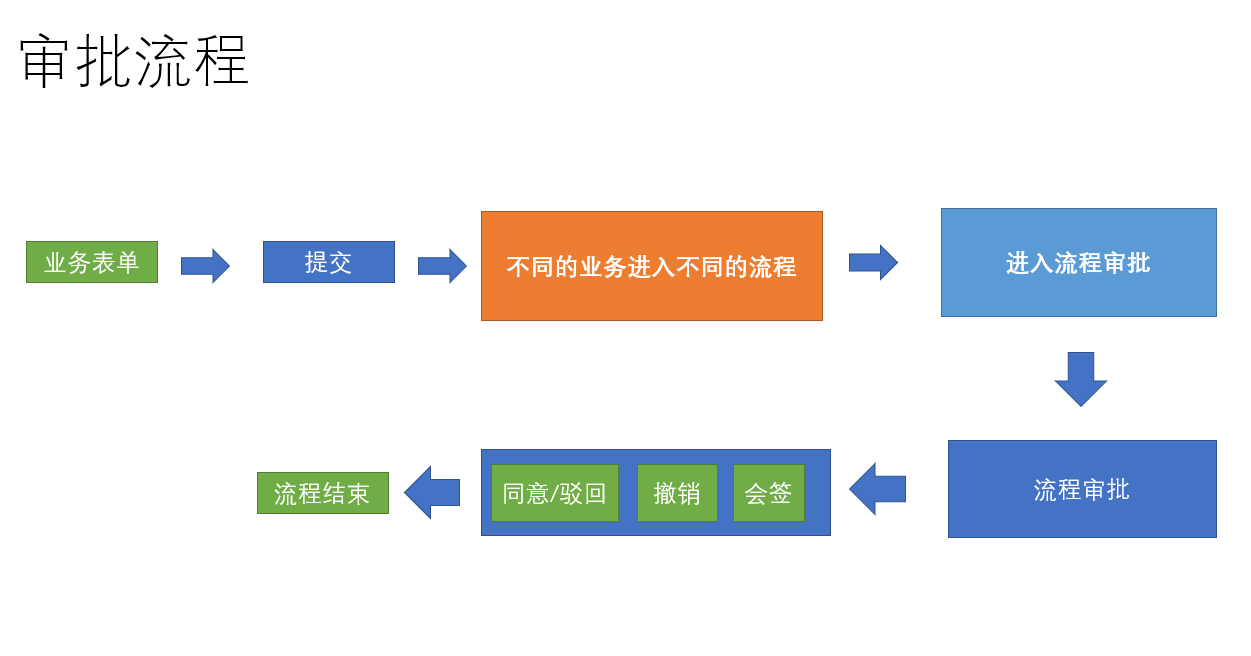
审批流程业务的基本介绍
什么是审批流程

提交一个离职审批
**目标**: 提交一个离职的审批,并完成业务流转
离职弹层
1
2
3
4
5
6
7
8
9
10
11
12
13
14
15
16
17
18
19
20
21
22
23
24
25
26
27
28
29
30
31
32
33
34
35
| <!-- 弹出层 -->
<el-dialog :visible="showDialog" title="离职申请" @close="btnCancel">
<el-form
ref="ruleForm"
:model="ruleForm"
status-icon
label-width="110px"
:rules="rules"
>
<!--离职表单-->
<el-form-item label="离职时间" prop="end_time">
<el-date-picker
v-model="ruleForm.exceptTime"
type="datetime"
value-format="yyyy-MM-dd HH:mm:ss"
placeholder="选择日期时间"
/>
</el-form-item>
<el-form-item label="离职原因" prop="reason">
<el-input
v-model="ruleForm.reason"
type="textarea"
:autosize="{ minRows: 3, maxRows: 8}"
style="width: 70%;"
placeholder="请输入内容"
/>
</el-form-item>
</el-form>
<el-row slot="footer" type="flex" justify="center">
<el-col :span="6">
<el-button size="small" type="primary" @click="btnOK">确定</el-button>
<el-button size="small" @click="btnCancel">取消</el-button>
</el-col>
</el-row>
</el-dialog>
|
显示弹层
1
| <el-button class="sideBtn" @click="showDialog = true">加班离职</el-button>
|
加班数据及校验
1
2
3
4
5
6
7
8
9
10
11
| showDialog: false,
ruleForm: {
exceptTime: '',
reason: '',
processKey: 'process_dimission',
processName: '离职'
},
rules: {
exceptTime: [{ required: true, message: '离职时间不能为空' }],
reason: [{ required: true, message: '离职原因不能为空' }]
}
|
提交审批逻辑
1
2
3
4
5
6
7
8
9
10
11
12
13
14
15
16
17
18
19
20
21
22
23
24
| import { startProcess } from '@/api/approvals'
methods: {
btnOK() {
this.$refs.ruleForm.validate(async validate => {
if (validate) {
const data = { ...this.ruleForm, userId: this.userInfo.userId }
await startProcess(data)
this.$message.success('提交流程成功')
this.btnCancel()
}
})
},
btnCancel() {
this.showDialog = false
this.$refs.ruleForm.resetFields()
this.ruleForm = {
exceptTime: '',
reason: '',
processKey: 'process_dimission',
processName: '离职'
}
}
}
|
配置审批列表的导航
1
2
| <el-button class="sideBtn" @click="$router.push('/users/approvals')">审批列表</el-button>
<el-button class="sideBtn" @click="$router.push('/users/info')">我的信息</el-button>
|
完成该流程的审批和流转
注意: 审批接口中的同意接口存在一定问题,可以测试 提交 /撤销 驳回等操作
提交代码


