0.学习目标
- 了解什么是无状态登录
- 了解JWT原理
- 实现登录授权功能
- 实现首页登录状态判断
- 实现Zuul的网关鉴权
1.无状态登录原理
1.1.什么是有状态?
有状态服务,即服务端需要记录每次会话的客户端信息,从而识别客户端身份,根据用户身份进行请求的处理,典型的设计如tomcat中的session。
例如登录:用户登录后,我们把登录者的信息保存在服务端session中,并且给用户一个cookie值,记录对应的session。然后下次请求,用户携带cookie值来,我们就能识别到对应session,从而找到用户的信息。
缺点是什么?
- 服务端保存大量数据,增加服务端压力
- 服务端保存用户状态,无法进行水平扩展
- 客户端请求依赖服务端,多次请求必须访问同一台服务器
1.2.什么是无状态
微服务集群中的每个服务,对外提供的都是Rest风格的接口。而Rest风格的一个最重要的规范就是:服务的无状态性,即:
- 服务端不保存任何客户端请求者信息
- 客户端的每次请求必须具备自描述信息,通过这些信息识别客户端身份
带来的好处是什么呢?
- 客户端请求不依赖服务端的信息,任何多次请求不需要必须访问到同一台服务
- 服务端的集群和状态对客户端透明
- 服务端可以任意的迁移和伸缩
- 减小服务端存储压力
1.3.如何实现无状态
无状态登录的流程:
- 当客户端第一次请求服务时,服务端对用户进行信息认证(登录)
- 认证通过,将用户信息进行加密形成token,返回给客户端,作为登录凭证
- 以后每次请求,客户端都携带认证的token
- 服务端对token进行解密,判断是否有效。
流程图:

整个登录过程中,最关键的点是什么?
token的安全性
token是识别客户端身份的唯一标示,如果加密不够严密,被人伪造那就完蛋了。
采用何种方式加密才是安全可靠的呢?
我们将采用JWT + RSA非对称加密
1.4.JWT
1.4.1.简介
JWT,全称是Json Web Token, 是JSON风格轻量级的授权和身份认证规范,可实现无状态、分布式的Web应用授权;官网:https://jwt.io
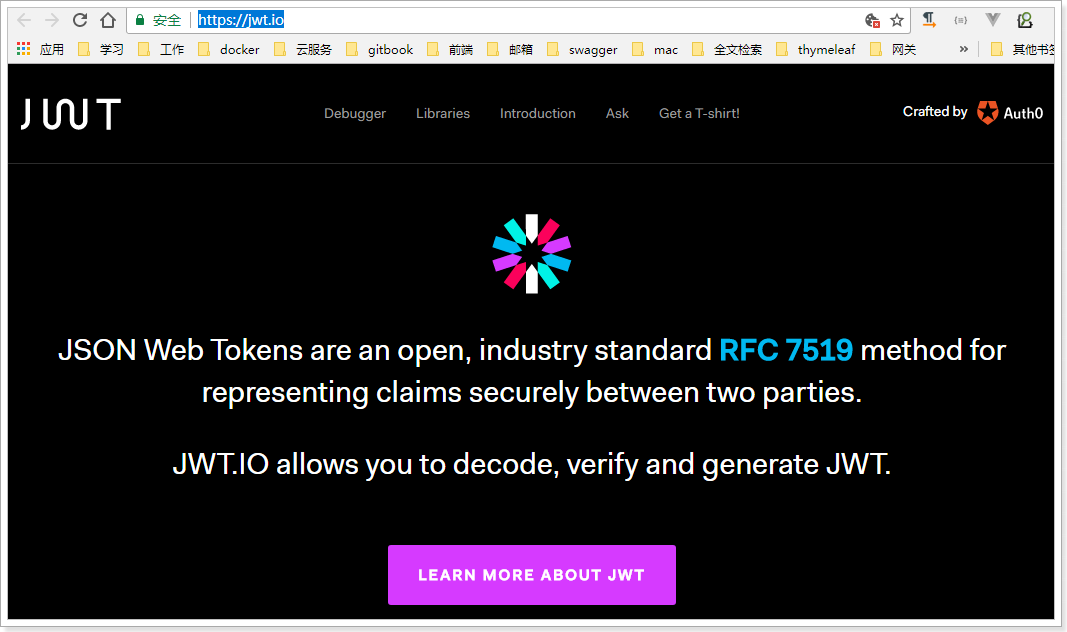
GitHub上jwt的java客户端:https://github.com/jwtk/jjwt
1.4.2.数据格式
JWT包含三部分数据:
Header:头部,通常头部有两部分内容:
我们会对头部进行base64加密(可解密),得到第一部分数据
Payload:载荷,就是有效数据,一般包含下面信息:
- 用户身份信息(注意,这里因为采用base64加密,可解密,因此不要存放敏感信息)
- tokenID:当前这个JWT的唯一标示
- 注册声明:如token的签发时间,过期时间,签发人等
这部分也会采用base64加密,得到第二部分数据
Signature:签名,是整个数据的认证信息。一般根据前两步的数据,再加上服务的的密钥(secret)(不要泄漏,最好周期性更换),通过加密算法生成。用于验证整个数据完整和可靠性
生成的数据格式:
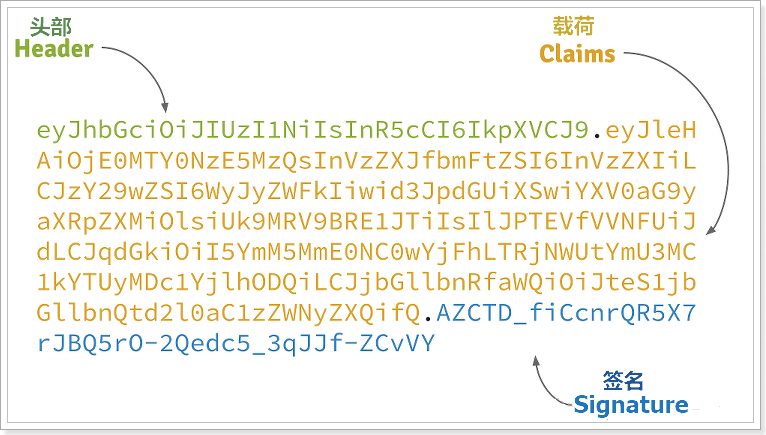
可以看到分为3段,每段就是上面的一部分数据
1.4.3.JWT交互流程
流程图:
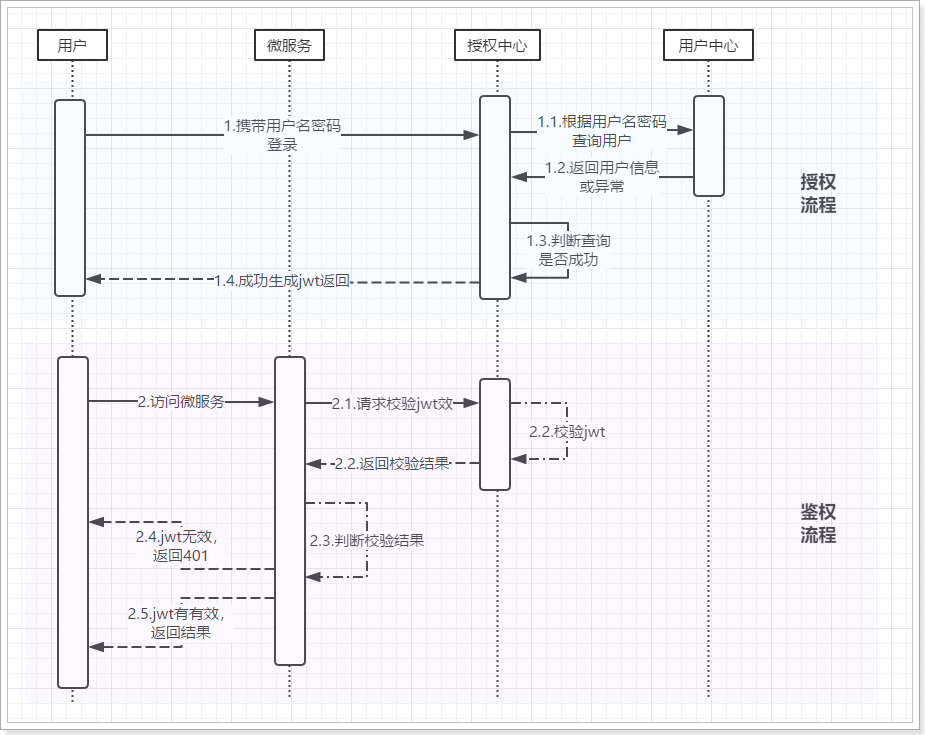
- 授权流程:
- 1、用户请求登录,携带用户名密码到授权中心
- 2、授权中心携带用户名密码,到用户中心查询用户
- 3、查询如果正确,生成JWT凭证
- 4、返回JWT给用户
- 鉴权流程:
- 1、用户请求某微服务功能,携带JWT
- 2、微服务将jwt交给授权中心校验
- 3、授权中心返回校验结果到微服务
- 4、微服务判断校验结果,成功或失败
- 5、失败则直接返回401
- 6、成功则处理业务并返回
因为JWT签发的token中已经包含了用户的身份信息,并且每次请求都会携带,这样服务的就无需保存用户信息,甚至无需去数据库查询,完全符合了Rest的无状态规范。
不过,这个过程是不是就完美了呢?
可以发现,用户访问我们的网站,一次授权后,以后访问微服务都需要鉴权,那么每次鉴权都需要访问授权中心,一个用户请求,被分解为2次请求才能完成,效率比较低。
能不能直接在微服务的完成鉴权,不去找授权中心呢?
如果这样,就可以减少一次网络请求,效率提高了一倍。但是,**微服务并没有鉴定JWT的能力**,因为鉴定需要通过密钥来完成。我们不能把密钥交给其它微服务,存在安全风险。
怎么办?
这就要用到RSA非对称加密技术了。
1.5.非对称加密验签
1.5.1.加密技术的类型
加密技术是对信息进行编码和解码的技术,编码是把原来可读信息(又称明文)译成代码形式(又称密文),其逆过程就是解码(解密),加密技术的要点是加密算法,加密算法可以分为三类:
- 对称加密,如AES
- 基本原理:将明文分成N个组,然后使用密钥对各个组进行加密,形成各自的密文,最后把所有的分组密文进行合并,形成最终的密文。
- 优势:算法公开、计算量小、加密速度快、加密效率高
- 缺陷:双方都使用同样密钥,安全性得不到保证
- 非对称加密,如RSA
- 基本原理:同时生成两把密钥:私钥和公钥,私钥隐秘保存,公钥可以下发给信任客户端
- 私钥加密,持有私钥或公钥才可以解密
- 公钥加密,持有私钥才可解密
- 优点:安全,难以破解
- 缺点:算法比较耗时
- 不可逆加密,如MD5,SHA
- 基本原理:加密过程中不需要使用密钥,输入明文后由系统直接经过加密算法处理成密文,这种加密后的数据是无法被解密的,无法根据密文推算出明文。
RSA算法历史:
1977年,三位数学家Rivest、Shamir 和 Adleman 设计了一种算法,可以实现非对称加密。这种算法用他们三个人的名字缩写:RSA
1.5.2.非对称加密验签
有了非对称加密,我们就可以改变签名和验签的方式了:
因为非对称加密的特性,不用担心公钥泄漏问题,因为公钥是无法伪造签名的,但要确保私钥的安全和隐秘。
非对称加密后的授权和鉴权流程:
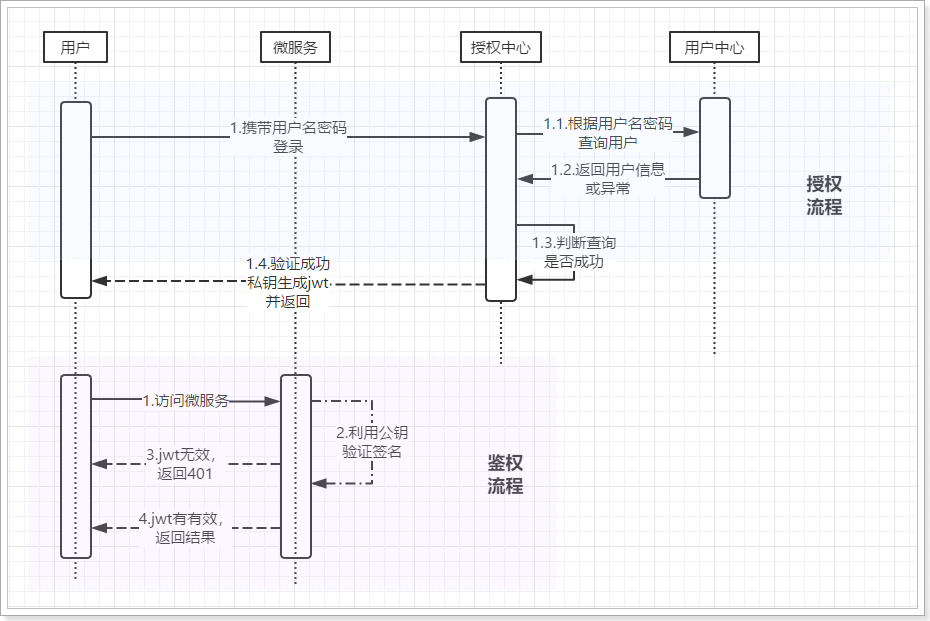
鉴权部分简化了非常多:
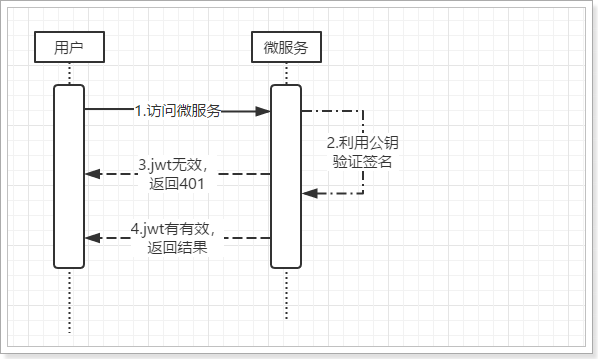
用户只需要与微服务交互,不用访问授权中心,效率大大提高!
接下来让我们撸起袖子,开始写代码吧!
2.编写JWT工具
因为生成jwt,解析jwt这样的行为以后在其它微服务中也会用到,因此我们会抽取成工具,放到ly-comon中。
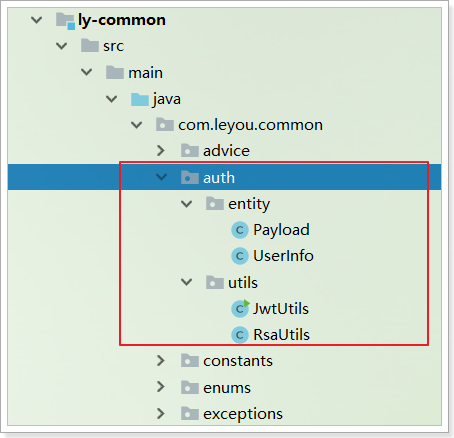
2.1.RSA工具类:
RSA工具类负责对RSA密钥的创建、读取功能:
1
2
3
4
5
6
7
8
9
10
11
12
13
14
15
16
17
18
19
20
21
22
23
24
25
26
27
28
29
30
31
32
33
34
35
36
37
38
39
40
41
42
43
44
45
46
47
48
49
50
51
52
53
54
55
56
57
58
59
60
61
62
63
64
65
66
67
68
69
70
71
72
73
74
75
76
77
78
79
80
81
82
83
84
85
86
87
88
89
90
91
92
93
94
95
96
97
98
99
100
101
| package com.leyou.common.auth.utils;
import java.io.File;
import java.io.IOException;
import java.nio.file.Files;
import java.security.*;
import java.security.spec.InvalidKeySpecException;
import java.security.spec.PKCS8EncodedKeySpec;
import java.security.spec.X509EncodedKeySpec;
import java.util.Base64;
public class RsaUtils {
private static final int DEFAULT_KEY_SIZE = 2048;
public static PublicKey getPublicKey(String filename) throws Exception {
byte[] bytes = readFile(filename);
return getPublicKey(bytes);
}
public static PrivateKey getPrivateKey(String filename) throws Exception {
byte[] bytes = readFile(filename);
return getPrivateKey(bytes);
}
private static PublicKey getPublicKey(byte[] bytes) throws Exception {
bytes = Base64.getDecoder().decode(bytes);
X509EncodedKeySpec spec = new X509EncodedKeySpec(bytes);
KeyFactory factory = KeyFactory.getInstance("RSA");
return factory.generatePublic(spec);
}
private static PrivateKey getPrivateKey(byte[] bytes) throws NoSuchAlgorithmException, InvalidKeySpecException {
bytes = Base64.getDecoder().decode(bytes);
PKCS8EncodedKeySpec spec = new PKCS8EncodedKeySpec(bytes);
KeyFactory factory = KeyFactory.getInstance("RSA");
return factory.generatePrivate(spec);
}
public static void generateKey(String publicKeyFilename, String privateKeyFilename, String secret, int keySize) throws Exception {
KeyPairGenerator keyPairGenerator = KeyPairGenerator.getInstance("RSA");
SecureRandom secureRandom = new SecureRandom(secret.getBytes());
keyPairGenerator.initialize(Math.max(keySize, DEFAULT_KEY_SIZE), secureRandom);
KeyPair keyPair = keyPairGenerator.genKeyPair();
byte[] publicKeyBytes = keyPair.getPublic().getEncoded();
publicKeyBytes = Base64.getEncoder().encode(publicKeyBytes);
writeFile(publicKeyFilename, publicKeyBytes);
byte[] privateKeyBytes = keyPair.getPrivate().getEncoded();
privateKeyBytes = Base64.getEncoder().encode(privateKeyBytes);
writeFile(privateKeyFilename, privateKeyBytes);
}
private static byte[] readFile(String fileName) throws Exception {
return Files.readAllBytes(new File(fileName).toPath());
}
private static void writeFile(String destPath, byte[] bytes) throws IOException {
File dest = new File(destPath);
if (!dest.exists()) {
dest.createNewFile();
}
Files.write(dest.toPath(), bytes);
}
}
|
2.2.JWT工具类
2.2.1依赖
我们需要先在ly-common中引入JWT依赖:
1
2
3
4
5
6
7
8
9
10
11
12
13
14
15
16
17
| <dependency>
<groupId>io.jsonwebtoken</groupId>
<artifactId>jjwt-api</artifactId>
<version>0.10.5</version>
</dependency>
<dependency>
<groupId>io.jsonwebtoken</groupId>
<artifactId>jjwt-impl</artifactId>
<version>0.10.5</version>
<scope>runtime</scope>
</dependency>
<dependency>
<groupId>io.jsonwebtoken</groupId>
<artifactId>jjwt-jackson</artifactId>
<version>0.10.5</version>
<scope>runtime</scope>
</dependency>
|
2.2.2.载荷对象:
JWT中,会保存载荷数据,我们计划存储3部分:
- id:jwt的id
- 用户信息:用户数据,不确定,可以是任意类型
- 过期时间:Date
为了方便后期获取,我们定义一个类来封装:
1
2
3
4
5
6
7
8
9
10
11
12
13
| package com.leyou.common.auth.entity;
import lombok.Data;
import java.util.Date;
@Data
public class Payload<T> {
private String id;
private T info;
private Date expiration;
}
|
2.2.3.工具:
1
2
3
4
5
6
7
8
9
10
11
12
13
14
15
16
17
18
19
20
21
22
23
24
25
26
27
28
29
30
31
32
33
34
35
36
37
38
39
40
41
42
43
44
45
46
47
48
49
50
51
52
53
54
55
56
57
58
59
60
61
62
63
64
65
66
67
68
69
70
71
72
73
74
75
76
77
78
79
80
81
82
83
84
85
86
87
88
89
90
91
92
93
94
95
96
97
98
99
100
101
102
| package com.leyou.common.auth.utils;
import com.leyou.common.auth.entity.Payload;
import com.leyou.common.utils.JsonUtils;
import io.jsonwebtoken.Claims;
import io.jsonwebtoken.Jws;
import io.jsonwebtoken.Jwts;
import io.jsonwebtoken.SignatureAlgorithm;
import org.joda.time.DateTime;
import java.security.PrivateKey;
import java.security.PublicKey;
import java.util.Base64;
import java.util.UUID;
public class JwtUtils {
private static final String JWT_PAYLOAD_USER_KEY = "user";
public static String generateTokenExpireInMinutes(Object userInfo, PrivateKey privateKey, int expire) {
return Jwts.builder()
.claim(JWT_PAYLOAD_USER_KEY, JsonUtils.toString(userInfo))
.setId(createJTI())
.setExpiration(DateTime.now().plusMinutes(expire).toDate())
.signWith(privateKey, SignatureAlgorithm.RS256)
.compact();
}
public static String generateTokenExpireInSeconds(Object userInfo, PrivateKey privateKey, int expire) {
return Jwts.builder()
.claim(JWT_PAYLOAD_USER_KEY, JsonUtils.toString(userInfo))
.setId(createJTI())
.setExpiration(DateTime.now().plusSeconds(expire).toDate())
.signWith(privateKey, SignatureAlgorithm.RS256)
.compact();
}
private static Jws<Claims> parserToken(String token, PublicKey publicKey) {
return Jwts.parser().setSigningKey(publicKey).parseClaimsJws(token);
}
private static String createJTI() {
return new String(Base64.getEncoder().encode(UUID.randomUUID().toString().getBytes()));
}
public static <T> Payload<T> getInfoFromToken(String token, PublicKey publicKey, Class<T> userType) {
Jws<Claims> claimsJws = parserToken(token, publicKey);
Claims body = claimsJws.getBody();
Payload<T> claims = new Payload<>();
claims.setId(body.getId());
claims.setInfo(JsonUtils.toBean(body.get(JWT_PAYLOAD_USER_KEY).toString(), userType));
claims.setExpiration(body.getExpiration());
return claims;
}
public static <T> Payload<T> getInfoFromToken(String token, PublicKey publicKey) {
Jws<Claims> claimsJws = parserToken(token, publicKey);
Claims body = claimsJws.getBody();
Payload<T> claims = new Payload<>();
claims.setId(body.getId());
claims.setExpiration(body.getExpiration());
return claims;
}
}
|
2.3.测试
2.3.1.用户信息
这里我们假设用户信息包含3部分:
- id:用户id
- username:用户名
- role:角色(权限中会使用)
载荷:UserInfo
1
2
3
4
5
6
7
8
9
10
11
12
13
14
15
16
17
| package com.leyou.common.auth.entity;
import lombok.AllArgsConstructor;
import lombok.Data;
import lombok.NoArgsConstructor;
@Data
@NoArgsConstructor
@AllArgsConstructor
public class UserInfo {
private Long id;
private String username;
private String role;
}
|
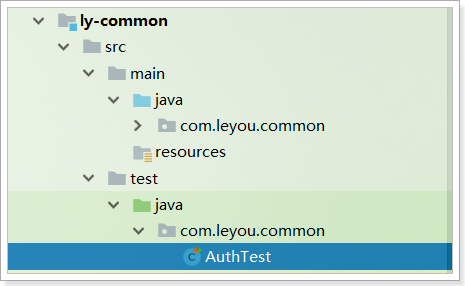
2.3.2.测试类
我们在ly-common中编写测试类:
1
2
3
4
5
6
7
8
9
10
11
12
13
14
15
16
17
18
19
20
21
22
23
24
25
26
27
28
29
30
31
32
33
34
35
36
37
38
39
40
41
42
43
44
45
46
47
48
| package com.leyou.common;
import com.leyou.common.auth.entity.Payload;
import com.leyou.common.auth.entity.UserInfo;
import com.leyou.common.auth.utils.JwtUtils;
import com.leyou.common.auth.utils.RsaUtils;
import org.junit.Test;
import java.security.PrivateKey;
import java.security.PublicKey;
public class AuthTest {
private String privateFilePath = "D:/heima/rsa/id_rsa";
private String publicFilePath = "D:/heima/rsa/id_rsa.pub";
@Test
public void testRSA() throws Exception {
RsaUtils.generateKey(publicFilePath, privateFilePath, "hello", 2048);
PrivateKey privateKey = RsaUtils.getPrivateKey(privateFilePath);
System.out.println("privateKey = " + privateKey);
PublicKey publicKey = RsaUtils.getPublicKey(publicFilePath);
System.out.println("publicKey = " + publicKey);
}
@Test
public void testJWT() throws Exception {
PrivateKey privateKey = RsaUtils.getPrivateKey(privateFilePath);
String token = JwtUtils.generateTokenExpireInMinutes(new UserInfo(1L, "Jack", "guest"), privateKey, 5);
System.out.println("token = " + token);
PublicKey publicKey = RsaUtils.getPublicKey(publicFilePath);
Payload<UserInfo> info = JwtUtils.getInfoFromToken(token, publicKey, UserInfo.class);
System.out.println("info.getExpiration() = " + info.getExpiration());
System.out.println("info.getInfo() = " + info.getInfo());
System.out.println("info.getId() = " + info.getId());
}
}
|
2.3.3.测试生成公钥和私钥
我们运行testRSA(),然后到指定的目录中查看:

打开公钥看看:
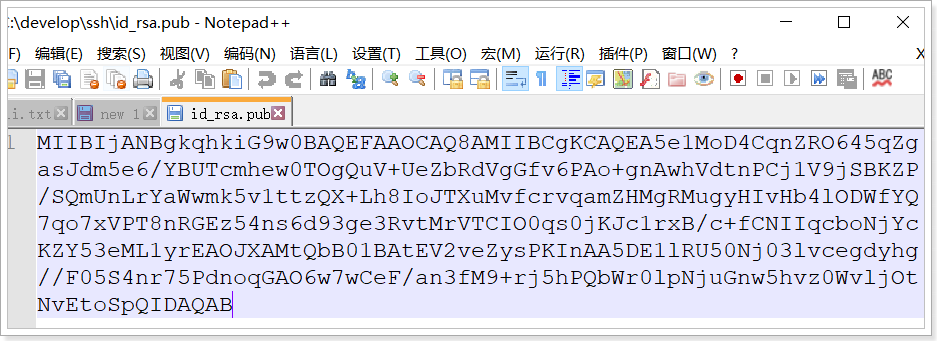
公钥和私钥已经生成了!
2.3.4.测试生成token
运行testJWT()方法,查看控制台:
1
2
3
4
5
6
7
| token = eyJhbGciOiJSUzI1NiJ9.eyJ1c2VyIjoie1wiaWRcIjoxLFwidXNlcm5hbWVcIjpcIkphY2tcIixcInJvbGVcIjpcImd1ZXN0XCJ9IiwianRpIjoiTkRnMlpUUXhaall0TUdNMFl5MDBNREU0TFdGaFpUWXRZVEUzT1Rjelpqa3hOVFEzIiwiZXhwIjoxNTU0NjEwNTMxfQ.FH_b4uBqgEYBTfLFaTnFNTrKNrm4n8e6clvBr1FiVMZirEinpjJdWUZc8NDNuJdSVA_FXd3G0aPAYgbTqPUXQ0QF3DC6BWB05lbXC2KGeJKHaKUSVw1KdIC2xjg5gOv-5QohjjVgXDRg3_p_s6zZeU6IMoao-6L5dZdYt4j60QP-4fp8uKn40HAiWh7KtKTQGbVn6w0sJNV17r2V5vmm1NplDUCJkDbfL7cEAkrszauB6qGEiw_vPe7sDydYAPUvIWkz85pJIUUs1ZbcZj4uw6xDjpiXKen3Xu8erV30buCFuJPbxg3pSHl5f-mvjyY7zF90TQOkA-Co580tlpUOhQ
info.getExpiration() = Sun Apr 07 12:15:31 CST 2019
info.getUserInfo() = UserInfo(id=1, username=Jack, role=guest)
info.getId() = NDg2ZTQxZjYtMGM0Yy00MDE4LWFhZTYtYTE3OTczZjkxNTQ3
Process finished with exit code 0
|
3.授权中心
授权中心的主要职责:
- 用户登录鉴权:
- 接收用户的登录请求,
- 通过用户中心的接口校验用户名密码
- 使用私钥生成JWT并返回
- 用户登录状态校验
- 用户登出
- 用户登录状态刷新
- 用户登录一段时间后,JWT可能过期,需要刷新有效期
接下来,我们逐一完成上述功能
3.1.创建授权中心
3.1.1.搭建项目
创建maven工程:
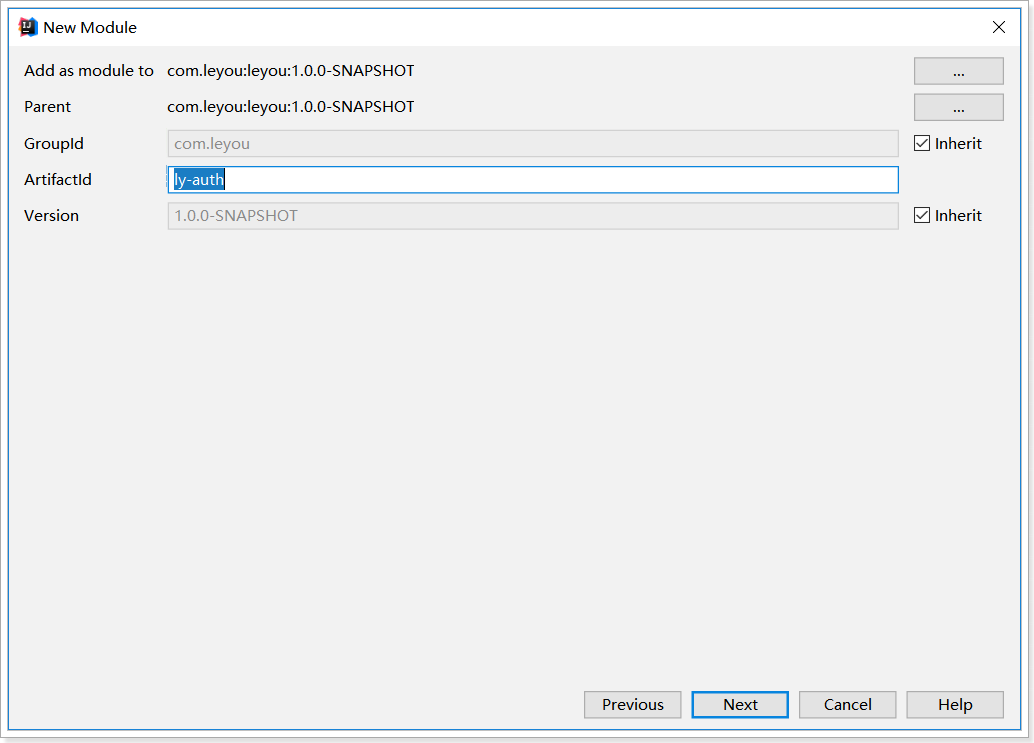
选择目录:
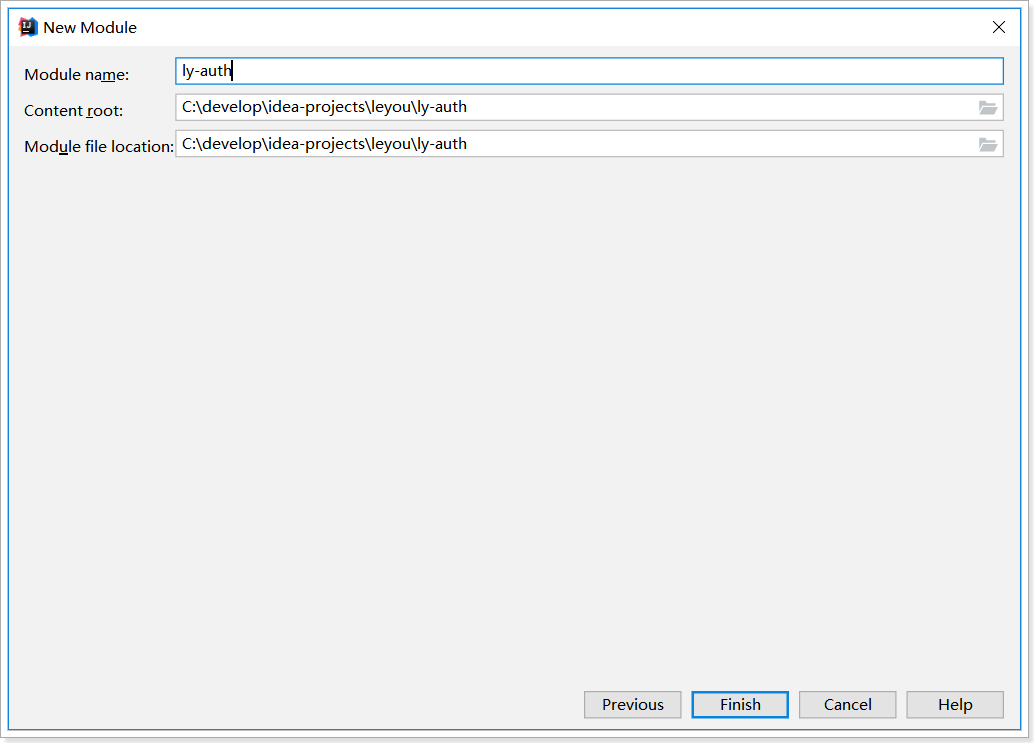
3.1.2.引入依赖
pom文件:
1
2
3
4
5
6
7
8
9
10
11
12
13
14
15
16
17
18
19
20
21
22
23
24
25
26
27
28
29
30
31
32
33
34
35
36
37
38
39
40
41
42
43
44
45
46
| <?xml version="1.0" encoding="UTF-8"?>
<project xmlns="http://maven.apache.org/POM/4.0.0"
xmlns:xsi="http://www.w3.org/2001/XMLSchema-instance"
xsi:schemaLocation="http://maven.apache.org/POM/4.0.0 http://maven.apache.org/xsd/maven-4.0.0.xsd">
<parent>
<artifactId>leyou</artifactId>
<groupId>com.leyou</groupId>
<version>1.0.0-SNAPSHOT</version>
</parent>
<modelVersion>4.0.0</modelVersion>
<artifactId>ly-auth</artifactId>
<dependencies>
<dependency>
<groupId>org.springframework.cloud</groupId>
<artifactId>spring-cloud-starter-netflix-eureka-client</artifactId>
</dependency>
<dependency>
<groupId>org.springframework.boot</groupId>
<artifactId>spring-boot-starter-web</artifactId>
</dependency>
<dependency>
<groupId>org.springframework.cloud</groupId>
<artifactId>spring-cloud-starter-openfeign</artifactId>
</dependency>
<dependency>
<groupId>com.leyou</groupId>
<artifactId>ly-user-interface</artifactId>
<version>1.0.0-SNAPSHOT</version>
</dependency>
<dependency>
<groupId>com.leyou</groupId>
<artifactId>ly-common</artifactId>
<version>1.0.0-SNAPSHOT</version>
</dependency>
</dependencies>
<build>
<plugins>
<plugin>
<groupId>org.springframework.boot</groupId>
<artifactId>spring-boot-maven-plugin</artifactId>
</plugin>
</plugins>
</build>
</project>
|
创建启动类:
1
2
3
4
5
6
7
8
| @SpringBootApplication(exclude = DataSourceAutoConfiguration.class)
@EnableDiscoveryClient
@EnableFeignClients
public class LyAuthApplication {
public static void main(String[] args) {
SpringApplication.run(LyAuthApplication.class, args);
}
}
|
3.1.3.配置
application.yml
1
2
3
4
5
6
7
8
9
10
11
12
| server:
port: 8087
spring:
application:
name: auth-service
eureka:
client:
service-url:
defaultZone: http://127.0.0.1:10086/eureka
instance:
ip-address: 127.0.0.1
prefer-ip-address: true
|
添加路由规则:
在api-gateway中添加路由规则:
1
2
3
4
| zuul:
prefix: /api
routes:
auth-service: /auth/**
|
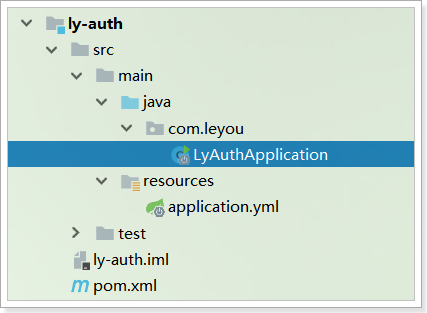
项目结构:
3.2.登录功能
接下来,我们需要在ly-auth编写一个接口,对外提供登录授权服务。
登录授权流程我们上面已经分析过,基本流程如下::
- 1、用户请求登录,携带用户名密码到授权中心
- 2、授权中心携带用户名密码,到用户中心查询用户
- 3、查询如果正确,生成JWT凭证,查询错误则返回400,
- 4、返回JWT给用户
上面的步骤有几个步骤需要我们去解决:
- 校验用户名密码必须到用户中心去做,因此用户中心必须对外提供的接口,根据用户名和密码查询用户。
- 生成JWT的过程需要私钥,验证签名需要公钥,因此需要在授权中心启动时加载公钥和私钥
- 返回JWT给用户,需要在以后的请求中携带jwt,那么客户端该把这个JWT保存在哪里呢?
3.2.1.读取公钥和私钥
1)编写配置
我们需要在授权中心完成授权,肯定要用到公钥、私钥、还有JWT工具,必须知道公钥、私钥文件的位置,另外生成token的有效期等信息,这些可以配置到application.yml中:
1
2
3
4
| ly:
jwt:
pubKeyPath: D:/heima/rsa/id_rsa.pub
priKeyPath: D:/heima/rsa/id_rsa
|
2)属性读取
然后编写属性类,加载这些数据:
1
2
3
4
5
6
7
8
9
10
11
12
13
14
15
16
17
18
19
| package com.leyou.auth.config;
import com.leyou.common.auth.utils.RsaUtils;
import lombok.Data;
import lombok.extern.slf4j.Slf4j;
import org.springframework.beans.factory.InitializingBean;
import org.springframework.boot.context.properties.ConfigurationProperties;
import java.security.PrivateKey;
import java.security.PublicKey;
@Data
@Slf4j
@ConfigurationProperties(prefix = "ly.jwt")
public class JwtProperties implements InitializingBean {
private String pubKeyPath;
private String priKeyPath;
}
|
为了让属性类生效,在启动类上添加注解,启用这个属性:

3)加载公钥和私钥
思考一下:这个属性类只帮我们读取了公钥和私钥的地址,那么每次使用公钥我们都需要从硬盘读取,效率是不是太低了,能不能在这个类中,直接读取公钥和私钥,保存起来,供以后使用呢?
我们来试一下。
那么问题来了,加载公钥和私钥的代码应该写在哪里呢?构造函数可以吗?
显然不行,因为构造函数执行时,Spring还没有完成属性注入,此时pubKeyPath和priKeyPath都没有值,我们**必须在Spring完成属性初始化后再加载密钥**。
那么,我们如何知道Spring完成了属性初始化呢?
这就必须要知道Spring的Bean初始化生命周期了,如图:
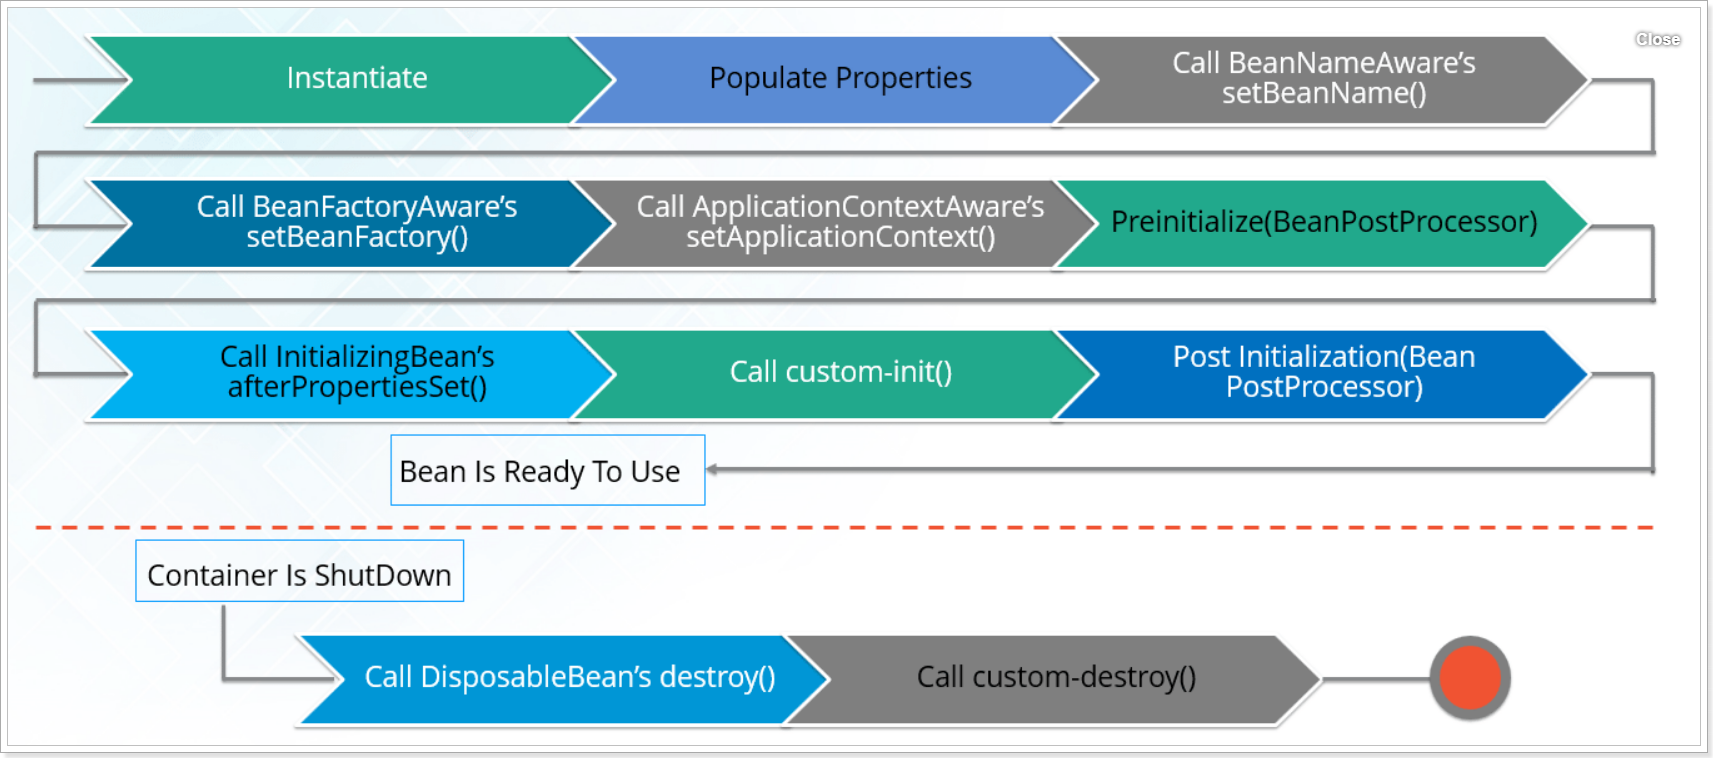
Spring Bean在Spring Bean Factory Container中完成其整个生命周期:以下是完成其生命周期所需的各种内容:
- Spring容器从XML文件或@Configuration中bean的定义中实例化bean。
- Spring依据配置中指定的属性,为bean填充所有属性。
- 如果bean实现BeanNameAware接口,spring调用setBeanName()方法,并传递bean的id。
- 如果bean实现BeanFactoryAware接口,spring将调用setBeanFactory()方法,并把自己作为参数。
- 如果bean实现ApplicationContextAware接口,spring将调用setApplicationContext()方法,并把ApplicationContext实例作为参数。
- 如果存在与bean关联的任何BeanPreProcessors(前置处理器),则调用preProcessBeforeInitialization()方法。比如Autowired等依赖注入功能是在此时完成。
- 如果Bean实现了InitializingBean接口,则调用bean的afterPropertiesSet()方法。
- 如果为bean指定了init-method,那么将调用bean的init方法。
- 最后,如果存在与bean关联的任何BeanPostProcessors,则将调用postProcessAfterInitialization()方法。
因此,我们加载公钥、私钥可以再7或8的两个位置来完成。比如我们在7的位置,需要两步:
- 实现InitializingBean接口
- 实现afterPropertiesSet方法,并在方法内加载密钥
示例:
1
2
3
4
5
6
7
8
9
10
11
12
13
14
15
16
17
18
19
20
21
22
23
24
25
26
27
28
29
30
31
32
33
34
35
36
37
38
39
40
| package com.leyou.auth.config;
import com.leyou.common.auth.utils.RsaUtils;
import lombok.Data;
import lombok.extern.slf4j.Slf4j;
import org.springframework.beans.factory.InitializingBean;
import org.springframework.boot.context.properties.ConfigurationProperties;
import java.security.PrivateKey;
import java.security.PublicKey;
@Data
@Slf4j
@ConfigurationProperties(prefix = "ly.jwt")
public class JwtProperties implements InitializingBean {
private String pubKeyPath;
private String priKeyPath;
private PublicKey publicKey;
private PrivateKey privateKey;
@Override
public void afterPropertiesSet() throws Exception {
try {
this.publicKey = RsaUtils.getPublicKey(pubKeyPath);
this.privateKey = RsaUtils.getPrivateKey(priKeyPath);
} catch (Exception e) {
log.error("初始化公钥和私钥失败!", e);
throw new RuntimeException(e);
}
}
}
|
3.2.2.查询用户接口
用户中心必须对外提供查询接口,方便ly-auth做用户名密码校验。
首先在ly-user-interface定义接口:
引入Feign依赖:
1
2
3
4
5
6
7
8
9
10
| <dependency>
<groupId>org.springframework.cloud</groupId>
<artifactId>spring-cloud-openfeign-core</artifactId>
</dependency>
<dependency>
<groupId>com.leyou</groupId>
<artifactId>ly-user-pojo</artifactId>
<version>1.0.0-SNAPSHOT</version>
<scope>compile</scope>
</dependency>
|
声明接口:
1
2
3
4
5
6
7
8
9
10
11
12
13
14
15
16
17
18
19
| package com.leyou.user.client;
import com.leyou.user.dto.UserDTO;
import org.springframework.cloud.openfeign.FeignClient;
import org.springframework.web.bind.annotation.GetMapping;
import org.springframework.web.bind.annotation.RequestParam;
@FeignClient("user-service")
public interface UserClient {
@GetMapping("query")
UserDTO queryUserByUsernameAndPassword(@RequestParam("username") String username, @RequestParam("password") String password);
}
|
3.3.3.JWT客户端存储方案
我们把jwt返回到客户端,客户端保存到哪里呢?
目前有两种解决方案:
- 方案一:存入web存储如:LocalStorage或SessionStorage中
- 优点:
- 不用担心cookie禁用问题
- 不会随着浏览器自动发送,可以减少不必要的请求头大小
- 缺点:
- 不会随着浏览器自动发送,需要前端额外代码,携带jwt
- 会遭到XSS(跨站脚本)攻击
- 方案二:存入cookie
- 优点:
- 会随着浏览器自动发送,客户端不用任何额外代码
- 使用httponly,避免XSS攻击风险
- 缺点:
- 会随着浏览器自动发送,某些时候有些多余
- 可能遭到CSRF(跨站资源访问)攻击
这里我们采用哪一种呢?
我们采用cookie方案,cookie方案的两个缺陷我们也可以解决:
- 问题1:会随着浏览器自动发送,某些时候有些多余
- 解决:后端服务与其它服务资源(如静态资源)采用不同域名,浏览器的同源策略会限制cookie
- 问题2:可能遭到CSRF(跨站资源访问)攻击
- 解决:避免get请求操作服务器资源,遵循Rest风格,必要时在token中存入随机码
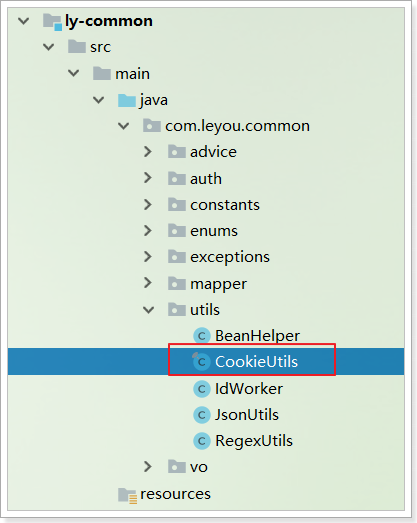
我们在ly-common中编写的CookieUtils可以帮我们快捷实现cookie的读写问题:
3.3.4.登录代码实现
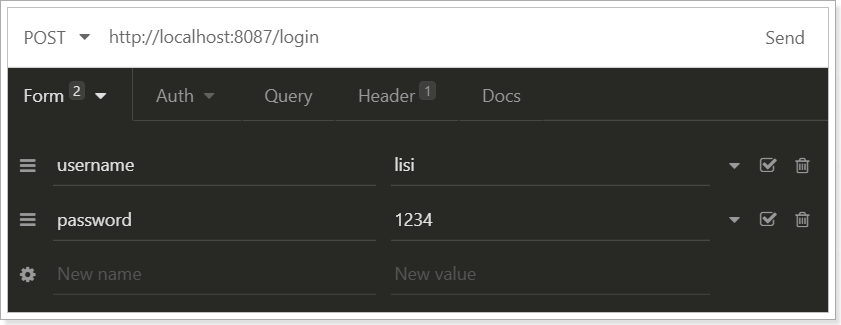
接下来我们就在ly-auth编写授权接口,接收用户名和密码,校验成功后,写入cookie中。
controller
- 请求方式:post
- 请求路径:/login
- 请求参数:username和password
- 返回结果:无,直接写入cookie
代码:
1
2
3
4
5
6
7
8
9
10
11
12
13
14
15
16
17
18
19
20
21
22
23
24
25
26
27
28
29
30
31
32
33
34
35
36
| package com.leyou.auth.web;
import com.leyou.auth.service.AuthService;
import org.springframework.beans.factory.annotation.Autowired;
import org.springframework.http.HttpStatus;
import org.springframework.http.ResponseEntity;
import org.springframework.web.bind.annotation.PostMapping;
import org.springframework.web.bind.annotation.RequestParam;
import org.springframework.web.bind.annotation.RestController;
import javax.servlet.http.HttpServletResponse;
@RestController
public class AuthController {
@Autowired
private AuthService authService;
@PostMapping("login")
public ResponseEntity<Void> login(
@RequestParam("username") String username,
@RequestParam("password") String password,
HttpServletResponse response) {
authService.login(username, password, response);
return ResponseEntity.status(HttpStatus.NO_CONTENT).build();
}
}
|
service
service的基本流程:
这里还有几个属性要配置,包括:
- token有效期
- cookie名称
- cookie的domain属性,决定cookie在哪些域名下生效
这三个属性我们也配置到配置文件,不过我们做下特殊标记,这些虽然与JWT有关,但却是用户登录相关属性,因此这样来配置:
1
2
3
4
5
6
7
8
| ly:
jwt:
pubKeyPath: D:/heima/rsa/id_rsa.pub
priKeyPath: D:/heima/rsa/id_rsa
user:
expire: 30
cookieName: LY_TOKEN
cookieDomain: leyou.com
|
注意:cookie的domain决定了cookie作用的域名,写成”leyou.com“可以让leyou.com下的所有二级域名共享cookie
然后在JwtProperties中添加属性:
1
2
3
4
5
6
7
8
9
10
11
12
13
14
15
16
17
18
19
20
21
22
23
24
25
26
27
28
29
30
31
32
33
34
35
36
37
38
39
40
41
42
43
44
45
46
47
48
49
50
51
52
53
54
55
56
57
58
59
60
61
| package com.leyou.auth.config;
import com.leyou.common.auth.utils.RsaUtils;
import lombok.Data;
import lombok.extern.slf4j.Slf4j;
import org.springframework.beans.factory.InitializingBean;
import org.springframework.boot.context.properties.ConfigurationProperties;
import java.security.PrivateKey;
import java.security.PublicKey;
@Data
@Slf4j
@ConfigurationProperties(prefix = "ly.jwt")
public class JwtProperties implements InitializingBean {
private String pubKeyPath;
private String priKeyPath;
private UserTokenProperties user = new UserTokenProperties();
private PublicKey publicKey;
private PrivateKey privateKey;
@Data
public class UserTokenProperties {
private int expire;
private String cookieName;
private String cookieDomain;
}
@Override
public void afterPropertiesSet() throws Exception {
try {
this.publicKey = RsaUtils.getPublicKey(pubKeyPath);
this.privateKey = RsaUtils.getPrivateKey(priKeyPath);
} catch (Exception e) {
log.error("初始化公钥和私钥失败!", e);
throw new RuntimeException(e);
}
}
}
|
完整的service代码:
1
2
3
4
5
6
7
8
9
10
11
12
13
14
15
16
17
18
19
20
21
22
23
24
25
26
27
28
29
30
31
32
33
34
35
36
37
38
39
40
41
42
43
44
45
46
47
| package com.leyou.auth.service;
import com.leyou.auth.config.JwtProperties;
import com.leyou.common.auth.entity.UserInfo;
import com.leyou.common.auth.utils.JwtUtils;
import com.leyou.common.enums.ExceptionEnum;
import com.leyou.common.exceptions.LyException;
import com.leyou.common.utils.CookieUtils;
import com.leyou.user.client.UserClient;
import com.leyou.user.dto.UserDTO;
import org.joda.time.DateTime;
import org.springframework.beans.factory.annotation.Autowired;
import org.springframework.stereotype.Service;
import javax.servlet.http.HttpServletResponse;
import java.util.Date;
@Service
public class AuthService {
@Autowired
private JwtProperties prop;
@Autowired
private UserClient userClient;
private static final String USER_ROLE = "role_user";
public void login(String username, String password, HttpServletResponse response) {
try {
UserDTO user = userClient.queryUserByUsernameAndPassword(username, password);
UserInfo userInfo = new UserInfo(user.getId(), user.getUsername(), USER_ROLE);
String token = JwtUtils.generateTokenExpireInMinutes(userInfo, prop.getPrivateKey(), prop.getUser().getExpire());
CookieUtils.newBuilder()
.response(response)
.httpOnly(true)
.domain(prop.getUser().getCookieDomain())
.name(prop.getUser().getCookieName()).value(token)
.build();
} catch (Exception e) {
throw new LyException(ExceptionEnum.INVALID_USERNAME_PASSWORD);
}
}
}
|
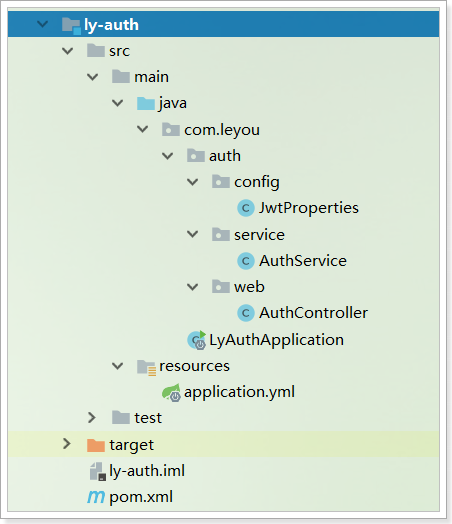
3.3.5.项目结构:
3.3.6.测试
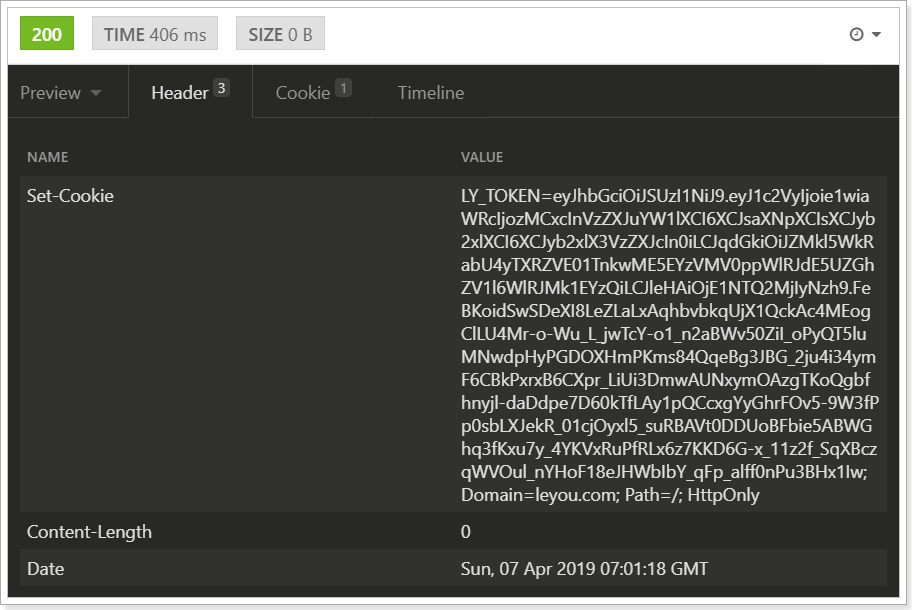
响应:
3.3.解决cookie写入问题
接下来,我们看看登录页面,是否能够正确的发出请求。
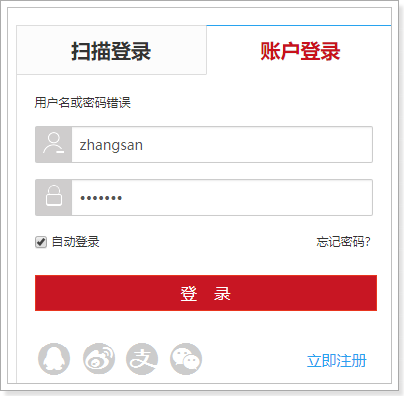
我们在页面输入登录信息,然后点击登录:
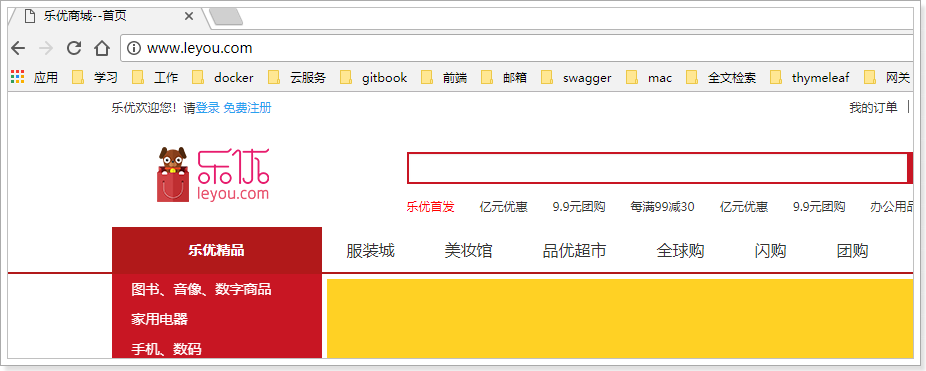
成功跳转到了首页:
接下来我们查看首页cookie:
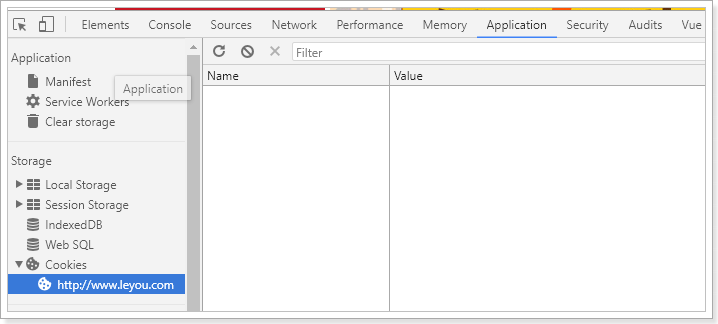
什么都没有,为什么?
3.3.1.问题分析
我们在客户端工具与页面访问的区别是什么呢?
- 客户端工具访问的是:localhost:8087/login
- 页面访问的是:api.leyou.com/api/auth/login
难道URL路径不同,导致了cookie问题?
那么,为了验证这件事情,我们在客户端工具中访问一下api.leyou.com/api/auth/login试试:

果然,虽然请求返回200,但是我们并没有在头中看到cookie,这是怎么回事呢?
两种访问的区别在哪里呢?仅仅是url地址不同吗??
你应该能想到了:
localhost:8087直接访问的是微服务api.leyou.com/api/则会先把请求发送到网关Zuul
那么,会不会是Zuul把cookie给弄丢了呢?
3.3.2.Zuul的敏感头过滤
Zuul内部有默认的过滤器,会对请求和响应头信息进行重组,过滤掉敏感的头信息:
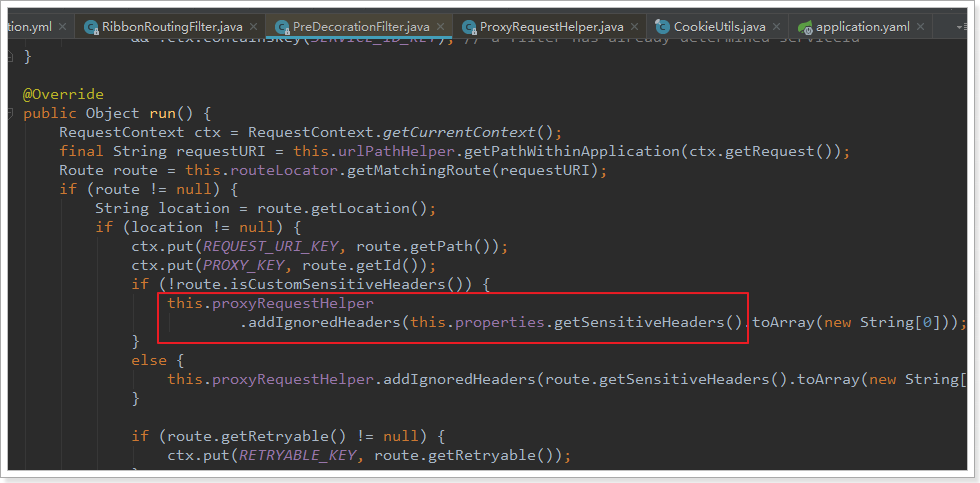
会发现,这里会通过一个名为SensitiveHeaders的属性,来获取敏感头列表,然后添加到IgnoredHeaders中,这些头信息就会被忽略。
而这个SensitiveHeaders来自于一个名为ZuulProperties的类,默认值就包含了set-cookie、Cookie、Authorization:
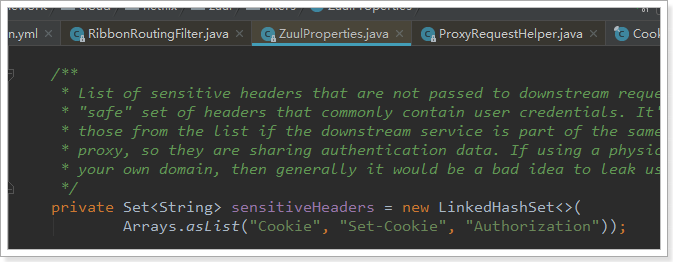
因此解决方案就是覆盖这个属性,我们查看ZuulProperties这个类:
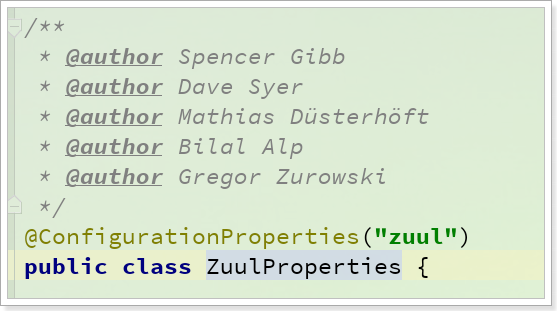
发现其属性前缀是:zuul,因此我们可以通过修改application.yml文件,覆盖默认配置。
有两种覆盖方式:
全局设置:
会作用于所有路径。
指定路由设置:
zuul.routes.<routeName>.sensitive-headers=zuul.routes.<routeName>.custom-sensitive-headers=true
此处我们采用全局配置:
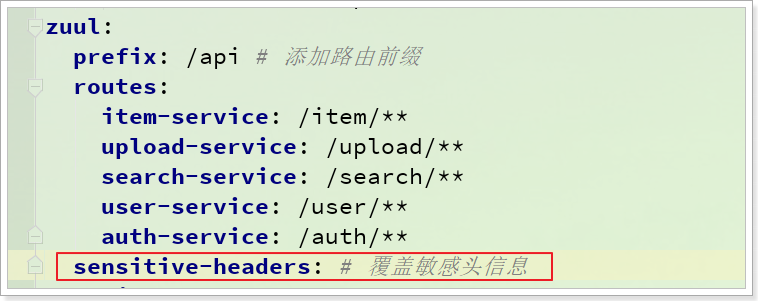
3.3.3.最后的测试
再次重启后测试,发现token成功写入了:
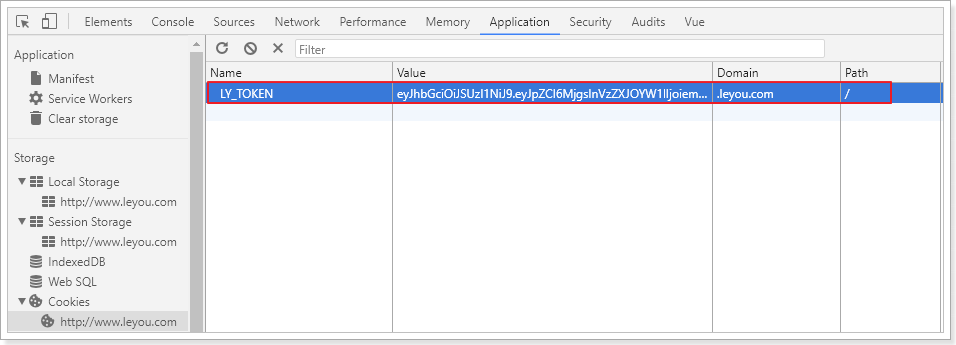
3.4.首页判断登录状态
虽然cookie已经成功写入,但是我们首页的顶部,登录状态依然没能判断出用户信息:
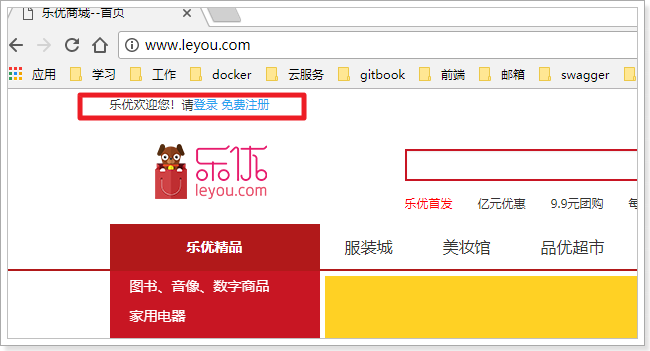
我们思考一下,应该如何判断用户是否登录呢?
3.4.1.步骤分析
传统登录校验的步骤:
- 1)用户请求到达服务端,会自动携带cookie
- 2)cookie中包含sessionId,tomcat根据sessionId获取session
- 3)从session中读取用户信息,判断是否存在
- 4)存在,证明已经登录;不存在,证明登录超时或未登录
我们现在使用的是无状态登录,不存在session,而是把用户身份写入了token,是否需要发请求到服务端进行校验呢?
肯定需要的,因为token需要通过公钥解析才知道是否有效。
分析一下步骤:
- 1)页面向后台发起请求,携带cookie
- 2)后台获取cookie中的LY_TOKEN
- 3)校验token是否有效
- 无效:登录失效
- 有效:解析出里面的用户信息,返回到页面
接下来,我们就分步实现上述功能。
3.4.2.页面JS代码
首先是页面发起请求,校验cookie。
页面的顶部已经被我们封装为一个独立的Vue组件,在/js/pages/shortcut.js中
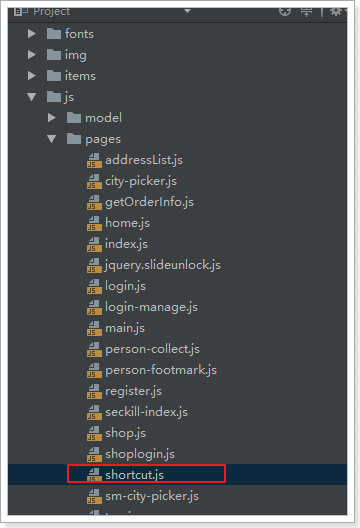
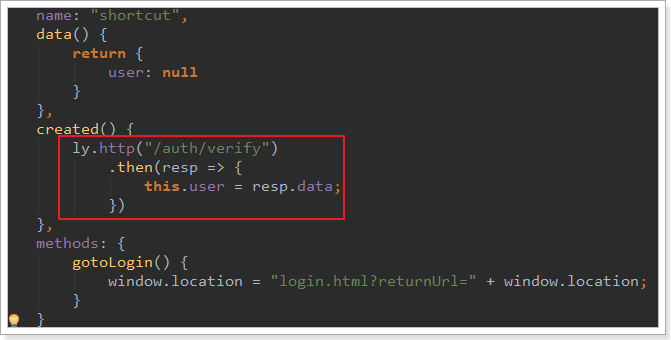
打开js,发现里面已经定义好了Vue组件,并且在created函数中,查询用户信息:
查看网络控制台,发现发起了请求:
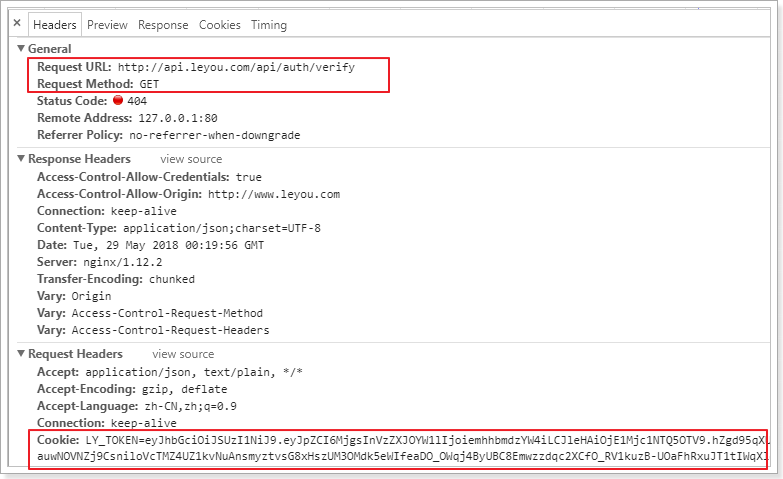
因为token在cookie中,因此本次请求肯定会携带token信息在头中。
3.4.3.校验用户登录状态
我们在ly-auth中定义用户的校验接口,通过cookie获取token,然后校验通过返回用户信息。
- 请求方式:GET
- 请求路径:/verify
- 请求参数:无,不过我们需要从cookie中获取token信息
- 返回结果:UserInfo,校验成功返回用户信息;校验失败,则返回401
controller代码:
1
2
3
4
5
6
7
8
9
10
|
@GetMapping("verify")
public ResponseEntity<UserInfo> verifyUser(HttpServletRequest request, HttpServletResponse response) {
return ResponseEntity.ok(authService.verifyUser(request, response));
}
|
service代码:
1
2
3
4
5
6
7
8
9
10
11
12
| public UserInfo verifyUser(HttpServletRequest request, HttpServletResponse response) {
try {
String token = CookieUtils.getCookieValue(request, prop.getUser().getCookieName());
Payload<UserInfo> payLoad = JwtUtils.getInfoFromToken(token, prop.getPublicKey(), UserInfo.class);
return payLoad.getUserInfo();
} catch (Exception e) {
throw new LyException(ExceptionEnum.UNAUTHORIZED);
}
}
|
3.4.4.测试
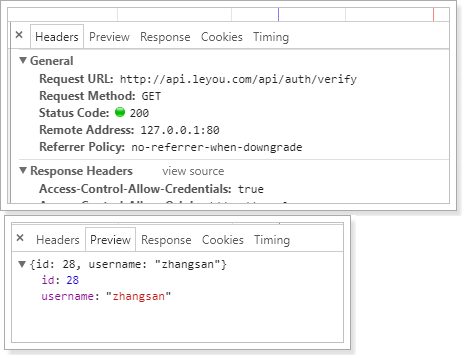
页面效果:
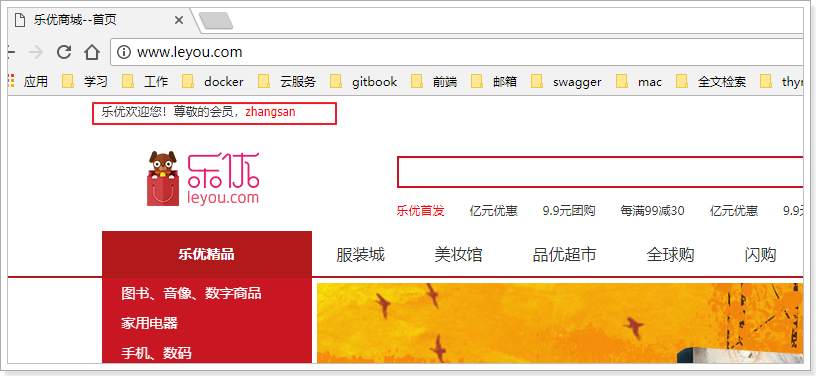
3.5.刷新token
JWT内部设置了token的有效期,默认是30分钟,30分钟后用户的登录信息就无效了,用户需要重新登录,用户体验不好,怎么解决呢?
JWT的缺点就凸显出来了:
- JWT是生成后无法更改,因此我们无法修改token中的有效期,也就是无法续签。
怎么办?
3种解决方案:
- 方案1:每次用户访问网站,都重新生成token。操作简单粗暴,但是token写入频率过高,效率实在不好。
- 方案2:登录时,除了生成jwt,还另外生成一个刷新token,每当token过期,如果用户持有刷新token,则为其重新生成一个token。这种方式比较麻烦,而且会增加header大小。
- 方案3:cookie即将到期时,重新生成一个token。比如token有效期为30分钟,当用户请求我们时,我们可以判断如果用户的token有效期还剩下15分钟,那么就重新生成token,可以看做上面两种的折中方案。
我们采用方案3,在验证登录的逻辑中,加入一段时间判断逻辑,如果距离有效期不足15分钟,则生成一个新token:
1
2
3
4
5
6
7
8
9
10
11
12
13
14
15
16
17
18
19
20
21
22
23
24
25
26
27
28
29
30
31
32
33
34
| public UserInfo verifyUser(HttpServletRequest request, HttpServletResponse response) {
try {
String token = CookieUtils.getCookieValue(request, prop.getUser().getCookieName());
Payload<UserInfo> payLoad = JwtUtils.getInfoFromToken(token, prop.getPublicKey(), UserInfo.class);
Date expiration = payLoad.getExpiration();
DateTime refreshTime = new DateTime(expiration.getTime()).minusMinutes(prop.getUser().getMinRefreshInterval());
if (refreshTime.isBefore(System.currentTimeMillis())) {
token = JwtUtils.generateTokenExpireInMinutes(payLoad.getUserInfo(), prop.getPrivateKey(), prop.getUser().getExpire());
CookieUtils.newBuilder()
.response(response)
.httpOnly(true)
.domain(prop.getUser().getCookieDomain())
.name(prop.getUser().getCookieName()).value(token)
.build();
}
return payLoad.getUserInfo();
} catch (Exception e) {
log.error("用户信息认证失败",e);
throw new LyException(ExceptionEnum.UNAUTHORIZED);
}
}
|
代码中有用到token的刷新周期:getMinRefreshInterval(),这个刷新周期也配置到配置文件中:
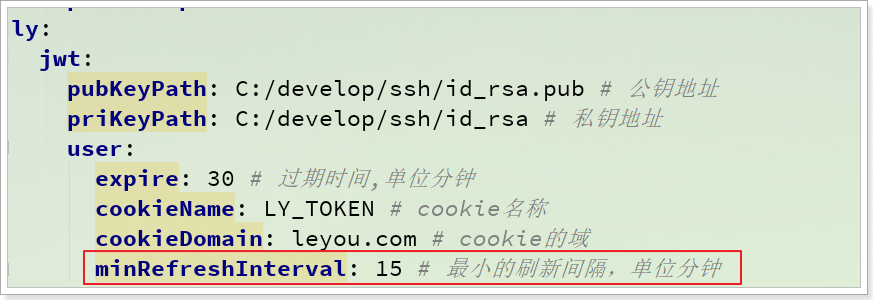
然后在属性类中读取:
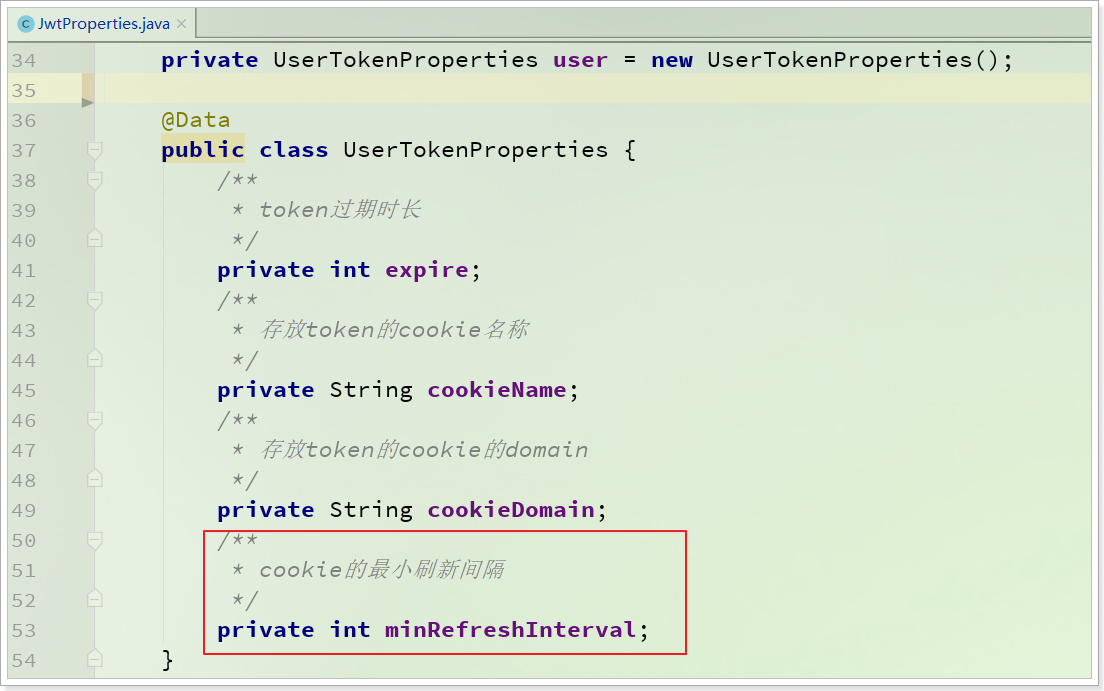
3.6.注销登录
首页左上角,登录后除了显示用户名,还有一个注销登录按钮:

点击这个按钮,该如何实现退出登录呢?
3.6.1.思路分析
回想下以前怎么实现的:
- 用户点击退出,发起请求到服务端
- 服务端删除用户session即可
我们现在登录是无状态的,也就没有session,那该怎么办呢?
有同学会想,太简单了,直接删除cookie就可以了。
别忘了,我们设置了httponly,JS无法操作cookie。因此,删除cookie也必须发起请求到服务端,由服务端来删除cookie。
那么,是不是删除了cookie,用户就完成了退出登录呢?
设想一下,删除了cookie,只是让用户在当前浏览器上的token删除了,但是这个token依然是有效的!这就是JWT的另外一个缺点了,无法控制TOKEN让其失效。如果用户提前备份了token,那么重新填写到cookie后,登录状态依然有效。
所以,我们不仅仅要让浏览器端清除cookie,而且要让这个cookie中的token失效!
3.6.2.失效token黑名单
怎样才能实现这样的效果呢?
大家肯定能想到很多办法,但是无论哪种思路,都绕不可一点:JWT的无法修改特性。因此我们不能修改token来标记token无效,而是在服务端记录token状态,于是就违背了无状态性的特性。
如果要记录每一个token状态,会造成极大的服务端压力,我提供一种思路,可以在轻量级数据量下,解决这个问题:
- 用户进行注销类型操作时(比如退出、修改密码),校验token有效性,并解析token信息
- 把token的id存入redis,并设置有效期为token的剩余有效期
- 校验用户登录状态的接口,除了要正常逻辑外,还必须判断token的id是否存在于redis
- 如果存在,则证明token无效;如果不存在,则证明有效
等于是在Redis中记录失效token的黑名单,黑名单的时间不用太长,最长也就是token的有效期:30分钟,因此服务端数据存储压力会减少。
3.6.3.代码实现
步骤梳理:
- 前端页面发起请求到服务端
- 服务端校验token是否有效,并解析token
- 将token的id存入redis,并设置有效期为token的剩余有效期
- 设置cookie有效期为0,即可删除cookie
这里要用到Redis,所以先在ly-auth引入Redis依赖和配置:
1
2
3
4
| <dependency>
<groupId>org.springframework.boot</groupId>
<artifactId>spring-boot-starter-data-redis</artifactId>
</dependency>
|
在application.yml中编写配置:
1
2
3
| spring:
redis:
host: 192.168.206.66
|
1)发起请求
点击页面,发现请求已经发出:
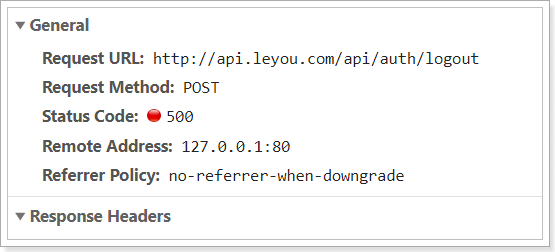
2)业务接口
controller分析:
- 请求方式:POST
- 请求路径:/logout
- 请求参数:无,但要cookie中的token,因此需要request和response
- 返回值:无,但要删除cookie
1
2
3
4
5
6
7
8
|
@PostMapping("logout")
public ResponseEntity<Void> logout(HttpServletRequest request, HttpServletResponse response){
authService.logout(request, response);
return ResponseEntity.status(HttpStatus.NO_CONTENT).build();
}
|
service代码:
1
2
3
4
5
6
7
8
9
10
11
12
13
14
15
16
17
18
| @Autowired
private StringRedisTemplate redisTemplate;
public void logout(HttpServletRequest request, HttpServletResponse response) {
String token = CookieUtils.getCookieValue(request, prop.getUser().getCookieName());
Payload<UserInfo> payload = JwtUtils.getInfoFromToken(token, prop.getPublicKey());
String id = payload.getId();
long time = payload.getExpiration().getTime() - System.currentTimeMillis();
if (time > 5000) {
redisTemplate.opsForValue().set(id, "", time, TimeUnit.MILLISECONDS);
}
CookieUtils.deleteCookie(prop.getUser().getCookieName(), prop.getUser().getCookieDomain(), response);
}
|
3.6.4.修改登录校验逻辑
登录校验不仅仅要看JWT是否有效,还要检查redis中是否已经存在
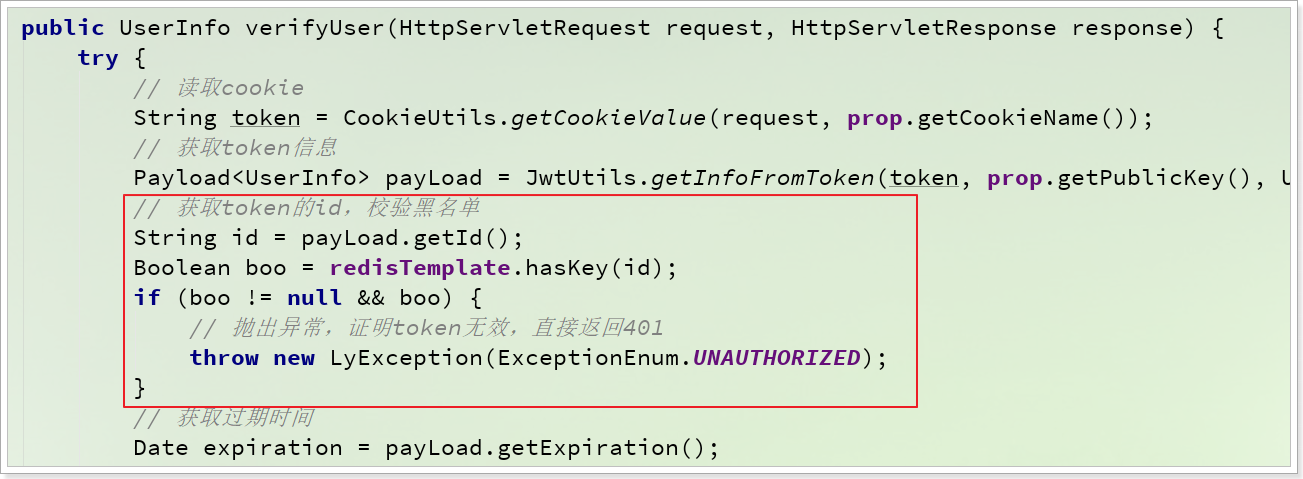
完整代码:
1
2
3
4
5
6
7
8
9
10
11
12
13
14
15
16
17
18
19
20
21
22
23
24
25
26
27
28
29
30
31
32
33
34
35
36
37
38
39
40
41
| public UserInfo verifyUser(HttpServletRequest request, HttpServletResponse response) {
try {
String token = CookieUtils.getCookieValue(request, prop.getUser().getCookieName());
Payload<UserInfo> payLoad = JwtUtils.getInfoFromToken(token, prop.getPublicKey(), UserInfo.class);
String id = payLoad.getId();
Boolean boo = redisTemplate.hasKey(id);
if (boo != null && boo) {
throw new LyException(ExceptionEnum.UNAUTHORIZED);
}
Date expiration = payLoad.getExpiration();
DateTime refreshTime = new DateTime(expiration.getTime()).plusMinutes(prop.getUser().getMinRefreshInterval());
if (refreshTime.isBefore(System.currentTimeMillis())) {
token = JwtUtils.generateTokenExpireInMinutes(payLoad.getUserInfo(), prop.getPrivateKey(), prop.getUser().getExpire());
CookieUtils.newBuilder()
.response(response)
.httpOnly(true)
.domain(prop.getUser().getCookieDomain())
.name(prop.getUser().getCookieName()).value(token)
.build();
}
return payLoad.getUserInfo();
} catch (Exception e) {
log.error("用户信息认证失败",e);
throw new LyException(ExceptionEnum.UNAUTHORIZED);
}
}
|


