day14-服务鉴权
0.学习目标
- 理解网关权限拦截流程
- 理解服务鉴权的思路
- 了解微服务授权流程
- 会使用Spring定时任务
- 会使用Feign拦截器
1.网关的权限控制
昨天的课程中,我们实现了登录相关的几个功能,也就是给用户授权。接下来,用户访问我们的系统,我们还需要根据用户的身份,判断是否有权限访问微服务资源,就是鉴权。
大部分的微服务都必须做这样的权限判断,但是如果在每个微服务单独做权限控制,每个微服务上的权限代码就会有重复,如何更优雅的完成权限控制呢?
我们可以在整个服务的入口完成服务的权限控制,这样微服务中就无需再做了,如图:
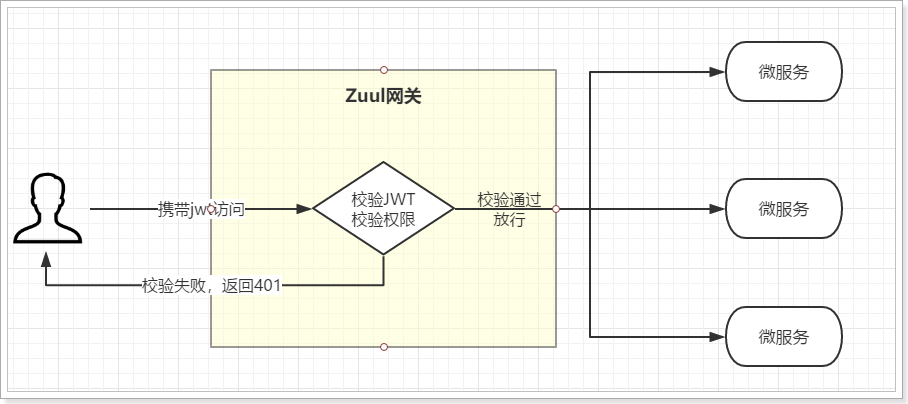
接下来,我们在Zuul编写拦截器,对用户的token进行校验,完成初步的权限判断。
1.1.流程分析
权限控制,一般有粗粒度、细粒度控制之分,但不管哪种,前提是用户必须先登录。知道访问者是谁,才能知道这个人具备怎样的权限,可以访问那些服务资源(也就是微服务接口)。
因此,权限控制的基本流程是这样:
- 1)获取用户的登录凭证jwt
- 2)解析jwt,获取用户身份
- 如果解析失败,证明没有登录,返回401
- 如果解析成功,继续向下
- 3)根据身份,查询用户权限信息
- 4)获取当前请求资源(微服务接口路径)
- 5)判断是否有访问资源的权限
一般权限信息会存储到数据库,会对应角色表和权限表:
- 角色:就是身份,例如普通用户,金钻用户,黑钻用户,商品管理员
- 权限:就是可访问的访问资源,如果是URL级别的权限控制,包含请求方式、请求路径、等信息
一个角色一般会有多个权限,一个权限也可以属于多个用户,属于多对多关系。根据角色可以查询到对应的所有权限,再根据权限判断是否可以访问当前资源即可。
在我们的功能中,因为还没有写权限功能,所以暂时只有一个角色,就是普通用户,可以访问的是商品及分类品牌等的查询功能,以及自己的信息。以后编写权限服务时,再补充相关业务。
1.2.加载公钥
权限控制的第一部分,就是获取cookie,并解析jwt,那么肯定需要公钥。我们在ly-api-gateway中配置公钥信息,并在服务启动时加载。
首先引入所需要的依赖:
1
2
3
4
5
| <dependency>
<groupId>com.leyou</groupId>
<artifactId>ly-common</artifactId>
<version>1.0.0-SNAPSHOT</version>
</dependency>
|
然后编写属性文件:
1
2
3
4
5
| ly:
jwt:
pubKeyPath: D:/heima/rsa/id_rsa.pub
user:
cookieName: LY_TOKEN
|
编写属性类,读取公钥:
1
2
3
4
5
6
7
8
9
10
11
12
13
14
15
16
17
18
19
20
21
22
23
24
25
26
27
28
29
30
31
32
33
34
| @Data
@Slf4j
@ConfigurationProperties(prefix = "ly.jwt")
public class JwtProperties implements InitializingBean {
private String pubKeyPath;
private PublicKey publicKey;
private UserTokenProperties user = new UserTokenProperties();
@Data
public class UserTokenProperties {
private String cookieName;
}
@Override
public void afterPropertiesSet() throws Exception {
try {
this.publicKey = RsaUtils.getPublicKey(pubKeyPath);
} catch (Exception e) {
log.error("初始化公钥失败!", e);
throw new RuntimeException(e);
}
}
}
|
1.3.编写过滤器逻辑
有了公钥,就可以编写权限控制逻辑了,权限验证通过,放行到微服务;不通过,则拦截并返回401给用户。因此拦截的逻辑需要在请求被路由之前执行,你能想到用什么实现吗?
没错,就是ZuulFilter。
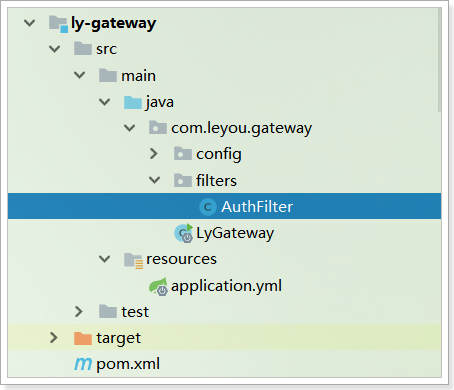
ZuulFilter是Zuul的过滤器,其中pre类型的过滤器会在路由之前执行,刚好符合我们的需求。接下来,我们自定义pre类型的过滤器,并在过滤器中完成权限校验逻辑。
基本逻辑:
- 获取cookie中的token
- 通过JWT对token进行解析
- 根据用户身份获取权限信息
- 获取当前请求路径,判断权限
- 通过:则放行;不通过:则返回401
1
2
3
4
5
6
7
8
9
10
11
12
13
14
15
16
17
18
19
20
21
22
23
24
25
26
27
28
29
30
31
32
33
34
35
36
37
38
39
40
41
42
43
44
45
46
47
48
49
50
51
52
53
54
55
56
57
58
59
60
61
62
63
64
65
66
67
68
69
70
71
72
| package com.leyou.gateway.filters;
import com.leyou.common.auth.entity.Payload;
import com.leyou.common.auth.entity.UserInfo;
import com.leyou.common.auth.utils.JwtUtils;
import com.leyou.common.utils.CookieUtils;
import com.leyou.gateway.config.JwtProperties;
import com.netflix.zuul.ZuulFilter;
import com.netflix.zuul.context.RequestContext;
import com.netflix.zuul.exception.ZuulException;
import lombok.extern.slf4j.Slf4j;
import org.springframework.beans.factory.annotation.Autowired;
import org.springframework.boot.context.properties.EnableConfigurationProperties;
import org.springframework.cloud.netflix.zuul.filters.support.FilterConstants;
import org.springframework.stereotype.Component;
import javax.servlet.http.HttpServletRequest;
@Slf4j
@Component
@EnableConfigurationProperties(JwtProperties.class)
public class AuthFilter extends ZuulFilter {
@Autowired
private JwtProperties jwtProp;
@Override
public String filterType() {
return FilterConstants.PRE_TYPE;
}
@Override
public int filterOrder() {
return FilterConstants.FORM_BODY_WRAPPER_FILTER_ORDER - 1;
}
@Override
public boolean shouldFilter() {
return true;
}
@Override
public Object run() throws ZuulException {
RequestContext ctx = RequestContext.getCurrentContext();
HttpServletRequest request = ctx.getRequest();
String token = CookieUtils.getCookieValue(request, jwtProp.getUser().getCookieName());
try {
Payload<UserInfo> payload = JwtUtils.getInfoFromToken(token, jwtProp.getPublicKey(), UserInfo.class);
UserInfo user = payload.getInfo();
String role = user.getRole();
String path = request.getRequestURI();
String method = request.getMethod();
log.info("【网关】用户{},角色{}。访问服务{} : {},", user.getUsername(), role, method, path);
} catch (Exception e) {
ctx.setSendZuulResponse(false);
ctx.setResponseStatusCode(403);
log.error("非法访问,未登录,地址:{}", request.getRemoteHost(), e );
}
return null;
}
}
|
登录状态时,访问商品查询接口:
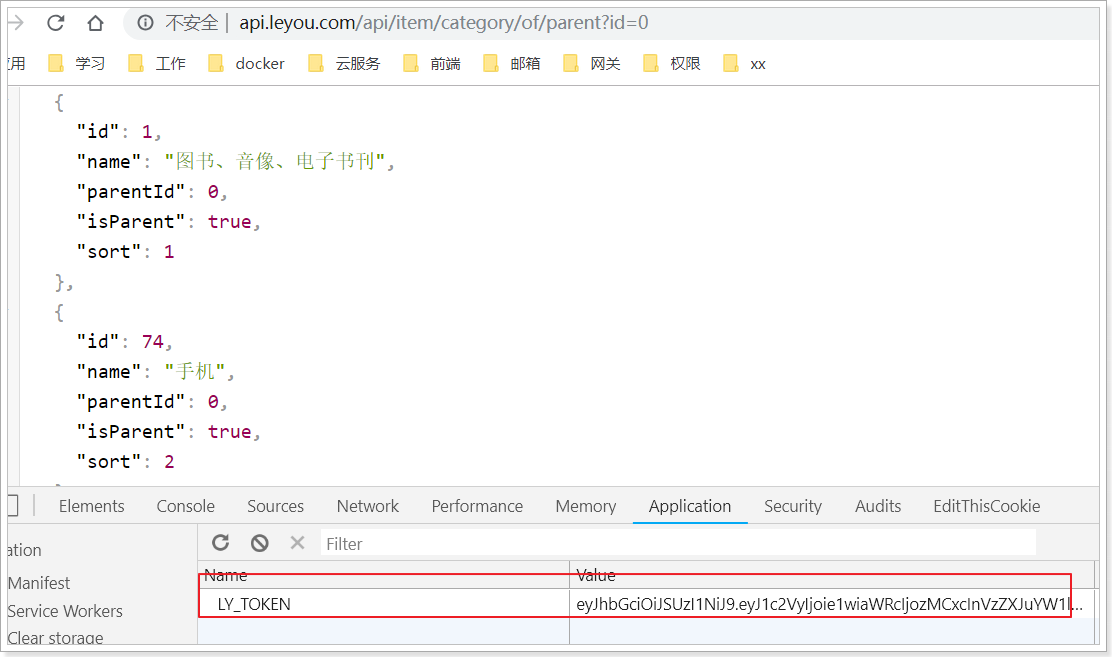
没有问题,可以访问。
退出登录,再次访问:
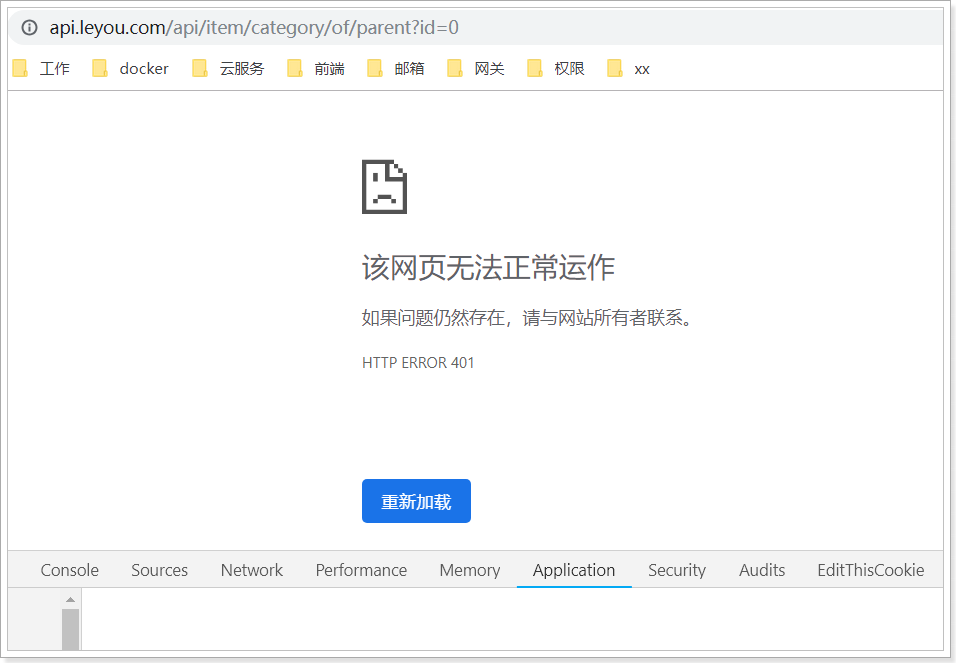
证明拦截器生效了!
1.4.白名单
此时我们尝试再次登录:
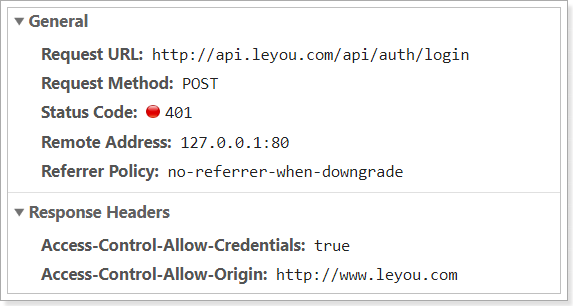
登录接口也被拦截器拦截了!!!
要注意,并不是所有的路径我们都需要拦截,例如:
登录校验接口:/auth/login
注册接口:/user/register
数据校验接口:/user/check/
发送验证码接口:/user/code
搜索接口:/search/**
另外,跟后台管理相关的接口,因为我们没有做登录和权限,因此暂时都放行,但是生产环境中要做登录校验:
所以,我们需要在拦截时,配置一个白名单,如果在名单内,则不进行拦截。
在application.yaml中添加规则:
1
2
3
4
5
6
7
8
9
| ly:
filter:
allowPaths:
- /api/auth/login
- /api/search
- /api/user/register
- /api/user/check
- /api/user/code
- /api/item
|
然后读取这些属性:
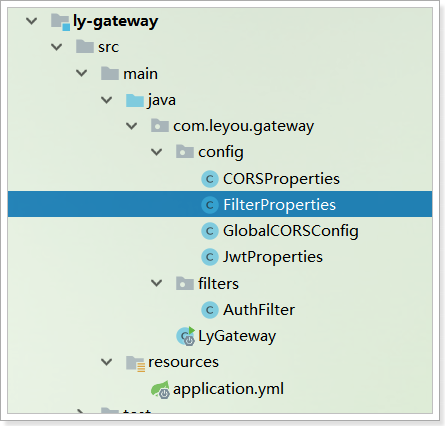
内容:
1
2
3
4
5
6
7
8
9
10
11
12
13
| @ConfigurationProperties(prefix = "ly.filter")
public class FilterProperties {
private List<String> allowPaths;
public List<String> getAllowPaths() {
return allowPaths;
}
public void setAllowPaths(List<String> allowPaths) {
this.allowPaths = allowPaths;
}
}
|
在过滤器中的shouldFilter方法中添加判断逻辑:
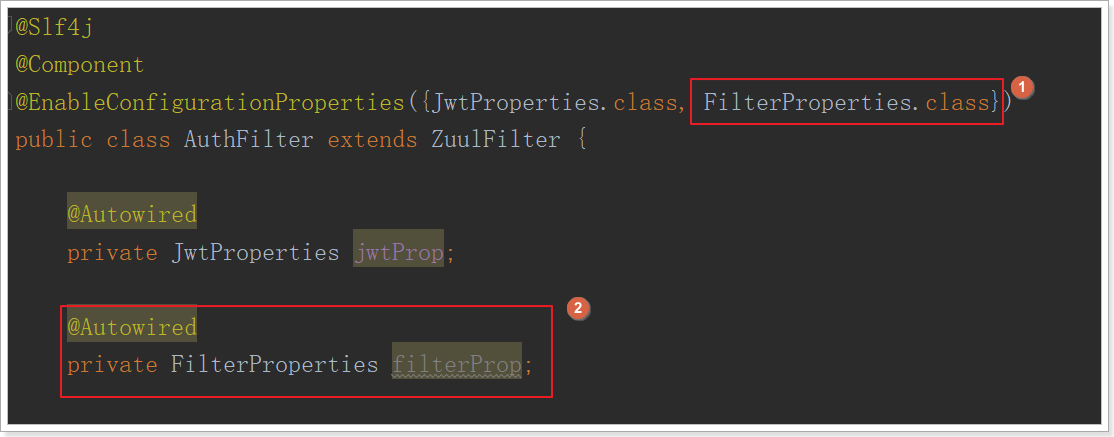
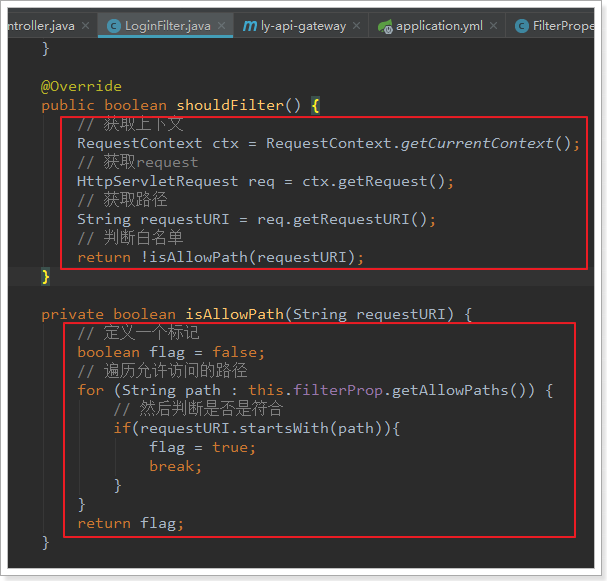
代码:
1
2
3
4
5
6
7
8
9
10
11
12
13
14
15
16
17
18
19
20
21
22
23
24
25
26
27
28
29
30
31
32
33
34
35
36
37
38
39
40
41
42
43
44
45
46
47
48
49
50
51
52
53
54
55
56
57
58
59
60
61
62
63
64
65
66
67
68
69
70
71
72
73
74
75
76
77
78
79
80
81
82
83
84
85
86
87
88
89
90
91
92
93
94
95
96
97
| package com.leyou.gateway.filters;
import com.leyou.common.auth.entity.Payload;
import com.leyou.common.auth.entity.UserInfo;
import com.leyou.common.auth.utils.JwtUtils;
import com.leyou.common.utils.CookieUtils;
import com.leyou.gateway.config.FilterProperties;
import com.leyou.gateway.config.JwtProperties;
import com.netflix.zuul.ZuulFilter;
import com.netflix.zuul.context.RequestContext;
import com.netflix.zuul.exception.ZuulException;
import lombok.extern.slf4j.Slf4j;
import org.springframework.beans.factory.annotation.Autowired;
import org.springframework.boot.context.properties.EnableConfigurationProperties;
import org.springframework.cloud.netflix.zuul.filters.support.FilterConstants;
import org.springframework.stereotype.Component;
import javax.servlet.http.HttpServletRequest;
@Slf4j
@Component
@EnableConfigurationProperties({JwtProperties.class, FilterProperties.class})
public class AuthFilter extends ZuulFilter {
@Autowired
private JwtProperties jwtProp;
@Autowired
private FilterProperties filterProp;
@Override
public String filterType() {
return FilterConstants.PRE_TYPE;
}
@Override
public int filterOrder() {
return FilterConstants.FORM_BODY_WRAPPER_FILTER_ORDER - 1;
}
@Override
public boolean shouldFilter() {
RequestContext ctx = RequestContext.getCurrentContext();
HttpServletRequest req = ctx.getRequest();
String requestURI = req.getRequestURI();
return !isAllowPath(requestURI);
}
private boolean isAllowPath(String requestURI) {
boolean flag = false;
for (String path : this.filterProp.getAllowPaths()) {
if(requestURI.startsWith(path)){
flag = true;
break;
}
}
return flag;
}
@Override
public Object run() throws ZuulException {
RequestContext ctx = RequestContext.getCurrentContext();
HttpServletRequest request = ctx.getRequest();
String token = CookieUtils.getCookieValue(request, jwtProp.getUser().getCookieName());
try {
Payload<UserInfo> payload = JwtUtils.getInfoFromToken(token, jwtProp.getPublicKey(), UserInfo.class);
UserInfo user = payload.getUserInfo();
String role = user.getRole();
String path = request.getRequestURI();
String method = request.getMethod();
log.info("【网关】用户{},角色{}。访问服务{} : {},", user.getUsername(), role, method, path);
} catch (Exception e) {
ctx.setSendZuulResponse(false);
ctx.setResponseStatusCode(403);
log.error("非法访问,未登录,地址:{}", request.getRemoteHost(), e );
}
return null;
}
}
|
2.服务鉴权
用户访问我们的微服务,都需要经过网关作为请求入口,网关对用户身份进行验证,从而保证微服务的安全。但是,大家有没有思考过这样一个问题:
如果你的微服务地址不小心暴露了呢?
一旦微服务地址暴露,用户就可以绕过网关,直接请求微服务,那么我们之前做的一切权限控制就白费了!
因此,我们的每个微服务都需要对调用者的身份进行认证,如果不是有效的身份,则应该阻止访问。
2.1.思路分析
合法的调用者身份,其实就是其它微服务,还有网关。我们首先需要把这些合法的调用者身份存入数据库,并给每一个调用者都设置密钥。接下来的步骤就简单了:
因此,我们必须在一个微服务来管理调用者身份、权限、当然还包括用户的权限,角色等,并对外提供验证调用者身份、查询调用者权限的接口,我们可以再ly-auth中完成这些业务。
2.1.1.版本1-密码认证
流程图:
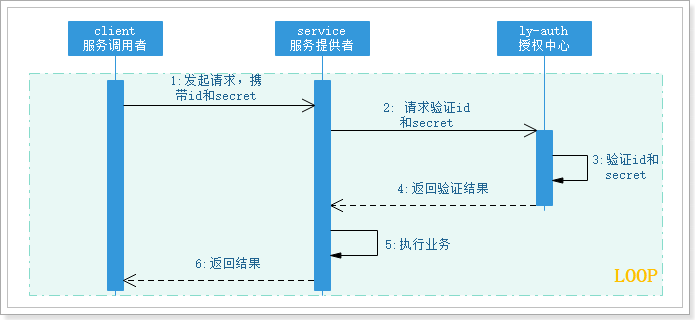
加入服务鉴权流程后有没有什么问题呢?
服务调用本来是访问者(client)与微服务(server)之间的交互,但是为了验证身份,不得不与授权中心交互。每次请求都会比原来多一次网络交互,效率大大降低。
能不能只验证一次呢?
2.1.2.版本2-令牌认证
如果我们将第一次验证后的身份信息生成一个令牌(token),以后每次请求携带这个token,只要验证token有效,就无需每次调用授权中心验证身份了!
服务调用方需要向授权中心申请令牌,而后每次请求微服务都携带这个令牌即可,而令牌的生成我们依然使用JWT规范来实现。如图:
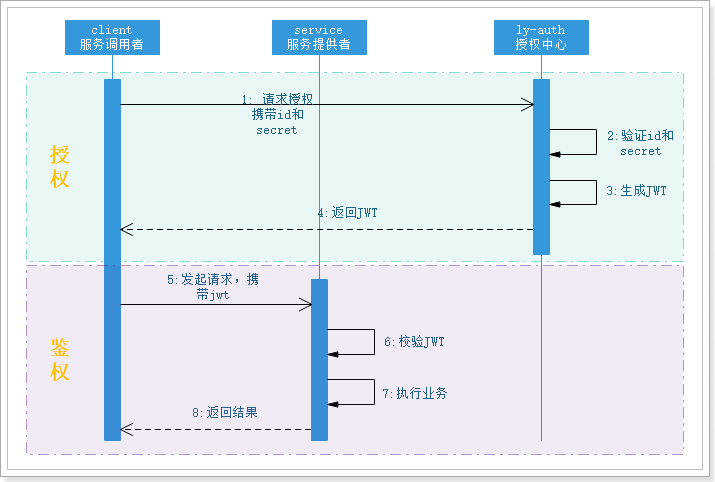
整个过程是不是跟用户登录也请求服务有点像啊?
没错,其实服务授权,就是把微服务也当做用户来看待。区别在于服务授权无需注册,而是有管理人员提前录入服务及服务的权限信息。
不过这里依然有问题需要思考:
- 请求令牌的动作什么时候做?
- 令牌过期以后如何生成新令牌?
2.1.3.版本3-令牌自动刷新
- 问题1:请求令牌的动作什么时候做?
- 我们肯定不希望频繁去申请令牌,所以应该在项目启动的时候,携带身份信息,去授权中心申请令牌,然后保存起来。
- 这个可以通过自定义配置类,在配置类中完成令牌的申请和保存,而配置类会在项目启动时加载
- 问题2:令牌过期以后如何生成新令牌?
- 虽然我们不希望频繁去申请令牌,但是出于安全考虑,令牌最好有一定的过期时间,然后定期更新。
- 既然是定期更新,当然是定时任务来完成了
如图:
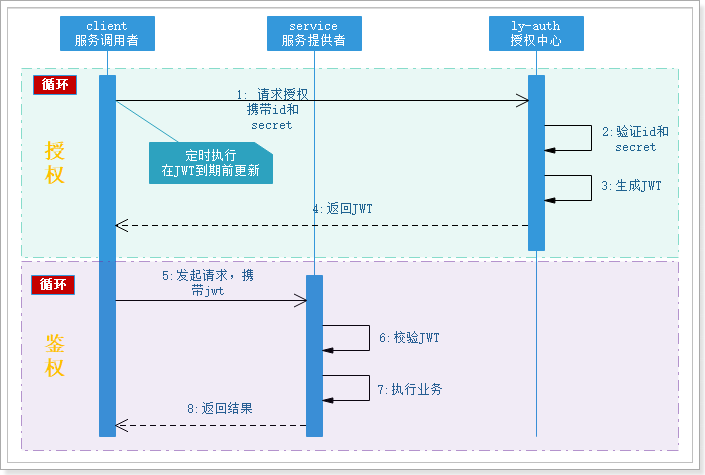
关键的步骤如下:
- 授权中心提供接口:验证身份,签发jwt
- 所有微服务中通过定时任务,向授权中心发起请求,获取jwt
- 微服务每次请求都携带jwt在请求头中
- 被访问服务拦截请求,判断请求头中的jwt身份合法
接下来,我们就实现上面的整个流程。
2.2.数据库表
首先,我们需要在数据库中录入服务调用者的身份信息,权限信息。
- 服务调用者:这里就是我们的微服务
- 权限信息:可以调用哪个微服务
来看下表结构:
微服务信息表:tb_application
1
2
3
4
5
6
7
8
9
10
| CREATE TABLE `tb_application` (
`id` int(20) NOT NULL AUTO_INCREMENT COMMENT '主键',
`service_name` varchar(32) NOT NULL COMMENT '服务名称',
`secret` varchar(60) NOT NULL COMMENT '密钥',
`info` varchar(128) DEFAULT NULL COMMENT '服务介绍',
`create_time` timestamp NULL DEFAULT CURRENT_TIMESTAMP COMMENT '创建时间',
`update_time` timestamp NULL DEFAULT CURRENT_TIMESTAMP ON UPDATE CURRENT_TIMESTAMP COMMENT '更新时间',
PRIMARY KEY (`id`),
UNIQUE KEY `uq_key_service_name` (`service_name`) USING HASH
) ENGINE=InnoDB AUTO_INCREMENT=10 DEFAULT CHARSET=utf8 COMMENT='服务信息表,记录微服务的id,名称,密文,用来做服务认证';
|
将来需要根据serviceName和secret来做身份认证,获取token。
服务权限表:tb_application_privilege
1
2
3
4
5
6
| CREATE TABLE `tb_service_privilege` (
`service_id` int(20) NOT NULL COMMENT '服务id',
`target_id` int(20) NOT NULL COMMENT '目标服务id',
`create_time` timestamp NULL DEFAULT CURRENT_TIMESTAMP COMMENT '创建时间',
PRIMARY KEY (`service_id`,`target_id`)
) ENGINE=InnoDB DEFAULT CHARSET=utf8 COMMENT='服务中间表,记录服务id以及服务能访问的目标服务的id';
|
服务权限记录包含2个信息:
- serviceId:服务id
- targetId:当前服务可以访问的微服务id
可以看做是一个中间表,记录服务与被调用服务的关系。这张表中没有的,就不能调用。
- 每一个服务,都可以有一个或多个可以调用的目标服务。
- 每一个服务,也可以被一个或多个其它服务调用。
因此可以认为是tb_application的表自关联,多对多关系。
另外,数据库中数据缺少了ly-auth服务的信息,所以这里有一条sql,可以补充添加相关数据:
1
2
3
4
5
6
7
8
9
10
11
12
13
14
15
16
17
18
19
20
21
22
23
24
25
26
| INSERT INTO `tb_application` (
`id`,
`service_name`,
`secret`,
`info`
)
VALUES
(
null,
'auth-service',
'$2a$10$6nqXhZPyosx71JnWaR2bXu/KbbmTbW6JhnazPKZk77JItm6LAG6YW',
'授权微服务'
);
INSERT INTO `tb_application_privilege` (`service_id`, `target_id`)
VALUES
(1, 10),
(2, 10),
(3, 10),
(4, 10),
(5, 10),
(6, 10),
(7, 10),
(8, 10),
(9, 10),
(10, 1);
|
2.3.查询服务权限信息
有了上面的数据库表,就具备了服务信息和权限信息。接下来就需要有验证服务id和secret、查询服务权限的功能:
- 验证服务id和secret,本质就是根据id查询和密码验证,通用mapper即可实现。
- 查询服务权限:即根据application的id查询出可以访问的target的id。
- 要通过tb_application_privilege表来实现,没有通用mapper可以使用,
以上业务都在**ly-auth**服务中实现。
2.3.1.实体类
在ly-auth中创建于数据库对应的持久对象:
1
2
3
4
5
6
7
8
9
10
11
12
13
14
15
16
17
18
19
20
21
22
23
24
25
26
27
28
29
30
31
32
33
34
35
36
37
| package com.leyou.auth.entity;
import lombok.Data;
import tk.mybatis.mapper.annotation.KeySql;
import javax.persistence.Id;
import javax.persistence.Table;
import java.util.Date;
@Data
@Table(name = "tb_application")
public class ApplicationInfo {
@Id
@KeySql(useGeneratedKeys = true)
private Long id;
private String serviceName;
private String secret;
private String info;
private Date createTime;
private Date updateTime;
}
|
2.3.2.数据库相关代码
要使用数据库相关业务,必须引入通用mapper等依赖:
1
2
3
4
5
6
7
8
| <dependency>
<groupId>tk.mybatis</groupId>
<artifactId>mapper-spring-boot-starter</artifactId>
</dependency>
<dependency>
<groupId>mysql</groupId>
<artifactId>mysql-connector-java</artifactId>
</dependency>
|
然后在application.yml配置文件中添加与数据库相关配置:
1
2
3
4
5
6
7
8
9
10
11
12
13
14
15
16
17
18
| spring:
application:
name: auth-service
datasource:
driver-class-name: com.mysql.jdbc.Driver
url: jdbc:mysql://localhost:3306/heima?allowMultiQueries=true
username: root
password: root
mybatis:
type-aliases-package: com.leyou.auth.entity
mapper-locations: mappers/*.xml
configuration:
map-underscore-to-camel-case: true
logging:
level:
com.leyou: trace
mapper:
wrap-keyword: "`{0}`"
|
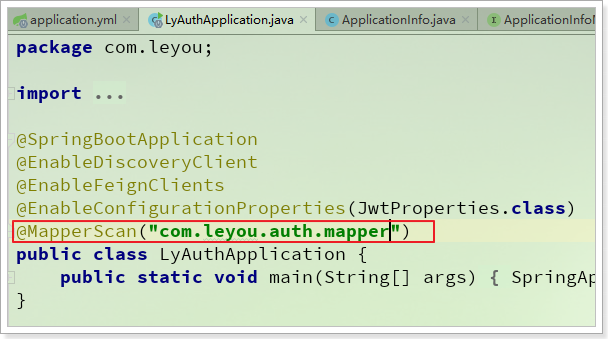
然后在启动类上引入mapper扫描包,并且要去除忽略DataSource:
编写mapper继承通用mapper
1
2
3
4
5
6
7
8
| package com.leyou.auth.mapper;
import com.leyou.auth.entity.ApplicationInfo;
import com.leyou.common.mapper.BaseMapper;
public interface ApplicationInfoMapper extends BaseMapper<ApplicationInfo> {
}
|
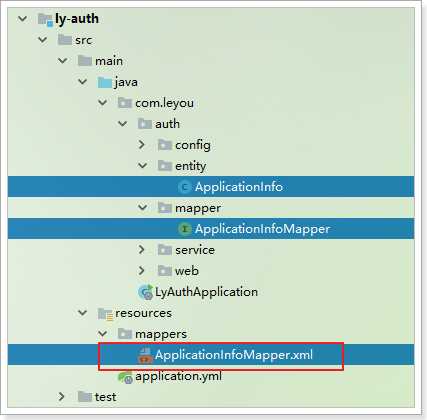
另外,将来一部分业务需要手写sql,可以先定义一个mapper文件:
编写基本信息:
1
2
3
4
5
6
| <?xml version="1.0" encoding="UTF-8"?>
<!DOCTYPE mapper PUBLIC "-//mybatis.org//DTD Mapper 3.0//EN"
"http://mybatis.org/dtd/mybatis-3-mapper.dtd">
<mapper namespace="com.leyou.auth.mapper.ApplicationInfoMapper">
</mapper>
|
2.3.3.根据id查询服务权限
查询服务权限,就是根据application的id查询出可以访问的target的id的集合。
先定义一个接口:
1
2
3
4
5
6
7
8
9
10
11
| package com.leyou.auth.mapper;
import com.leyou.auth.entity.ApplicationInfo;
import com.leyou.common.mappers.BaseMapper;
import java.util.List;
public interface ApplicationInfoMapper extends BaseMapper<ApplicationInfo> {
List<Long> queryTargetIdList(Long serviceId);
}
|
对应的Sql语句:
1
2
3
4
5
6
7
8
| <?xml version="1.0" encoding="UTF-8"?>
<!DOCTYPE mapper PUBLIC "-//mybatis.org//DTD Mapper 3.0//EN"
"http://mybatis.org/dtd/mybatis-3-mapper.dtd">
<mapper namespace="com.leyou.auth.mapper.ApplicationInfoMapper">
<select id="queryTargetIdList" resultType="java.lang.Long">
SELECT target_id FROM tb_application_privilege WHERE service_id = #{id}
</select>
</mapper>
|
2.4.服务授权接口
有了服务信息,接下来就需要在授权中心ly-auth编写服务验证并签发JWT的接口了。这个接口与登录非常相似,流程是下图中的红圈中的部分:
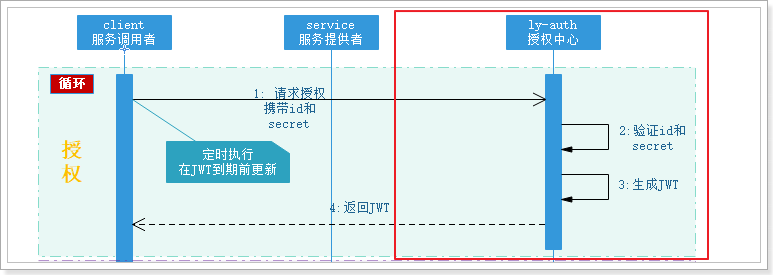
基本思路如下:
- 接收请求方的id和secret
- 验证id和secret
- 生成JWT
因此,这里我们需要一个新的载荷对象:AppInfo
1
2
3
4
5
6
7
8
9
10
11
12
13
| package com.leyou.common.auth.entity;
import lombok.Data;
import java.util.List;
@Data
public class AppInfo {
private Long id;
private String serviceName;
private List<Long> targetList;
}
|
2.4.1.controller:
请求相关信息:
- 请求方式:Get
- 请求路径:/authorization
- 请求参数:id和secret
- 返回结果:JWT,包含载荷数据就是AppInfo
1
2
3
4
5
6
7
8
9
10
11
|
@GetMapping("authorization")
public ResponseEntity<String> authorize(@RequestParam("id") Long id, @RequestParam("secret") String secret) {
return ResponseEntity.ok(authService.authenticate(id, secret));
}
|
这里token并没有写入cookie,而是作为返回值。
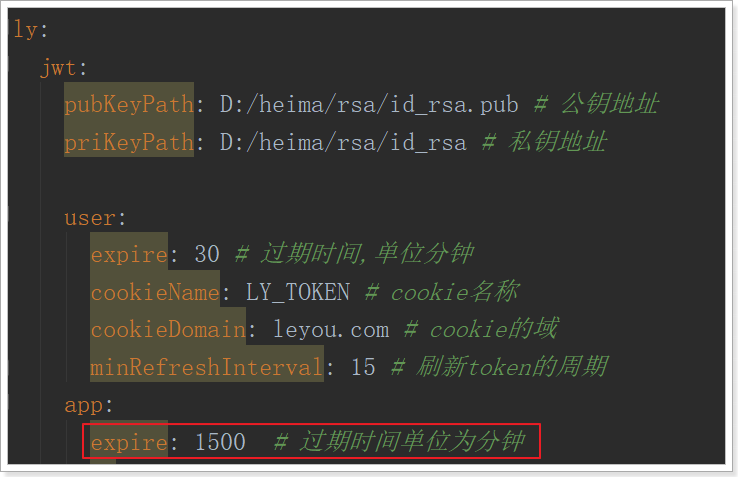
2.4.2.配置token有效期
生成token的过程中,需要设置有效时间,因此我们写入到配置文件,这个配置与用户登录的User无关,我们写到另一个配置中:
然后在JwtProperties中读取:
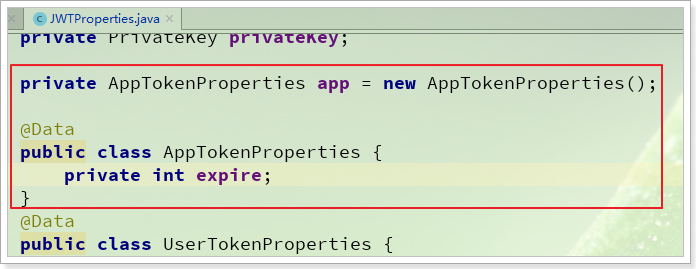
完整代码:
1
2
3
4
5
6
7
8
9
10
11
12
13
14
15
16
17
18
19
20
21
22
23
24
25
26
27
28
29
30
31
32
33
34
35
36
37
38
39
40
41
42
43
44
45
46
47
48
49
50
51
52
53
54
55
56
57
58
59
60
61
62
63
64
65
66
67
68
69
70
71
72
73
74
75
76
| package com.leyou.auth.config;
import com.leyou.common.auth.utils.RsaUtils;
import lombok.Data;
import lombok.extern.slf4j.Slf4j;
import org.springframework.beans.factory.InitializingBean;
import org.springframework.boot.context.properties.ConfigurationProperties;
import java.security.PrivateKey;
import java.security.PublicKey;
@Slf4j
@Data
@ConfigurationProperties("ly.jwt")
public class JwtProperties implements InitializingBean {
private String pubKeyPath;
private String priKeyPath;
private UserTokenProperties user = new UserTokenProperties();
private PublicKey publicKey;
private PrivateKey privateKey;
private AppTokenProperties app = new AppTokenProperties();
@Data
public class UserTokenProperties {
private int expire;
private String cookieName;
private String cookieDomain;
private int refreshInterval;
}
@Data
public class AppTokenProperties {
private int expire;
}
@Override
public void afterPropertiesSet() {
try {
publicKey = RsaUtils.getPublicKey(pubKeyPath);
privateKey = RsaUtils.getPrivateKey(priKeyPath);
} catch (Exception e) {
log.error("加载公钥和私钥异常。系统崩溃!");
throw new RuntimeException(e);
}
}
}
|
2.4.3.PasswordEncoder
数据库中的secret也是加密存储的,因此需要通过之前学习过的PasswordEncoder来加密和验证。
在yaml文件中引入密码相关配置:
1
2
3
4
5
| ly:
encoder:
crypt:
secret: ${random.uuid}
strength: 10
|
编写配置类,配置PasswordEncoder:
1
2
3
4
5
6
7
8
9
10
11
12
13
14
15
16
17
18
19
20
21
22
23
24
25
26
27
| package com.leyou.auth.config;
import lombok.Data;
import org.springframework.boot.context.properties.ConfigurationProperties;
import org.springframework.context.annotation.Bean;
import org.springframework.context.annotation.Configuration;
import org.springframework.security.crypto.bcrypt.BCryptPasswordEncoder;
import java.security.SecureRandom;
@Data
@Configuration
@ConfigurationProperties(prefix = "ly.encoder.crypt")
public class PasswordConfig {
private int strength;
private String secret;
@Bean
public BCryptPasswordEncoder passwordEncoder(){
SecureRandom secureRandom = new SecureRandom(secret.getBytes());
return new BCryptPasswordEncoder(strength, secureRandom);
}
}
|
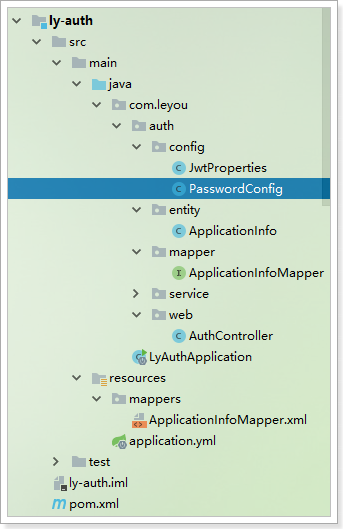
结构:
2.4.4.AuthService
在AuthService中,添加新的方法:
1
2
3
4
5
6
7
8
9
10
11
12
13
14
15
16
17
18
19
20
21
22
23
24
25
26
27
28
29
30
31
32
33
34
35
36
37
38
39
40
41
42
43
44
45
46
47
48
49
50
51
52
53
54
55
56
57
58
59
60
61
62
63
| package com.leyou.auth.service;
import com.leyou.auth.config.JwtProperties;
import com.leyou.auth.entity.ApplicationInfo;
import com.leyou.auth.mapper.ApplicationInfoMapper;
import com.leyou.common.auth.entity.AppInfo;
import com.leyou.common.auth.entity.UserInfo;
import com.leyou.common.auth.utils.JwtUtils;
import com.leyou.common.enums.ExceptionEnum;
import com.leyou.common.execeptions.LyException;
import com.leyou.common.utils.CookieUtils;
import com.leyou.user.client.UserClient;
import com.leyou.user.dto.UserDTO;
import lombok.extern.slf4j.Slf4j;
import org.springframework.beans.factory.annotation.Autowired;
import org.springframework.security.crypto.bcrypt.BCryptPasswordEncoder;
import org.springframework.stereotype.Service;
import javax.servlet.http.HttpServletResponse;
import java.util.List;
@Slf4j
@Service
public class AuthService {
@Autowired
private JwtProperties prop;
@Autowired
private ApplicationInfoMapper appMapper;
@Autowired
private BCryptPasswordEncoder passwordEncoder;
public String authenticate(Long id, String secret) {
ApplicationInfo app = appMapper.selectByPrimaryKey(id);
if (app == null) {
throw new LyException(ExceptionEnum.INVALID_SERVER_ID_SECRET);
}
if (!passwordEncoder.matches(secret, app.getSecret())) {
throw new LyException(ExceptionEnum.INVALID_SERVER_ID_SECRET);
}
List<Long> idList = appMapper.queryTargetIdList(id);
AppInfo appInfo = new AppInfo();
appInfo.setId(id);
appInfo.setServiceName(app.getServiceName());
appInfo.setTargetList(idList);
return JwtUtils.generateTokenExpireInMinutes(
appInfo, prop.getPrivateKey(), prop.getApp().getExpire());
}
}
|
2.5.微服务获取JWT
凡是需要调用其它微服务的服务,都需要申请JWT,否则请求将来会被拦截。包括下列服务:
- ly-gateway:网关的路由功能,要求它会调用所有其它微服务
- ly-auth:授权中心要调用ly-user,查询用户或微服务信息
- ly-search:搜索服务要调用商品微服务
- ly-page:搜索服务要调用商品微服务
上述这些微服务可以分成两类来处理:
- ly-auth:ly-auth本身就是JWT的签发者,比较特殊,因此其JWT可以自己生成,无需找别人获取。
- 其它微服务:其它微服务获取JWT都需要找ly-auth来实现
因此下面我们以ly-gateway和ly-auth为例来讲解如何在项目启动时加载JWT。
2.5.1.ly-gateway获取token
2.5.1.1.配置id和secret
申请token,必须携带服务id和服务密钥信息,这两部分我们设置到配置文件中:
1
2
3
4
5
6
7
8
| ly:
jwt:
pubKeyPath: D:/heima/rsa/id_rsa.pub
user:
cookieName: LY_TOKEN
app:
id: 7
secret: ${spring.application.name}
|
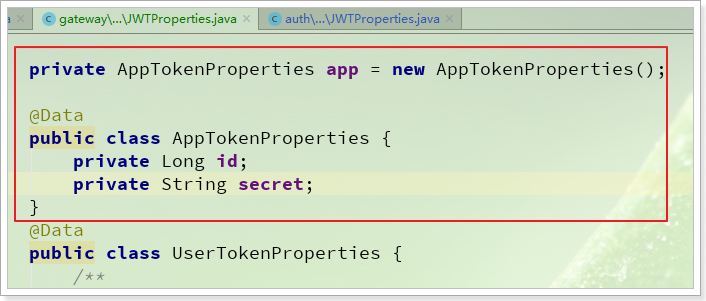
然后在配置类JwtProperties中读取:
1
2
3
4
5
6
7
8
9
10
11
12
13
14
15
16
17
18
19
20
21
22
23
24
25
26
27
28
29
30
31
32
33
34
35
36
37
38
39
40
41
42
43
44
45
46
47
48
49
50
51
52
53
54
55
56
57
58
59
60
61
| package com.leyou.gateway.config;
import com.leyou.common.auth.utils.RsaUtils;
import lombok.Data;
import lombok.extern.slf4j.Slf4j;
import org.springframework.beans.factory.InitializingBean;
import org.springframework.boot.context.properties.ConfigurationProperties;
import java.security.PublicKey;
@Data
@Slf4j
@ConfigurationProperties(prefix = "ly.jwt")
public class JwtProperties implements InitializingBean {
private String pubKeyPath;
private UserTokenProperties user = new UserTokenProperties();
private PublicKey publicKey;
@Data
public class UserTokenProperties {
private String cookieName;
}
private PrivilegeTokenProperties app = new PrivilegeTokenProperties();
@Data
public class PrivilegeTokenProperties{
private Long id;
private String secret;
}
@Override
public void afterPropertiesSet() throws Exception {
try {
this.publicKey = RsaUtils.getPublicKey(pubKeyPath);
} catch (Exception e) {
log.error("初始化公钥失败!", e);
throw new RuntimeException(e);
}
}
}
|
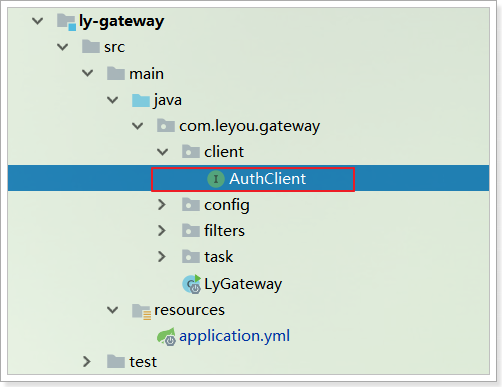
2.5.1.2.Feign客户端
接下来,定义一个Feign的客户端,用来调用授权中心的授权认证接口:
先在ly-gateway引入Feign依赖:
1
2
3
4
| <dependency>
<groupId>org.springframework.cloud</groupId>
<artifactId>spring-cloud-starter-openfeign</artifactId>
</dependency>
|
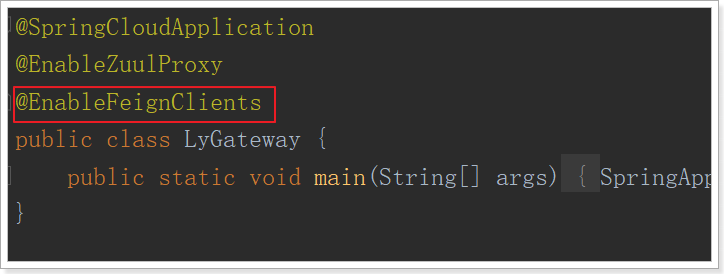
然后在启动类上添加注解,开启Feign:
代码实现:
1
2
3
4
5
6
7
8
9
10
11
12
13
14
15
16
17
18
19
| package com.leyou.gateway.client;
import org.springframework.cloud.openfeign.FeignClient;
import org.springframework.web.bind.annotation.GetMapping;
import org.springframework.web.bind.annotation.RequestParam;
@FeignClient("auth-service")
public interface AuthClient {
@GetMapping("authorization")
String authorize(@RequestParam("id") Long id, @RequestParam("secret") String secret);
}
|
2.5.1.3.定时任务
按照之前的分析,获取token可通过定时任务来完成,我们之前生成token的有效期已经设置为了25小时。那么更新token的频率可以设置为24小时,避免时间误差。
那么,如何编写定时任务呢?
Spring 中已经集成了对定时任务的支持,使用非常简单。
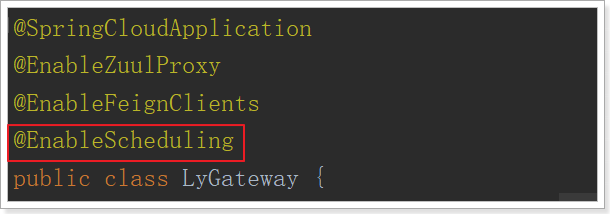
1)开启定时任务
在启动类上添加注解,即可开启定时任务:
2)配置定时任务
定义普通的Bean,并通过注解配置定时任务:
1
2
3
4
5
6
7
8
9
10
11
12
13
14
15
16
17
18
19
20
21
22
23
24
25
26
27
28
29
30
31
32
33
34
35
36
37
38
39
40
41
42
43
44
45
46
47
48
49
50
51
52
53
54
| package com.leyou.gateway.task;
import com.leyou.gateway.client.AuthClient;
import com.leyou.gateway.config.JwtProperties;
import lombok.extern.slf4j.Slf4j;
import org.springframework.beans.factory.annotation.Autowired;
import org.springframework.scheduling.annotation.Scheduled;
import org.springframework.stereotype.Component;
@Slf4j
@Component
public class PrivilegeTokenHolder {
@Autowired
private JwtProperties prop;
private String token;
private static final long TOKEN_REFRESH_INTERVAL = 86400000L;
private static final long TOKEN_RETRY_INTERVAL = 10000L;
@Autowired
private AuthClient authClient;
@Scheduled(fixedDelay = TOKEN_REFRESH_INTERVAL)
public void loadToken() throws InterruptedException {
while (true) {
try {
this.token = authClient.authorize(prop.getApp().getId(), prop.getApp().getSecret());
log.info("【网关】定时获取token成功");
break;
} catch (Exception e) {
log.info("【网关】定时获取token失败");
}
Thread.sleep(TOKEN_RETRY_INTERVAL);
}
}
public String getToken(){
return token;
}
}
|
定时任务的关键是这行代码:
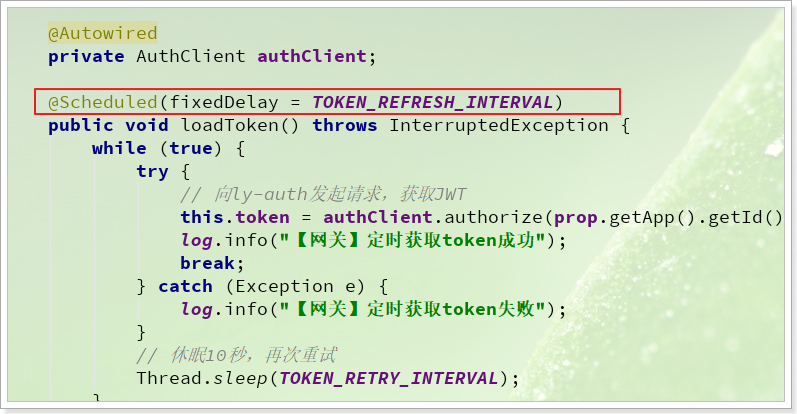
解读:
- @Scheduled:声明在方法上,方法中的代码就是定时任务执行的代码。支持下列属性:
- fixedDelay:控制方法执行的间隔时间,是以上一次方法执行完开始算起,如上一次方法执行阻塞住了,那么直到上一次执行完,并间隔给定的时间后,执行下一次。
- fixedRate:是按照一定的速率执行,是从上一次方法执行开始的时间算起,如果上一次方法阻塞住了,下一次也是不会执行,但是在阻塞这段时间内累计应该执行的次数,当不再阻塞时,一下子把这些全部执行掉,而后再按照固定速率继续执行
- cron表达式:可以定制化执行任务,但是执行的方式是与fixedDelay相近的,也是会按照上一次方法结束时间开始算起。
此处我们选择了fixedDelay,并定义了固定时长:86400000毫秒,也就是24小时。
2.5.2.ly-auth获取token
授权中心本身就是签发token的,但是它也需要调用ly-user,因此我们在ly-auth中定时获取token,可以省略验证id和secret的过程,因为本身自己给自己签发token,还需要去找别人验证,这不等于自己证明自己是谁吗,多余。
2.5.2.1.配置
一样,先配置基本属性:
1
2
3
4
5
6
7
8
9
10
11
12
13
| ly:
jwt:
pubKeyPath: D:/heima/rsa/id_rsa.pub
priKeyPath: D:/heima/rsa/id_rsa
user:
expire: 30
cookieName: LY_TOKEN
cookieDomain: leyou.com
refreshInterval: 10
app:
expire: 1500
id: 10
secret: ${spring.application.name}
|
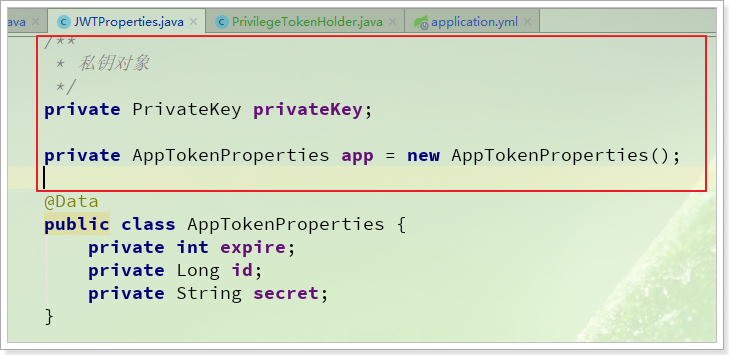
在配置类中读取:
2.5.2.2.定时任务
因为是给自己签发token,无需远程调用,所以直接自己生成即可:
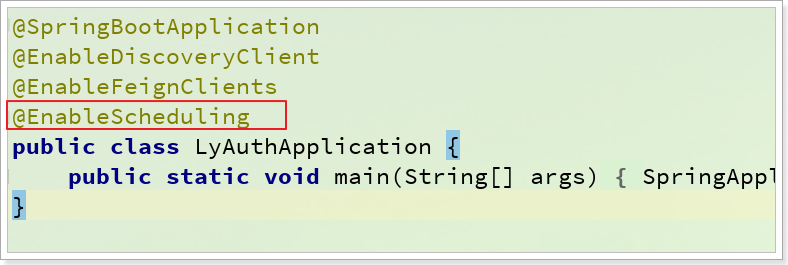
启动类上添加注解:
定时任务:
1
2
3
4
5
6
7
8
9
10
11
12
13
14
15
16
17
18
19
20
21
22
23
24
25
26
27
28
29
30
31
32
33
34
35
36
37
38
39
40
41
42
43
44
45
46
47
48
49
50
51
52
53
54
55
56
57
58
59
60
61
62
63
64
| package com.leyou.auth.task;
import com.leyou.auth.config.JwtProperties;
import com.leyou.auth.mapper.ApplicationInfoMapper;
import com.leyou.common.auth.entity.AppInfo;
import com.leyou.common.auth.utils.JwtUtils;
import lombok.extern.slf4j.Slf4j;
import org.springframework.beans.factory.annotation.Autowired;
import org.springframework.scheduling.annotation.Scheduled;
import org.springframework.stereotype.Component;
import java.util.List;
@Slf4j
@Component
public class AppTokenHolder {
private static final long TOKEN_REFRESH_INTERVAL = 86400000L;
private static final long TOKEN_RETRY_INTERVAL = 10000L;
private String token;
@Autowired
private ApplicationInfoMapper infoMapper;
@Autowired
private JwtProperties prop;
@Scheduled(fixedDelay = TOKEN_REFRESH_INTERVAL)
public void loadTokenTask() throws InterruptedException {
while (true){
try {
List<Long> idList = infoMapper.queryTargetIdList(prop.getApp().getId());
AppInfo appInfo = new AppInfo();
appInfo.setId(prop.getApp().getId());
appInfo.setServiceName(prop.getApp().getSecret());
appInfo.setTargetList(idList);
this.token = JwtUtils.generateTokenExpireInMinutes(
appInfo, prop.getPrivateKey(), prop.getApp().getExpire());
log.info("【auth服务】申请token成功!");
break;
}catch (Exception e){
log.info("【auth服务】申请token失败!", e);
}
Thread.sleep(TOKEN_RETRY_INTERVAL);
}
}
public String getToken(){
return token;
}
}
|
2.6.请求头中携带token
2.6.1.思路分析
有了token后的下一步,就是在每次请求时都携带上token。这里有两个问题需要思考:
- 要在请求中携带token,放到请求中的哪里呢?
- 如何对服务间调用的请求拦截和修改呢?
问题1:请求中携带token,放到请求中的哪里呢?
请求中可以携带数据的地方有下面几种选择:
我们不能把token放到请求参数中,因为请求调用的接口,其参数都是固定的,我们不能随意修改。
综上所述,我们使用请求头来携带token。
问题2:如何对服务间调用的请求拦截和修改呢?
对于不同微服务有两种的不同的实现方式:
- 网关ly-gateway:
- 网关是反向代理,把请求转发给微服务,不需要经过feign,因此要在转发前修改请求头
- 其它通过Feign调用的微服务:
- 微服务之间调用时通过Feign,我们需要在Feign发起请求前修改请求头
这里微服务之间调用我们依然是ly-auth为例来演示。
2.6.2.网关请求头处理
配置请求头
首先配置token在请求头中的名称,修改ly-gateway的application.yml:
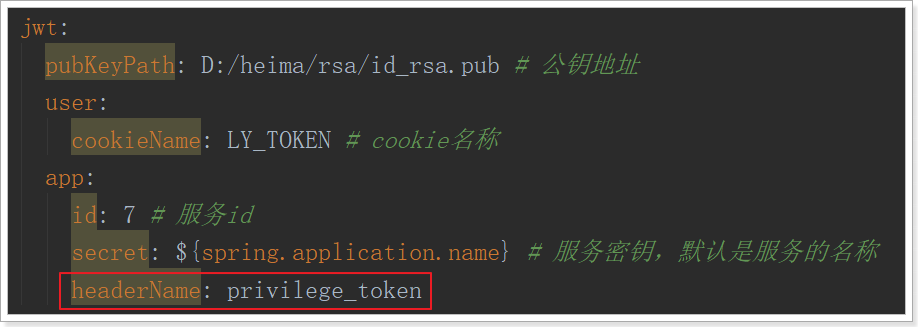
在ly-gateway配置类JwtProperties中添加属性:
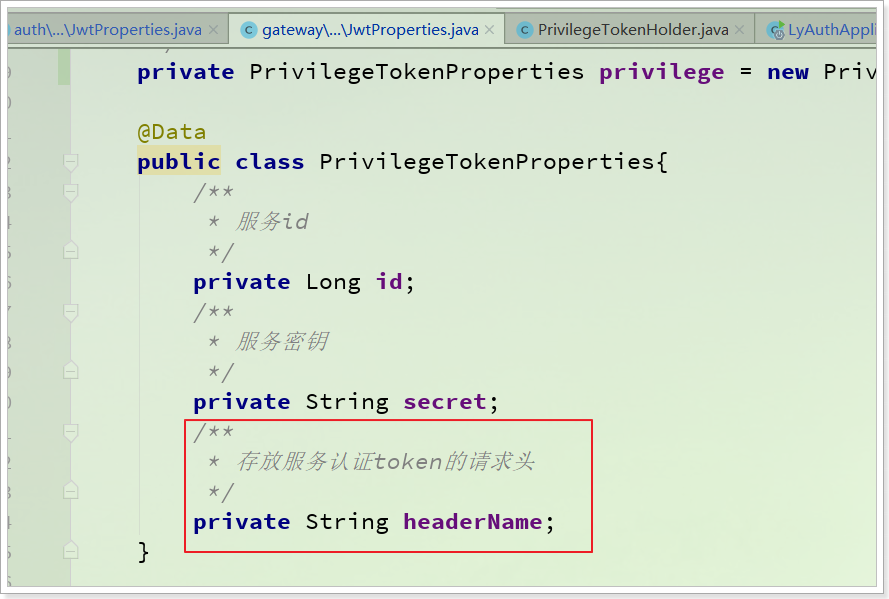
zuul过滤器处理请求头
要在转发前修改请求头,肯定是通过网关的拦截器来做:
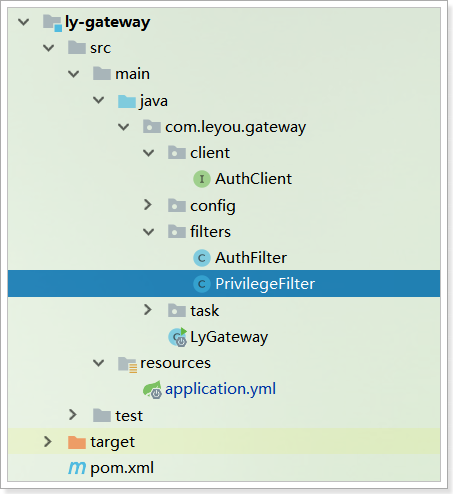
代码:
1
2
3
4
5
6
7
8
9
10
11
12
13
14
15
16
17
18
19
20
21
22
23
24
25
26
27
28
29
30
31
32
33
34
35
36
37
38
39
40
41
42
43
44
45
46
47
48
49
| package com.leyou.gateway.filters;
import com.leyou.gateway.config.JwtProperties;
import com.leyou.gateway.task.PrivilegeTokenHolder;
import com.netflix.zuul.ZuulFilter;
import com.netflix.zuul.context.RequestContext;
import com.netflix.zuul.exception.ZuulException;
import org.springframework.beans.factory.annotation.Autowired;
import org.springframework.cloud.netflix.zuul.filters.support.FilterConstants;
import org.springframework.stereotype.Component;
@Component
public class PrivilegeFilter extends ZuulFilter {
@Autowired
private JwtProperties prop;
@Autowired
private PrivilegeTokenHolder tokenHolder;
@Override
public String filterType() {
return FilterConstants.PRE_TYPE;
}
@Override
public int filterOrder() {
return FilterConstants.PRE_DECORATION_FILTER_ORDER + 1;
}
@Override
public boolean shouldFilter() {
return true;
}
@Override
public Object run() throws ZuulException {
RequestContext ctx = RequestContext.getCurrentContext();
ctx.addZuulRequestHeader(prop.getApp().getHeaderName(), tokenHolder.getToken());
return null;
}
}
|
2.6.3.微服务中请求头处理
这里以ly-auth为例来演示。
配置请求头
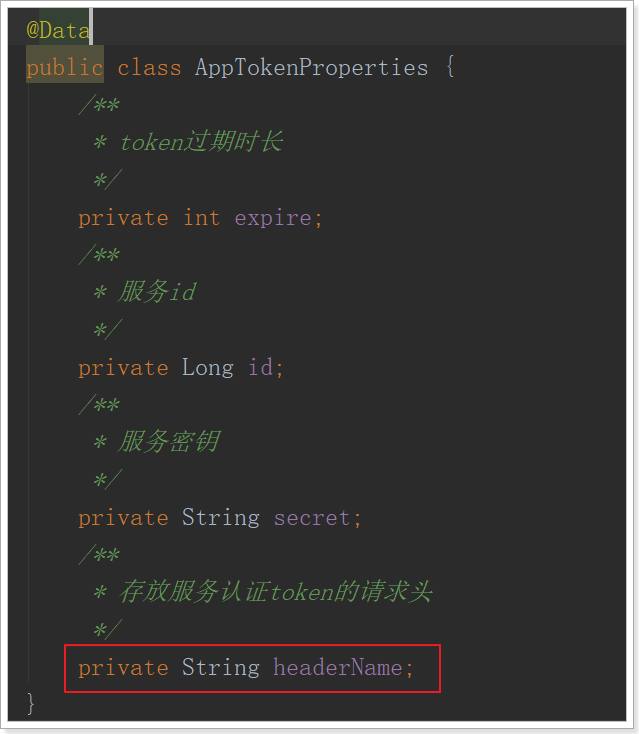
首先,也需要配置请求头的名称,修改ly-auth中的application.yml:
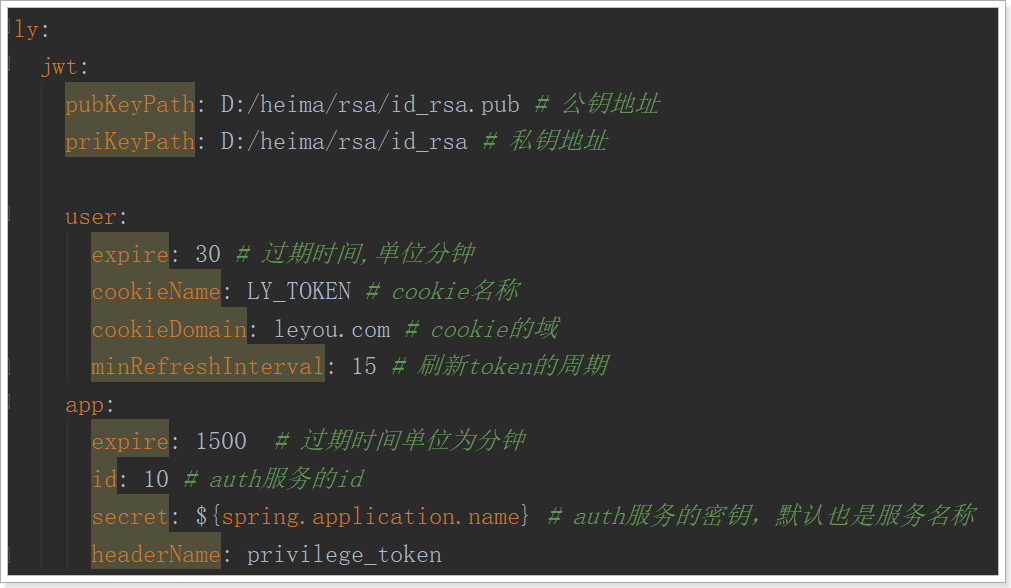
然后在配置类JwtProperties中读取:
Feign的拦截器处理请求头
微服务间调用是通过Feign来实现的,而Feign是声明式调用,看不到请求的过程。
因此要想对请求修改,必须通过Feign的拦截器来实现。
Feign中有一个拦截器接口:
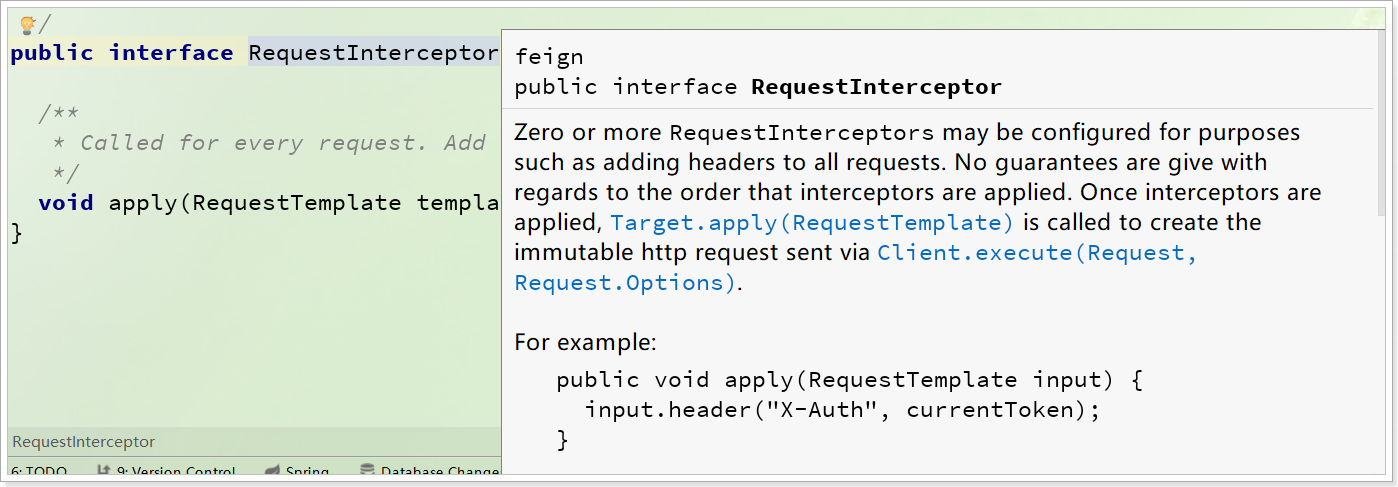
可以看到接口中有一个抽象方法:apply(RequestTemplate template),在请求发出之前会调用拦截器的apply方法。其参数:template可以对请求进行任意个性化修改。
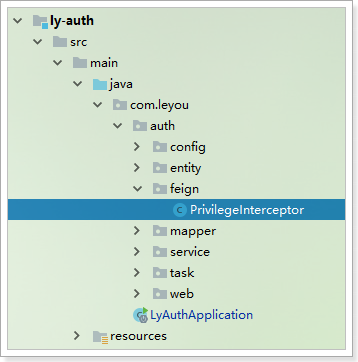
因此我们需要实现这样一个接口,并且在其中添加请求头,而要让这个接口生效,还需要把这个拦截器注册到Spring容器中。
我们以ly-auth为例来演示:
代码:
1
2
3
4
5
6
7
8
9
10
11
12
13
14
15
16
17
18
19
20
21
22
23
24
25
26
27
| package com.leyou.auth.feign;
import com.leyou.auth.config.JwtProperties;
import com.leyou.auth.task.AppTokenHolder;
import feign.RequestInterceptor;
import feign.RequestTemplate;
import org.springframework.beans.factory.annotation.Autowired;
import org.springframework.stereotype.Component;
@Component
public class PrivilegeInterceptor implements RequestInterceptor {
@Autowired
private JwtProperties prop;
@Autowired
private AppTokenHolder tokenHolder;
@Override
public void apply(RequestTemplate template) {
String token = tokenHolder.getToken();
template.header(prop.getApp().getHeaderName(), token);
}
}
|
2.7.微服务验证token
最后,我们需要在被调用的微服务中验证每一个请求,检查请求头中的token是否有效。
微服务的接口都是以SpringMVC来实现的,因此验证的代码可以放到SpringMVC的拦截器来实现。
我们以ly-user为例来演示。
2.7.1.配置请求头名称
首先修改application.yml,添加与权限验证相关配置:
1
2
3
4
5
6
7
8
9
10
11
| ly:
encoder:
crypt:
secret: ${random.uuid}
strength: 10
jwt:
pubKeyPath: D:/heima/rsa/id_rsa.pub
app:
id: 1
secret: ${spring.application.name}
headerName: privilege_token
|
然后在JwtProperties中读取:
1
2
3
4
5
6
7
8
9
10
11
12
13
14
15
16
17
18
19
20
21
22
23
24
25
26
27
28
29
30
31
32
33
34
35
36
37
38
39
40
41
42
43
44
45
46
47
48
49
50
51
52
53
| package com.leyou.user.config;
import com.leyou.common.auth.utils.RsaUtils;
import lombok.Data;
import lombok.extern.slf4j.Slf4j;
import org.springframework.beans.factory.InitializingBean;
import org.springframework.boot.context.properties.ConfigurationProperties;
import java.security.PublicKey;
@Data
@Slf4j
@ConfigurationProperties(prefix = "ly.jwt")
public class JwtProperties implements InitializingBean {
private String pubKeyPath;
private PrivilegeTokenProperties app = new PrivilegeTokenProperties();
private PublicKey publicKey;
@Data
public class PrivilegeTokenProperties{
private Long id;
private String secret;
private String headerName;
}
@Override
public void afterPropertiesSet() throws Exception {
try {
this.publicKey = RsaUtils.getPublicKey(pubKeyPath);
} catch (Exception e) {
log.error("初始化公钥失败!", e);
throw new RuntimeException(e);
}
}
}
|
2.7.2.定义拦截器:
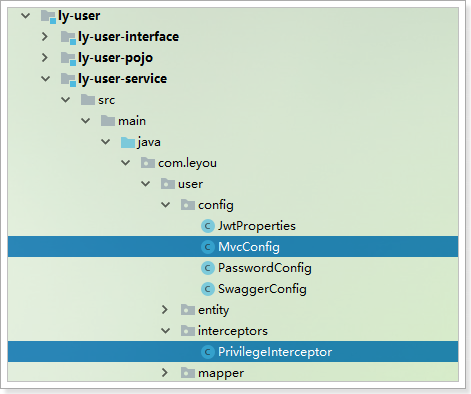
需要定义的包括一个用来拦截请求的拦截器,以及注册拦截器的SpringMVC的配置:
代码实现:
1
2
3
4
5
6
7
8
9
10
11
12
13
14
15
16
17
18
19
20
21
22
23
24
25
26
27
28
29
30
31
32
33
34
35
36
37
38
39
40
41
42
43
44
45
46
47
48
49
| package com.leyou.user.interceptors;
import com.leyou.common.auth.entity.AppInfo;
import com.leyou.common.auth.entity.Payload;
import com.leyou.common.auth.utils.JwtUtils;
import com.leyou.user.config.JwtProperties;
import lombok.extern.slf4j.Slf4j;
import org.springframework.web.servlet.HandlerInterceptor;
import javax.servlet.http.HttpServletRequest;
import javax.servlet.http.HttpServletResponse;
import java.util.List;
@Slf4j
public class PrivilegeInterceptor implements HandlerInterceptor {
private JwtProperties jwtProp;
public PrivilegeInterceptor(JwtProperties jwtProp) {
this.jwtProp = jwtProp;
}
@Override
public boolean preHandle(HttpServletRequest request, HttpServletResponse response, Object handler) {
try {
String token = request.getHeader(jwtProp.getApp().getHeaderName());
Payload<AppInfo> payload = JwtUtils.getInfoFromToken(token, jwtProp.getPublicKey(), AppInfo.class);
AppInfo appInfo = payload.getUserInfo();
List<Long> targetList = appInfo.getTargetList();
Long currentServiceId = jwtProp.getApp().getId();
if(targetList == null || !targetList.contains(currentServiceId)){
log.error("请求者没有访问本服务的权限!");
}
log.info("服务{}正在请求资源:{}", appInfo.getServiceName(), request.getRequestURI());
return true;
}catch (Exception e){
log.error("服务访问被拒绝,token认证失败!", e);
return false;
}
}
}
|
配置MvcConfig,让拦截器生效:
1
2
3
4
5
6
7
8
9
10
11
12
13
14
15
16
17
18
19
20
21
22
| package com.leyou.user.config;
import com.leyou.user.interceptors.PrivilegeInterceptor;
import org.springframework.beans.factory.annotation.Autowired;
import org.springframework.boot.context.properties.EnableConfigurationProperties;
import org.springframework.context.annotation.Configuration;
import org.springframework.web.servlet.config.annotation.InterceptorRegistry;
import org.springframework.web.servlet.config.annotation.WebMvcConfigurer;
@Configuration
@EnableConfigurationProperties(JwtProperties.class)
public class MvcConfig implements WebMvcConfigurer {
@Autowired
private JwtProperties prop;
@Override
public void addInterceptors(InterceptorRegistry registry) {
registry.addInterceptor(new PrivilegeInterceptor(prop)).excludePathPatterns("/swagger-ui.html");
}
}
|
3.面试常见问题
你们使用JWT做登录凭证,如何解决token注销问题
答:jwt的缺陷是token生成后无法修改,因此无法让token失效。只能采用其它方案来弥补,基本思路如下:
1)适当减短token有效期,让token尽快失效
2)删除客户端cookie
3)服务端对失效token进行标记,形成黑名单,虽然有违无状态特性,但是因为token有效期短,因此标记 时间也比较短。服务器压力会比较小
既然token有效期短,怎么解决token失效后的续签问题?
答:在验证用户登录状态的代码中,添加一段逻辑:判断cookie即将到期时,重新生成一个token。比如token有效期为30分钟,当用户请求我们时,我们可以判断如果用户的token有效期还剩下10分钟,那么就重新生成token。因此用户只要在操作我们的网站,就会续签token
如何解决异地登录问题?
答:在我们的应用中是允许用户异地登录的。如果要禁止用户异地登录,只能采用有状态方式,在服务端记录登录用户的信息,并且判断用户已经登录,并且在其它设备再次登录时,禁止登录请求,并要求发送短信验证。
如何解决cookie被盗用问题?
答:cookie被盗用的可能性主要包括下面几种:
- XSS攻击:这个可以在前端页面渲染时对 数据做安全处理即可,而且我们的cookie使用了Httponly为true,可以防止JS脚本的攻击。
- CSRF攻击:
- 我们严格遵循了Rest风格,CSRF只能发起Get请求,不会对服务端造成损失,可以有效防止CSRF攻击
- 利用Referer头,防盗链
- 抓包,获取用户cookie:我们采用了HTTPS协议通信,无法获取请求的任何数据
- 请求重放攻击:对于普通用户的请求没有对请求重放做防御,而是对部分业务做好了幂等处理。运行管理系统中会对token添加随机码,认证token一次有效,来预防请求重放攻击。
- 用户电脑中毒:这个无法防范。
如何解决cookie被篡改问题?
- 答:cookie可以篡改,但是签名无法篡改,否则服务端认证根本不会通过
如何完成权限校验的?
- 首先我们有权限管理的服务,管理用户的各种权限,及可访问路径等
- 在网关zuul中利用Pre过滤器,拦截一切请求,在过滤器中,解析jwt,获取用户身份,查询用户权限,判断用户身份可以访问当前路径
服务端微服务地址不小心暴露了,用户就可以绕过网关,直接访问微服务,怎么办?
- 答:我们的微服务都做了严格的服务间鉴权处理,任何对微服务的访问都会被验证是否有授权,如果没有则会被拦截。具体实现:此处省略500字,见本节课内容


