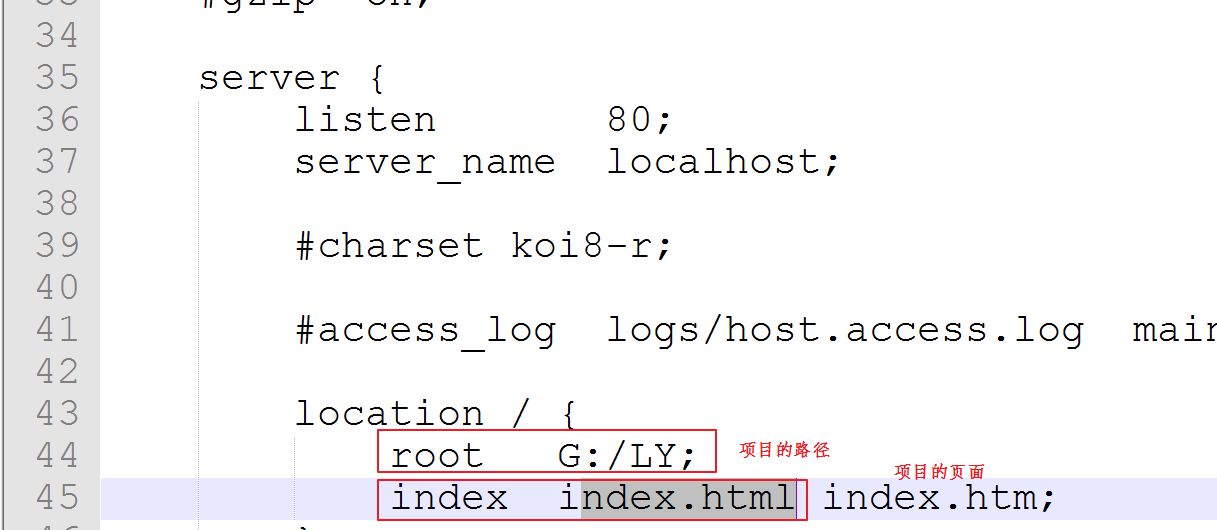
面面项目第一天 学习目标
第一章-版本控制 知识点-版本控制相关的概念 1.目标
2.路径
什么是版本控制
为什么要进行版本控制
常见版本控制工具
3.讲解 3.1 什么是版本控制 版本控制(Revision control)是一种软体工程技巧,籍以在开发的过程中,确保由不同人所编辑的同一档案(项目代码)都得到更新。
3.2 为什么要进行版本控制
恢复到历史某个时间的代码
查看以往的代码修改记录及变化
协同开发时,合并同一文件中不同开发者写的代码
协同开发时定位修改代码的责任人
备份源代码
保护代码不被外泄
3.3 常见版本控制工具
CVS 早期版本管理软件
ClearCase IBM企业级大型版本管理工具, 收费
VSS 微软推出的版本管理工具, 较少使用
SVN市面流行的版本管理工具之一,拥有CVS所有功能,修复了CVS的不足
GIT分布式版本管理工具, 已经是趋势,最常用的
4.小结
什么版本控制
是一种软体工程技巧, 确保由不同人所编辑的同一档案(项目代码)都得到更新。
为什么要使用版本控制
1. 便于协同开发中的代码合并
2. 可以恢复到某个版本的代码
3. 可以对代码的修改进行溯源
4. 保护代码的安全不泄露
常见的版本控制工具
SVN
Git(使用最多的)
知识点-SVN介绍 1.目标
2.路径
SVN概述
SVN工作方式【重点】
3.讲解 3.1SVN概述 Svn(Subversion)是版本管理工具,在当前的开源项目里(J2EE),几乎95%以上的项目都用到了 SVN。Subversion 项目的初衷是为了替换当年开源社区最为流行的版本控制软件CVS,在CVS的功能的基础上有很多的提升同时也能较好的解决CVS系统的一些不足。
3.2 SVN工作方式【重点】
4.小结
SVN: 就是一个版本管理工具
SVN工作方式
实操-SVN的安装 1.目标
2.路径
SVN服务器的安装
SVN客户端的安装
3.讲解 3.1 SVN服务器的安装 详情参考资料 【 01_VisualSVNServer安装步骤.html】
3.2 SVN客户端的安装 详情参考资料 【02_svn客户端安装步骤.html】
4.小结
注意
目录都不要有中文和空格
装客户端
实操-创建仓库和用户 1.目标
2.路径
创建仓库
创建用户
3.讲解 3.1创建仓库 详情参考资料 【03_VisualSVN创建仓库.html】
3.2创建用户 详情参考资料 【04_VisualSVN创建用户步骤.html】
4.小结
创建仓库
用户和组
实操-SVN功能操作【了解,主要是在idea中操作】 1.目标
2.路径 3.讲解 3.1检出代码(checkout)
拷贝路径
通过svn客户端检出代码
检出的结果
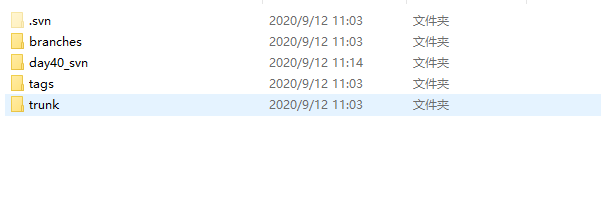
.svn文件夹为版本控制的标记记录
3.2提交代码
新建文件
新建完成后,文件会有一个?号图标,代表当前文件未纳入到版本控制中
添加到版本控制中
添加操作完成后,文件图标会变为+号图标,代表当前文件已经纳入到版本控制中,但是没有上传到svn服务器中。
提交到版本控制器服务器
提交操作完成后,图标会变为对钩,代表文件已经上传到版本控制服务器中。
3.3 更新代码 当一份代码被修改之后,文件前面的图标会变成感叹号,表示这个文件的内容和svn服务器上的内容不一致
修改者要使用commit命令将修改之后的代码提交到SVN服务器;
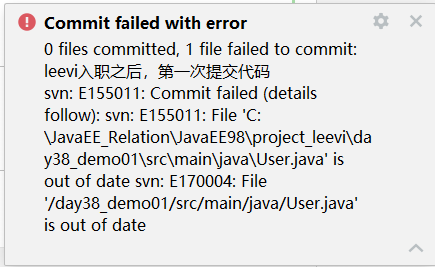
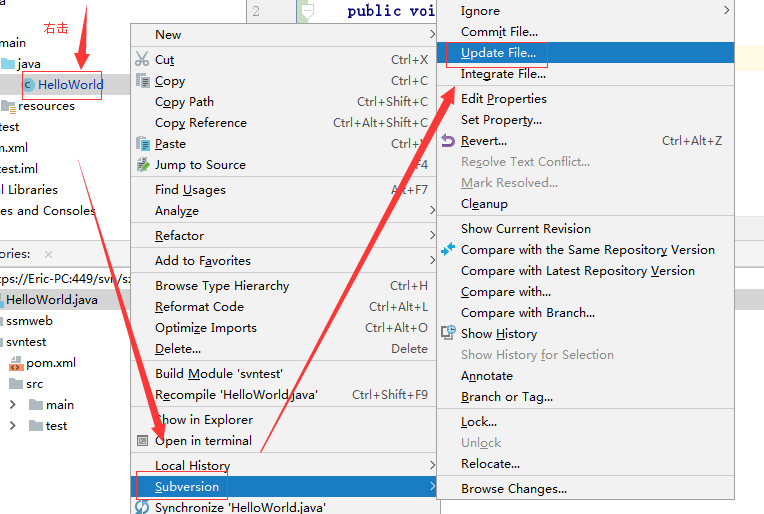
Update,它是更新操作,可以将svn服务器上的内容更新到本地,另一个程序员在写代码之前,要先进行update操作,如果不先进行update操作,就会发生代码冲突
3.4 冲突解决
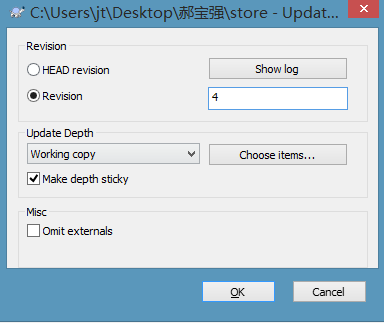
3.5 更新到某个版本 选中文件,右键更新之某个版本
3.6 版本库的备份和还原【了解】
到版本VisualSVN的仓库目录中拷贝要备份版本库。
4.小结 4.1SVN图标
4.2 SVN使用规范
先更新,再修改,再提交
SVN更新的原则是要随时更新,随时提交。当完成了一个小功能,能够通过编译并且自己测试之后,谨慎地提交。
多提交
每次提交的间歇尽可能地短,以几个小时的开发工作为宜。例如在更改UI界面的时候,可以每完成一个UI界面的修改或者设计,就提交一次。在开发功能模块的时候,可以每完成一个小细节功能的测试,就提交一次,在修改bug的时候,每修改掉一个bug并且确认修改了这个bug,也就提交一次。我们提倡多提交,也就能多为代码添加上保险。
不要提交不能通过编译的代码
代码在提交之前,首先要确认自己能够在本地编译。如果在代码中使用了第三方类库,要考虑到项目组成员中有些成员可能没有安装相应的第三方类库。项目经理在准备项目工作区域的时候,需要考虑到这样的情况,确保开发小组成员在签出代码之后能够在统一的环境中进行编译。
每次提交必须写明注释
在一个项目组中使用SVN,如果提交空的标注或者不确切的标注将会让项目组中其他的成员感到很无奈,项目经理无法很清晰的掌握工作进度,无法清晰的把握此次提交的概要信息。在发现错误后也无法准确的定位引起错误的文件。所以,在提交工作时,要填写明晰的标注,能够概要的描述所提交文件的信息,让项目组其他成员在看到标注后不用详细看代码就能了解你所做的修改。
不要提交本地自动生成的文件
IDEA里面的编译之后的文件target, .idea文件
实操-在IDEA中使用SVN(重点) 1.目标
2.路径
配置SVN
IDEA SVN使用
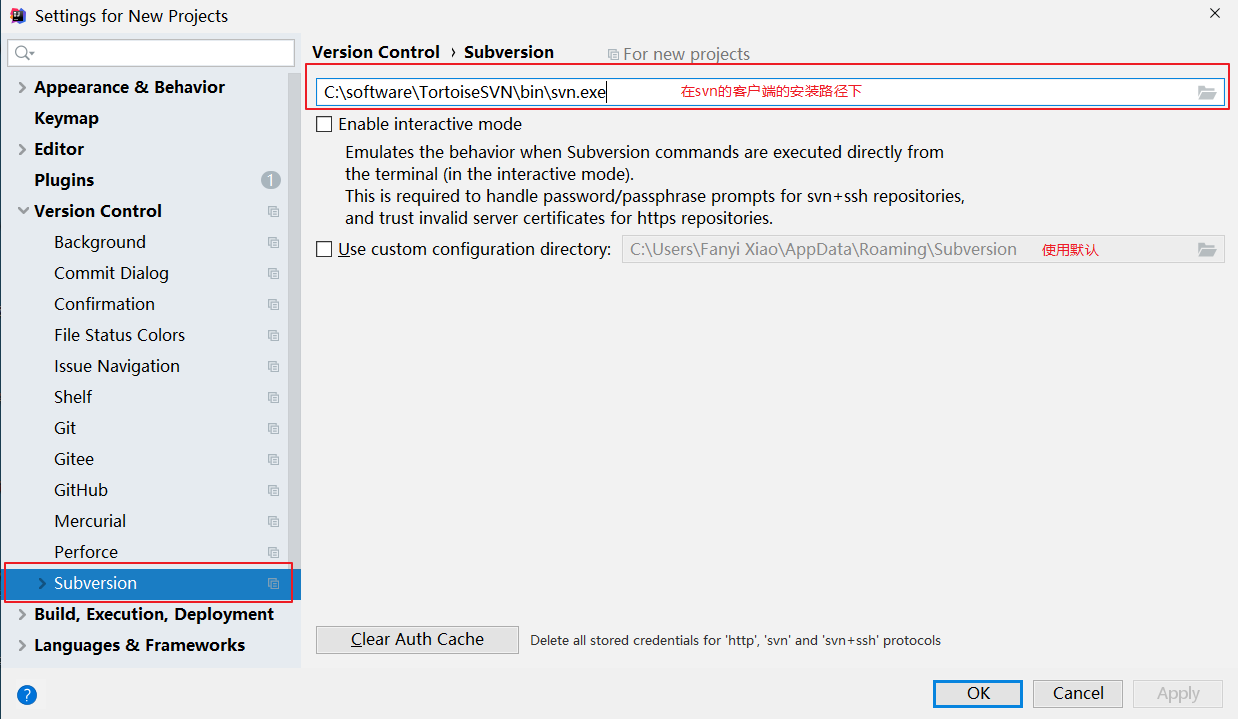
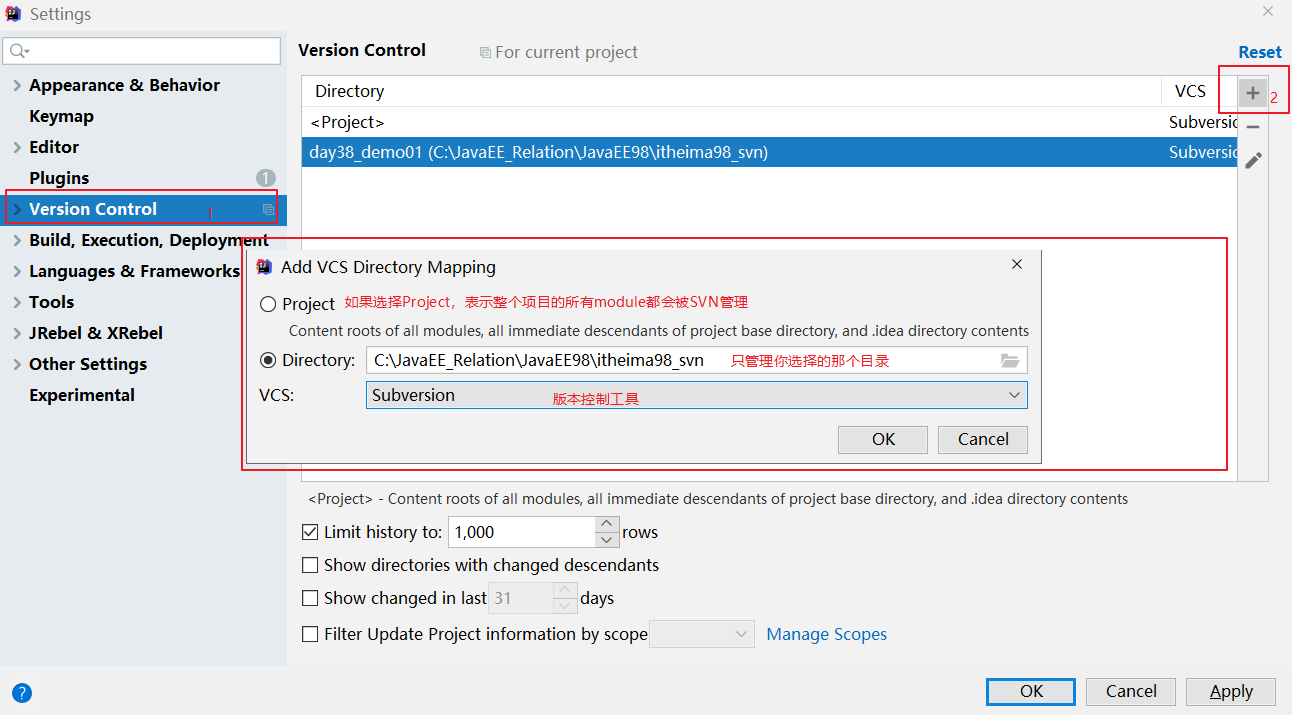
3.讲解 3.1 配置SVN 注意: 需要认证证书时,删除这个目录下所有内容C:\Users\用户名\AppData\Roaming\Subversion
选择File>Other Settings> Settings For New Projects>Version Controller>Subversion,分别设置命令行客户端工具和svn配置信息存储目录。如下图:
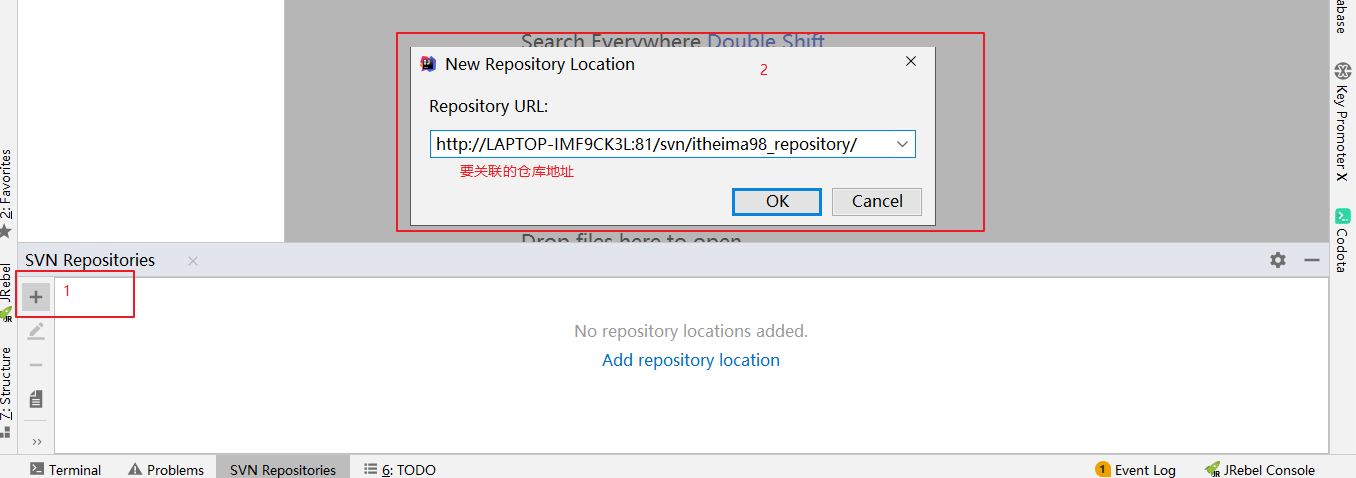
3.2 IDEA SVN使用 3.2.1 浏览仓库 选中IDEA工具栏的VCS > Browse VCS Repository > Browse Subversion Repository
此时会出现如下界面,我们点击+号,输入本地SVN地址,再点击OK即可将SVN地址加入进来。
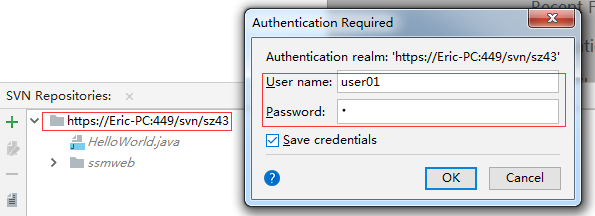
如果没有记住用户名和密码时,它就会弹出界面如下,需要我们输入正确的账号和密码方能实现仓库浏览。
账号密码正确后,如下浏览:
3.2.2 上传本地项目到SVN 在IDEA中,将本地项目共享到SVN,这个操作比较简单。
要做这个练习,我们先创建一个maven工程,这个工程还没有连接到SVN。然后再做以下操作
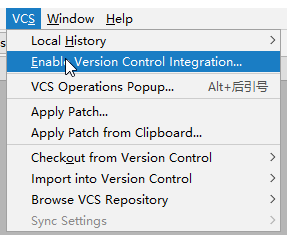
确保SVN功能已经开启:VCS > Enable Version Controller Integration
选中Subversion,此时项目的颜色会变成黄色,表明SVN功能已经开启。
2019版本的idea需要额外设置
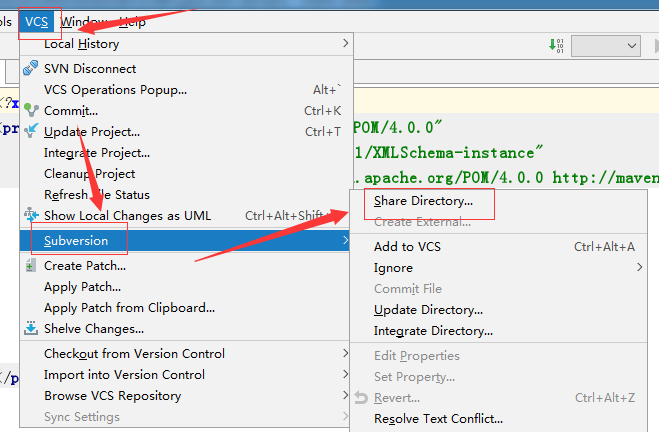
共享操作:在工程上右键 > Subversion > Share Directory
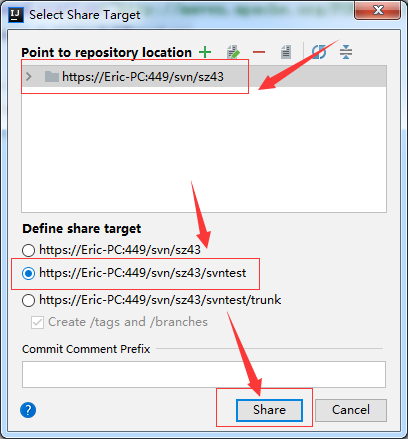
选择要共享的目标SVN地址,接着指定要共享的目标对象,点击Share之后,会在SVN创建一个对应的版本库文件,但该项目并未立刻提交。
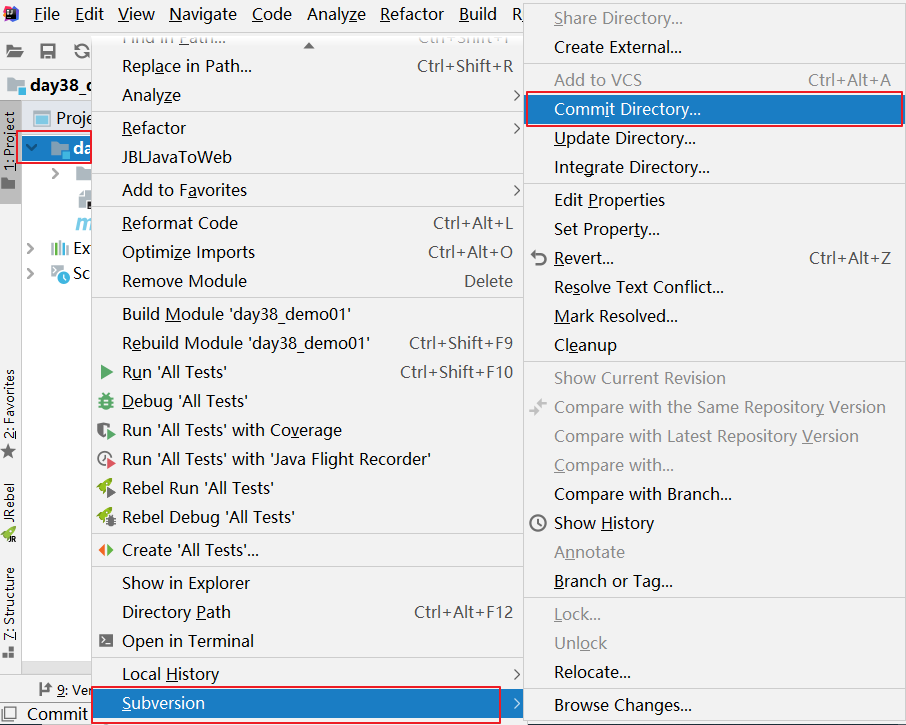
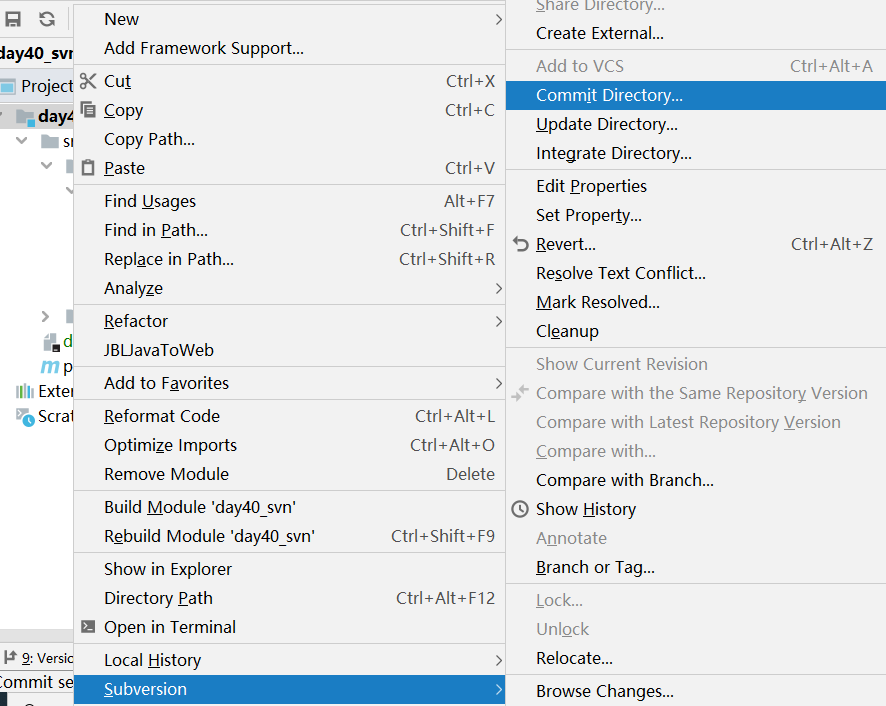
提交对应工程:选择对应工程 > Subversion > Commit Directory
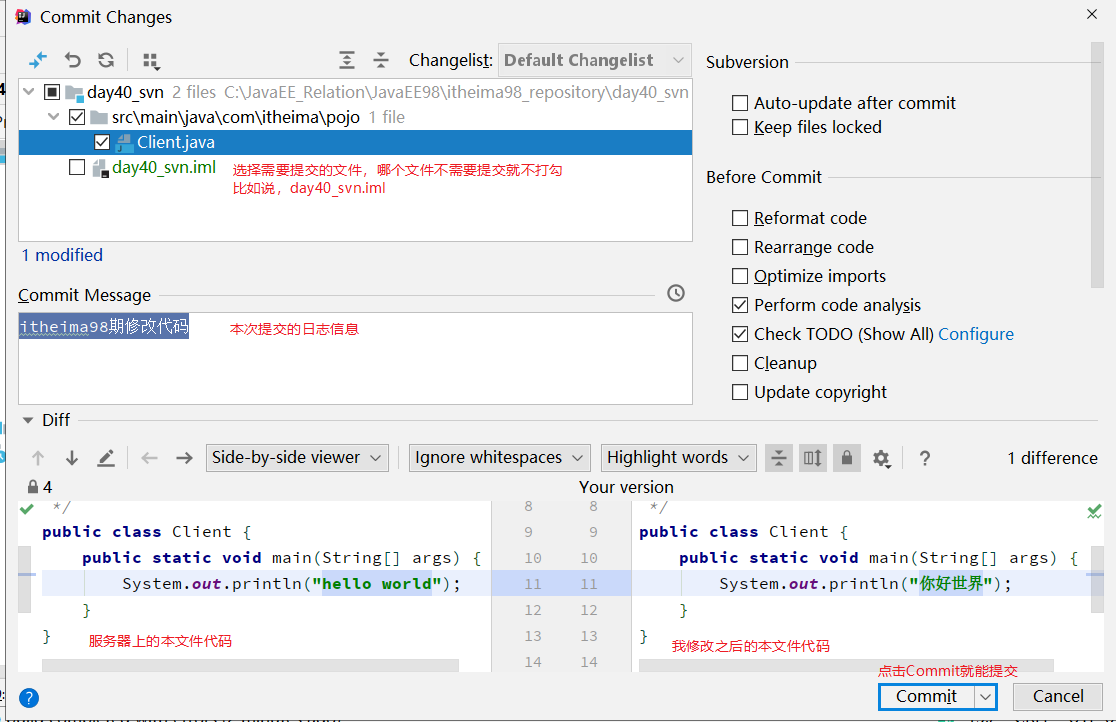
勾选要提交的内容,并填写上提交内容的注释信息,然后点击commit提交,提交完成后,项目就会被提交到SVN
成功后再查询仓库,此时新的项目就出现了
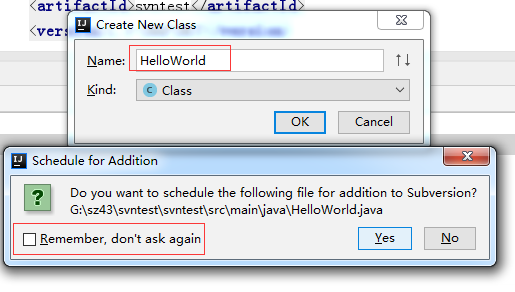
3.2.3 Add Commit 添加新文件时,idea会访问是否将新文件添加到SVN管理中
注意,此时的文件是没有上传到svn上的,需要通过commit file才行
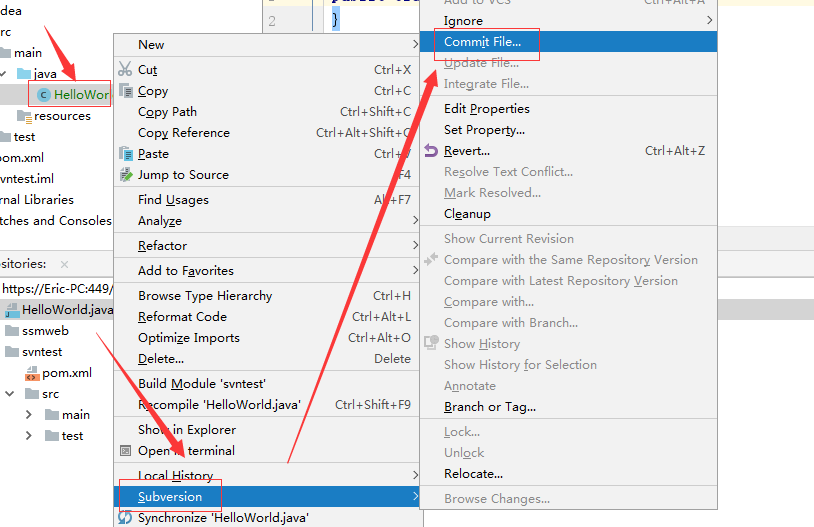
如果文件有修改,也是要在项目上或者修改的文件上右击Subversion > Commit File
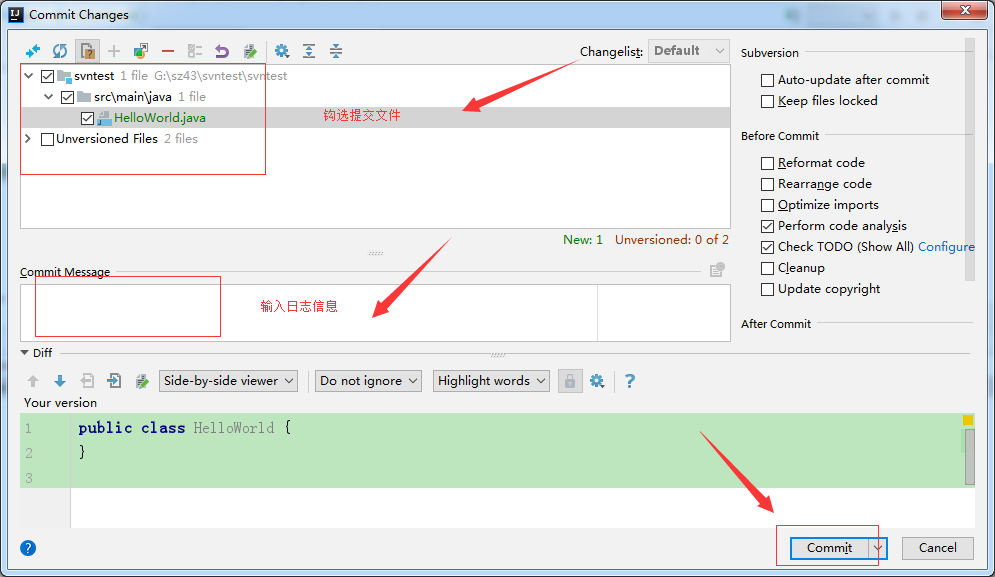
选择要提交的内容,并填写上注释,然后选中commit即可。
3.2.6 checkout 检出
新创建一个文件夹,作为你的本地仓库
在当前文件夹中执行svn检出操作,将SVN服务器仓库中的内容检出到本地仓库
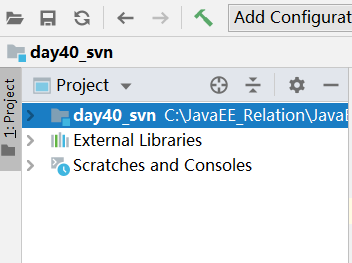
在idea中创建一个空项目,在空项目中导入你检出的内容中的module(day40_svn)
修改完项目的代码执行,执行svn的commit就可以提交代码
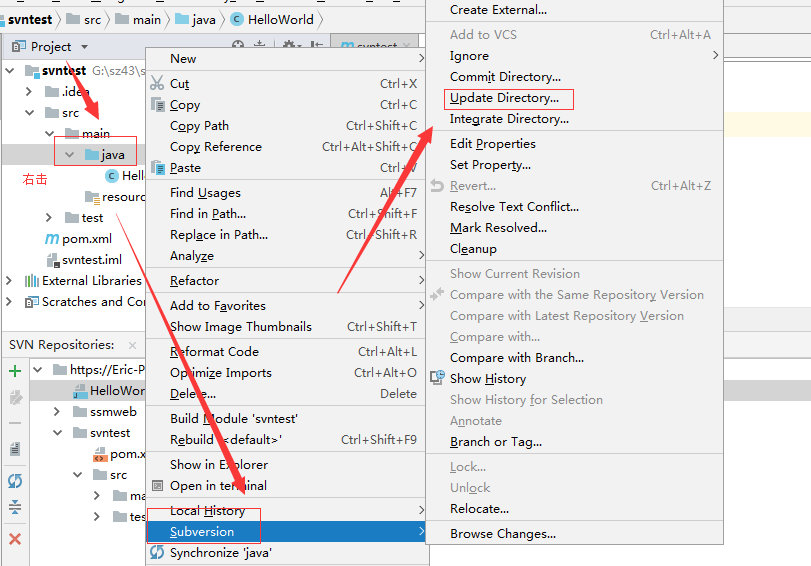
3.2.4 Update 如果需要更新服务器上的文件,选中要更新的项目并右键 > Subversion > Update Directory
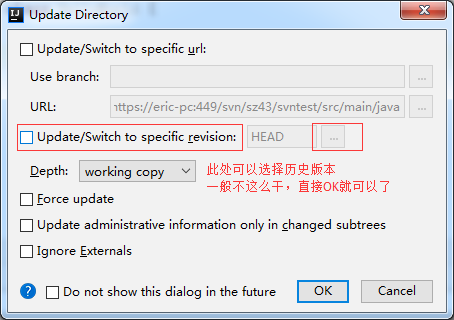
一般直接点击OK即可,但如果需要选择历史版本,则勾上HEAD选项。
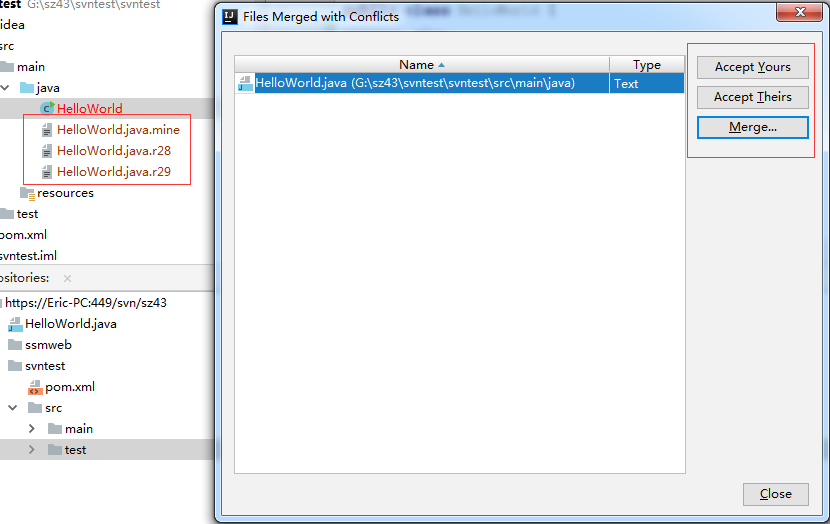
3.2.5 解决冲突 多个用户同时编辑一个文件并都直接执行提交时,容易导致冲突产生,如下:
产生了冲突
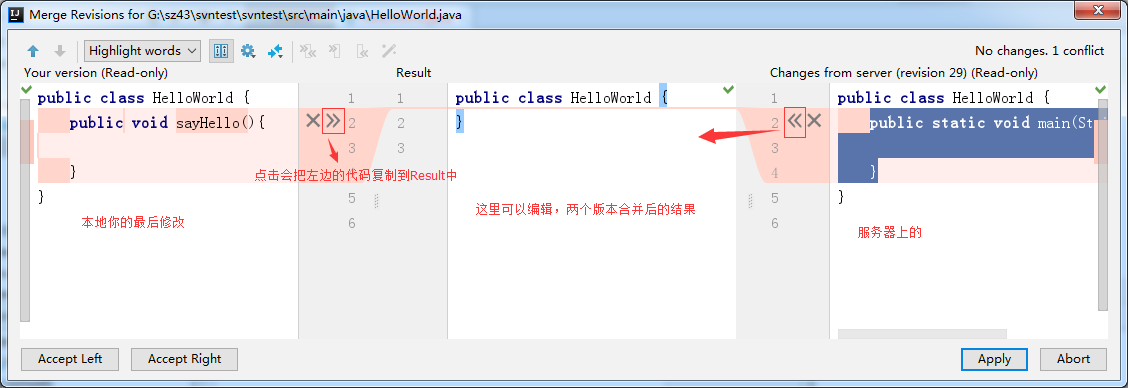
如果文件变更发生冲突,会看到如下界面,这里会有三个选项:
Accept Yours:接受你的版本,会以自己的版本为正确版本。
Accept Theirs:接受SVN上的版本,会把服务器的版本作为正确版本。
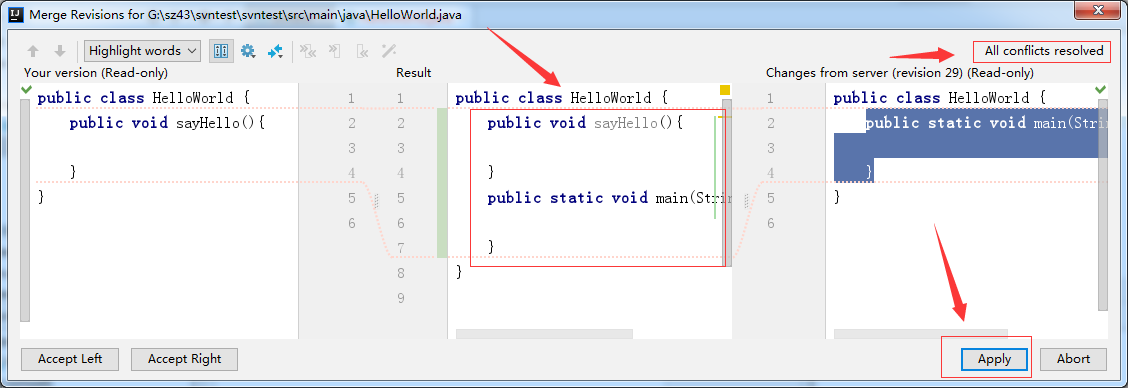
Merge:合并,需要将冲突手动排除。
最后还要把这个文件提交
4.小结
安装SVN服务器
安装SVN客户端
在SVN服务器上创建仓库、用户、用户组
在idea上配置SVN
在idea上新建一个module,共享给SVN服务器,提交到SVN服务器
模拟第一天进公司,需要从svn服务器上检出项目,并且修改代码、提交代码
模拟协同开发的时候,解决冲突
第二章-自定义MVC框架(理解、会使用) 知识点-以模块为单位创建Servlet 1.目标
2.路径
复习 以模块为单位创建Servlet
使用反射优化
3.讲解 3.1以模块为单位创建Servlet 传统方式的开发一个请求对应一个Servlet:这样的话会导致一个模块的Servlet过多,导致整个项目的Servlet都会很多.能不能做一个处理?让一个模块都用一个Servlet处理请求. 用户模块, 创建UserServlet
注册:http://localhost:8080/day36/userServlet?action=regist
登录:http://localhost:8080/day36/userServlet?action=login
激活:http://localhost:8080/day36/userServle?action=active
1
2
3
4
5
6
7
8
9
10
11
12
13
14
15
16
17
18
19
20
21
22
23
24
25
26
27
28
29
30
31
32
33
34
35
36
37
class UserServlet extend HttpServlet{ ... doGet(HttpServletRequest request, HttpServletResponse response){ String action = request.getParameter("action" ); if ("regist" .equals(action)){ regist(request,response); }else if ("login" .equals(action)){ login(request,response); }else if ("active" .equals(action)){ active(request,response); } } public void regist (HttpServletRequest request, HttpServletResponse response) { } public void login (HttpServletRequest request, HttpServletResponse response) { } public void active (HttpServletRequest request, HttpServletResponse response) { } }
3.2使用反射优化 发现在上面的doGet方法里面,有大量的if语句,能不能不写if语句
注册:http://localhost:8080/day36/userServlet?action=regist
登录:http://localhost:8080/day36/userServlet?action=login
激活:http://localhost:8080/day36/userServle?action=active
1
2
3
4
5
6
7
8
9
10
11
12
13
14
15
16
17
18
19
20
21
22
23
24
25
26
27
28
29
30
31
32
class UserServlet extend HttpServlet{ ... doGet(HttpServletRequest request, HttpServletResponse response){ String action = request.getParameter("action" ); Class clazz = this .getClass(); Method method = clazz.getMethod(action,HttpServletRequest.class,HttpServletResponse.class); method.invoke(this ,request,response); } public void regist (HttpServletRequest request, HttpServletResponse response) { } public void login (HttpServletRequest request, HttpServletResponse response) { } public void active (HttpServletRequest request, HttpServletResponse response) { } }
4.小结
一个模块就创建一个Servlet, 每个请求都携带请求参数method=xx
知识点-BaseServlet 1.目标
2.路径
BaseServlet分析
BaseServlet编写
3.讲解 3.1BaseServlet分析 以模块为单元创建Servlet
1
2
3
4
5
6
7
8
9
10
11
12
13
14
15
16
17
18
19
20
21
22
23
24
25
26
27
28
29
30
31
32
33
34
35
36
37
38
39
40
41
42
43
44
45
46
47
48
49
50
51
52
53
54
55
56
57
58
59
60
61
62
63
64
65
66
67
68
69
70
71
72
73
74
75
76
77
78
79
80
81
82
83
84
85
86
87
88
89
90
91
92
93
94
95
96
97
98
99
100
101
102
103
104
105
106
107
108
109
110
111
112
113
114
115
-- 用户模块 注册:http: 登录:http: 激活:http: class UserServlet extend HttpServlet{ ... doGet(HttpServletRequest request, HttpServletResponse response){ String methodStr = request.getParameter("method" ); Class clazz = this .getClass(); Method method = clazz.getMethod(methodStr,HttpServletRequest.class,HttpServletResponse.class); method.invoke(this ,request,response) } public void regist (HttpServletRequest request, HttpServletResponse response) { } public void login (HttpServletRequest request, HttpServletResponse response) { } public void active (HttpServletRequest request, HttpServletResponse response) { } } -- 商品模块 增加:http: 删除:http: 查询所有:http: class ProductServlet extend HttpServlet{ ... doGet(HttpServletRequest request, HttpServletResponse response){ String methodStr = request.getParameter("method" ); Class clazz = this .getClass(); Method method = clazz.getMethod(methodStr,HttpServletRequest.class,HttpServletResponse.class); method.invoke(this ,request,response) } public void add (HttpServletRequest request, HttpServletResponse response) { } public void delete (HttpServletRequest request, HttpServletResponse response) { } public void findAll (HttpServletRequest request, HttpServletResponse response) { } } -- 类别模块 增加:http: 删除:http: class CategoryServlet extend HttpServlet{ ... doGet(HttpServletRequest request, HttpServletResponse response){ String methodStr = request.getParameter("method" ); Class clazz = this .getClass(); Method method = clazz.getMethod(methodStr,HttpServletRequest.class,HttpServletResponse.class); method.invoke(this ,request,response) } public void add (HttpServletRequest request, HttpServletResponse response) { } public void delete (HttpServletRequest request, HttpServletResponse response) { } }
每一个模块对应一个Servlet,发现doGet()方法里面,代码都是重复的,所以抽取一个通用的BaseServlet基类, 让各个模块Servlet继承BaseServlet.通用的BaseServlet 好处: 少些代码, 把公共的代码抽取
1
2
3
4
5
6
7
8
9
10
11
12
13
14
15
16
17
18
19
20
21
22
23
24
25
26
27
28
29
30
31
32
33
34
35
36
37
38
39
40
41
42
43
44
45
46
47
48
49
50
51
52
53
54
55
56
57
58
59
60
61
62
63
64
65
66
67
68
69
70
71
72
73
74
75
76
77
78
79
80
81
82
83
84
85
86
87
88
89
90
91
92
93
94
95
96
97
98
99
100
101
class BaseServlet extend HttpServlet{ @Override protected void doPost (javax.servlet.http.HttpServletRequest request, javax.servlet.http.HttpServletResponse response) throws javax.servlet.ServletException, IOException { doGet(request, response); } @Override protected void doGet (javax.servlet.http.HttpServletRequest request, javax.servlet.http.HttpServletResponse response) throws javax.servlet.ServletException, IOException { try { String action = request.getParameter("action" ); Class clazz = this .getClass(); Method method = clazz.getMethod(action, HttpServletRequest.class, HttpServletResponse.class); method.invoke(this ,request,response); } catch (Exception e) { e.printStackTrace(); } } } -- 用户模块 注册:http: 登录:http: 激活:http: class UserServlet extend BaseServlet{ public void regist (HttpServletRequest request, HttpServletResponse response) { } public void login (HttpServletRequest request, HttpServletResponse response) { } public void active (HttpServletRequest request, HttpServletResponse response) { } } -- 商品模块 增加:http: 删除:http: 查询所有:http: class ProductServlet extend BaseServlet{ public void add (HttpServletRequest request, HttpServletResponse response) { } public void delete (HttpServletRequest request, HttpServletResponse response) { } public void findAll (HttpServletRequest request, HttpServletResponse response) { } } -- 类别模块 增加:http: 删除:http: class CategoryServlet extend BaseServlet{ public void add (HttpServletRequest request, HttpServletResponse response) { } public void delete (HttpServletRequest request, HttpServletResponse response) { } }
3.2BaseServlet编写 1 2 3 4 5 6 7 8 9 10 11 12 13 14 15 16 17 18 19 20 21 22 23 24 25 26 27 28 29 30 31 32 33 34 35 package com.itheima.web.servlet;import javax.servlet.http.HttpServlet;import javax.servlet.http.HttpServletRequest;import javax.servlet.http.HttpServletResponse;import java.io.IOException;import java.lang.reflect.Method;public class BaseServlet extends HttpServlet { @Override protected void doPost (javax.servlet.http.HttpServletRequest request, javax.servlet.http.HttpServletResponse response) throws javax.servlet.ServletException, IOException { doGet(request, response); } @Override protected void doGet (javax.servlet.http.HttpServletRequest request, javax.servlet.http.HttpServletResponse response) throws javax.servlet.ServletException, IOException { try { String action = request.getParameter("action" ); Class clazz = this .getClass(); Method method = clazz.getMethod(action, HttpServletRequest.class, HttpServletResponse.class); method.invoke(this ,request,response); } catch (Exception e) { e.printStackTrace(); } } }
4.小结
把公共的代码抽取到父类BaseServlet, 模块的Servlet继承BaseServlet就可以了
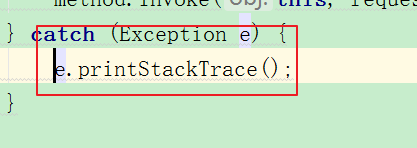
BaseServlet里面的异常打印不要删除
BaseServlet的路径随便取, 但是不要写 /*, /之类的
在BaseServlet里面反射的API是getMethod 也就意味着模块里面的Servlet的方法应该是public的
知识点-自定义MVC框架 1.目标
2.路径
BaseServlet问题分析
自定义MVC框架初级版本
自定义MVC框架终极版本
3.讲解 3.1BaseServlet问题分析 BaseServlet中,可以灵活的处理客户端的请求,应对部分项目开发没有问题。
这种实现要求客户端的每个请求都必须传递一个action参数 ,否则无法找到对应的web方法,另外处理请求的Servlet也必须要继承父类BaseServlet ,因为是在父类的doGet()中完成请求解析与调用。这种方式不是很便捷并且耦合度比较高。一个总控制器类 ,这个总控制器继承HttpServlet类,其他的控制器(子控制器)是普通Java类,不需要间接继承HttpServlet,然后由总控制器动态的去调用子控制器的业务方法,这种动态调用是采用在参数中不加入action的方式来实现的。
如下:
直接在方法上添加一个注解@RequestMapping(“/user/login”),
就可以处理http://localhost:8080/day36/user/login.do这个请求
3.2自定义SpringMVC框架初级版本 3.2.1思路
创建@RequestMapping注解
创建UserController, 定义方法, 在这个方法上面添加@RequestMapping注解
创建DispatcherServlet继承HttpServlet, 路径配置*.do
在DispatcherServlet的service()方法里面
1 2 3 4 5 6 7 //1.获得请求的URI和项目部署路径, 截取获得映路径 eg: /user/login //2.扫描某个包里面的所有类的字节码对象集合List //3.遍历字节码对象集合List //4.获得类里面的所有的Method //5.遍历所有的Method //6.获得method上面的RequestMapping注解 获得注解的value属性值 //7.判断value属性值是否和获得映路径一致, 一致 就调用method
3.2.2代码实现
1 2 3 4 5 6 7 8 9 10 11 12 13 14 15 16 17 18 package com.itheima.frame;import java.lang.annotation.ElementType;import java.lang.annotation.Retention;import java.lang.annotation.RetentionPolicy;import java.lang.annotation.Target;@Target({ElementType.TYPE,ElementType.METHOD}) @Retention(RetentionPolicy.RUNTIME) public @interface RequestMapping { String value () ; }
1 2 3 4 5 6 7 8 9 10 11 12 13 14 15 16 17 18 19 20 21 22 23 24 25 26 27 28 29 30 31 32 33 34 35 36 37 38 39 40 41 42 43 44 45 46 47 48 49 50 51 52 53 54 55 56 57 58 59 60 61 62 63 64 65 66 package com.itheima.framework;import javax.servlet.ServletException;import javax.servlet.annotation.WebServlet;import javax.servlet.http.HttpServlet;import javax.servlet.http.HttpServletRequest;import javax.servlet.http.HttpServletResponse;import java.io.IOException;import java.lang.reflect.Method;import java.util.List;@WebServlet("*.do") public class DispatcherServlet extends HttpServlet { @Override protected void doPost (HttpServletRequest request, HttpServletResponse response) throws ServletException, IOException { doGet(request, response); } @Override protected void doGet (HttpServletRequest request, HttpServletResponse response) throws ServletException, IOException { String uri = request.getRequestURI(); String contextPath = request.getContextPath(); String mappingPath = uri.substring(contextPath.length(), uri.lastIndexOf("." )); List<Class<?>> classList = ClassScannerUtils.getClasssFromPackage("com.itheima.controller" ); try { if (classList != null ) { for (Class<?> clazz : classList) { Method[] methods = clazz.getMethods(); for (Method method : methods) { if (method.isAnnotationPresent(RequestMapping.class)) { String requestMappingValue = method.getAnnotation(RequestMapping.class).value(); if (mappingPath.equals(requestMappingValue)) { method.invoke(clazz.newInstance(),request,response); return ; } } } } } throw new RuntimeException ("No Method To Invoke....." ); } catch (Exception e) { e.printStackTrace(); throw new RuntimeException (e.getMessage()); } } }
1 2 3 4 5 6 7 8 9 10 11 12 13 14 15 16 17 18 19 20 21 22 23 24 25 26 27 28 29 30 31 package com.itheima.controller;import com.itheima.framework.RequestMapping;import javax.servlet.http.HttpServletRequest;import javax.servlet.http.HttpServletResponse;import java.io.IOException;public class UserController { @RequestMapping("/user/add") public void add (HttpServletRequest request, HttpServletResponse response) throws IOException { response.getWriter().write("add....." ); } @RequestMapping("/user/delete") public void delete (HttpServletRequest request, HttpServletResponse response) throws IOException { response.getWriter().write("delete....." ); } @RequestMapping("/user/update") public void update (HttpServletRequest request, HttpServletResponse response) throws IOException { response.getWriter().write("update....." ); } @RequestMapping("/user/query") public void query (HttpServletRequest request, HttpServletResponse response) throws IOException { response.getWriter().write("query....." ); } }
3.3自定义SpringMVC框架终极版本 初级版本存在问题:
DispatcherServlet的映射路径是使用注解配置的
要扫描的Controller的包名写死了
扫描包的代码不应该放在doGet里面,因为放在doGet里面的话,会每次处理请求都执行
每次执行Controller中的方法都会新创建Controller对象
会扫描整个controller包中的所有类,我们只想扫描能够处理请求的那些类
3.1.1 解决问题的思路思路
不在DispatcherServlet中使用注解配置映射路径,而由使用者自己在web.xml中配置映射路径
在web.xml配置文件中,使用servlet的初始化参数进行配置
将扫描包的代码写在DispatcherServlet的初始化方法init()里面
使用单例(容器式单例)
定义一个Controller注解,添加到能够处理请求的类上,扫描的时候我就只需要判断类上是否有Controller注解就行了
3.1.2代码实现
1 2 3 4 5 6 7 8 9 10 11 12 13 14 15 16 17 package com.itheima.framework;import java.lang.annotation.ElementType;import java.lang.annotation.Retention;import java.lang.annotation.RetentionPolicy;import java.lang.annotation.Target;@Target(ElementType.TYPE) @Retention(RetentionPolicy.RUNTIME) public @interface Controller {}
1 2 3 4 5 6 7 8 9 10 11 12 13 14 15 16 17 18 19 20 21 22 23 24 25 26 27 28 29 30 31 32 33 34 35 36 37 38 39 40 41 42 43 44 45 package com.itheima.framework;import java.io.Serializable;import java.lang.reflect.Method;public class MvcMethod implements Serializable { private Object object; private Method method; public MvcMethod () { } public MvcMethod (Object object, Method method) { this .object = object; this .method = method; } @Override public String toString () { return "MvcMethod{" + "object=" + object + ", method=" + method + '}' ; } public Object getObject () { return object; } public void setObject (Object object) { this .object = object; } public Method getMethod () { return method; } public void setMethod (Method method) { this .method = method; } }
1 2 3 4 5 6 7 8 9 10 11 12 13 14 15 16 17 18 19 20 21 22 23 24 25 26 27 28 29 30 31 32 33 34 35 36 37 38 39 40 41 42 43 44 45 46 47 48 49 50 51 52 53 54 55 56 57 58 59 60 61 62 63 64 65 66 67 68 69 70 71 72 73 74 75 76 77 78 79 80 81 82 83 84 85 86 87 88 package com.itheima.framework;import javax.servlet.ServletConfig;import javax.servlet.ServletException;import javax.servlet.http.HttpServlet;import javax.servlet.http.HttpServletRequest;import javax.servlet.http.HttpServletResponse;import java.io.IOException;import java.lang.reflect.Method;import java.util.HashMap;import java.util.List;import java.util.Map;public class DispatcherServlet extends HttpServlet { private Map<String,MvcMethod> map = new HashMap <>(); @Override public void init (ServletConfig config) throws ServletException { super .init(config); String scanPackage = config.getInitParameter("scanPackage" ); List<Class<?>> classList = ClassScannerUtils.getClasssFromPackage(scanPackage); try { if (classList != null ) { for (Class<?> clazz : classList) { if (clazz.isAnnotationPresent(Controller.class)) { Object object = clazz.newInstance(); Method[] methods = clazz.getMethods(); for (Method method : methods) { if (method.isAnnotationPresent(RequestMapping.class)) { String requestMappingValue = method.getAnnotation(RequestMapping.class).value(); map.put(requestMappingValue,new MvcMethod (object,method)); } } } } } } catch (Exception e) { e.printStackTrace(); throw new RuntimeException (e.getMessage()); } } @Override protected void doPost (HttpServletRequest request, HttpServletResponse response) throws ServletException, IOException { doGet(request, response); } @Override protected void doGet (HttpServletRequest request, HttpServletResponse response) throws ServletException, IOException { try { String uri = request.getRequestURI(); String contextPath = request.getContextPath(); String mappingPath = uri.substring(contextPath.length(), uri.lastIndexOf("." )); MvcMethod mvcMethod = map.get(mappingPath); if (mvcMethod != null ) { mvcMethod.getMethod().invoke(mvcMethod.getObject(),request,response); return ; } throw new RuntimeException ("No Method To Be Invoked....." ); } catch (Exception e) { e.printStackTrace(); throw new RuntimeException (e.getMessage()); } } }
1 2 3 4 5 6 7 8 9 10 11 12 13 14 15 16 17 18 19 20 21 22 23 <?xml version="1.0" encoding="UTF-8" ?> <web-app xmlns:xsi ="http://www.w3.org/2001/XMLSchema-instance" xmlns ="http://java.sun.com/xml/ns/javaee" xsi:schemaLocation ="http://java.sun.com/xml/ns/javaee http://java.sun.com/xml/ns/javaee/web-app_2_5.xsd" version ="2.5" > <servlet > <servlet-name > dispatcherServlet</servlet-name > <servlet-class > com.itheima.framework.DispatcherServlet</servlet-class > <init-param > <param-name > scanPackage</param-name > <param-value > com.itheima.controller</param-value > </init-param > </servlet > <servlet-mapping > <servlet-name > dispatcherServlet</servlet-name > <url-pattern > *.do</url-pattern > </servlet-mapping > </web-app >
4.小结
我们自定义MVC框架的目的: 锻炼大家的能力. 但是我们后面的大项目, 工作里面的开发是使用别人写好的框架 SpringMVC
实操- 在自己的项目中使用heima_mvc框架
使用maven引入heima_mvc框架
1 2 3 4 5 6 <dependency > <groupId > com.itheima</groupId > <artifactId > heima_mvc</artifactId > <version > 1.0-SNAPSHOT</version > </dependency >
在web.xml中配置DispatcherServlet
指定映射路径为*.do
配置servlet标签中的init-param,指定参数名为scanPackage,参数值为要扫描的包名
通过load-on-startup标签配置DispatcherServlet在服务器启动的时候加载
1 2 3 4 5 6 7 8 9 10 11 12 13 14 15 16 17 18 <servlet > <servlet-name > dispatcherServlet</servlet-name > <servlet-class > com.itheima.frame.DispatcherServlet</servlet-class > <init-param > <param-name > scanPackage</param-name > <param-value > com.haha.controller</param-value > </init-param > <load-on-startup > 1</load-on-startup > </servlet > <servlet-mapping > <servlet-name > dispatcherServlet</servlet-name > <url-pattern > *.do</url-pattern > </servlet-mapping >
给各个Controller类添加Controller注解
给Controller类中的各个方法,添加RequestMapping注解,并且指定路径
访问的时候,访问路径记得一定要加上”.do”
第三章-ElementUI 知识点-ElementUI的介绍 1.目标 黑马面面后台系统就是使用ElementUI来构建页面.
2.路径
ElementUI介绍
ElementUI的使用前的导入
3.讲解 3.1 什么是ElementUI ElementUI是一套基于VUE2.0的桌面端组件库,ElementUI提供了丰富的组件帮助开发人员快速构建功能强大、风格统一的页面。
官网地址:http://element-cn.eleme.io/#/zh-CN
3.2ElementUI的使用前的导入 在页面上引入 js 和 css 文件即可开始使用,如下:
1 2 3 4 5 <link rel ="stylesheet" href ="https://unpkg.com/element-ui/lib/theme-chalk/index.css" > <script src ="https://unpkg.com/vue/dist/vue.js" > </script > <script src ="https://unpkg.com/element-ui/lib/index.js" > </script >
4.小结
ElementUI是饿了么开发的一套基于vue的组件库, 适合做==后台管理系统页面==
使用步骤
知识点-常用组件 1.目标
2.路径
Container 布局容器
Dropdown 下拉菜单
NavMenu 导航菜单
Table 表格
Pagination 分页
Message 消息提示
Tabs 标签页
Form 表单
3.讲解 3.1 Container 布局容器 用于布局的容器组件,方便快速搭建页面的基本结构:
<el-container>:外层容器。当子元素中包含 <el-header> 或 <el-footer> 时,全部子元素会垂直上下排列,否则会水平左右排列
<el-header>:顶栏容器
<el-aside>:侧边栏容器
<el-main>:主要区域容器
<el-footer>:底栏容器
1 2 3 4 5 6 7 8 9 10 11 12 13 14 15 16 17 18 19 20 21 22 23 24 25 26 27 28 29 30 31 32 33 34 35 36 37 38 39 40 41 <body > <div id ="app" > <el-container > <el-header > Header</el-header > <el-container > <el-aside width ="200px" > Aside</el-aside > <el-container > <el-main > Main</el-main > <el-footer > Footer</el-footer > </el-container > </el-container > </el-container > </div > <style > .el-header , .el-footer { background-color : #B3C0D1 ; color : #333 ; text-align : left; line-height : 60px ; } .el-aside { background-color : #D3DCE6 ; color : #333 ; text-align : center; line-height : 200px ; } .el-main { background-color : #E9EEF3 ; color : #333 ; text-align : center; line-height : 590px ; } </style > </body > <script > new Vue ({ el :'#app' }); </script >
3.2 Dropdown 下拉菜单 将动作或菜单折叠到下拉菜单中。
1 2 3 4 5 6 7 8 9 10 11 12 <el-dropdown trigger ="click" > <span class ="el-dropdown-link" > 下拉菜单<i class ="el-icon-arrow-down el-icon--right" > </i > </span > <el-dropdown-menu slot ="dropdown" > <el-dropdown-item > 黄金糕</el-dropdown-item > <el-dropdown-item > 狮子头</el-dropdown-item > <el-dropdown-item > 螺蛳粉</el-dropdown-item > <el-dropdown-item disabled > 双皮奶</el-dropdown-item > <el-dropdown-item divided > 蚵仔煎</el-dropdown-item > </el-dropdown-menu > </el-dropdown >
为网站提供导航功能的菜单。
1 2 3 4 5 6 7 8 9 10 11 12 13 14 15 16 17 18 19 20 <el-menu > <el-submenu index ="1" > <template slot ="title" > <i class ="el-icon-location" > </i > <span slot ="title" > 导航一</span > </template > <el-menu-item > 选项1</el-menu-item > <el-menu-item > 选项2</el-menu-item > <el-menu-item > 选项3</el-menu-item > </el-submenu > <el-submenu index ="2" > <template slot ="title" > <i class ="el-icon-menu" > </i > <span slot ="title" > 导航二</span > </template > <el-menu-item > 选项1</el-menu-item > <el-menu-item > 选项2</el-menu-item > <el-menu-item > 选项3</el-menu-item > </el-submenu > </el-menu >
3.4 Table 表格【重要】 用于展示多条结构类似的数据,可对数据进行排序、筛选、对比或其他自定义操作。
1 2 3 4 5 6 7 8 9 10 11 12 13 14 15 16 17 18 19 20 21 22 23 24 25 26 27 28 29 30 31 32 33 34 35 36 37 38 39 40 41 42 43 44 45 46 47 48 49 50 51 52 53 54 55 56 57 58 59 60 61 62 63 64 65 66 <!DOCTYPE html > <html lang ="en" > <head > <meta charset ="UTF-8" > <title > ElementUI的表格</title > <script src ="../vue.js" > </script > <link rel ="stylesheet" href ="../index.css" > <script src ="../index.js" > </script > </head > <body > <div id ="app" > <el-table :data ="tableData" stripe > <el-table-column prop ="date" label ="日期" > </el-table-column > <el-table-column prop ="name" label ="姓名" > </el-table-column > <el-table-column prop ="address" label ="地址" > </el-table-column > <el-table-column label ="操作" align ="center" > <template slot-scope ="scope" > <el-button type ="primary" size ="mini" @click ="handleUpdate(scope.row)" > 编辑</el-button > <el-button type ="danger" size ="mini" @click ="handleDelete(scope.row)" > 删除</el-button > </template > </el-table-column > </el-table > </div > <script > new Vue ({ el :"#app" , data :{ tableData :[{ date : '2016-05-02' , name : '小虎' , address : '上海市普陀区金沙江路 1518 弄' }, { date : '2016-05-04' , name : '销户' , address : '上海市普陀区金沙江路 1517 弄' }, { date : '2016-05-01' , name : '一虎之力' , address : '上海市普陀区金沙江路 1519 弄' }] }, methods :{ handleDelete (row ){ alert ("要删除的用户是:" +row.name ) }, handleUpdate (row ){ alert ("要修改的的用户是:" +row.name ) } } }) </script > </body > </html >
当数据量过多时,使用分页分解数据。
1 2 3 4 5 6 7 8 9 10 11 12 13 14 15 16 17 18 19 20 21 22 23 24 25 26 27 28 29 30 31 32 33 34 35 36 37 38 39 40 41 42 43 44 45 46 47 48 49 50 51 52 53 54 <!DOCTYPE html > <html lang ="en" > <head > <meta charset ="UTF-8" > <title > 分页组件</title > <script src ="../vue.js" > </script > <link rel ="stylesheet" href ="../index.css" > <script src ="../index.js" > </script > </head > <body > <div id ="app" > <el-pagination @size-change ="handleSizeChange" @current-change ="handleCurrentChange" :current-page ="currentPage" :page-sizes ="sizes" :page-size ="10" layout ="total, sizes, prev, pager, next, jumper" :total ="total" > </el-pagination > </div > <script > new Vue ({ el :"#app" , data :{ currentPage : 1 , sizes :[10 , 20 , 30 , 40 ], total : 300 }, methods :{ handleSizeChange (val ){ alert (`每页 ${val} 条` ) }, handleCurrentChange (val ){ this .currentPage = `${val} ` alert (this .currentPage ) } } }) </script > </body > </html >
3.6 Message 消息提示【重要】 常用于主动操作后的反馈提示。
1 2 3 4 5 6 7 8 9 10 11 12 13 14 15 16 17 18 19 20 21 22 23 24 25 26 27 28 29 30 31 32 33 34 35 36 37 38 39 40 41 42 43 44 45 46 47 48 49 50 51 52 53 54 55 56 57 58 59 60 61 62 63 64 65 66 67 68 69 70 71 72 <!DOCTYPE html > <html lang ="en" > <head > <meta charset ="UTF-8" > <title > 消息提示框</title > <script src ="../vue.js" > </script > <link rel ="stylesheet" href ="../index.css" > <script src ="../index.js" > </script > </head > <body > <div id ="app" > <el-button :plain ="true" @click ="open1" > 消息</el-button > <el-button :plain ="true" @click ="open2" > 成功</el-button > <el-button :plain ="true" @click ="open3" > 警告</el-button > <el-button :plain ="true" @click ="open4" > 错误</el-button > </div > <script > new Vue ({ el :"#app" , methods :{ open1 ( this .$message({ type :"info" , message :"这是一条普通消息" , center :true , showClose :true }) }, open2 ( this .$message({ type :"success" , message :"这是一条成功的消息" , center :true , showClose :true }) }, open3 ( this .$message({ type :"warning" , message :"这是一条警告消息" , center :true , showClose :true }) }, open4 ( this .$message({ type :"error" , message :"发生错误了" , center :true , showClose :true }) } } }) </script > </body > </html >
3.7 Tabs 标签页 分隔内容上有关联但属于不同类别的数据集合。
1 2 3 4 5 6 7 8 9 10 11 12 13 14 15 16 17 18 19 20 21 22 23 24 25 26 27 28 29 <h3 > 基础的、简洁的标签页</h3 > <el-tabs value ="first" > <el-tab-pane label ="用户管理" name ="first" > 用户管理</el-tab-pane > <el-tab-pane label ="配置管理" name ="second" > 配置管理</el-tab-pane > <el-tab-pane label ="角色管理" name ="third" > 角色管理</el-tab-pane > <el-tab-pane label ="定时任务补偿" name ="fourth" > 定时任务补偿</el-tab-pane > </el-tabs > <h3 > 选项卡样式的标签页</h3 > <el-tabs value ="first" type ="card" > <el-tab-pane label ="用户管理" name ="first" > 用户管理</el-tab-pane > <el-tab-pane label ="配置管理" name ="second" > 配置管理</el-tab-pane > <el-tab-pane label ="角色管理" name ="third" > 角色管理</el-tab-pane > <el-tab-pane label ="定时任务补偿" name ="fourth" > 定时任务补偿</el-tab-pane > </el-tabs > <h3 > 卡片化的标签页</h3 > <el-tabs value ="first" type ="border-card" > <el-tab-pane label ="用户管理" name ="first" > 用户管理</el-tab-pane > <el-tab-pane label ="配置管理" name ="second" > 配置管理</el-tab-pane > <el-tab-pane label ="角色管理" name ="third" > 角色管理</el-tab-pane > <el-tab-pane label ="定时任务补偿" name ="fourth" > 定时任务补偿</el-tab-pane > </el-tabs > <script > new Vue ({ el : '#app' }) </script >
由输入框、选择器、单选框、多选框等控件组成,用以收集、校验、提交数据。在 Form 组件中,每一个表单域由一个 Form-Item 组件构成,表单域中可以放置各种类型的表单控件,包括 Input、Select、Checkbox、Radio、Switch、DatePicker、TimePicker。
1 2 3 4 5 6 7 8 9 10 11 12 13 14 15 16 17 18 19 20 21 22 23 24 25 26 27 28 29 30 31 32 33 34 35 36 37 38 39 40 41 42 43 44 45 46 47 48 49 50 51 52 53 54 55 56 57 58 59 60 61 62 63 64 65 66 67 68 69 70 71 72 73 74 75 76 77 78 79 80 81 82 83 84 85 86 87 88 89 90 91 92 93 94 95 96 97 98 99 100 101 102 103 104 105 106 <!DOCTYPE html > <html lang ="en" > <head > <meta charset ="UTF-8" > <title > ElementUI的表单</title > <script src ="../vue.js" > </script > <link rel ="stylesheet" href ="../index.css" > <script src ="../index.js" > </script > </head > <body > <div id ="app" > <el-form ref ="form" :model ="form" :rules ="rules" label-width ="80px" > <el-form-item label ="活动名称" prop ="name" > <el-input v-model ="form.name" > </el-input > </el-form-item > <el-form-item label ="活动区域" prop ="region" > <el-select v-model ="form.region" placeholder ="请选择活动区域" > <el-option label ="区域一" value ="shanghai" > </el-option > <el-option label ="区域二" value ="beijing" > </el-option > </el-select > </el-form-item > <el-form-item label ="活动时间" > <el-col :span ="11" > <el-date-picker type ="date" placeholder ="选择日期" v-model ="form.date1" style ="width: 100%;" > </el-date-picker > </el-col > <el-col class ="line" :span ="2" > -</el-col > <el-col :span ="11" > <el-time-picker type ="fixed-time" placeholder ="选择时间" v-model ="form.date2" style ="width: 100%;" > </el-time-picker > </el-col > </el-form-item > <el-form-item label ="即时配送" > <el-switch v-model ="form.delivery" > </el-switch > </el-form-item > <el-form-item label ="活动性质" > <el-checkbox-group v-model ="form.type" > <el-checkbox label ="美食/餐厅线上活动" name ="type" > </el-checkbox > <el-checkbox label ="地推活动" name ="type" > </el-checkbox > <el-checkbox label ="线下主题活动" name ="type" > </el-checkbox > <el-checkbox label ="单纯品牌曝光" name ="type" > </el-checkbox > </el-checkbox-group > </el-form-item > <el-form-item label ="特殊资源" > <el-radio-group v-model ="form.resource" > <el-radio label ="线上品牌商赞助" > </el-radio > <el-radio label ="线下场地免费" > </el-radio > </el-radio-group > </el-form-item > <el-form-item label ="活动形式" > <el-input type ="textarea" v-model ="form.desc" > </el-input > </el-form-item > <el-form-item > <el-button type ="primary" @click ="onSubmit" > 立即创建</el-button > </el-form-item > </el-form > </div > <script > new Vue ({ el : '#app' , data :{ form : { name : '' , region : '' , date1 : '' , date2 : '' , delivery : false , type : [], resource : '' , desc : '' }, rules : { name : [ { required : true , message : '请输入活动名称' , trigger : 'blur' }, { min : 3 , max : 5 , message : '长度在 3 到 5 个字符' , trigger : 'blur' } ], region : [ { required : true , message : '请选择活动区域' , trigger : 'change' } ] } }, methods :{ onSubmit ( console .log (this .form ); this .$refs ['form' ].validate ((valid ) => { if (valid) { alert ('submit!' ); } else { console .log ('error submit!!' ); return false ; } }); } } }) </script > </body > </html >
4.小结
至少要将分页、表格、表单看一遍
面面项目第二天 今日目标
第一章-项目介绍和环境搭建 知识点-项目的开发流程 1.目标
2.讲解 软件开发一般会经历如下几个阶段,整个过程是顺序展开,所以通常称为瀑布模型 。
3.小结
瀑布模型定义项目的各个阶段
知识点-面面项目介绍 1.目标
2.路径
项目介绍
原型展示
架构介绍
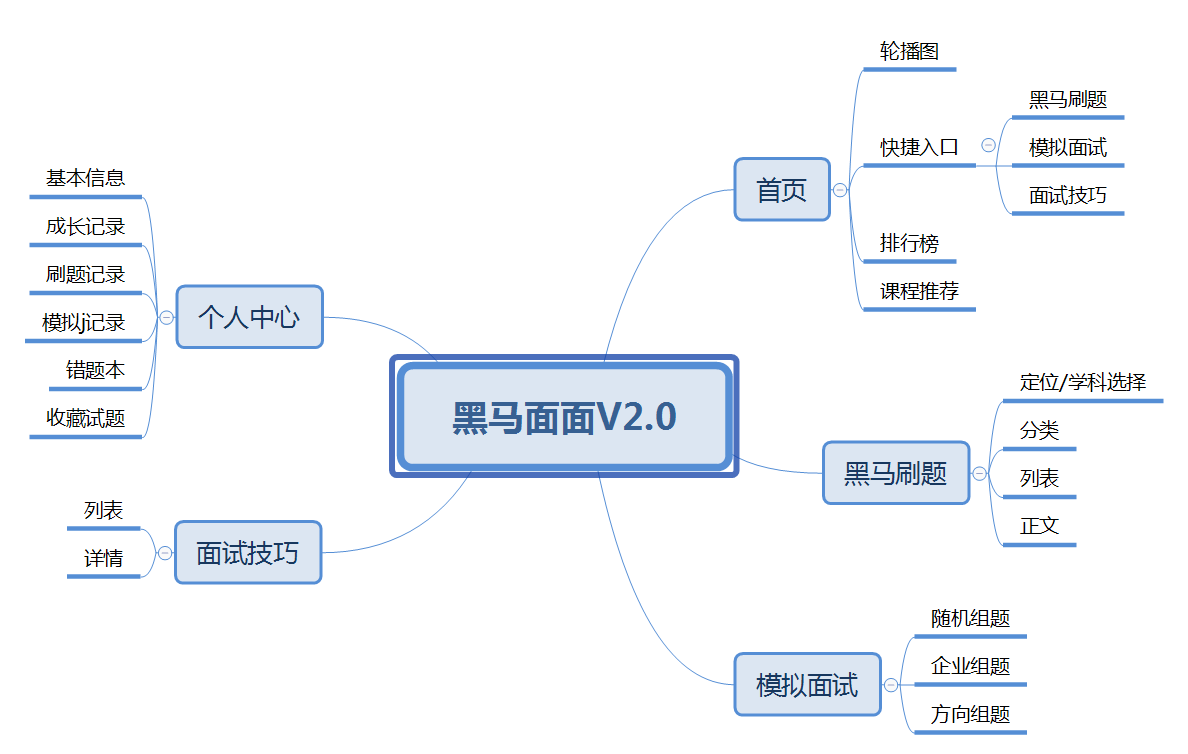
功能介绍
3.讲解 3.1 项目介绍 黑马面面是一款面向程序员的面试刷题小程序 。针对目前大量学员在培训完之后直接去面试企业的通过率低的问题,公司研发了黑马面面小程序,学员在空闲时间可以通过查看企业真实面试题,不仅可以查看企业真题,也可以通过刷题寻找自己的短板进行补充。
资料\01-需求文档\黑马面面_V2.0.181212.docx
3.2 原型展示 资料\02-产品原型\后台原型
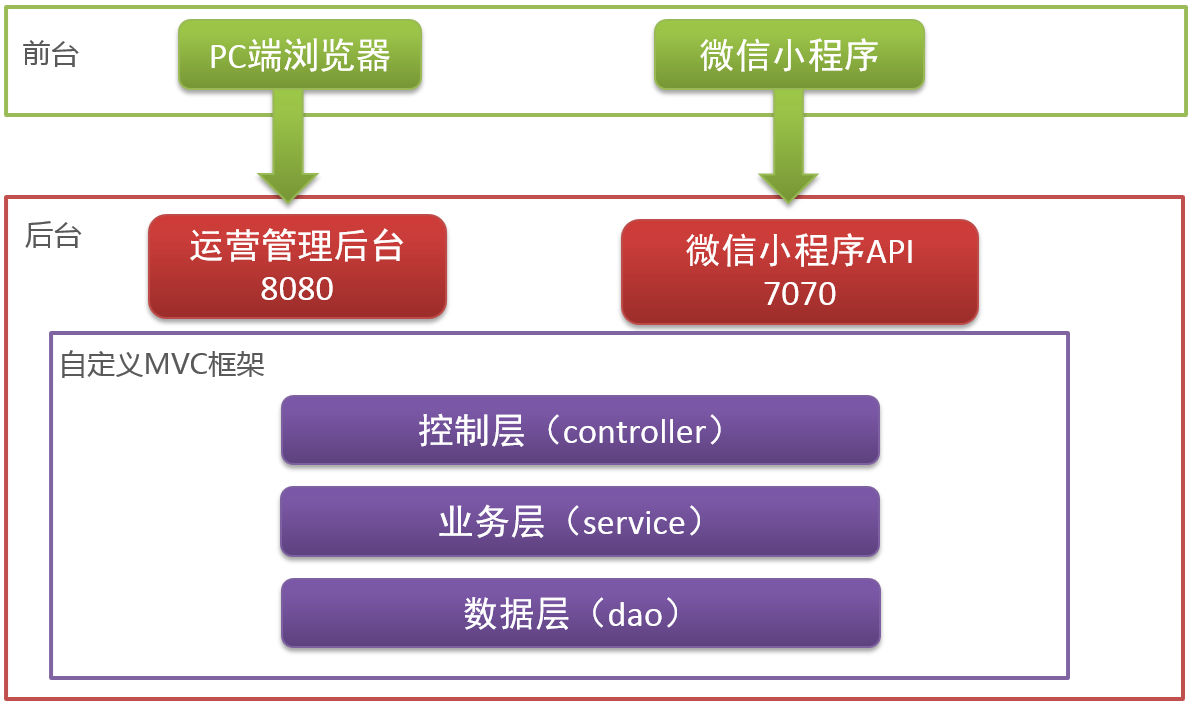
3.3 架构介绍 3.1 系统架构 运营管理后台主要面向公司内部运营人员使用,访问人员主要来自公司内部,未来从安全性和访问量考虑分析,可以和小程序端API接口应用隔离安装部署,所以也需要单独构建一个Web应用。
微信小程序面向前端用户,未来从业务增长速度来讲,可能访问的用户越来越多,故从安全性、可维护升级和可扩展性等角度分析,微信小程序API接口需要独立安装部署,所以需要单独构建一个Web应用;
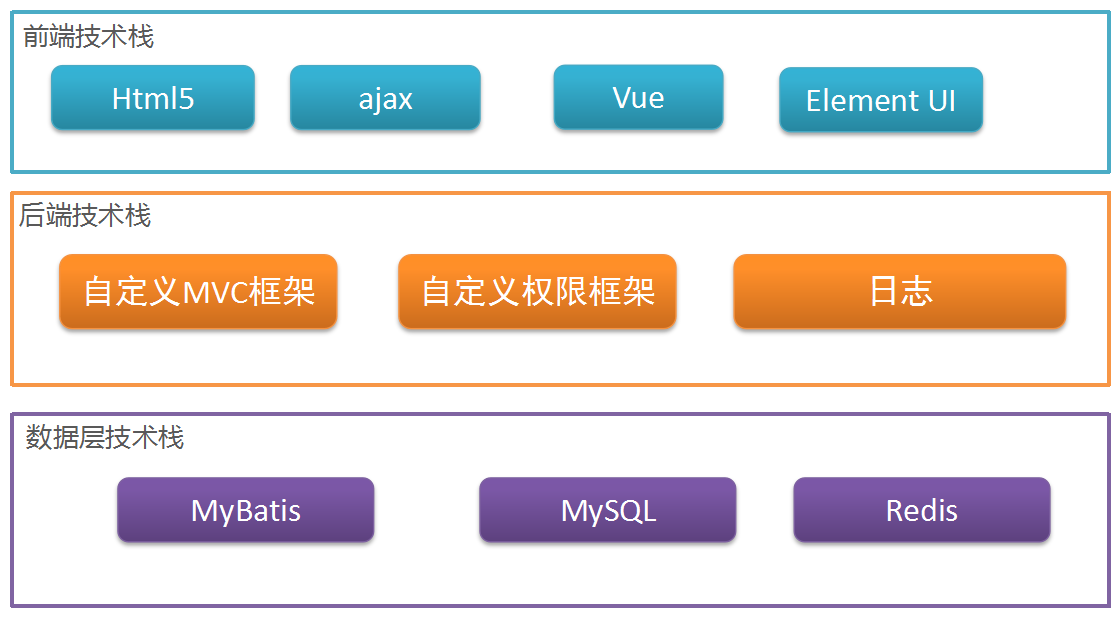
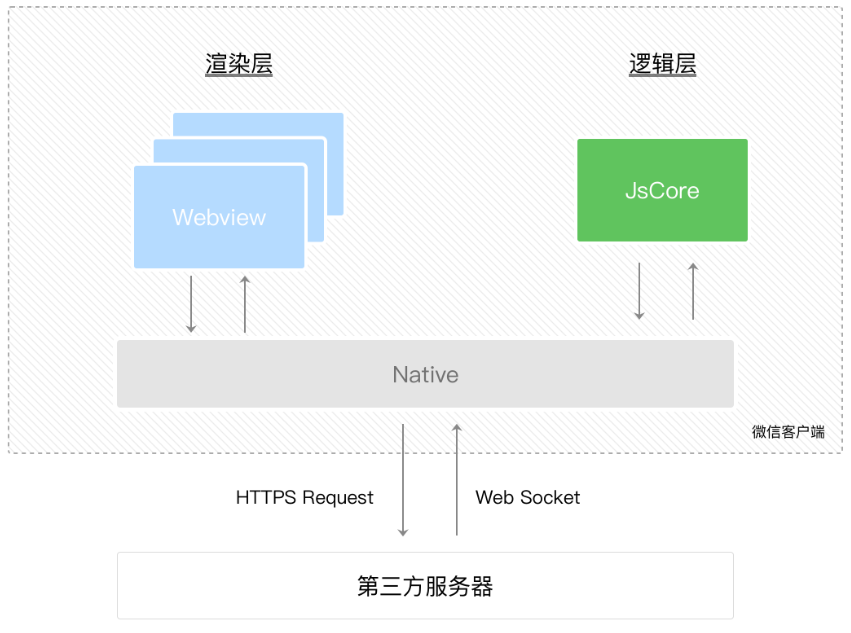
3.2 技术架构
3.4功能介绍 3.4.1 管理后台功能列表
序号
模块
子模块
描述
1
用户管理
角色管理
通过添加角色并对不同角色赋予不用的权限从而完成对系统中试题录入、审核等角色的配置,实现不同用户操作不同资源。
用户管理
通过用户管理,可以派生不同角色和权限的新用户。
2
企业管理
企业管理
面试真题来源企业,通过企业管理可以完成对面试题所属企业的管理。
3
方向管理
方向管理
方向为行业方向,比如电子商务、互联网金融、O2O、医疗服务等。
4
学科管理
学科管理
题目必须隶属某一个学科,通过学科管理可以管理面试题目的大学科,比如Java、Python、PHP等。
学科目录管理
每个学科下面可以管理学科二级目录,比如Java学科,可以设置Java基础、Java Web、Spring框架等二级目录,目前仅创建学科二级目录。
学科标签管理
新增题目时,可以为题目设置多个技术标签,标签是创建在学科下面的。
5
题库管理
基础题库
用户根据自己的权限,可以录入基础题库。
精选题库
用户根据自己的权限,可以录入精选题库。
新增题目
题目必须隶属某一学科下的某一二级目录,可以为试题指定多个技术标签。
试题预览
试题列表中的题目都可以通过预览方式查看显示效果。
试题审核
只要精选题目列表中的题目,可以进行试题审核。
3.4.2 前台小程序功能列表
序号
模块
子模块
描述
1
用户登录
用户登录
当前系统必须授权登录方可访问
2
设置城市及学科方向
设置城市及学科方向
后续看到的题目数据全部根据当前用户所选的城市及学科方向来提取数据
3
题库分类列表
题库分类列表
分类有三种方式(按技术、按企业、按方向)
4
题库分类题目列表
题库分类题目列表
根据所选分类,提前对应的题目列表,包含题目详情信息
5
题目操作
收藏
针对某一题目,用户可以收藏这个题目
答案提交
答题
答题是在客户端完成
提交答案
无论单选、多选还是简单,最终需要把当前题目信息提交到后端,后端保存用户做题记录。
6
个人中心
个人中心
获取用户信息数据,展示在个人中心
继续答题
跳转到最后一次完成答题的位置,继续答题
4.小结 实操-环境的搭建 1.目标
2.路径
数据库的创建
项目的创建
3.讲解 3.1 数据库的创建 本项目一共有18张表,其中13张主表,5张关系表。
序号
中文名
表名
备注
1
t_user
用户名表
管理后台用户表
2
t_role
角色表
3
t_permission
权限表
4
tr_user_role
用户角色关系表
关系表
5
tr_role_permission
角色权限关系表
关系表
6
t_dict
数据字典表
存储项目中的常规数据信息,比如省市数据、邮政编码、职业类型等等。
7
t_company
公司表
题目来源公司表
8
t_industry
行业方向表
城市所属行业信息表
9
tr_company_industry
公司行业方向关系表
关系表
10
t_course
学科表
11
t_catalog
学科目录表
学科二级目录
12
t_tag
学科标签表
学科所属标签
13
t_question
题目表
存储题目信息
14
t_question_item
题目选项表
存储题目选项信息(单选、多选选项)
15
tr_question_tag
题目标签关系表
关系表
16
t_review_log
题目审核表
存储审核记录
17
t_wx_member
会员表
小程序登录用户信息表
18
tr_member_question
会员做题记录表
关系表,c存储会员所有做题记录
创建数据库itheima_mm, 导入数据库, 数据库资料在 资料\04-数据库
3.2 后台管理工程的创建 通过系统概述分析,微信小程序端使用微信小程序开发工具来完成小程序端页面的开发,微信小程序API接口、运营管理后台API接口及运营管理后台网页中的ajax通信全部通过IDEA开发工具来开发。
3.2.1步骤
创建mm_backend_management 打包方式为war
拷贝坐标
创建包结构, 拷贝pojo, 工具类, 实体类, 配置文件
在web.xml配置DispatcherServlet
拷贝页面
3.2.2实现
创建子工程mm_backend_management 打包方式为war
pom文件
1 2 3 4 5 6 7 8 9 10 11 12 13 14 15 16 17 18 19 20 21 22 23 24 25 26 27 28 29 30 31 32 33 34 35 36 37 38 39 40 41 42 43 44 45 46 47 48 49 50 51 52 53 54 55 56 57 58 59 60 61 62 63 64 65 66 67 68 69 70 71 72 73 74 75 76 77 78 79 80 81 82 83 84 85 86 87 88 89 90 91 92 93 94 95 96 97 98 99 100 101 102 103 104 105 106 107 108 109 110 111 112 113 114 115 116 117 118 119 120 121 122 123 124 125 126 127 128 129 130 131 132 133 134 135 136 137 138 139 140 141 142 143 144 145 146 147 148 149 150 151 152 153 154 <?xml version="1.0" encoding="UTF-8" ?> <project xmlns ="http://maven.apache.org/POM/4.0.0" xmlns:xsi ="http://www.w3.org/2001/XMLSchema-instance" xsi:schemaLocation ="http://maven.apache.org/POM/4.0.0 http://maven.apache.org/xsd/maven-4.0.0.xsd" > <modelVersion > 4.0.0</modelVersion > <groupId > com.itheima</groupId > <artifactId > mm_backend_management</artifactId > <version > 1.0-SNAPSHOT</version > <packaging > war</packaging > <properties > <project.build.sourceEncoding > UTF-8</project.build.sourceEncoding > <maven.compiler.source > 1.8</maven.compiler.source > <maven.compiler.target > 1.8</maven.compiler.target > <junit.version > 4.12</junit.version > <javax.servlet-api.version > 3.1.0</javax.servlet-api.version > <fastjson.version > 1.2.47</fastjson.version > <mysql-connector-java.version > 5.1.38</mysql-connector-java.version > <mybatis.version > 3.4.5</mybatis.version > <log4j.version > 1.2.17</log4j.version > <slf4j-api.version > 1.7.25</slf4j-api.version > <commons-fileupload.version > 1.3.1</commons-fileupload.version > <commons-io.version > 2.6</commons-io.version > <lombok.version > 1.18.8</lombok.version > <tomcat7-maven-plugin.version > 2.2</tomcat7-maven-plugin.version > <dom4j.version > 1.6.1</dom4j.version > <jaxen.version > 1.2.0</jaxen.version > <okhttp.version > 3.1.0</okhttp.version > <okio.version > 1.4.0</okio.version > <bcprov-jdk16.version > 1.45</bcprov-jdk16.version > <jedis.version > 2.7.0</jedis.version > </properties > <dependencies > <dependency > <groupId > com.itheima</groupId > <artifactId > heima_mvc</artifactId > <version > 1.0-SNAPSHOT</version > </dependency > <dependency > <groupId > junit</groupId > <artifactId > junit</artifactId > <version > ${junit.version}</version > </dependency > <dependency > <groupId > javax.servlet</groupId > <artifactId > javax.servlet-api</artifactId > <version > ${javax.servlet-api.version}</version > <scope > provided</scope > </dependency > <dependency > <groupId > com.alibaba</groupId > <artifactId > fastjson</artifactId > <version > ${fastjson.version}</version > </dependency > <dependency > <groupId > mysql</groupId > <artifactId > mysql-connector-java</artifactId > <version > ${mysql-connector-java.version}</version > </dependency > <dependency > <groupId > org.mybatis</groupId > <artifactId > mybatis</artifactId > <version > ${mybatis.version}</version > </dependency > <dependency > <groupId > commons-beanutils</groupId > <artifactId > commons-beanutils</artifactId > <version > 1.9.3</version > </dependency > <dependency > <groupId > commons-fileupload</groupId > <artifactId > commons-fileupload</artifactId > <version > ${commons-fileupload.version}</version > </dependency > <dependency > <groupId > commons-io</groupId > <artifactId > commons-io</artifactId > <version > ${commons-io.version}</version > </dependency > <dependency > <groupId > dom4j</groupId > <artifactId > dom4j</artifactId > <version > ${dom4j.version}</version > </dependency > <dependency > <groupId > jaxen</groupId > <artifactId > jaxen</artifactId > <version > ${jaxen.version}</version > </dependency > <dependency > <groupId > log4j</groupId > <artifactId > log4j</artifactId > <version > ${log4j.version}</version > </dependency > <dependency > <groupId > org.slf4j</groupId > <artifactId > slf4j-api</artifactId > <version > ${slf4j-api.version}</version > </dependency > <dependency > <groupId > org.slf4j</groupId > <artifactId > slf4j-log4j12</artifactId > <version > ${slf4j-api.version}</version > </dependency > <dependency > <groupId > org.projectlombok</groupId > <artifactId > lombok</artifactId > <version > ${lombok.version}</version > </dependency > <dependency > <groupId > redis.clients</groupId > <artifactId > jedis</artifactId > <version > ${jedis.version}</version > </dependency > </dependencies > <build > <resources > <resource > <directory > src/main/java</directory > <includes > <include > **/*.xml</include > <include > **/*.properties</include > </includes > <filtering > false</filtering > </resource > <resource > <directory > src/main/resources</directory > <includes > <include > **/*.xml</include > <include > **/*.properties</include > </includes > <filtering > false</filtering > </resource > </resources > </build > </project >
创建包结构,拷贝实体类, 常量
拷贝配置文件
配置web.xml
1 2 3 4 5 6 7 8 9 10 11 12 13 14 15 16 17 18 19 20 21 22 23 24 25 26 27 28 29 30 31 32 33 <?xml version="1.0" encoding="UTF-8" ?> <web-app xmlns:xsi ="http://www.w3.org/2001/XMLSchema-instance" xmlns ="http://java.sun.com/xml/ns/javaee" xsi:schemaLocation ="http://java.sun.com/xml/ns/javaee http://java.sun.com/xml/ns/javaee/web-app_2_5.xsd" version ="2.5" > <servlet > <servlet-name > dispatcherServlet</servlet-name > <servlet-class > com.itheima.framework.servlet.DispatcherServlet</servlet-class > <init-param > <param-name > scanPackage</param-name > <param-value > com.itheima.mm.controller</param-value > </init-param > <load-on-startup > 1</load-on-startup > </servlet > <servlet-mapping > <servlet-name > dispatcherServlet</servlet-name > <url-pattern > *.do</url-pattern > </servlet-mapping > <filter > <filter-name > characterEncodingFilter</filter-name > <filter-class > com.itheima.mm.filter.CharacterEncodingFilter</filter-class > </filter > <filter-mapping > <filter-name > characterEncodingFilter</filter-name > <url-pattern > /*</url-pattern > </filter-mapping > </web-app >
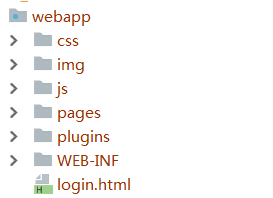
拷贝前端页面
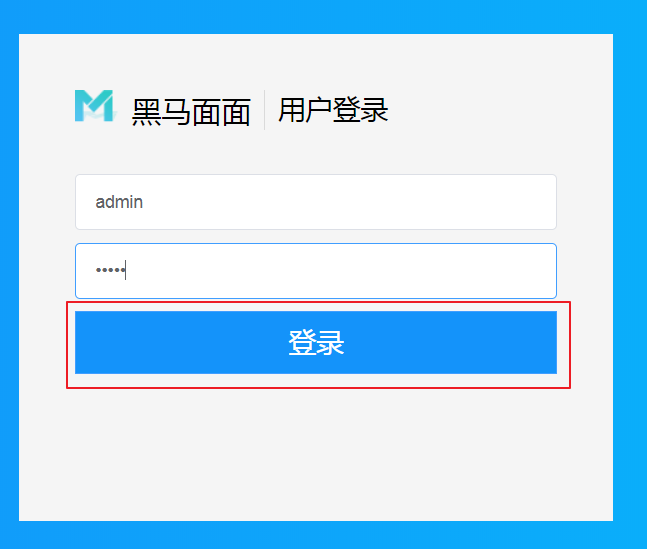
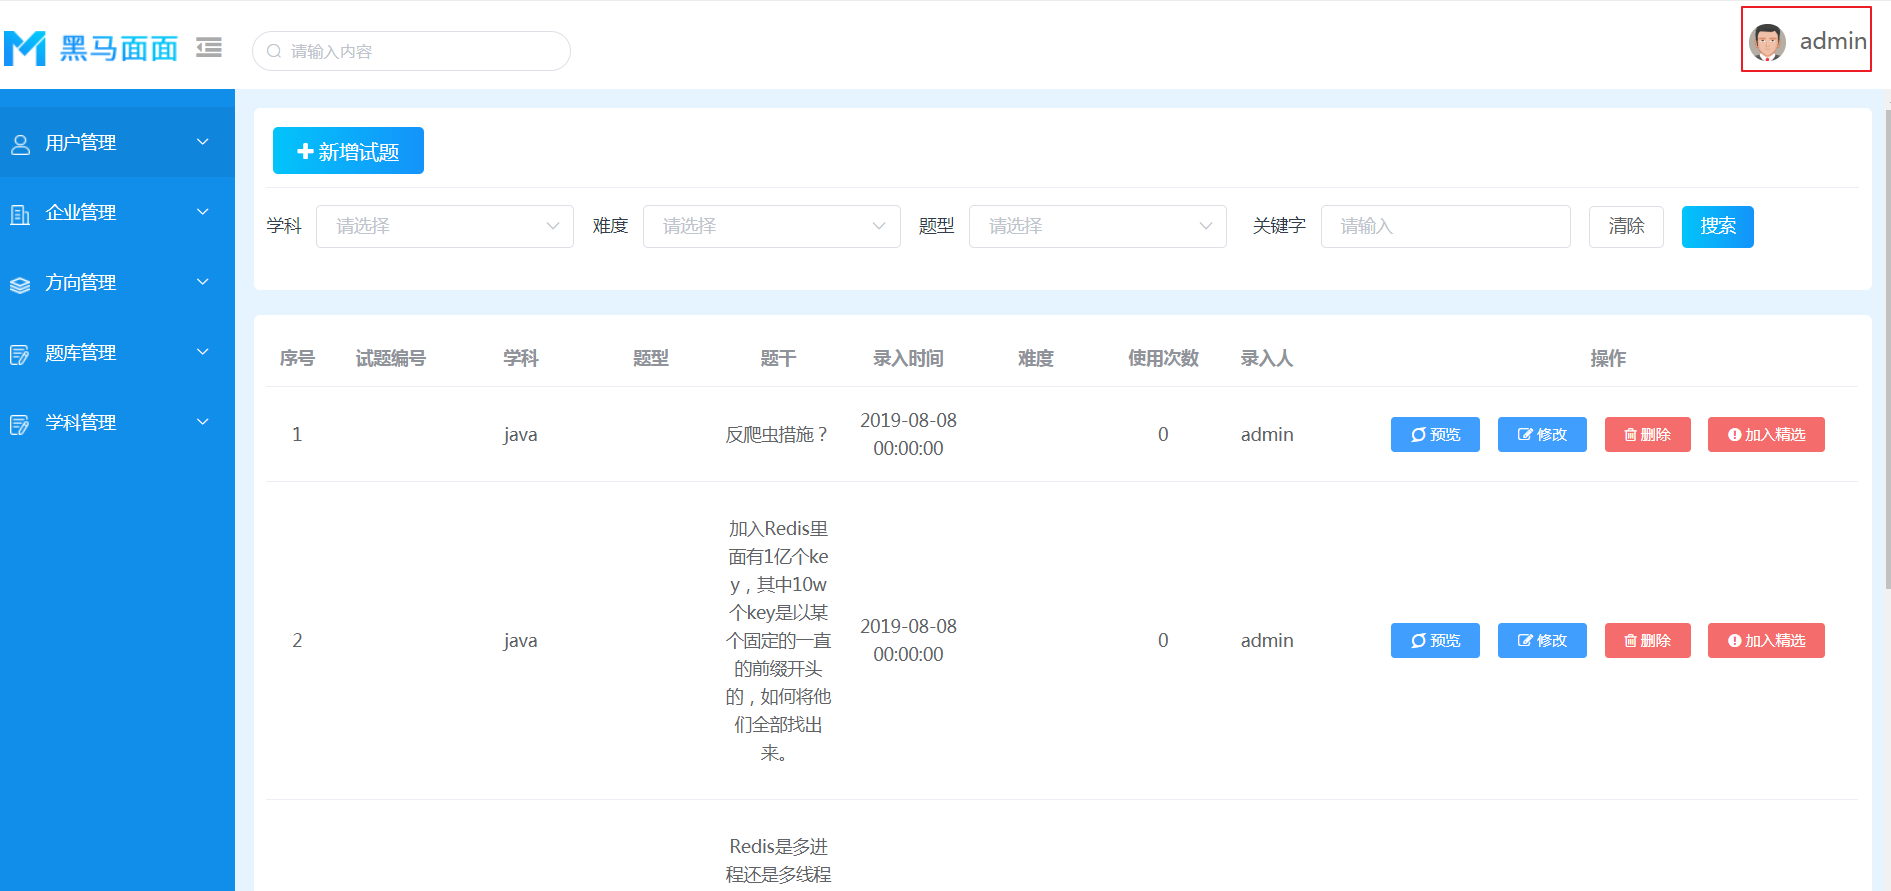
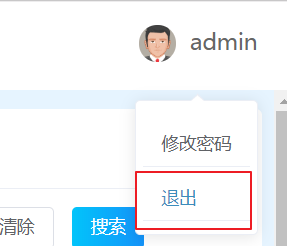
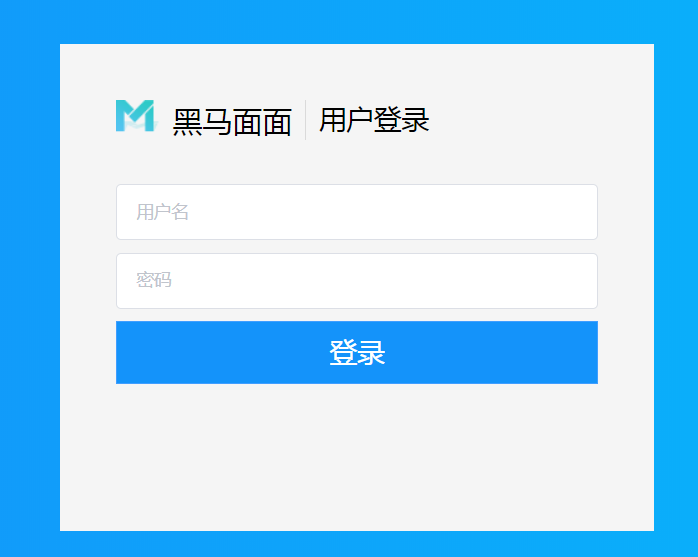
4.小结 第二章-用户模块 管理后台需要登录方可进入,在登录页面输入相应的用户名及密码,信息正确登录到后台系统,信息错误,进行相应的提示(比如用户不正确、密码错误等信息)。进入系统后在主页右上角显示用户名,然后点击下方退出,方可退出系统。
案例-用户登录 1.需求
2.分析 2.1涉及到的表和实体类
1 2 3 4 5 6 7 8 9 10 11 12 @Data public class User { private Integer id; private String username; private String password; private Integer state; private String email; private String source; private String createDate; private String remark; .. }
2.2思路
在login.html页面, 点击登录按钮, 把用户名和密码提交到UserController
在UserController里面创建login()方法
1 2 3 //1.获得请求参数, 封装成User对象 //2.调用业务 进行登录 //3.判断是否登录成功(如果成功,通过session保存登录状态), 响应
创建UserService
1 2 3 4 public User login(User loginUser){ //调用Dao, 判断 }
创建UserDao
1 2 方案一: 根据用户名和密码查询数据库 方案二: 根据用户名查询数据库 返回User对象, 再在业务层比对密码
3.实现 3.1前端
1 2 3 4 5 6 7 8 9 10 11 12 13 14 15 16 17 18 19 20 21 22 23 24 25 26 27 28 29 30 31 32 33 34 35 36 37 38 onSubmit ( var t = this ; this .$refs ['form' ].validate ((valid ) => { if (valid) { this .$refs ['form' ].validate ((valid ) => { if (valid) { var formData = { username : this .form .userName , password : this .form .pwd }; axios.post ("/user/login.do" ,formData).then (response => if (response.data .flag ) { console .log (formData.username ) sessionStorage .setItem ("userName" ,formData.username ) location.href = "/pages/index.html" }else { this .$message({ type :"error" , message :response.data .message , showClose :true }) } }) } }); } }); }
3.2后台
1 2 3 4 5 6 7 8 9 10 11 12 13 14 15 16 17 18 19 20 21 22 23 24 25 26 27 28 29 30 31 32 33 34 35 36 37 package com.itheima.mm.controller;import com.itheima.framework.Controller;import com.itheima.framework.RequestMapping;import com.itheima.mm.entity.Result;import com.itheima.mm.pojo.User;import com.itheima.mm.service.UserService;import com.itheima.mm.utils.JsonUtils;import javax.servlet.http.HttpServletRequest;import javax.servlet.http.HttpServletResponse;import java.io.IOException;@Controller public class UserController { private UserService userService = new UserService (); @RequestMapping("/user/login") public void login (HttpServletRequest request, HttpServletResponse response) throws IOException { try { User parameterUser = JsonUtils.parseJSON2Object(request, User.class); User loginUser = userService.findUser(parameterUser); JsonUtils.printResult(response,new Result (true ,"登录成功" ,loginUser)); } catch (Exception e) { e.printStackTrace(); JsonUtils.printResult(response,new Result (false ,e.getMessage())); } } }
1 2 3 4 5 6 7 8 9 10 11 12 13 14 15 16 17 18 19 20 21 22 23 24 25 26 27 28 29 30 31 32 33 34 35 36 package com.itheima.mm.service;import com.itheima.mm.dao.UserDao;import com.itheima.mm.pojo.User;import com.itheima.mm.utils.SqlSessionFactoryUtils;import org.apache.ibatis.session.SqlSession;public class UserService { public User findUser (User parameterUser) throws Exception { SqlSession sqlSession = SqlSessionFactoryUtils.openSqlSession(); UserDao userDao = sqlSession.getMapper(UserDao.class); User loginUser = userDao.findUserByUsername(parameterUser.getUsername()); if (loginUser != null ) { if (parameterUser.getPassword().equals(loginUser.getPassword())) { return loginUser; }else { throw new RuntimeException ("密码错误" ); } }else { throw new RuntimeException ("用户名错误" ); } } }
1 2 3 4 5 6 7 8 9 10 11 12 13 package com.itheima.mm.dao;import com.itheima.mm.pojo.User;public interface UserDao { User findUserByUsername (String username) ; }
1 2 3 4 5 6 7 8 9 <?xml version="1.0" encoding="UTF-8" ?> <!DOCTYPE mapper PUBLIC "-//mybatis.org//DTD Mapper 3.0//EN" "http://mybatis.org/dtd/mybatis-3-mapper.dtd" > <mapper namespace ="com.itheima.mm.dao.UserDao" > <select id ="findUserByUsername" parameterType ="string" resultType ="User" > select * from t_user where username=#{username} </select > </mapper >
4.小结
用户登录
先直接根据用户名查询数据库, 获得User对象
把查询出来的User的密码和用户输入的密码比较
案例-退出 1.需求
2.分析
在index.html页面, 点击退出 , 在logout()方法里面
1 2 请求服务器, 获得退出的响应的结果; 如果flag=true, 前端保存的用户名给清空
在UserController创建logout()方法
1 2 //1.清空session里面保存的user //2.响应
3.实现 3.1前端
1 2 3 4 5 6 7 8 9 10 11 logout ( axios.post ("/user/logout.do" ).then (response => sessionStorage .removeItem ("userName" ) window .location .href = "/login.html" ; }) }
3.2后台
1 2 3 4 5 6 7 @RequestMapping("/user/logout") public void logout (HttpServletRequest request, HttpServletResponse response) throws IOException { request.getSession().invalidate(); JsonUtils.printResult(response,new Result (true ,"退出成功" ,null )); }
4.小结
退出
清空session里面保存订单User
清空前端保存的userName
第三章-学科管理模块 知识点-学科模块分析 1.目标
2.路径
需求分析
涉及到的表
3.讲解 3.1需求分析
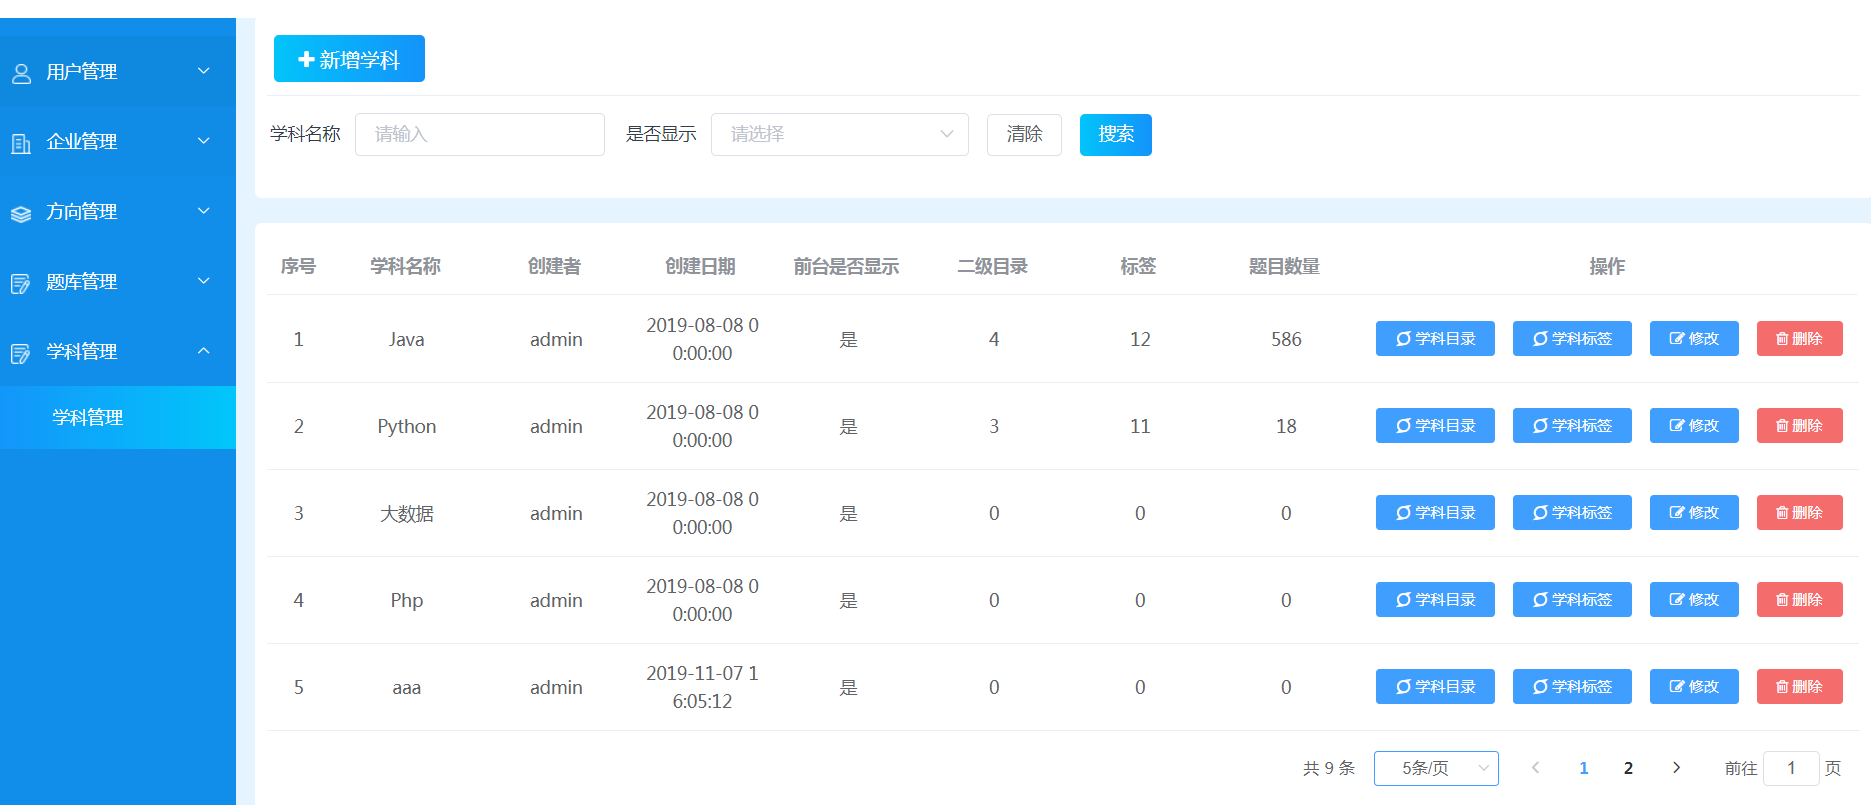
学科管理模块,需要完成学科的列表展示、新增、更新、删除四个功能;
学科列表展示
学科列表需要展示学科创建者,故创建的每个学科,需要关联当前用户ID;
学科列表需要展示管理的题目数量、标签数量、二级目录数量,这些查询需要嵌入子查询,开始可以先写固定数值,等调试成功后,再细化数值。
列表展示需要分页显示,每页显示10条记录;
新增、更新学科后刷新当前列表。
删除学科,如果学科下已有数据,不能删除该学科;
3.2涉及到的表,实体类,页面
表
学科业务相关的表有t_course(学科表)、t_catalog(学科目录表)、t_tag(标签表),学科表与学科目录、学科标签表都是1对多的关系。
实体类
页面 courseList.html
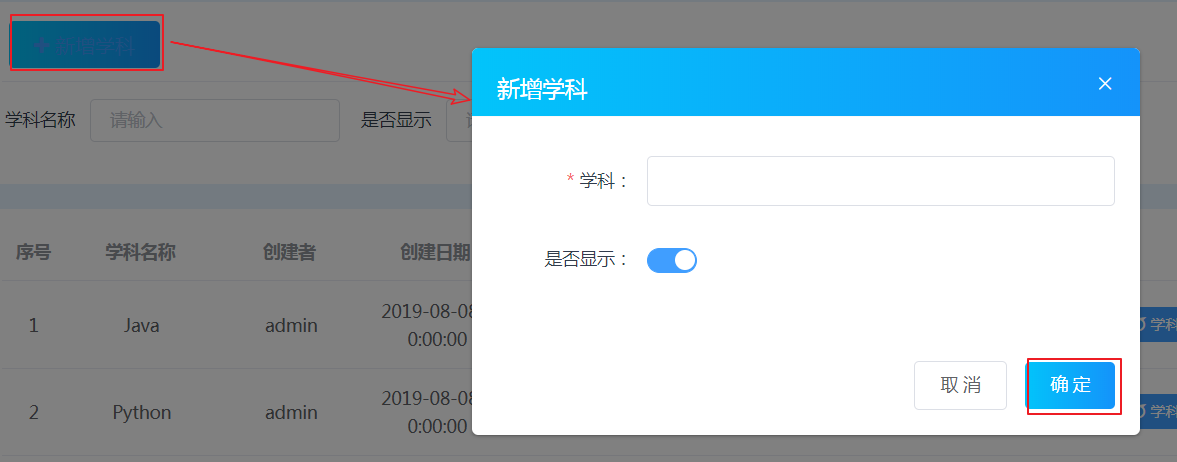
4.小结 案例-新增学科 1.需求
2.分析 2.1页面
定位 handleCreateConfirm() 方法
数据绑定到了form里面
2.2思路
在courseList.html 点击确定把数据发生到CourseController
创建CourseController, 创建add()
1 2 3 4 //1.获得请求参数 封装成Course对象 //2.补全Courser的数据(user_id,创建时间...) //3.调用Service 新增 //4.响应
创建CourseService, 调用Dao
创建CourseDao 保存 向t_course插入一条记录
3.实现 3.1前端
1 2 3 4 5 6 7 8 9 10 11 12 13 14 15 16 17 18 19 20 21 22 23 24 25 26 27 28 29 30 31 32 33 34 35 36 37 38 39 40 41 42 43 44 45 46 47 handleCreate ( if (this .$refs ['form' ]) { this .form = {} } this .dialogFormVisible = true ; }, handleCreateConfirm ( this .$refs ['form' ].validate ((valid ) => { if (valid) { let params = this .form ; axios.post ("/course/add.do" ,params).then (response => if (response.data .flag ) { this .$message({ type :"success" , message :response.data .message , showClose :true }) this .dialogFormVisible = false ; this .getList (); }else { this .$message({ type :"error" , message :response.data .message , showClose :true }) } }) } }); }
3.2后台
1 2 3 4 5 6 7 8 9 10 11 12 13 14 15 16 17 18 19 20 21 22 23 24 25 26 27 28 29 30 31 32 33 34 35 36 37 38 39 40 41 42 43 44 45 46 47 48 49 50 package com.itheima.mm.controller;import com.itheima.framework.Controller;import com.itheima.framework.RequestMapping;import com.itheima.mm.constants.Constants;import com.itheima.mm.entity.Result;import com.itheima.mm.pojo.Course;import com.itheima.mm.pojo.User;import com.itheima.mm.service.CourseService;import com.itheima.mm.utils.DateUtils;import com.itheima.mm.utils.JsonUtils;import javax.servlet.http.HttpServletRequest;import javax.servlet.http.HttpServletResponse;import java.io.IOException;import java.util.Date;@Controller public class CourseController { private CourseService courseService = new CourseService (); @RequestMapping("/course/add") public void addCourse (HttpServletRequest request, HttpServletResponse response) throws IOException { try { Course course = JsonUtils.parseJSON2Object(request, Course.class); course.setCreateDate(DateUtils.parseDate2String(new Date ())); course.setOrderNo(1 ); User user = (User) request.getSession().getAttribute(Constants.USER_SESSION_KEY); course.setUserId(user.getId()); courseService.addCourse(course); JsonUtils.printResult(response,new Result (true ,"添加学科成功" )); } catch (Exception e) { e.printStackTrace(); JsonUtils.printResult(response,new Result (false ,"添加学科失败" )); } } }
1 2 3 4 5 6 7 8 9 10 11 12 13 14 15 16 17 18 19 20 21 22 23 package com.itheima.mm.service;import com.itheima.mm.dao.CourseDao;import com.itheima.mm.pojo.Course;import com.itheima.mm.utils.SqlSessionFactoryUtils;import org.apache.ibatis.session.SqlSession;public class CourseService { public void addCourse (Course course) throws Exception { SqlSession sqlSession = SqlSessionFactoryUtils.openSqlSession(); CourseDao courseDao = sqlSession.getMapper(CourseDao.class); courseDao.add(course); SqlSessionFactoryUtils.commitAndClose(sqlSession); } }
1 2 3 4 5 6 7 8 9 10 11 12 13 14 package com.itheima.mm.dao;import com.itheima.mm.pojo.Course;public interface CourseDao { void add (Course course) ; }
1 2 3 4 5 6 7 8 9 10 <?xml version="1.0" encoding="UTF-8" ?> <!DOCTYPE mapper PUBLIC "-//mybatis.org//DTD Mapper 3.0//EN" "http://mybatis.org/dtd/mybatis-3-mapper.dtd" > <mapper namespace ="com.itheima.mm.dao.CourseDao" > <insert id ="add" parameterType ="Course" > insert into t_course (name,createDate,isShow,userId,orderNo) values (#{name},#{createDate},#{isShow},#{userId},#{orderNo}) </insert > </mapper >
4.小结 案例-学科列表 1.需求
2.分析 2.1数据模型
学科分页列表需要响应的数据格式, 我们使用使用Result对象封装, 但是数据部分用PageResult封装
前端页面需要这样的数据, 才可以展示, 假数据已经写好了
请求服务器, 在后台里面把数据整出来(查询,封装…), 给前端响应(需要和假数据一样的格式的)
整块的数据还是使用Result类封装, 但是这是查询需要数据result, Result类里面的Object result应该有两个属性(total,rows)
我们现在有一个类PageResult, 这个类里面就是有这两个属性(total,rows)
1 2 3 4 5 6 @Data @AllArgsConstructor public class PageResult implements Serializable{ private Long total;//总记录数 private List rows;//当前页结果 }
所以我们把PageResult创建对象出来给Result类里面的Object result赋值
1 2 3 4 5 6 7 8 9 10 11 12 13 14 15 16 17 18 19 20 21 22 23 24 25 26 27 28 29 { "flag" : true , "message" : "获取学科列表成功" , "result" : { "rows" : [ { "catalogQty" : 10 , "createDate" : "2019-08-08 00:00:00.0" , "creator" : "admin" , "id" : 1 , "isShow" : 0 , "name" : "Java" , "questionQty" : 1 , "tagQty" : 5 } , { "catalogQty" : 10 , "createDate" : "2019-08-08 00:00:00.0" , "creator" : "admin" , "id" : 2 , "isShow" : 0 , "name" : "Python" , "questionQty" : 1 , "tagQty" : 5 } ] , "total" : 15 } }
请求参数格式, 我们后台使用QueryPageBean接收
客户端请求参数格式:
1 2 3 4 5 6 7 8 { currentPage: 1 , pageSize: 10 , queryParams: { name: '', status: ' } }
QueryPageBean类
1 2 3 4 5 6 7 8 9 10 11 12 13 14 15 16 @Data public class QueryPageBean implements Serializable{ private Integer currentPage; // 页码 private Integer pageSize; //每页记录数 private Map queryParams; //查询条件 private Integer offset; // 分页查询,开始记录下标 /** * 获取分页起始记录位置 * 根据分页页数,计算limit其实记录 * @return */ public Integer getOffset(){ return (currentPage-1)*pageSize; } }
2.2思路分析
在created()里面调用了getList()
在getList(), 请求CourseController, 携带请求参数
在CourseController里面创建findListByPage()方法
1 2 3 //1.获得请求参数, 封装成QueryPageBean对象 //2.调用业务 获得分页的数据 PageResult //3.把PageResult封装成Result 响应json
在CourseService里面
1 2 3 4 public PageResult findListByPage(QueryPageBean queryPageBean){ //调用Dao, 封装PageResult }
在CourseDao 定义两个方法
3.实现 3.1前端
1 2 3 4 5 6 7 8 9 10 11 12 13 14 15 16 17 18 19 20 21 22 23 24 25 26 27 28 getList ( let params = { currentPage : this .pagination .pageNum , pageSize : this .pagination .pageSize , queryParams :this .requestParameters }; axios.post ("/course/list.do" ,params).then (response => if (response.data .flag ) { this .pagination .total = response.data .result .total this .items = response.data .result .rows }else { this .$message({ type :"error" , message :response.data .message , showClose :true }) } }) }
3.2后台
1 2 3 4 5 6 7 8 9 10 11 12 13 14 @RequestMapping("/course/list") public void list (HttpServletRequest request, HttpServletResponse response) throws IOException { try { QueryPageBean queryPageBean = JsonUtils.parseJSON2Object(request, QueryPageBean.class); PageResult pageResult = courseService.findByPage(queryPageBean); JsonUtils.printResult(response,new Result (true ,"查询学科分页列表成功" ,pageResult)); } catch (Exception e) { e.printStackTrace(); JsonUtils.printResult(response,new Result (false ,"查询学科分页列表失败" )); } }
1 2 3 4 5 6 7 8 9 10 11 12 13 14 15 16 17 18 19 20 21 22 23 24 25 public PageResult findByPage (QueryPageBean queryPageBean) throws Exception { SqlSession sqlSession = SqlSessionFactoryUtils.openSqlSession(); CourseDao courseDao = sqlSession.getMapper(CourseDao.class); Map map = queryPageBean.getQueryParams(); if (map != null ) { if (!map.get("status" ).equals("" )) { String status = (Integer) map.get("status" ) + "" ; map.put("status" ,status); } } Long total = courseDao.findTotalCourse(queryPageBean); List<Course> courseList = courseDao.findCourseListByPage(queryPageBean); SqlSessionFactoryUtils.commitAndClose(sqlSession); return new PageResult (total,courseList); }
1 2 3 4 5 6 7 8 9 10 11 12 13 14 15 16 17 18 19 20 package com.itheima.mm.dao;import com.itheima.mm.entity.QueryPageBean;import com.itheima.mm.pojo.Course;import java.util.List;public interface CourseDao { void add (Course course) ; Long findTotalCourse (QueryPageBean queryPageBean) ; List<Course> findCourseListByPage (QueryPageBean queryPageBean) ; }
1 2 3 4 5 6 7 8 9 10 11 12 13 14 15 16 17 18 19 20 21 22 23 24 25 26 27 28 29 30 31 32 33 34 35 36 37 38 39 40 41 42 43 44 45 46 47 48 49 50 51 52 53 54 55 56 57 58 59 60 61 62 63 64 65 66 <?xml version="1.0" encoding="UTF-8" ?> <!DOCTYPE mapper PUBLIC "-//mybatis.org//DTD Mapper 3.0//EN" "http://mybatis.org/dtd/mybatis-3-mapper.dtd" > <mapper namespace ="com.itheima.mm.dao.CourseDao" > <sql id ="select_where" > <where > <if test ="queryParams.name != null and queryParams.name.length > 0" > and name like "%"#{queryParams.name}"%" </if > <if test ="queryParams.status != null and queryParams.status.length > 0" > and isShow=#{queryParams.status} </if > </where > </sql > <insert id ="add" parameterType ="Course" > insert into t_course (name,createDate,isShow,userId,orderNo) values (#{name},#{createDate},#{isShow},#{userId},#{orderNo}) </insert > <select id ="findTotalCourse" parameterType ="QueryPageBean" resultType ="long" > select count(*) from t_course <include refid ="select_where" > </include > </select > <select id ="findCourseListByPage" parameterType ="QueryPageBean" resultType ="Course" > select tc.id, tc.name, (select username from t_user where id=tc.userId) creator, tc.createDate, tc.isShow, (select count(*) from t_catalog where courseId=tc.id) catalogQty, (select count(*) from t_tag where courseId=tc.id) tagQty, (select count(*) from t_question where courseId=tc.id) questionQty from t_course tc <include refid ="select_where" > </include > limit #{offset},#{pageSize} </select > </mapper >
4.小结 查询当前页数据集合的SQL语句分析
– 查询当前学科的二级目录个数
– 查询当前学科的标签个数
– 查询当前学科的题目个数
– 查询创建者
案例-更新学科 1.需求
2.分析
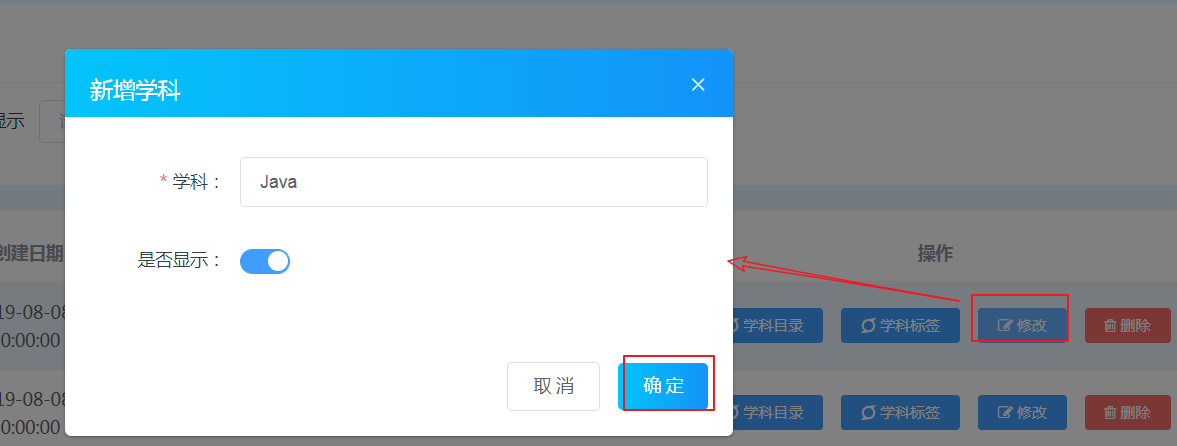
弹出dialog 回显数据
点击了确定, handleUpdateConfirm()
1 请求CourseController, 携带用户修改后的数据
在CourseController里面创建update()
1 2 3 4 //1.获得请求参数, 封装成Course对象 //2.给Course补全数据(修改人的id, 时间...) //3.调用业务 //4.响应
在CourseService里面创建update()
1 2 3 4 public void update(Course course){ //调用Dao }
在CourseDao 根据id更新
3.实现 3.1前端
1 2 3 4 5 6 7 8 9 10 11 12 13 14 15 16 17 18 19 20 21 22 23 24 25 26 27 28 29 30 31 32 33 34 35 36 37 38 39 40 41 42 43 44 45 46 47 handleUpdate (row ) { if (this .$refs ['form' ]) { this .form = {} } this .form .id = row.id ; this .form .name = row.name ; this .form .isShow = row.isShow ; this .dialogFormVisible = true ; }, handleCreateConfirm ( this .$refs ['form' ].validate ((valid ) => { if (valid) { let params = this .form ; axios.post ("/course/add.do" ,params).then (response => if (response.data .flag ) { this .$message({ type :"success" , message :response.data .message , showClose :true }) this .dialogFormVisible = false ; this .getList (); }else { this .$message({ type :"error" , message :response.data .message , showClose :true }) } }) } }); }
3.2后台
1 2 3 4 5 6 7 8 9 10 11 12 13 14 @RequestMapping("/course/update") public void update (HttpServletRequest request, HttpServletResponse response) throws IOException { try { Course course = JsonUtils.parseJSON2Object(request, Course.class); courseService.updateCourse(course); JsonUtils.printResult(response,new Result (true ,"修改学科信息成功" )); } catch (Exception e) { e.printStackTrace(); JsonUtils.printResult(response,new Result (false ,"修改学科信息失败" )); } }
1 2 3 4 5 6 7 8 public void updateCourse (Course course) throws Exception { SqlSession sqlSession = SqlSessionFactoryUtils.openSqlSession(); CourseDao courseDao = sqlSession.getMapper(CourseDao.class); courseDao.update(course); SqlSessionFactoryUtils.commitAndClose(sqlSession); }
1 2 3 4 5 6 7 8 9 10 11 12 13 14 15 16 17 18 19 20 21 22 package com.itheima.mm.dao;import com.itheima.mm.entity.QueryPageBean;import com.itheima.mm.pojo.Course;import java.util.List;public interface CourseDao { void add (Course course) ; Long findTotalCourse (QueryPageBean queryPageBean) ; List<Course> findCourseListByPage (QueryPageBean queryPageBean) ; void update (Course course) ; }
1 2 3 <update id ="update" parameterType ="Course" > update t_course set name=#{name},isShow=#{isShow} where id=#{id} </update >
4.小结
就是根据id更新
案例-删除学科 1.需求
2.分析 3.实现 3.1前端 1 2 3 4 5 6 7 8 9 10 11 12 13 14 15 16 17 18 19 20 21 22 23 24 25 26 27 28 29 30 handleDeleted (row ) { this .$confirm('此操作将永久删除' +row.name +'学科 ' + ', 是否继续?' , '提示' , { type : 'warning' }).then (() => { axios.get ("/course/delete.do?id=" +row.id ).then (response => if (response.data .flag ) { this .$message({ type :"success" , message :response.data .message , showClose :true }) this .getList () }else { this .$message({ type :"error" , message :response.data .message , showClose :true }) } }) }).catch (() => { this .$message .info ('已取消操作!' ) }); }
3.2后台
1 2 3 4 5 6 7 8 9 10 11 12 13 14 @RequestMapping("/course/delete") public void delete (HttpServletRequest request, HttpServletResponse response) throws IOException { try { Integer id = Integer.valueOf(request.getParameter("id" )); courseService.deleteById(id); JsonUtils.printResult(response,new Result (true ,"删除学科信息成功" )); } catch (Exception e) { e.printStackTrace(); JsonUtils.printResult(response,new Result (false ,e.getMessage())); } }
1 2 3 4 5 6 7 8 9 10 11 12 13 14 15 16 17 18 19 20 21 22 23 24 25 26 27 28 29 30 31 32 33 34 35 36 37 38 39 public void deleteById (Integer id) throws Exception { SqlSession sqlSession = null ; try { sqlSession = SqlSessionFactoryUtils.openSqlSession(); CatalogDao catalogDao = sqlSession.getMapper(CatalogDao.class); Long catalogCount = catalogDao.findCatalogCountByCourseId(id); if (catalogCount != 0 ) { throw new RuntimeException ("有关联的二级目录,不能删除" ); } TagDao tagDao = sqlSession.getMapper(TagDao.class); Long tagCount = tagDao.findTagCountByCourseId(id); if (tagCount != 0 ) { throw new RuntimeException ("有关联的标签,不能删除" ); } QuestionDao questionDao = sqlSession.getMapper(QuestionDao.class); Long questionCount = questionDao.findQuestionCountByCourseId(id); if (questionCount != 0 ) { throw new RuntimeException ("有关联的题目,不能删除" ); } CourseDao courseDao = sqlSession.getMapper(CourseDao.class); courseDao.deleteById(id); } catch (Exception e) { e.printStackTrace(); throw new RuntimeException (e.getMessage()); } finally { SqlSessionFactoryUtils.commitAndClose(sqlSession); } }
CatalogDao和CatalogDao.xml代码
1 2 3 4 5 6 7 8 9 10 11 package com.itheima.mm.dao;public interface CatalogDao { Long findCatalogCountByCourseId (int courseId) ; }
1 2 3 4 5 6 7 8 9 <?xml version="1.0" encoding="UTF-8" ?> <!DOCTYPE mapper PUBLIC "-//mybatis.org//DTD Mapper 3.0//EN" "http://mybatis.org/dtd/mybatis-3-mapper.dtd" > <mapper namespace ="com.itheima.mm.dao.CatalogDao" > <select id ="findCatalogCountByCourseId" parameterType ="int" resultType ="long" > select count(*) from t_catalog where courseId=#{courseId} </select > </mapper >
1 2 3 4 5 6 7 8 9 10 11 package com.itheima.mm.dao;public interface TagDao { Long findTagCountByCourseId (int courseId) ; }
1 2 3 4 5 6 7 8 9 <?xml version="1.0" encoding="UTF-8" ?> <!DOCTYPE mapper PUBLIC "-//mybatis.org//DTD Mapper 3.0//EN" "http://mybatis.org/dtd/mybatis-3-mapper.dtd" > <mapper namespace ="com.itheima.mm.dao.TagDao" > <select id ="findTagCountByCourseId" parameterType ="int" resultType ="long" > select count(*) from t_tag where courseId=#{courseId} </select > </mapper >
QuestionDao和QuestionDao.xml代码
1 2 3 4 5 6 7 8 9 10 11 package com.itheima.mm.dao;public interface QuestionDao { Long findQuestionCountByCourseId (int courseId) ; }
1 2 3 4 5 6 7 8 9 <?xml version="1.0" encoding="UTF-8" ?> <!DOCTYPE mapper PUBLIC "-//mybatis.org//DTD Mapper 3.0//EN" "http://mybatis.org/dtd/mybatis-3-mapper.dtd" > <mapper namespace ="com.itheima.mm.dao.QuestionDao" > <select id ="findQuestionCountByCourseId" parameterType ="int" resultType ="long" > select count(*) from t_question where courseId=#{courseId} </select > </mapper >
CourseDao和CourseDao.xml代码
1 2 3 4 5 6 7 8 9 10 11 12 13 14 15 16 17 18 19 20 21 22 23 24 package com.itheima.mm.dao;import com.itheima.mm.entity.QueryPageBean;import com.itheima.mm.pojo.Course;import java.util.List;public interface CourseDao { void add (Course course) ; Long findTotalCourse (QueryPageBean queryPageBean) ; List<Course> findCourseListByPage (QueryPageBean queryPageBean) ; void update (Course course) ; void deleteById (Integer id) ; }
1 2 3 <delete id ="deleteById" parameterType ="int" > delete from t_course where id=#{id} </delete >
4.小结 面面项目第三天 今日目标
第一章-题库管理分析 知识点-题库管理模块分析 1.目标
2.路径
需求分析
涉及到的表
3.讲解 3.1需求分析 基础题库管理是普通录入人员操作的功能,新的题目先经过基础题库录入,加入精选后方可进入精选题库列表,此时题目的状态默认是待审核状态,有操作精选题库权限的用户,可以审核题目。
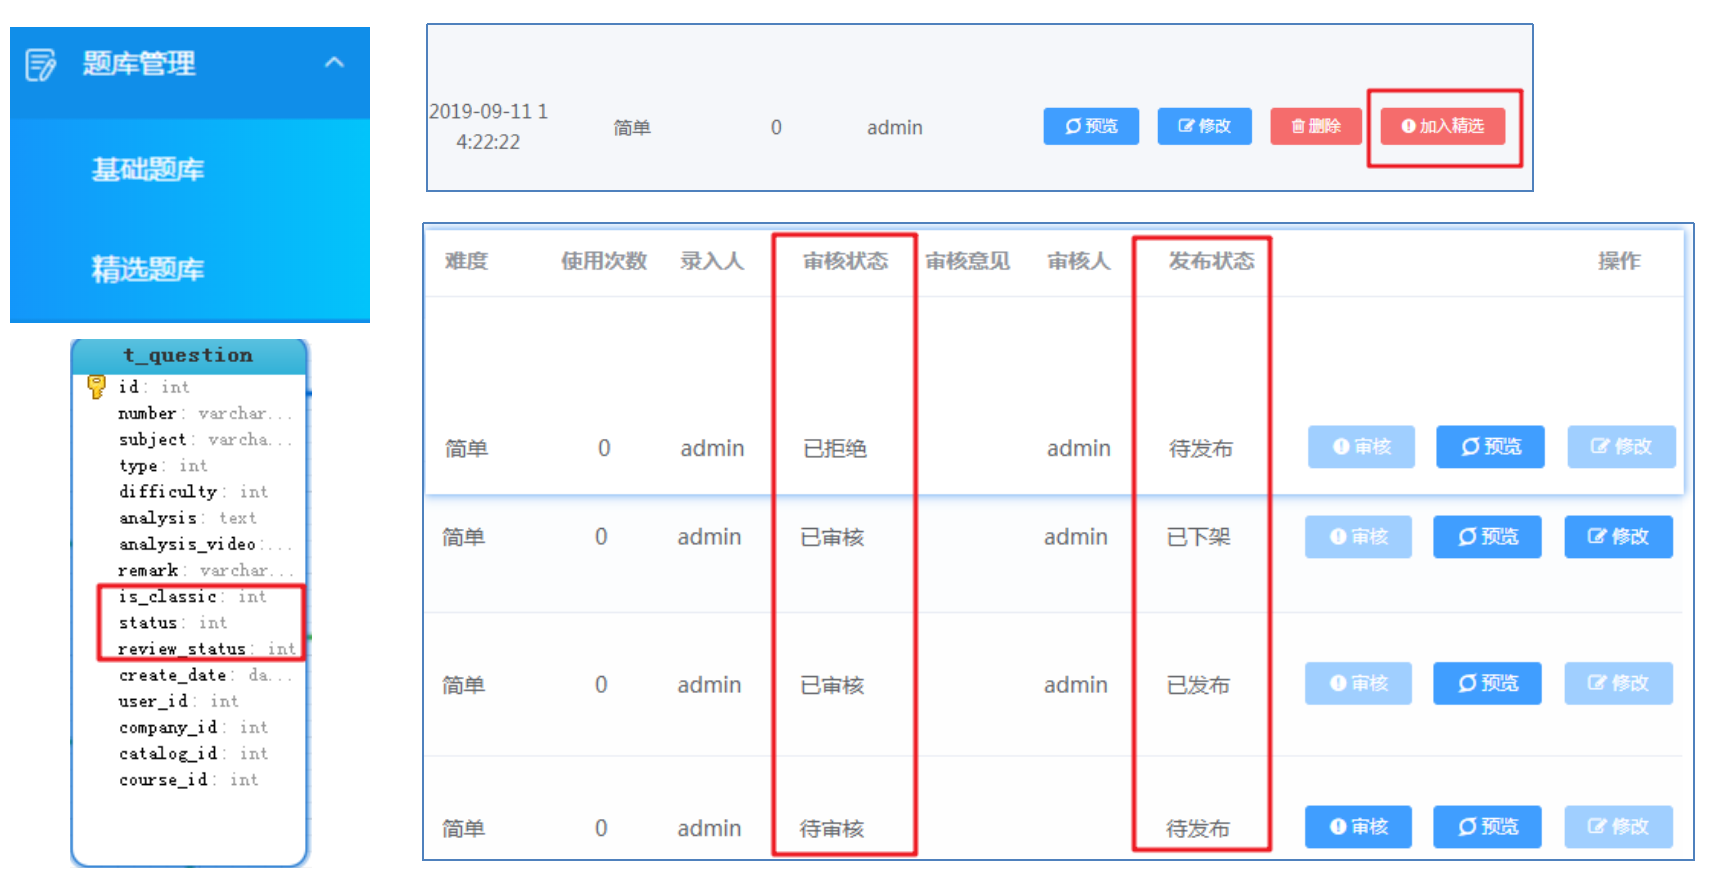
基础题库与精选题库,从数据库上都来源于同一张主表t_question,只是题目的类型有所不同。区分两种题库主要是通过is_classic字段来区分,is_classic为0是基础题目,为1是精选题目。题目状态是通过status区分,审核状态靠review_status来区分。具体题目的类型、状态及审核状态,总结如下:
题目类型(is_classic):0 基础题目、1精选题目
题目状态(status): 0 待发布(待审核、已拒绝)、1 已发布(已审核)、 2 已下架(已审核)
审核状态(review_status): 0 待审核、1 审核通过、2 审核拒绝
3.2涉及到的表 题目业务涉及的表有t_user、t_question、t_question_item、t_company、t_course、t_catalog、t_tag七张表。
4.小结 第二章-基础题库 案例-基础题库列表展示 1.需求
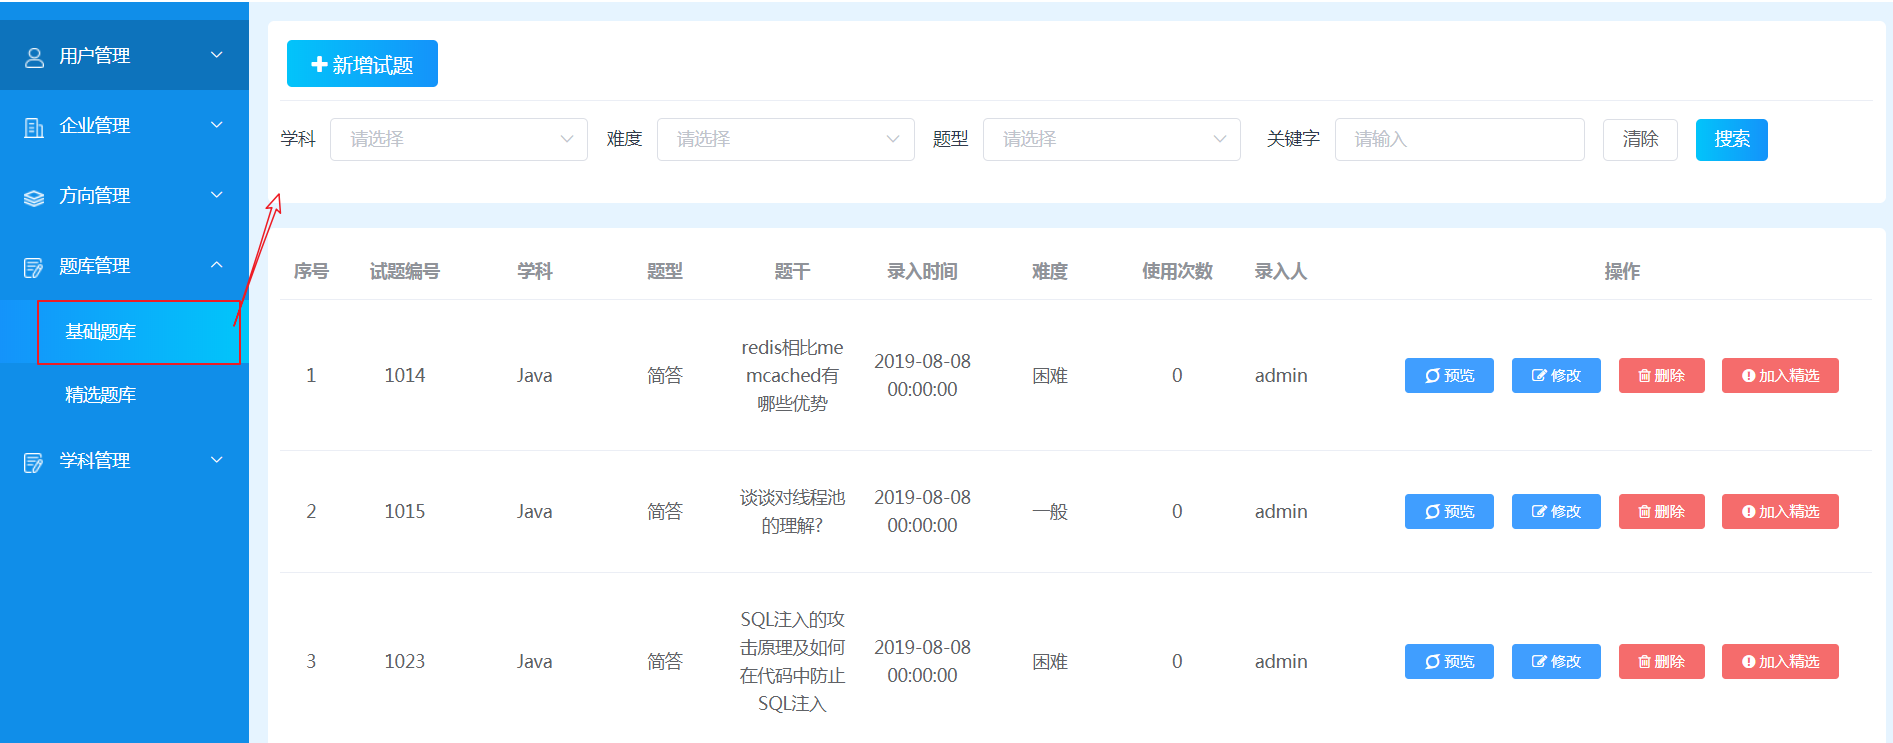
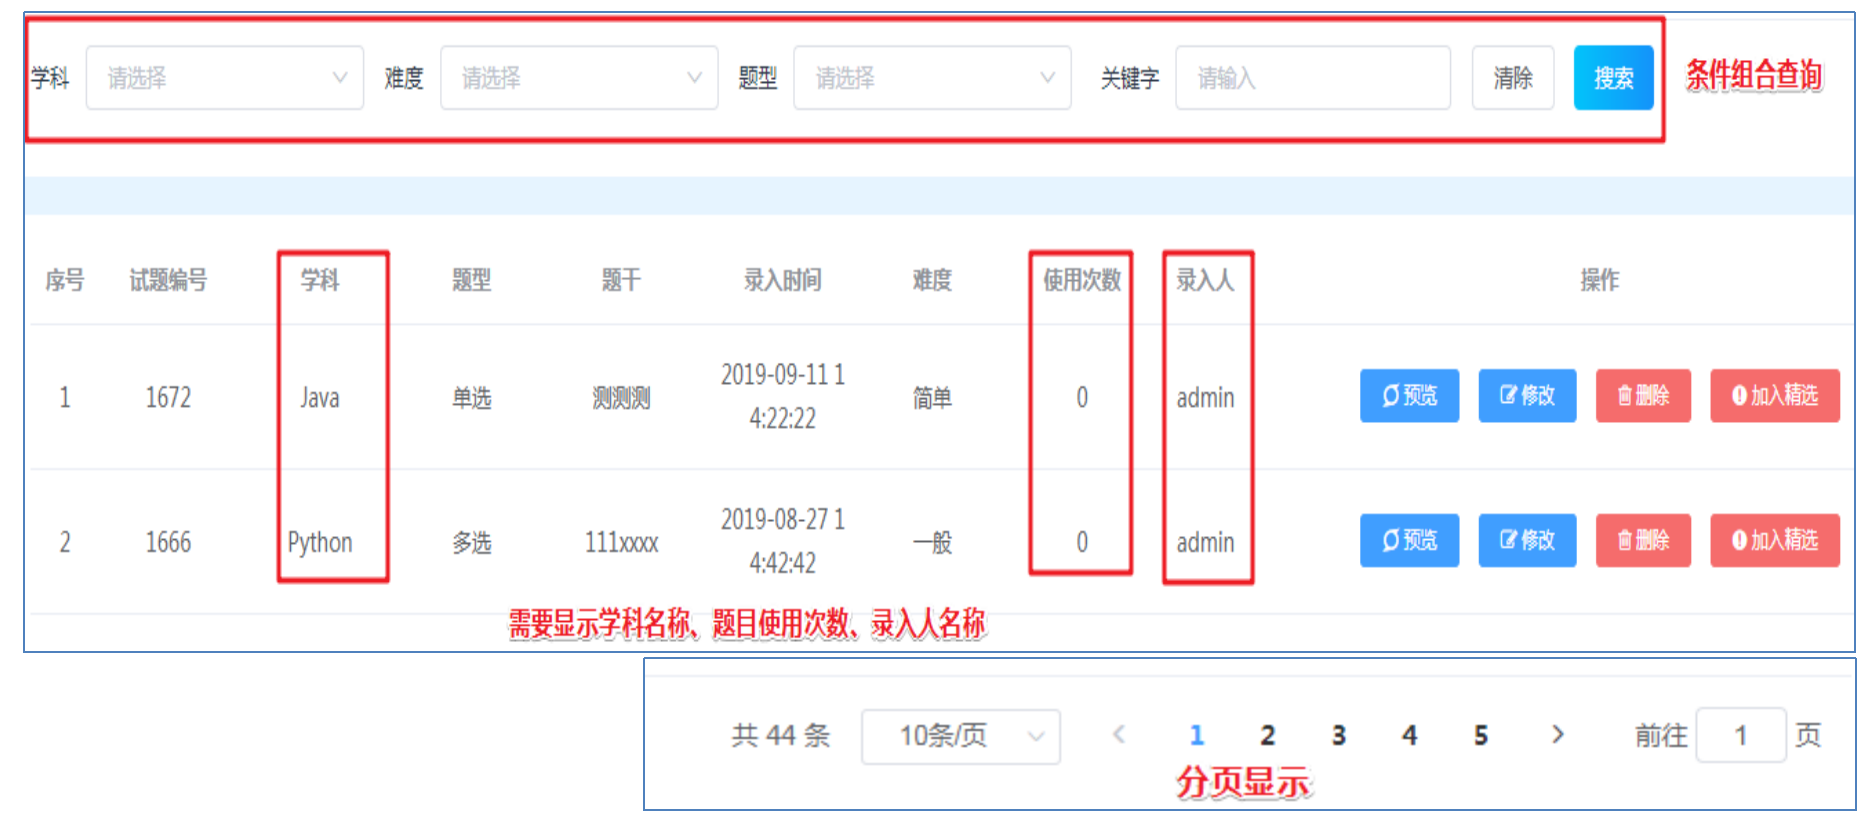
2.分析 2.1业务分析 基础题目列表中,需要展示创建者、使用次数及学科名称,故需要三表连接,列表中还需要显示使用次数,需要使用嵌套子查询统计题目被用户使用题的次数。基础题目列表需要分页,所有需要使用相同的条件查询总记录数和数据集。根据页面分析,查询需要组合的条件很多,可以使用QueryPageBean的queryParams来动态组合查询。试题编号规则采用从1000+主键ID.
2.2数据模型 2.2.1请求参数格式
1 2 3 4 5 6 7 8 9 10 { "currentPage": 1, "pageSize": 10, "queryParams": { "courseId": 24, "difficulty": 2, "type": 5, "keyWord": "Java" } }
1 2 3 4 5 public class QueryPageBean implements Serializable{ private Integer currentPage; // 页码 private Integer pageSize; //每页记录数 private Map queryParams; //查询条件 }
2.2.2响应数据格式
1 2 3 4 5 6 7 8 9 10 11 12 13 14 15 16 17 18 19 20 21 22 23 24 25 26 27 28 29 30 31 32 { "flag": true, "message": "获取题目列表成功", "result": { "rows": [{ "courseName": "java", "createDate": "2019-08-08 00:00:00.0", "creator": "admin", "difficulty": 4, "id": 11, "number": "", "status": 0, "subject": "<p>反爬虫措施?</p>\r\n", "type": 3, "usedQty": "0" }, { "courseName": "java", "createDate": "2019-08-08 00:00:00.0", "creator": "admin", "difficulty": 5, "id": 12, "number": "", "status": 0, "subject": "<p>加入Redis里面有1亿个key,其中10w个key是以某个固定的一直的前缀开头的,如何将他们全部找出来。</p>\r\n", "type": 3, "usedQty": "0" } ], "total": 20 } }
1 2 3 4 5 public class Result implements java.io.Serializable { private boolean flag;//执行结果,true为执行成功 false为执行失败 private String message;//返回结果信息 private Object result;//返回数据 }
Result里面的Object result有两个属性(total,rows), 所以我们创建PageResult对象 给Object result赋值
1 2 3 4 public class PageResult implements Serializable{ private Long total;//总记录数 private List rows;//当前页结果 }
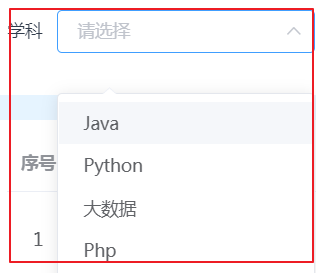
2.3思路分析 2.3.1加载所有学科思路
在questionBasicList.html的initCourses()里面, 发送Ajax请求CourseController
在CourseController里面创建findAll()方法
1 2 //1.调用业务 获得学科的列表 List<Course> list //2.封装, 响应
在CourseService里面创建findAll
1 2 3 4 public List<Course> findAll(){ //调用Dao }
在CourseDao查询所有的学科
2.3.2基础题库列表思路
在questionBasicList.html的getList()里面, 发送Ajax请求QuestionController ,携带请求参数
1 2 3 4 5 6 7 8 9 10 { "currentPage": 1, "pageSize": 10, "queryParams": { "courseId": 1, "difficulty": 1, "keyWord": "String", "type": 1 } }
在QuestionController 里面创建findListByPage()方法
1 2 3 //1.获得请求参数 封装成QueryPageBean //2.调用业务 获得分页的数据 PageResult //3.把PageResult封装成Result 响应
在QuestionService创建
1 2 3 public PageResult findListByPage(QueryPageBean queryPageBean){ //调用dao,封装PageResult }
在QuestionDao
查询题目的总数量(带条件)
查询题目一页展示的List
3.实现 3.1加载所有学科实现 3.1.1前端
1 2 3 4 5 6 7 8 9 10 11 12 13 14 15 16 17 18 19 20 21 22 23 24 25 26 27 28 29 initCourses ( let t = this ; let params = { status : 0 }; axios.post ("/course/findAll.do" ,params).then (response => if (response.data .flag ) { this .$message({ type :"success" , message :response.data .message , showClose :true }) this .courses = response.data .result }else { this .$message({ type :"error" , message :response.data .message , showClose :true }) } }) }
3.1.2后台
1 2 3 4 5 6 7 8 9 10 11 12 13 14 @RequestMapping("/course/findAll") public void findAll (HttpServletRequest request,HttpServletResponse response) throws IOException { try { Map parameterMap = JsonUtils.parseJSON2Object(request, Map.class); List<Course> courseList = courseService.findAll(parameterMap); JsonUtils.printResult(response,new Result (true ,"加载所有学科成功" ,courseList)); } catch (Exception e) { e.printStackTrace(); JsonUtils.printResult(response,new Result (false ,"加载所有学科失败" )); } }
1 2 3 4 5 6 7 8 9 public List<Course> findAll (Map parameterMap) throws Exception { SqlSession sqlSession = SqlSessionFactoryUtils.openSqlSession(); CourseDao courseDao = sqlSession.getMapper(CourseDao.class); List<Course> courseList = courseDao.findAll(parameterMap); SqlSessionFactoryUtils.commitAndClose(sqlSession); return courseList; }
1 2 3 4 5 6 7 8 <select id ="findAll" parameterType ="map" resultType ="Course" > select id,name from t_course <where > <if test ="status != null" > isShow=#{status} </if > </where > </select >
3.2 基础题库列表实现 3.2.1前端
1 2 3 4 5 6 7 8 9 10 11 12 13 14 15 16 17 18 19 20 21 22 23 24 25 26 27 28 29 30 31 32 33 34 35 36 37 38 39 40 41 42 43 44 45 46 47 48 49 50 51 52 53 54 getList ( let t = this ; let params = { currentPage : t.pagination .pageNum , pageSize : t.pagination .pageSize }; let queryParams = {}; let courseId = t.requestParameters .courseId ; if (courseId !== '' ) { queryParams.courseId = courseId; } let difficulty = t.requestParameters .difficulty ; if (difficulty !== '' ) { queryParams.difficulty = difficulty; } let type = t.requestParameters .type ; if (type !== '' ) { queryParams.type = type; } let keyWord = t.requestParameters .keyWord ; if (keyWord !== '' ) { queryParams.keyWord = keyWord; } if (Object .keys (queryParams).length ) { params.queryParams = queryParams; } axios.post ("/question/page.do" ,params).then (response => this .items = response.data .result .rows this .pagination .total = response.data .result .total }) }
3.2.2后台
1 2 3 4 5 6 7 8 9 10 11 12 13 14 @RequestMapping("/question/page") public void findByPage (HttpServletRequest request, HttpServletResponse response) throws IOException { try { QueryPageBean queryPageBean = JsonUtils.parseJSON2Object(request, QueryPageBean.class); PageResult pageResult = questionService.findByPage(queryPageBean); JsonUtils.printResult(response,new Result (true ,"分页查询基础题目列表成功" ,pageResult)); } catch (Exception e) { e.printStackTrace(); JsonUtils.printResult(response,new Result (false ,"分页查询基础题目列表失败" )); } }
1 2 3 4 5 6 7 8 9 10 11 12 public PageResult findByPage (QueryPageBean queryPageBean) throws Exception { SqlSession sqlSession = SqlSessionFactoryUtils.openSqlSession(); QuestionDao questionDao = sqlSession.getMapper(QuestionDao.class); Long total = questionDao.findTotal(queryPageBean); List<Question> questionList = questionDao.findPageList(queryPageBean); SqlSessionFactoryUtils.commitAndClose(sqlSession); return new PageResult (total,questionList); }
1 2 3 Long findTotal (QueryPageBean queryPageBean) ; List<Question> findPageList (QueryPageBean queryPageBean) ;
1 2 3 4 5 6 7 8 9 10 11 12 13 14 15 16 17 18 19 20 21 22 23 24 25 26 27 28 29 30 31 32 33 34 35 36 37 38 39 40 41 42 <sql id ="select_where" > <if test ="queryParams != null" > <if test ="queryParams.courseId != null" > and courseId=#{queryParams.courseId} </if > <if test ="queryParams.difficulty != null" > and difficulty=#{queryParams.difficulty} </if > <if test ="queryParams.type != null" > and type=#{queryParams.type} </if > <if test ="queryParams.keyWord != null" > and subject like "%"#{queryParams.keyWord}"%" </if > </if > </sql > <select id ="findTotal" parameterType ="queryPageBean" resultType ="long" > select count(*) from t_question where isClassic=0 <include refid ="select_where" > </include > </select > <select id ="findPageList" parameterType ="queryPageBean" resultType ="Question" > select id, subject, createDate, difficulty, type, id+10000 number, (select name from t_course where id=q.courseId) courseName, (select count(*) from tr_member_question WHERE questionId=q.id) usedQty, (select username from t_user where id=q.userId) creator from t_question q where isClassic=0 <include refid ="select_where" > </include > limit #{offset},#{pageSize} </select >
4.小结 案例-基础题库新增 1.需求
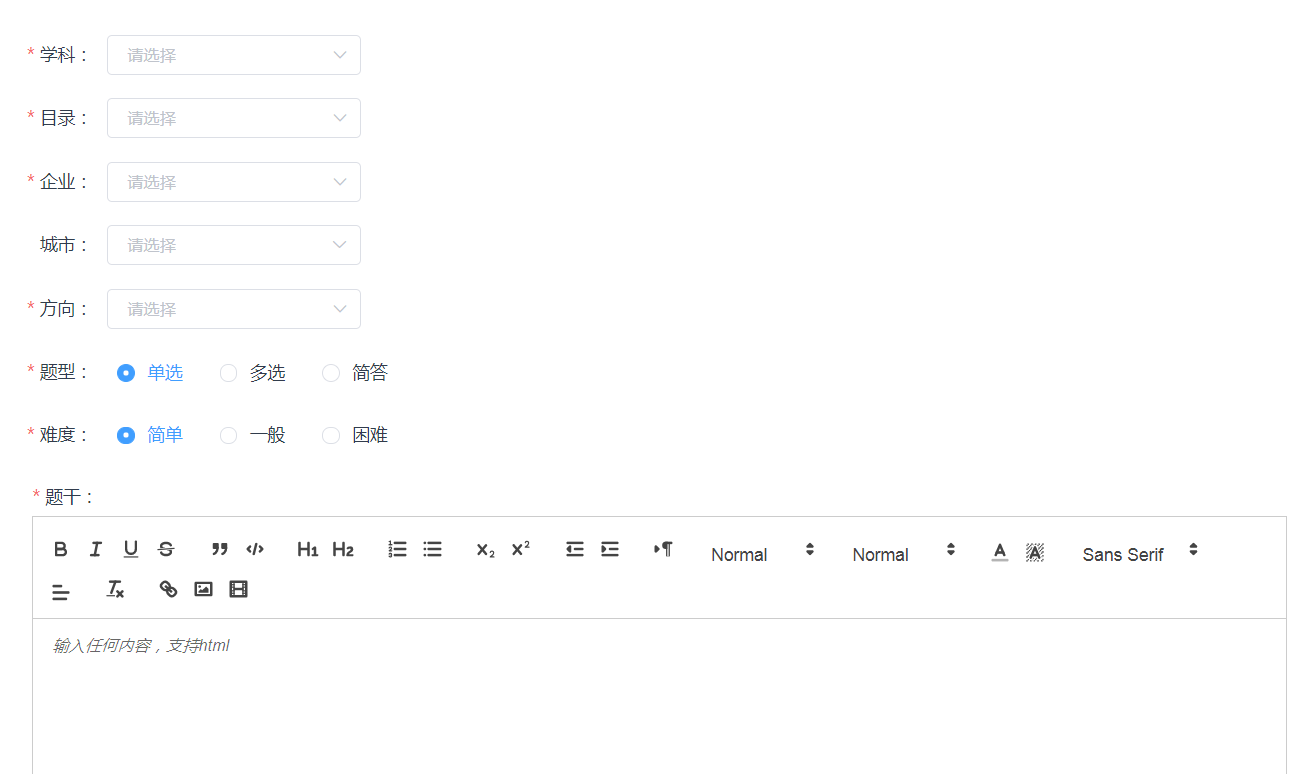
新增题目页面需要先初始化页面的数据(学科、学科目录及标签、公司、省市列表、行业方向),然后再提交数据进行保存,保存数据需要涉及大约九张表的更新操作。题目选项在单选与复选时可以上传图片,图片需要考虑上传但未保存数据库服务器垃圾图片的处理问题。
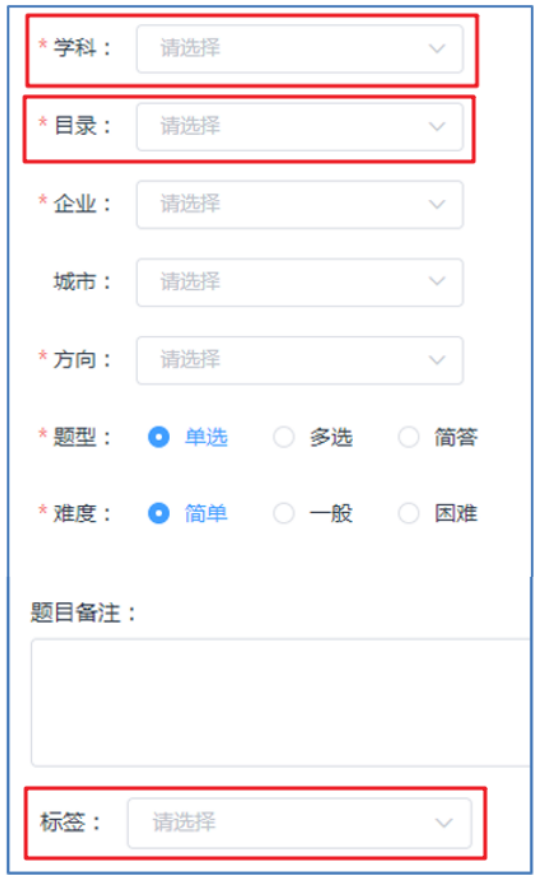
2.分析 2.1初始化页面数据分析 2.1.1初始化学科 页面选择学科时,学科目录及学科标签列表也随之发生改变。所以需要在初始化学科数据时,与之对应的学科目录及标签数据同时获取。 涉及到的表 t_course, t_catalog, t_tag
在questionEditor.html的initCourses(), 发送ajax请求CourseController
在CourseController创建findListAll()方法
1 2 //1.调用业务 获得List<Course> list //2.封装Result 响应
在CourseService里面创建findListAll()方法, 调用Dao
在CourseDao, 使用ResultMap封装 使用collocation标签
注意: 根据学科,查询出学科对应的目录数据,以及学科对应的标签数据
2.2数据保存分析 页面初始化已完成,用户根据页面进行数据输入,输入元素包含单选、复选、简单,其中单选、复选选项可以上传图片,如果不上传图片,页面中输入元素使用的是富文本编辑器输入文本。所谓富文本编辑器是指可以编写带有复杂样式的文本,数据保存到数据库中内容是带有html标签样式的。
选择学科及学科目录,选择不同的学科,与之对应的标签列表也会不同;
选择公司后,与之对应的省市、行业方向是自动选择,同时可以再次编辑后与题目一起提交;
可以为当前题目设置多个标签,标签列表是根据当前选择的学科变化而变化的。
根据以上分析,保存题目数据的同时,需要更新题目数据、题目选项数据、标签数据、公司数据,故实现本小结功能,我们先把流程业务走通,把数据从前端页面传递控制器,从控制器传递到Service,Service先保证传递到后端的数据是正确的,然后再分步完成数据的保存。
1 2 3 4 5 6 7 8 9 10 11 12 13 14 15 16 17 18 19 20 21 22 23 24 25 26 27 28 29 30 31 32 33 34 35 36 37 38 39 40 41 42 43 44 45 46 47 { "id" : 0 , "is_classic" : null , "courseId" : 1 , "catalogId" : 1 , "companyId" : 1 , "cityIds" : [ 2 , 10 ] , "industryIds" : [ 1 , 2 , 18 , 26 , 27 ] , "type" : 2 , "difficulty" : 3 , "subject" : "<p>测试题目</p>" , "questionItemList" : [ { "id" : 0 , "content" : "a" , "isRight" : true , "imgUrl" : "" } , { "id" : 0 , "content" : "b" , "isRight" : false , "imgUrl" : "" } , { "id" : 0 , "content" : "c" , "isRight" : false , "imgUrl" : "" } , { "id" : 0 , "content" : "d" , "isRight" : false , "imgUrl" : "" } , { "id" : 0 , "content" : "e" , "isRight" : false , "imgUrl" : "" } , { "id" : 0 , "content" : "f" , "isRight" : false , "imgUrl" : "" } ] , "analysis" : "<p>a答案正确</p>" , "analysisVideo" : "http://www.baidu.com" , "remark" : "测试题目" , "tagIds" : [ 1 , 3 ] }
2.2.1保存/更新题目信息 题目的主体数据(题干,难度,题目类型) 保存到t_question, 如果选项Id为0,即为保存,非0为更新。
2.2.2保存/更新题干选项 题目选项数据保存到t_question_item表中,如果选项Id为0,即为保存,非0为更新。
2.2.3保存/更新标签信息 题目与学科标签是多对多的关系,需要使用关系表tr_question_tag来保存题目与学科标签的关系。当前业务需要考虑题目的新建与更新,对于的标签关系也是如此。如果标签关系发生改变,需要同时删除旧关系,新增新关系的方式来实现。
questionEditor.html的createItem()函数里面 请求QuestionController
在QuestionController里面创建addOrUpdate()
1 2 3 4 //1.获得请求参数 封装成Question //2.获得用户id //3.调用业务 进行新增或者更新 //4.响应
在QuestionService里面创建addOrUpdate()
1 2 3 4 5 6 7 8 public void addOrUpdate(Question question){ //1.保存或者更新题目信息 //2.保存或者更新题目选项选项 //3.维护题目和标签的关系 }
QuestionDao, QuestionItemDao, TagDao
3.实现 3.1初始化页面数据实现 3.1.1初始化学科 前端
1 2 3 4 5 6 7 8 9 10 11 12 13 14 15 16 17 initCourses ( let t = this ; axios.post ("/course/findAll.do" ,"{}" ).then (response => if (response.data .flag ) { this .courses = response.data .result }else { this .$message({ type :"error" , message :response.data .message , showClose :true }) } }) }
后台
1 2 3 4 5 6 7 8 9 10 11 12 13 14 @RequestMapping("/course/findAll") public void findAll (HttpServletRequest request,HttpServletResponse response) throws IOException { try { Map parameterMap = JsonUtils.parseJSON2Object(request, Map.class); List<Course> courseList = courseService.findAll(parameterMap); JsonUtils.printResult(response,new Result (true ,"加载所有学科成功" ,courseList)); } catch (Exception e) { e.printStackTrace(); JsonUtils.printResult(response,new Result (false ,"加载所有学科失败" )); } }
1 2 3 4 5 6 7 8 9 public List<Course> findAll (Map parameterMap) throws Exception { SqlSession sqlSession = SqlSessionFactoryUtils.openSqlSession(); CourseDao courseDao = sqlSession.getMapper(CourseDao.class); List<Course> courseList = courseDao.findAll(parameterMap); SqlSessionFactoryUtils.commitAndClose(sqlSession); return courseList; }
CatalogDao和CatalogDao.xml
1 2 3 4 5 List<Catalog> findCatalogListByCourseId (Integer courseId) ; <select id="findCatalogListByCourseId" parameterType="int" resultType="Catalog" > select id,name from t_catalog where courseId=#{courseId} </select>
1 2 3 4 5 6 7 public interface TagDao { List<Tag> findTagListByCourseId (int courseId) ; } <select id="findTagListByCourseId" resultType="Tag" parameterType="int" > select * from t_tag where courseId=#{courseId} </select>
1 2 3 4 5 6 7 8 9 10 11 12 13 14 15 16 17 18 19 20 21 22 23 24 25 26 <resultMap id ="courseMap" type ="Course" autoMapping ="true" > <id column ="id" property ="id" > </id > <collection property ="catalogList" column ="id" select ="com.itheima.mm.dao.CatalogDao.findCatalogListByCourseId" fetchType ="lazy" > </collection > <collection property ="tagList" column ="id" select ="com.itheima.mm.dao.TagDao.findTagListByCourseId" fetchType ="lazy" > </collection > </resultMap > <select id ="findAll" parameterType ="map" resultMap ="courseMap" > select id,name from t_course <where > <if test ="status != null" > isShow=#{status} </if > </where > </select >
3.2数据保存实现
1 2 3 4 5 6 7 8 9 10 11 12 13 14 15 16 17 18 19 20 21 22 23 24 25 26 27 28 29 30 31 32 33 34 35 36 37 38 39 40 41 42 43 44 45 46 47 48 49 50 51 52 53 54 55 56 57 58 59 60 61 62 63 64 65 66 67 68 69 70 71 72 73 74 75 76 77 78 79 80 81 82 83 84 85 86 87 88 89 90 91 92 93 94 95 96 97 98 99 100 createItem() { let isValid = false ; this .$refs['formData' ].validate((valid) => { isValid = valid; }); if (!isValid) { return ; } let formData = this .formData; let industrys = this .industrys; let industryList = []; formData.industryIds.forEach(industryId => { let industry = industrys.find(industry => { return industry.id === industryId; }); if (industry){ industryList.push(industry); }else { industryList.push({ id:0 , name:industryId }); } }); let company = { id: formData.companyId, cityId: formData.cityIds[1 ], industryList: industryList }; formData.company = company; let questionItemList = this .formData.questionItemList; questionItemList.forEach(val => { val.isRight = val.isRight ? 1 : 0 ; }); let tags = this .tags; let tagList = []; formData.tagIds.forEach(tagId => { let tag = tags.find(tag => { return tag.id === tagId; }); if (tag){ tagList.push(tag); }else { tagList.push({ id:0 , name:tagId }); } }); formData.tagList = tagList; axios.post("/question/add.do" ,formData).then(response=>{ if (response.data.flag) { this .$message({ type:"success" , message:response.data.message, showClose:true }) if (!this .formData.isClassic) { setTimeout(function () { window.location.href = "questionBasicList.html" ; } , 1000 ); } else { setTimeout(function () { window.location.href = "questionClassicList.html" ; }, 1000 ); } }else { this .$message({ type:"error" , message:response.data.message, showClose:true }) } }) }
1 2 3 4 5 6 7 8 9 10 11 12 13 14 15 16 17 18 19 20 21 22 @RequestMapping("/question/add") public void addQuestion (HttpServletRequest request, HttpServletResponse response) throws IOException{ try { Question question = JsonUtils.parseJSON2Object(request, Question.class); question.setStatus(0 ); question.setReviewStatus(0 ); question.setCreateDate(DateUtils.parseDate2String(new Date ())); User user = (User) request.getSession().getAttribute(Constants.USER_SESSION_KEY); question.setUserId(user.getId()); questionService.addQuestion(question); JsonUtils.printResult(response,new Result (true ,"添加试题成功" )); } catch (Exception e) { e.printStackTrace(); JsonUtils.printResult(response,new Result (false ,"添加试题失败" )); } }
1 2 3 4 5 6 7 8 9 10 11 12 13 14 15 16 17 18 19 20 21 22 23 24 25 26 27 28 29 30 31 32 33 34 35 36 37 38 39 40 41 42 43 44 45 46 47 48 49 50 51 52 53 public void addQuestion (Question question) throws Exception { SqlSession sqlSession = SqlSessionFactoryUtils.openSqlSession(); try { QuestionDao questionDao = sqlSession.getMapper(QuestionDao.class); questionDao.addQuestion(question); List<QuestionItem> questionItemList = question.getQuestionItemList(); QuestionItemDao questionItemDao = sqlSession.getMapper(QuestionItemDao.class); if (questionItemList != null && questionItemList.size() > 0 ) { for (QuestionItem questionItem : questionItemList) { questionItem.setQuestionId(question.getId()); } questionItemDao.addQuestionItemList(questionItemList); } List<Tag> tagList = question.getTagList(); if (tagList != null && tagList.size() > 0 ) { TagDao tagDao = sqlSession.getMapper(TagDao.class); for (Tag tag : tagList) { Map parameterMap = new HashMap (); parameterMap.put("questionId" ,question.getId()); parameterMap.put("tagId" ,tag.getId()); tagDao.associationQuestionTag(parameterMap); } } SqlSessionFactoryUtils.commitAndClose(sqlSession); } catch (Exception e) { e.printStackTrace(); SqlSessionFactoryUtils.rollbackAndClose(sqlSession); throw new RuntimeException (e.getMessage()); } }
QuestionDao和QuestionDao.xml
1 2 3 4 5 6 7 8 9 10 11 void addQuestion(Question question); <insert id ="addQuestion" parameterType ="Question" > <selectKey keyProperty ="id" keyColumn ="id" resultType ="int" order ="AFTER" > select last_insert_id() </selectKey > insert into t_question (subject,type,difficulty,analysis,analysisVideo,remark,isClassic,status, reviewStatus,createDate,userId,companyId,catalogId,courseId) values (#{subject},#{type},#{difficulty},#{analysis},#{analysisVideo},#{remark},#{isClassic},#{status}, #{reviewStatus},#{createDate},#{userId},#{companyId},#{catalogId},#{courseId}) </insert >
QuestionItemDao和QuestionItemDao.xml
注意:批量添加和一个个添加随便选哪个都行
1 2 3 4 5 6 7 8 9 10 11 12 13 14 15 void addQuestionItem(QuestionItem questionItem); void addQuestionItemList(List<QuestionItem > questionItemList); <insert id ="addQuestionItem" parameterType ="questionItem" > insert into t_question_item (content,imgUrl,isRight,questionId) values (#{content},#{imgUrl},#{isRight},#{questionId}) </insert > <insert id ="addQuestionItemList" parameterType ="QuestionItem" > insert into t_question_item (content,imgUrl,isRight,questionId) values <foreach collection ="list" separator ="," item ="questionItem" > (#{questionItem.content},#{questionItem.imgUrl},#{questionItem.isRight},#{questionItem.questionId}) </foreach > </insert >
4.小结 全部完成后,测试题目数据保存的过程,可以使用如下查询,查询数据是否正确保存。
查询t_question表
查询t_question_item表
查询tr_question_tag表
案例-图片上传 6.1 功能分析 题目的单选或复选,可以上传图片作为选项,页面通过后端提供上传图片组件来完成单个图片上传,图片暂时上传到服务端指定的目录保存。图片上传成功后,后端返回一个访问的相对路径(包含图片上传后的新名称),这个路径需要在表单最终提交时,与其他表单数据提交到服务端与题目选项数据一起保存到数据表中。
6.2 实现思路 后端需要提供一个单独的上传图片组件,然后返回给客户端一个可以保持到数据库的相对路径,另外对上传的图片要重新命名,保证图片名称不冲突。上传图片组件将放在一个名为公共控制器中,本图片上传不涉及其他操作,故不需要Service和Dao。
图片上传涉及到底层IO流的操作,本节将使用三方组件commons-fileupload组件来完成图片上传的功能。
之前已经引入了
1 2 3 4 5 6 7 8 9 10 <dependency> <groupId>commons-fileupload</groupId> <artifactId>commons-fileupload</artifactId> <version>1.3.1</version> </dependency> <dependency> <groupId>commons-io</groupId> <artifactId>commons-io</artifactId> <version>2.6</version> </dependency>
6.3 知识点补充 6.3.1 文件上传表单分析
凡是表单带上传文件,表单提交类型必须是【 enctype=”multipart/form-data”】
必须从底层IO流获取原始数据,然后进行数据解析,获取上传的数据
通过三方组件commons-fileupload(依赖commons-io)来解析IO流数据
6.3.2 commons组件
commons-IO组件
commons-fileupload组件
DiskFileItemFactory 类
ServletFileUpload 类
FileItem 类
6.4 实现上传组件 考虑到上传组件的复用性,在完成时考虑同时批量上传的情况。
6.4.1 初始化上传文件路径配置 在webapp下创建img/upload目录
如图所示:
6.4.2 新增CommonController 1 2 3 4 5 6 7 8 9 10 11 12 13 14 15 16 17 18 19 20 21 22 23 24 25 26 27 28 29 30 31 32 33 34 35 36 37 38 39 40 41 42 43 44 45 46 47 48 49 50 51 52 53 54 55 56 57 58 59 60 61 62 63 64 65 66 67 68 69 70 71 72 73 74 75 76 77 78 79 80 81 82 83 84 85 86 87 package com.itheima.mm.controller;import com.itheima.frame.Controller;import com.itheima.frame.RequestMapping;import com.itheima.mm.entity.Result;import com.itheima.mm.utils.JsonUtils;import com.itheima.mm.utils.UploadUtils;import org.apache.commons.fileupload.FileItem;import org.apache.commons.fileupload.disk.DiskFileItemFactory;import org.apache.commons.fileupload.servlet.ServletFileUpload;import org.apache.commons.io.IOUtils;import javax.servlet.http.HttpServletRequest;import javax.servlet.http.HttpServletResponse;import java.io.File;import java.io.FileOutputStream;import java.io.InputStream;import java.util.List;@Controller public class CommonController { @RequestMapping(value = "/common/upload") public void uploadFile (HttpServletRequest request, HttpServletResponse response) throws Exception { InputStream is = null ; FileOutputStream os = null ; try { DiskFileItemFactory itemFactory = new DiskFileItemFactory (); ServletFileUpload fileUpload = new ServletFileUpload (itemFactory); List<FileItem> list = fileUpload.parseRequest(request); String imgUrl = null ; for (FileItem fileItem : list) { if (!fileItem.isFormField()) { String fileName = fileItem.getFieldName(); fileName = UploadUtils.getUUIDName(fileName); imgUrl = "/img/upload/" +fileName; is = fileItem.getInputStream(); String uploadPath = request.getServletContext().getRealPath("img/upload" ); File file = new File (uploadPath); if (!file.exists()) { file.mkdirs(); } os = new FileOutputStream (new File (file,fileName)); IOUtils.copy(is,os); } } JsonUtils.printResult(response,new Result (true ,"图片上传成功" ,imgUrl)); } catch (Exception e) { e.printStackTrace(); JsonUtils.printResult(response,new Result (false ,"图片上传失败" )); }finally { os.close(); is.close(); } } }
6.4.3 编写前端代码 在questionEditor.html页面中,找到handleHttpRequest方法,加入axios请求。
1 2 3 4 5 6 7 8 9 10 11 12 13 14 15 16 17 18 19 20 21 22 23 24 25 26 27 28 29 30 31 32 33 handleHttpRequest (params, index ) { let file = params.file ; let formData = new FormData (); formData.append (file.name , file); axios.post ("/common/upload.do" ,formData).then (response => if (response.data .flag ) { this .$message({ type :"success" , message :response.data .message , showClose :true }) this .formData .questionItemList [index].imgUrl = response.data .result }else { this .$message({ type :"error" , message :response.data .message , showClose :true }) } }) }
两处el-upload
1 2 3 4 5 6 7 8 <el-upload class ="avatar-uploader" action="" :show-file-list="false" :http-request="function(params) {return handleHttpRequest(params, index)}" > <img v-if ="item.imgUrl" :src ="item.imgUrl" class ="avatar" > <i v-else class ="el-icon-plus avatar-uploader-icon" > </i > </el-upload >
单独测试成功后,输入表单数据,查看数据库表中的数据是否正确,正确如图所示:
面面项目第四天 今日目标
第一章-微信小程序基础 知识点-微信小程序入门 1.目标
2.路径
什么是微信小程序
小程序开发准备
安装开发者工具
第一个小程序
3.讲解 3.1什么是微信小程序 微信小程序,简称小程序,英文名Mini Program,是一种不需要下载安装即可使用的应用 ,它实现了应用“触手可及”的梦想,用户扫一扫或搜一下即可打开应用。
开发者文档 https://developers.weixin.qq.com/miniprogram/dev/framework/quickstart/
3.2 小程序开发准备(申请AppID) 开发小程序的第一步,需要拥有一个小程序 AppID,后续的所有开发流程会基于这个 AppID 来完成。小程序的注册非常简单,只需几个操作。
使用浏览器打开 https://mp.weixin.qq.com/ 点击立即注册,如图1-1所示,在打开的页面中选择小程序后,填入相关的信息,就可以完成注册了,也可以自己点击https://mp.weixin.qq.com/wxopen/waregister?action=step1 这个链接。注册完成后需要绑定一个微信号作为管理员。
注册成功之后,点击 “开发”—“开发设置” 就可以看到小程序的 AppID,如图所示。
AppID和AppSecret需要在开发中设置。
3.3 安装开发工具 在小程序开发文档中找到小程序开发工具的下载页面,根据自己的操作系统下载对应的安装包进行安装。 https://mp.weixin.qq.com/debug/wxadoc/dev/devtools/download.html
需要注意的是,小程序开发工具在 Windows上仅支持 Windows 7 及以上版,在 Mac 上支持 OS X 10.8 及以上版本。Windows 上,双击下载完成的安装文件,根据提示点击下一步,即可完成安装,安装成功后,可以在桌面或者开始菜单中找到小程序开发工具的快捷方式,打开即可
3.4 第一个小程序 打开小程序开发工具,使用之前注册小程序所使用的微信扫码登录。
选择小程序,如图所示:
新建之后,如图所示:
如果在微信查看,如图操作所示:
如果想让其他人员查看效果,进入小程序管理后台-成员管理,添加项目成员或体检成员,每个最多添加15人。如图所示:
4.小结
微信小程序: 是一种不需要下载安装即可使用的应用 , 基于微信平台的
准备
知识点-微信小程序开发环境 1.目标
2.路径
代码结构
小程序运行环境
3.讲解 3.1代码结构 项目里边生成了不同类型的文件:
.json 后缀的 JSON 配置文件.wxml 后缀的 WXML 模板文件.wxss 后缀的 WXSS 样式文件.js 后缀的 JS 脚本逻辑文件
小程序包含一个描述整体程序的 app 和多个描述各自页面的 page。
一个小程序主体部分由三个文件组成,必须放在项目的根目录,如下:
一个小程序页面由四个文件组成,分别是:
3.1.1 JSON配置 JSON 是一种数据格式,并不是编程语言,在小程序中,JSON扮演的静态配置的角色。
我们可以看到在项目的根目录有一个 app.json 和 project.config.json,我们依次来说明一下它们的用途。
app.json 是当前小程序的全局配置,包括了小程序的所有页面路径、界面表现、网络超时时间、底部 tab 等。第一个程序的app.json配置如图所示:
pages字段 用于描述当前小程序所有页面路径,这是为了让微信客户端知道当前你的小程序页面定义在哪个目录 window字段定义小程序所有页面的顶部背景颜色,文字颜色定义等。
小程序开发者工具在每个项目的根目录都会生成一个 project.config.json,你在工具上做的任何配置都会写入到这个文件,当你重新安装工具或者换电脑工作时,你只要载入同一个项目的代码包,开发者工具就自动会帮你恢复到当时你开发项目时的个性化配置,其中会包括编辑器的颜色、代码上传时自动压缩等等一系列选项。
一般无需开发者修改。
JSON文件都是被包裹在一个大括号中 {},通过key-value的方式来表达数据。JSON的Key必须包裹在一个双引号中,在实践中,编写 JSON 的时候,忘了给 Key 值加双引号或者是把双引号写成单引号是常见错误。
JSON的值只能是以下几种数据格式,其他任何格式都会触发报错,例如 JavaScript 中的 undefined。
数字,包含浮点数和整数
字符串,需要包裹在双引号中
Bool值,true 或者 false
数组,需要包裹在方括号中 []
对象,需要包裹在大括号中 {}
Null
还需要注意的是 JSON 文件中无法使用注释,试图添加注释将会引发报错。
3.1.2 WXML模板 网页编程采用的是 HTML + CSS + JS 这样的组合,其中 HTML 是用来描述当前这个页面的结构,CSS 用来描述页面的样子,JS 通常是用来处理这个页面和用户的交互。同样道理,在小程序中也有同样的角色,其中 WXML 充当的就是类似 HTML 的角色。如图所示:
和 HTML 非常相似,WXML 由标签、属性等等构成。但是也有很多不一样的地方,如下所示:
标签名称
小程序的 WXML 用的标签是 view, button, text 等等,这些标签就是小程序给开发者包装好的基本能力,还提供了地图、视频、音频等等组件能力。
开发模型
目前前端开发基本采用 MVVM 的开发模式(例如 React, Vue),提倡把渲染和逻辑分离。简单来说就是不要再让 JS 直接操控 DOM,JS 只需要管理状态即可,然后再通过一种模板语法来描述状态和界面结构的关系即可。小程序的框架也是用到了这个思路,如果你需要把一个 Hello World 的字符串显示在界面上。
WXML 是这么写 :
JS 只需要管理状态即可:
1 this .setData ({ msg : "Hello World" })
更详细的文档可以参考 WXML
3.1.3WXSS样式 WXSS 具有 CSS 大部分的特性,小程序在 WXSS 也做了一些扩充和修改。
新增了尺寸单位。在写 CSS 样式时,开发者需要考虑到手机设备的屏幕会有不同的宽度和设备像素比,采用一些技巧来换算一些像素单位。WXSS 在底层支持新的尺寸单位 rpx ,开发者可以免去换算的烦恼,只要交给小程序底层来换算即可,由于换算采用的浮点数运算,所以运算结果会和预期结果有一点点偏差。
提供了全局的样式和局部样式。和前边 app.json, page.json 的概念相同,你可以写一个 app.wxss 作为全局样式,会作用于当前小程序的所有页面,局部页面样式 page.wxss 仅对当前页面生效。
此外 WXSS 仅支持部分 CSS 选择器
更详细的文档可以参考 WXSS
3.1.4 JS逻辑交互 一个服务仅仅只有界面展示是不够的,还需要和用户做交互:响应用户的点击、获取用户的位置等等。在小程序里边,我们就通过编写 JS 脚本文件来处理用户的操作。比如:
1 2 <view > {{ msg }}</view > <button bindtap ="clickMe" > 点击我</button >
点击 button 按钮的时候,我们希望把界面上 msg 显示成 "Hello World",于是我们在 button 上声明一个属性: bindtap ,在 JS 文件里边声明了 clickMe 方法来响应这次点击操作:
1 2 3 4 5 Page ({ clickMe : function ( this .setData ({ msg : "Hello World" }) } })
响应用户的操作就是这么简单,更详细的事件可以参考文档 WXML - 事件 。在 JS 中调用小程序提供的丰富的 API,利用这些 API 可以很方便的调起微信提供的能力,例如获取用户信息、本地存储、微信支付等。在前边的 QuickStart 例子中,在 pages/index/index.js 就调用了 wx.getUserInfo 获取微信用户的头像和昵称,最后通过 setData 把获取到的信息显示到界面上。更多 API 可以参考文档 小程序的API 。
3.2 小程序运行环境 小程序的运行环境分成渲染层和逻辑层,其中 WXML 模板和 WXSS 样式工作在渲染层,JS 脚本工作在逻辑层。小程序的渲染层和逻辑层分别由2个线程管理:渲染层的界面使用了WebView 进行渲染;逻辑层采用JsCore线程运行JS脚本。一个小程序存在多个界面,所以渲染层存在多个WebView线程,这两个线程的通信会经由微信客户端(下文中也会采用Native来代指微信客户端)做中转,逻辑层发送网络请求也经由Native转发,小程序的通信模型下图所示:
3.2.1 程序与页面 微信客户端在打开小程序之前,会把整个小程序的代码包下载到本地。紧接着通过 app.json 的 pages 字段就可以知道你当前小程序的所有页面路径,pages 字段的第一个页面就是这个小程序的首页(打开小程序看到的第一个页面)。于是微信客户端就把首页的代码装载进来,通过小程序底层的一些机制,就可以渲染出这个首页。小程序启动之后,在 app.js 定义的 App 实例的 onLaunch 回调会被执行:
1 2 3 4 5 App ({ onLaunch : function ( } })
整个小程序只有一个 App 实例,是全部页面共享的。
3.2.2 小程序组件 小程序提供了丰富的基础组件给开发者,开发者可以像搭积木一样,组合各种组件拼合成自己的小程序。只需要在 WXML 写上对应的组件标签名字就可以把该组件显示在界面上,例如,你需要在界面上显示地图,你只需要这样写即可:
可以通过属性传递值给组件,让组件可以以不同的状态去展现,也会通过事件的形式让开发者可以感知,也可以通过 style 或者 class 来控制组件的外层样式,以便适应你的界面宽度高度等等。
3.2.3 小程序API 为了让开发者可以很方便的调起微信提供的能力,例如获取用户信息、微信支付等等,小程序提供了很多 API 给开发者去使用。要获取用户的地理位置时,只需要:
1 2 3 4 5 6 7 wx.getLocation ({ type : 'wgs84' , success : (res ) => { var latitude = res.latitude var longitude = res.longitude } })
调用微信扫一扫能力,只需要:
1 2 3 4 5 wx.scanCode ({ success : (res ) => { console .log (res) } })
多数 API 的回调都是异步,你需要处理好代码逻辑的异步问题。更多的 API 能力见 小程序的API 。
4.小结
一个小程序—>App
一个App—>多个Page
一个Page
.js 交互逻辑
.json 当前的Page的配置
.wxml 当前Page定义标签的,页面
.wxss 当前Page的样式
第二章-面面项目小程序介绍和初始化 知识点-面面小程序功能与设计 1.目标
2.路径
功能结构图
功能列表
产品原型
UI设计
接口文档
3.讲解 3.1 功能结构图
3.2 功能列表
序号
模块
子模块
描述
1
用户登录
用户登录
当前系统必须授权登录方可访问
2
设置城市及学科方向
设置城市及学科方向
后续看到的题目数据全部根据当前用户所选的城市及学科方向来提取数据
3
题库分类列表
题库分类列表
分类有三种方式(按技术、按企业、按方向)
4
题库分类题目列表
题库分类题目列表
根据所选分类,提前对应的题目列表,包含题目详情信息
5
题目操作
收藏
针对某一题目,用户可以收藏这个题目
答案提交
答题
答题是在客户端完成
提交答案
无论单选、多选还是简单,最终需要把当前题目信息提交到后端,后端保存用户做题记录。
6
个人中心
个人中心
获取用户信息数据,展示在个人中心
继续答题
跳转到最后一次完成答题的位置,继续答题
以上是我们后续章节要实现的功能。
3.3 产品原型 参考资料-产品原型-小程序原型,格式.html
3.4 UI设计 参考资料-UI设计-小程序UI设计,格式PNG
3.5 接口文档 参考资料-接口文档-小程序_api.html
4.小结
工作里面比较重要
知识点-构建面面微信小程序模块 1.目标
2.路径
初始化面面微信小程序
构建微信小程序 API模块
3.讲解 3.1 初始化面面微信小程序 已经了解了微信开发环境和开发工具,后续小程序的开发是在已经构建好的小程序前端工程基础上来完成,无需后端工程师去构建复杂的小程序前端页面。把资料-前端代码-project-mp-mianshi_小程序代码.zip解压缩到本地工程目录,当前给的代码是基于模拟API完成了所有业务路径的调用,故小程序被导入微信小程序工具后是完成开业独立运行的,所有的API调用都是调用的模拟API。
代码解压后,如图所示:
3.3.1 导入项目 打开微信小程序工具,按如图所示顺序操作:
==其中第6步,一定是选择自己在微信小程序管理后台的AppID。==选择完成后,点击右下角“导入”。
3.3.2 设置项目
3.2构建微信小程序API模块 3.2.1步骤
创建工程mm_wx_api 打包方式为war
pom文件添加坐标
拷贝实体类, 常量
拷贝配置文件
配置web.xml
3.2.2实现
创建工程mm_wx_api 打包方式为war
pom文件
1 2 3 4 5 6 7 8 9 10 11 12 13 14 15 16 17 18 19 20 21 22 23 24 25 26 27 28 29 30 31 32 33 34 35 36 37 38 39 40 41 42 43 44 45 46 47 48 49 50 51 52 53 54 55 56 57 58 59 60 61 62 63 64 65 66 67 68 69 70 71 72 73 74 75 76 77 78 79 80 81 82 83 84 85 86 87 88 89 90 91 92 93 94 95 96 97 98 99 100 101 102 103 104 105 106 107 108 109 110 111 112 113 114 115 116 117 118 119 120 121 122 123 124 125 126 127 128 129 130 131 132 133 134 135 136 137 138 139 140 141 142 143 144 145 146 147 148 149 150 151 152 153 154 155 156 157 158 159 160 161 162 163 164 165 166 167 168 169 170 171 172 173 174 175 176 177 178 179 180 181 182 183 184 185 186 187 188 189 190 191 192 193 194 195 196 197 198 199 200 201 202 203 204 205 <?xml version="1.0" encoding="UTF-8" ?> <project xmlns ="http://maven.apache.org/POM/4.0.0" xmlns:xsi ="http://www.w3.org/2001/XMLSchema-instance" xsi:schemaLocation ="http://maven.apache.org/POM/4.0.0 http://maven.apache.org/xsd/maven-4.0.0.xsd" > <modelVersion > 4.0.0</modelVersion > <groupId > com.itheima</groupId > <artifactId > mm_wx_api</artifactId > <version > 1.0-SNAPSHOT</version > <packaging > war</packaging > <properties > <project.build.sourceEncoding > UTF-8</project.build.sourceEncoding > <maven.compiler.source > 1.8</maven.compiler.source > <maven.compiler.target > 1.8</maven.compiler.target > <junit.version > 4.12</junit.version > <javax.servlet-api.version > 3.1.0</javax.servlet-api.version > <fastjson.version > 1.2.47</fastjson.version > <mysql-connector-java.version > 5.1.38</mysql-connector-java.version > <mybatis.version > 3.5.3</mybatis.version > <log4j.version > 1.2.17</log4j.version > <slf4j-api.version > 1.7.25</slf4j-api.version > <commons-fileupload.version > 1.3.1</commons-fileupload.version > <commons-io.version > 2.6</commons-io.version > <lombok.version > 1.18.8</lombok.version > <tomcat7-maven-plugin.version > 2.2</tomcat7-maven-plugin.version > <dom4j.version > 1.6.1</dom4j.version > <jaxen.version > 1.2.0</jaxen.version > <druid.version > 1.1.10</druid.version > <okhttp.version > 3.1.0</okhttp.version > <okio.version > 1.4.0</okio.version > <bcprov-jdk16.version > 1.45</bcprov-jdk16.version > <jedis.version > 2.7.0</jedis.version > <jackson.version > 2.3.3</jackson.version > </properties > <dependencies > <dependency > <groupId > com.itheima</groupId > <artifactId > heima_mvc</artifactId > <version > 1.0-SNAPSHOT</version > </dependency > <dependency > <groupId > junit</groupId > <artifactId > junit</artifactId > <version > ${junit.version}</version > </dependency > <dependency > <groupId > javax.servlet</groupId > <artifactId > javax.servlet-api</artifactId > <version > ${javax.servlet-api.version}</version > <scope > provided</scope > </dependency > <dependency > <groupId > com.alibaba</groupId > <artifactId > fastjson</artifactId > <version > ${fastjson.version}</version > </dependency > <dependency > <groupId > com.fasterxml.jackson.core</groupId > <artifactId > jackson-databind</artifactId > <version > ${jackson.version}</version > </dependency > <dependency > <groupId > com.fasterxml.jackson.core</groupId > <artifactId > jackson-core</artifactId > <version > ${jackson.version}</version > </dependency > <dependency > <groupId > com.fasterxml.jackson.core</groupId > <artifactId > jackson-annotations</artifactId > <version > ${jackson.version}</version > </dependency > <dependency > <groupId > mysql</groupId > <artifactId > mysql-connector-java</artifactId > <version > ${mysql-connector-java.version}</version > </dependency > <dependency > <groupId > org.mybatis</groupId > <artifactId > mybatis</artifactId > <version > ${mybatis.version}</version > </dependency > <dependency > <groupId > commons-beanutils</groupId > <artifactId > commons-beanutils</artifactId > <version > 1.9.3</version > </dependency > <dependency > <groupId > commons-fileupload</groupId > <artifactId > commons-fileupload</artifactId > <version > ${commons-fileupload.version}</version > </dependency > <dependency > <groupId > commons-io</groupId > <artifactId > commons-io</artifactId > <version > ${commons-io.version}</version > </dependency > <dependency > <groupId > dom4j</groupId > <artifactId > dom4j</artifactId > <version > ${dom4j.version}</version > </dependency > <dependency > <groupId > jaxen</groupId > <artifactId > jaxen</artifactId > <version > ${jaxen.version}</version > </dependency > <dependency > <groupId > log4j</groupId > <artifactId > log4j</artifactId > <version > ${log4j.version}</version > </dependency > <dependency > <groupId > org.slf4j</groupId > <artifactId > slf4j-api</artifactId > <version > ${slf4j-api.version}</version > </dependency > <dependency > <groupId > org.slf4j</groupId > <artifactId > slf4j-log4j12</artifactId > <version > ${slf4j-api.version}</version > </dependency > <dependency > <groupId > org.projectlombok</groupId > <artifactId > lombok</artifactId > <version > ${lombok.version}</version > </dependency > <dependency > <groupId > com.alibaba</groupId > <artifactId > druid</artifactId > <version > ${druid.version}</version > </dependency > <dependency > <groupId > com.squareup.okhttp3</groupId > <artifactId > okhttp</artifactId > <version > ${okhttp.version}</version > </dependency > <dependency > <groupId > com.squareup.okio</groupId > <artifactId > okio</artifactId > <version > ${okio.version}</version > </dependency > <dependency > <groupId > org.bouncycastle</groupId > <artifactId > bcprov-jdk16</artifactId > <version > ${bcprov-jdk16.version}</version > </dependency > <dependency > <groupId > redis.clients</groupId > <artifactId > jedis</artifactId > <version > ${jedis.version}</version > </dependency > </dependencies > <build > <resources > <resource > <directory > src/main/java</directory > <includes > <include > **/*.xml</include > <include > **/*.properties</include > </includes > <filtering > false</filtering > </resource > <resource > <directory > src/main/resources</directory > <includes > <include > **/*.xml</include > <include > **/*.properties</include > </includes > <filtering > false</filtering > </resource > </resources > <plugins > <plugin > <groupId > org.apache.tomcat.maven</groupId > <artifactId > tomcat7-maven-plugin</artifactId > <version > 2.2</version > <configuration > <port > 8822</port > <path > /</path > </configuration > </plugin > </plugins > </build > </project >
拷贝实体类, 常量
拷贝配置文件
配置web.xml
第三章-面面小程序业务功能 案例-城市定位(获得城市数据) 1.需求
面面小程序端要求第一次启动,先定位当前的位置,然后根据微信提供的地理位置信息,从服务端获取其所在的城市名称及城市ID及城市列表。如果城市不是当前用户需要的,可。
2.分析 定位需要授权才可以获取,而且是第一次的时候进行授权,在模拟测试时,需要通过小程序的客户端全部清除缓存才可以。微信端获取的是定位的源数据,即地址位置经纬度数据,需要通过服务器或第三方平台,解析出定位位置执行的城市或地址字符串。这个过程称为地理位置逆解析。
当前的思路是,在微信端获取经纬度数据,然后把其传递给服务端,服务端通过第三方平台(百度地图、腾讯地图或高德地图)API,解析地址位置信息,从而获取城市名称,再从我们的数据库获取到城市ID,最终返回给客户端。
根据提供的API文档,小程序客户端会传递经纬度数据到服务端,服务端根据地址解析工具解析出城市,然后根据城市获取相关ID及城市列表返回给客户端。
3.实现 3.1 解析地址信息 3.1.1 注册地图平台用户 使用高德地图API,先进入官方https://lbs.amap.com/ 注册一个用户,然后创建一个应用,如图
添加key
最终获得一个应用的Key,如图:
3.1.2 地址信息解析API 参考高德地图API https://lbs.amap.com/api/webservice/guide/api/georegeo 逆地址解析来完成一个地理位置信息的解析工具。API如图所示:
此为GET请求,仅需要Key和location即可。
实例: https://restapi.amap.com/v3/geocode/regeo?key=fb63c0c5ce314ba03d14cdadd9e4e35a&location=114.05,22.55
3.1.3 地址信息解析工具类 拷贝工具类到项目
3.2 构建城市API接口 3.2.1思路
创建CommonsController, 创建getCitys()方法
1 2 3 //1.获得请求参数(fs,location) 封装成Map对象 //2.调用业务 获得城市的数据Map //3.封装成Result 响应
创建DictService, 创建getCitys()方法
1 2 3 4 5 6 7 public Map getCitys(Map paramsMap){ //1.根据location(经纬度)调用高德 获得当前的城市 //2.调用Dao 根据城市名字查询 获得 Dict //3. 调用Dao,根据fs 获得城市的列表 List<Dict> //4.封装到Map 返回 }
创建DIctDao
//根据城市名字查询
//根据data_tag查询
3.2.1后台
1 2 3 4 5 6 7 8 9 10 11 12 13 14 15 16 17 18 19 20 21 22 23 24 25 26 27 28 29 30 31 32 33 34 35 36 37 38 39 40 41 42 package com.itheima.mm.controller;import com.itheima.framework.Controller;import com.itheima.framework.RequestMapping;import com.itheima.mm.entity.Result;import com.itheima.mm.pojo.Course;import com.itheima.mm.service.CourseService;import com.itheima.mm.service.DictService;import com.itheima.mm.utils.JsonUtils;import javax.servlet.http.HttpServletRequest;import javax.servlet.http.HttpServletResponse;import java.io.IOException;import java.util.List;import java.util.Map;@Controller public class CommonsController { private DictService dictService = new DictService (); private CourseService courseService = new CourseService (); @RequestMapping(value = "/common/citys") public void citys (HttpServletRequest request, HttpServletResponse response) throws IOException { try { Map parameterMap = JsonUtils.parseJSON2Object(request, Map.class); Map resultMap = dictService.findCityList(parameterMap); JsonUtils.printResult(response,new Result (true ,"查询城市信息成功" ,resultMap)); } catch (Exception e) { e.printStackTrace(); JsonUtils.printResult(response,new Result (false ,"查询城市信息失败" )); } } }
1 2 3 4 5 6 7 8 9 10 11 12 13 14 15 16 17 18 19 20 21 22 23 24 25 26 27 28 29 30 31 32 33 34 35 36 37 38 39 40 41 42 package com.itheima.mm.service;import com.itheima.mm.dao.DictDao;import com.itheima.mm.pojo.Dict;import com.itheima.mm.utils.LocationUtil;import com.itheima.mm.utils.SqlSessionFactoryUtils;import org.apache.ibatis.session.SqlSession;import java.util.HashMap;import java.util.List;import java.util.Map;public class DictService { public Map findCityList (Map parameterMap) throws Exception { SqlSession sqlSession = SqlSessionFactoryUtils.openSqlSession(); DictDao dictDao = sqlSession.getMapper(DictDao.class); String location = (String) parameterMap.get("location" ); String cityName = LocationUtil.parseLocation(location); Dict dict = dictDao.findByCityName(cityName); List<Dict> dictList = dictDao.findList(parameterMap); Map resultMap = new HashMap (); resultMap.put("location" ,dict); resultMap.put("citys" ,dictList); SqlSessionFactoryUtils.commitAndClose(sqlSession); return resultMap; } }
1 2 3 4 5 6 7 8 9 10 11 12 13 14 15 16 17 18 19 package com.itheima.mm.dao;import com.itheima.mm.pojo.Dict;import java.util.List;import java.util.Map;public interface DictDao { List<Dict> findList (Map parameterMap) ; Dict findByCityName (String cityName) ; }
1 2 3 4 5 6 7 8 9 10 11 12 13 14 15 16 <?xml version="1.0" encoding="UTF-8" ?> <!DOCTYPE mapper PUBLIC "-//mybatis.org//DTD Mapper 3.0//EN" "http://mybatis.org/dtd/mybatis-3-mapper.dtd" > <mapper namespace ="com.itheima.mm.dao.DictDao" > <select id ="findList" parameterType ="map" resultType ="Dict" > select id,dataValue title from t_dict WHERE dataType=1 <if test ="fs == 1" > AND dataTag=1 </if > </select > <select id ="findByCityName" parameterType ="string" resultType ="dict" > select id,dataValue title from t_dict where dataValue=#{cityName} </select > </mapper >
3.2.2 前端 以下操作,需要打开微信小程序开发工具,打开小程序客户端代码。
1.定位城市获取首页推荐列表
utils/config,将urlBase修改成你自己的服务器路径
找到工程utils/api.js文件,修改如下代码,将baseCitys的请求路径修改成你自己的Controller的请求路径
pages/welcome/activate/activate.js是默认首页()
编译并运行 小程序客户端运行测试。看是否能获取到城市信息,如图所示:
2.获取城市全部列表
刚才是完成了城市定位及首页推荐列表,点击如图箭头获取全部城市列表
跳转代码,前端已完成,参考如图:
点击右侧箭头获取全部城市列表数据,加载的是pages/welcome/city,找出city.js,如图所示:
编译运行,如图所示:
4.小结 案例-获取学科列表 1.需求
在这个页面还需要获取学科列表,需要用户设置城市及学科,后续业务都是根据这两个大条件进行的数据筛选。
2.分析
在CommonController创建getCourseList()
1 2 //1.调用业务 获得学科的数据List<Course> list //2.封装成Result 响应
在CourseService创建getCourseList()
在CourseDao创建selectCourseList()
1 SELECT id, name title, IFNULL(icon,'') icon FROM t_course
3.实现 3.1后台
1 2 3 4 5 6 7 8 9 10 11 12 13 14 15 16 17 18 19 20 21 22 23 24 25 26 27 28 29 30 31 32 33 34 35 36 37 38 39 40 41 42 43 44 45 46 47 48 49 50 51 52 53 54 package com.itheima.mm.controller;import com.itheima.framework.Controller;import com.itheima.framework.RequestMapping;import com.itheima.mm.entity.Result;import com.itheima.mm.pojo.Course;import com.itheima.mm.service.CourseService;import com.itheima.mm.service.DictService;import com.itheima.mm.utils.JsonUtils;import javax.servlet.http.HttpServletRequest;import javax.servlet.http.HttpServletResponse;import java.io.IOException;import java.util.List;import java.util.Map;@Controller public class CommonsController { private DictService dictService = new DictService (); private CourseService courseService = new CourseService (); @RequestMapping(value = "/common/citys") public void citys (HttpServletRequest request, HttpServletResponse response) throws IOException { try { Map parameterMap = JsonUtils.parseJSON2Object(request, Map.class); Map resultMap = dictService.findCityList(parameterMap); JsonUtils.printResult(response,new Result (true ,"查询城市信息成功" ,resultMap)); } catch (Exception e) { e.printStackTrace(); JsonUtils.printResult(response,new Result (false ,"查询城市信息失败" )); } } @RequestMapping("/common/courseList") public void courseList (HttpServletRequest request, HttpServletResponse response) throws IOException { try { List<Course> courseList = courseService.findCourseList(); JsonUtils.printResult(response,new Result (true ,"查询学科列表成功" ,courseList)); } catch (Exception e) { e.printStackTrace(); JsonUtils.printResult(response,new Result (false ,"查询学科列表失败" )); } } }
1 2 3 4 5 6 7 8 9 10 11 12 13 14 15 16 17 18 19 20 21 22 23 24 25 26 package com.itheima.mm.service;import com.itheima.mm.dao.CourseDao;import com.itheima.mm.pojo.Course;import com.itheima.mm.utils.SqlSessionFactoryUtils;import org.apache.ibatis.session.SqlSession;import java.util.List;public class CourseService { public List<Course> findCourseList () throws Exception { SqlSession sqlSession = SqlSessionFactoryUtils.openSqlSession(); CourseDao courseDao = sqlSession.getMapper(CourseDao.class); List<Course> courseList = courseDao.findList(); SqlSessionFactoryUtils.commitAndClose(sqlSession); return courseList; } }
1 2 3 4 5 6 7 8 9 10 11 12 13 14 15 package com.itheima.mm.dao;import com.itheima.mm.pojo.Course;import java.util.List;public interface CourseDao { List<Course> findList () ; }
1 2 3 4 5 6 7 8 9 <?xml version="1.0" encoding="UTF-8" ?> <!DOCTYPE mapper PUBLIC "-//mybatis.org//DTD Mapper 3.0//EN" "http://mybatis.org/dtd/mybatis-3-mapper.dtd" > <mapper namespace ="com.itheima.mm.dao.CourseDao" > <select id ="findList" resultType ="Course" > select id,icon,name title from t_course </select > </mapper >
3.2前端
utils/api.js
activate.js
4.小结 案例 - 登录与注册 1. 需求 定位城市及选择了学科后,需要点击确定按钮保存到服务端。但是这些信息必须与用户关联,如果用户第一次使用该客户端,点击下方确定按钮,会出现如图授权登录提示:
如果之前服务端没有保存过用户数据,可理解为注册过程,如果保存过只要匹配到数据即为登录。这个过程可以理解为登录与注册的过程。
2. 分析 微信正常注册用户比较复杂,需要客户端提交登录凭证到后端,后端根据登录凭证和小程序后端的appid及secret去微信服务器换取openId和session_key,openId是微信用户在小程序的唯一标识,session_key是用来解密用户数据的。
在这里我们用比较简单的方式实现,在微信客户端可以获取到用户基本数据,后端根据用户基本信息的昵称去数据库查询该用户是否注册过,如果注册过就默认登录,如果没有注册过就注册该用户,这样能快速实现业务功能。
无论是登录还是注册,后续小程序在与后端交互过程中,后端需要知道是哪个客户端,故需要把微信用户的id下发到客户端作为用户提交数据的唯一标识。
3.会员登录和注册实现 需要在WxMember类中,增加两个属性,学科ID和城市ID,如下所示:
3.1 WxMemberController及Service调用 1 2 3 4 5 6 7 8 9 10 11 12 13 14 15 16 17 18 19 20 21 22 23 24 25 26 27 28 29 30 31 32 33 34 35 36 37 38 39 40 41 42 43 44 45 46 47 48 49 50 51 52 53 54 55 56 57 package com.itheima.mm.controller;import com.itheima.framework.Controller;import com.itheima.framework.RequestMapping;import com.itheima.mm.entity.Result;import com.itheima.mm.pojo.WxMember;import com.itheima.mm.service.MemberService;import com.itheima.mm.utils.DateUtils;import com.itheima.mm.utils.JsonUtils;import javax.servlet.http.HttpServletRequest;import javax.servlet.http.HttpServletResponse;import java.io.IOException;import java.util.Date;import java.util.HashMap;import java.util.Map;@Controller public class MemberController { private MemberService memberService = new MemberService (); @RequestMapping("/member/login") public void login (HttpServletRequest request, HttpServletResponse response) throws IOException { try { WxMember wxMember = JsonUtils.parseJSON2Object(request, WxMember.class); WxMember loginMember = memberService.findByNickname(wxMember.getNickName()); if (loginMember == null ) { wxMember.setCreateTime(DateUtils.parseDate2String(new Date ())); memberService.addMember(wxMember); loginMember = wxMember; } Map resultMap = new HashMap <>(); resultMap.put("token" ,loginMember.getId()); resultMap.put("userInfo" ,loginMember); JsonUtils.printResult(response,new Result (true ,"登录成功" ,resultMap)); } catch (Exception e) { e.printStackTrace(); JsonUtils.printResult(response,new Result (false ,"登录失败" )); } } }
3.2 WxMemberService类 1 2 3 4 5 6 7 8 9 10 11 12 13 14 15 16 17 18 19 20 21 22 23 24 25 26 27 28 29 30 package com.itheima.mm.service;import com.itheima.mm.dao.MemberDao;import com.itheima.mm.pojo.WxMember;import com.itheima.mm.utils.SqlSessionFactoryUtils;import org.apache.ibatis.session.SqlSession;public class MemberService { public WxMember findByNickname (String nickName) throws Exception { SqlSession sqlSession = SqlSessionFactoryUtils.openSqlSession(); MemberDao memberDao = sqlSession.getMapper(MemberDao.class); WxMember wxMember = memberDao.findByNickname(nickName); SqlSessionFactoryUtils.commitAndClose(sqlSession); return wxMember; } public void addMember (WxMember wxMember) throws Exception { SqlSession sqlSession = SqlSessionFactoryUtils.openSqlSession(); MemberDao memberDao = sqlSession.getMapper(MemberDao.class); memberDao.addMember(wxMember); SqlSessionFactoryUtils.commitAndClose(sqlSession); } }
3.3 新增WxMemberDao接口及映射文件 1 2 3 4 5 6 7 8 9 10 11 12 13 14 15 16 package com.itheima.mm.dao;import com.itheima.mm.pojo.WxMember;public interface MemberDao { WxMember findByNickname (String nickName) ; void addMember (WxMember wxMember) ; }
WxMemberDao.xml修订如下,当然也可以不使用resultMap,直接使用POJO也可以。
1 2 3 4 5 6 7 8 9 10 11 12 13 14 15 16 17 <?xml version="1.0" encoding="UTF-8" ?> <!DOCTYPE mapper PUBLIC "-//mybatis.org//DTD Mapper 3.0//EN" "http://mybatis.org/dtd/mybatis-3-mapper.dtd" > <mapper namespace ="com.itheima.mm.dao.MemberDao" > <select id ="findByNickname" parameterType ="string" resultType ="WxMember" > select * from t_wx_member where nickname=#{nickname} </select > <insert id ="addMember" parameterType ="WxMember" > <selectKey resultType ="int" keyProperty ="id" keyColumn ="id" order ="AFTER" > select last_insert_id() </selectKey > insert into t_wx_member (nickName,avatarUrl,gender,city,province,country,language,openId,unionId,createTime) values (#{nickName},#{avatarUrl},#{gender},#{city},#{province},#{country},#{language},#{openId},#{unionId},#{createTime}) </insert > </mapper >
3.4 前端代码 activate.js代码如下:不用修改
app.js中getUserInfo的定义如下:需要修改
修订api.js,调用用户登录API
面面项目第五天 今日目标
第一章-面面业务功能 案例 - 设置城市及学科 1.需求 点击确定按钮,除了授权 登录与注册,还需要同时存储当前用户设置的城市与学科信息,在会员信息表中,有两个属性,分别储存的是城市ID与学科Id.
2.分析
在WxMemberController里面创建setCityCourse()
1 2 3 4 1.从请求头中获取用户的id 2.根据id获取用户信息 3.设置用户的cityId和courseId 4. 调用业务层的方法修改用户信息
在WxMemberService里面创建setCityCourse()
1 2 3 public void setCityCourse(Map map){ 1. 调用dao的方法修改用户信息 }
在WxMemberDao
3.实现 3.1后台
1 2 3 4 5 6 7 8 9 10 11 12 13 14 15 16 17 18 19 20 21 22 23 24 25 @RequestMapping("/member/setCityCourse") public void setCityCourse (HttpServletRequest request, HttpServletResponse response) throws IOException{ try { String authorization = request.getHeader("Authorization" ); Integer id = Integer.valueOf(authorization.substring(7 )); Map parameterMap = JsonUtils.parseJSON2Object(request, Map.class); WxMember wxMember = memberService.findById(id); wxMember.setCityId((Integer) parameterMap.get("cityID" )); wxMember.setCourseId((Integer) parameterMap.get("subjectID" )); memberService.updateWxMember(wxMember); JsonUtils.printResult(response,new Result (true ,"设置城市学科成功" )); } catch (Exception e) { e.printStackTrace(); JsonUtils.printResult(response,new Result (false ,"设置城市学科失败" )); } }
1 2 3 4 5 6 7 8 9 10 11 12 13 14 public void updateWxMember (WxMember wxMember) throws Exception { SqlSession sqlSession = SqlSessionFactoryUtils.openSqlSession(); MemberDao memberDao = sqlSession.getMapper(MemberDao.class); memberDao.updateWxMember(wxMember); SqlSessionFactoryUtils.commitAndClose(sqlSession); } public WxMember findById (Integer id) throws Exception { SqlSession sqlSession = SqlSessionFactoryUtils.openSqlSession(); MemberDao memberDao = sqlSession.getMapper(MemberDao.class); WxMember wxMember = memberDao.findById(id); SqlSessionFactoryUtils.commitAndClose(sqlSession); return wxMember; }
1 2 3 WxMember findById (Integer id) ; void updateWxMember (WxMember wxMember) ;
1 2 3 4 5 6 7 8 9 10 <select id ="findById" parameterType ="int" resultType ="WxMember" > select * from t_wx_member where id=#{id} </select > <update id ="updateWxMember" parameterType ="WxMember" > update t_wx_member set nickName=#{nickName},avatarUrl=#{avatarUrl},gender=#{gender},city=#{city},province=#{province}, country=#{country},language=#{language},openId=#{openId},unionId=#{unionId},createTime=#{createTime},cityId=#{cityId}, courseId=#{courseId},lastCategoryKind=#{lastCategoryKind},lastCategoryType=#{lastCategoryType},lastCategoryId=#{lastCategoryId}, lastQuestionId=#{lastQuestionId} where id=#{id} </update >
3.2前端
4.小结
更新当前用户的城市Id和学科ID
根据id去更新
案例-题库分类列表展示 1.需求 小程序默认题库列表,也称为刷题列表 ,这个列表也是我的错题本、收藏本、练习本的展示列表,这个题库首页列表主要是由技术点、企业、方向列表组成,效果如图所示:
以上列表中的技术点是根据所选学科的学科目录来筛选,企业是根据当前所选城市的全部企业列表,方向是所选城市企业的所属行业方向。三种列表的展示内容来自数据库的不同数据表,但都可以进入题干展示。为便于从数据库提取数据和在不同列表切换数据方便,需要对这种展示数据进行一个数据定义,其中把按技术点、企业、方向三种类型的区分称为题库列表的种类(CategoryKind),三种列表(题库列表、错题本列表、收藏本列表、练习本列表)称为题库列表的类型(CategoryType)。
1 2 3 4 categoryKind 1 -按学科目录 2 - 按企业 3 -按行业方向 categoryType 101 -刷题、201 -错题本、202 -我的练习、203 -收藏题目
每个列表需要显示该种类的总题目数量,还有显示当前用户已做题目的数量。用户做题数据是根据用户做题记录表(tr_member_question)来获取。
2.分析
创建CategoryController定义categoryList()
1 2 3 4 5 //1.获得请求参数(categoryKind,categoryType) 封装到Map //2.获得请求头, 获得id //3.调用根据id获得Member对象 获得city_id和course_id //4.调用业务, 进行查询 List<Map> list //5.封装Result 响应
在CategoryService定义categoryList()
1 2 3 public List<Map> list categorys(Map map){ //调用Dao }
3.实现 3.1后台
1 2 3 4 5 6 7 8 9 10 11 12 13 14 15 16 17 18 19 20 21 22 private CategoryService categoryService = new CategoryService ();@RequestMapping("/category/list") public void categoryList (HttpServletRequest request, HttpServletResponse response) throws IOException { try { String authorization = request.getHeader("Authorization" ); Integer id = Integer.valueOf(authorization.substring(7 )); Map parameterMap = JsonUtils.parseJSON2Object(request, Map.class); parameterMap.put("id" ,id); List<Map> resultList = categoryService.findCategoryList(parameterMap); JsonUtils.printResult(response,new Result (true ,"查询题库分类列表成功" ,resultList)); } catch (Exception e) { e.printStackTrace(); JsonUtils.printResult(response,new Result (false ,"查询题库分类列表失败" )); } }
1 2 3 4 5 6 7 8 9 10 11 12 13 14 15 16 17 18 19 20 21 22 23 24 25 26 public List<Map> findCategoryList (Map parameterMap) throws Exception { SqlSession sqlSession = SqlSessionFactoryUtils.openSqlSession(); String categoryType = parameterMap.get("categoryType" ) + "" ; List<Map> resultList = null ; if (categoryType.equals("101" )) { String categoryKind = parameterMap.get("categoryKind" ) + "" ; if (categoryKind.equals("1" )) { CatalogDao catalogDao = sqlSession.getMapper(CatalogDao.class); resultList = catalogDao.findCatalogList(parameterMap); }else if (categoryKind.equals("2" )){ CompanyDao companyDao = sqlSession.getMapper(CompanyDao.class); resultList = companyDao.findCompanyList(parameterMap); }else { } } SqlSessionFactoryUtils.commitAndClose(sqlSession); return resultList; }
1 List<Map> findCatalogList (Map parameterMap) ;
1 2 3 4 5 6 7 8 9 10 11 <select id ="findCatalogList" parameterType ="map" resultType ="map" > SELECT tc.id,tc.name title, (select count(*) from t_question WHERE catalogId=tc.id) allCount, (select count(*) from tr_member_question WHERE memberId=#{id} and questionId in (SELECT id from t_question WHERE catalogId=tc.id)) finishedCount FROM t_catalog tc WHERE tc.courseId=(SELECT courseId from t_wx_member WHERE id=#{id}) </select >
1 List<Map> findCompanyList (Map parameterMap) ;
1 2 3 4 5 6 7 8 9 10 11 <select id ="findCompanyList" parameterType ="map" resultType ="map" > SELECT tc.id,tc.shortName title, (select count(*) from t_question WHERE companyId=tc.id) allCount, (SELECT count(*) FROM tr_member_question WHERE memberId=#{id} and questionId in (SELECT id from t_question WHERE companyId=tc.id)) finishedCount FROM t_company tc WHERE cityId=(select cityId from t_wx_member where id=#{id}) </select >
3.3 前端
main.js
4.小结 案例-题目详情信息展示 1. 需求 用户选择相应的分类后,点击进入题目详情。题目详情信息包含题干,选项(单选、复选,答案),解析内容、解析视频、难易度、是否名企、用户答案及当前所选分类的总题目数及当前题目序号。
2. 分析 题目详情是根据当前用户所选的分类种类、分类类型、分类ID,然后从数据库中读取相应的数据。数据读取采用一次性次性读取当前分类数据返回给前端(后续如果数据量非常大时再考虑分页获取)。另外在每个题目右下角都需要显示当前分类的总题目数量和题目序号,故可以考虑先根据分类ID获取当前分类数据,然后再获取这个分类的题目列表。
题目列表需要全部显示,同时需要显示是否是用户已完成的,所以需要题目表与用户题目关系表进行左或右连接。在查询题目数据的同时,需要关联查询其标签列表及题目选项列表。另外根据用户所选分类不同,获取题目列表的条件也不同。
整个查询中以小程序客户端需要的字段为基准,数据字段返回时可以使用别名方式命名,如果没有对应的POJO类,可以使用Map类封装数据。
本次查询先按技术点获取,整个流程走通后再实现另外两种分类数据的获取,另外两个仅仅是Dao的不同,在这里实现按技术点获取题目详情。
获取题目的同时,需要获取每个题目的选项及考点,考点即题目的标签。
3. 实现 3.1 CategoryController及Service调用 1 2 3 4 5 6 7 8 9 10 11 12 13 14 15 16 17 18 19 @RequestMapping("/question/list") public void questionList (HttpServletRequest request, HttpServletResponse response) throws IOException { try { String authorization = request.getHeader("Authorization" ); Integer id = Integer.valueOf(authorization.substring(7 )); Map parameterMap = JsonUtils.parseJSON2Object(request, Map.class); parameterMap.put("id" ,id); Map resultMap = categoryService.findQuestionList(parameterMap); JsonUtils.printResult(response,new Result (true ,"查询题目列表成功" ,resultMap)); } catch (Exception e) { e.printStackTrace(); JsonUtils.printResult(response,new Result (false ,"查询题目列表失败" )); } }
3.2 CategoryService类 1 2 3 4 5 6 7 8 9 10 11 12 13 14 15 16 17 18 public Map findQuestionList (Map parameterMap) throws IOException { String categoryType = parameterMap.get("categoryType" ) + "" ; SqlSession sqlSession = SqlSessionFactoryUtils.openSqlSession(); Map resultMap = null ; if (categoryType.equals("101" )) { CatalogDao catalogDao = sqlSession.getMapper(CatalogDao.class); resultMap = catalogDao.findDetail(parameterMap); QuestionDao questionDao = sqlSession.getMapper(QuestionDao.class); List<Question> questionList = questionDao.findQuestionListByCategoryId(parameterMap); resultMap.put("items" ,questionList); } SqlSessionFactoryUtils.commitAndClose(sqlSession); return resultMap; }
3.3 Dao接口及映射文件
1 Map findDetail (Map parameterMap) ;
1 2 3 4 5 6 7 8 9 10 11 12 13 14 15 16 17 18 19 20 21 22 <select id ="findDetail" parameterType ="map" resultType ="map" > select id, <if test ="categoryKind == 1" > name title, (select count(*) from t_question WHERE catalogId=#{categoryID}) allCount, (select count(*) from tr_member_question WHERE memberId=#{id} and questionId in (SELECT id from t_question WHERE catalogId=#{categoryID})) finishedCount from t_catalog </if > <if test ="categoryKind == 2" > shortName title, (select count(*) from t_question WHERE companyId=#{categoryID}) allCount, (SELECT count(*) FROM tr_member_question WHERE memberId=#{id} and questionId in (SELECT id from t_question WHERE companyId=#{categoryID})) finishedCount from t_company </if > where id=#{categoryID} </select >
1 List<Question> findQuestionListByCategoryId (Map parameterMap) ;
1 2 3 4 5 6 7 8 9 10 11 12 13 14 15 16 17 18 19 20 21 22 23 24 25 26 27 28 29 30 31 32 33 34 35 36 37 38 39 40 41 42 43 44 45 46 47 48 <?xml version="1.0" encoding="UTF-8" ?> <!DOCTYPE mapper PUBLIC "-//mybatis.org//DTD Mapper 3.0//EN" "http://mybatis.org/dtd/mybatis-3-mapper.dtd" > <mapper namespace ="com.itheima.mm.dao.QuestionDao" > <resultMap id ="questionMap" type ="Question" > <id column ="id" property ="id" > </id > <result column ="content" property ="content" > </result > <result column ="grade" property ="grade" > </result > <result column ="title" property ="title" > </result > <result column ="isFavorite" property ="isFavorite" > </result > <result column ="type" property ="type" > </result > <result column ="video" property ="video" > </result > <result column ="isFamous" property ="isFamous" > </result > <result column ="" property ="" > </result > <collection property ="selection" column ="id" select ="com.itheima.mm.dao.QuestionItemDao.findQuestionItemListByQuestionId" > </collection > <collection property ="tags" column ="id" select ="com.itheima.mm.dao.TagDao.findTagListByQuestionId" > </collection > </resultMap > <select id ="findQuestionListByCategoryId" parameterType ="map" resultMap ="questionMap" > select tq.id, (SELECT tag from tr_member_question WHERE memberId=#{id} and questionId=tq.id) answerTag, tq.analysis content, tq.difficulty grade, <if test ="categoryKind == 2" > (select isFamous from t_company where id=#{categoryID}) isFamous, </if > (SELECT isFavorite FROM tr_member_question WHERE memberId=#{id} and questionId=tq.id) isFavorite, tq.subject title, tq.type, tq.analysisVideo video from t_question tq where <if test ="categoryKind == 1" > catalogId=#{categoryID} </if > <if test ="categoryKind == 2" > companyId=#{categoryID} </if > </select > </mapper >
1 2 3 4 5 6 7 8 9 10 11 12 13 14 15 package com.itheima.mm.dao;import com.itheima.mm.pojo.QuestionItem;import java.util.List;public interface QuestionItemDao { List<QuestionItem> findQuestionItemListByQuestionId (int questionId) ; }
1
2
3
4
5
6
7
8
9
<?xml version="1.0" encoding="UTF-8" ?> <!DOCTYPE mapper PUBLIC "-//mybatis.org//DTD Mapper 3.0//EN" "http://mybatis.org/dtd/mybatis-3-mapper.dtd" > <mapper namespace ="com.itheima.mm.dao.QuestionItemDao" > <select id ="findQuestionItemListByQuestionId" parameterType ="int" resultType ="QuestionItem" > select id,content title,isRight from t_question_item where questionId=#{questionId} </select > </mapper >
1 2 3 4 5 6 7 8 9 10 11 12 13 14 15 package com.itheima.mm.dao;import com.itheima.mm.pojo.Tag;import java.util.List;public interface TagDao { List<Tag> findTagListByQuestionId (int questionId) ; }
1 2 3 4 5 6 7 8 9 10 <?xml version="1.0" encoding="UTF-8" ?> <!DOCTYPE mapper PUBLIC "-//mybatis.org//DTD Mapper 3.0//EN" "http://mybatis.org/dtd/mybatis-3-mapper.dtd" > <mapper namespace ="com.itheima.mm.dao.TagDao" > <select id ="findTagListByQuestionId" parameterType ="int" resultType ="Tag" > select id,name title from t_tag where id in (select tagId from tr_question_tag WHERE questionId=#{questionId}) </select > </mapper >
2.3.4 前端代码 在main.js中,从题库分类列表页跳转到题目详情页面:
exam.js中,从onload开始,然后加载getList,然后是processData
api.js:
编译运行小程序,效果如图:
面面项目第六天 今日目标
第一章-面面业务功能 案例-题目答案提交 1 需求 在题目列表下发时,已经把每个题目的答案下发到客户端,故用户做题的答案验证是在客户端实现的。用户在切换下一题时把答题结果提交到服务器。当前题目类型有单选、多选及简答三种类型,做题的实现方式也会有所不同。
单选题目,只要用户点击任何一单选选项,页面立即响应答题结果;
多选题目,用户选择题目选项,需要下拉到最下方提交答案,然后页面显示做题结果;
简单题目,用户看到题目后,思考自己的题目答案,点击解析后查看是否与自己的思考匹配,选择下方的“理想”与“不理想”作为简答题的答案。
2 分析 单选与复选答案是正确与错误,简单题答案是理想与不理想,在数据库里面一个题目的答案就是正确与错误,需要在后端处理这两种情况 ,在答案提交时,也需要同时把当前收藏状态一并提交到服务端。单选、复习、简单在客户端已经完成了验证,只需要把题目答案提交到服务端即可。
单选与复选题目的答题结果,采用json数组字符串的形式存入数据库。
提交用户答案时,需要判断用户之前是否有做题记录,如果有,需要更新做题状态;没有就添加做题记录。
提交答案后,需要把当前做题的分类信息、最后一题信息更新到会员表中。
3 实现 3.1 CategoryController及Service调用 1 2 3 4 5 6 7 8 9 10 11 12 13 14 15 16 17 18 19 @RequestMapping("/question/submit") public void submit (HttpServletRequest request, HttpServletResponse response) throws IOException { try { Integer memberId = Integer.valueOf(request.getHeader("Authorization" ).substring(7 )); Map parameterMap = JsonUtils.parseJSON2Object(request, Map.class); parameterMap.put("memberId" ,memberId); questionService.submitQuestion(parameterMap); JsonUtils.printResult(response,new Result (true ,"提交答案成功" )); } catch (Exception e) { e.printStackTrace(); JsonUtils.printResult(response,new Result (false ,"提交答案失败" )); } }
3.2 CategoryService类 1 2 3 4 5 6 7 8 9 10 11 12 13 14 15 16 17 18 19 20 21 22 23 24 25 26 27 28 29 30 31 32 33 34 35 36 37 38 39 40 41 42 43 44 45 46 47 48 49 50 51 52 53 54 55 56 57 58 59 60 61 62 63 64 65 66 67 68 69 70 71 72 73 74 75 76 77 78 79 80 public void submitQuestion (Map parameterMap) throws Exception { Integer type = Integer.valueOf(parameterMap.get("type" ) + "" ); Boolean answerIsRight = (Boolean) parameterMap.get("answerIsRight" ); Integer tag = getTag(type, answerIsRight); parameterMap.put("tag" ,tag); JSONArray jsonArray = (JSONArray) parameterMap.get("answerResult" ); if (jsonArray != null ){ Object[] array = jsonArray.toArray(); String answerResult = Arrays.toString(array); parameterMap.put("answerResult" ,answerResult); } SqlSession sqlSession = SqlSessionFactoryUtils.openSqlSession(); QuestionDao questionDao = sqlSession.getMapper(QuestionDao.class); if (questionDao.findByMemberIdAndQuestionId(parameterMap) != null ) { questionDao.updateMemberQuestion(parameterMap); }else { questionDao.addMemberQuestion(parameterMap); } WxMember wxMember = wxMemberService.findById((Integer) parameterMap.get("memberId" )); wxMember.setLastCategoryType(Integer.valueOf(parameterMap.get("categoryType" )+"" )); wxMember.setLastCategoryKind(Integer.valueOf(parameterMap.get("categoryKind" )+"" )); wxMember.setLastCategoryId(Integer.valueOf(parameterMap.get("categoryID" )+"" )); wxMember.setLastQuestionId(Integer.valueOf(parameterMap.get("id" )+"" )); WxMemberDao memberDao = sqlSession.getMapper(WxMemberDao.class); memberDao.update(wxMember); SqlSessionFactoryUtils.commitAndClose(sqlSession); } private Integer getTag (Integer type, Boolean answerIsRight) { Integer tag = null ; if (type == 5 ) { if (answerIsRight) { tag = 2 ; }else { tag = 3 ; } }else { if (answerIsRight) { tag = 0 ; }else { tag= 1 ; } } return tag; }
3.3 QuestionDao接口 1 2 3 4 5 Map findByMemberIdAndQuestionId (Map parameterMap) ; void updateMemberQuestion (Map parameterMap) ;void addMemberQuestion (Map parameterMap) ;
3.4 QuestionDao.xml映射配置文文件 1 2 3 4 5 6 7 8 9 10 11 12 13 <select id ="findByMemberIdAndQuestionId" parameterType ="map" resultType ="map" > select * from tr_member_question where memberId=#{memberId} and questionId=#{id} </select > <update id ="updateMemberQuestion" parameterType ="map" > update tr_member_question set isFavorite=#{isFavorite},tag=#{tag},answerResult=#{answerResult} where memberId=#{memberId} and questionId=#{id} </update > <insert id ="addMemberQuestion" parameterType ="map" > insert into tr_member_question(memberId,questionId,tag,isFavorite,answerResult) values (#{memberId},#{id},#{tag},#{isFavorite},#{answerResult}) </insert >
3.5 前端代码 exam.js中的questionsCommitOne方法,在单选、复选及简答题提交时,都会调用此方法,方法如图所示:
修改api.js,调用后端答案提交接口,代码如图:
先编译运行后端接口,再编译运行小程序客户端。
做题过程:
返回列表页面,查看已做题数量及数据库中的记录是否正确,结果如图所示:
t_wx_member表
案例-个人中心展示 个人中心需要显示当前用户的状态,状态包含当前用户已完成的题目数量及最后刷题的信息,然后可以根据这些信息跳转到上次最后做题的位置继续答题。返回数据中需要显示分类名称,故需要根据不同的参数获取不同的分类名称。
1 更新WxMemberController及Service调用 1 2 3 4 5 6 7 8 9 10 11 12 13 14 15 16 17 @RequestMapping("/user/center") public void userCenter (HttpServletRequest request, HttpServletResponse response) throws IOException { try { Integer id = Integer.valueOf(request.getHeader("Authorization" ).substring(7 )); WxMember wxMember = wxMemberService.findById(id); Map userCenterMap = wxMemberService.findUserCenter(wxMember); JsonUtils.printResult(response,new Result (true ,"获取个人中心数据成功" ,userCenterMap)); } catch (Exception e) { e.printStackTrace(); JsonUtils.printResult(response,new Result (false ,"获取个人中心数据失败" )); } }
2 更新WxMemberService实现类 1 2 3 4 5 6 7 8 9 10 11 12 13 14 15 16 17 18 19 20 21 22 23 24 25 26 27 28 29 30 31 32 33 public Map findUserCenter (WxMember wxMember) throws Exception { SqlSession sqlSession = SqlSessionFactoryUtils.openSqlSession(); WxMemberDao memberDao = sqlSession.getMapper(WxMemberDao.class); Long answerCount = memberDao.findAnswerCount(wxMember); String categoryTitle = memberDao.findCategoryTitle(wxMember); String cityName = memberDao.findCityName(wxMember); Map userCenterMap = new HashMap (); userCenterMap.put("answerCount" ,answerCount); Map lastAnswerMap = new HashMap (); lastAnswerMap.put("categoryID" ,wxMember.getLastCategoryId()); lastAnswerMap.put("categoryTitle" ,categoryTitle); lastAnswerMap.put("categoryKind" ,wxMember.getLastCategoryKind()); lastAnswerMap.put("categoryType" ,wxMember.getLastCategoryType()); userCenterMap.put("lastAnswer" ,lastAnswerMap); Map categoryMap = new HashMap (); categoryMap.put("cityID" ,wxMember.getCityId()); categoryMap.put("cityName" ,cityName); categoryMap.put("subjectID" ,wxMember.getCourseId()); userCenterMap.put("category" ,categoryMap); return userCenterMap; }
3 更新映射文件 3.1 WxMemerDao 1 2 3 4 5 Long findAnswerCount (WxMember wxMember) ; String findCategoryTitle (WxMember wxMember) ; String findCityName (WxMember wxMember) ;
3.2 WxMemberDao.xml 1 2 3 4 5 6 7 8 9 10 11 12 13 14 15 16 17 18 19 <select id ="findAnswerCount" parameterType ="wxMember" resultType ="long" > select count(*) from tr_member_question where memberId=#{id} </select > <select id ="findCategoryTitle" parameterType ="wxMember" resultType ="string" > select <if test ="lastCategoryKind == 1" > name from t_catalog </if > <if test ="lastCategoryKind == 2" > shortName from t_company </if > where id=#{lastCategoryId} </select > <select id ="findCityName" parameterType ="wxMember" resultType ="string" > select dataValue from t_dict where id=#{cityId} </select >
4 编写前端代码 api.js,代码如下:
main.js按如图修改:
效果如图:
第二章-部署 在企业中,一般都采用linux系统作为Web应用服务器,所以我们需要在linux系统搭建项目运行环境。在linux系统上搭建运行环境需要安装jdk、myql、tomcat相关软件。
实操-部署管理后台和微信API 1.目标
2.步骤
软件安装(已经做好了)
向mysql导入数据
把项目打成war包,上传到服务器
3.讲解 3.1.linux系统myql导入数据库
本地数据库导出
linux系统mysql导入数据库文件
查看导入的表与数据
3.2.导出war包部署到tomcat上
步骤1:上传war文件
步骤2:打开浏览器浏览网站
如果有乱码, 在数据库的url上添加编码:
1 jdbc:mysql://localhost:3306/itheima104_mm?characterEncoding=utf-8
3.3解决第一次启动慢
4.小结 实操-小程序的部署【了解】 1.目标
2.步骤
上传
设置小程序基本信息
开发设置
发布小程序
3.讲解 3.1上传 测试OK后,上传到微信小程序管理后台,如图所示:
3.2 设置小程序基本信息 登录小程序管理后台,在首页有填写基本信息的入口,如果已填写完毕,如图所示
基本信息主要包含名称、简称及头像等信息,请根据实际情况如实填写:
3.3 开发设置 开发设置,主要设置域名,如图所示:
3.4 发布小程序 从首页,点击“前往发布”
点击提交审核,如图
配置功能页面
最后提交审核完成:
接下来等待腾讯审核结果即可,如何审核未通过,根据反馈进行修订,然后重新提交审核。
4.小结 第三章-Nginx介绍和安装 知识点-Nginx介绍 1. 目标
2. 路径
Nginx简介
Nginx作用
3. 讲解 3.1 Nginx简介 Nginx(engine x)是一个高性能的HTTP和反向代理web服务器,同时也提供了IMAP/POP3/SMTP服务。
Nginx是由伊戈尔·赛索耶夫为俄罗斯访问量第二的Rambler.ru站点(俄文:Рамблер)开发的,第一个公开版本0.1.0发布于2004年10月4日。
因它的稳定性、丰富的功能集、示例配置文件和低系统资源的消耗而闻名,其特点是占有内存少,并发能力强,事实上nginx的并发能力确实在同类型的网页服务器中表现较好,中国大陆使用nginx网站用户有:百度、京东、新浪、网易、腾讯、淘宝等。
3.2 Nginx作用
Nginx是一款轻量级的服务器,可以处理静态资源
Nginx是反向代理服务器,实现负载均衡
Nginx也是电子邮件(IMAP/POP3)代理服务器,能够代理收发电子邮件
3.3 tomcat与nginx的区别
设计目的
Tomcat是一个免费的开源的Servlet(动态资源)容器,实现了JAVAEE规范,遵循http协议的的服务器
Nginx是一款轻量级的电子邮件(电子邮件遵循IMAP/POP3协议)代理服务器,后来又发展成可以部署静态应用程序和进行反向代理的服务器
存放内容
tomcat可以存放静态和动态资源
nginx可以存放静态资源
应用场景
tomcat用来开发和测试javaweb应用程序
nginx用来做负载均衡服务器, 发布静态网页
4. 小结
Nginx 是高性能的服务器软件
Nginx作用
发布静态资源
方向代理服务器
负载均衡服务器
邮件服务器
实操-Nginx安装和启动 1. 目标
2. 步骤
下载Nginx
安装Nginx
nginx常用操作命令
3. 实现 3.1 下载
3.2 安装 3.2.1window下安装Nginx
Nginx的Windows版免安装,解压可直接使用
解压后目录结构如下:
1 2 3 4 5 6 7 8 nginx-1.16.1 |--conf 配置文件,其中有一个nginx.conf是核心配置文件 |--contrib nginx提供的一些脚本工具等 |--docs 文档说明 |--html nginx的默认部署的静态资源,其中有欢迎页面和错误页面 |--logs 日志 |--temp 临时文件夹 |--nginx.exe nginx程序 ★
3.2.2Linux下安装Nginx
进入http://nginx.org/网站,下载nginx-1.16.1.tar.gz文件
把安装包上传到Linux
在 usr/local下新建文件夹 nginx
将root下的nginx移动到 /usr/local/nginx
1 mv nginx-1.16.1.tar.gz /usr/local/nginx/
进入/usr/local/nginx, 解包
1 2 cd /usr/local/nginx/ tar -xvf nginx-1.16.1.tar.gz
安装Nginx依赖环境gcc (安装redis的时候已经装过了)
Nginx是C/C++语言开发,建议在Linux上运行,安装Nginx需要先将官网下载的源码进行编译,编译依赖gcc环境,所以需要安装gcc。一直y(同意)(需要网络),
连接网络,安装Nginx依赖环境pcre/zlib/openssl. y表示安装过程如有提示,默认选择y
1 2 3 yum -y install pcre pcre-devel yum -y install zlib zlib-devel yum -y install openssl openssl-devel
编译和安装nginx
1 2 3 4 cd nginx-1.16.1 进入nginx目录 ./configure 配置nginx(在nginx-1.16.1目录中执行这个配置文件) make 编译nginx make install 安装nginx
进去sbin目录,启动
1 2 cd /usr/local/nginx/sbin 进入/usr/local/nginx/sbin这个目录 ./nginx 启动Nginx
开放Linux的对外访问的端口80,在默认情况下,Linux不会开放端口号80
1 2 3 4 5 6 7 8 9 10 11 修改配置文件 cd /etc/sysconfig vi iptables 复制(yy p) -A INPUT -m state --state NEW -m tcp -p tcp --dport 22 -j ACCEPT 改成 -A INPUT -m state --state NEW -m tcp -p tcp --dport 80 -j ACCEPT 重启加载防火墙或者重启防火墙 service iptables reload 或者 service iptables restart
停止Nginx服务器
1 2 cd /usr/local/nginx/sbin 进入/usr/local/nginx/sbin这个目录 ./nginx -s stop 停止Nginx
3.3 常用操作命令 3.3.1 操作命令
打开cmd,切换到nginx的解压目录
输入命令,操作nginx:
启动Nginx:start nginx.exe
重新载入配置文件:nginx.exe -s reload
停止:nginx.exe -s stop
3.3.2 演示效果
启动nginx
启动成功后,在任务管理器中会有两个nginx的进程
使用浏览器访问nginx
nginx的默认端口是80,所以访问地址是:http://localhost:80
如果修改了配置文件,就重新载入
停止nginx
4. 小结
下载
我们工作里面一般不会使用最新的版本的. 一般在稳定(正式)版本里面选择最新的
安装
window: 解压到一个没有中文和空格目录
Linux: 安装C++ 环境,
常用的命令
第四章-Nginx的功能 实操-Nginx部署静态web应用(了解) 1. 目标
2. 步骤
准备一个静态web应用
修改nginx的配置文件
启动nginx,使用浏览器访问
3. 实现 3.1 准备一个静态web应用
3.2 修改nginx的配置文件
打开conf\nginx.conf配置文件,修改http中server的内容
3.3 启动nginx,使用浏览器访问
打开cmd,启动nginx:start nginx.exe
使用浏览器访问:http://localhost:80,或者使用ip访问:http://192.168.1.100:80
4. 小结
修改nginx的配置文件
我们后面项目或者工作里面, 可以把一些访问量比较大 通过模版静态化技术, 生成静态页面, 直接部署到Nginx(商品详细页)
知识点-反向代理介绍(重点) 1. 目标
2. 路径
正向代理
方向代理
正向代理和反向代理区别
3. 讲解 3.1 正向代理 3.1.1正向代理介绍 正向代理类似一个跳板机,代理访问外部资源。
举个例子:
我是一个用户,我访问不了某网站,但是我能访问一个代理服务器,这个代理服务器呢,它能访问那个我不能访问的网站,于是我先连上代理服务器,告诉他我需要那个无法访问网站的内容,代理服务器去取回来,然后返回给我。从那个网站的角度来看,只在代理服务器来取内容的时候有一次记录,有时候并不知道是用户的请求,也隐藏了用户的资料,这取决于代理告不告诉网站。
注意:客户端必须设置正向代理服务器,当然前提是要知道正向代理服务器的IP地址,还有代理程序的端口。
本地客户端设置代理服务器操作如下:
3.1.2正向代理原理
总结来说:正向代理 是一个位于客户端和原始服务器(origin server)之间的服务器,为了从原始服务器取得内容,客户端向代理发送一个请求并指定目标(原始服务器),然后代理向原始服务器转交请求并将获得的内容返回给客户端。客户端必须要进行一些特别的设置才能使用正向代理。
3.1.3正向代理的用途 (1)访问原来无法访问的资源,如google
(2) 可以做缓存,加速访问资源
(3)对客户端访问授权,上网进行认证
(4)代理可以记录用户访问记录(上网行为管理),对外隐藏用户信息
3.2.反向代理 3.2.1反向代理介绍 反向代理(Reverse Proxy)方式是指以==代理服务器来接受internet上的连接请求==,==然后将请求转发给内部网络上的服务器,并将从服务器上得到的结果返回给internet上请求连接的客户端==,此时代理服务器对外就表现为一个服务器。
3.2.2反向代理原理
3.2.3反向代理的作用 (1) 保证内网的安全,可以使用反向代理提供防火墙(WAF)功能,阻止web攻击。大型网站,通常将反向代理作为公网访问地址,Web服务器是内网。
(2)负载均衡,通过反向代理服务器来优化网站的负载。当大量客户端请求代理服务器时,反向代理可以集中分发不同用户请求给不同的web服务器进行处理请求。(本阶段不实现,负载均衡技术项目阶段讲解)
4. 小结 4.1 反向代理与正向代理区别 正向代理中,proxy和client同属一个局域网(Local Area Network,LAN),对server透明;
反向代理中,proxy和server同属一个局域网(Local Area Network,LAN),对client透明;
实际上proxy在两种代理中做的事都是代为收发请求和响应,不过从结构上来看正好左右互换了下,所以把后出现的那种代理方式叫反向代理。
我们使用Nginx作为方向代理服务器
实操-Nginx反向代理配置 1. 目标
2. 步骤
准备一个服务器实例,这里使用Tomcat
修改配置nginx,使用Nginx作为服务端的代理(反向代理服务器)
启动Nginx,浏览器通过Nginx访问目标服务器
3. 实现 3.1 准备一个服务器实例
把web应用wx.war拷贝到Tomcat的webapps里
双击Tomcat的bin\startup.bat,启动Tomcat
访问 http://localhost:8080/wx/
3.2 修改配置nginx,使用Nginx作为反向代理
3.3 启动Nginx,浏览器通过Nginx访问目标服务器
4. 小结
配置tomcat
1 2 3 upstream tomcat_servers{ # tomcat_servers 是自己命名的,可以叫其它名称 server 127.0.0.1:8080; # 格式: server 服务器的域名或ip:端口; }
配置方向代理
1 2 3 4 5 server { location / { proxy_pass http://tomcat_servers; } }
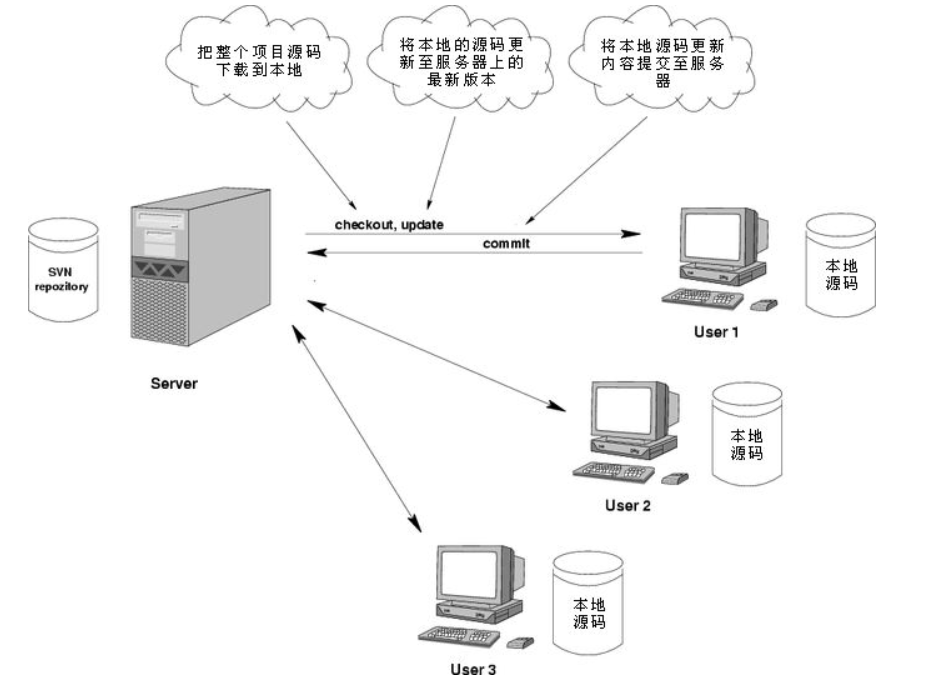
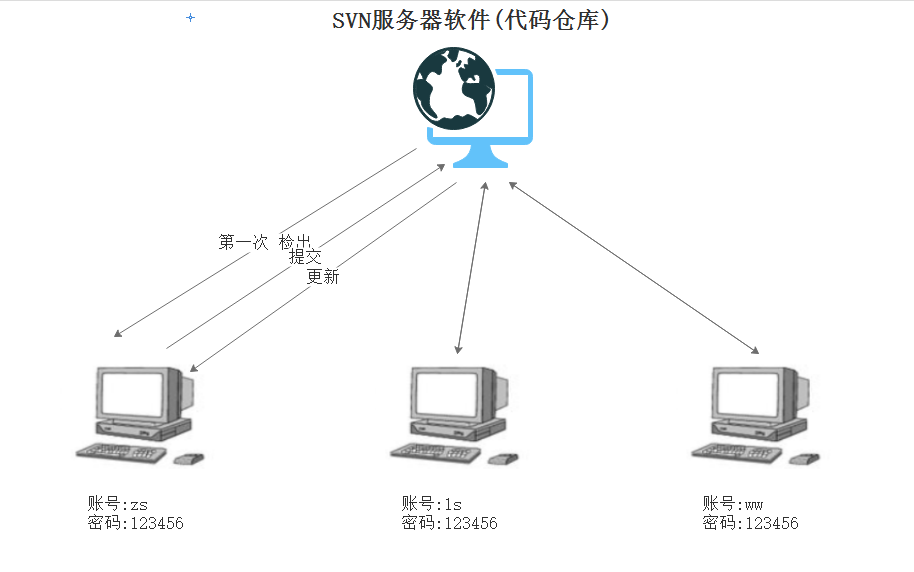

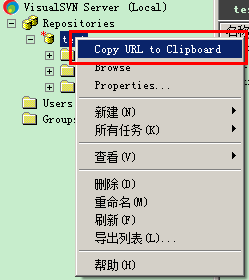
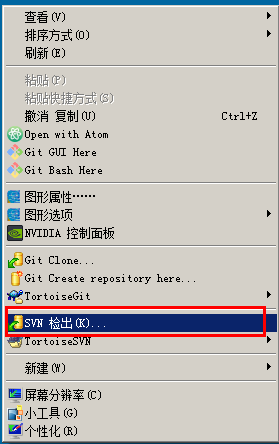
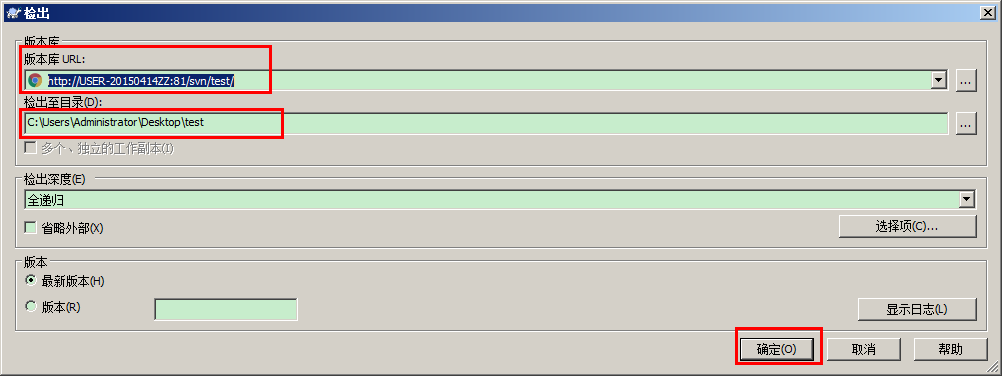
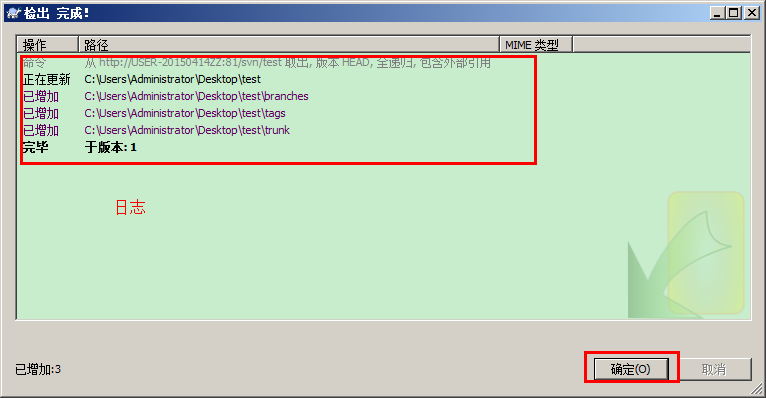

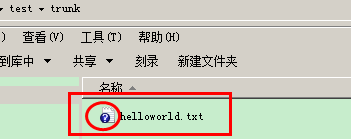
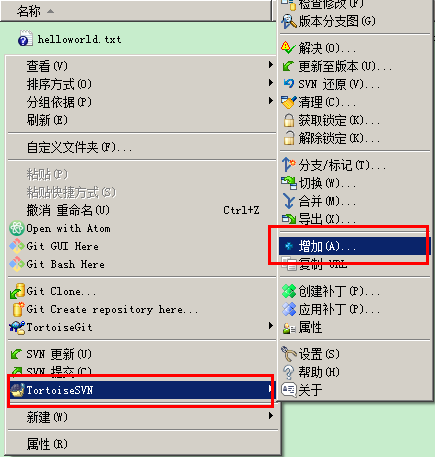
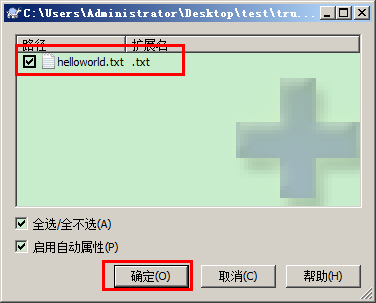
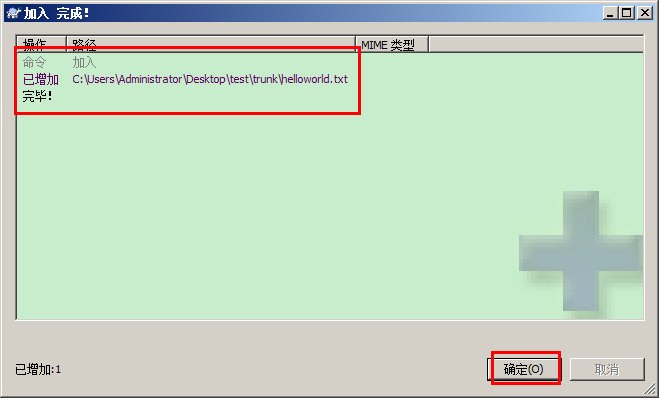

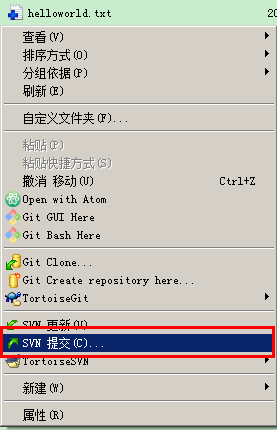
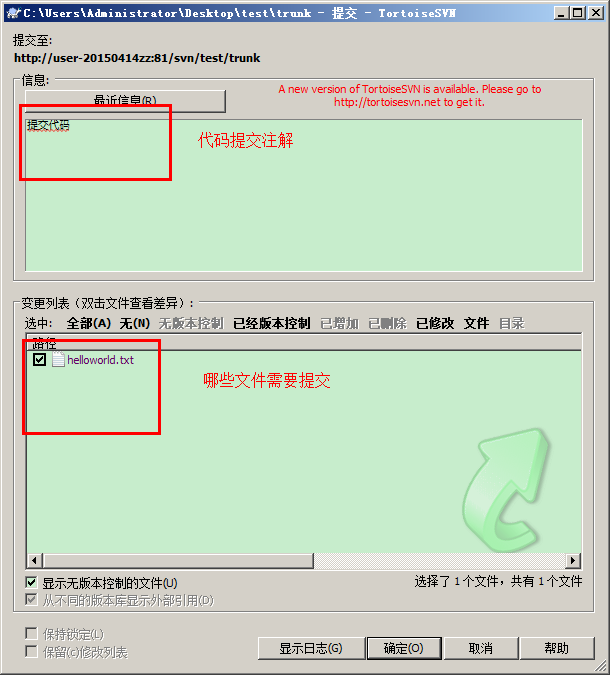
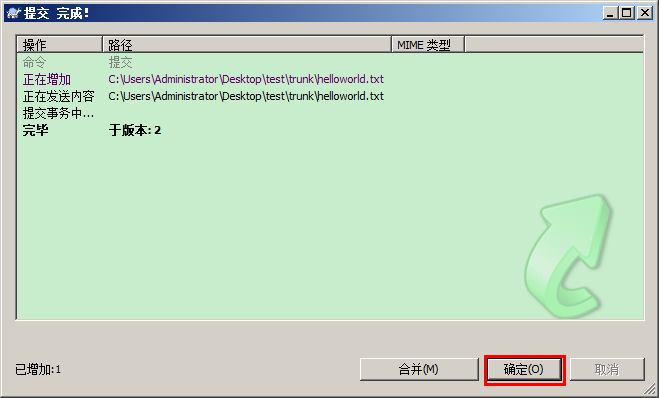


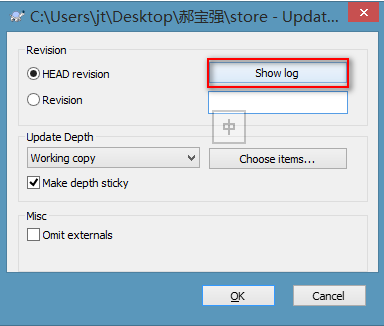
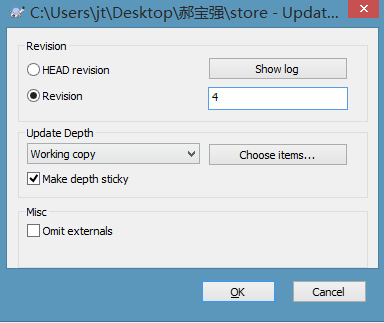
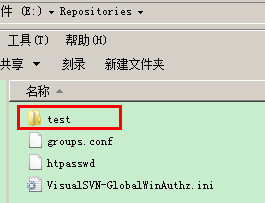
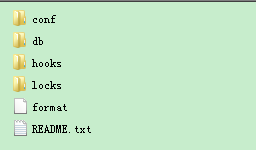
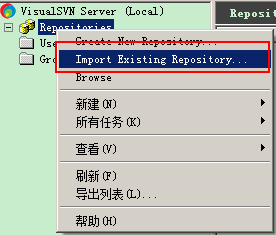
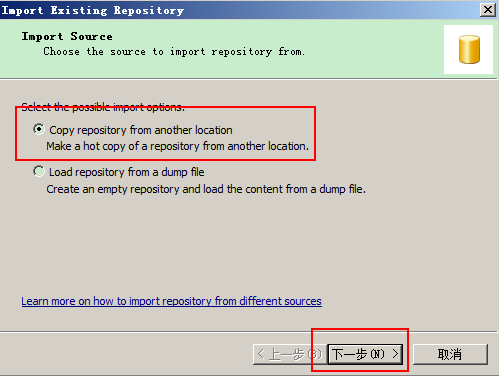
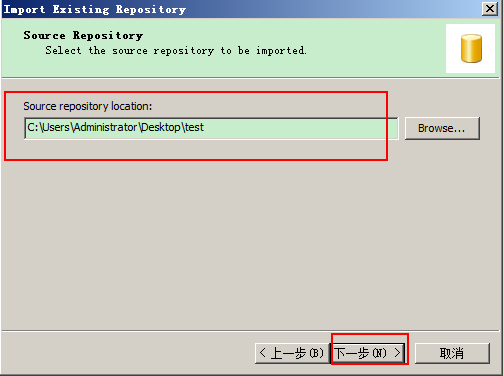
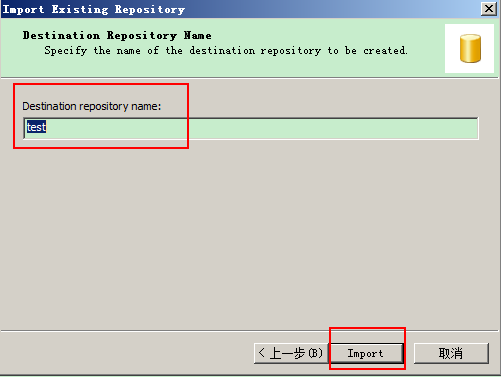
![]()
