面向对象
你懂面向对象的奥义吗?你能接收面向对象的奥义吗?你的行为准则能按面向对象来吗?你真的可以接收自己面向对象的处事方式吗?
就是不必亲历亲为,做到开箱即用
类和对象
面向对象和面向过程编程思想
编程思想其实就是编程思路,我们开发中2种经典的编程思想就是面向过程编程思想和面向对象编程思想.
- 面向过程编程思想:强调的是过程,必须清楚每一个步骤,然后按照步骤一步一步去实现
- 面向对象编程思想:强调的是对象, 通过调用对象的行为来实现功能,而不是自己一步一步的去操作实现。
举例对比2种编程思想
洗衣服:
- 面向过程:把衣服脱下来–>找一个盆–>放点洗衣粉–>加点水–>浸泡10分钟–>揉一揉–>清洗衣服–>拧干–>晾起来
- 面向对象: 把衣服脱下来–>给女朋友去洗
吃饭
- 面向过程: 买菜—>洗菜—>切菜—->炒菜—>吃
- 面向对象: 找个饭店–>20块钱
java程序上的区别:
1
2
3
4
5
6
7
8
9
10
11
12
13
14
15
16
17
18
19
20
21
22
23
24
25
26
27
28
29
30
31
32
33
34
35
36
37
38
39
|
public class Test {
public static void main(String[] args) {
int[] arr = {10, 20, 30, 40, 50};
for (int i = 0; i < arr.length; i++) {
int e = arr[i];
if (i == 0) {
System.out.print("[" + e + ", ");
} else if (i == arr.length - 1) {
System.out.println(e + "]");
} else {
System.out.print(e + ", ");
}
}
System.out.println("==================================");
System.out.println(Arrays.toString(arr));
}
}
|
类的概述
类的概述
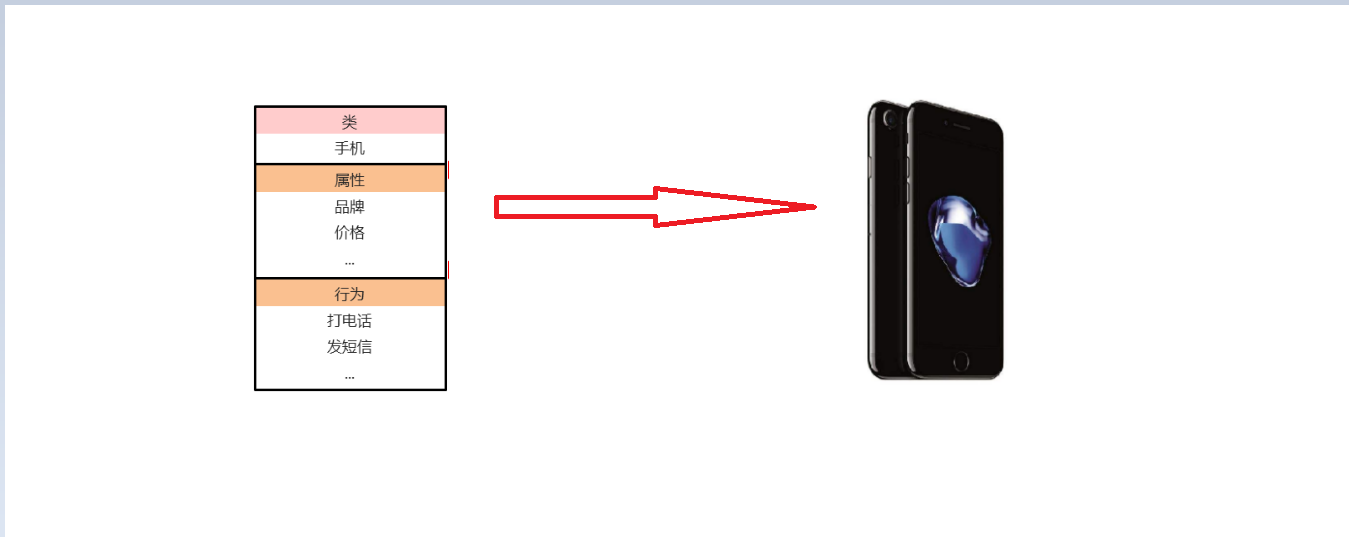
- 类是用来描述一类具有共同属性和行为事物的统称。所以其实类在客观世界里是不存在的,是抽象的,只是用来描述数据信息的。
- 手机类—描述手机
- 人类—-描述人
类的组成
- 属性:该类事物的状态信息,在类中通过成员变量来体现(类中方法外的变量)
- 行为:该类事物有什么功能,在类中通过成员方法来体现(和前面的方法相比去掉static关键字即可)
举例
- 手机类
- 人类:
- 属性: 姓名,年龄,性别….
- 行为:吃饭,睡觉,…..
对象的概述
对象的概念
- 对象是类的一个实例(并不是你的女朋友哈),具体存在的,看得见摸得着的,并且具备该类事物的属性和行为
- 对象的属性:对象的属性具有特定的值
- 对象的行为:对象可以操作的行为
举例
- 对象: 你手上拿的这台手机
- 属性:华为、1999。 对象的属性具体的值,类中的属性没有具体的值
- 行为:使用打电话功能,使用发短信功能。对象可以使用行为
类和对象的关系
类是对一类具有共同属性和行为的事物的统称,是抽象的
对象是一类事物的具体实例,看得见,摸的着的,真实存在的实体,是具体的
类是对象的抽象,对象是类的实体
类的定义
1
2
3
4
5
6
7
8
9
10
| public class 类名 {
数据类型 变量名1;
数据类型 变量名2;
...
方法; 去掉static
}
|
举例
1
2
3
4
5
6
7
8
9
10
11
12
13
14
15
16
17
18
19
20
21
22
23
24
25
26
27
28
29
30
31
32
|
public class Phone {
String brand;
double price;
public void call(String phoneNum){
System.out.println("正则给"+phoneNum+"打电话...");
}
public void sendMessage(String phoneNum,String message){
System.out.println("正在给"+phoneNum+"发送短信,短信内容是:"+message);
}
}
|
对象的创建和使用
创建对象的格式:
类名 对象名 = new 类名();- 类其实就是对象的数据类型,类是引用数据类型
- 例: Phone p1 = new Phone (); 创建了一个手机对象(Phone类的对象)
对象的使用
- 访问成员变量
- 获取成员变量的值: 对象名.成员变量名
- 给成员变量赋值: 对象名.成员变量名=值;
- 访问成员方法
案例演示
1
2
3
4
5
6
7
8
9
10
11
12
13
14
15
16
17
18
19
20
21
22
23
24
25
26
27
28
29
30
31
32
33
34
35
36
37
38
39
40
41
42
43
44
45
46
47
48
49
50
51
52
53
54
55
56
57
58
59
60
61
62
63
64
65
66
67
68
69
70
71
72
73
74
75
76
77
78
79
80
81
82
83
84
85
86
87
88
89
90
91
92
93
94
95
96
97
98
99
100
101
102
103
104
105
106
107
| public class Phone {
String brand;
double price;
public void call(String phoneNum){
System.out.println("正在给"+phoneNum+"打电话...");
}
public void sendMessage(String phoneNum,String message){
System.out.println("正在给"+phoneNum+"发送短信,短信内容是:"+message);
}
public int show(String str){
System.out.println("有参数有返回值的方法:"+str);
return 100;
}
}
public class Test {
public static void main(String[] args) {
Phone p1 = new Phone();
p1.brand = "华为";
p1.price = 999.8;
System.out.println(p1.brand);
System.out.println(p1.price);
p1.call("10086");
p1.sendMessage("10086","请问一下联通的客服电话号码是多少?");
System.out.println("==============================");
p1.show("张三");
int res = p1.show("李四");
System.out.println("res:"+res);
System.out.println(p1.show("java"));
}
}
|
学生对象-练习
需求
- 首先定义一个学生类,然后定义一个学生测试类,在学生测试类中通过对象完成成员变量和成员方法的使用
分析
- 定义学生类
- 测试类
- 创建main方法,在main 方法中创建学生对象
- 使用学生对象访问成员变量和访问成员方法
实现
1
2
3
4
5
6
7
8
9
10
11
12
13
14
15
16
17
18
19
20
21
22
23
24
25
26
27
28
29
30
31
32
33
34
35
36
37
38
39
40
41
42
43
44
45
46
| public class Student {
String name;
int age;
public void study(){
System.out.println("学生正在学习Java...");
}
public void doHomeWork(){
System.out.println("学生正在做作业敲代码...");
}
}
public class Test {
public static void main(String[] args) {
Student stu = new Student();
stu.name = "冰冰";
stu.age = 18;
System.out.println(stu.name+","+stu.age);
stu.study();
stu.doHomeWork();
}
}
|
成员变量默认值
1
2
3
4
5
6
7
8
9
10
11
12
13
14
15
16
17
18
19
20
21
22
23
24
25
26
27
28
29
30
31
32
33
34
35
36
37
38
39
40
41
| public class Student {
String name;
int age;
double score;
char c;
}
public class Test {
public static void main(String[] args) {
Student stu = new Student();
System.out.println(stu.name);
System.out.println(stu.age);
System.out.println(stu.score);
System.out.println("="+stu.c+"=");
}
}
|
单个对象内存图
1
2
3
4
5
6
7
8
9
10
11
12
13
14
15
16
17
18
19
20
21
22
23
24
25
26
27
28
29
30
31
32
33
34
35
36
37
38
39
40
41
42
43
| public class Student {
String name;
int age;
public void study(){
System.out.println("学生正在学习Java...");
}
public void doHomeWork(){
System.out.println("学生正在做作业敲代码...");
}
}
public class Test {
public static void main(String[] args) {
Student stu = new Student();
System.out.println(stu);
stu.name = "冰冰";
stu.age = 18;
System.out.println(stu.name+","+stu.age);
stu.study();
stu.doHomeWork();
}
}
|
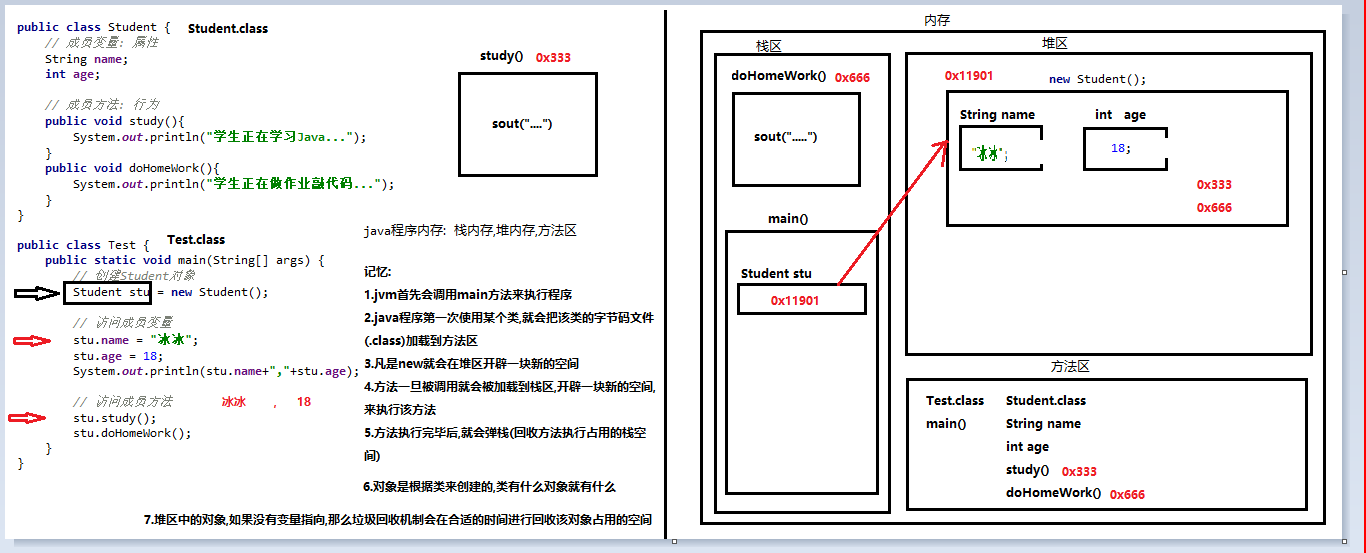
字节码文件会被加载到方法区。堆内存中的存的是成员方法的地址,通过地址找到方法区的方法。
多个对象内存图
1
2
3
4
5
6
7
8
9
10
11
12
13
14
15
16
17
18
19
20
21
22
23
24
25
26
27
28
29
30
31
32
33
34
35
36
37
38
39
40
41
42
43
44
45
46
47
48
49
50
51
52
53
| public class Student {
String name;
int age;
public void study(){
System.out.println("学生正在学习Java...");
}
public void doHomeWork(){
System.out.println("学生正在做作业敲代码...");
}
}
public class Test {
public static void main(String[] args) {
Student stu1 = new Student();
System.out.println(stu1);
stu1.name = "冰冰";
stu1.age = 18;
System.out.println(stu1.name+","+stu1.age);
stu1.study();
stu1.doHomeWork();
System.out.println("==========================");
Student stu2 = new Student();
System.out.println(stu2.name+","+stu2.age);
stu2.study();
}
}
|
绘制内存图
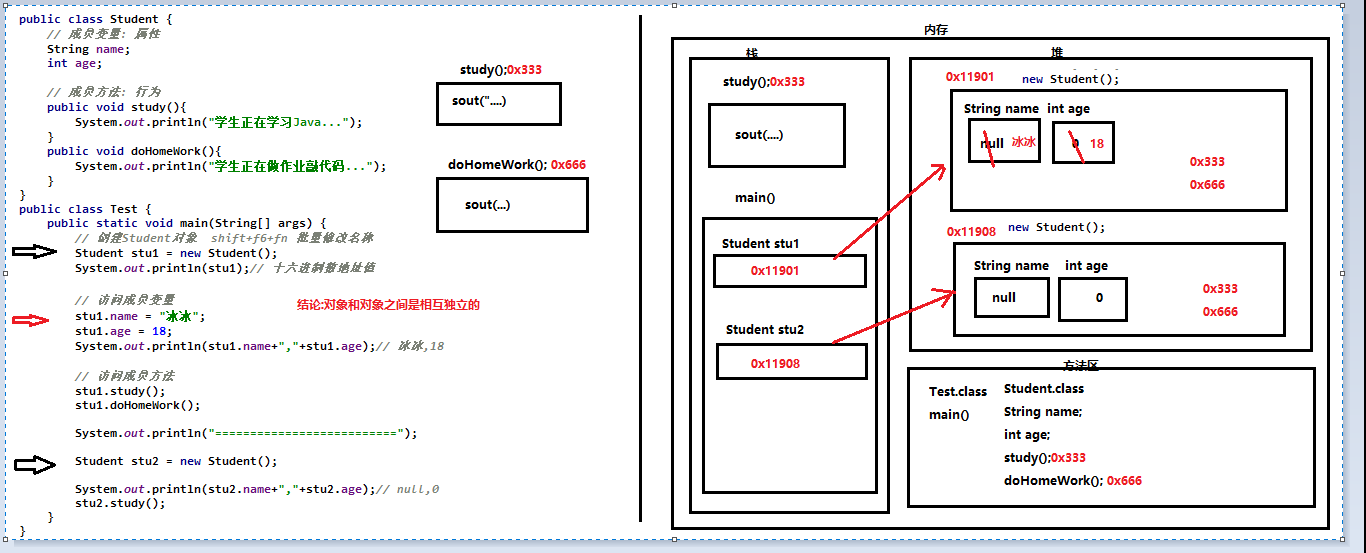
注意:
- 多个对象在堆内存中,都有不同的内存划分,成员变量存储在各自对象的内存区域中,成员方法多个对象共用的一份
- 凡是new就会重新在堆区开辟一块新空间
- 对象和对象之间的关系是相互独立的
多个变量指向相同对象内存图
查看程序案例
1
2
3
4
5
6
7
8
9
10
11
12
13
14
15
16
17
18
19
20
21
22
23
24
25
26
27
28
29
30
31
32
33
34
35
36
37
38
39
40
41
42
43
44
45
46
47
48
49
| public class Student {
String name;
int age;
public void study(){
System.out.println("学生正在学习Java...");
}
public void doHomeWork(){
System.out.println("学生正在做作业敲代码...");
}
}
public class Test {
public static void main(String[] args) {
Student stu1 = new Student();
stu1.name = "冰冰";
stu1.age = 18;
System.out.println(stu1.name + "," + stu1.age);
stu1.study();
System.out.println("============================");
Student stu2 = stu1;
System.out.println(stu2.name + "," + stu2.age);
stu2.study();
}
}
|
绘制内存图
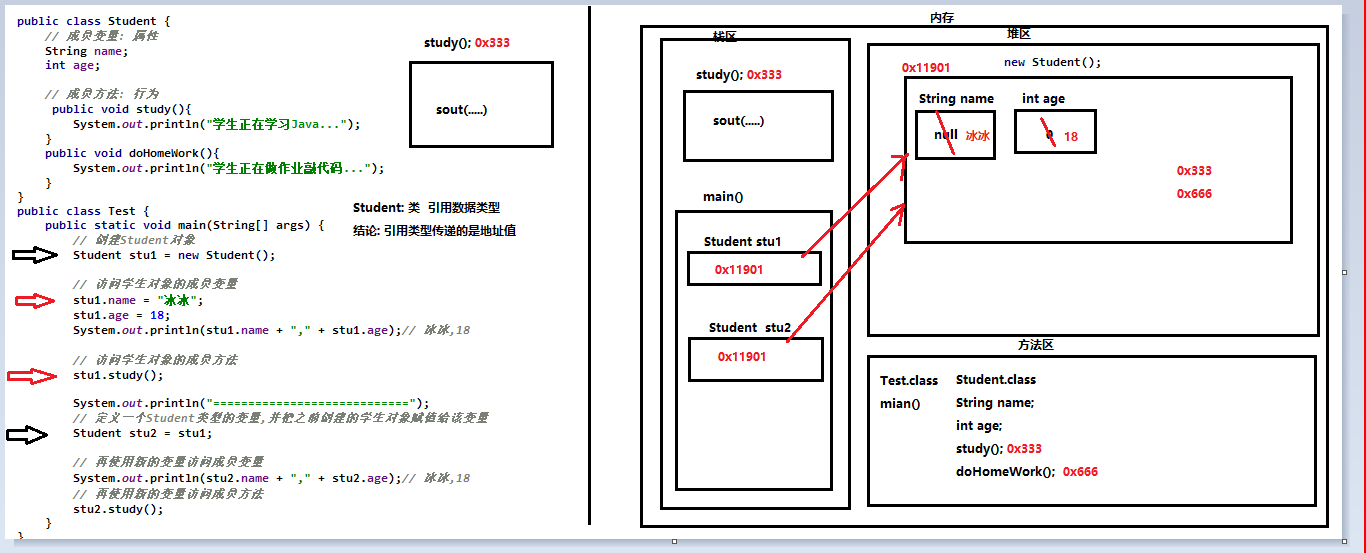
注意点:
- 当多个对象的引用指向同一个内存空间(变量所记录的地址值是一样的)
- 只要有任何一个对象修改了内存中的数据,随后,无论使用哪一个对象进行数据获取,都是修改后的数据。
- 引用类型传递的是地址值
成员变量和局部变量的区别
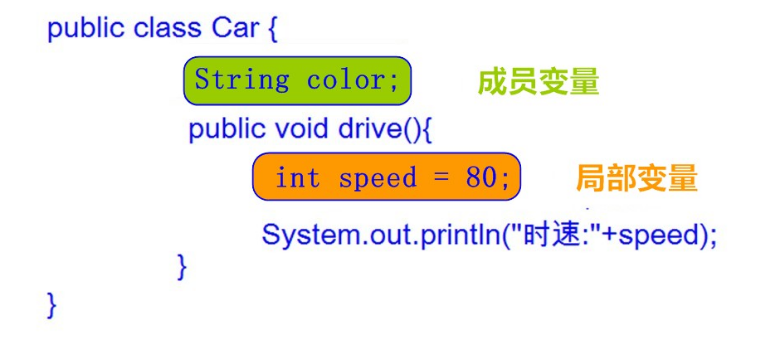
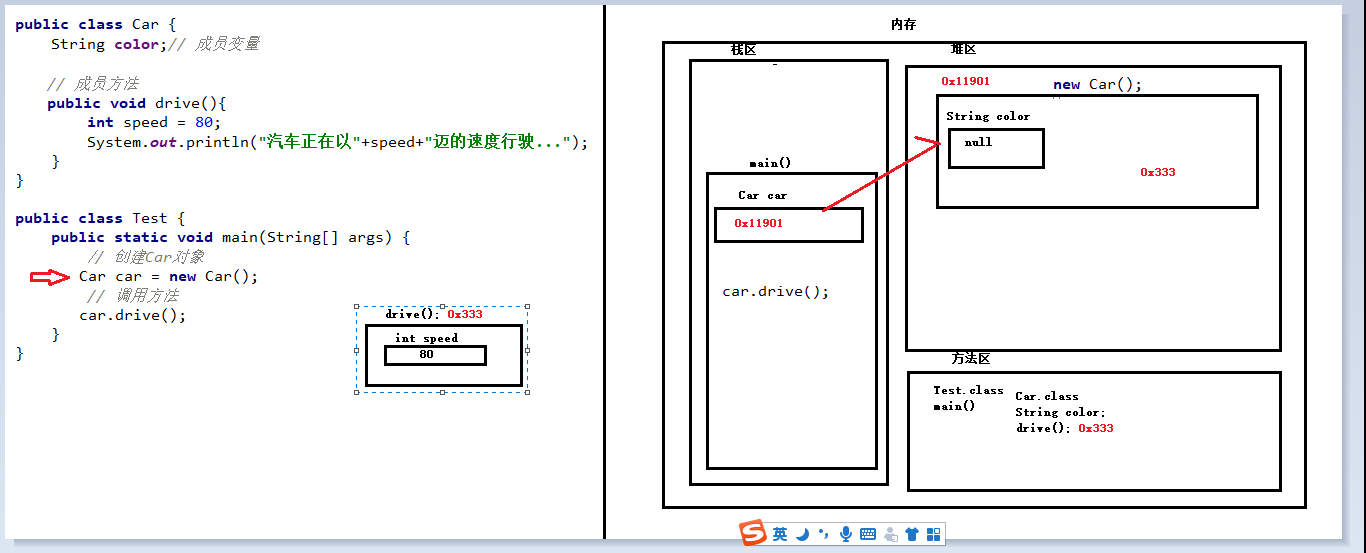
- 类中位置不同:成员变量(类中方法外)局部变量(方法内部或方法声明上)
- 内存中位置不同:成员变量(堆内存)局部变量(栈内存)
- 生命周期不同:成员变量(随着对象的存在而存在,随着对象的消失而消失)局部变量(随着方法的调用而存在,随着方法的调用完毕而消失)
- 初始化值不同:成员变量(有默认初始化值)局部变量(没有默认初始化值,必须先定义,赋值才能使用)
1
2
3
4
5
6
7
8
9
10
11
12
13
14
15
16
17
18
19
20
21
22
23
24
25
26
27
28
29
30
31
32
| public class Car {
String color;
public void drive(){
int speed = 80;
System.out.println("汽车正在以"+speed+"迈的速度行驶...");
}
}
public class Test {
public static void main(String[] args) {
Car car = new Car();
car.drive();
}
}
|
封装
private关键字
private的含义
- 概述: private是一个权限修饰符,代表最小权限。
- 特点:
- 可以修饰成员变量和成员方法。
- 被private修饰后的成员变量和成员方法,只在本类中才能访问。
private的使用格式
1
2
3
4
5
6
7
|
private 数据类型 变量名 ;
private 返回值类型 方法名(参数列表){
代码
}
|
案例
1
2
3
4
5
6
7
8
9
10
11
12
13
14
15
16
17
18
19
20
21
22
23
24
25
26
27
28
29
30
31
32
33
34
35
36
37
38
39
40
41
42
43
44
45
46
47
| public class Student {
private String name;
private int age;
private void study(){
System.out.println("正在学习java");
}
public void show(){
System.out.println(name+","+age);
}
}
public class Test {
public static void main(String[] args) {
Student stu1 = new Student();
}
}
|
为什么要对属性进行封装
1
2
3
4
5
6
7
8
9
10
11
12
13
14
15
16
17
18
19
20
21
22
23
24
25
26
27
28
29
30
31
32
33
34
35
| public class Student {
String name;
int age;
}
public class Test {
public static void main(String[] args) {
Student stu1 = new Student();
stu1.name = "冰冰";
stu1.age = -18;
System.out.println(stu1.name + "," + stu1.age);
}
}
|
set和get方法
set和get方法的介绍
set和get方法的书写
1
2
3
4
5
6
7
8
9
10
11
12
13
14
15
16
17
18
19
20
21
22
23
24
25
26
27
28
29
30
31
32
33
34
35
36
37
38
39
40
41
42
43
44
45
46
47
48
49
50
51
52
53
54
55
| public class Student {
private String name;
private int age;
public void setName(String s){
name = s;
}
public void setAge(int a){
if (a < 0 || a > 150){
age = -1;
System.out.println("您的数据不合法!");
}else{
age = a;
}
}
public String getName(){
return name;
}
public int getAge(){
return age;
}
}
public class Test {
public static void main(String[] args) {
Student stu1 = new Student();
stu1.setName("冰冰");
stu1.setAge(-18);
System.out.println(stu1.getName()+","+stu1.getAge());
}
}
|
this关键字
问题
我们发现 setXxx 方法中的形参名字并不符合见名知意的规定,那么如果修改与成员变量名一致,是否就见名知意了呢?代码如下:
1
2
3
4
5
6
7
8
9
10
11
12
| public class Student {
private String name;
private int age;
public void setName(String name) {
name = name;
}
public void setAge(int age) {
age = age;
}
}
|
经过修改和测试,我们发现新的问题,成员变量赋值失败了。也就是说,在修改了setXxx() 的形参变量名后,方法并没有给成员变量赋值!这是由于形参变量名与成员变量名重名,导致成员变量名被隐藏,方法中的变量名,无法访问到成员变量,从而赋值失败。所以,我们只能使用this关键字,来解决这个重名问题。
this的含义和使用
- 使用
this 修饰方法中的变量,解决成员变量被隐藏的问题,代码如下:
1
2
3
4
5
6
7
8
9
10
11
12
13
14
15
16
17
18
19
20
21
22
23
24
25
26
27
28
29
30
31
32
33
34
35
36
37
38
39
40
41
42
43
44
45
46
47
48
49
50
51
52
53
54
55
56
57
58
59
60
61
62
| public class Student {
private String name;
private int age;
public void setName(String name){
this.name = name;
}
public void setAge(int age){
if (age < 0 || age > 150){
this.age = -1;
System.out.println("您的数据不合法!");
}else{
this.age = age;
}
}
public String getName(){
return name;
}
public int getAge(){
return age;
}
}
public class Test {
public static void main(String[] args) {
Student stu1 = new Student();
stu1.setName("冰冰");
stu1.setAge(-18);
System.out.println(stu1.getName()+","+stu1.getAge());
Student stu2 = new Student();
stu2.setName("空空");
}
}
|
小贴士:方法中只有一个变量名时,默认也是使用 this 修饰,可以省略不写。
this内存原理
代码
1
2
3
4
5
6
7
8
9
10
11
12
13
14
15
16
17
18
19
20
21
22
23
24
25
26
27
28
29
30
31
32
33
34
35
36
37
38
39
40
41
42
43
44
45
46
47
48
49
50
51
52
53
54
55
56
57
58
59
60
61
62
63
| public class Test {
public static void main(String[] args) {
Student stu1 = new Student();
stu1.setName("冰冰");
stu1.setAge(-18);
System.out.println(stu1.getName()+","+stu1.getAge());
Student stu2 = new Student();
stu2.setName("空空");
System.out.println(stu2.getName()+","+stu2.getAge());
}
}
public class Student {
private String name;
private int age;
public void setName(String name){
this.name = name;
}
public void setAge(int age){
if (age < 0 || age > 150){
this.age = -1;
System.out.println("您的数据不合法!");
}else{
this.age = age;
}
}
public String getName(){
return name;
}
public int getAge(){
return age;
}
}
|
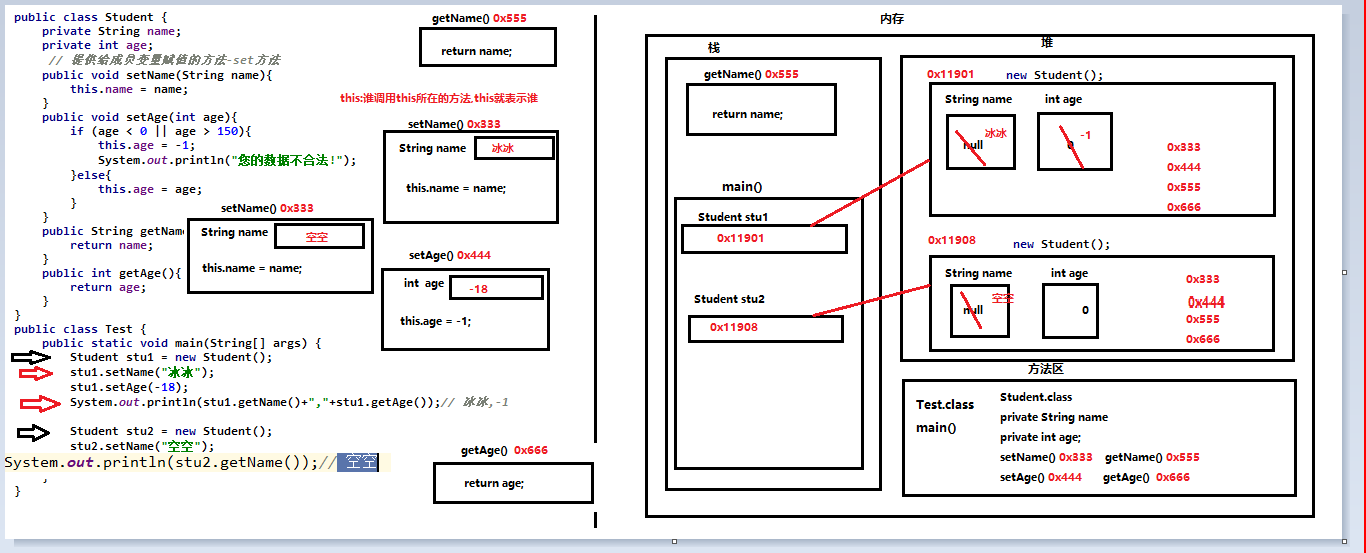
封装概述
封装概述
- 是面向对象三大特征之一(封装,继承,多态)
- 是面向对象编程语言对客观世界的模拟,客观世界里成员变量都是隐藏在对象内部的,外界是无法直接操作的
封装原则
- 将类的某些信息隐藏在类内部,不允许外部程序直接访问,而是通过该类提供的方法来实现对隐藏信息的操作和访问
- 例如:成员变量使用private修饰,提供对应的getXxx()/setXxx()方法
封装好处
- 通过方法来控制成员变量的操作,提高了代码的安全性
- 把代码用方法进行封装,提高了代码的复用性
构造方法
构造方法是一种特殊的方法,主要是完成对象的创建和对象数据的初始化
格式
1
2
3
4
5
6
7
8
9
|
修饰符 类名(){
}
修饰符 类名(参数列表){
}
|
特点:
- 构造方法的写法上,方法名与它所在的类名相同
- 构造方法没有返回值,所以不需要返回值类型,甚至不需要void
示例代码:
1
2
3
4
5
6
7
8
9
10
11
12
13
14
15
16
17
18
19
20
21
22
23
24
25
26
27
28
29
30
31
32
33
34
35
36
37
38
39
40
41
42
43
44
45
46
47
48
49
50
51
52
53
54
55
56
57
58
59
| public class Student {
private String name;
private int age;
public Student(){
System.out.println("空参方法");
}
public Student(String name,int age){
this.name = name;
this.age = age;
}
public String getName(){
return name;
}
public int getAge(){
return age;
}
}
public class Test {
public static void main(String[] args) {
Student stu1 = new Student();
System.out.println(stu1.getName()+","+stu1.getAge());
Student stu2 = new Student("冰冰",18);
System.out.println(stu2.getName()+","+stu2.getAge());
}
}
|
注意事项
1
2
3
4
5
6
7
8
9
10
11
12
13
14
15
16
17
18
19
20
21
22
23
24
25
26
27
28
29
30
31
32
33
34
35
36
37
38
39
40
41
42
43
44
45
46
47
48
49
50
51
52
53
54
55
56
57
58
59
60
61
62
63
64
65
66
67
68
69
| public class Student {
private String name;
private int age;
public Student(){
}
public Student(String name,int age){
this.name = name;
this.age = age;
}
public Student(String name){
this.name = name;
}
public Student(int age){
this.age = age;
}
public void setAge(int age){
this.age = age;
}
public int getAge(){
return age;
}
}
public class Test {
public static void main(String[] args) {
Student stu1 = new Student();
Student stu2 = new Student("冰冰",18);
Student stu3 = new Student("冰冰",18);
System.out.println(stu2.getAge());
stu2.setAge(19);
System.out.println(stu2.getAge());
stu2.setAge(20);
System.out.println(stu2.getAge());
}
}
|
小结
1
2
3
4
5
6
7
8
| 构造方法的注意事项:
- 构造方法的创建
- 如果没有定义构造方法,系统将给出一个默认的无参数构造方法
- 如果定义了构造方法,系统将不再提供默认的构造方法
- 构造方法只能给属性赋值一次,不能重复赋值,可以谁有set方法给属性重复赋值
- 构造方法可以重载,既可以定义参数,也可以不定义参数。
- 定义构造方法的时候,不要写返回值,连void都不能有
- 定义构造方法的时候,构造方法名和类名一定要一致
|
标准类制作
标准类的组成
JavaBean 是 Java语言编写类的一种标准规范。符合JavaBean 的类,要求类必须是公共的,属性使用private修饰,并且具有无参数的构造方法,提供用来操作成员变量的set 和get 方法。
1
2
3
4
5
6
7
8
9
| public class ClassName{
}
|
案例演示
- 需求:定义标准学生类,要求分别使用空参和有参构造方法创建对象,空参创建的对象通过setXxx赋值,有参创建的对象直接赋值,并通过show方法展示数据。
- 示例代码:
1
2
3
4
5
6
7
8
9
10
11
12
13
14
15
16
17
18
19
20
21
22
23
24
25
26
27
28
29
30
31
32
33
34
35
36
37
38
39
40
41
42
43
44
45
| public class Student {
private String name;
private int age;
public Student() {
}
public Student(String name, int age) {
this.name = name;
this.age = age;
}
public String getName() {
return name;
}
public void setName(String name) {
this.name = name;
}
public int getAge() {
return age;
}
public void setAge(int age) {
this.age = age;
}
public void show(){
System.out.println(name+","+age);
}
}
|
API
什么是API
API (Application Programming Interface) :应用程序编程接口。Java API是一本程序员的字典 ,是JDK中提供给我们使用的类的说明文档。这些类将底层的代码实现封装了起来,我们不需要关心这些类是如何实现的,只需要学习这些类如何使用即可。所以我们可以通过查询API的方式,来学习Java提供的类,并得知如何使用它们。
- API其实就是jdk中核心类库的说明文档
- 对于jdk中的核心类库只需要知道如何使用,无须关心他是如何实现的
使用步骤
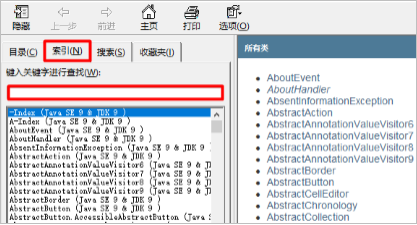
- 打开API帮助文档。
- 点击显示,找到索引,看到输入框。
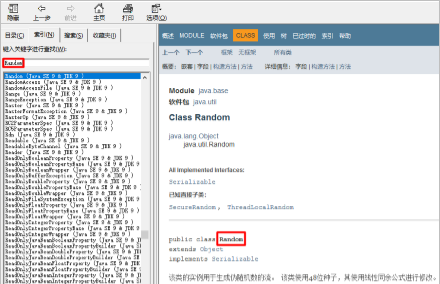
- 你要找谁?在输入框里输入,然后回车。
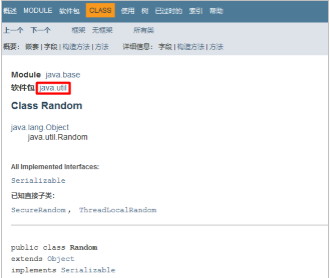
- 看包。java.lang下的类不需要导包,其他需要。
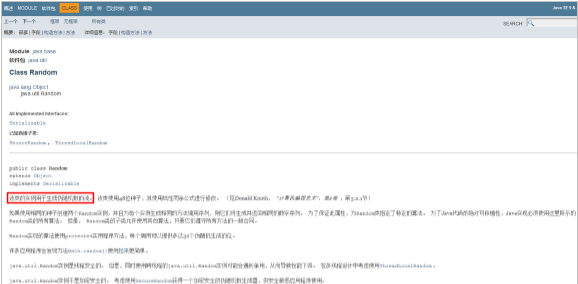
- 看类的解释和说明。
- 看构造方法。
- 看成员方法。
演示API的使用

找到索引选项卡中的输入框
在输入框中输入Random


1
2
3
4
5
6
7
8
9
10
11
12
13
14
15
16
17
18
19
20
21
22
23
24
25
26
27
28
29
30
31
32
33
34
35
36
37
38
39
40
41
42
43
44
45
46
47
48
49
50
51
52
53
54
55
56
57
58
| public class Test {
public static void main(String[] args) {
Scanner sc = new Scanner(System.in);
System.out.println("请输入年龄:");
int age = sc.nextInt();
System.out.println("年龄:"+age);
System.out.println("请输入姓名:");
String name = sc.next();
System.out.println("姓名:"+name);
}
}
|
对象的内存图
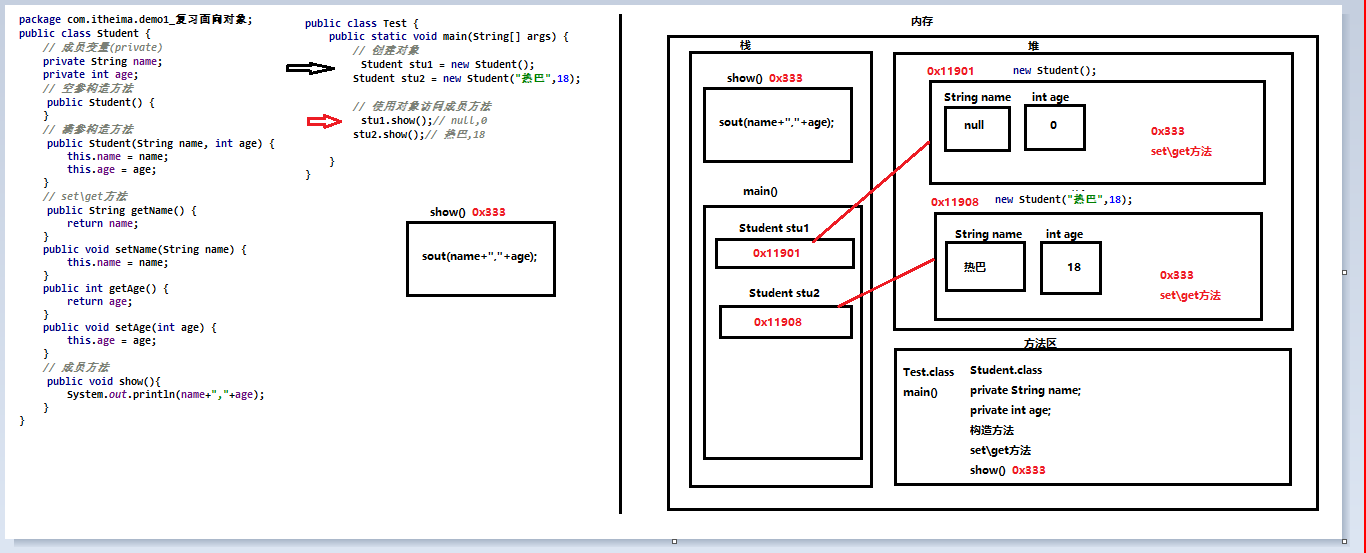
注意点:
- 只要是new对象就会在堆区开辟一块独立的空间
- 只要调用方法,方法就会被加载进栈
- 只要方法执行完毕,方法就会被弹栈
匿名对象
什么是匿名对象:就是指”没有名字”的对象。
1
2
3
4
5
6
| 有名字的对象:
Student stu = new Student();
stu.show();
stu.study();
匿名对象:
new Student();
|
特点:匿名对象只能使用一次
1
2
3
4
5
6
7
8
9
10
11
12
13
14
15
16
17
18
19
20
21
22
23
24
25
26
27
28
29
30
31
32
33
34
35
36
37
38
39
40
41
42
43
44
45
46
| public class Test {
public static void main(String[] args) {
Student stu1 = new Student("热巴",18);
stu1.show();
stu1.show();
System.out.println("==================================");
new Student("热巴",18).show();
new Student("热巴",18).show();
System.out.println("==================================");
Student stu2 = new Student("热巴",18);
method1(stu2);
method1(new Student("热巴",18));
System.out.println("==================================");
Student stu3 = method2();
stu3.show();
}
public static void method1(Student stu){
stu.show();
}
public static Student method2(){
return new Student("丽颖",18);
}
}
|
继承
如果满足 is a的时候,可以考虑时候继承
继承概述
为什么要有继承
现实生活中,为什么要有继承?
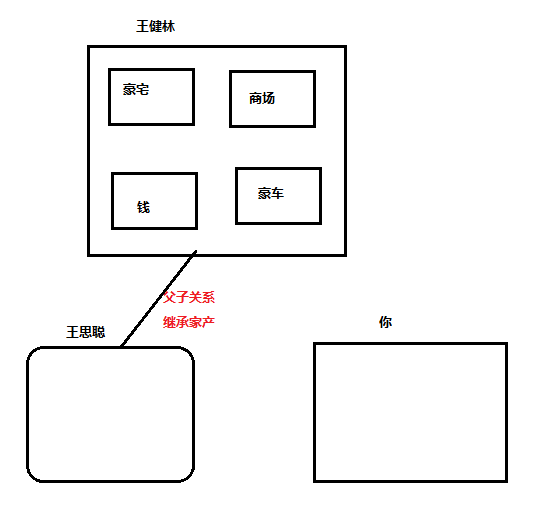
程序中为什么要有继承?
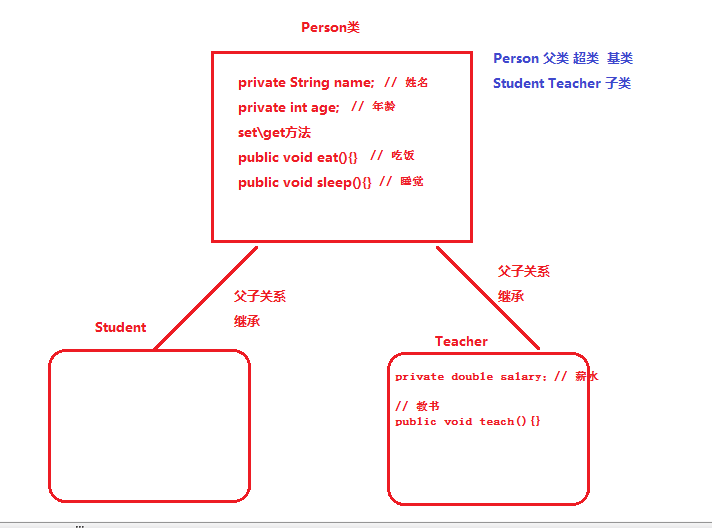
继承的含义
继承:在java中指的是“一个类”可以“继承自”“另一个类”。 “被继承的类”叫做: 父类/超类/基类,”继承其他类的类”叫做:子类。继承后,“子类”中就“拥有”了“父类”中所有的成员(成员变量、成员方法)。 “子类就不需要再定义了”。
继承的好处
- 提高代码的复用性(减少代码冗余,相同代码重复利用)。
- 使类与类之间产生了关系。
继承的格式
通过 extends 关键字,可以声明一个子类继承另外一个父类,定义格式如下:
1
2
3
4
5
6
7
| class 父类 {
...
}
class 子类 extends 父类 {
...
}
|
需要注意:Java是单继承的,一个类只能继承一个直接父类,并且满足is-a的关系,例如:Dog is a Animal, Student is a Person
继承的演示
1
2
3
4
5
6
7
8
9
10
11
12
13
14
15
16
17
18
19
20
21
22
23
24
25
26
27
28
29
30
31
32
33
34
35
36
37
38
| 人类:
public class Person {
String name;
int age;
public void eat(){
System.out.println("吃东西...");
}
public void sleep(){
System.out.println("睡觉...");
}
}
老师类: extends 人类
public class Teacher extends Person {
double salary;
public void teach(){}
}
学生类: extends 人类
public class Student extends Person{
}
Dog: extends 人类
public class Dog extends Person{
}
测试:
public class Test {
public static void main(String[] args) {
Teacher t = new Teacher();
System.out.println(t.name);
System.out.println(t.age);
t.eat();
t.sleep();
}
}
|
继承后成员访问规则
继承后构造方法的访问规则
构造方法不能被继承
1
2
3
4
5
6
7
8
9
10
11
12
13
14
15
16
17
18
19
20
21
| class Fu {
Fu(){}
Fu(String name,int age){}
}
class Zi extends Fu{
}
public class Test {
public static void main(String[] args) {
}
}
|
继承后私有成员的访问规则
继承后非私有成员的访问规则
方法重写
方法重写 :子类中出现与父类一模一样的方法时(返回值类型,方法名和参数列表都相同),会出现覆盖效果,也称为重写或者复写。声明不变,重新实现。
1
2
3
4
5
6
7
8
9
10
11
12
13
14
15
16
17
18
19
20
21
22
23
24
25
26
27
28
29
30
31
32
33
34
35
| class Fu{
public void method(){
System.out.println("Fu method");
}
}
class Zi extends Fu{
@Override
public void method() {
System.out.println("Zi method");
}
public void show(){
System.out.println("Zi show");
}
}
public class Test {
public static void main(String[] args) {
Zi zi = new Zi();
zi.method();
}
}
|
注意事项
方法重写是发生在子父类之间的关系。
子类方法重写父类方法,返回值类型、方法名和参数列表都要一模一样。
子类方法重写父类方法,必须要保证权限大于等于父类权限。
- 访问权限从大到小: public protected (默认) private
使用@Override注解,检验是否重写成功,重写注解校验!
- 建议重写方法都加上这个注解,一方面可以提高代码的可读性,一方面可以防止重写出错!
使用场景
1
2
3
4
5
6
7
8
9
10
11
12
13
14
15
16
17
18
19
20
21
22
23
24
25
26
27
28
29
30
31
32
33
34
35
36
37
38
39
40
41
42
43
44
45
46
47
48
49
50
51
52
| class Fu{
public void sport(){
System.out.println("Fu 运动的方式跑步");
}
public void run(){
System.out.println("Fu 第1圈");
System.out.println("Fu 第2圈");
System.out.println("Fu 第3圈");
}
}
class Zi extends Fu{
@Override
public void sport() {
System.out.println("Zi 运动的方式游泳");
}
@Override
public void run() {
super.run();
System.out.println("Zi 第4圈");
System.out.println("Zi 第5圈");
System.out.println("Zi 第6圈");
System.out.println("Zi 第7圈");
System.out.println("Zi 第8圈");
System.out.println("Zi 第9圈");
System.out.println("Zi 第10圈");
}
}
public class Test {
public static void main(String[] args) {
Zi zi = new Zi();
zi.sport();
zi.run();
}
}
|
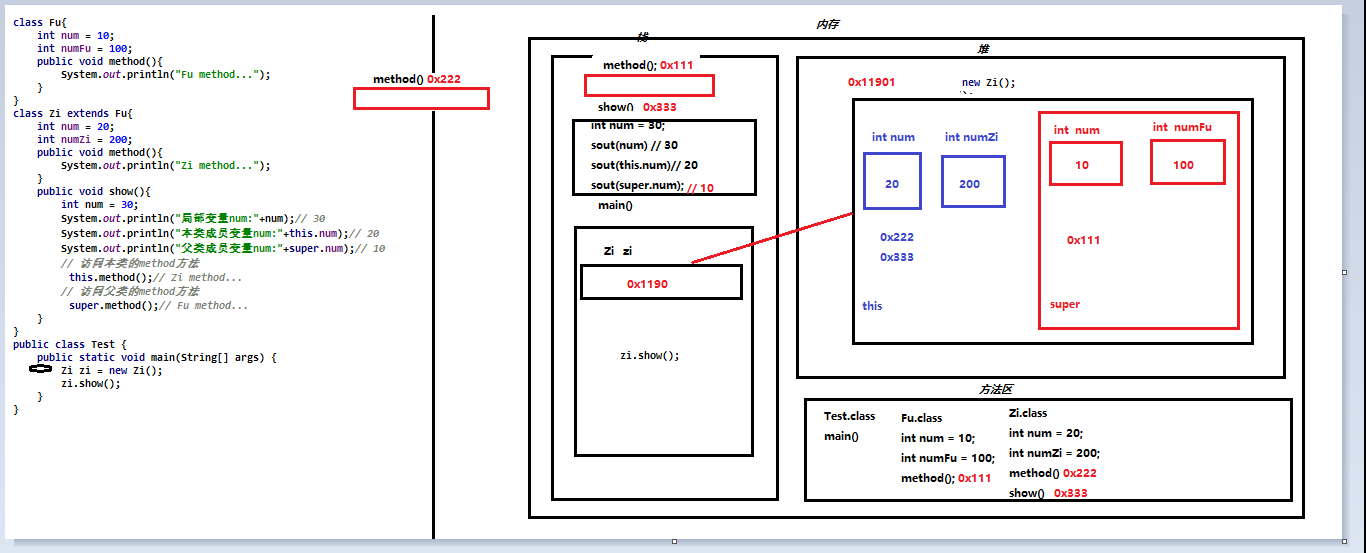
this和super关键字
this和super关键字的介绍
- this:存储的“当前对象”的引用;
- this可以访问:本类的成员属性、成员方法、构造方法;
- super:存储的“父类对象”的引用;
- super可以访问:父类的成员属性、成员方法、构造方法;
this关键字的三种用法
super关键字的三种用法
小结
this关键字的三种用法:
this可以访问本类的成员变量: this.成员变量 一般用来区分同名的成员变量和局部变量
this可以访问本类的成员访问: this.成员方法名(实参);
this可以访问本类的构造方法:
空参构造: this();
有参构造: this(实参);
注意:
1.只能在本类的构造方法中使用this调用其他构造方法
2.在本类的构造方法中使用this调用其他构造方法,必须放在该构造方法的第一行,否则会报错
3.两个构造方法不能使用this同时相互调用
1
2
3
4
5
6
7
8
9
10
11
12
|
- ```java
super关键字的三种用法:
super可以访问父类的成员变量: super.成员变量 一般用来区分父子类中同名的成员变量
super可以访问父类的成员方法: super.成员方法(实参); 一般用来在子类中访问父类的成员方法
super可以访问父类的构造方法:
空参构造: super();
有参构造: super(实参);
注意:
1.子类的构造方法默认会调用父类的空参构造方法
2.super访问父类的构造方法,可以用来初始化从父类继承过来的属性
3.在子类的构造方法中,使用super调用父类的构造方法,必须放在子类构造方法的第一行
|
super的注意事项
super访问成员变量和成员方法: 优先去父类中找,如果有就直接使用,如果没有就去爷爷类中找,如果有,就用,依次类推…
1
2
3
4
5
6
7
8
9
10
11
12
13
14
15
16
17
18
19
20
21
22
23
24
25
26
27
| class Ye{
int num = 10;
public void method(){
System.out.println("Ye method");
}
}
class Fu extends Ye{
int num = 100;
public void method(){
System.out.println("Fu method");
}
}
class Zi extends Fu{
int num = 1000;
public void show(){
System.out.println(super.num);
super.method();
}
}
public class Test {
public static void main(String[] args) {
Zi zi = new Zi();
zi.show();
}
}
|
子类的构造方法默认会调用父类的空参构造方法,如果父类中的没有空参构造方法,只定义了有参构造方法,会编译报错
1
2
3
4
5
6
7
8
9
10
11
12
13
14
15
16
17
18
19
20
21
22
23
24
25
26
27
28
29
30
31
32
33
34
35
36
37
38
39
40
41
42
43
44
45
46
47
48
49
50
51
52
53
54
55
56
57
58
59
60
61
62
| class Fu1{
public Fu1(){
System.out.println("Fu1 空参构造");
}
public Fu1(int num){
System.out.println("Fu1 有参构造");
}
}
class Zi1 extends Fu1{
public Zi1(){
}
public Zi1(int num){
}
}
class Person{
private String name;
private int age;
public Person(String name, int age) {
this.name = name;
this.age = age;
}
public void show(){
System.out.println(name+","+age);
}
}
class Student extends Person{
public Student(String name,int age){
super(name,age);
}
}
public class Test2 {
public static void main(String[] args) {
Student stu = new Student("张三", 18);
stu.show();
}
}
|
子类构造方法中使用super调用父类的构造方法,是为了在创建子类对象的时候,初始化从父类继承过来的属性
继承体系对象的内存图
继承的特点
- Java只支持单继承,不支持多继承。但是可以多层继承,java中所有类都是直接或者间接继承Object,所有类都是Object类的子类
1
2
3
4
5
6
7
8
9
10
11
12
13
|
class A {
}
class B {
}
class C1 extends A {
}
class C2 extends A, B {
}
|
- 一个类只能有一个父类,但可以有多个子类。
1
2
3
4
5
6
7
8
9
10
|
class A {
}
class C1 extends A {
}
class C2 extends A {
}
|
- 可以多层继承。
1
2
3
4
5
6
7
8
9
| class A {
}
class B extends A {
}
class C extends B {
}
|
补充: 顶层父类是Object类。所有的类默认继承Object,作为父类。
class A {} 默认继承Object类 直接继承Object类
class B extends A{} B的父类就是A,但是A的父类是Object类 间接继承Object类
java中所有类都是直接或者间接继承Object,所有类都是Object类的子类
抽象类
抽象类的概述和定义
抽象类的概述
- 概述: 使用abstract关键字修饰的类就是抽象类
- 特点: 这种类不能被创建对象,它就是用来做父类的,被子类继承的
抽象类的定义
格式:
1
2
3
| 修饰符 abstract class 类名{
}
|
例如:
1
2
3
| public abstract class Person{
}
|
抽象类中的成员
1
2
3
4
5
6
7
8
9
10
11
12
13
14
15
16
17
18
19
20
21
22
23
24
25
26
27
28
29
30
31
32
33
34
35
36
37
38
39
40
41
42
43
44
45
46
47
48
49
50
51
52
53
54
55
56
57
58
59
60
61
62
63
64
| public abstract class Animal {
private String name;
private int age;
public Animal(){
}
public Animal(String name,int age){
this.name = name;
this.age = age;
}
public String getName() {
return name;
}
public void setName(String name) {
this.name = name;
}
public int getAge() {
return age;
}
public void setAge(int age) {
this.age = age;
}
public void show(){
System.out.println(name+","+age);
}
}
public class Test {
public static void main(String[] args) {
}
}
|
抽象方法的概述和定义
抽象方法的概述
- 没有方法体,使用abstract修饰的方法就是抽象方法
抽象方法的定义
1
2
3
| 修饰符 abstract 返回值类型 方法名(形参列表);
例如:
public abstract void work();
|
抽象方法的作用: 强制要求子类重写的
1
2
3
4
5
6
7
8
9
10
11
12
13
14
15
16
17
18
19
20
21
22
23
24
25
26
27
28
29
30
31
32
33
34
35
36
37
38
39
40
41
42
43
44
45
46
47
48
49
50
51
52
53
54
55
56
57
58
59
60
61
62
63
64
65
66
67
68
69
70
71
72
73
74
75
76
77
78
79
80
81
| public abstract class Animal {
private String name;
private int age;
public Animal(){
}
public Animal(String name, int age){
this.name = name;
this.age = age;
}
public String getName() {
return name;
}
public void setName(String name) {
this.name = name;
}
public int getAge() {
return age;
}
public void setAge(int age) {
this.age = age;
}
public void show(){
System.out.println(name+","+age);
}
public abstract void eat();
}
public class Dog extends Animal {
@Override
public void eat() {
System.out.println("狗吃骨头...");
}
}
package com.itheima.demo14_抽象方法的概述和定义;
public class Cat extends Animal {
@Override
public void eat() {
System.out.println("猫吃鱼...");
}
}
public class Test {
public static void main(String[] args) {
Dog d = new Dog();
d.eat();
Cat c = new Cat();
c.eat();
}
}
|
抽象类的注意事项
- 抽象类不能被创建对象,就是用来做“父类”,被子类继承的。
- 抽象类不能被创建对象,但可以有“构造方法”——为成员变量初始化。
- 抽象类中可以没有抽象方法,但抽象方法必须定义在抽象类中
- 子类继承抽象类后,必须重写抽象类中所有的抽象方法,否则子类必须也是一个抽象类
1
2
3
4
5
6
7
8
9
10
11
12
13
14
15
16
17
18
19
20
21
22
23
24
25
26
27
28
29
30
31
32
33
34
35
36
37
38
39
40
41
42
43
44
45
46
47
48
49
50
51
52
53
54
55
56
57
58
59
60
61
62
63
64
65
66
67
68
69
70
71
72
73
74
75
76
77
| abstract class Animal{
private String name;
private int age;
public Animal() {
}
public Animal(String name, int age) {
this.name = name;
this.age = age;
}
public void show(){
System.out.println(name+","+age);
}
}
class Dog extends Animal{
public Dog() {
super();
}
public Dog(String name, int age) {
super(name, age);
}
}
abstract class Person{
public abstract void eat();
public abstract void drink();
}
class Student extends Person{
@Override
public void eat() {
}
@Override
public void drink() {
}
}
abstract class Teacher extends Person{
@Override
public void eat() {
}
}
public class Test {
public static void main(String[] args) {
Dog d = new Dog("旺财", 2);
d.show();
}
}
|
模板设计模式
设计模式概述
- 设计模式就是解决一些问题时的固定思路,也就是代码设计思路经验的总结。
模板设计模式概述
- 针对某些情况,在父类中指定一个模板,然后根据具体情况,在子类中灵活的具体实现该模板
1
2
3
4
5
6
7
8
9
| public abstract class Person{
public void sleep(){
System.out.println("两眼一闭,就睡觉...");
}
public abstract void eat();
}
|
- 抽象类体现的就是模板设计思想,模板是将通用的东西在抽象类中具体的实现,而模板中不能决定的东西定义成抽象方法,让使用模板(继承抽象类的类)的类去重写抽象方法实现需求
模板模式的实现步骤
- 定义抽象父类作为模板
- 在父类中定义”模板方法”— 实现方法(通用模板)+抽象方法(填充模板)
- 子类继承父类,重写抽象方法(填充父类的模板)
- 测试类:
- 创建子类对象,通过子类调用父类的“实现的方法”+ “子类重写后的方法” e
案例演示
假如我现在需要定义新司机和老司机类,新司机和老司机都有开车功能,开车的步骤都一样,只是驾驶时的姿势有点不同,新司机:开门,点火,双手紧握方向盘,刹车,熄火,老司机:开门,点火,右手握方向盘左手抽烟,刹车,熄火。那么这个时候我们就可以将固定流程写到父类中,不同的地方就定义成抽象方法,让不同的子类去重写
分析:
- 司机类
- 开车方法: 确定实现–通用模板
- 姿势方法: 不确定实现–填充模板
- 新司机类继承司机类,重写姿势方法
- 老司机类继承司机类,重写姿势方法
1
2
3
4
5
6
7
8
9
10
11
12
13
14
15
16
|
public abstract class Driver {
public void driveCar(){
System.out.println("开门");
System.out.println("点火");
ziShi();
System.out.println("刹车");
System.out.println("熄火");
}
public abstract void ziShi();
}
|
现在定义两个使用模板的司机:
1
2
3
4
5
6
7
8
9
10
11
12
13
| public class NewDriver extends Driver {
@Override
public void ziShi() {
System.out.println("双手紧握方向盘");
}
}
public class OldDriver extends Driver {
@Override
public void ziShi() {
System.out.println("右手握方向盘左手抽烟");
}
}
|
编写测试类
1
2
3
4
5
6
7
8
9
10
11
12
13
14
| public class Test {
public static void main(String[] args) {
NewDriver d1 = new NewDriver();
d1.driveCar();
OldDriver d2 = new OldDriver();
d2.driveCar();
}
}
|
运行效果
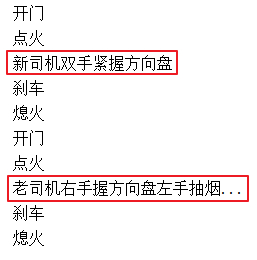
可以看出,模板模式的优势是,模板已经定义了通用架构,使用者只需要关心自己需要实现的功能即可!非常的强大!
final关键字
final: 不可改变。可以用于修饰类、方法和变量。
- 类:被修饰的类,不能被继承。
- 方法:被修饰的方法,不能被重写。
- 变量:被修饰的变量,就只能赋值一次,不能被重新赋值。
修饰类
格式如下:
1
2
3
4
5
6
7
8
9
| 修饰符 final class 类名 {
}
例如:
public final class FinalClassFu {
}
public class FinalClassZi {
}
|
查询API发现像 public final class String 、public final class Math 、public final class Scanner 等,很多我们学习过的类,都是被final修饰的,目的就是供我们使用,而不让我们所以改变其内容。
修饰方法
格式如下:
1
2
3
| 修饰符 final 返回值类型 方法名(参数列表){
}
|
重写被 final修饰的方法,编译时就会报错。
1
2
3
4
5
6
7
8
9
10
11
12
13
| public class FinalMethodFu {
public final void show(){
}
}
public class FinalMethodZi extends FinalMethodFu {
}
|
修饰变量
局部变量——基本类型
基本类型的局部变量,被final修饰后,只能赋值一次,不能再更改。代码如下:
1
2
3
4
5
6
7
| public class FinalDemo1 {
public static void main(String[] args) {
final int NUM = 10;
}
}
|
局部变量——引用类型
引用类型的局部变量,被final修饰后,只能指向一个对象,地址不能再更改。但是不影响对象内部的成员变量值的修改,代码如下:
1
2
3
4
5
6
7
8
9
| public class FinalDemo2 {
public static void main(String[] args) {
final Student stu = new Student("张三",18);
stu.setAge(19);
}
}
|
成员变量
成员变量涉及到初始化的问题,初始化方式有两种,只能二选一:
显示初始化;
1
2
3
| public class FinalVariable {
final int NUM1 = 10;
}
|
构造方法初始化。
1
2
3
4
5
6
7
8
9
| public class FinalVariable {
final int NUM2;
public FinalVariable(int NUM2){
this.NUM2 = NUM2;
}
public FinalVariable(){
this.NUM2 = 10;
}
}
|
被final修饰的常量名称,一般都有书写规范,所有字母都大写。
static关键字
之前咋们写main方法的时候,使用过了一个static关键字,接下来我们来学习一下static关键字
static关键字概述
static是一个静态修饰符关键字,表示静态的意思,可以修饰成员变量和成员方法以及代码块。
static关键字的使用
static修饰成员变量
当 static 修饰成员变量时,该变量称为类变量。该类的每个对象都共享同一个类变量的值。任何对象都可以更改该类变量的值,但也可以在不创建该类的对象的情况下对类变量进行操作。
定义格式
静态成员变量的访问方式
1
2
| 对象名.静态成员变量名; 不推荐
类名.静态成员变量名; 推荐
|
案例
1
2
3
4
5
6
7
8
9
10
11
12
13
14
15
16
17
18
19
20
21
22
23
24
25
26
27
28
29
30
31
32
33
34
35
36
37
| public class Person {
String name;
static String country;
public Person() {
}
public Person(String name, String country) {
this.name = name;
this.country = country;
}
}
public class Test {
public static void main(String[] args) {
Person p1 = new Person("张三", "中国");
System.out.println(p1.name+","+p1.country);
System.out.println("=======================");
Person p2 = new Person();
System.out.println(p2.name+","+p2.country);
System.out.println("=======================");
System.out.println(Person.country);
}
}
|
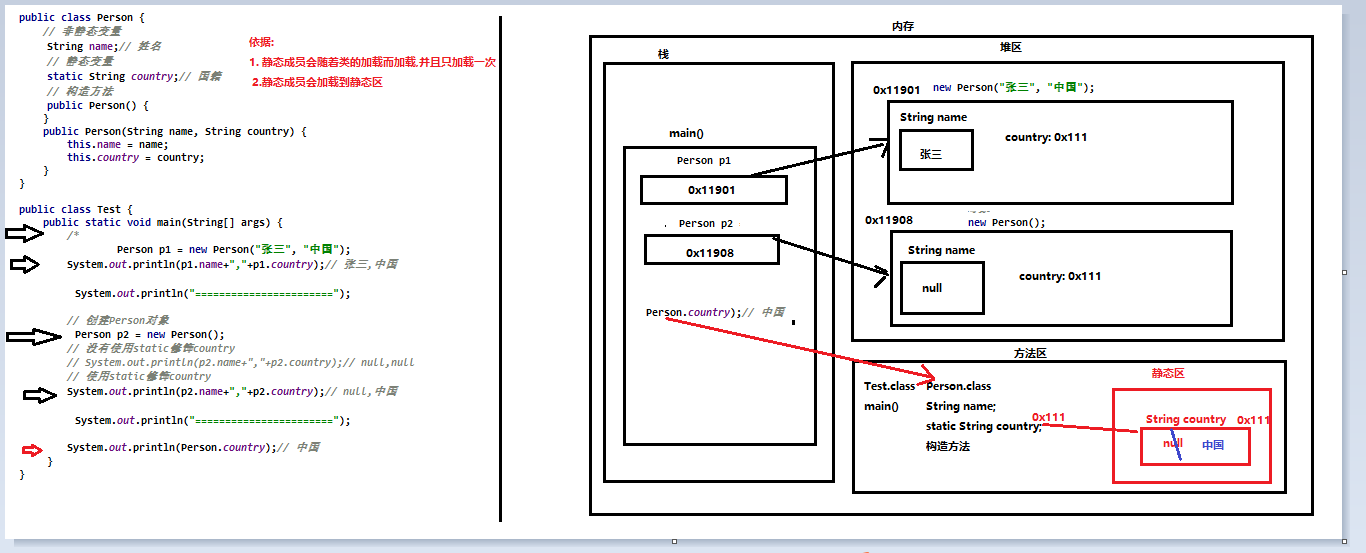
static修饰成员方法
被static修饰的方法会变成静态方法,也称为类方法,该静态方法可以使用类名直接调用。
格式
1
2
3
| 修饰符 static 返回值类型 方法名 (参数列表){
}
|
访问方式
1
2
| 对象名.方法名(实参);
类名.方法名(实参); 推荐
|
1
2
3
4
5
6
7
8
9
10
11
12
13
14
15
16
17
18
19
20
21
22
23
24
25
26
27
28
29
30
| public class Person {
public void method1(){
System.out.println("Person method1...");
}
public static void method2(){
System.out.println("Person method2...");
}
}
public class Test {
public static void main(String[] args) {
Person p = new Person();
p.method2();
Person.method2();
}
}
|
静态方法调用的注意事项:
- 静态方法中不能出现this关键字
- 静态方法中只能直接访问静态成员变量和静态成员方法
- 静态方法中不能直接访问非静态成员变量和非静态成员方法
- 非静态方法中可以直接访问一切成员变量和成员方法
1
2
3
4
5
6
7
8
9
10
11
12
13
14
15
16
17
18
19
20
21
22
23
24
25
26
27
28
29
30
31
32
33
34
35
36
37
38
39
40
41
42
43
44
45
46
47
48
49
50
51
52
53
54
55
56
57
58
59
60
61
62
63
64
65
66
67
68
69
70
71
72
73
| public class ChinesePeople {
String name;
static String country;
public void method1(){
System.out.println("非静态 method2方法");
}
public void method2(){
System.out.println(name);
System.out.println(country);
method1();
method4();
System.out.println("非静态 method2方法");
}
public static void method3(){
System.out.println("静态成员变量:"+country);
method4();
System.out.println("非静态 method3方法");
}
public static void method4(){
System.out.println("非静态 method4方法");
}
}
public class Test {
public static void main(String[] args) {
ChinesePeople.method3();
}
}
|
以后开发中static的应用
概述
以后的项目中,通常会需要一些“全局变量”或者“全局的工具方法”,这些全局变量和方法,可以单独定义在一个类中,并声明为static(静态)的,可以很方便的通过类名访问
例如:
1
2
3
4
5
6
7
8
9
10
11
12
13
14
15
16
17
18
19
20
21
22
23
24
25
26
27
28
29
30
31
32
33
34
35
| public class Utils {
public static final int WIDTH = 800;
public static final int HEIGHT = 800;
public static int getArrayMax(int[] arr){
int max = arr[0];
for (int i = 0; i < arr.length; i++) {
if(arr[i] > max){
max = arr[i];
}
}
return max;
}
}
public class Test {
public static void main(String[] args) {
System.out.println(Utils.width);
System.out.println(Utils.height);
int[] arr = {23,34,545,56};
System.out.println(Utils.getArrayMax(arr));
}
}
|
小结
1
2
3
4
5
6
7
8
9
10
11
| static修饰成员方法:
格式: 在返回值类型前面加static关键字
使用: 类名.静态方法名(实参);
注意事项:
1.静态方法中不能出现this
2.静态方法中只能直接访问静态成员变量和成员方法
3.非静态方法中可以直接访问一切成员变量和成员方法
static修饰成员变量:
格式: static 数据类型 变量名;
使用; 类名.静态成员变量名
特点; 被static修饰的变量会被该类的所有对象共享
|
接口
概述
引用数据类型除了类其实还有接口,接下来学习接口的概述
概述: 接口是Java语言中的一种引用类型,是方法的”集合”,所以接口的内部主要就是定义方法,包含常量,抽象方法(JDK 7及以前),默认方法和静态方法(JDK 8),私有方法(jdk9)。
接口的定义,它与定义类方式相似,但是使用 interface 关键字。它也会被编译成.class文件,但一定要明确它并不是类,而是另外一种引用数据类型。
public class 类名{}–>.class
public interface 接口名{}->.class
引用数据类型:数组,类,接口。
接口的使用,它不能创建对象,但是可以被实现(implements ,类似于被继承)。一个实现接口的类(可以看做是接口的子类),需要实现接口中所有的抽象方法,创建该类对象,就可以调用方法了,否则它必须是一个抽象类。
小结
- 接口是java语言中的一种引用数据类型
- 接口中的成员:
- 常量(jdk7及其以前)
- 抽象方法(jdk7及其以前)
- 默认方法和静态方法(jdk8额外增加)
- 私有方法(jdk9额外增加)
- 定义接口使用interface关键字—接口编译后产生class文件
- 接口不能创建对象,需要使用实现类实现接口(类似于继承),实现接口的类叫做实现类(子类)
定义格式
格式
1
2
3
4
5
6
7
| public interface 接口名称 {
}
|

案例
1
2
3
4
5
6
7
8
9
10
11
12
13
14
15
16
17
18
19
20
21
22
23
24
25
26
27
28
| public interface IA {
public static final int NUM1 = 10;
int NUM2 = 20;
public abstract void method1();
void method2();
public default void method3(){
System.out.println("默认方法 method3");
}
public static void method4(){
System.out.println("静态方法 method4");
}
private static void method5(){
System.out.println("私有静态方法 method5");
}
private void method6(){
System.out.println("私有非静态方法 method6");
}
}
|
实现接口
实现概述
类与接口的关系为实现关系,即类实现接口,该类可以称为接口的实现类,也可以称为接口的子类。实现的动作类似继承,格式相仿,只是关键字不同,实现使用 implements关键字。
实现格式
接口中成员的访问特点
接口中成员访问特点概述
1
2
3
4
5
6
| 接口中成员的访问特点:
接口中的常量: 主要是供接口直接使用
接口中的抽象方法: 供实现类重写的
接口中的默认方法: 供实现类继承的(实现类中可以直接调用,实现类对象也可以直接调用)
接口中的静态方法: 只供接口直接调用,实现类继承不了
接口中的私有方法: 只能在接口中直接调用,实现类继承不了
|
案例演示
1
2
3
4
5
6
7
8
9
10
11
12
13
14
15
16
17
18
19
20
21
22
23
24
25
26
27
28
29
30
31
32
33
34
35
36
37
38
39
40
41
42
43
44
45
46
47
48
49
50
51
52
53
54
55
56
57
58
59
60
61
62
63
64
65
66
67
68
69
70
71
72
73
74
75
76
| public interface IA {
public static final int NUM = 10;
public abstract void method1();
public default void method2(){
System.out.println("IA 接口中的默认方法method2");
}
public static void method3(){
System.out.println("IA 接口中的静态方法method3");
}
private void method4(){
System.out.println("IA 接口中的私有方法method4");
}
private static void method5(){
System.out.println("IA 接口中的私有方法method5");
}
}
public class Imp implements IA {
@Override
public void method1() {
System.out.println("实现类重写IA接口中的抽象方法");
}
@Override
public void method2() {
System.out.println("实现类重写IA接口中的默认方法");
}
}
public class Test {
public static void main(String[] args) {
System.out.println(IA.NUM);
Imp imp = new Imp();
imp.method1();
imp.method2();
IA.method3();
}
}
|
小结
- 接口中成员访问特点:
- 常量:主要是供接口名直接访问
- 抽象类:就是用来给实现类重写的
- 默认方法:只供实现类重写或者实现类对象直接调用
- 静态方法:只供接口名直接调用
- 私有方法:只能在本接口中调用
多实现时的几种冲突情况
公有静态常量的冲突
1
2
3
4
5
6
7
8
9
10
11
12
13
14
15
16
17
18
19
20
| interface A{
public static final int NUM1 = 10;
}
interface B{
public static final int NUM1 = 20;
public static final int NUM2 = 30;
}
class Imp implements A,B{
}
public class Test {
public static void main(String[] args) {
System.out.println(Imp.NUM2);
}
}
|
公有抽象方法的冲突
1
2
3
4
5
6
7
8
9
10
11
12
13
14
15
16
17
18
19
20
| interface A{
public abstract void method();
}
interface B{
public abstract void method();
}
class Imp implements A,B{
@Override
public void method() {
System.out.println("实现类重写");
}
}
public class Test {
public static void main(String[] args) {
}
}
|
公有默认方法的冲突
1
2
3
4
5
6
7
8
9
10
11
12
13
14
15
16
17
18
19
20
21
22
23
24
25
26
| interface A{
public default void method(){
System.out.println("A 接口的默认方法method");
}
}
interface B{
public default void method(){
System.out.println("B 接口的默认方法method");
}
}
class Imp implements A,B{
@Override
public void method() {
System.out.println("实现类重写的默认方法");
}
}
public class Test {
public static void main(String[] args) {
Imp imp = new Imp();
imp.method();
}
}
|
公有静态方法的冲突
私有方法的冲突
小结
1
2
3
4
5
6
| 多实现时的几种冲突情况:
- 公有静态常量的冲突:实现类不继承冲突的常量
- 公有抽象方法的冲突:实现类只需要重写一个
- 公有默认方法的冲突:实现类必须重写一次最终版本
- 公有静态方法的冲突:静态方法是直接属于接口的,不能被继承,所以不存在冲突
- 私有方法的冲突:私有方法只能在本接口中直接使用,不存在冲突
|
接口和接口的关系
接口与接口之间的关系
接口多继承接口的冲突情况
公有静态常量的冲突
1
2
3
4
5
6
7
8
9
10
11
12
13
14
15
16
17
18
19
20
| interface A{
public static final int NUM1 = 10;
}
interface B{
public static final int NUM1 = 20;
public static final int NUM2 = 30;
}
interface C extends A,B{
}
public class Test {
public static void main(String[] args) {
System.out.println(C.NUM2);
}
}
|
公有抽象方法冲突
1
2
3
4
5
6
7
8
9
10
11
12
13
14
15
16
17
18
19
20
21
22
23
24
25
26
| interface A{
public abstract void method();
}
interface B{
public abstract void method();
}
interface C extends A,B{
}
class Imp implements C{
@Override
public void method() {
System.out.println("实现接口的抽象方法");
}
}
public class Test {
public static void main(String[] args) {
Imp imp = new Imp();
imp.method();
}
}
|
公有默认方法的冲突
1
2
3
4
5
6
7
8
9
10
11
12
13
14
15
16
17
18
19
20
21
22
23
24
25
26
27
28
29
30
31
32
33
34
35
36
| interface A{
public default void method(){
System.out.println("A 接口中的默认方法method");
}
}
interface B{
public default void method(){
System.out.println("B 接口中的默认方法method");
}
}
interface C extends A,B{
@Override
public default void method() {
System.out.println("重写父接口中的method方法");
}
}
class Imp implements C{
}
public class Test {
public static void main(String[] args) {
Imp imp = new Imp();
imp.method();
}
}
|
公有静态方法和私有方法
- 不冲突,因为静态方法是直接属于接口的,只能使用本接口直接访问,而私有方法只能在接口中访问,也没有冲突
1
2
3
4
5
6
7
8
9
10
11
12
13
14
15
16
17
18
19
20
21
22
| interface A{
public static void method(){
System.out.println("A 接口的静态方法method");
}
}
interface B{
public static void method(){
System.out.println("B 接口的静态方法method");
}
}
interface C extends A,B{
}
public class Test {
public static void main(String[] args) {
}
}
|
小结
1
2
3
4
5
6
7
8
9
10
11
12
13
14
15
16
17
18
19
| - 接口与接口之间的关系: 继承关系
单继承: A接口继承B接口
多继承: A接口同时继承B接口,C接口,...
多层继承: A接口继承B接口,B接口,继承C接口
格式:
public interface 接口名 extends 接口名1,接口名2,...{
}
- 接口多继承时的冲突情况
- 公有静态常量的冲突:子接口无法继承父接口中冲突的常量
- 公有抽象方法的冲突:子接口只会继承一个有冲突的抽象方法
- 公有默认方法的冲突:子接口中必须重写一次有冲突的默认方法(注意要加default)
- 公有静态方法和私有方法的冲突:
不冲突,因为静态方法是直接属于接口的,只能使用本接口直接访问,而私有方法只能在接口中访问,也没有冲突
面试题:
实现类重写接口中的默认方法,不需要加default
子接口重写父接口中的默认方法,必须加default
|
实现类继承父类又实现接口时的冲突
父类和接口的公有静态常量的冲突
1
2
3
4
5
6
7
8
9
10
11
12
13
14
15
16
17
18
19
20
21
22
| class Fu{
public static final int NUM1 = 10;
public static final int NUM2 = 100;
}
interface A{
public static final int NUM1 = 20;
}
class Zi extends Fu implements A{
}
public class Test {
public static void main(String[] args) {
System.out.println(Zi.NUM2);
}
}
|
父类和接口的抽象方法冲突
1
2
3
4
5
6
7
8
9
10
11
12
13
14
15
16
17
18
19
20
21
| abstract class Fu{
public abstract void method();
}
interface A{
public abstract void method();
}
class Zi extends Fu implements A{
@Override
public void method() {
System.out.println("Zi 重写有冲突的抽象方法");
}
}
public class Test {
public static void main(String[] args) {
Zi zi = new Zi();
zi.method();
}
}
|
父类和接口的公有默认方法的冲突
1
2
3
4
5
6
7
8
9
10
11
12
13
14
15
16
17
18
19
20
21
22
23
| class Fu{
public void method(){
System.out.println("Fu 类中的默认方法method");
}
}
interface A{
public default void method(){
System.out.println("A 接口中的默认方法method");
}
}
class Zi extends Fu implements A{
}
public class Test {
public static void main(String[] args) {
Zi zi = new Zi();
zi.method();
}
}
|
父类和接口的公有静态方法
1
2
3
4
5
6
7
8
9
10
11
12
13
14
15
16
17
18
19
20
21
22
| class Fu{
public static void method(){
System.out.println("Fu 类中的静态方法method");
}
}
interface A{
public static void method(){
System.out.println("A 接口中的静态方法method");
}
}
class Zi extends Fu implements A{
}
public class Test {
public static void main(String[] args) {
Zi.method();
}
}
|
父类和接口的私有方法
小结
1
2
3
4
5
6
| 实现类继承父类又实现接口时的冲突:
- 公有静态常量的冲突:子类无法继承有冲突的常量
- 公有抽象方法的冲突:子类必须重写一次有冲突的抽象方法
- 公有默认方法的冲突:优先访问父类的
- 公有静态方法的冲突:只会访问父类的静态方法
- 私有方法的冲突: 不存在冲突
|
抽象类和接口的练习
需求
通过实例进行分析和代码演示抽象类和接口的用法。
1、举例:
犬: —抽象父类
行为:吼叫;吃饭;
缉毒犬:继承犬类,实现缉毒接口
行为:吼叫;吃饭;缉毒;
缉毒接口:
缉毒
- 如果一个父类中的某个方法,所有子类都有不同的实现,那么该方法就应该定义成抽象方法,所以该父类就是抽象类 (父类一般都是抽象类)
- 如果某个功能是一个类额外增加的,那么就可以把这个额外的功能定义到接口中,再这个类去实现
分析
由于犬分为很多种类,他们吼叫和吃饭的方式不一样,在描述的时候不能具体化,也就是吼叫和吃饭的行为不能明确。当描述行为时,行为的具体动作不能明确,这时,可以将这个行为写为抽象行为,那么这个类也就是抽象类。
可是有的犬还有其他额外功能,而这个功能并不在这个事物的体系中 , 例如 : 缉毒犬。缉毒的这个功能有好多种动物都有 , 例如 : 缉毒猪 , 缉毒鼠。我们可以将这个额外功能定义接口中 ,让缉毒犬继承犬且实现缉毒接口 , 这样缉毒犬既具备犬科自身特点也有缉毒功能。
- 额外的功能—> 在接口中定义,让实现类实现
- 共性的功能—> 在父类中定义,让子类继承
实现
1
2
3
4
5
6
7
8
9
10
11
12
13
14
15
16
17
18
19
20
21
22
23
24
25
26
27
28
29
30
31
32
33
34
35
36
37
38
|
public abstract class Dog {
public abstract void houJiao();
public abstract void eat();
}
public interface JiDu {
public abstract void jiDu();
}
public class JiDuDog extends Dog implements JiDu{
@Override
public void houJiao() {
System.out.println("缉毒犬找到了毒品,开始吼叫,汪汪汪....");
}
@Override
public void eat() {
System.out.println("缉毒之前,开始吃骨头...");
}
@Override
public void jiDu() {
System.out.println("吃完东西后,开始使用鼻子查找毒品....");
}
}
public class Test {
public static void main(String[] args) {
JiDuDog jd = new JiDuDog();
jd.eat();
jd.jiDu();
jd.houJiao();
}
}
|
小结
- 额外的功能—> 在接口中定义,让实现类实现
- 如果可以确定的通用功能,使用默认方法
- 如果不能确定的功能,使用抽象方法
- 共性的功能—> 在父类中定义,让子类继承
- 如果可以确定的通用功能,使用默认方法
- 如果不能确定的功能,使用抽象方法
新JDK接口使用思路:

多态
概述
多态是继封装、继承之后,面向对象的第三大特性。
生活中,比如跑的动作,小猫、小狗和大象,跑起来是不一样的。再比如飞的动作,昆虫、鸟类和飞机,飞起来也是不一样的。可见,同一行为,通过不同的事物,可以体现出来的不同的形态。多态,描述的就是这样的状态。
定义
- 多态: 是指同一行为,对于不同的对象具有多个不同表现形式。
- 程序中多态: 是指同一方法,对于不同的对象具有不同的实现.
前提条件【重点】
- 继承或者实现【二选一】
- 父类引用指向子类对象\接口引用指向实现类对象【格式体现】
- 方法的重写【意义体现:不重写,无意义】
实现多态
多态的体现:父类的引用指向它的子类的对象:
1
2
| 父类类型 变量名 = new 子类对象;
变量名.方法名();
|
父类类型:指子类对象继承的父类类型,或者实现的父接口类型。
1
2
3
4
5
6
7
8
9
10
11
12
13
14
15
16
17
18
19
20
21
22
23
24
25
26
27
28
29
30
| class Animal{
public void eat(){
System.out.println("吃东西");
}
}
class Dog extends Animal{
@Override
public void eat() {
System.out.println("狗吃骨头...");
}
}
class Cat extends Animal{
@Override
public void eat() {
System.out.println("猫吃鱼...");
}
}
public class Test1 {
public static void main(String[] args) {
Animal anl = new Dog();
anl.eat();
Animal anl1 = new Cat();
anl1.eat();
}
}
|
多态时访问成员的特点
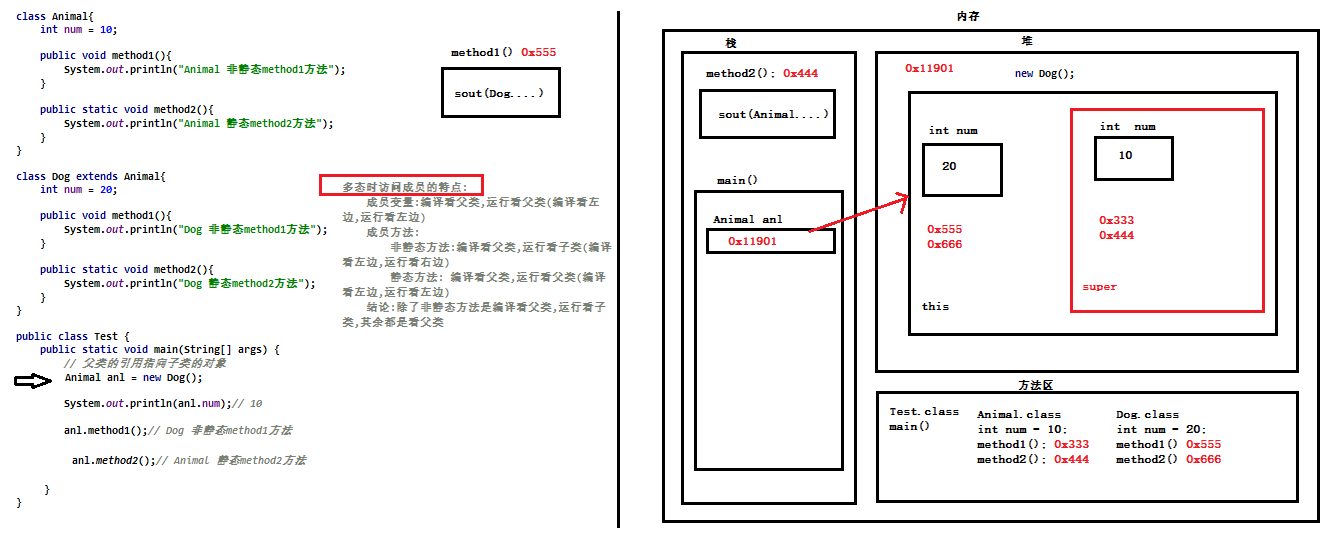
- 多态时成员变量的访问特点
- 多态时成员方法的访问特点
- 非静态方法:编译看左边,运行看右边
- 简而言之:编译的时候去父类中查找方法,运行的时候去子类中查找方法来执行
- 静态方法:编译看左边,运行看左边
- 简而言之:编译的时候去父类中查找方法,运行的时候去父类中查找方法来执行
- 注意:多态的情况下是无法访问子类独有的方法
除了非静态方法是编译看父类,运行看子类,其余都是看父类
演示代码:
1
2
3
4
5
6
7
8
9
10
11
12
13
14
15
16
17
18
19
20
21
22
23
24
25
26
27
28
29
30
| class Animal{
int num = 10;
public void method1(){
System.out.println("Animal 非静态method1方法");
}
public static void method2(){
System.out.println("Animal 静态method2方法");
}
}
class Dog extends Animal{
int num = 20;
public void method1(){
System.out.println("Dog 非静态method1方法");
}
public static void method2(){
System.out.println("Dog 静态method2方法");
}
}
public class Test {
public static void main(String[] args) {
Animal anl = new Dog();
System.out.println(anl.num);
anl.method1();
anl.method2();
}
}
|
多态的表现形式
普通父类多态
1
2
3
4
5
6
7
| public class Fu{}
public class Zi extends Fu{}
public class Demo{
public static void main(String[] args){
Fu f = new Zi();
}
}
|
抽象父类多态
1
2
3
4
5
6
7
| public abstract class Fu{}
public class Zi extends Fu{}
public class Demo{
public static void main(String[] args){
Fu f = new Zi();
}
}
|
父接口多态
1
2
3
4
5
6
7
| public interface A{}
public class AImp implements A{}
public class Demo{
public static void main(String[] args){
A a = new AImp();
}
}
|
多态的应用场景
变量多态 —–> 意义不大
1
2
3
4
5
6
7
8
9
10
11
12
13
14
15
16
17
18
19
20
21
22
23
24
25
26
27
28
| class Animal{
public void eat(){
System.out.println("吃东西...");
}
}
class Dog extends Animal{
@Override
public void eat() {
System.out.println("狗吃骨头");
}
}
class Cat extends Animal{
@Override
public void eat() {
System.out.println("猫吃鱼");
}
}
public class Test {
public static void main(String[] args) {
Animal anl = new Dog();
anl.eat();
anl = new Cat();
anl.eat();
}
}
|
形参多态—-> 常用
1
2
3
4
5
6
7
8
9
10
11
12
13
14
15
16
17
18
19
20
21
22
23
24
25
26
27
28
29
30
31
32
33
34
35
36
37
| class Animal{
public void eat(){
System.out.println("吃东西...");
}
}
class Dog extends Animal{
@Override
public void eat() {
System.out.println("狗吃骨头");
}
}
class Cat extends Animal{
@Override
public void eat() {
System.out.println("猫吃鱼");
}
}
public class Test {
public static void main(String[] args) {
Dog d = new Dog();
method(d);
System.out.println("===============================");
Cat c = new Cat();
method(c);
}
public static void method(Animal anl){
anl.eat();
}
}
|
返回值多态—> 常用
1
2
3
4
5
6
7
8
9
10
11
12
13
14
15
16
17
18
19
20
21
22
23
24
25
26
27
28
29
30
31
32
33
34
35
36
37
38
39
40
41
42
43
| class Animal{
public void eat(){
System.out.println("吃东西...");
}
}
class Dog extends Animal{
@Override
public void eat() {
System.out.println("狗吃骨头");
}
}
class Cat extends Animal{
@Override
public void eat() {
System.out.println("猫吃鱼");
}
}
public class Test {
public static void main(String[] args) {
Animal anl = method();
anl.eat();
}
public static Animal method(){
return new Cat();
}
public static Animal method1(){
if (1==1){
return new Animal();
}else if (2==2){
return new Dog();
}else{
return new Cat();
}
}
}
|
多态的好处和弊端
好处
弊端
- 多态的情况下,无法访问子类独有的方法或者成员变量,因为多态成员访问的特点是,编译看父类
示例代码
1
2
3
4
5
6
7
8
9
10
11
12
13
14
15
16
17
18
19
20
21
22
23
24
25
26
27
28
29
| class Animal{
public void eat(){
System.out.println("吃东西...");
}
}
class Dog extends Animal{
@Override
public void eat() {
System.out.println("狗吃骨头...");
}
public void lookHome(){
System.out.println("狗在看家...");
}
}
public class Test {
public static void main(String[] args) {
Animal anl = new Dog();
anl.eat();
}
}
|
引用类型转换
向上转型
子类类型向父类类型向上转换的过程,这个过程是默认的。
向下转型
父类类型向子类类型向下转换的过程,这个过程是强制的。
1
2
| Aniaml anl = new Cat();
Cat c = (Cat)anl;
|
示例代码
1
2
3
4
5
6
7
8
9
10
11
12
13
14
15
16
17
18
19
20
21
22
23
24
25
26
27
28
29
30
31
32
33
34
35
36
37
38
39
40
41
42
43
44
45
46
47
48
49
50
51
52
53
54
55
| class Animal{
public void eat(){
System.out.println("吃东西...");
}
}
class Dog extends Animal{
@Override
public void eat() {
System.out.println("狗吃骨头...");
}
public void lookHome(){
System.out.println("狗在看家...");
}
}
class Cat extends Animal{
@Override
public void eat() {
System.out.println("猫吃鱼...");
}
}
class Person{}
public class Test {
public static void main(String[] args) {
Animal anl = new Dog();
Dog dog = (Dog)anl;
System.out.println("===================================");
}
}
|
instanceof关键字
向下强转有风险,最好在转换前做一个验证 :
格式:
1
2
3
4
5
6
7
| 变量名 instanceof 数据类型
如果变量属于该数据类型,返回true。
如果变量不属于该数据类型,返回false。
if( anl instanceof Cat){
Cat c = (Cat)anl;
}
|
示例代码
1
2
3
4
5
6
7
8
9
10
11
12
13
14
15
16
17
18
19
20
21
22
23
24
25
26
27
28
29
30
31
32
33
34
35
36
37
38
39
40
41
42
43
44
45
46
47
48
49
50
| class Animal{
public void eat(){
System.out.println("吃东西...");
}
}
class Dog extends Animal{
@Override
public void eat() {
System.out.println("狗吃骨头...");
}
public void lookHome(){
System.out.println("狗在看家...");
}
}
class Cat extends Animal{
@Override
public void eat() {
System.out.println("猫吃鱼...");
}
}
public class Test {
public static void main(String[] args) {
Animal anl = new Cat();
if (anl instanceof Dog){
Dog d = (Dog)anl;
}
System.out.println("正常结束");
}
}
|
小结
1
2
3
4
5
6
7
8
9
10
11
12
| 引用类型转换:
向上转型:子类类型向父类类型向上转换的过程,这个过程是默认\自动的。
向下转型:父类类型向子类类型向下转换的过程,这个过程是强制\手动的。
格式: 子类类型 对象名 = (子类类型)父类类型的变量;
注意:
1.向下转型的时候:右边父类类型的变量一定要指向要转型的子类类型的对象
2.不管是向上转型还是向下转型,一定满足父子类关系或者实现关系
instanceof关键字:
if(变量名 instanceof 数据类型){}
如果变量属于该数据类型,返回true。
如果变量不属于该数据类型,返回false。
|
解决多态的弊端
1
2
3
4
5
6
7
8
9
10
11
12
13
14
15
16
17
18
19
20
21
22
23
24
25
26
27
28
29
30
31
32
33
34
35
36
37
38
| class Animal{
public void eat(){
System.out.println("吃东西...");
}
}
class Dog extends Animal{
@Override
public void eat() {
System.out.println("狗吃骨头...");
}
public void lookHome(){
System.out.println("狗在看家...");
}
}
public class Test {
public static void main(String[] args) {
Animal anl = new Dog();
anl.eat();
if (anl instanceof Dog){
Dog d = (Dog)anl;
d.lookHome();
}
System.out.println("正常结束");
}
}
|
多态的应用场景综合案例
1
2
3
4
5
6
7
8
9
10
11
12
13
14
15
16
17
18
19
20
21
22
23
24
25
26
27
28
29
30
31
32
33
34
35
36
37
38
39
40
41
42
43
44
45
46
47
48
49
50
51
52
53
54
55
| class Animal{
public void eat(){
System.out.println("吃东西...");
}
}
class Dog extends Animal{
@Override
public void eat() {
System.out.println("狗吃骨头...");
}
public void lookHome(){
System.out.println("狗在看家...");
}
}
class Cat extends Animal{
@Override
public void eat() {
System.out.println("猫吃鱼...");
}
public void catchMouse(){
System.out.println("猫抓老鼠...");
}
}
public class Test {
public static void main(String[] args) {
Dog d = new Dog();
method(d);
System.out.println("==========================");
Cat c = new Cat();
method(c);
}
public static void method(Animal anl){
anl.eat();
if (anl instanceof Dog){
Dog d = (Dog)anl;
d.lookHome();
}
if (anl instanceof Cat){
Cat c = (Cat)anl;
c.catchMouse();
}
}
}
|
内部类
什么是内部类
将一个类A定义在另一个类B里面,里面的那个类A就称为内部类,B则称为外部类。
成员内部类
定义格式:
1
2
3
4
5
| class 外部类 {
class 内部类{
}
}
|
在描述事物时,若一个事物内部还包含其他事物,就可以使用内部类这种结构。比如,汽车类Car 中包含发动机类Engine ,这时,Engine 就可以使用内部类来描述,定义在成员位置。
代码举例:
1
2
3
4
5
| class Car {
class Engine {
}
}
|
访问特点
- 内部类可以直接访问外部类的成员,包括私有成员。
- 外部类要访问内部类的成员,必须要建立内部类的对象。
创建内部类对象格式:
1
| 外部类名.内部类名 对象名 = new 外部类型().new 内部类型();
|
访问演示,代码如下:
1
2
3
4
5
6
7
8
9
10
11
12
13
14
15
16
17
18
19
20
21
22
23
24
25
26
27
28
29
30
31
32
33
34
35
36
37
38
39
40
41
42
43
44
45
46
47
48
49
50
51
52
53
54
55
56
57
58
59
60
61
62
63
64
65
66
67
68
69
70
71
72
73
74
75
76
77
|
public class Body {
public void methodW1(){
Heart bh = new Heart();
System.out.println(bh.numN);
bh.methodN1();
}
private int numW = 100;
private void methodW2(){
System.out.println("外部类的成员方法 methodW2");
}
public class Heart{
int numN = 10;
public void methodN1(){
System.out.println("内部类的成员方法 methodN1");
}
public void methodN2(){
System.out.println(numW);
methodW2();
}
}
}
public class Test {
public static void main(String[] args) {
Body.Heart bh = new Body().new Heart();
System.out.println(bh.numN);
bh.methodN1();
System.out.println("=======================");
Body b = new Body();
b.methodW1();
System.out.println("=======================");
bh.methodN2();
}
}
|
匿名内部类
是内部类的简化写法。它的本质是一个带具体实现的 父类或者父接口的 匿名的 子类对象。
代码一:
1
2
3
4
5
6
7
8
9
10
11
12
13
14
15
16
17
18
19
20
21
22
23
24
25
26
27
28
29
30
31
32
33
34
35
36
37
38
39
40
41
42
43
| abstract class Animal{
public abstract void eat();
}
class Dog extends Animal{
@Override
public void eat() {
System.out.println("狗吃骨头...");
}
}
public class Test {
public static void main(String[] args) {
Dog d = new Dog();
d.eat();
System.out.println("==========================");
Animal anl = new Animal() {
@Override
public void eat() {
System.out.println("匿名内部类");
}
};
anl.eat();
}
}
|
代码二:
1
2
3
4
5
6
7
8
9
10
11
12
13
14
15
16
17
18
19
20
21
22
23
24
25
26
27
28
29
30
31
32
33
34
35
36
37
38
| interface A{
public abstract void show();
}
class Imp implements A{
public void show(){
System.out.println("实现类实现show方法");
}
}
public class Test {
public static void main(String[] args) {
Imp imp = new Imp();
imp.show();
System.out.println("==============================");
A a = new A() {
@Override
public void show() {
System.out.println("匿名内部类");
}
};
a.show();
}
}
|
小结:
1
2
3
4
5
6
7
8
9
10
11
12
13
14
15
| 对于类:
概述:本质其实就是一个类的匿名子类的对象
格式:
new 类名(){
实现抽象方法
};
对于接口:
概述:本质是一个接口的匿名实现类的对象
格式:
new 接口名(){
实现抽象方法
};
匿名内部类作用:就是用来简化代码的,没有其他的功能
使用场景:
如果方法的形参类型为抽象类或者接口类型,那么为了简化代码,可以直接传入该抽象类或者接口的匿名内部类
|
补充
1
2
3
4
5
6
7
8
|
new Imp().show();
new A() {
@Override
public void show() {
System.out.println("匿名内部类");
}
}.show();
|
引用类型使用
实际的开发中,引用类型的使用非常重要,也是非常普遍的。我们可以在理解基本类型的使用方式基础上,进一步去掌握引用类型的使用方式。基本类型可以作为成员变量、作为方法的参数、作为方法的返回值,那么当然引用类型也是可以的。在这我们使用两个例子 , 来学习一下。
类名作为方法参数和返回值
1
2
3
4
5
6
7
8
9
10
11
12
13
14
15
16
17
18
19
20
21
22
23
24
25
26
27
28
29
30
31
32
33
34
35
36
37
38
39
| class Person{
public String name;
public int age;
public Person(String name, int age) {
this.name = name;
this.age = age;
}
public void show(){
System.out.println(name+","+age);
}
}
public class Test {
public static void main(String[] args) {
Person p = new Person("冰冰",18);
method1(p);
System.out.println("=========================================");
Person person = method2(p);
person.show();
}
public static void method1(Person p){
p.show();
}
public static Person method2(Person p){
p.age = 20;
return p;
}
}
|
抽象类作为方法参数和返回值
- 抽象类作为形参:表示可以接收任何此抽象类的”子类对象”作为实参;
- 抽象类作为返回值:表示”此方法可以返回此抽象类的任何子类对象”;
1
2
3
4
5
6
7
8
9
10
11
12
13
14
15
16
17
18
19
20
21
22
23
24
25
26
27
28
29
30
31
32
33
34
35
36
37
38
39
40
| abstract class Animal{
public abstract void eat();
}
class Dog extends Animal{
@Override
public void eat() {
System.out.println("狗吃骨头...");
}
}
public class Test {
public static void main(String[] args) {
method1(new Dog());
System.out.println("========================");
method1(new Animal() {
@Override
public void eat() {
System.out.println("匿名内部类的方式...");
}
});
System.out.println("========================");
Dog d = (Dog)method2();
}
public static void method1(Animal anl){
anl.eat();
}
public static Animal method2(){
return new Dog();
}
}
|
接口作为方法参数和返回值
- 接口作为方法的形参:【同抽象类】
- 接口作为方法的返回值:【同抽象类】
1
2
3
4
5
6
7
8
9
10
11
12
13
14
15
16
17
18
19
20
21
22
23
24
25
26
27
28
29
30
31
32
33
34
35
36
37
38
39
40
41
42
43
44
| interface A{
void show();
}
class Imp implements A{
public void show(){
System.out.println("实现类的方式实现show方法");
}
}
public class Test {
public static void main(String[] args) {
method1(new Imp());
System.out.println("===================");
method1(new A() {
@Override
public void show() {
System.out.println("匿名内部类的方式实现show方法");
}
});
System.out.println("===================");
Imp imp = (Imp) method2();
}
public static void method1(A a){
a.show();
}
public static A method2(){
return new Imp();
}
}
|
类名作为成员变量
我们每个人(Person)都有一个身份证(IDCard) , 为了表示这种关系 , 就需要在Person中定义一个IDCard的成员变量。定义Person类时,代码如下:
1
2
3
4
| class Person {
String name;
int age;
}
|
使用String 类型表示姓名 , int 类型表示年龄。其实,String本身就是引用类型,我们往往忽略了它是引用类型。如果我们继续丰富这个类的定义,给Person 增加身份证号 , 身份证签发机关等属性,我们将如何编写呢?这时候就需要编写一个IDCard类了
修改Person类:
1
2
3
4
5
6
7
8
9
10
11
12
13
14
15
16
17
18
19
20
21
22
23
24
25
26
27
28
29
30
31
32
| class Person{
String name;
int age;
IdCard idCard;
public Person(String name, int age, IdCard idCard) {
this.name = name;
this.age = age;
this.idCard = idCard;
}
}
class IdCard{
String idNum;
String address;
public IdCard(String idNum, String address) {
this.idNum = idNum;
this.address = address;
}
}
public class Test {
public static void main(String[] args) {
IdCard idCard = new IdCard("440330200010101919","广东省深圳市宝安区公安局");
Person p = new Person("张三",18,idCard);
System.out.println(p.name+","+p.age+","+p.idCard.idNum+","+p.idCard.address);
}
}
|
类作为成员变量时,对它进行赋值的操作,实际上,是赋给它该类的一个对象。同理 , 接口也是如此 , 例如我们笔记本案例中使用usb设备。在此我们只是通过小例子 , 让大家熟识下引用类型的用法 , 后续在咱们的就业班学习中 , 这种方式会使用的很多。
抽象类作为成员变量
- 抽象类作为成员变量——为此成员变量赋值时,可以是任何它的子类对象
1
2
3
4
5
6
7
8
9
10
11
12
13
14
15
16
17
18
19
20
21
22
23
24
25
26
27
28
29
30
31
32
33
34
35
36
| abstract class Pet{
String name;
public Pet(String name) {
this.name = name;
}
}
class Dog extends Pet{
public Dog(String name) {
super(name);
}
}
class Person{
String name;
int age;
Pet pet;
public Person(String name, int age, Pet pet) {
this.name = name;
this.age = age;
this.pet = pet;
}
}
public class Test {
public static void main(String[] args) {
Pet pet = new Dog("旺财");
Person p = new Person("张三",18,pet);
System.out.println(p.name);
System.out.println(p.age);
System.out.println(p.pet.name);
}
}
|
接口作为成员变量
1
2
3
4
5
6
7
8
9
10
11
12
13
14
15
16
17
18
19
20
21
22
23
24
25
26
27
28
29
30
31
| abstract interface Pet{
}
class Dog implements Pet{
}
class Person{
String name;
int age;
Pet pet;
public Person(String name, int age, Pet pet) {
this.name = name;
this.age = age;
this.pet = pet;
}
}
public class Test {
public static void main(String[] args) {
Pet pet = new Dog();
Person p = new Person("张三",18,pet);
System.out.println(p.name);
System.out.println(p.age);
System.out.println(p.pet);
}
}
英雄: name,皮肤,法术(接口)
|
小结
1
2
3
4
5
6
7
8
| - 类名作为方法参数和返回值:可以直接传入该类的对象;返回该类的对象
- 抽象类作为方法参数和返回值:只能传入该类的子类对象;返回该类的子类对象
- 接口作为方法参数和返回值:只能传入该接口的实现类对象;返回该接口的实现类对象
传递的都是地址值,返回的也是地址值
- 类作为成员变量 : 赋该类的对象
- 抽象类作为成员变量 ; 赋该类的子类对象
- 接口作为成员变量 : 赋该接口的实现类对象
|
权限修饰符
在Java中提供了四种访问权限,使用不同的访问权限修饰符修饰时,被修饰的内容会有不同的访问权限,
- public:公共的
- protected:受保护的
- (空的):默认的
- private:私有的
不同权限的访问能力
|
public |
protected |
(空的) |
private |
| 同一类中 |
√ |
√ |
√ |
√ |
| 同一包中(子类与无关类) |
√ |
√ |
√ |
|
| 不同包的子类 |
√ |
√ |
|
|
| 不同包中的无关类 |
√ |
|
|
|
1
2
3
4
5
6
7
8
9
10
11
12
13
14
15
16
17
18
19
20
21
22
23
24
25
26
27
28
29
30
31
32
33
34
35
36
37
38
39
40
41
42
43
| 包:com.nbchen.demo9_权限修饰符
public class AAA {
public void method1(){}
protected void method2(){}
void method3(){}
private void method4(){}
public void method(){
method1();
method2();
method3();
method4();
}
}
public class Test {
public static void main(String[] args) {
AAA a = new AAA();
a.method1();
a.method2();
a.method3();
}
}
包:com.nbchen.demo10_权限修饰符
public class Zi extends AAA {
public void show(){
method1();
method2();
}
}
public class Test {
public static void main(String[] args) {
AAA a = new AAA();
a.method1();
}
}
|
可见,public具有最大权限。private则是最小权限。
编写代码时,如果没有特殊的考虑,建议这样使用权限:
成员变量使用private ,隐藏细节。
构造方法使用 public ,方便创建对象。
成员方法使用public ,方便调用方法。
代码块
构造代码块
1
2
3
4
5
6
7
8
9
10
11
12
13
14
15
16
17
18
19
20
21
22
23
24
25
| 格式: {}
位置: 类中,方法外
执行: 每次在调用构造方法的时候,就会执行
使用场景: 统计创建了多少个该类对象
例如:
public class Person{
{
构造代码块执行了
}
}
public class Test {
public static void main(String[] args) {
Person p1 = new Person();
Person p2 = new Person();
}
}
|
静态代码块
1
2
3
4
5
6
7
8
9
10
11
12
13
14
15
16
17
18
19
20
21
22
23
24
25
26
27
28
29
30
31
32
33
34
35
36
| 格式:static{}
位置: 类中,方法外
执行: 当类被加载的时候执行,并只执行一次
使用场景: 例如加载驱动,这种只需要执行一次的代码就可以放在静态代码块中
public class Person {
static {
System.out.println("Person 静态代码块");
}
{
System.out.println("Person 构造代码块");
}
public Person(){
System.out.println("Person 构造方法");
}
}
public class Test {
public static void main(String[] args) {
Person p1 = new Person();
Person p2 = new Person();
}
}
|
局部代码块
1
2
3
4
5
6
7
8
9
10
11
12
13
14
15
16
17
18
19
20
21
22
23
| 格式:{}
位置: 方法中
执行: 调用方法,执行到局部代码块的时候就执行
使用场景: 节省内存空间,没有多大的意义
例如:
public class Test {
public static void main(String[] args) {
System.out.println("开始");
{
int num1 = 10;
System.out.println("局部代码块");
}
System.out.println("结束");
}
}
|


