前置知识 HTTP(HyperTextTransferProtocol)即超文本传输协议,目前网页传输的的通用协议。HTTP协议采用了请求/响应模型,浏览器或其他客户端发出请求,服务器给与响应。就整个网络资源传输而言,包括message-header和message-body两部分。首先传递message- header,即http header 消息 。 http header 消息通常被分为4个部分:general header, request header, response header, entity header。但是这种分法就理解而言,感觉界限不太明确。根据维基百科对http header内容的组织形式,大体分为Request和Response两部分。
Requests部分
Header
解释
示例
Accept
指定客户端能够接收的内容类型
Accept: text/plain, text/html
Accept-Charset
浏览器可以接受的字符编码集。
Accept-Charset: iso-8859-5
Accept-Encoding
指定浏览器可以支持的web服务器返回内容压缩编码类型。
Accept-Encoding: compress, gzip
Accept-Language
浏览器可接受的语言
Accept-Language: en,zh
Accept-Ranges
可以请求网页实体的一个或者多个子范围字段
Accept-Ranges: bytes
Authorization
HTTP授权的授权证书
Authorization: Basic QWxhZGRpbjpvcGVuIHNlc2FtZQ==
Cache-Control
指定请求和响应遵循的缓存机制
Cache-Control: no-cache
Connection
表示是否需要持久连接。(HTTP 1.1默认进行持久连接)
Connection: close
Cookie
HTTP请求发送时,会把保存在该请求域名下的所有cookie值一起发送给web服务器。
Cookie: $Version=1; Skin=new;
Content-Length
请求的内容长度
Content-Length: 348
Content-Type
请求的与实体对应的MIME信息
Content-Type: application/x-www-form-urlencoded
Date
请求发送的日期和时间
Date: Tue, 15 Nov 2010 08:12:31 GMT
Expect
请求的特定的服务器行为
Expect: 100-continue
From
发出请求的用户的Email
From: user@email.com
Host
指定请求的服务器的域名和端口号
Host: www.zcmhi.com
If-Match
只有请求内容与实体相匹配才有效
If-Match: “737060cd8c284d8af7ad3082f209582d”
If-Modified-Since
如果请求的部分在指定时间之后被修改则请求成功,未被修改则返回304代码
If-Modified-Since: Sat, 29 Oct 2010 19:43:31 GMT
If-None-Match
如果内容未改变返回304代码,参数为服务器先前发送的Etag,与服务器回应的Etag比较判断是否改变
If-None-Match: “737060cd8c284d8af7ad3082f209582d”
If-Range
如果实体未改变,服务器发送客户端丢失的部分,否则发送整个实体。参数也为Etag
If-Range: “737060cd8c284d8af7ad3082f209582d”
If-Unmodified-Since
只在实体在指定时间之后未被修改才请求成功
If-Unmodified-Since: Sat, 29 Oct 2010 19:43:31 GMT
Max-Forwards
限制信息通过代理和网关传送的时间
Max-Forwards: 10
Pragma
用来包含实现特定的指令
Pragma: no-cache
Proxy-Authorization
连接到代理的授权证书
Proxy-Authorization: Basic QWxhZGRpbjpvcGVuIHNlc2FtZQ==
Range
只请求实体的一部分,指定范围
Range: bytes=500-999
Referer
先前网页的地址,当前请求网页紧随其后,即来路
Referer: http://www.zcmhi.com/archives/71.html
TE
客户端愿意接受的传输编码,并通知服务器接受接受尾加头信息
TE: trailers,deflate;q=0.5
Upgrade
向服务器指定某种传输协议以便服务器进行转换(如果支持)
Upgrade: HTTP/2.0, SHTTP/1.3, IRC/6.9, RTA/x11
User-Agent
User-Agent的内容包含发出请求的用户信息
User-Agent: Mozilla/5.0 (Linux; X11)
Via
通知中间网关或代理服务器地址,通信协议
Via: 1.0 fred, 1.1 nowhere.com (Apache/1.1)
Warning
关于消息实体的警告信息
Warn: 199 Miscellaneous warning
Responses 部分
Header
解释
示例
Accept-Ranges
表明服务器是否支持指定范围请求及哪种类型的分段请求
Accept-Ranges: bytes
Age
从原始服务器到代理缓存形成的估算时间(以秒计,非负)
Age: 12
Allow
对某网络资源的有效的请求行为,不允许则返回405
Allow: GET, HEAD
Cache-Control
告诉所有的缓存机制是否可以缓存及哪种类型
Cache-Control: no-cache
Content-Encoding
web服务器支持的返回内容压缩编码类型。
Content-Encoding: gzip
Content-Language
响应体的语言
Content-Language: en,zh
Content-Length
响应体的长度
Content-Length: 348
Content-Location
请求资源可替代的备用的另一地址
Content-Location: /index.htm
Content-MD5
返回资源的MD5校验值
Content-MD5: Q2hlY2sgSW50ZWdyaXR5IQ==
Content-Range
在整个返回体中本部分的字节位置
Content-Range: bytes 21010-47021/47022
Content-Type
返回内容的MIME类型
Content-Type: text/html; charset=utf-8
Date
原始服务器消息发出的时间
Date: Tue, 15 Nov 2010 08:12:31 GMT
ETag
请求变量的实体标签的当前值
ETag: “737060cd8c284d8af7ad3082f209582d”
Expires
响应过期的日期和时间
Expires: Thu, 01 Dec 2010 16:00:00 GMT
Last-Modified
请求资源的最后修改时间
Last-Modified: Tue, 15 Nov 2010 12:45:26 GMT
Location
用来重定向接收方到非请求URL的位置来完成请求或标识新的资源
Location: http://www.zcmhi.com/archives/94.html
Pragma
包括实现特定的指令,它可应用到响应链上的任何接收方
Pragma: no-cache
Proxy-Authenticate
它指出认证方案和可应用到代理的该URL上的参数
Proxy-Authenticate: Basic
refresh
应用于重定向或一个新的资源被创造,在5秒之后重定向(由网景提出,被大部分浏览器支持)
Refresh: 5; url=http://www.zcmhi.com/archives/94.html
Retry-After
如果实体暂时不可取,通知客户端在指定时间之后再次尝试
Retry-After: 120
Server
web服务器软件名称
Server: Apache/1.3.27 (Unix) (Red-Hat/Linux)
Set-Cookie
设置Http Cookie
Set-Cookie: UserID=JohnDoe; Max-Age=3600; Version=1
Trailer
指出头域在分块传输编码的尾部存在
Trailer: Max-Forwards
Transfer-Encoding
文件传输编码
Transfer-Encoding:chunked
Vary
告诉下游代理是使用缓存响应还是从原始服务器请求
Vary: *
Via
告知代理客户端响应是通过哪里发送的
Via: 1.0 fred, 1.1 nowhere.com (Apache/1.1)
Warning
警告实体可能存在的问题
Warning: 199 Miscellaneous warning
WWW-Authenticate
表明客户端请求实体应该使用的授权方案
WWW-Authenticate: Basic
Content-Disposition
指示客户端下载文件
attachment;filename=“filename.xls”
什么是三层架构 什么是系统架构 1 2 所谓系统架构是指,整合应用系统程序大的结构。经常提到的系统结构有两种: 三层架构与 MVC。这两种结构既有区别,又有联系。但这两种结构的使用,均是为了降低系统模块间的耦合度
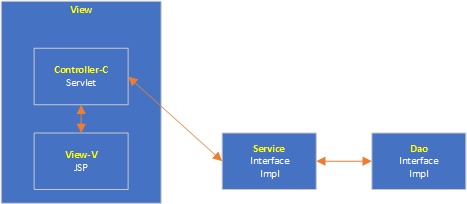
什么是三层架构 1 2 三层架构是指:视图层 View、服务层 Service,与持久层 DAO。它们分别完成不同的功能。
View 层:用于接收用户提交请求的代码
Service 层:系统的业务逻辑主要在这里完成
DAO 层:直接操作数据库的代码
1 2 3 4 为了更好的降低各层间的耦合度,在三层架构程序设计中,采用面向抽象编程。 即上层对下层的调用,是通过接口实现的。 而下层对上层的真正服务提供者,是下层接口的实现类。 服务标准(接口)是相同的,服务提供者(实现类)可以更换。这就实现了层间解耦合。
002_什么是 MVC 模式
什么是 MVC 模式 概述
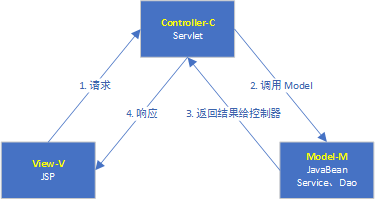
1 MVC,即 Model 模型、View 视图,及 Controller 控制器。
View:视图,为用户提供使用界面,与用户直接进行交互。
Model:模型,承载数据,并对用户提交请求进行计算的模块。其分为两类,一类称为数据承载 Bean,一类称为业务处理 Bean。所谓数据承载 Bean 是指实体类,专门用户承载业务数据的,如 Student、User 等。而业务处理 Bean 则是指 Service 或 Dao 对象, 专门用于处理用户提交请求的。
Controller:控制器,用于将用户请求转发给相应的 Model 进行处理,并根据 Model 的计算结果向用户提供相应响应
MVC 架构程序的工作流程
用户通过 View 页面向服务端提出请求,可以是表单请求、超链接请求、AJAX 请求等
服务端 Controller 控制器接收到请求后对请求进行解析,找到相应的 Model 对用户请求进行处理
Model 处理后,将处理结果再交给 Controller
Controller 在接到处理结果后,根据处理结果找到要作为向客户端发回的响应 View 页面。页面经渲染(数据填充)后,再发送给客户端。
三层架构 + MVC 示意图
开闭合离最单依 开闭合离最单依
1 2 3 1.面向对象设计原则 2.重构原则(重构也是为了解耦,业务在不断地变化,为了赶进度。有时候没时间想是不是符合这些原则。所以,有个重构原则。) 事不过三,三则重构
MVC体会 1.为什么要做架构?
系统架构,全局观,大局观,决定你的产品能走多远,技术支撑,能抗多少并发,能处理多大的业务量。这都是从底层的系统架构开发。
比如,假如支付宝做系统架构可以每秒做1000W次交易。如果你不做架构,你系统每秒能做多少次交易,你根本不知道,也不能支撑。
三层架构是架构的一种,还有比如微服务架构等。mvc三层架构,用于单体应用足够了。
代码越写越多,系统的复杂度越来越高。
复杂度=耦合度。
做系统的架构就是降低系统之间的耦合度,降低系统之间的复杂度。
2.三层架构长什么样?
>视图层:和用户交互
>业务逻辑层: Service
(不是说一定要叫service,你叫manager也可以。但是约定大于配置。协同开发,你乱起就会增加沟通成本,交流有障碍。)
>数据访问层: DAO
数据不一定存在数据库啊,也可以存文件,但是,随着业务的复杂,有一些特殊需求,比如,你一个文件存用户,一个文件存金额。然后你用io流去一行一行读,这样效率太低了。难道你只能一行一行检索吗?数据库就出来了。而且,你文件放那边,谁都能看,所以,还有个安全问题。)
3.做开发,业务才是核心。
怎么让查的快一点,怎么让别人不能轻易攻击,这是技术。
技术是辅助业务的。
4.业务是有复杂度,复杂度等于耦合度。事务和业务相关。
复杂度是分等级的
- 简单业务 : 只开启一个事务
- 普通业务 : 开启3个事务
- 复杂业务 : 开启7个事务(非常的复杂,恶心,一定要想办法解耦)
耦合度:多张表之间有个依赖关系,你该一张表,你另外的表也要改。
模块与模块之间,系统和系统之间存在强关联性。
降低耦合,就是降低关联性,弱关联性。
只能降低,耦合一定是存在的,一定有依赖,有关联,至少数据库表你最起码要依赖数据库。这就是耦合。所以,只能使降低耦合。让业务尽量简单。
5.三层结构可以降低每一层之间的耦合
- 一个类只做一种事(高内聚)
- 一个方法只做一件事
- 写且只写一次
MVC模式
6.Model 角色
数据模型: Entity
业务模型: Service
7.Controller : 控制器 : Servlet
Servlet 服务器小程序 out.print -- 耦合度高,可读性差
(既要处理业务逻辑,又要处理业务展示。这是不符合,一个类只做一种事。内聚↓,耦合↑)
所以JSP出现了
View 视图 JSP
JSP 处理页面展示 (jsp就是servlet)。把页面展示和业务逻辑分离。解耦合
降低耦合度,降低复杂度
jsp能把servlet中的页面展示功能分离出来,这就是一门技术。
MVC模式是视图层的模式
Spring MVC 简介 概述 Spring MVC 也叫 Spring Web MVC ,属于展示层框架。SpringMVC 是 Spring 框架的一部分。
Spring Web MVC 框架提供了 MVC (模型 - 视图 - 控制器) 架构和用于开发灵活和松散耦合的 Web 应用程序的组件。 MVC 模式导致应用程序的不同方面(输入逻辑,业务逻辑和 UI 逻辑)分离,同时提供这些元素之间的松散耦合。
模型 (Model):封装了应用程序数据,通常它们将由 POJO 类组成。
视图 (View):负责渲染模型数据,一般来说它生成客户端浏览器可以解释 HTML 输出。
控制器 (Controller):负责处理用户请求并构建适当的模型,并将其传递给视图进行渲染。
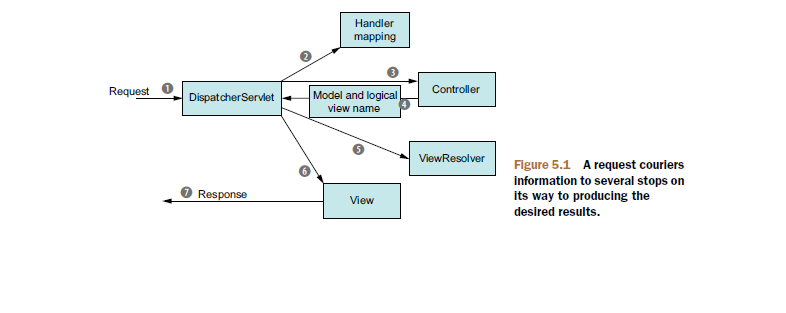
DispatcherServlet 组件类 Spring Web MVC 框架是围绕 DispatcherServlet 设计的,它处理所有的 HTTP 请求和响应。 Spring Web MVC DispatcherServlet 的请求处理工作流如下图所示:
以下是对应于到 DispatcherServlet 的传入 HTTP 请求的事件顺序:
在接收到 HTTP 请求后,DispatcherServlet 会查询 HandlerMapping 以调用相应的 Controller。
Controller 接受请求并根据使用的 GET 或 POST 方法调用相应的服务方法。 服务方法将基于定义的业务逻辑设置模型数据,并将视图名称返回给 DispatcherServlet。
DispatcherServlet 将从 ViewResolver 获取请求的定义视图。
当视图完成,DispatcherServlet 将模型数据传递到最终的视图,并在浏览器上呈现。
所有上述组件,即: HandlerMapping,Controller 和 ViewResolver 是 WebApplicationContext 的一部分,它是普通 ApplicationContext 的扩展,带有 Web 应用程序所需的一些额外功能。
Spring MVC 整合 Spring POM 在 pom.xml 配置文件中增加 org.springframework:spring-webmvc 依赖
1 2 3 4 5 <dependency > <groupId > org.springframework</groupId > <artifactId > spring-webmvc</artifactId > <version > 4.3.17.RELEASE</version > </dependency >
配置 web.xml CharacterEncodingFilter 配置字符集过滤器,用于解决中文编码问题
1 2 3 4 5 6 7 8 9 10 11 12 13 14 15 16 <filter > <filter-name > encodingFilter</filter-name > <filter-class > org.springframework.web.filter.CharacterEncodingFilter</filter-class > <init-param > <param-name > encoding</param-name > <param-value > UTF-8</param-value > </init-param > <init-param > <param-name > forceEncoding</param-name > <param-value > true</param-value > </init-param > </filter > <filter-mapping > <filter-name > encodingFilter</filter-name > <url-pattern > /*</url-pattern > </filter-mapping >
DispatcherServlet 配置 Spring 的 Servlet 分发器处理所有 HTTP 的请求和响应
1 2 3 4 5 6 7 8 9 10 11 12 13 <servlet > <servlet-name > springServlet</servlet-name > <servlet-class > org.springframework.web.servlet.DispatcherServlet</servlet-class > <init-param > <param-name > contextConfigLocation</param-name > <param-value > classpath*:/spring-mvc*.xml</param-value > </init-param > <load-on-startup > 1</load-on-startup > </servlet > <servlet-mapping > <servlet-name > springServlet</servlet-name > <url-pattern > /</url-pattern > </servlet-mapping >
配置 Spring MVC 创建一个名为 spring-mvc.xml 文件来配置 MVC
1 2 3 4 5 6 7 8 9 10 11 12 13 14 15 16 17 18 19 20 21 <?xml version="1.0" encoding="UTF-8" ?> <beans xmlns ="http://www.springframework.org/schema/beans" xmlns:xsi ="http://www.w3.org/2001/XMLSchema-instance" xmlns:context ="http://www.springframework.org/schema/context" xmlns:mvc ="http://www.springframework.org/schema/mvc" xsi:schemaLocation ="http://www.springframework.org/schema/beans http://www.springframework.org/schema/beans/spring-beans.xsd http://www.springframework.org/schema/context http://www.springframework.org/schema/context/spring-context.xsd http://www.springframework.org/schema/mvc http://www.springframework.org/schema/mvc/spring-mvc.xsd" > <description > Spring MVC Configuration</description > <context:property-placeholder ignore-unresolvable ="true" location ="classpath:myshop.properties" /> <context:component-scan base-package ="com.lusifer.myshop" use-default-filters ="false" > <context:include-filter type ="annotation" expression ="org.springframework.stereotype.Controller" /> </context:component-scan > <mvc:annotation-driven /> <bean class ="org.springframework.web.servlet.view.InternalResourceViewResolver" > <property name ="prefix" value ="${web.view.prefix}" /> <property name ="suffix" value ="${web.view.suffix}" /> </bean > <mvc:resources mapping ="/static/**" location ="/static/" cache-period ="31536000" /> </beans >
相关配置说明:
context:property-placeholder
context:component-scan
InternalResourceViewResolver
mvc:resources
系统相关配置 在 spring-mvc.xnl 中,我们配置了 <context:property-placeholder ignore-unresolvable=”true” location=”classpath:myshop.properties”/> 用于动态加载属性配置文件,实际开发中我们会将系统所需的一些配置信息封装到 .properties 配置文件中便于统一的管理。
创建一个名为 myshop.properties 的配置文件,内容如下:
1 2 3 4 5 6 7 web.view.prefix =/WEB-INF/views/ web.view.suffix =.jsp
去掉 Spring 配置的重复扫描 由于 spring-mvc.xml 中已经配置了 @Controller 注解的扫描而 spring-context.xml 中配置的是扫描全部注解,故在这里需要将 @Controller 注解的扫描配置排除。
修改 spring-context.xml 配置:
1 2 3 4 <context:component-scan base-package ="com.funtl.my.shop" > <context:exclude-filter type ="annotation" expression ="org.springframework.stereotype.Controller" /> </context:component-scan >
Spring MVC 第一个Controller 概述 1 2 3 4 5 6 7 8 9 10 11 12 13 14 15 16 17 18 19 20 21 22 23 24 25 package com.funtl.my.shop.web.controller;import com.funtl.my.shop.service.UserService;import org.springframework.beans.factory.annotation.Autowired;import org.springframework.stereotype.Controller;import org.springframework.web.bind.annotation.RequestMapping;import org.springframework.web.bind.annotation.RequestMethod;import org.springframework.web.bind.annotation.RequestParam;@Controller public class LoginController { @Autowired private UserService userService; @RequestMapping(value = {"", "login"}, method = RequestMethod.GET) public String login () { return "login" ; } @RequestMapping(value = "login", method = RequestMethod.POST) public String login (@RequestParam(required = true) String email, @RequestParam(required = true) String password) { return "redirect:/main" ; } }
注解说明
@Controller
在 Spring MVC 中,控制器 Controller 负责处理由 DispatcherServlet 分发的请求,它把用户请求的数据经过业务处理层处理之后封装成一个 Model ,然后再把该 Model 返回给对应的 View 进行展示。在 Spring MVC 中提供了一个非常简便的定义 Controller 的方法,你无需继承特定的类或实现特定的接口,只需使用 @Controller 标记一个类是 Controller ,然后使用 @RequestMapping 和 @RequestParam 等一些注解用以定义 URL 请求和 Controller 方法之间的映射,这样的 Controller 就能被外界访问到。此外 Controller 不会直接依赖于 HttpServletRequest 和 HttpServletResponse 等 HttpServlet 对象,它们可以通过 Controller 的方法参数灵活的获取到。
@Controller 用于标记在一个类上,使用它标记的类就是一个 Spring MVC Controller 对象。分发处理器将会扫描使用了该注解的类的方法,并检测该方法是否使用了 @RequestMapping 注解。@Controller 只是定义了一个控制器类,而使用 @RequestMapping 注解的方法才是真正处理请求的处理器。
@RequestMapping RequestMapping 是一个用来处理请求地址映射的注解,可用于类或方法上。用于类上,表示类中的所有响应请求的方法都是以该地址作为父路径。
RequestMapping 注解有六个属性:
value, method
value:指定请求的实际地址,指定的地址可以是 URI Template 模式
method:指定请求的method类型, GET、POST、PUT、DELETE 等
consumes,produces
consumes:指定处理请求的提交内容类型(Content-Type),例如 application/json, text/html
produces: 指定返回的内容类型,仅当 request 请求头中的(Accept)类型中包含该指定类型才返回
params,headers
params:指定 request 中必须包含某些参数值是,才让该方法处理
headers:指定 request 中必须包含某些指定的 header 值,才能让该方法处理请求
Spring MVC Maven模块化开发 概述 在多人协同开发时,特别是规模较大的项目,为了方便日后的代码维护和管理,我们会将每个开发人员的工作细分到具体的功能和模块上。随着项目的不断扩大,模块也会越来越多,后续会更加难以维护和扩展,为了应对这种情况后期我们还会采用微服务架构的方式进行开发。
以当前教程为例,我们可以将模块划分为如下形式:
统一的依赖管理(dependencies)
通用的工具类(commons)
领域模型(domain)
管理后台(admin)
商城前端(ui)
接口模块(api)
整个模块化开发过程主要是在开发思想上稍作了一些转变,只需要按照下面的流程操作即可。
创建根项目(工程) 创建一个名为 my-shop 的工程,pom.xml 文件如下:
1 2 3 4 5 6 7 8 9 10 11 12 13 14 <?xml version="1.0" encoding="UTF-8" ?> <project xmlns ="http://maven.apache.org/POM/4.0.0" xmlns:xsi ="http://www.w3.org/2001/XMLSchema-instance" xsi:schemaLocation ="http://maven.apache.org/POM/4.0.0 http://maven.apache.org/xsd/maven-4.0.0.xsd" > <modelVersion > 4.0.0</modelVersion > <groupId > com.funtl</groupId > <artifactId > my-shop</artifactId > <version > 1.0.0-SNAPSHOT</version > <packaging > pom</packaging > <modules > </modules > </project >
该项目称之为 Root 项目,主要作用是管理整个工程的全部模块,当有新模块加入时需要在 modules 元素下配置对应的模块目录
创建统一的依赖管理 创建一个名为 my-shop-dependencies 的项目,pom.xml 文件如下:
1 2 3 4 5 6 7 8 9 10 11 12 13 14 15 16 17 18 19 20 21 22 23 24 25 26 27 28 29 30 31 32 33 34 35 36 37 38 39 40 41 42 43 44 45 46 47 48 49 50 51 52 53 54 55 56 57 58 59 60 61 62 63 64 65 66 67 68 69 70 71 72 73 74 75 76 77 78 79 80 81 82 83 84 85 86 87 88 89 90 91 92 93 94 95 96 97 98 99 100 101 102 103 104 105 106 107 108 109 110 111 112 113 114 115 116 117 118 <?xml version="1.0" encoding="UTF-8" ?> <project xmlns ="http://maven.apache.org/POM/4.0.0" xmlns:xsi ="http://www.w3.org/2001/XMLSchema-instance" xsi:schemaLocation ="http://maven.apache.org/POM/4.0.0 http://maven.apache.org/xsd/maven-4.0.0.xsd" > <modelVersion > 4.0.0</modelVersion > <parent > <groupId > com.funtl</groupId > <artifactId > my-shop</artifactId > <version > 1.0.0-SNAPSHOT</version > <relativePath > ../pom.xml</relativePath > </parent > <artifactId > my-shop-dependencies</artifactId > <packaging > pom</packaging > <name > my-shop-dependencies</name > <description > </description > <properties > <project.build.sourceEncoding > UTF-8</project.build.sourceEncoding > <project.reporting.outputEncoding > UTF-8</project.reporting.outputEncoding > <java.version > 1.8</java.version > <commons-lang3.version > 3.5</commons-lang3.version > <jstl.version > 1.2</jstl.version > <log4j.version > 1.2.17</log4j.version > <servlet-api.version > 3.1.0</servlet-api.version > <slf4j.version > 1.7.25</slf4j.version > <spring.version > 4.3.17.RELEASE</spring.version > </properties > <dependencyManagement > <dependencies > <dependency > <groupId > org.springframework</groupId > <artifactId > spring-context</artifactId > <version > ${spring.version}</version > </dependency > <dependency > <groupId > org.springframework</groupId > <artifactId > spring-webmvc</artifactId > <version > ${spring.version}</version > </dependency > <dependency > <groupId > javax.servlet</groupId > <artifactId > javax.servlet-api</artifactId > <version > ${servlet-api.version}</version > <scope > provided</scope > </dependency > <dependency > <groupId > javax.servlet</groupId > <artifactId > jstl</artifactId > <version > ${jstl.version}</version > </dependency > <dependency > <groupId > org.slf4j</groupId > <artifactId > slf4j-api</artifactId > <version > ${slf4j.version}</version > </dependency > <dependency > <groupId > org.slf4j</groupId > <artifactId > slf4j-log4j12</artifactId > <version > ${slf4j.version}</version > </dependency > <dependency > <groupId > org.slf4j</groupId > <artifactId > jcl-over-slf4j</artifactId > <version > ${slf4j.version}</version > </dependency > <dependency > <groupId > org.slf4j</groupId > <artifactId > jul-to-slf4j</artifactId > <version > ${slf4j.version}</version > </dependency > <dependency > <groupId > log4j</groupId > <artifactId > log4j</artifactId > <version > ${log4j.version}</version > </dependency > <dependency > <groupId > org.apache.commons</groupId > <artifactId > commons-lang3</artifactId > <version > ${commons-lang3.version}</version > </dependency > </dependencies > </dependencyManagement > <build > <plugins > <plugin > <groupId > org.apache.maven.plugins</groupId > <artifactId > maven-compiler-plugin</artifactId > <version > 3.7.0</version > <configuration > <source > ${java.version}</source > <target > ${java.version}</target > <encoding > ${project.build.sourceEncoding}</encoding > <showWarnings > true</showWarnings > </configuration > </plugin > </plugins > <resources > <resource > <directory > src/main/java</directory > <excludes > <exclude > **/*.java</exclude > </excludes > </resource > <resource > <directory > src/main/resources</directory > </resource > </resources > </build > </project >
PS:别忘记在 my-shop 工程的 pom.xml 中增加 <module>my-shop-dependencies</module> 配置
创建通用的工具类 创建一个名为 my-shop-commons 的项目,pom.xml 文件如下:
1 2 3 4 5 6 7 8 9 10 11 12 13 14 <?xml version="1.0" encoding="UTF-8" ?> <project xmlns ="http://maven.apache.org/POM/4.0.0" xmlns:xsi ="http://www.w3.org/2001/XMLSchema-instance" xsi:schemaLocation ="http://maven.apache.org/POM/4.0.0 http://maven.apache.org/xsd/maven-4.0.0.xsd" > <modelVersion > 4.0.0</modelVersion > <parent > <groupId > com.funtl</groupId > <artifactId > my-shop-dependencies</artifactId > <version > 1.0.0-SNAPSHOT</version > <relativePath > ../my-shop-dependencies/pom.xml</relativePath > </parent > <artifactId > my-shop-commons</artifactId > <packaging > jar</packaging > <name > my-shop-commons</name > <description > </description > </project >
PS:别忘记在 my-shop 工程的 pom.xml 中增加 <module>my-shop-commons</module> 配置
创建领域模型 创建一个名为 my-shop-domain 的项目,pom.xml 文件如下:
1 2 3 4 5 6 7 8 9 10 11 12 13 14 <?xml version="1.0" encoding="UTF-8" ?> <project xmlns ="http://maven.apache.org/POM/4.0.0" xmlns:xsi ="http://www.w3.org/2001/XMLSchema-instance" xsi:schemaLocation ="http://maven.apache.org/POM/4.0.0 http://maven.apache.org/xsd/maven-4.0.0.xsd" > <modelVersion > 4.0.0</modelVersion > <parent > <groupId > com.funtl</groupId > <artifactId > my-shop-dependencies</artifactId > <version > 1.0.0-SNAPSHOT</version > <relativePath > ../my-shop-dependencies/pom.xml</relativePath > </parent > <artifactId > my-shop-domain</artifactId > <packaging > jar</packaging > <name > my-shop-domain</name > <description > </description > </project >
PS:别忘记在 my-shop 工程的 pom.xml 中增加 <module>my-shop-domain</module> 配置
创建管理后台 创建一个名为 my-shop-web-admin 的项目,pom.xml 文件如下:
1 2 3 4 5 6 7 8 9 10 11 12 13 14 15 16 17 18 19 20 21 22 23 24 25 26 <?xml version="1.0" encoding="UTF-8" ?> <project xmlns ="http://maven.apache.org/POM/4.0.0" xmlns:xsi ="http://www.w3.org/2001/XMLSchema-instance" xsi:schemaLocation ="http://maven.apache.org/POM/4.0.0 http://maven.apache.org/xsd/maven-4.0.0.xsd" > <modelVersion > 4.0.0</modelVersion > <parent > <groupId > com.funtl</groupId > <artifactId > my-shop-dependencies</artifactId > <version > 1.0.0-SNAPSHOT</version > <relativePath > ../my-shop-dependencies/pom.xml</relativePath > </parent > <artifactId > my-shop-web-admin</artifactId > <packaging > war</packaging > <name > my-shop-web-admin</name > <description > </description > <dependencies > <dependency > <groupId > com.funtl</groupId > <artifactId > my-shop-commons</artifactId > <version > ${project.parent.version}</version > </dependency > <dependency > <groupId > com.funtl</groupId > <artifactId > my-shop-domain</artifactId > <version > ${project.parent.version}</version > </dependency > </dependencies > </project >
PS:别忘记在 my-shop 工程的 pom.xml 中增加 <module>my-shop-web-admin</module> 配置
创建商城前端 创建一个名为 my-shop-web-ui 的项目,pom.xml 文件如下:
1 2 3 4 5 6 7 8 9 10 11 12 13 14 15 16 17 18 19 20 21 <?xml version="1.0" encoding="UTF-8" ?> <project xmlns ="http://maven.apache.org/POM/4.0.0" xmlns:xsi ="http://www.w3.org/2001/XMLSchema-instance" xsi:schemaLocation ="http://maven.apache.org/POM/4.0.0 http://maven.apache.org/xsd/maven-4.0.0.xsd" > <modelVersion > 4.0.0</modelVersion > <parent > <groupId > com.funtl</groupId > <artifactId > my-shop-dependencies</artifactId > <version > 1.0.0-SNAPSHOT</version > <relativePath > ../my-shop-dependencies/pom.xml</relativePath > </parent > <artifactId > my-shop-web-ui</artifactId > <packaging > war</packaging > <name > my-shop-web-ui</name > <description > </description > <dependencies > <dependency > <groupId > com.funtl</groupId > <artifactId > my-shop-commons</artifactId > <version > ${project.parent.version}</version > </dependency > </dependencies > </project >
PS:别忘记在 my-shop 工程的 pom.xml 中增加 <module>my-shop-web-ui</module> 配置
创建接口模块 创建一个名为 my-shop-web-api 的项目,pom.xml 文件如下:
1 2 3 4 5 6 7 8 9 10 11 12 13 14 15 16 17 18 19 20 21 <?xml version="1.0" encoding="UTF-8" ?> <project xmlns ="http://maven.apache.org/POM/4.0.0" xmlns:xsi ="http://www.w3.org/2001/XMLSchema-instance" xsi:schemaLocation ="http://maven.apache.org/POM/4.0.0 http://maven.apache.org/xsd/maven-4.0.0.xsd" > <modelVersion > 4.0.0</modelVersion > <parent > <groupId > com.funtl</groupId > <artifactId > my-shop-dependencies</artifactId > <version > 1.0.0-SNAPSHOT</version > <relativePath > ../my-shop-dependencies/pom.xml</relativePath > </parent > <artifactId > my-shop-web-api</artifactId > <packaging > war</packaging > <name > my-shop-web-api</name > <description > </description > <dependencies > <dependency > <groupId > com.funtl</groupId > <artifactId > my-shop-commons</artifactId > <version > ${project.parent.version}</version > </dependency > </dependencies > </project >
PS:别忘记在 my-shop 工程的 pom.xml 中增加 <module>my-shop-web-api</module> 配置
清理、编译、打包 至此一个完整的模块化工程创建完毕,此时的 Root 工程 pom.xml 文件如下:
1 2 3 4 5 6 7 8 9 10 11 12 13 14 15 16 <?xml version="1.0" encoding="UTF-8" ?> <project xmlns ="http://maven.apache.org/POM/4.0.0" xmlns:xsi ="http://www.w3.org/2001/XMLSchema-instance" xsi:schemaLocation ="http://maven.apache.org/POM/4.0.0 http://maven.apache.org/xsd/maven-4.0.0.xsd" > <modelVersion > 4.0.0</modelVersion > <groupId > com.funtl</groupId > <artifactId > my-shop</artifactId > <version > 1.0.0-SNAPSHOT</version > <packaging > pom</packaging > <modules > <module > my-shop-dependencies</module > <module > my-shop-commons</module > <module > my-shop-domain</module > <module > my-shop-web-admin</module > <module > my-shop-web-ui</module > <module > my-shop-web-api</module > </modules > </project >
我们可以在 Root 工程中使用 Maven 提供的 mvn clean 命令测试一下效果,控制台输出如下:
1 2 3 4 5 6 7 8 9 10 11 12 13 14 15 16 17 18 19 20 21 22 23 24 25 26 27 28 29 30 31 32 33 34 35 36 37 38 39 40 41 42 43 44 45 46 47 48 49 50 51 52 53 54 55 56 57 58 59 60 61 62 63 64 65 66 67 68 69 70 71 72 73 [INFO] Scanning for projects... [INFO] ------------------------------------------------------------------------ [INFO] Reactor Build Order: [INFO] [INFO] my-shop [INFO] my-shop-dependencies [INFO] my-shop-commons [INFO] my-shop-domain [INFO] my-shop-web-admin [INFO] my-shop-web-ui [INFO] my-shop-web-api [INFO] [INFO] ------------------------------------------------------------------------ [INFO] Building my-shop 1.0 .0 -SNAPSHOT [INFO] ------------------------------------------------------------------------ [INFO] [INFO] --- maven-clean-plugin:2.5 :clean (default -clean) @ my-shop --- [INFO] [INFO] ------------------------------------------------------------------------ [INFO] Building my-shop-dependencies 1.0 .0 -SNAPSHOT [INFO] ------------------------------------------------------------------------ [INFO] [INFO] --- maven-clean-plugin:2.5 :clean (default -clean) @ my-shop-dependencies --- [INFO] [INFO] ------------------------------------------------------------------------ [INFO] Building my-shop-commons 1.0 .0 -SNAPSHOT [INFO] ------------------------------------------------------------------------ [INFO] [INFO] --- maven-clean-plugin:2.5 :clean (default -clean) @ my-shop-commons --- [INFO] Deleting D:\Workspace\my-shop\my-shop-commons\target [INFO] [INFO] ------------------------------------------------------------------------ [INFO] Building my-shop-domain 1.0 .0 -SNAPSHOT [INFO] ------------------------------------------------------------------------ [INFO] [INFO] --- maven-clean-plugin:2.5 :clean (default -clean) @ my-shop-domain --- [INFO] Deleting D:\Workspace\my-shop\my-shop-domain\target [INFO] [INFO] ------------------------------------------------------------------------ [INFO] Building my-shop-web-admin 1.0 .0 -SNAPSHOT [INFO] ------------------------------------------------------------------------ [INFO] [INFO] --- maven-clean-plugin:2.5 :clean (default -clean) @ my-shop-web-admin --- [INFO] Deleting D:\Workspace\my-shop\my-shop-web-admin\target [INFO] [INFO] ------------------------------------------------------------------------ [INFO] Building my-shop-web-ui 1.0 .0 -SNAPSHOT [INFO] ------------------------------------------------------------------------ [INFO] [INFO] --- maven-clean-plugin:2.5 :clean (default -clean) @ my-shop-web-ui --- [INFO] [INFO] ------------------------------------------------------------------------ [INFO] Building my-shop-web-api 1.0 .0 -SNAPSHOT [INFO] ------------------------------------------------------------------------ [INFO] [INFO] --- maven-clean-plugin:2.5 :clean (default -clean) @ my-shop-web-api --- [INFO] ------------------------------------------------------------------------ [INFO] Reactor Summary: [INFO] [INFO] my-shop ............................................ SUCCESS [ 0.158 s] [INFO] my-shop-dependencies ............................... SUCCESS [ 0.004 s] [INFO] my-shop-commons .................................... SUCCESS [ 0.020 s] [INFO] my-shop-domain ..................................... SUCCESS [ 0.016 s] [INFO] my-shop-web-admin .................................. SUCCESS [ 0.033 s] [INFO] my-shop-web-ui ..................................... SUCCESS [ 0.012 s] [INFO] my-shop-web-api .................................... SUCCESS [ 0.008 s] [INFO] ------------------------------------------------------------------------ [INFO] BUILD SUCCESS [INFO] ------------------------------------------------------------------------ [INFO] Total time: 0.400 s [INFO] Finished at: 2018 -06 -12T07:47 :58 +08:00 [INFO] Final Memory: 8M/241M [INFO] ------------------------------------------------------------------------
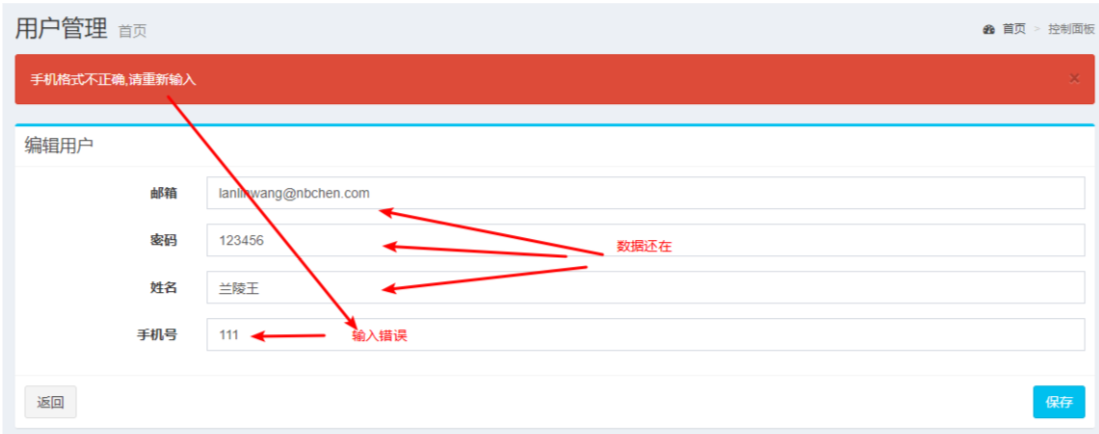
Spring MVC 表单标签库 为什么用? 如果不用,我们保存表单失败的时候,想要把表单的值留着,我们就得写一堆${user.username}代码,来回显表单的值。所以,为了简化代码。
声明表单标签库 在使用 SpringMVC 的时候我们可以使用 Spring 封装的一系列表单标签,这些标签都可以访问到 ModelMap 中的内容。我们需要先在 JSP 中声明使用的标签,具体做法是在 JSP 文件的顶部加入以下指令:
1 <%@ taglib prefix="form" uri="http://www.springframework.org/tags/form"%>
表单标签 <form:form />使用 Spring MVC 的 form 标签主要有两个作用,第一是它会自动的绑定来自 Model 中的一个属性值到当前 form 对应的实体对象,默认是 command 属性,这样我们就可以在 form 表单体里面方便的使用该对象的属性了。第二是它支持我们在提交表单的时候使用除 GET 和 POST 之外的其他方法进行提交,包括 DELETE 和 PUT 等。
1 2 3 4 5 6 7 8 9 10 11 12 13 <form:form action ="formTag/form.do" method ="post" > <table > <tr > <td > Name:</td > <td > <form:input path ="name" /> </td > </tr > <tr > <td > Age:</td > <td > <form:input path ="age" /> </td > </tr > <tr > <td colspan ="2" > <input type ="submit" value ="提交" /> </td > </tr > </table > </form:form >
文本框 <form:input />使用 <form:input path="name" /> 标签来渲染一个 HTML 文本框,等同于:
1 <input id ="name" name ="name" type ="text" value ="" />
密码框 <form:password />使用 <form:password path="password" /> 标签来渲染一个 HTML 密码框,等同于:
1 <input id ="password" name ="password" type ="password" value ="" />
文本域 <form:textarea />使用 <form:textarea path="address" rows="5" cols="30" /> 标签来渲染一个 HTML 文本域,等同于:
1 <textarea id ="address" name ="address" rows ="5" cols ="30" >
复选框 <form:checkbox />使用 <form:checkbox path="receivePaper" /> 标签来渲染一个 HTML 复选框,等同于:
1 2 <input id ="receivePaper1" name ="receivePaper" type ="checkbox" value ="true" /> <input type ="hidden" name ="_receivePaper" value ="on" />
复选框(多选) <form:checkboxes />使用 <form:checkboxes items="${webFrameworkList}" path="favoriteFrameworks" /> 标签来渲染一个 HTML 多选复选框,等同于:
1 2 3 4 5 6 7 8 9 10 11 12 13 14 15 16 17 <span > <input id ="favoriteFrameworks1" name ="favoriteFrameworks" type ="checkbox" value ="Spring MVC" checked ="checked" /> <label for ="favoriteFrameworks1" > Spring MVC</label > </span > <span > <input id ="favoriteFrameworks2" name ="favoriteFrameworks" type ="checkbox" value ="Struts 1" /> <label for ="favoriteFrameworks2" > Struts 1</label > </span > <span > <input id ="favoriteFrameworks3" name ="favoriteFrameworks" type ="checkbox" value ="Struts 2" checked ="checked" /> <label for ="favoriteFrameworks3" > Struts 2</label > </span > <span > <input id ="favoriteFrameworks4" name ="favoriteFrameworks" type ="checkbox" value ="Apache Wicket" /> <label for ="favoriteFrameworks4" > Apache Wicket</label > </span > <input type ="hidden" name ="_favoriteFrameworks" value ="on" />
单选按钮 <form:radiobutton />使用 <form:radiobutton /> 标签来渲染一个 HTML 单选按钮,等同于:
1 2 <form:radiobutton path ="gender" value ="M" label ="男" /> <form:radiobutton path ="gender" value ="F" label ="女" />
1 2 <input id ="gender1" name ="gender" type ="radio" value ="M" checked ="checked" /> <label for ="gender1" > 男</label > <input id ="gender2" name ="gender" type ="radio" value ="F" /> <label for ="gender2" > 女</label >
单选按钮(多选) <form:radiobuttons />使用 <form:radiobuttons path="favoriteNumber" items="${numbersList}" /> 标签来渲染一个 HTML 多项单选按钮,等同于:
1 2 3 4 5 6 7 8 9 10 11 12 13 14 15 16 <span > <input id ="favoriteNumber1" name ="favoriteNumber" type ="radio" value ="1" /> <label for ="favoriteNumber1" > 1</label > </span > <span > <input id ="favoriteNumber2" name ="favoriteNumber" type ="radio" value ="2" /> <label for ="favoriteNumber2" > 2</label > </span > <span > <input id ="favoriteNumber3" name ="favoriteNumber" type ="radio" value ="3" /> <label for ="favoriteNumber3" > 3</label > </span > <span > <input id ="favoriteNumber4" name ="favoriteNumber" type ="radio" value ="4" /> <label for ="favoriteNumber4" > 4</label > </span >
下拉列表 使用 <form:select />, <form:option />,<form:options /> 标签来渲染一个 HTML 下拉列表,等同于:
1 2 3 4 <form:select path ="country" > <form:option value ="NONE" label ="Select" /> <form:options items ="${countryList}" /> </form:select >
1 2 3 4 5 6 7 <select id ="country" name ="country" > <option value ="NONE" > 请选择...</option > <option value ="US" > United States</option > <option value ="CH" > China</option > <option value ="MY" > Malaysia</option > <option value ="SG" > Singapore</option > </select >
下拉列表(多选) 使用 <form:select /> 标签及其属性 multiple=true 来渲染一个 HTML 多选下拉列表,等同于:
1 <form:select path ="skills" items ="${skillsList}" multiple ="true" />
1 2 3 4 5 6 7 <select id ="skills" name ="skills" multiple ="multiple" > <option value ="Struts" > Struts</option > <option value ="Hibernate" > Hibernate</option > <option value ="Apache Wicket" > Apache Hadoop</option > <option value ="Spring" > Spring</option > </select > <input type ="hidden" name ="_skills" value ="1" />
隐藏字段域 <form:hidden />使用 <form:hidden path="id" value="1000"/> 标签来渲染一个 HTML 隐藏字段域,等同于:
1 <input id ="id" name ="id" type ="hidden" value ="1000" />
Spring MVC 注解 controller
1 2 3 map & pojo 需要加@RequestBody 基本类型 & 数组 & MultipartFile 只要保持页面的参数名称和controller方法形参一致i,就不用加@ReqeustParam List不管名字一不一样,必须加@RequestParam
dao/mapper
1 2 3 4 map & pojo 不需要加@Param 多参数建议加@Param,不加就需要按照param1,param2 ... paramN List & Array可以不加@Param,如果不加@aram取值需要写list & array 如果有多个List参数,那么取值,param1 param2 .. paramN
@ModelAttribute 为什么用它? 如果不用它,我们就得一个个手动绑定属性到对象上,然后返回给前端界面。用了它,我们可以在访问请求方法前,执行该注解的方法,拿到对象,赋给界面。相当于前置方法。AOP切面编程思想。
简介 @ModelAttribute 具有如下三个作用:
绑定请求参数到命令对象:放在功能处理方法的入参上时,用于将多个请求参数绑定到一个命令对象,从而简化绑定流程,而且自动暴露为模型数据用于视图页面展示时使用
暴露 @RequestMapping 方法返回值为模型数据:放在功能处理方法的返回值上时,是暴露功能处理方法的返回值为模型数据,用于视图页面展示时使用
暴露表单引用对象为模型数据:放在处理器的一般方法(非功能处理方法)上时,是为表单准备要展示的表单引用对象,如注册时需要选择的所在城市等,而且在执行功能处理方法(@RequestMapping 注解的方法)之前,自动添加到模型对象中,用于视图页面展示时使用
例子 暴露表单引用对象为模型数据的例子
1 2 3 4 5 6 7 8 9 10 11 @ModelAttribute public User get (@RequestParam(required = false) String id) { User entity = null ; if (StringUtils.isNotBlank(id)) { entity = userService.get(id); } if (entity == null ) { entity = new User (); } return entity; }
要和前端代码配合使用
1 2 3 4 5 6 7 8 9 10 11 12 13 14 15 16 17 18 19 20 21 22 23 24 25 26 27 28 29 30 31 32 <form:form cssClass ="form-horizontal" action ="/user/save" method ="post" commandName ="tbUser" > <div class ="box-body" > <div class ="form-group" > <label for ="email" class ="col-sm-2 control-label" > 邮箱</label > <div class ="col-sm-10" > <form:input path ="email" class ="form-control" placeholder ="请输入邮箱" /> </div > </div > <div class ="form-group" > <label for ="password" class ="col-sm-2 control-label" > 密码</label > <div class ="col-sm-10" > <form:input path ="password" class ="form-control" placeholder ="请输入密码" /> </div > </div > <div class ="form-group" > <label for ="username" class ="col-sm-2 control-label" > 姓名</label > <div class ="col-sm-10" > <form:input path ="username" class ="form-control" placeholder ="请输入姓名" /> </div > </div > <div class ="form-group" > <label for ="phone" class ="col-sm-2 control-label" > 手机号</label > <div class ="col-sm-10" > <form:input path ="phone" class ="form-control" placeholder ="请输入手机号" /> </div > </div > </div > <div class ="box-footer" > <button type ="button" onclick ="history.go(-1)" class ="btn btn-default" > 返回</button > <button type ="submit" class ="btn btn-info pull-right" > 保存</button > </div > </form:form >
@ResponseBody 为什么用它? 因为不想让controller的方法返回被视图解析器解析做页面跳转.而且要返回json格式给页面.
简介 @ResponseBody 注解表示该方法的返回的结果直接写入 HTTP 响应正文(ResponseBody)中,一般在异步获取数据时使用,通常是在使用 @RequestMapping 后,返回值通常解析为跳转路径,加上 @ResponseBody 后返回结果不会被解析为跳转路径,而是直接写入HTTP 响应正文中。
作用 该注解用于将 Controller 的方法返回的对象,通过适当的 HttpMessageConverter 转换为指定格式后,写入到 Response 对象的 body 数据区。
使用时机 返回的数据不是 html 标签的页面,而是其他某种格式的数据时(如json、xml等)使用
处理自定义类型 如果需要返回自定义对象为 JSON 数据类型,需要增加 jackson 依赖,pom.xml 配置文件如下:
1 2 3 4 5 6 7 8 9 10 11 12 13 14 15 16 17 <dependency > <groupId > com.fasterxml.jackson.core</groupId > <artifactId > jackson-core</artifactId > <version > 2.9.5</version > </dependency > <dependency > <groupId > com.fasterxml.jackson.core</groupId > <artifactId > jackson-databind</artifactId > <version > 2.9.5</version > </dependency > <dependency > <groupId > com.fasterxml.jackson.core</groupId > <artifactId > jackson-annotations</artifactId > <version > ${jackson.version}</version > </dependency >
【2019-07-07注:】为什么不用fastjson(alibaba),因为fastjson的代码很多地方写死了,且代码有bug,而且,有的是模仿jackson的.没有jackson优雅.jackson是目前全球效率最高的.
Spring MVC 实现文件上传 文件上传介绍 文件上传概述以及使用场景 就是把客户端(浏览器)的文件保存一份到服务器 说白了就是文件的拷贝
常见的使用场景:上传头像、上传各种照片、上传word、Excel等等文件
文件上传要求 浏览器端要求(通用浏览器的要求)
表单提交方式 post
提供文件上传框(组件) input type=”file”
表单的entype属性必须为 multipart/form-data(没有这个属性值的话, 文件的内容是提交不过去的)
服务器端要求
获取客户端上传的文件
准备一个目录存储客户端上传的文件
将客户端上传的文件写入到准备好的目录中
注意:
若表单使用了 multipart/form-data ,使用原生request.getParameter()去获取参数的时候都为null
我们做文件上传一般会借助第三方组件(jar, 框架 SpringMVC)实现文件上传.
常见的文件上传jar包和框架
serlvet3.0(原生的文件上传的API)
commons-fileupload : apache出品的一款专门处理文件上传的工具包 (我们肯定不会直接使用)
struts2(底层封装了:commons-fileupload)
SpringMVC(底层封装了:commons-fileupload)
案例-springmvc 传统方式文件上传 使用springmvc 完成传统方式文件上传
步骤
把commons-fileupload坐标导入进来
在控制器的方法的形参里面定义和文件相关的变量 MultipartFile
把文件存到服务器
配置文件解析器
实现
1 2 3 4 5 6 7 8 9 10 11 12 13 14 15 16 17 18 19 20 21 22 23 24 25 26 27 28 <dependencies > <dependency > <groupId > commons-fileupload</groupId > <artifactId > commons-fileupload</artifactId > <version > 1.3.1</version > </dependency > <dependency > <groupId > org.springframework</groupId > <artifactId > spring-webmvc</artifactId > <version > 5.0.2.RELEASE</version > </dependency > <dependency > <groupId > javax.servlet</groupId > <artifactId > servlet-api</artifactId > <version > 2.5</version > <scope > provided</scope > </dependency > <dependency > <groupId > javax.servlet.jsp</groupId > <artifactId > jsp-api</artifactId > <version > 2.0</version > <scope > provided</scope > </dependency > </dependencies >
1 2 3 4 5 6 <h1 > 一,springmvc传统方式文件上传</h1 > <form action ="/file/upload" method ="post" enctype ="multipart/form-data" > 图片: <input type ="file" name ="upload" /> <br /> 图片描述:<input type ="text" name ="pdesc" /> <input type ="submit" value ="上传" /> </form >
1 2 3 4 5 6 7 8 9 10 11 12 13 14 15 16 17 18 19 20 21 22 23 24 25 26 27 28 29 30 31 32 33 34 35 36 37 38 39 40 41 42 43 44 45 46 47 48 49 50 51 52 53 54 55 56 57 package com.itheima.controller;import org.apache.commons.io.IOUtils;import org.springframework.web.bind.annotation.RequestMapping;import org.springframework.web.bind.annotation.RestController;import org.springframework.web.multipart.MultipartFile;import javax.servlet.ServletContext;import javax.servlet.http.HttpSession;import java.io.File;import java.io.FileOutputStream;import java.io.IOException;import java.io.InputStream;@RestController @RequestMapping("/file") public class FileController { @RequestMapping("/upload") public String upload (MultipartFile upload, String pdesc, HttpSession session) throws IOException { System.out.println(pdesc); InputStream is = null ; FileOutputStream out = null ; try { ServletContext servletContext = session.getServletContext(); String realPath = servletContext.getRealPath("upload" ); File file = new File (realPath); if (!file.exists()) { file.mkdirs(); } String originalFilename = upload.getOriginalFilename(); out = new FileOutputStream (new File (file, originalFilename)); is = upload.getInputStream(); IOUtils.copy(is, out); return "success" ; } catch (Exception e) { e.printStackTrace(); return "fail" ; } finally { is.close(); out.close(); } } }
1 2 3 4 5 <bean id ="multipartResolver" class ="org.springframework.web.multipart.commons.CommonsMultipartResolver" > <property name ="maxUploadSize" value ="5242880" > </property > </bean >
案例-springmvc 跨服务器方式上传 了解使用springmvc 跨服务器方式的文件上传
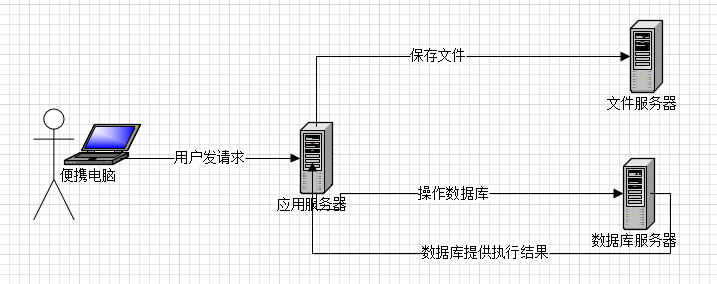
分服务器的目的 在实际开发中,我们会有很多处理不同功能的服务器(注意:此处说的不是服务器集群)。 例如:
应用服务器:负责部署我们的应用
数据库服务器:运行我们的数据库
缓存和消息服务器:负责处理高并发访问的缓存和消息
文件服务器:负责存储用户上传文件的服务器。
分服务器处理的目的是让服务器各司其职,从而提高我们项目的运行效率。
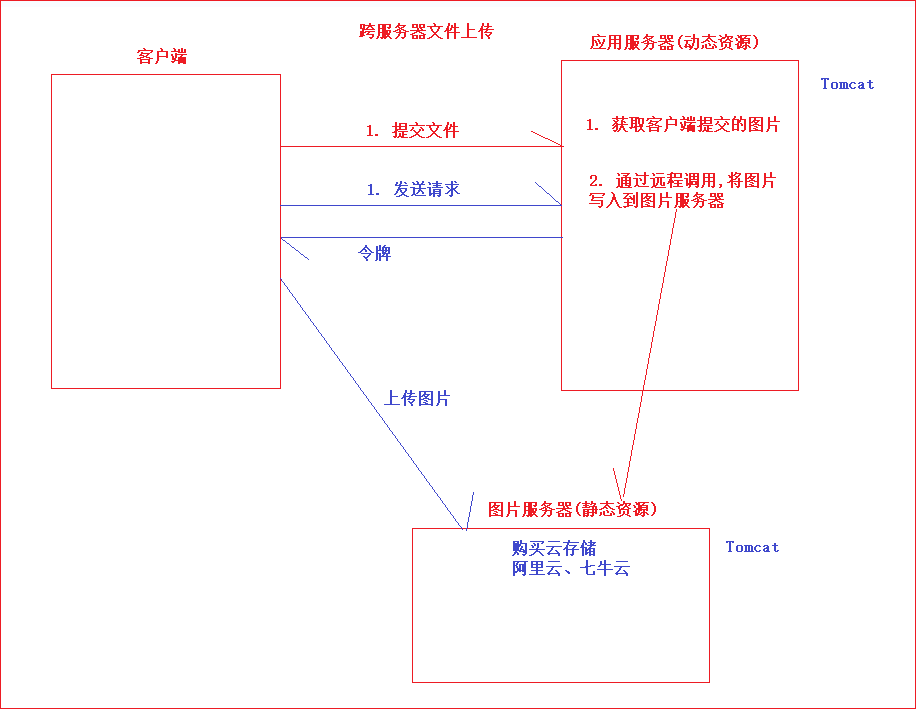
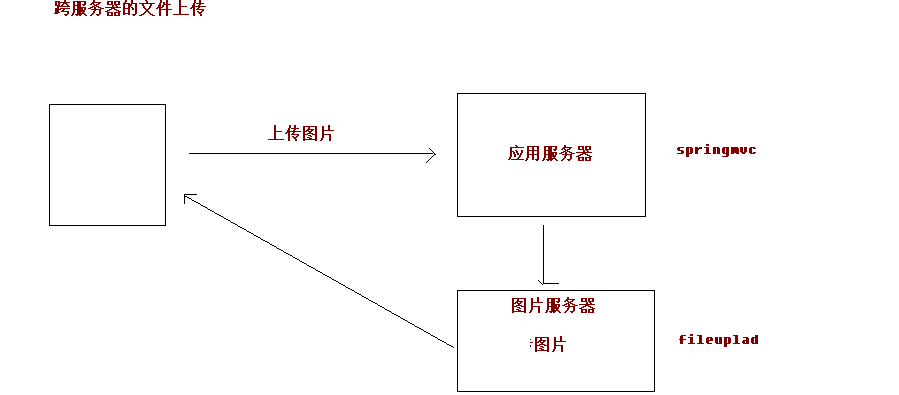
跨服务器方式的文件上传图解
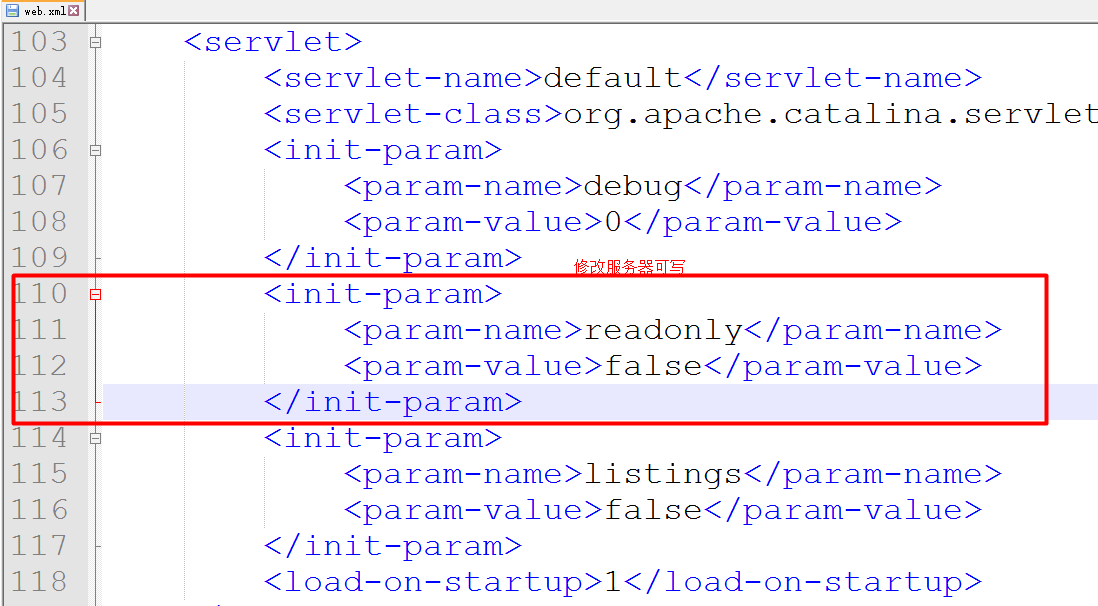
准备两个服务器(默认情况下,tomcat是不允许其他服务器往它里面写入数据的), 修改tomcat的的conf目录下的web.xml, 添加readonly参数为false
实现
1 2 3 4 5 6 7 8 9 10 11 12 13 14 15 16 17 18 19 20 21 22 23 24 25 26 27 28 29 30 31 32 33 34 35 36 37 38 39 40 41 <dependencies > <dependency > <groupId > commons-fileupload</groupId > <artifactId > commons-fileupload</artifactId > <version > 1.3.1</version > </dependency > <dependency > <groupId > org.springframework</groupId > <artifactId > spring-webmvc</artifactId > <version > 5.0.2.RELEASE</version > </dependency > <dependency > <groupId > javax.servlet</groupId > <artifactId > servlet-api</artifactId > <version > 2.5</version > <scope > provided</scope > </dependency > <dependency > <groupId > javax.servlet.jsp</groupId > <artifactId > jsp-api</artifactId > <version > 2.0</version > <scope > provided</scope > </dependency > <dependency > <groupId > com.sun.jersey</groupId > <artifactId > jersey-core</artifactId > <version > 1.18.1</version > </dependency > <dependency > <groupId > com.sun.jersey</groupId > <artifactId > jersey-client</artifactId > <version > 1.18.1</version > </dependency > </dependencies >
1 2 3 4 5 6 <h1 > 二,springmvc 跨服务器方式的文件上传</h1 > <form action ="/file/upload" method ="post" enctype ="multipart/form-data" > 图片: <input type ="file" name ="upload" /> <br /> 图片描述:<input type ="text" name ="pdesc" /> <input type ="submit" value ="上传" /> </form >
1 2 3 4 5 6 7 8 9 10 11 12 13 14 15 16 17 18 19 20 21 22 23 24 25 26 27 28 29 30 31 32 33 34 35 36 37 38 39 40 41 42 43 44 45 46 47 48 49 50 51 package com.itheima.controller;import com.sun.jersey.api.client.Client;import com.sun.jersey.api.client.WebResource;import org.springframework.web.bind.annotation.RequestMapping;import org.springframework.web.bind.annotation.RestController;import org.springframework.web.multipart.MultipartFile;import java.io.IOException;@RestController @RequestMapping("/file") public class FileController { @RequestMapping("/upload") public String upload (MultipartFile upload, String pdesc) throws IOException { System.out.println(pdesc); try { String originalFilename = upload.getOriginalFilename(); String uploadPath = "http://localhost:8899/upload/" +originalFilename; Client client = Client.create(); WebResource resource = client.resource(uploadPath); resource.put(upload.getBytes()); return "success" ; } catch (Exception e) { e.printStackTrace(); return "fail" ; } } }
Spring MVC 中的异常处理 分析
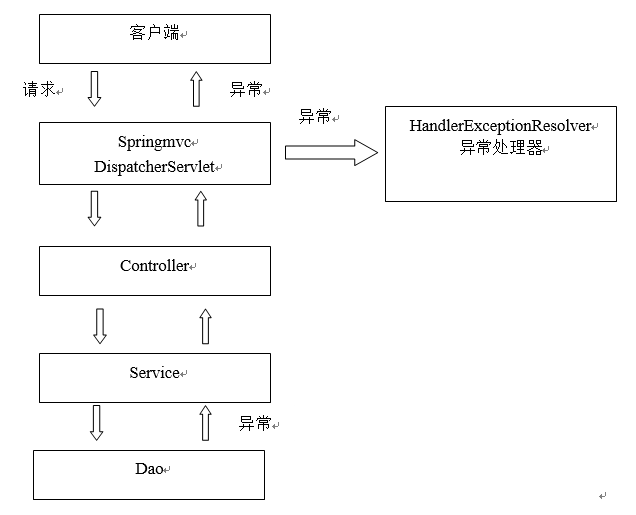
系统中异常包括两类:编译时异常和运行时异常RuntimeException,前者通过捕获异常从而获取异常信息,后者主要通过规范代码开发、测试通过手段减少运行时异常的发生。
系统的dao、service、controller出现都通过throws Exception向上抛出,最后由springmvc前端控制器交由异常处理器进行异常处理,如下图:
springmvc在处理请求过程中出现异常信息交由异常处理器进行处理,自定义异常处理器可以实现一个系统的异常处理逻辑。
代码实现
自定义异常处理器 1 2 3 4 5 6 7 8 9 10 11 12 13 14 15 16 17 18 19 20 21 22 23 24 25 26 27 28 29 30 31 package com.itheima.handler;import org.springframework.web.servlet.HandlerExceptionResolver;import org.springframework.web.servlet.ModelAndView;import javax.servlet.http.HttpServletRequest;import javax.servlet.http.HttpServletResponse;public class GlobalExceptionHandler implements HandlerExceptionResolver { @Override public ModelAndView resolveException (HttpServletRequest request, HttpServletResponse response, Object handler, Exception ex) { ex.printStackTrace(); ModelAndView modelAndView = new ModelAndView (); modelAndView.setViewName("error" ); return modelAndView; } }
配置异常处理器
1 <bean id ="sysExceptionResolver" class ="com.itheima.handler.GlobalExceptionHandler" > </bean >
Spring MVC 中的拦截器 拦截器概述 Spring MVC 的处理器拦截器类似于 Servlet 开发中的过滤器 Filter,用于对处理器(自己编写的Controller)进行预处理和后处理。
用户可以自己定义一些拦截器来实现特定的功能。谈到拦截器,还要向大家提一个词——拦截器链(Interceptor Chain)。拦截器链就是将拦截器按一定的顺序联结成一条链。在访问被拦截的方法或字段时,拦截器链中的拦截器就会按其之前定义的顺序被调用。说到这里,可能大家脑海中有了一个疑问,这不是我们之前学的过滤器吗?是的它和过滤器是有几分相似,但是也有区别,接下来我们就来说说他们的区别:
类别
使用范围
拦截范围
拦截器
SpringMVC项目
只会拦截访问的控制器方法的请求
过滤器
任何web项目
任何资源(servlet,控制器,jsp,html等)
我们要想自定义拦截器, 要求必须实现: HandlerInterceptor 接口。
常见应用场景
日志记录:记录请求信息的日志,以便进行信息监控、信息统计、计算 PV(Page View)等
权限检查:如登录检测,进入处理器检测检测是否登录,如果没有直接返回到登录页面
性能监控:有时候系统在某段时间莫名其妙的慢,可以通过拦截器在进入处理器之前记录开始时间,在处理完后记录结束时间,从而得到该请求的处理时间
通用行为:读取 Cookie 得到用户信息并将用户对象放入请求,从而方便后续流程使用,还有如提取 Locale、Theme 信息等,只要是多个处理器都需要的即可使用拦截器实现
自定义拦截器入门
编写一个普通类实现 HandlerInterceptor 接口
1 2 3 4 5 6 7 8 9 10 11 12 13 14 15 16 17 18 19 20 21 22 23 24 25 26 27 28 29 30 31 32 33 34 35 36 37 38 39 40 41 package com.itheima.interceptor;import org.springframework.web.servlet.HandlerInterceptor;import org.springframework.web.servlet.ModelAndView;import javax.servlet.http.HttpServletRequest;import javax.servlet.http.HttpServletResponse;public class PermissionInterceptor implements HandlerInterceptor { @Override public boolean preHandle (HttpServletRequest request, HttpServletResponse response, Object handler) throws Exception { System.out.println("PermissionInterceptor的preHandle方法执行了..." ); return true ; } @Override public void postHandle (HttpServletRequest request, HttpServletResponse response, Object handler, ModelAndView modelAndView) throws Exception { System.out.println("PermissionInterceptor的postHandle方法执行了..." ); } @Override public void afterCompletion (HttpServletRequest request, HttpServletResponse response, Object handler, Exception ex) throws Exception { System.out.println("PermissionInterceptor的afterCompletion方法执行了..." ); } }
1 2 3 4 5 6 7 8 9 10 11 12 13 14 15 16 17 18 19 20 21 22 23 24 25 26 <?xml version="1.0" encoding="UTF-8" ?> <beans xmlns ="http://www.springframework.org/schema/beans" xmlns:xsi ="http://www.w3.org/2001/XMLSchema-instance" xmlns:context ="http://www.springframework.org/schema/context" xmlns:mvc ="http://www.springframework.org/schema/mvc" xsi:schemaLocation ="http://www.springframework.org/schema/beans http://www.springframework.org/schema/beans/spring-beans.xsd http://www.springframework.org/schema/context http://www.springframework.org/schema/context/spring-context.xsd http://www.springframework.org/schema/mvc http://www.springframework.org/schema/mvc/spring-mvc.xsd" > <context:component-scan base-package ="com.itheima" /> <mvc:interceptors > <mvc:interceptor > <mvc:mapping path ="/**" /> <mvc:exclude-mapping path ="/hello/sayHaha.do" /> <bean id ="permissionInterceptor" class ="com.itheima.interceptor.PermissionInterceptor" > </bean > </mvc:interceptor > </mvc:interceptors > </beans >
自定义拦截器进阶 拦截器的放行
拦截器的路径 1 2 3 4 5 6 7 8 9 10 11 12 13 14 15 16 17 18 19 20 21 22 23 24 25 26 <?xml version="1.0" encoding="UTF-8" ?> <beans xmlns ="http://www.springframework.org/schema/beans" xmlns:xsi ="http://www.w3.org/2001/XMLSchema-instance" xmlns:context ="http://www.springframework.org/schema/context" xmlns:mvc ="http://www.springframework.org/schema/mvc" xsi:schemaLocation ="http://www.springframework.org/schema/beans http://www.springframework.org/schema/beans/spring-beans.xsd http://www.springframework.org/schema/context http://www.springframework.org/schema/context/spring-context.xsd http://www.springframework.org/schema/mvc http://www.springframework.org/schema/mvc/spring-mvc.xsd" > <context:component-scan base-package ="com.itheima" /> <mvc:interceptors > <mvc:interceptor > <mvc:mapping path ="/**" /> <mvc:exclude-mapping path ="/hello/sayHaha.do" /> <bean id ="permissionInterceptor" class ="com.itheima.interceptor.PermissionInterceptor" > </bean > </mvc:interceptor > </mvc:interceptors > </beans >
拦截器的其它方法
afterCompletion 在目标方法完成视图层渲染后执行。
postHandle 在目标方法执行完毕获得了返回值后执行。
preHandle 被拦截的目标方法执行之前执行。
1 2 3 4 5 6 7 8 9 10 11 12 13 14 15 16 17 18 19 20 21 22 23 24 25 26 27 28 29 30 31 32 33 34 35 36 37 38 39 40 41 package com.itheima.interceptor;import org.springframework.web.servlet.HandlerInterceptor;import org.springframework.web.servlet.ModelAndView;import javax.servlet.http.HttpServletRequest;import javax.servlet.http.HttpServletResponse;public class PermissionInterceptor implements HandlerInterceptor { @Override public boolean preHandle (HttpServletRequest request, HttpServletResponse response, Object handler) throws Exception { System.out.println("PermissionInterceptor的preHandle方法执行了..." ); return true ; } @Override public void postHandle (HttpServletRequest request, HttpServletResponse response, Object handler, ModelAndView modelAndView) throws Exception { System.out.println("PermissionInterceptor的postHandle方法执行了..." ); } @Override public void afterCompletion (HttpServletRequest request, HttpServletResponse response, Object handler, Exception ex) throws Exception { System.out.println("PermissionInterceptor的afterCompletion方法执行了..." ); } }
多个拦截器执行顺序 回想多个过滤器的执行顺序:
如果采用配置文件方式配置过滤器,那么就按照过滤器的配置先后顺序执行
如果采用注解方式配置过滤器,那么就按照类名的排序执行
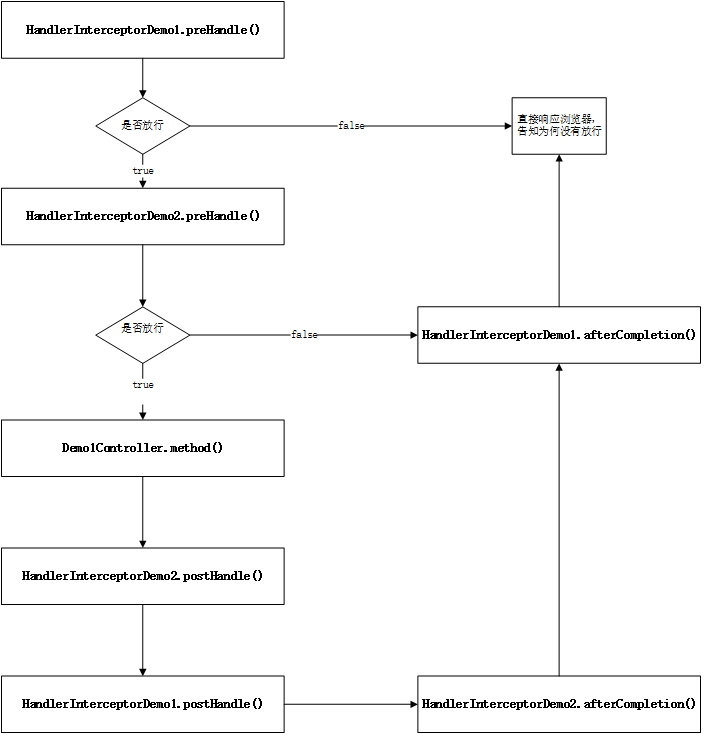
我们可以配置多个拦截器, 所以就存在一个优先级问题了.多个拦截器的优先级是按照配置的顺序决定的。
配置顺序
1 2 3 4 5 6 7 8 9 10 11 12 13 14 15 16 17 18 19 <mvc:interceptors > <mvc:interceptor > <mvc:mapping path ="/**" /> <mvc:exclude-mapping path ="/hello/sayHaha.do" /> <bean id ="permissionInterceptor" class ="com.itheima.interceptor.PermissionInterceptor" > </bean > </mvc:interceptor > <mvc:interceptor > <mvc:mapping path ="/**" /> <bean id ="secondInterceptor" class ="com.itheima.interceptor.SecondInterceptor" > </bean > </mvc:interceptor > </mvc:interceptors >
将Spring项目改成SSM 第一步-引入依赖
并且去掉heima_mvc的依赖,并且删除web.xml中相关配置,并且删除掉自己项目中的解决乱码的过滤器
spring相关依赖
spring-webmvc
spring-jdbc
aop依赖
mybatis整合spring的依赖
log相关依赖
jackson相关的依赖
druid连接池依赖
文件上传的依赖
1 2 3 4 5 6 7 8 9 10 11 12 13 14 15 16 17 18 19 20 21 22 23 24 25 26 27 28 29 30 31 32 33 34 35 36 37 38 39 40 41 42 43 44 45 46 47 48 49 50 51 52 53 <properties > <spring.version > 5.0.2.RELEASE</spring.version > <slf4j.version > 1.6.6</slf4j.version > <log4j.version > 1.2.12</log4j.version > </properties > <dependencies > <dependency > <groupId > org.springframework</groupId > <artifactId > spring-webmvc</artifactId > <version > ${spring.version}</version > </dependency > <dependency > <groupId > org.springframework</groupId > <artifactId > spring-jdbc</artifactId > <version > ${spring.version}</version > </dependency > <dependency > <groupId > com.fasterxml.jackson.core</groupId > <artifactId > jackson-databind</artifactId > <version > 2.9.0</version > </dependency > <dependency > <groupId > com.fasterxml.jackson.core</groupId > <artifactId > jackson-core</artifactId > <version > 2.9.0</version > </dependency > <dependency > <groupId > com.fasterxml.jackson.core</groupId > <artifactId > jackson-annotations</artifactId > <version > 2.9.0</version > </dependency > <dependency > <groupId > org.mybatis</groupId > <artifactId > mybatis-spring</artifactId > <version > 1.3.0</version > </dependency > <dependency > <groupId > com.alibaba</groupId > <artifactId > druid</artifactId > <version > 1.1.5</version > </dependency > <dependency > <groupId > org.aspectj</groupId > <artifactId > aspectjweaver</artifactId > <version > 1.8.7</version > </dependency > </dependencies >
第二步-修改mybatis的核心配置文件 第三步-编写spring整合mybatis的配置文件
整合mybatis
第四步-编写声明式事务的配置文件
配置事务管理者
加载事务注解驱动
导入spring-mybatis.xml
第五步-编写spring的主配置文件
包扫描
加载mvc注解驱动
导入导入spring-tx.xml
第六步-修改web.xml配置
将heimaMVC中的DispatcherServlet的配置改成SpringMVC中的DispatcherServlet的配置
将解决乱码的过滤器的配置改成SpringMVC中的解决乱码的过滤器配置
删除项目中自己定义的解决乱码的过滤器
第七步-修改各个controller的代码
将原本heimaMvc的Controller注解改成springMvc中的RestController注解
使用Autowired注解注入Service对象
在各个Controller类上添加RequestMapping注解
将Controller类的各个方法上的RequestMapping注解改成SpringMVC中的RequestMapping注解,并且修改路径
将各个方法的获取请求参数的方式改成SpringMVC中的获取请求参数
将各个方法的响应数据给客户端的方式改成SpringMVC的响应数据方式
第八步-修改各个Service的代码
将所有的Service的实现类改名成”XXXImpl”
给各个实现类添加接口,然后Controller中一定要以接口类型接收Service的对象
各个Service的实现类商添加Service注解进行IOC
使用Autowired注解注入Dao对象
将方法中所有涉及到SqlSession的代码全部删掉,直接就能使用Dao对象
要进行事务控制的类或者方法上添加Transactional注解
第九步-修改文件上传的代码
将原来的获取上传文件的代码改成SpringMVC的文件上传代码
在创建spring文件上传的配置文件,配置文件解析器
SSM总结 1 2 3 4 5 6 7 8 9 10 11 12 13 14 15 16 17 18 19 20 21 22 23 24 25 26 27 28 29 30 31 32 33 34 35 36 37 38 39 40 41 42 43 44 45 46 47 48 49 50 51 52 53 54 55 56 57 58 59 60 61 62 63 64 65 66 67 68 69 70 71 72 73 74 75 76 77 78 79 80 81 82 一、MyBatis框架 1. 映射配置文件 1. 映射配置文件的文件名和存储路径,要和对应的Dao接口的名字和路径一致 2. mapper根标签,namespace属性的值,要和对应的Dao接口的全限定名一致 3. insert、delete、update、select、selectKey标签 4. parameterType 参数类型 5. resultType 结果类型 6. resultMap 自定义结果集映射 7. 动态SQL标签 if where forEach sql和include标签 8. 一对一的映射、一对多的映射 二、Spring框架 1. 掌握注解的方式进行:IOC(控制反转)和DI(依赖注入),配置文件方式也要掌握 1.1 自己写的类,使用注解方式进行IOC和DI 1.2 第三方的类,使用配置文件方式进行IOC和DI 2. 配置文件方式使用AOP、注解的方式使用AOP 3. 注解的方式使用声明式事务 4. 配置DataSource 三、SpringMVC框架 1. 配置前端控制器(DispatcherServlet) 2. 配置解决乱码的过滤器 3. 常用注解 Controller注解 RestController注解 RequestMapping注解 RequestParam注解 RequestBody注解 4. 与json数据的交互(项目中必须引入jackson依赖) 1. 接收客户端的json类型的请求参数,封装到POJO对象中,使用RequestBody注解 2. 将服务器端的对象,解析成json字符串,响应给客户端,可以使用ResponseBody注解,也可以使用RestController 5. 获取客户端的请求参数 1. 简单类型的参数 2. POJO对象类型的参数 1. "key=value&key=value" 2. "{key:value,key:value}" 3. Map类型的参数 4. List类型的参数 6. 使用PathVariable注解获取RestFul风格的url中的数据 7. 掌握文件上传 四、掌握使用spring整合mybatis 1. 引入整合的依赖 2. 在spring-mybatis.xml里面配置SqlSessionFactoryBean对象,注入DataSource,typeAliasesPackage 3. 配置MapperScannerConfigurer对象,注入要加载的dao接口的包名 五、能够让专门的配置文件做专门的事情: 1. springmvc的配置文件:项目全局的配置文件 1. 包扫描 2. 加载mvc注解驱动 3. 配置springmvc的各种组件:视图解析器、文件解析器、异常处理器、类型转换器、拦截器等等 4. 导入其它的配置文件 2. spring的配置文件: 1. aop的配置 2. 声明式事务的配置 3. 其它的一些ioc和依赖注入的配置 4. 导入其它的配置文件(如果有需要的话) 3. spring-mybatis.xml,做整合的事情 1. 配置dataSource 2. 整合mybatis和spring 4. log4j.properties 日志框架的配置文件 5. db.properties 数据库环境的配置文件 6. web.xml,里面是配置Servlet和Filter、Listener 7. mybatis的主配置文件、mybatis的映射配置文件
附录 web.xml 1 2 3 4 5 6 7 8 <?xml version="1.0" encoding="UTF-8" ?> <web-app xmlns:xsi ="http://www.w3.org/2001/XMLSchema-instance" xmlns ="http://java.sun.com/xml/ns/javaee" xsi:schemaLocation ="http://java.sun.com/xml/ns/javaee http://java.sun.com/xml/ns/javaee/web-app_2_5.xsd" id ="WebApp_ID" version ="2.5" > <display-name > Archetype Created Web Application</display-name > </web-app >
springmvc.xml 1 2 3 4 5 6 7 8 9 10 11 12 13 14 <?xml version="1.0" encoding="UTF-8" ?> <beans xmlns ="http://www.springframework.org/schema/beans" xmlns:mvc ="http://www.springframework.org/schema/mvc" xmlns:context ="http://www.springframework.org/schema/context" xmlns:xsi ="http://www.w3.org/2001/XMLSchema-instance" xsi:schemaLocation =" http://www.springframework.org/schema/beans http://www.springframework.org/schema/beans/spring-beans.xsd http://www.springframework.org/schema/mvc http://www.springframework.org/schema/mvc/spring-mvc.xsd http://www.springframework.org/schema/context http://www.springframework.org/schema/context/spring-context.xsd" ></beans >
applicationContext(约束).xml 1 2 3 4 5 6 7 8 9 10 11 12 13 14 15 16 17 18 19 <?xml version="1.0" encoding="UTF-8" ?> <beans xmlns ="http://www.springframework.org/schema/beans" xmlns:xsi ="http://www.w3.org/2001/XMLSchema-instance" xmlns:context ="http://www.springframework.org/schema/context" xmlns:aop ="http://www.springframework.org/schema/aop" xmlns:tx ="http://www.springframework.org/schema/tx" xsi:schemaLocation ="http://www.springframework.org/schema/beans http://www.springframework.org/schema/beans/spring-beans.xsd http://www.springframework.org/schema/context http://www.springframework.org/schema/context/spring-context.xsd http://www.springframework.org/schema/aop http://www.springframework.org/schema/aop/spring-aop.xsd http://www.springframework.org/schema/tx http://www.springframework.org/schema/tx/spring-tx.xsd" > </beans >
sqlMapConfig.xml 1 2 3 4 5 6 7 8 9 10 11 12 13 14 15 16 17 18 19 20 21 22 23 24 25 26 27 28 29 30 31 <?xml version="1.0" encoding="UTF-8" ?> <!DOCTYPE configuration PUBLIC "-//mybatis.org//DTD Config 3.0//EN" "http://mybatis.org/dtd/mybatis-3-config.dtd" > <configuration > <properties resource ="jdbcConfig.properties" > </properties > <environments default ="mysql" > <environment id ="mysql" > <transactionManager type ="JDBC" > </transactionManager > <dataSource type ="pooled" > <property name ="driver" value ="${jdbc.driver}" /> <property name ="url" value ="${jdbc.url}" /> <property name ="username" value ="${jdbc.username}" /> <property name ="password" value ="${jdbc.password}" /> </dataSource > </environment > </environments > <mappers > <mapper class ="com.itheima.dao.IAccountDao" /> </mappers > </configuration >

