activiti7:https://activiti.gitbook.io/activiti-7-developers-guide/
Activiti基础篇 第1章 什么是工作流 1.1工作流介绍 工作流(Workflow),就是通过计算机对业务流程自动化执行管理。它主要解决的是“使在多个参与者之间按照某种预定义的规则自动进行传递文档、信息或任务的过程,从而实现某个预期的业务目标, 或者促使此目标的实现”。
1.2工作流系统 一个软件系统中具有工作流的功能,我们把它称为工作流系统,一个系统中工作流的功能是什么?就是对系统的业务流程进行自动化管理,所以工作流是建立在业务流程的基础上,所以一个软件的系统核心根本上还是系统的业务流程,工作流只是协助进行业务流程管理。即使没有工作流业务系统也可以开发运行,只不过有了工作流可以更好的管理业务流程,提高系统的可扩展性。
1.2.1适用行业 消费品行业,制造业,电信服务业,银证险等金融服务业,物流服务业,物业服务业,物业管理, 大中型进出口贸易公司,政府事业机构,研究院所及教育服务业等,特别是大的跨国企业和集团公 司。
1.2.2具体应用 1.关键业务流程:订单、报价处理、合同审核、客户电话处理、供应链管理等
5.客户服务类:客户信息管理、客户投诉、请求处理、售后服务管理等。
6.特殊服务类:ISO 系列对应流程、质量管理对应流程、产品数据信息管理、贸易公司报关处理、物流公司货物跟踪处理等各种通过表单逐步手工流转完成的任务均可应用工作流软件自动规范 地实施。
1.3工作流实现方式 在没有专门的工作流引擎之前,我们之前为了实现流程控制 ,通常的做法就是采用状态字段的值来跟踪流程的变化情况。这样不用角色的用户,通过状态字段的取值来决定记录是否显示。
针对有权限可以查看的记录,当前用户根据自己的角色来决定审批是否合格的操作。如果合格将状态字段设置一个值,来代表合格;当然如果不合格也需要设置一个值来代表不合格的情况。
这是一种最为原始的方式。通过状态字段虽然做到了流程控制,但是当我们的流程发生变更的时候, 这种方式所编写的代码也要进行调整。
比如去除总经理节点,那代码必须要调整重写了,这是一种很痛苦的事情。
那么有没有专业的方式来实现工作流的管理呢?并且可以做到业务流程变化之后,我们的程序可以不用改变 ,如果可以实现这样的效果,那么我们的业务系统的适应能力就得到了极大提升。
1.4工作流实现原理分析 如何可以做到我们在业务流程发生变更后,我们的业务系统代码可以不发生改变?此时我们就来分 析一下原理。
流程图新增/删除一个节点,对应的只是表里的一行数据多/少了。而每次去表里读的代码不会受到影响。
activity可以解决业务需求变更时,源代码不需要更新,更新的是业务流程图。
底层的原理:
而activity就是基于这个大方向做了一系列完善的功能封装。
第2章 什么是Activiti7 2.1Activiti 介绍 Alfresco 软件在 2010 年 5 月 17 日宣布 Activiti 业务流程管理(BPM)开源项目的正式启动,其首席架构师由业务流程管理 BPM 的专家 Tom Baeyens 担任,Tom Baeyens 就是原来 jbpm 的架构师,而 jbpm 是一个非常有名的工作流引擎,当然 activiti 也是一个工作流引擎。
Activiti 是一个工作流引擎, activiti 可以将业务系统中复杂的业务流程抽取出来,使用专门的建模语言(BPMN2.0)进行定义,业务系统按照预先定义的流程进行执行,实现了业务系统的业务流程由 activiti 进行管理,减少业务系统由于流程变更进行系统升级改造的工作量,从而提高系统的健壮性,同时也减少了系统开发维护成本。
官方网站:https://www.activiti.org/
经历的版本:
目前最新版本:Activiti7.0.0.Beta
2.1.1 BPM BPM(Business Process Management),即业务流程管理,是一种以规范化的构造端到端的卓越业务流程为中心,以持续的提高组织业务绩效为目的系统化方法,常见商业管理教育如 EMBA、MBA等均将 BPM 包含在内。
企业流程管理主要是对企业内部改革,改变企业职能管理机构重叠、中间层次多、流程不闭环等,做到机构不重叠、业务不重复,达到缩短流程周期、节约运作资本、提高企业效益的作用。
比较下边的两个人事加薪流程哪个效率更高?
流程一:
流程二:
上边两个流程的区别在于第二个流程在执行时,如果本次加薪金额在一万元以内不再由总经理审批
将比第一个流程缩短流程周期,从而提交效率。
再比较下边的例子,哪个效率更高?
流程一:
流程二:
上边两个流程的区别在于第二个流程将交费和取药放在一起进行,这样导致的结果是此窗口的工作人员必须具备财务、药学专业知识,岗位强度加大,人员培训难度加大从而导致人员不易扩展,工作效率低下。
2.1.2 BPM 软件 BPM 软件就是根据企业中业务环境的变化,推进人与人之间、人与系统之间以及系统与系统之间的整合及调整的经营方法与解决方案的 IT 工具。 通常以 Internet 方式实现信息传递、数据同步、业务监控和企业业务流程的持续升级优化,从而实现跨应用、跨部门、跨合作伙伴与客户的企业运作。通过 BPM 软件对企业内部及外部的业务流程的整个生命周期进行建模、自动化、管理监控和优化,使企业成本降低,利润得以大幅提升。
BPM 软件在企业中应用领域广泛,凡是有业务流程的地方都可以 BPM 软件进行管理,比如企业人事办公管理、采购流程管理、公文审批流程管理、财务管理等。
2.1.3 BPMN BPMN(Business Process Model And Notation)- 业务流程模型和符号 是由 BPMI(Business Process Management Initiative)开发的一套标准的业务流程建模符号,使用 BPMN 提供的符号可以创建业务流程。 2004 年 5 月发布了 BPMN1.0 规范.BPMI 于 2005 年 9 月并入 OMG(The Object Management Group 对象管理组织)组织。OMG 于 2011 年 1 月发布BPMN2.0 的最终版本。
具体发展历史如下:
BPMN 是目前被各 BPM 厂商广泛接受的 BPM 标准。Activiti 就是使用 BPMN 2.0 进行流程建模、流程执行管理,它包括很多的建模符号,比如:
Event 用一个圆圈表示,它是流程中运行过程中发生的事情。
活动用圆角矩形表示,一个流程由一个活动或多个活动组成
一个 bpmn 图形的例子:
首先当事人发起一个请假单;
其次他所在部门的经理对请假单进行审核;
然后人事经理进行复核并进行备案;
最后请假流程结束。
Bpmn 图形其实是通过 xml 表示业务流程,上边的.bpmn 文件使用文本编辑器打开:
1
2
3
4
5
6
7
8
9
10
11
12
13
14
15
16
17
18
19
20
21
22
23
24
25
26
27
28
29
30
31
32
33
34
35
36
37
38
39
40
41
42
43
44
45
46
47
48
49
50
51
52
53
54
55
56
57
58
<?xml version="1.0" encoding="UTF-8" ?> <definitions xmlns ="http://www.omg.org/spec/BPMN/20100524/MODEL" xmlns:xsi ="http://www.w3.org/2001/XMLSchema-instance" xmlns:xsd ="http://www.w3.org/2001/XMLSchema" xmlns:activiti ="http://activiti.org/bpmn" xmlns:bpmndi ="http://www.omg.org/spec/BPMN/20100524/DI" xmlns:omgdc ="http://www.omg.org/spec/DD/20100524/DC" xmlns:omgdi ="http://www.omg.org/spec/DD/20100524/DI" typeLanguage ="http://www.w3.org/2001/XMLSchema" expressionLanguage ="http://www.w3.org/1999/XPath" targetNamespace ="http://www.activiti.org/test" > <process id ="myProcess" name ="My process" isExecutable ="true" > <startEvent id ="startevent1" name ="Start" > </startEvent > <userTask id ="usertask1" name ="创建请假单" > </userTask > <sequenceFlow id ="flow1" sourceRef ="startevent1" targetRef ="usertask1" > </sequenceFlow > <userTask id ="usertask2" name ="部门经理审核" > </userTask > <sequenceFlow id ="flow2" sourceRef ="usertask1" targetRef ="usertask2" > </sequenceFlow > <userTask id ="usertask3" name ="人事复核" > </userTask > <sequenceFlow id ="flow3" sourceRef ="usertask2" targetRef ="usertask3" > </sequenceFlow > <endEvent id ="endevent1" name ="End" > </endEvent > <sequenceFlow id ="flow4" sourceRef ="usertask3" targetRef ="endevent1" > </sequenceFlow > </process > <bpmndi:BPMNDiagram id ="BPMNDiagram_myProcess" > <bpmndi:BPMNPlane bpmnElement ="myProcess" id ="BPMNPlane_myProcess" > <bpmndi:BPMNShape bpmnElement ="startevent1" id ="BPMNShape_startevent1" > <omgdc:Bounds height ="35.0" width ="35.0" x ="130.0" y ="160.0" > </omgdc:Bounds > </bpmndi:BPMNShape > <bpmndi:BPMNShape bpmnElement ="usertask1" id ="BPMNShape_usertask1" > <omgdc:Bounds height ="55.0" width ="105.0" x ="210.0" y ="150.0" > </omgdc:Bounds > </bpmndi:BPMNShape > <bpmndi:BPMNShape bpmnElement ="usertask2" id ="BPMNShape_usertask2" > <omgdc:Bounds height ="55.0" width ="105.0" x ="360.0" y ="150.0" > </omgdc:Bounds > </bpmndi:BPMNShape > <bpmndi:BPMNShape bpmnElement ="usertask3" id ="BPMNShape_usertask3" > <omgdc:Bounds height ="55.0" width ="105.0" x ="510.0" y ="150.0" > </omgdc:Bounds > </bpmndi:BPMNShape > <bpmndi:BPMNShape bpmnElement ="endevent1" id ="BPMNShape_endevent1" > <omgdc:Bounds height ="35.0" width ="35.0" x ="660.0" y ="160.0" > </omgdc:Bounds > </bpmndi:BPMNShape > <bpmndi:BPMNEdge bpmnElement ="flow1" id ="BPMNEdge_flow1" > <omgdi:waypoint x ="165.0" y ="177.0" > </omgdi:waypoint > <omgdi:waypoint x ="210.0" y ="177.0" > </omgdi:waypoint > </bpmndi:BPMNEdge > <bpmndi:BPMNEdge bpmnElement ="flow2" id ="BPMNEdge_flow2" > <omgdi:waypoint x ="315.0" y ="177.0" > </omgdi:waypoint > <omgdi:waypoint x ="360.0" y ="177.0" > </omgdi:waypoint > </bpmndi:BPMNEdge > <bpmndi:BPMNEdge bpmnElement ="flow3" id ="BPMNEdge_flow3" > <omgdi:waypoint x ="465.0" y ="177.0" > </omgdi:waypoint > <omgdi:waypoint x ="510.0" y ="177.0" > </omgdi:waypoint > </bpmndi:BPMNEdge > <bpmndi:BPMNEdge bpmnElement ="flow4" id ="BPMNEdge_flow4" > <omgdi:waypoint x ="615.0" y ="177.0" > </omgdi:waypoint > <omgdi:waypoint x ="660.0" y ="177.0" > </omgdi:waypoint > </bpmndi:BPMNEdge > </bpmndi:BPMNPlane > </bpmndi:BPMNDiagram > </definitions >
2.2Activit 如何使用
部署 activiti
流程定义(画图)
如果使用其它公司开发的工作作引擎一般都提供了可视化的建模工具(Process Designer)用于生成流程定义文件,建模工具操作直观,一般都支持图形化拖拽方式、多窗口的用户界面、丰富的过程图形元素、过程元素拷贝、粘贴、删除等功能。
流程定义部署
启动一个流程实例(ProcessInstance)
用户查询待办任务(Task)
用户办理任务
流程结束
2.3下载官网资源 1.进入 Activiti-Core 学习向导页面https://github.com/Activiti/activiti-7-developers-guide/blob/51a1681c0e4bb5e2f96a6dea73516c9fd53d8521/getting-started/getting-started-activiti-core.md https://github.com/Activiti/activiti-examples
我们可以通过官方文档和官方示例来学习 Activiti7,目前国内的关于 Activiti7 的参考资料还很少,我们本次将结合这些资料来学习 Activiti7 课程。
2.4Activiti7 面临的挑战 Tom Baeyens 离职,并带着原班 Activiti 开发者又开发了一版新的工作流引擎,叫 flowable。这对于Activiti 阵营而言是一个不少的挑战。我们现在所学的 Activiti7 是另一个架构师在原有的 Activiti6 基础上再进行一层封装,所以 API 有着很大的改变。
2.5Activiti7 的组成部分
从这个部分我们可以看到 Activiti 现在已经分成两个不同的部分,Activiti Core 作为 Activiti 的核心部分,本次课程我们重点解决。另一部分 Activiti Cloud 主要是利用云服务来实现分布式业务流程开发。
Activiti Cloud 简单介绍
2.5Activiti 新的 API 介绍
Activiti7 为了简化对工作流的操作,特别在原有 API 的基础上再次进行封闭,这样我们原来所学习的 Activiti 基本 API 就被封闭起来了。具体要学习的包括:
ProcessRuntime 接口
TaskRuntime 接口
新的API底层也是封装了那些service,所以可以直接用,更方便了
发给到/processes/下的会自动部署
7的需要spring security集成
2.5.1 ProcessRuntime 接口
通过上面的分析,我们发现使用 Activiti7 开发时,只要注入 ProcessRuntime 的实现对象,就可以实现流程定义信息的操作。当然这个过程中因为 Activiti7 与 SpringSecurity 的强耦合,引导我们也必须将 SpringSecurity 加入进来。
2.5.2 TaskRuntime 接口
上面部分给我们介绍了如何引入 Activiti Core 所需的坐标,同时介绍了如何添加 TaskRuntime 实现对象,源码介绍等。我们会发现 TaskRuntime 本身就是对于 TaskService 的一个封装
第3章 环境准备 3.1三个环境 第一个环境: 没有加入工作流 SaaS-IHRM 系统
第二个环境: activiti 测试环境
第三个环境: activiti 应用环境,加入工作流的 SaaS-IHRM 系统
3.2开发环境 3.2.1 Java 环境 Jdk1.8 或以上版本
3.2.2 数据库 Mysql 5 及以上的版本
3.2.3 Web 容器 本项目采用的是 Tomcat8.5
3.2.4 开发工具 Mysql 客户端连接工具,Sqlyog 或其它
注意:activiti 的流程定义工具插件可以安装在 IDEA 下,也可以安装在 Eclipse 工具下。
3.3Activiti 环境 Activiti7.0.0.Beta1
3.3.1 下载 activiti7 Activiti 下载地址:http://activiti.org/download.html
1 2 3 4 5 6 7 8 9 10 11 <dependencyManagement > <dependencies > <dependency > <groupId > org.activiti</groupId > <artifactId > activiti-dependencies</artifactId > <version > 7.0.0.Beta1</version > <scope > import</scope > <type > pom</type > </dependency > </dependencies > </dependencyManagement >
Database:
Docs
Wars
3.3.2 Activiti Designer 流程设计器(Eclipse 工具) 本教程使用 Activiti –Designer-eclipse-plugin(activiti 流程设计器插件)完成流程的制作。
下面介绍了 activiti designer 设计器插件的安装方式,本教程使用的插件安装方式详细参考“activiti开发环境配置.docx”文档的“Eclipse 插件安装”章节。
3.3.2.1 Eclispe 工具下插件安装方式 1 参数文档开发工具目录下的“activiti 开发环境配置.docx”中“eclipse 插件安装”,其中包括了 Activiti插件。
3.3.2.2 Eclispe 工具下插件安装方式 2 网络在线安装:
打开 Help -> Install New Software. 在如下面板中:
在如下 Install 界面板中,点击 Add 按钮:
配置新装插件的地址和名称
然后填入下列字段
1
2
Name: Activiti BPMN 2.0 designer Location: http://activiti.org/designer/update/
回到 Install 界面,在面板正中列表中把所有展示出来的项目都勾上:
点击复选框
在 Detail 部分记得选中 “Contact all updates sites..” , 因为它会检查所有当前安装所需要的插件并可以被 Eclipse 下载.
安装完以后,点击新建工程 new->Other…打开面板,如果看到下图内容:
说明安装成功了。
3.3.2.3 补充说明 打开菜单 Windows->Preferences->Activiti->Save 下流程图片的生成方式:
虽然流程引擎在单独部署 bpmn 文件时会自动生成图片,但在实际开发过程中,自动生成的图片会导致和 BPMN 中的坐标有出入,在实际项目中展示流程当前位置图会有问题。
所在完成以上配置后,会由我们自己来管理流程图片。在发布流程时把流程规则文件和流程图片一起上传就行了。
3.3.3 Activiti Designer 流程设计器(IDEA 工具) 在 IDEA 的 File 菜单中找到子菜单”Settings”,后面我们再选择左侧的“plugins”菜单,如下图所示:
此时我们就可以搜索到 actiBPM 插件,它就是 Activiti Designer 的 IDEA 版本。
安装好后,页面如下:
3.3.4 Activti BPMN visualizer 流程设计器(IDEA工具)
3.3.5 Activiti 支持的数据库 Activiti 的运行需要数据库支撑,需要安装 activiti 数据库,支持如下版本:
3.3.6 创建 mysql 数据库 本教程使用 mysql 数据库。
3.3.7 创建表方式 通过运行 java 程序创建表。
3.3.7.1 创建 java 工程 使用 eclipse 或 idea 创建 maven 的 java 工程。
3.3.7.2 加入 maven 依赖的坐标(jar 包) 首先需要在 java 工程中加入 ProcessEngine 所需要的 jar 包,包括:
activiti-engine-7.0.0.beta1.jar
activiti 依赖的 jar 包:mybatis、alf4j、log4j 等
activiti 依赖的 spring 包
数据库驱动
第三方数据连接池 dbcp
单元测试 Junit-4.12.jar
我们使用 maven 来实现项目的构建,所以应当导入这些 jar 所对应的坐标到 pom.xml 文件中。
1 2 3 4 5 6 7 8 9 10 11 12 13 14 15 16 17 18 19 20 21 22 23 24 25 26 27 28 29 30 31 32 33 34 35 36 37 38 39 40 41 42 43 44 45 46 47 48 49 50 51 52 53 54 55 56 57 58 59 60 61 62 63 64 65 66 67 68 69 70 71 72 73 74 75 76 <properties > <slf4j.version > 1.6.6</slf4j.version > <log4j.version > 1.2.12</log4j.version > </properties > <dependencies > <dependency > <groupId > org.activiti</groupId > <artifactId > activiti-engine</artifactId > <version > 7.0.0.Beta1</version > </dependency > <dependency > <groupId > org.activiti</groupId > <artifactId > activiti-spring</artifactId > <version > 7.0.0.Beta1</version > </dependency > <dependency > <groupId > org.activiti</groupId > <artifactId > activiti-bpmn-model</artifactId > <version > 7.0.0.Beta1</version > </dependency > <dependency > <groupId > org.activiti</groupId > <artifactId > activiti-bpmn-converter</artifactId > <version > 7.0.0.Beta1</version > </dependency > <dependency > <groupId > org.activiti</groupId > <artifactId > activiti-json-converter</artifactId > <version > 7.0.0.Beta1</version > </dependency > <dependency > <groupId > org.activiti</groupId > <artifactId > activiti-bpmn-layout</artifactId > <version > 7.0.0.Beta1</version > </dependency > <dependency > <groupId > org.activiti.cloud</groupId > <artifactId > activiti-cloud-services-api</artifactId > <version > 7.0.0.Beta1</version > </dependency > <dependency > <groupId > mysql</groupId > <artifactId > mysql-connector-java</artifactId > <version > 5.1.40</version > </dependency > <dependency > <groupId > junit</groupId > <artifactId > junit</artifactId > <version > 4.12</version > </dependency > <dependency > <groupId > log4j</groupId > <artifactId > log4j</artifactId > <version > ${log4j.version}</version > </dependency > <dependency > <groupId > org.slf4j</groupId > <artifactId > slf4j-api</artifactId > <version > ${slf4j.version}</version > </dependency > <dependency > <groupId > org.slf4j</groupId > <artifactId > slf4j-log4j12</artifactId > <version > ${slf4j.version}</version > </dependency > <dependency > <groupId > org.mybatis</groupId > <artifactId > mybatis</artifactId > <version > 3.4.5</version > </dependency > <dependency > <groupId > commons-dbcp</groupId > <artifactId > commons-dbcp</artifactId > <version > 1.4</version > </dependency > </dependencies >
3.3.7.3 log4j.properties 1 2 3 4 5 6 7 8 9 10 11 12 13 14 15 16 17 log4j.rootCategory =debug, CONSOLE, LOGFILE log4j.logger.org.apache.axis.enterprise =FATAL, CONSOLE log4j.appender.CONSOLE =org.apache.log4j.ConsoleAppender log4j.appender.CONSOLE.layout =org.apache.log4j.PatternLayout log4j.appender.CONSOLE.layout.ConversionPattern =%d{ISO8601} %-6r [%15.15t] %-5p %30.30c %x - %m\n log4j.appender.LOGFILE =org.apache.log4j.FileAppender log4j.appender.LOGFILE.File =d:\axis.log log4j.appender.LOGFILE.Append =true log4j.appender.LOGFILE.layout =org.apache.log4j.PatternLayout log4j.appender.LOGFILE.layout.ConversionPattern =%d{ISO8601} %-6r [%15.15t] %-5p %30.30c %x - %m\n
3.3.7.4 activiti.cfg.xml 在 classpath 下创建 activiti.cgf.xml 文件:
1 2 3 4 5 6 7 8 9 10 11 12 <?xml version="1.0" encoding="UTF-8" ?> <beans xmlns ="http://www.springframework.org/schema/beans" xmlns:xsi ="http://www.w3.org/2001/XMLSchema-instance" xmlns:context ="http://www.springframework.org/schema/context" xmlns:tx ="http://www.springframework.org/schema/tx" xsi:schemaLocation ="http://www.springframework.org/schema/beans http://www.springframework.org/schema/beans/spring-beans.xsd http://www.springframework.org/schema/contex http://www.springframework.org/schema/context/spring-context.xsd http://www.springframework.org/schema/tx http://www.springframework.org/schema/tx/spring-tx.xsd" ></beans >
在 activiti.cfg.xml 中配置数据源和 processEngineConfiguration
数据源
1 2 3 4 5 6 7 8 <bean id ="dataSource" class ="org.apache.commons.dbcp.BasicDataSource" > <property name ="driverClassName" value ="com.mysql.jdbc.Driver" /> <property name ="url" value ="jdbc:mysql://localhost:3306/ itcast0711activiti" /> <property name ="username" value ="root" /> <property name ="password" value ="root" /> <property name =" maxActive" value ="3" /> <property name ="maxIdle" value ="1" /> </bean >
processEngineConfiguration
processEngineConfiguration 用来创建 ProcessEngine,在创建 ProcessEngine 时会执行数据库的操作。
1 2 3 4 5 6 <bean id ="processEngineConfiguration" class ="org.activiti.engine.impl.cfg.StandaloneProcessEngineConfiguration" > <property name ="dataSource" ref ="dataSource" /> <property name ="databaseSchemaUpdate" value ="true" /> </bean >
关于 processEngineConfiguration 中的 databaseSchemaUpdate 参数,通过此参数设计 activiti数据表的处理策略,参数如下:
false(默认):检查数据库表的版本和依赖库的版本, 如果版本不匹配就抛出异常。
true: 构建流程引擎时,执行检查,如果需要就执行更新。 如果表不存在,就创建。
create-drop: 构建流程引擎时创建数据库表, 关闭流程引擎时删除这些表。
drop-create:先删除表再创建表。
create: 构建流程引擎时创建数据库表, 关闭流程引擎时不删除这些表。
注意: 在 activiti.cfg.xml 配置文件中的 dataSource 和 processEngineConfiguration 也可以使用一次性配置出来。(写在一起了)
1 2 3 4 5 6 7 8 9 10 <bean id ="processEngineConfiguration" class ="org.activiti.engine.impl.cfg.StandaloneProcessEngineConfiguration" > <property name ="jdbcDriver" value ="com.mysql.jdbc.Driver" /> <property name ="jdbcUrl" value ="jdbc:mysql://localhost:3306/itcast0711activiti" /> <property name ="jdbcUsername" value ="root" /> <property name ="jdbcPassword" value ="root" /> <property name ="databaseSchemaUpdate" value ="true" /> </bean >
3.3.7.5 编写程序 创建 ProcessEngineConfiguration,通过 ProcessEngineConfiguration 创建 ProcessEngine,在创建ProcessEngine 时会自动创建数据库。
1 2 3 4 5 ProcessEngineConfiguration configuration = ProcessEngineConfiguration.createProcessEngineConfigurationFromResource("activiti.cfg.xml" )ProcessEngine processEngine = configuration.buildProcessEngine();System.out.println(processEngine);
说明:
2、 上 边 的 方法 createProcessEngineConfigurationFromResource 在执行时在activiti.cfg.xml 中找固定的名称 processEngineConfiguration也可以使用重载方法调用,这时可以不用限定bean中的 processEngineConfiguration 名称
此时我们查看数据库,创建了 25 张表,结果如下:
3.3.8 数据库表的命名规则 Activiti 的表都以 ACT_开头。 第二部分是表示表的用途的两个字母标识。 用途也和服务的 API 对应。
ACT_RE_*: ‘RE’表示 repository。 这个前缀的表包含了流程定义和流程静态资源 (图片,规则,等等)。ACT_RU_*: ‘RU’表示 runtime。 这些运行时的表,包含流程实例,任务,变量,异步任务,等运行中的数据。 Activiti 只在流程实例执行过程中保存这些数据, 在流程结束时就会删除这些记录。 这样运行时表可以一直很小速度很快。ACT_HI_*: ‘HI’表示 history。 这些表包含历史数据,比如历史流程实例, 变量,任务等等。ACT_GE_*: GE 表示 general。通用数据, 用于不同场景下。
第4章 Activiti 服务架构图
在新版本中,我们通过实验可以发现 IdentityService,FormService 两个 Serivce 都已经删除了。所以后面我们对于这两个 Service 也不讲解了,但老版本中还是有这两个 Service,同学们需要了解一下
用activiti,对上面的流程相关表的操作不需要通过DAO了,而是用相应的API操作。如果还要自己写CRUD,那用activiti也就没意义了。
4.1 activiti.cfg.xml activiti 的引擎配置文件,包括:ProcessEngineConfiguration 的定义、数据源定义、事务管理器等,此文件其实就是一个 spring 配置文件,下面是一个基本的配置只配置了 ProcessEngineConfiguration和数据源:
1 2 3 4 5 6 7 8 9 10 11 12 13 14 15 16 17 18 19 20 21 22 23 24 25 <beans xmlns ="http://www.springframework.org/schema/beans" xmlns:context ="http://www.springframework.org/schema/context" xmlns:tx ="http://www.springframework.org/schema/tx" xmlns:xsi ="http://www.w3.org/2001/XMLSchema-instance" xsi:schemaLocation ="http://www.springframework.org/schema/beans http://www.springframework.org/schema/beans/spring-beans-3.1.xsd http://www.springframework.org/schema/context http://www.springframework.org/schema/context/spring-context-3.1.xsd http://www.springframework.org/schema/tx http://www.springframework.org/schema/tx/spring-tx-3.1.xsd" > <bean id ="dataSource" class ="org.apache.commons.dbcp.BasicDataSource" > <property name ="driverClassName" value ="com.mysql.jdbc.Driver" /> <property name ="url" value ="jdbc:mysql://localhost:3306/activiti" /> <property name ="username" value ="root" /> <property name ="password" value ="mysql" /> </bean > <bean id ="processEngineConfiguration" class ="org.activiti.engine.impl.cfg.StandaloneProcessEngineConfiguration" > <property name ="dataSource" ref ="dataSource" /> <property name ="databaseSchemaUpdate" value ="true" /> </bean > </beans >
4.2 ProcessEngineConfiguration: 流程引擎的配置类,通过 ProcessEngineConfiguration 可以创建工作流引擎 ProceccEngine,常用的两种方法如下:
4.2.1 StandaloneProcessEngineConfiguration 通过 org.activiti.engine.impl.cfg.StandaloneProcessEngineConfiguration Activiti 可以单独运行,使用它创建的 ProcessEngine,Activiti 会自己处理事务。
通常在 activiti.cfg.xml 配置文件中定义一个 id 为 processEngineConfiguration 的 bean,这里会使用 spring 的依赖注入来构建引擎。
方法如下:
1 2 3 4 5 6 <bean id ="processEngineConfiguration" class ="org.activiti.engine.impl.cfg.StandaloneProcessEngineConfiguration" > <property name ="dataSource" ref ="dataSource" /> <property name ="databaseSchemaUpdate" value ="true" /> </bean >
4.2.2 SpringProcessEngineConfiguration 通过 org.activiti.spring.SpringProcessEngineConfiguration 与 Spring 整合。
创建 spring 与 activiti 的整合配置文件:
1 2 3 4 5 6 7 8 9 10 11 12 13 14 15 16 17 18 19 20 21 22 23 24 25 26 27 28 29 30 31 32 33 34 35 36 37 38 39 40 41 42 43 44 45 46 47 48 49 50 51 52 53 54 55 56 57 58 59 60 61 62 63 64 65 66 67 68 69 70 <beans xmlns ="http://www.springframework.org/schema/beans" xmlns:xsi ="http://www.w3.org/2001/XMLSchema-instance" xmlns:mvc ="http://www.springframework.org/schema/mvc" xmlns:context ="http://www.springframework.org/schema/context" xmlns:aop ="http://www.springframework.org/schema/aop" xmlns:tx ="http://www.springframework.org/schema/tx" xsi:schemaLocation ="http://www.springframework.org/schema/beans http://www.springframework.org/schema/beans/spring-beans-3.1.xsd http://www.springframework.org/schema/mvc http://www.springframework.org/schema/mvc/spring-mvc-3.1.xsd http://www.springframework.org/schema/context http://www.springframework.org/schema/context/spring-context-3.1.xsd http://www.springframework.org/schema/aop http://www.springframework.org/schema/aop/spring-aop-3.1.xsd http://www.springframework.org/schema/tx http://www.springframework.org/schema/tx/spring-tx-3.1.xsd " > <bean id ="processEngineConfiguration" class ="org.activiti.spring.SpringProcessEngineConfiguration" > <property name ="dataSource" ref ="dataSource" /> <property name ="transactionManager" ref ="transactionManager" /> <property name ="databaseSchemaUpdate" value ="drop-create" /> <property name ="jobExecutorActivate" value ="false" /> </bean > <bean id ="processEngine" class ="org.activiti.spring.ProcessEngineFactoryBean" > <property name ="processEngineConfiguration" ref ="processEngineConfiguration" /> </bean > <bean id ="repositoryService" factory-bean ="processEngine" factory-method ="getRepositoryService" /> <bean id ="runtimeService" factory-bean ="processEngine" factory-method ="getRuntimeService" /> <bean id ="taskService" factory-bean ="processEngine" factory-method ="getTaskService" /> <bean id ="historyService" factory-bean ="processEngine" factory-method ="getHistoryService" /> <bean id ="identityService" factory-bean ="processEngine" factory-method ="getIdentityService" /> <bean id ="managementService" factory-bean ="processEngine" factory-method ="getManagementService" /> <bean id ="dataSource" class ="org.apache.commons.dbcp.BasicDataSource" > <property name ="driverClassName" value ="com.mysql.jdbc.Driver" /> <property name ="url" value ="jdbc:mysql://localhost:3306/activiti" /> <property name ="username" value ="root" /> <property name ="password" value ="mysql" /> <property name ="maxActive" value ="3" /> <property name ="maxIdle" value ="1" /> </bean > <bean id ="transactionManager" class ="org.springframework.jdbc.datasource.DataSourceTransactionManager" > <property name ="dataSource" ref ="dataSource" /> </bean > <tx:advice id ="txAdvice" transaction-manager ="transactionManager" > <tx:attributes > <tx:method name ="save*" propagation ="REQUIRED" /> <tx:method name ="insert*" propagation ="REQUIRED" /> <tx:method name ="delete*" propagation ="REQUIRED" /> <tx:method name ="update*" propagation ="REQUIRED" /> <tx:method name ="find*" propagation ="SUPPORTS" read-only ="true" /> <tx:method name ="get*" propagation ="SUPPORTS" read-only ="true" /> </tx:attributes > </tx:advice > <aop:config proxy-target-class ="true" > <aop:advisor advice-ref ="txAdvice" pointcut ="execution(* com.itheima.ihrm.service.impl.*.*(..))" /> </aop:config > </beans >
4.2.3 创建 processEngineConfiguration 1 ProcessEngineConfiguration configuration = ProcessEngineConfiguration.createProcessEngineConfigurationFromResource("activiti.cfg.xml" )
上边的代码要求 activiti.cfg.xml 中必须有一个 processEngineConfiguration 的 bean
也可以使用下边的方法,更改 bean 的名字:
1 ProcessEngineConfiguration.createProcessEngineConfigurationFromResource(String resource, String beanName);
4.3 ProcessEngine 工作流引擎,相当于一个门面接口,通过 ProcessEngineConfiguration 创建 processEngine,通过ProcessEngine 创建各个 service 接口。
4.3.1一般创建方式 1 2 ProcessEngine processEngine = processEngineConfiguration.buildProcessEngine();
4.3.2简单创建方式 将 activiti.cfg.xml 文件名及路径固定,且 activiti.cfg.xml 文件中有 processEngineConfiguration的配置,可以使用如下代码创建 processEngine:
1 2 3 ProcessEngine processEngine = ProcessEngines.getDefaultProcessEngine();System.out.println(processEngine);
4.4 Service 4.4.1 Service 创建方式 通过 ProcessEngine 创建 Service,Service 是工作流引擎提供用于进行工作流部署、执行、管理的服务接口。
1 2 3 4 RuntimeService runtimeService = processEngine.getRuntimeService();RepositoryService repositoryService = processEngine.getRepositoryService();TaskService taskService = processEngine.getTaskService();……
4.4.2 Service 总览
注:红色标注为常用 service。
4.4.3 RepositoryService 是 activiti 的资源管理类,提供了管理和控制流程发布包和流程定义的操作。使用工作流建模工具设计的业务流程图需要使用此service 将流程定义文件的内容部署到计算机。
除了部署流程定义以外还可以:
查询引擎中的发布包和流程定义。
暂停或激活发布包,对应全部和特定流程定义。 暂停意味着它们不能再执行任何操作了,激活是对应的反向操作。
获得多种资源,像是包含在发布包里的文件, 或引擎自动生成的流程图。
获得流程定义的 pojo 版本, 可以用来通过 java 解析流程,而不必通过 xml。
4.4.4 RuntimeService 它是 activiti 的流程运行管理类。可以从这个服务类中获取很多关于流程执行相关的信息
4.4.5 TaskService 是 activiti 的任务管理类。可以从这个类中获取任务的信息。
4.4.6 HistoryService 是 activiti 的历史管理类,可以查询历史信息,执行流程时,引擎会保存很多数据(根据配置),比如流程实例启动时间,任务的参与者, 完成任务的时间,每个流程实例的执行路径,等等。 这个服务主要通过查询功能来获得这些数据。
4.4.7 ManagementService 是 activiti 的引擎管理类,提供了对 Activiti 流程引擎的管理和维护功能,这些功能不在工作流驱动的应用程序中使用,主要用于 Activiti 系统的日常维护。
第5章 Activiti 入门体验 5.1 流程定义 5.1.1 Activiti-Designer 使用 5.1.1.1 Palette(画板) 在 eclipse 或 idea 中安装 activiti-designer 插件即可使用,画板中包括以下结点:
Connection—连接
Event—事件
Task—任务
Gateway—网关
Container—容器
Boundary event—边界事件
Intermediate event- -中间事件
流程图设计完毕保存生成.bpmn 文件。
5.1.1.2 新建流程(IDEA 工具) 首先选中存放图形的目录(本次我们选择 resources 下的 bpmn 目录),点击菜单:New-BpmnFile,如
弹出如下图所示框:
起完名字 holiday 后(默认扩展名为 bpmn),就可以看到进入了流程设计页面,如图所示:
5.1.1.3 新建流程(Eclipse 工具) 首先选中存放图形的目录(本次我们选择 resources 下的 bpmn 目录), File-New-Other 菜单,打开如下窗口
创建成功:
左侧区域是绘图区,右侧区域是 palette 画板区域
鼠标先点击画板的元素即可在左侧绘图。
5.1.2 绘制流程
图形绘制好后会生成两个文件:
自动生成图形,需要设置 eclipse:
5.1.3 指定流程定义 key 流程定义 key 即流程定义的标识,在 eclipse 中通过 properties 视图查看流程的 key
5.1.4 指定任务负责人 在 properties 视图指定每个任务结点的负责人,比如下边是填写请假单的负责人为 zhangsan
5.2 部署流程定义 部署流程定义就是要将上边绘制的图形即流程定义(.bpmn)部署在工作流程引擎 activiti 中,方法如下:
使用 ProcessEngine 创建 RepositoryService,代码如下:
1 2 3 4 5 6 7 8 9 10 RepositoryService repositoryService = processEngine.getRepositoryService();Deployment deployment = repositoryService.createDeployment() .addClasspathResource("diagram/myholiday.bpmn" ) .addClasspathResource("diagram/myholiday.png" ) .name("请假申请流程" ) .deploy(); System.out.println("流程部署id:" + deployment.getId()); System.out.println("流程部署名称:" + deployment.getName());
执行此操作后 activiti 会将上边代码中指定的 bpm 文件和图片文件保存在 activiti 数据库。
5.3 启动一个流程实例 流程定义部署在 activiti 后就可以通过工作流管理业务流程了,也就是说上边部署的请假申请流程可以使用了。
针对该流程,启动一个流程表示发起一个新的请假申请单,这就相当于 java 类与 java 对象的关系,类定义好后需要 new 创建一个对象使用,当然可以 new 多个对象。对于请假申请流程,张三发起一个请假申请单需要启动一个流程实例,请假申请单发起一个请假单也需要启动一个流程实例。
代码如下:
1 2 3 4 5 6 7 8 9 10 11 12 13 14 15 @Test public void startProcessInstance () { RuntimeService runtimeService = processEngine.getRuntimeService(); ProcessInstance processInstance = runtimeService .startProcessInstanceByKey("myholiday01" ); System.out.println(" 流程定义 id : " + processInstance.getProcessDefinitionId()); System.out.println("流程实例id:" + processInstance.getId()); System.out.println(" 当前活动 Id : " + processInstance.getActivityId()); }
5.4 任务查询 流程启动后,各各任务的负责人就可以查询自己当前需要处理的任务,查询出来的任务都是该用户的待办任务。
1 2 3 4 5 6 7 8 9 10 11 12 13 14 15 16 17 18 19 @Test public void findPersonalTaskList () { String assignee = "zhangsan" ; TaskService taskService = processEngine.getTaskService(); List<Task> list = taskService.createTaskQuery() .processDefinitionKey("myholiday01" ) .taskAssignee(assignee) .list(); for (Task task : list) { System.out.println(" 流 程 实 例 id : " + task.getProcessInstanceId()); System.out.println("任务id:" + task.getId()); System.out.println("任务负责人:" + task.getAssignee()); System.out.println("任务名称:" + task.getName()); } }
5.5 任务处理 任务负责人查询待办任务,选择任务进行处理,完成任务。
1 2 3 4 5 6 7 8 9 10 11 @Test public void completTask () { String taskId = "8305" ; TaskService taskService = processEngine.getTaskService(); taskService.complete(taskId); System.out.println("完成任务id=" +taskId); }
第6章 流程定义 6.1流程定义 6.1.1 什么是流程定义 流程定义是线下按照 bpmn2.0 标准去描述 业务流程,通常使用 activiti-explorer(web 控制台)或 activiti-eclipse-designer 插件对业务流程进行建模,这两种方式都遵循 bpmn2.0 标准。本教程使用activiti-eclipse-designer 插件完成流程建模。使用 designer 设计器绘制流程,会生成两个文件:.bpmn和.png
6.1.2 .bpmn 文件 使用 activiti-desinger 设计业务流程,会生成.bpmn 文件,首先将 holiday.bpmn 文件改名为 holiday.xml,如下图:
.bpmn 内容如下:
1 2 3 4 5 6 7 8 9 10 11 12 13 14 15 16 17 18 19 20 21 22 23 24 25 26 27 28 29 30 31 32 33 34 35 36 37 38 39 40 41 42 43 44 45 46 47 48 49 50 51 52 53 54 55 56 57 58 59 60 61 <?xml version="1.0" encoding="UTF-8" standalone="yes" ?> <definitions xmlns ="http://www.omg.org/spec/BPMN/20100524/MODEL" xmlns:activiti ="http://activiti.org/bpmn" xmlns:bpmndi ="http://www.omg.org/spec/BPMN/20100524/DI" xmlns:omgdc ="http://www.omg.org/spec/DD/20100524/DC" xmlns:omgdi ="http://www.omg.org/spec/DD/20100524/DI" xmlns:tns ="http://www.activiti.org/test" xmlns:xsd ="http://www.w3.org/2001/XMLSchema" xmlns:xsi ="http://www.w3.org/2001/XMLSchema-instance" expressionLanguage ="http://www.w3.org/1999/XPath" id ="m1539820628606" name ="" targetNamespace ="http://www.activiti.org/test" typeLanguage ="http://www.w3.org/2001/XMLSchema" > <process id ="myProcess_1" isClosed ="false" isExecutable ="true" processType ="None" > <startEvent id ="_2" name ="StartEvent" /> <userTask activiti:exclusive ="true" id ="_3" name ="UserTask" /> <sequenceFlow id ="_4" sourceRef ="_2" targetRef ="_3" /> <userTask activiti:exclusive ="true" id ="_5" name ="UserTask" /> <sequenceFlow id ="_6" sourceRef ="_3" targetRef ="_5" /> </process > <bpmndi:BPMNDiagram documentation ="background=#FFFFFF;count=1;horizontalcount=1;orientation=0;width=842 .4;height=1195.2;imageableWidth=832.4;imageableHeight=1185.2;imageableX=5.0;imageab leY=5.0" id ="Diagram-_1" name ="New Diagram" > <bpmndi:BPMNPlane bpmnElement ="myProcess_1" > <bpmndi:BPMNShape bpmnElement ="_2" id ="Shape-_2" > <omgdc:Bounds height ="32.0" width ="32.0" x ="200.0" y ="70.0" /> <bpmndi:BPMNLabel > <omgdc:Bounds height ="32.0" width ="32.0" x ="0.0" y ="0.0" /> </bpmndi:BPMNLabel > </bpmndi:BPMNShape > <bpmndi:BPMNShape bpmnElement ="_3" id ="Shape-_3" > <omgdc:Bounds height ="55.0" width ="85.0" x ="165.0" y ="175.0" /> <bpmndi:BPMNLabel > <omgdc:Bounds height ="55.0" width ="85.0" x ="0.0" y ="0.0" /> </bpmndi:BPMNLabel > </bpmndi:BPMNShape > <bpmndi:BPMNShape bpmnElement ="_5" id ="Shape-_5" > <omgdc:Bounds height ="55.0" width ="85.0" x ="160.0" y ="295.0" /> <bpmndi:BPMNLabel > <omgdc:Bounds height ="55.0" width ="85.0" x ="0.0" y ="0.0" /> </bpmndi:BPMNLabel > </bpmndi:BPMNShape > <bpmndi:BPMNEdge bpmnElement ="_4" id ="BPMNEdge__4" sourceElement ="_2" targetElement ="_3" > <omgdi:waypoint x ="216.0" y ="102.0" /> <omgdi:waypoint x ="216.0" y ="175.0" /> <bpmndi:BPMNLabel > <omgdc:Bounds height ="0.0" width ="0.0" x ="0.0" y ="0.0" /> </bpmndi:BPMNLabel > </bpmndi:BPMNEdge > <bpmndi:BPMNEdge bpmnElement ="_6" id ="BPMNEdge__6" sourceElement ="_3" targetElement ="_5" > <omgdi:waypoint x ="205.0" y ="230.0" /> <omgdi:waypoint x ="205.0" y ="295.0" /> <bpmndi:BPMNLabel > <omgdc:Bounds height ="0.0" width ="0.0" x ="0.0" y ="0.0" /> </bpmndi:BPMNLabel > </bpmndi:BPMNEdge > </bpmndi:BPMNPlane > </bpmndi:BPMNDiagram > </definitions >
BPMN 2.0 根节点是 definitions 节点。 这个元素中,可以定义多个流程定义(不过我们建议每个文件只包含一个流程定义, 可以简化开发过程中的维护难度)。
注意,definitions 元素 最少也要包含 xmlns 和 targetNamespace 的声明。 targetNamespace 可以是任意值,它用来对流程实例进行分类。
流程定义部分:定义了流程每个结点的描述及结点之间的流程流转。
流程布局定义:定义流程每个结点在流程图上的位置坐标等信息。
6.1.3 .png 图片文件 Eclipse 工具中的操作
使用 activiti-designer 设计流程图时自动生成需在 eclipse 中进行配置:
使用 designer 设计流程图的同时自动生成与 bpmn 文件同名的图片文件(.png)
由 activiti 自动生成图形
IDEA 工具中的操作方式
第二步:在 holiday.xml 文件上面,点右键并选择 Diagrams 菜单,再选择 Show BPMN2.0 Designer…
第三步:打开后的效果图如下:
第四步:
点击 Export To File 的小图标,如下:
打开如下窗口,注意填写文件名及扩展名,选择好保存图片的位置:
第五步:中文乱码的解决
1.打开 IDEA 安装路径,找到如下的安装目录
根据自己所安装的版本来决定,我使用的是 64 位的 idea,所以在 idea64.exe.vmoptions 文件的最后一行追加一条命令: -Dfile.encoding=UTF-8
如下所示:
一定注意,不要有空格,否则重启 IDEA 时会打不开,然后 重启 IDEA,把原来的 png 图片删掉,再重新生成,即可解决乱码问题
6.2流程定义部署 6.2.1 什么是流程定义部署 将线下定义的流程部署到 activiti 数据库中,这就是流程定义部署,通过调用 activiti 的 api 将流程定义的 bpmn 和 png 两个文件一个一个添加部署到 activiti 中,也可以将两个文件打成 zip 包进行部署。
6.2.2 单个文件部署方式 分别将 bpmn 文件和 png图片文件部署。
1 2 3 4 5 6 7 8 9 10 11 12 13 14 15 16 17 18 19 20 21 22 23 24 25 @Test public void deployProcess () { RepositoryService repositoryService = processEngine .getRepositoryService(); InputStream inputStream_bpmn = this .getClass() .getClassLoader() .getResourceAsStream( "diagram/holiday.bpmn" ); InputStream inputStream_png = this .getClass() .getClassLoader() .getResourceAsStream( " diagram/holiday.png" ); Deployment deployment = repositoryService.createDeployment() .addInputStream("holiday.bpmn" , inputStream_bpmn) .addInputStream("holiday.png" , inputStream_png) .deploy(); System.out.println("流程部署id:" + deployment.getId()); System.out.println("流程部署名称:" + deployment.getName()); }
执行此操作后 activiti 会将上边代码中指定的 bpm 文件和图片文件保存在 activiti 数据库
6.2.3 压缩包部署方式 将 holiday.bpmn 和 holiday.png 压缩成 zip 包。
1 2 3 4 5 6 7 8 9 10 11 12 13 14 15 16 17 18 19 @Test public void deployProcessByZip () { InputStream inputStream = this .getClass() .getClassLoader() .getResourceAsStream( " diagram/holiday.zip" ); ZipInputStream zipInputStream = new ZipInputStream (inputStream); RepositoryService repositoryService = processEngine .getRepositoryService(); Deployment deployment = repositoryService.createDeployment() .addZipInputStream(zipInputStream) .deploy(); System.out.println("流程部署id:" + deployment.getId()); System.out.println("流程部署名称:" + deployment.getName()); }
执行此操作后 activiti 会将上边代码中指定的 bpm 文件和图片文件保存在 activiti 数据库。
6.2.4 操作数据表 流程定义部署后操作 activiti 数据表如下:
1 2 3 SELECT * FROM act_re_deployment #流程定义部署表,记录流程部署信息SELECT * FROM act_re_procdef #流程定义表,记录流程定义信息SELECT * FROM act_ge_bytearray #资源表
说明:
act_re_deployment 和 act_re_procdef 一对多关系,一次部署在流程部署表生成一条记录,但一次部署可以部署多个流程定义,每个流程定义在流程定义表生成一条记录。每一个流程定义在
act_ge_bytearray 会存在两个资源记录,bpmn 和 png。
建议:一次部署一个流程,这样部署表和流程定义表是一对一有关系,方便读取流程部署及流程定义信息。
6.3流程定义查询 查询部署的流程定义。
1 2 3 4 5 6 7 8 9 10 11 12 13 14 15 16 17 18 19 20 21 22 23 24 25 @Test public void queryProceccDefinition () { String processDefinitionKey = "holiday" ; RepositoryService repositoryService = processEngine .getRepositoryService(); ProcessDefinitionQuery processDefinitionQuery = repositoryService .createProcessDefinitionQuery(); List<ProcessDefinition> list = processDefinitionQuery .processDefinitionKey(processDefinitionKey) .orderByProcessDefinitionVersion().desc().list(); for (ProcessDefinition processDefinition : list) { System.out.println("------------------------" ); System.out.println(" 流 程 部 署 id : " + processDefinition.getDeploymentId()); System.out.println("流程定义id:" + processDefinition.getId()); System.out.println("流程定义名称:" + processDefinition.getName()); System.out.println("流程定义key:" + processDefinition.getKey()); System.out.println("流程定义版本:" + processDefinition.getVersion()); } }
6.4流程定义删除 删除已经部署成功的流程定义。
1 2 3 4 5 6 7 8 9 10 public void deleteDeployment () { String deploymentId = "8801" ; RepositoryService repositoryService = processEngine.getRepositoryService(); repositoryService.deleteDeployment(deploymentId); }
说明:
使用 repositoryService 删除流程定义
如果该流程定义下没有正在运行的流程,则可以用普通删除。
如果该流程定义下存在已经运行的流程,使用普通删除报错,可用级联删除方法将流程及相关记录全部删除。项目开发中使用级联删除的情况比较多,删除操作一般只开放给超级管理员使用。
6.5流程定义资源查询 6.5.1 方式 1 通过流程定义对象获取流程定义资源,获取 bpmn 和 png。
1 2 3 4 5 6 7 8 9 10 11 12 13 14 15 16 17 18 19 20 21 22 23 24 25 26 27 28 29 30 31 32 33 34 35 36 37 38 @Test public void getProcessResources () throws IOException { String processDefinitionId = "" ; RepositoryService repositoryService = processEngine.getRepositoryService(); ProcessDefinition processDefinition = repositoryService .createProcessDefinitionQuery() .processDefinitionId(processDefinitionId).singleResult(); String resource_bpmn = processDefinition.getResourceName(); String resource_png = processDefinition.getDiagramResourceName(); System.out.println("bpmn:" + resource_bpmn); System.out.println("png:" + resource_png); File file_png = new File ("d:/purchasingflow01.png" ); File file_bpmn = new File ("d:/purchasingflow01.bpmn" ); InputStream resourceAsStream = null ; resourceAsStream = repositoryService.getResourceAsStream(processDefinition.getDeploymentId(), resource_bpmn); FileOutputStream fileOutputStream = new FileOutputStream (file_bpmn); byte [] b = new byte [1024 ]; int len = -1 ; while ((len = resourceAsStream.read(b, 0 , 1024 )) != -1 ) { fileOutputStream.write(b, 0 , len); } resourceAsStream = repositoryService.getResourceAsStream(processDefinition.getDeploymentId(), resource_png); fileOutputStream = new FileOutputStream (file_png); while ((len = resourceAsStream.read(b, 0 , 1024 )) != -1 ) { fileOutputStream.write(b, 0 , len); } }
6.5.2 方式 2 通过查询流程部署信息获取流程定义资源
1 2 3 4 5 6 7 8 9 10 11 12 13 14 15 16 17 18 19 20 21 22 23 24 25 26 27 28 29 30 @Test public void getProcessResources () throws IOException { String deploymentId = "9001" ; RepositoryService repositoryService = processEngine .getRepositoryService(); List<String> resources = repositoryService.getDeploymentResourceNames(deploymentId); String resource_image = null ; for (String resource_name :resources){ if (resource_name.indexOf(".png" )>=0 ){ resource_image = resource_name; } } InputStream inputStream = repositoryService.getResourceAsStream(deploymentId, resource_image); File exportFile = new File ("d:/holiday.png" ); FileOutputStream fileOutputStream = new FileOutputStream (exportFile); byte [] buffer = new byte [1024 ]; int len = -1 ; while ((len = inputStream.read(buffer))!=-1 ){ fileOutputStream.write(buffer, 0 , len); } inputStream.close(); fileOutputStream.close(); }
说明:
deploymentId 为流程部署 ID
resource_name 为 act_ge_bytearray 表中 NAME_列的值
使用 repositoryService 的 getDeploymentResourceNames方法可以获取指定部署下得所有文件的名
使用 repositoryService 的 getResourceAsStream 方法传入部署 ID和资源图片名称可以获取部署下
最后的将输入流中的图片资源进行输出。
6.6流程历史信息的查看 即使流程定义已经删除了,流程执行的历史信息通过前面的分析,依然保存在 activiti 的 act_hi_*相
1 2 3 4 5 6 7 8 9 10 11 12 13 14 public void testHistoric01 () { HistoryService historyService = pe.getHistoryService(); HistoricActivityInstanceQuery query = historyService.createHistoricActivityInstanceQuery(); query.processInstanceId("1501" ); List<HistoricActivityInstance> list = query.list(); for (HistoricActivityInstance ai :list){ System.out.println(ai.getActivityId()); System.out.println(ai.getActivityName()); System.out.println(ai.getProcessDefinitionId()); System.out.println(ai.getProcessInstanceId()); System.out.println("==============================" ); } }
Activiti进阶篇 1.流程实例 1.1 什么是流程实例 流程实例(ProcessInstance)代表流程定义的执行实例,一个流程实例包括了所有的运行节点,我们可以利用这个对象来了解当前流程实例的进度等信息 例如:用户或者程序安装流程定义的内容发起了一个流程,这个就是一个流程实例
比如请假流程和审核人是定的,对应流程的定义,但是公司的员工,每个人都可以填写请假流程,就是对应不同的实例
1.2 业务管理 流程定义部署在Activiti后,我们就可以在系统中通过Activiti去管理流程的执行,但是如果我们要将我们的流程实例和业务数据关联,这时我们需要使用到Activiti中预留的BusinessKey(业务标识)来关联
就是需要把业务系统和activiti关联起来。存储每个流程额外的信息。activiti只是管理流程的自动化,不会存储具体的业务信息。
所以必须要把业务系统的id存到activiti,这样才能知道是XX员工的请假流程在不断往后推进
实现代码:
1 2 3 4 5 6 7 8 9 10 11 12 13 14 @Test public void test01 () { ProcessEngine processEngine = ProcessEngines.getDefaultProcessEngine(); RuntimeService runtimeService = processEngine.getRuntimeService(); ProcessInstance instance = runtimeService.startProcessInstanceByKey("evection" , "1001" ); System.out.println("businessKey = " +instance.getBusinessKey()); }
1.3 流程实例的挂起和激活 在实际场景中可能由于流程变更需要将当前运行的流程暂停而不是删除,流程暂停后将不能继续执行。
1.3.1 全部流程挂起 操作流程的定义为挂起状态,该流程定义下边所有的流程实例全部暂停。
流程定义为挂起状态,该流程定义将不允许启动新的流程实例,同时该流程定义下的所有的流程实例都将全部挂起暂停执行。
1 2 3 4 5 6 7 8 9 10 11 12 13 14 15 16 17 18 19 20 21 22 23 24 25 26 27 28 29 30 31 32 33 34 35 @Test public void test02 () { ProcessEngine engine = ProcessEngines.getDefaultProcessEngine(); RepositoryService repositoryService = engine.getRepositoryService(); ProcessDefinition processDefinition = repositoryService.createProcessDefinitionQuery() .processDefinitionKey("evection" ) .singleResult(); boolean suspended = processDefinition.isSuspended(); String id = processDefinition.getId(); if (suspended){ repositoryService.activateProcessDefinitionById( id ,true ,null ); System.out.println("流程定义:" + id + ",已激活" ); }else { repositoryService.suspendProcessDefinitionById( id ,true ,null ); System.out.println("流程定义:" + id + ",已挂起" ); } }
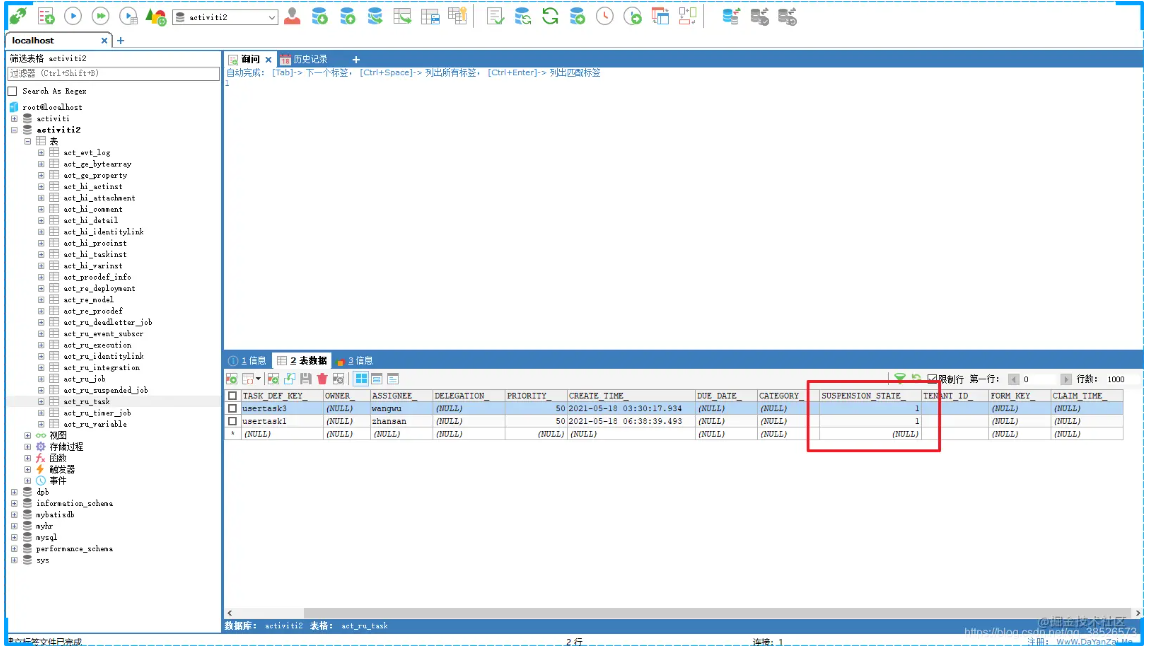
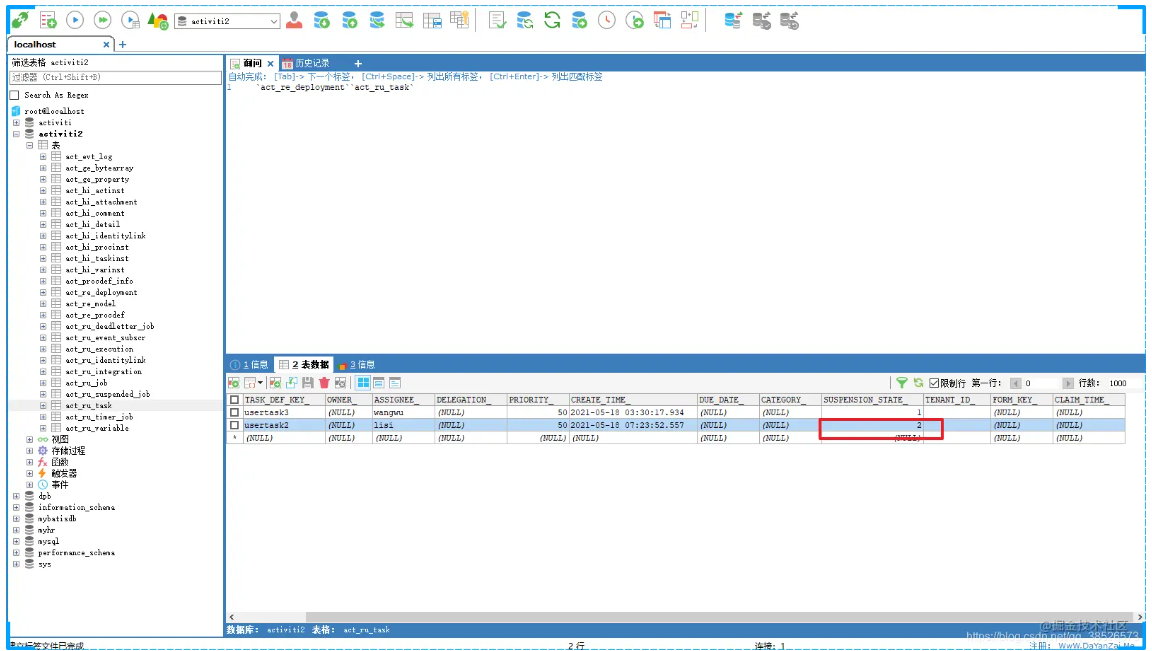
挂起流程定义后,对于的实例对象中的状态会修改为2
然后再去操作对于的流程实例会抛异常信息
然后就是业务流程可以正常处理了
1.3.2 单个实例挂起 操作流程实例对象,针对单个流程执行挂起操作,某个流程实例挂起则此流程不再继续执行,当前流程定义的其他流程实例是不受干扰的。完成该流程实例的当前任务会抛异常
1 2 3 4 5 6 7 8 9 10 11 12 13 14 15 16 17 18 19 20 21 22 23 24 25 26 27 28 29 @Test public void test03 () { ProcessEngine engine = ProcessEngines.getDefaultProcessEngine(); RuntimeService runtimeService = engine.getRuntimeService(); ProcessInstance processInstance = runtimeService.createProcessInstanceQuery() .processInstanceId("25001" ) .singleResult(); boolean suspended = processInstance.isSuspended(); String id = processInstance.getId(); if (suspended){ runtimeService.activateProcessInstanceById(id); System.out.println("流程定义:" + id + ",已激活" ); }else { runtimeService.suspendProcessInstanceById(id); System.out.println("流程定义:" + id + ",已挂起" ); } } 复制代码
然后我们可以在数据库中查看到状态的更新
2.个人任务 2.1 分配任务责任人 2.1.1 固定分配 在进行业务流程建模的时候指定固定的任务负责人:
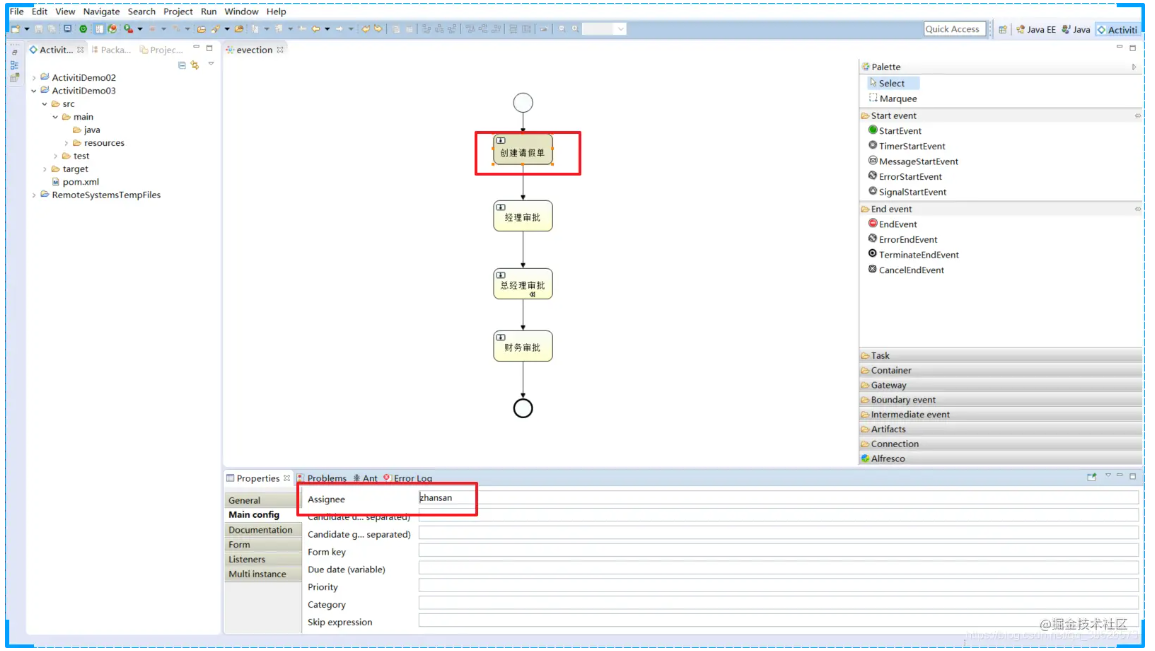
在Properties视图中,填写Assiginee项为任务负责人
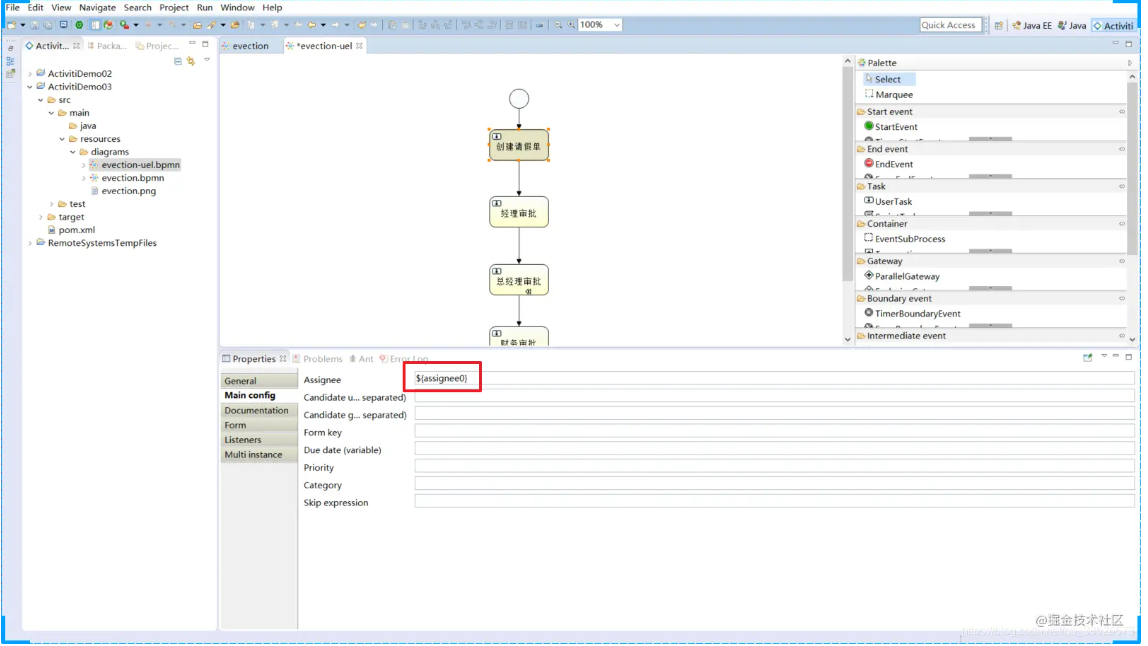
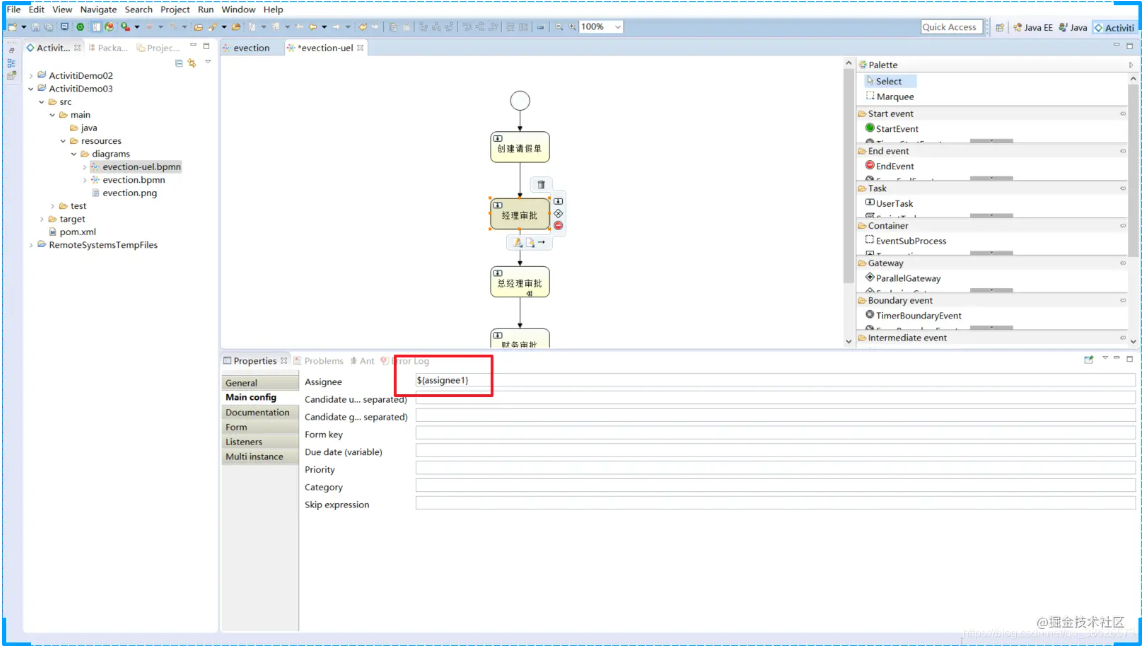
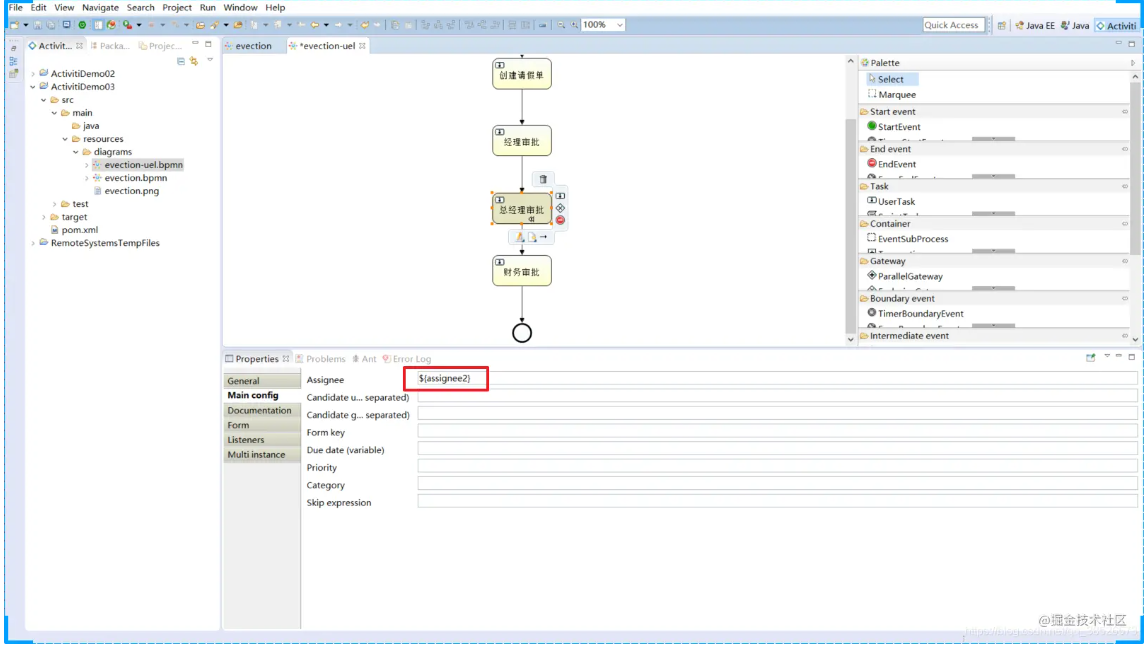
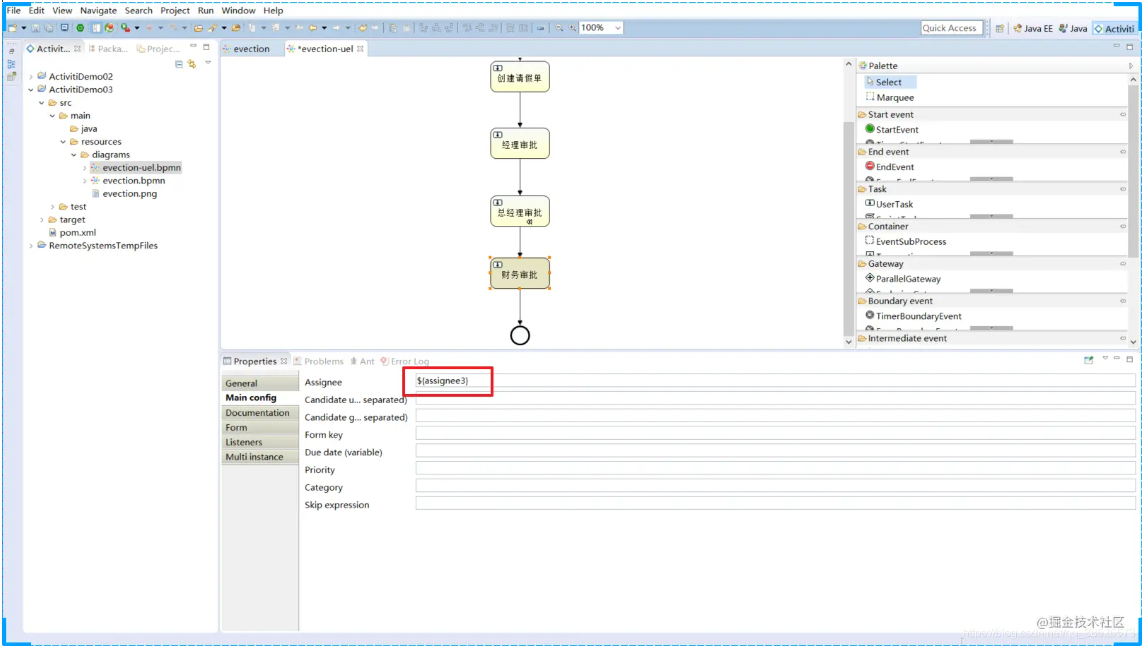
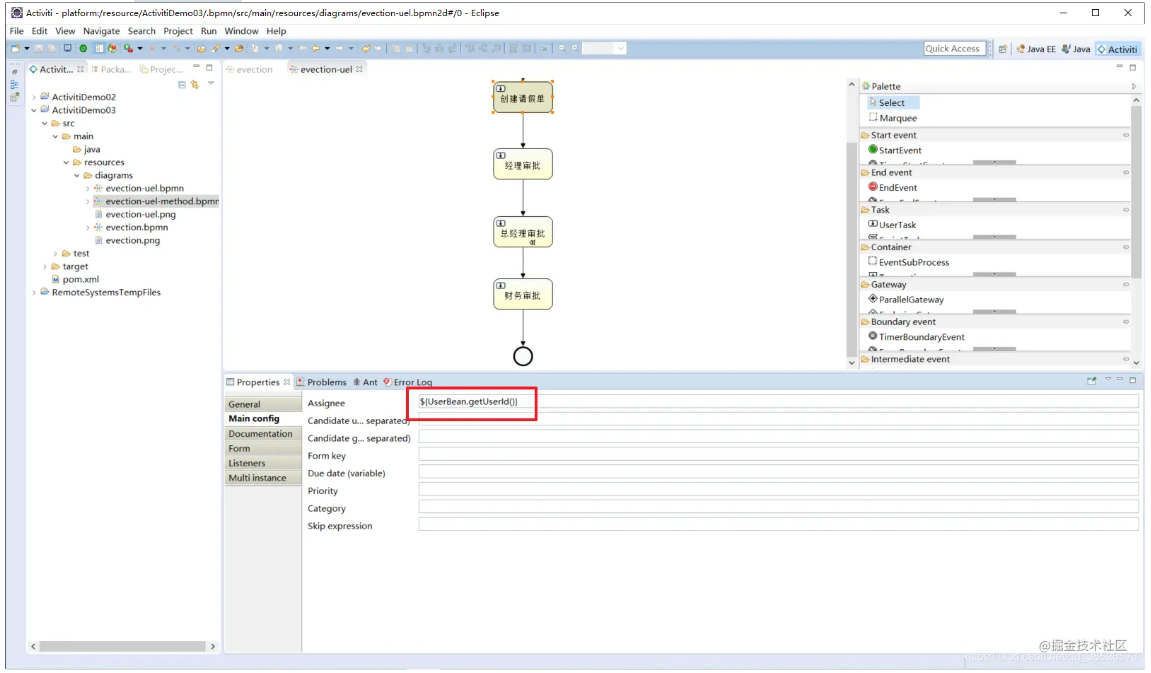
2.1.2 表达式分配 在Activiti中支持使用UEL表达式,UEL表达式是Java EE6 规范的一部分, UEL(Unified Expression Language) 即 统一表达式语音, Activiti支持两种UEL表达式: UEL-value 和UEL-method
UEL-value
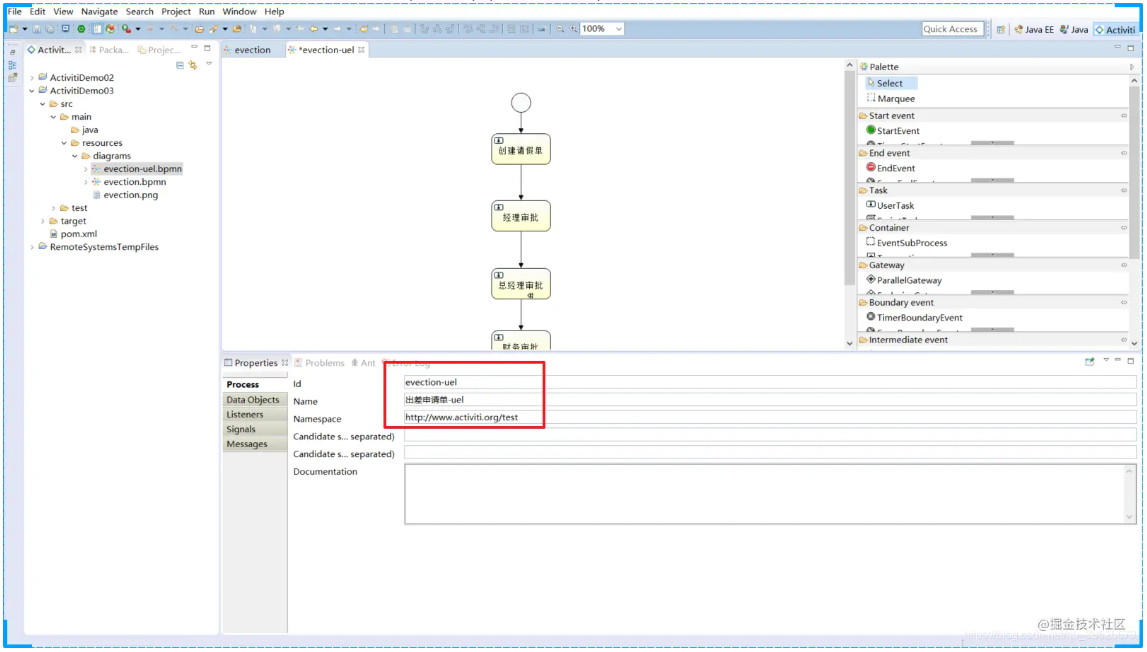
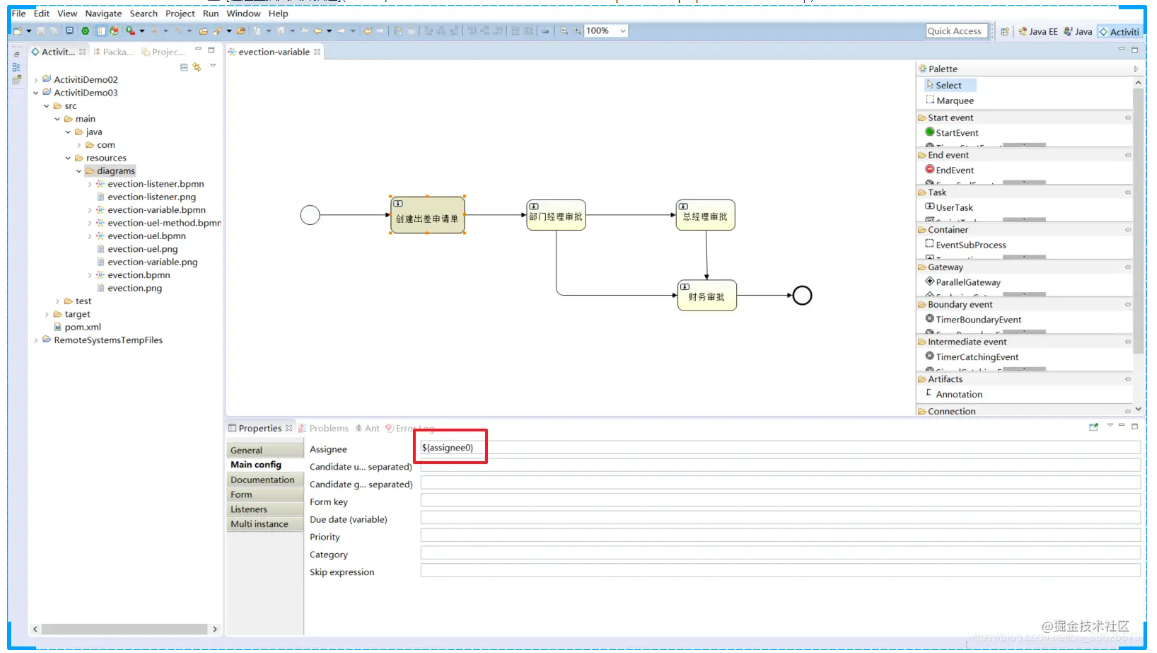
在assignee中使用流程变量处理
然后我们可以来操作
首先我们需要将定义的流程部署到Activiti数据库中
1 2 3 4 5 6 7 8 9 10 11 12 13 14 15 16 17 18 19 @Test public void test01 () { ProcessEngine engine = ProcessEngines.getDefaultProcessEngine(); RepositoryService service = engine.getRepositoryService(); Deployment deploy = service.createDeployment() .addClasspathResource("bpmn/evection-uel.bpmn" ) .addClasspathResource("bpmn/evection-uel.png" ) .name("出差申请流程-UEL" ) .deploy(); System.out.println("流程部署的id:" + deploy.getId()); System.out.println("流程部署的名称:" + deploy.getName()); }
部署成功后我们需要启动一个新的流程实例,然后在流程实例创建的其实关联UEL表达式
1 2 3 4 5 6 7 8 9 10 11 12 13 14 15 16 17 18 19 @Test public void test02 () { ProcessEngine processEngine = ProcessEngines.getDefaultProcessEngine(); RuntimeService runtimeService = processEngine.getRuntimeService(); Map<String,Object> map = new HashMap <>(); map.put("assignee0" ,"张三" ); map.put("assignee1" ,"李四" ); map.put("assignee2" ,"王五" ); map.put("assignee3" ,"赵财务" ); runtimeService.startProcessInstanceByKey("evection-uel" ,map); }
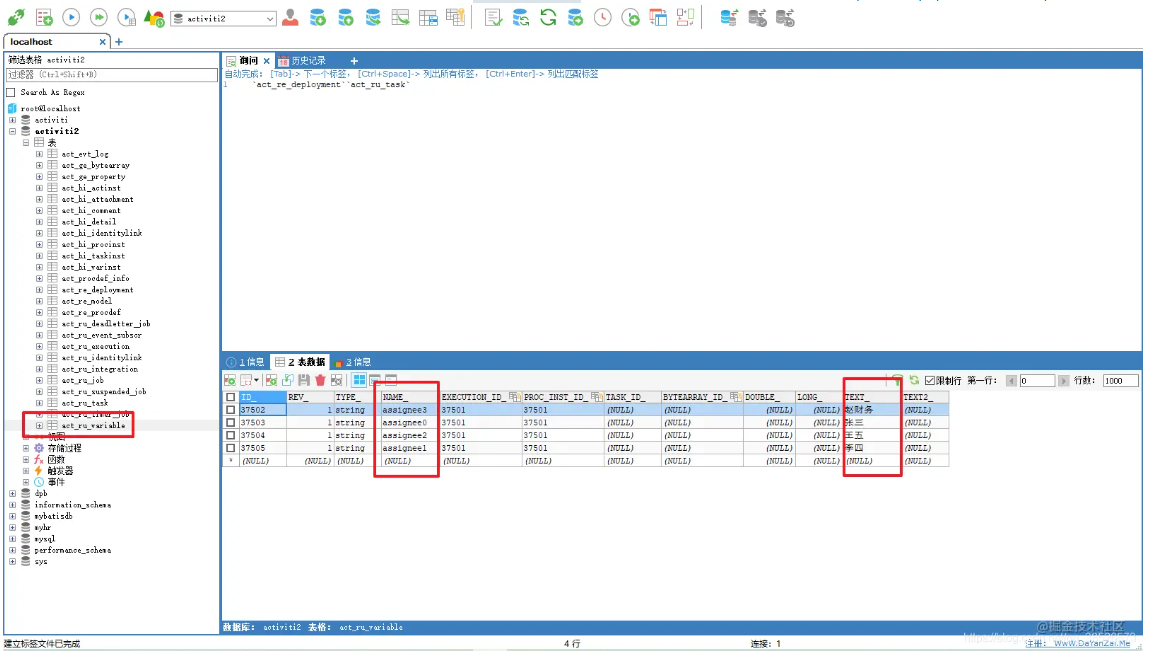
启动成功后我们在 act_ru_variable中可以看到UEL表达式对应的赋值信息
UEL-method
userBean 是 spring 容器中的一个 bean,表示调用该 bean 的 getUserId()方法。
UEL-method 与 UEL-value 结合 再比如: ${ldapService.findManagerForEmployee(emp)} ldapService 是 spring 容器的一个 bean,findManagerForEmployee 是该 bean 的一个方法,emp 是 activiti 流程变量, emp 作为参数传到 ldapService.findManagerForEmployee 方法中。
其它 表达式支持解析基础类型、 bean、 list、 array 和 map,也可作为条件判断。 如下: ${order.price > 100 && order.price < 250}
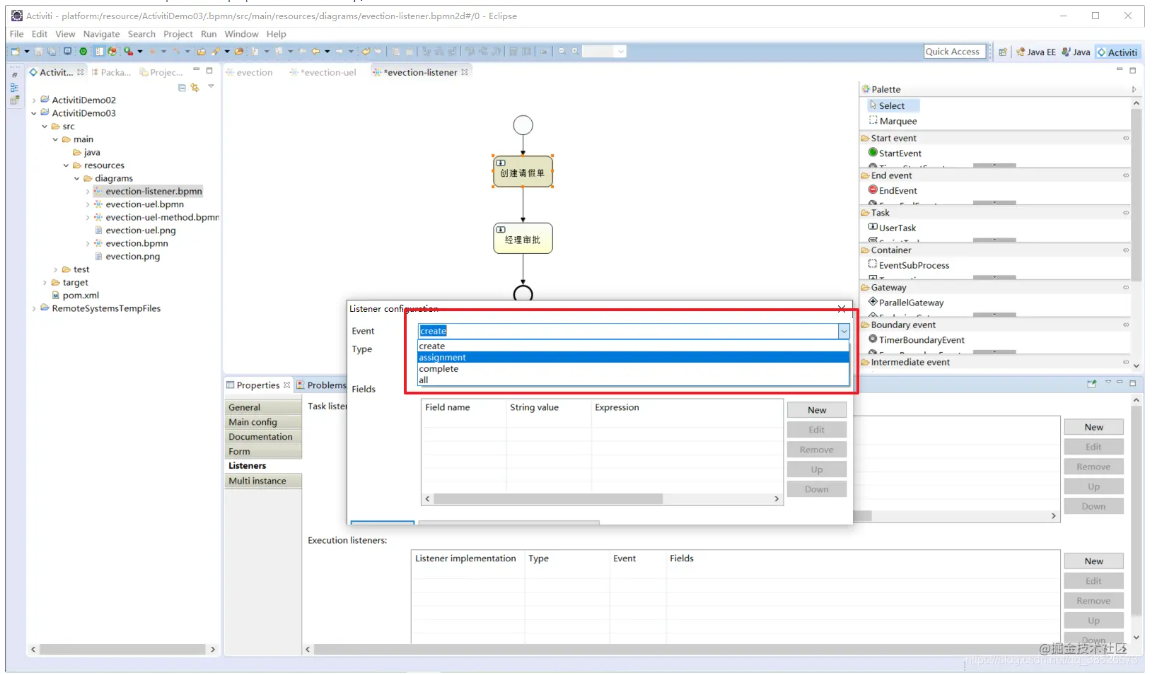
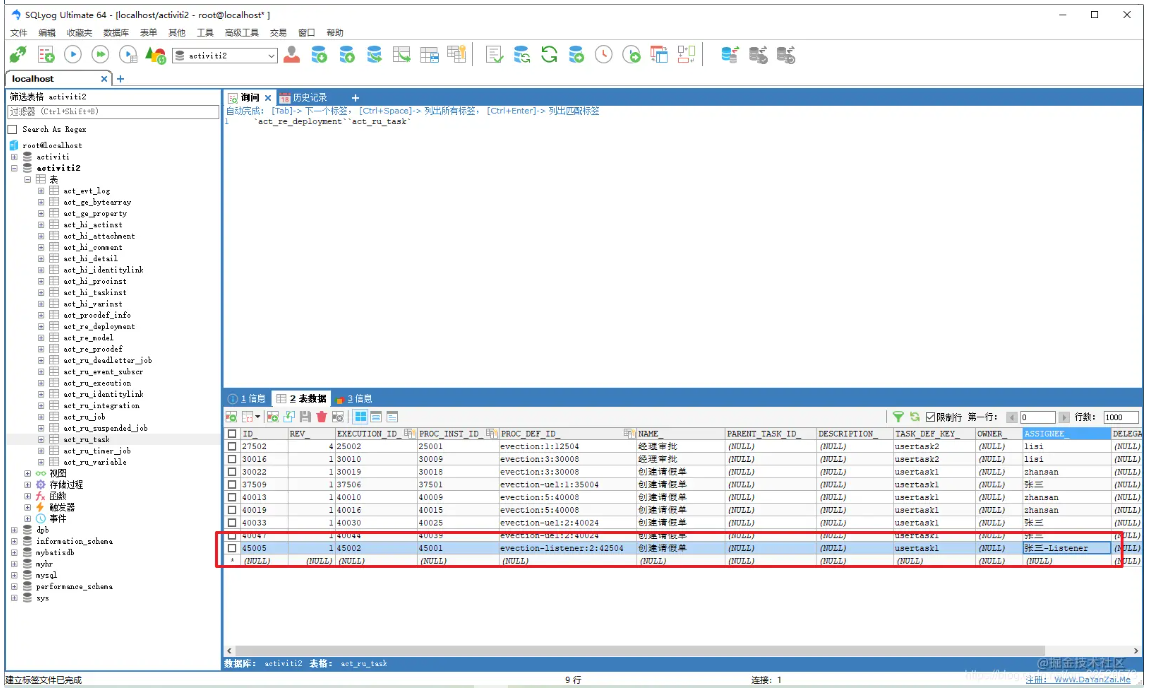
2.1.3 监听器分配 可以使用监听器来完成很多Activiti的流程业务。我们在此处使用监听器来完成负责人的指定,那么我们在流程设计的时候就不需要指定assignee Event选项
1 2 3 4 create:任务创建后触发 assignment:任务分配后触发 Delete:任务完成后触发 All:所有事件都触发
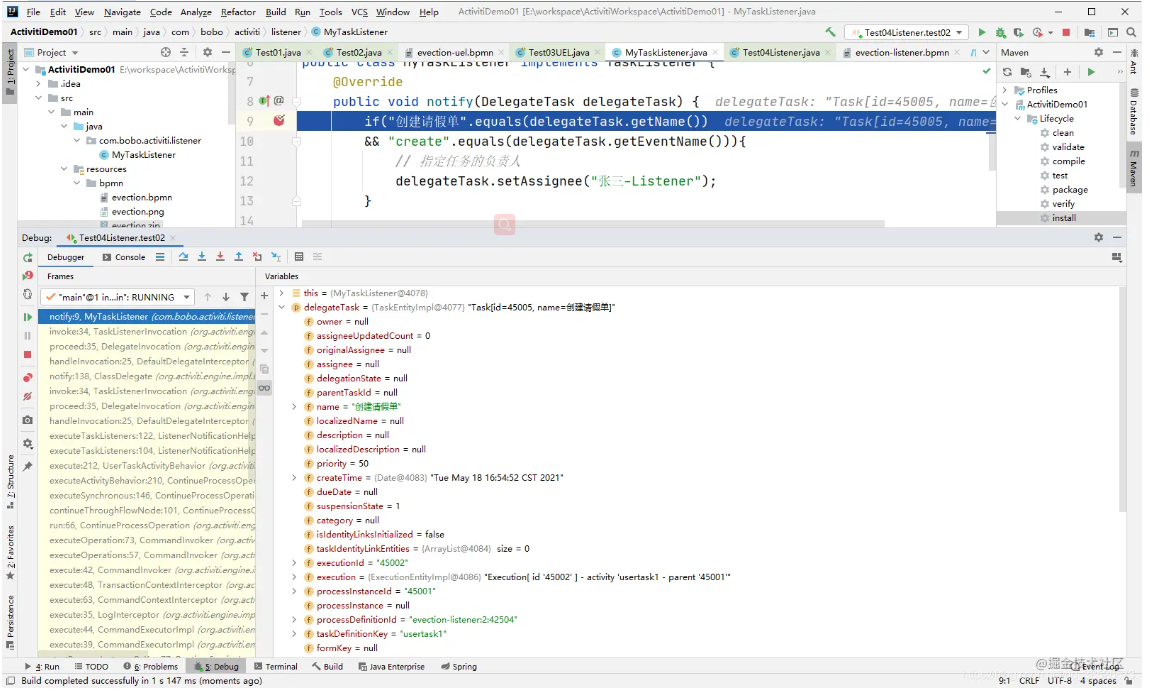
自定义的监听器
1 2 3 4 5 6 7 8 9 10 11 12 13 14 import org.activiti.engine.delegate.DelegateTask;import org.activiti.engine.delegate.TaskListener;public class MyTaskListener implements TaskListener { @Override public void notify (DelegateTask delegateTask) { if ("创建请假单" .equals(delegateTask.getName()) && "create" .equals(delegateTask.getEventName())){ delegateTask.setAssignee("张三-Listener" ); } } }
测试代码
1 2 3 4 5 6 7 8 9 10 11 12 13 14 15 16 17 18 19 20 21 22 23 24 25 26 27 28 29 30 31 32 33 34 @Test public void test01 () { ProcessEngine engine = ProcessEngines.getDefaultProcessEngine(); RepositoryService service = engine.getRepositoryService(); Deployment deploy = service.createDeployment() .addClasspathResource("bpmn/evection-listener.bpmn" ) .addClasspathResource("bpmn/evection-listener.png" ) .name("出差申请流程-UEL" ) .deploy(); System.out.println("流程部署的id:" + deploy.getId()); System.out.println("流程部署的名称:" + deploy.getName()); } @Test public void test02 () { ProcessEngine processEngine = ProcessEngines.getDefaultProcessEngine(); RuntimeService runtimeService = processEngine.getRuntimeService(); runtimeService.startProcessInstanceByKey("evection-listener" ); }-
2.2 查询任务 查询任务负责人的待办任务 代码如下:
1 2 3 4 5 6 7 8 9 10 11 12 13 14 15 16 17 18 19 20 21 22 23 @Test public void findPersonalTaskList () { String processDefinitionKey = "myEvection1" ; String assignee = "张三" ; TaskService taskService = processEngine.getTaskService(); List<Task> taskList = taskService.createTaskQuery() .processDefinitionKey(processDefinitionKey) .includeProcessVariables() .taskAssignee(assignee) .list(); for (Task task : taskList) { System.out.println("----------------------------" ); System.out.println("流程实例id: " + task.getProcessInstanceId()); System.out.println("任务id: " + task.getId()); System.out.println("任务负责人: " + task.getAssignee()); System.out.println("任务名称: " + task.getName()); } } 复制代码
关联 businessKey 需求:在 activiti 实际应用时,查询待办任务可能要显示出业务系统的一些相关信息。
比如:查询待审批出差任务列表需要将出差单的日期、出差天数等信息显示出来。
出差天数等信息在业务系统中存在,而并没有在 activiti 数据库中存在,所以是无法通过 activiti 的 api 查询到出差天数等信息。
实现:在查询待办任务时,通过 businessKey(业务标识 )关联查询业务系统的出差单表,查询出出差天数等信息。
1 2 3 4 5 6 7 8 9 10 11 12 13 14 15 16 17 18 19 20 21 22 23 24 25 26 @Test public void findProcessInstance () { ProcessEngine processEngine = ProcessEngines.getDefaultProcessEngine(); TaskService taskService = processEngine.getTaskService(); RuntimeService runtimeService = processEngine.getRuntimeService(); Task task = taskService.createTaskQuery() .processDefinitionKey("myEvection1" ) .taskAssignee("张三" ) .singleResult(); String processInstanceId = task.getProcessInstanceId(); ProcessInstance processInstance = runtimeService.createProcessInstanceQuery() .processInstanceId(processInstanceId) .singleResult(); String businessKey = processInstance.getBusinessKey(); System.out.println("businessKey==" +businessKey); } 复制代码
2.3 办理任务 注意:在实际应用中,完成任务前需要校验任务的负责人是否具有该任务的办理权限 。
1 2 3 4 5 6 7 8 9 10 11 12 13 14 15 16 17 18 19 20 21 22 23 24 25 @Test public void completTask () { String taskId = "15005" ; String assingee = "张三" ; ProcessEngine processEngine = ProcessEngines.getDefaultProcessEngine(); TaskService taskService = processEngine.getTaskService(); Task task = taskService.createTaskQuery() .taskId(taskId) .taskAssignee(assingee) .singleResult(); if (task != null ){ taskService.complete(taskId); System.out.println("完成任务" ); } }
3.流程变量 3.1、什么是流程变量 流程变量在 activiti 中是一个非常重要的角色,流程运转有时需要靠流程变量,业务系统和 activiti结合时少不了流程变量,流程变量就是 activiti 在管理工作流时根据管理需要而设置的变量。比如:在出差申请流程流转时如果出差天数大于 3 天则由总经理审核,否则由人事直接审核, 出差天数就可以设置为流程变量,在流程流转时使用。
注意:虽然流程变量中可以存储业务数据可以通过activiti的api查询流程变量从而实现 查询业务数据,但是不建议这样使用,因为业务数据查询由业务系统负责,activiti设置流程变量是为了流程执行需要而创建。
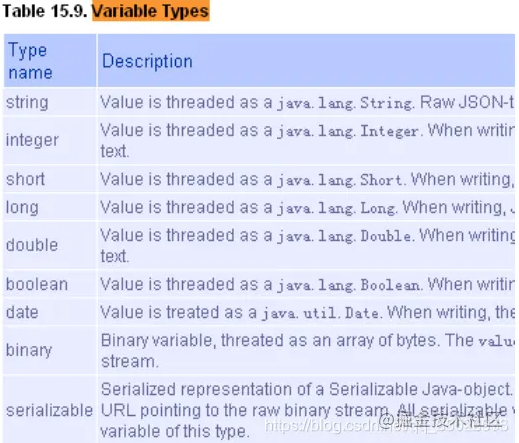
3.2、流程变量类型 如果将 pojo 存储到流程变量中,必须实现序列化接口 serializable,为了防止由于新增字段无法反序列化,需要生成 serialVersionUID。
3.3、流程变量作用域 流程变量的作用域可以是一个流程实例(processInstance),或一个任务(task),或一个执行实例 (execution)
3.3.1、globa变量 流程变量的默认作用域是流程实例。当一个流程变量的作用域为流程实例时,可以称为 global 变量
注意:
如: Global变量:userId(变量名)、zhangsan(变量值)
global 变量中变量名不允许重复,设置相同名称的变量,后设置的值会覆盖前设置的变量值。
3.3.2、local变量 任务和执行实例仅仅是针对一个任务和一个执行实例范围,范围没有流程实例大, 称为 local 变量。Local 变量由于在不同的任务或不同的执行实例中,作用域互不影响,变量名可以相同没有影响。Local 变量名也可以和 global 变量名相同,没有影响。
3.4、流程变量的使用方法 3.4.1、在属性上使用UEL表达式 可以在 assignee 处设置 UEL 表达式,表达式的值为任务的负责人,比如: ${assignee}, assignee 就是一个流程变量名称。
Activiti获取UEL表达式的值,即流程变量assignee的值 ,将assignee的值作为任务的负责人进行任务分配
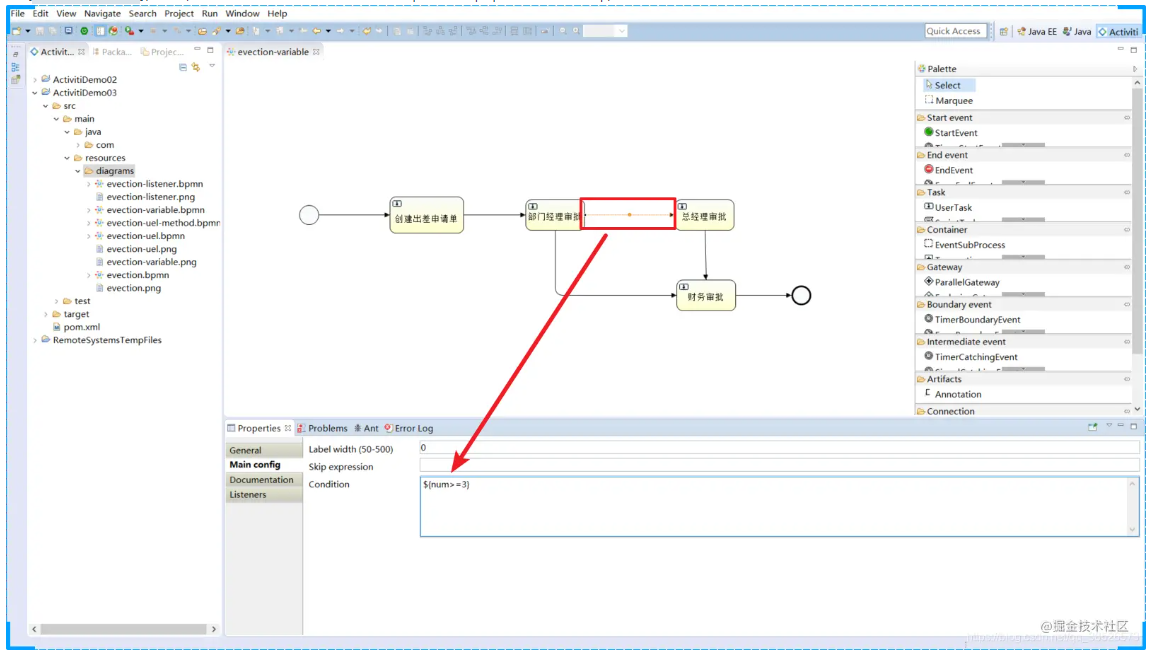
3.4.2、在连线上使用UEL表达式 可以在连线上设置UEL表达式,决定流程走向。比如:${price<10000} 。price就是一个流程变量名称,uel表达式结果类型为布尔类型。如果UEL表达式是true,要决定 流程执行走向。
3.5 流程变量使用 3.5.1 需求 员工创建出差申请单,由部门经理审核,部门经理申请通过后3天以下由财务直接申批,3天以上先由总经理审批,总经理审批通过后再由财务审批。
3.5.2 流程定义 先通过UEL-value来设置负责人
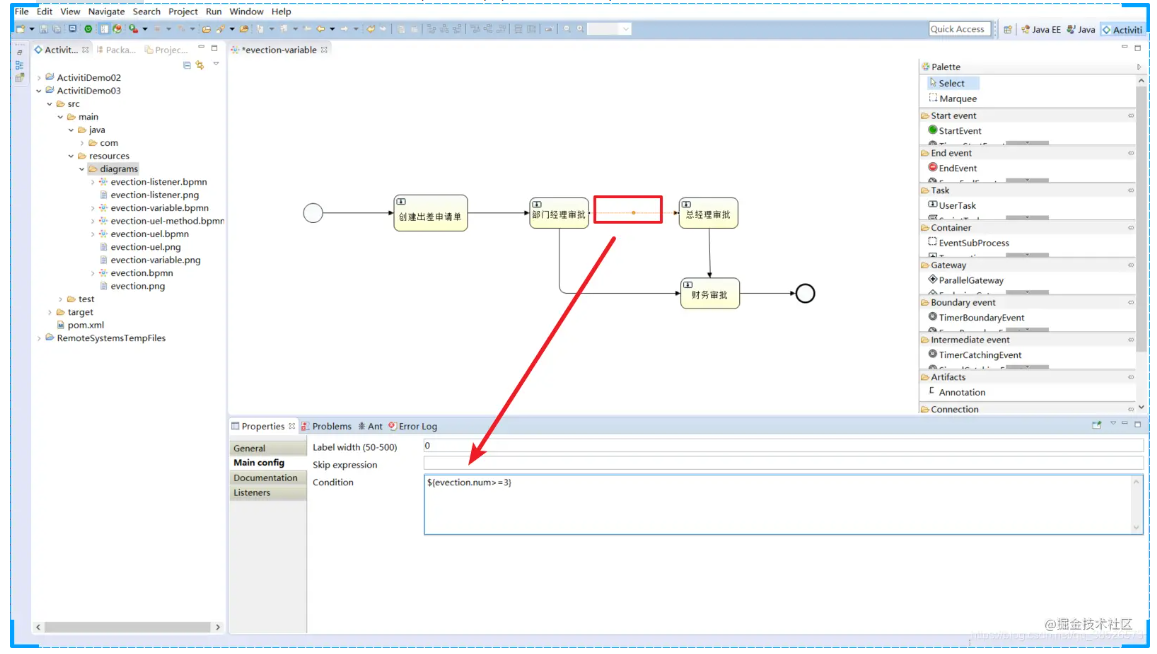
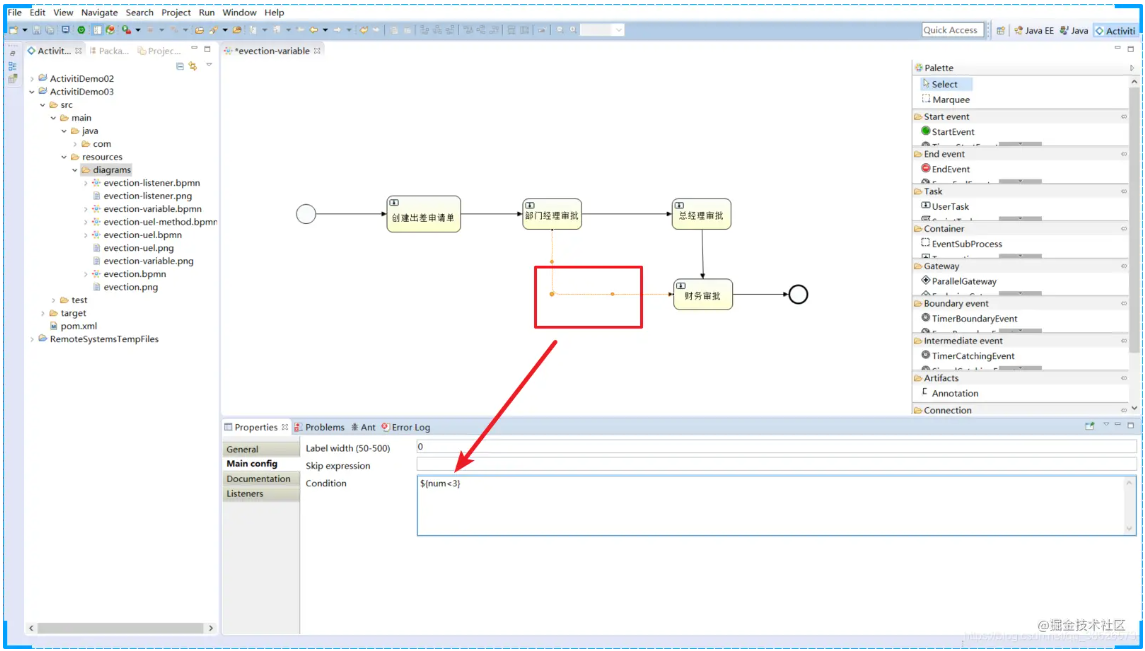
然后在分支线上来设置条件
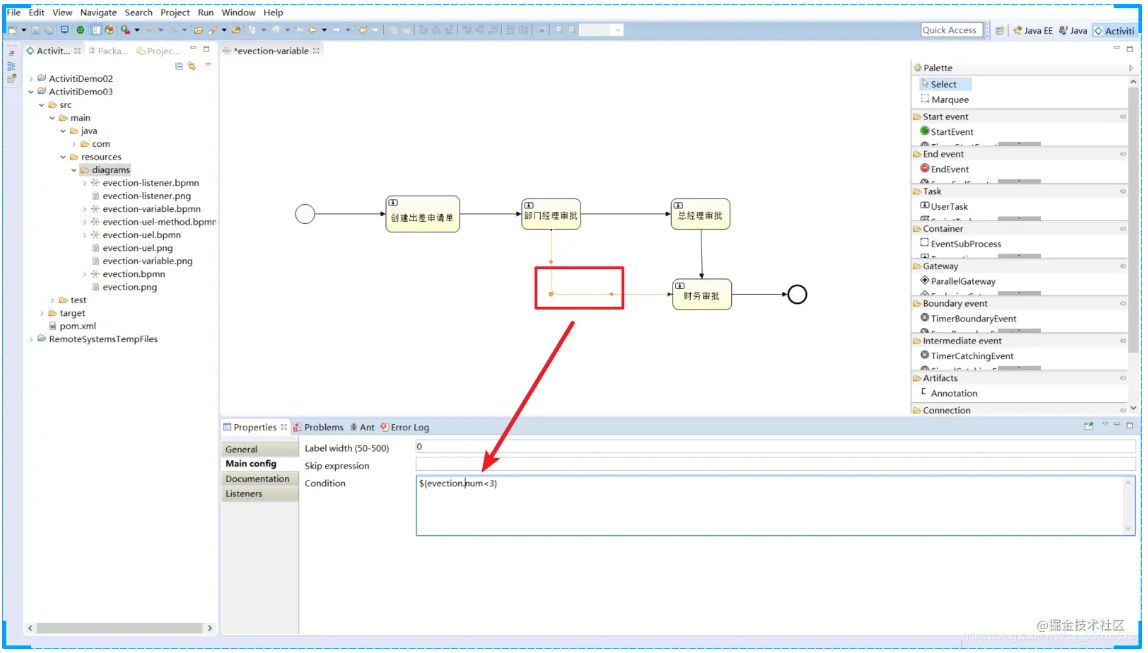
那么还可以通过对象参数命名,比如 evection.num:
另一根线对应的设置
然后可以将相关的资源文件拷贝到项目中,
3.5.3 使用Global变量 接下来使用Global变量控制流程
3.5.3.1 POJO创建 首先创建POJO对象
1 2 3 4 5 6 7 8 9 10 11 12 13 14 15 16 17 18 19 20 21 22 23 24 @Data public class Evection { private long id; private String evectionName; private double num; private Date beginDate; private Date endDate; private String destination; private String reson; }
3.5.3.2 流程的部署 1 2 3 4 5 6 7 8 9 10 11 12 13 14 15 16 17 18 19 @Test public void test01 () { ProcessEngine engine = ProcessEngines.getDefaultProcessEngine(); RepositoryService service = engine.getRepositoryService(); Deployment deploy = service.createDeployment() .addClasspathResource("bpmn/evection-variable.bpmn" ) .addClasspathResource("bpmn/evection-variable.png" ) .name("出差申请流程-流程变量" ) .deploy(); System.out.println("流程部署的id:" + deploy.getId()); System.out.println("流程部署的名称:" + deploy.getName()); }
3.5.3.3 设置流程变量 a.启动时设置流程变量 在启动流程时设置流程变量,变量的作用域是整个流程实例。
1 2 3 4 5 6 7 8 9 10 11 12 13 14 15 16 17 18 19 20 21 22 23 24 25 26 27 @Test public void test02 () { ProcessEngine engine = ProcessEngines.getDefaultProcessEngine(); RuntimeService runtimeService = engine.getRuntimeService(); String key = "evection-variable" ; Map<String,Object> variables = new HashMap <>(); Evection evection = new Evection (); evection.setNum(4d ); variables.put("evection" ,evection); variables.put("assignee0" ,"张三1" ); variables.put("assignee1" ,"李四1" ); variables.put("assignee2" ,"王五1" ); variables.put("assignee3" ,"赵财务1" ); ProcessInstance processInstance = runtimeService.startProcessInstanceByKey(key, variables); System.out.println("获取流程实例名称:" +processInstance.getName()); System.out.println("流程定义ID:" + processInstance.getProcessDefinitionId()); }
完成任务
1 2 3 4 5 6 7 8 9 10 11 12 13 14 15 16 17 18 @Test public void test03 () { String key = "evection-variable" ; String assignee = "李四1" ; ProcessEngine engine = ProcessEngines.getDefaultProcessEngine(); TaskService taskService = engine.getTaskService(); Task task = taskService.createTaskQuery() .processDefinitionKey(key) .taskAssignee(assignee) .singleResult(); if (task != null ){ taskService.complete(task.getId()); System.out.println("任务执行完成..." ); } }
通过startProcessInstanceByKey方法设置流程变量的作用域是一个流程实例,流程变量使用Map存储,同一个流程实例map中的key相同,后者会覆盖前者
b.任务办理时设置 在完成任务时设置流程变量,该流程变量只有在该任务完成后其它结点才可使用该变量,它的作用域是整个流程实例,如果设置的流程变量的key在流程实例中已存在相同的名字则后设置的变量替换前边设置的变量。
这里需要在创建出差单任务完成时设置流程变量
1 2 3 4 5 6 7 8 9 10 11 12 13 14 15 16 17 18 19 20 21 22 23 24 25 26 27 28 29 30 31 32 33 34 35 36 37 38 39 40 41 42 43 44 45 46 47 48 49 50 @Test public void test02 () { ProcessEngine engine = ProcessEngines.getDefaultProcessEngine(); RuntimeService runtimeService = engine.getRuntimeService(); String key = "evection-variable" ; Map<String,Object> variables = new HashMap <>(); variables.put("assignee0" ,"张三1" ); variables.put("assignee1" ,"李四1" ); variables.put("assignee2" ,"王五1" ); variables.put("assignee3" ,"赵财务1" ); ProcessInstance processInstance = runtimeService.startProcessInstanceByKey(key, variables); System.out.println("获取流程实例名称:" +processInstance.getName()); System.out.println("流程定义ID:" + processInstance.getProcessDefinitionId()); } @Test public void test03 () { String key = "evection-variable" ; String assignee = "李四1" ; ProcessEngine engine = ProcessEngines.getDefaultProcessEngine(); TaskService taskService = engine.getTaskService(); Task task = taskService.createTaskQuery() .processDefinitionKey(key) .taskAssignee(assignee) .singleResult(); Map<String,Object> variables = new HashMap <>(); Evection evection = new Evection (); evection.setNum(4d ); variables.put("evection" ,evection); if (task != null ){ taskService.complete(task.getId(),variables); System.out.println("任务执行完成..." ); } }
说明: 通过当前任务设置流程变量,需要指定当前任务id,如果当前执行的任务id不存在则抛出异常。 任务办理时也是通过map<key,value>设置流程变量,一次可以设置多个变量。
c.当前流程实例设置 通过流程实例id设置全局变量,该流程实例必须未执行完成。
1 2 3 4 5 6 7 8 9 10 11 12 13 14 15 16 17 @Test public void setGlobalVariableByExecutionId () { String executionId="2601" ; ProcessEngine processEngine = ProcessEngines.getDefaultProcessEngine(); RuntimeService runtimeService = processEngine.getRuntimeService(); Evection evection = new Evection (); evection.setNum(3d ); runtimeService.setVariable(executionId, "evection" , evection); }
注意: executionId必须当前未结束 流程实例的执行id,通常此id设置流程实例 的id。也可以通runtimeService.getVariable()获取流程变量。
d.当前任务设置 1 2 3 4 5 6 7 8 9 10 11 12 13 14 15 @Test public void setGlobalVariableByTaskId () { String taskId="1404" ; ProcessEngine processEngine = ProcessEngines.getDefaultProcessEngine(); TaskService taskService = processEngine.getTaskService(); Evection evection = new Evection (); evection.setNum(3 ); taskService.setVariable(taskId, "evection" , evection); }
注意: 任务id必须是当前待办任务id,act_ru_task中存在。如果该任务已结束,会报错也可以通过taskService.getVariable()获取流程变量。
3.5.4 设置local流程变量 3.5.4.1、任务办理时设置 任务办理时设置local流程变量,当前运行的流程实例只能在该任务结束前使用,任务结束该变量无法在当前流程实例使用,可以通过查询历史任务查询。
1 2 3 4 5 6 7 8 9 10 11 12 13 14 15 16 17 18 19 20 21 22 23 24 @Test public void completTask () { String taskId = "1404" ; ProcessEngine processEngine = ProcessEngines.getDefaultProcessEngine(); TaskService taskService = processEngine.getTaskService(); Map<String, Object> variables = new HashMap <String, Object>(); Evection evection = new Evection (); evection.setNum(3d ); Map<String, Object> variables = new HashMap <String, Object>(); variables.put("evection" , evection); taskService.setVariablesLocal(taskId, variables); taskService.complete(taskId); } 复制代码
说明: 设置作用域为任务的local变量,每个任务可以设置同名的变量,互不影响。
3.5.4.2、通过当前任务设置 1 2 3 4 5 6 7 8 9 10 11 12 13 14 15 @Test public void setLocalVariableByTaskId () { String taskId="1404" ; ProcessEngine processEngine = ProcessEngines.getDefaultProcessEngine(); TaskService taskService = processEngine.getTaskService(); Evection evection = new Evection (); evection.setNum(3d ); taskService.setVariableLocal(taskId, "evection" , evection); } 复制代码
注意: 任务id必须是当前待办任务id,act_ru_task中存在。
3.5.4.3、 Local变量测试1 如果上边例子中设置global变量改为设置local变量是否可行?为什么? Local变量在任务结束后无法在当前流程实例执行中使用,如果后续的流程执行需要用到此变量则会报错。
3.5.4.4、 Local变量测试2 在部门经理审核、总经理审核、财务审核时设置local变量,可通过historyService查询每个历史任务时将流程变量的值也查询出来。
代码如下:
1 2 3 4 5 6 7 8 9 10 11 12 13 HistoricTaskInstanceQuery historicTaskInstanceQuery = historyService.createHistoricTaskInstanceQuery(); historicTaskInstanceQuery.includeTaskLocalVariables(); for (HistoricTaskInstance historicTaskInstance : list) { System.out.println("==============================" ); System.out.println("任务id:" + historicTaskInstance.getId()); System.out.println("任务名称:" + historicTaskInstance.getName()); System.out.println("任务负责人:" + historicTaskInstance.getAssignee()); System.out.println("任务local变量:" + historicTaskInstance.getTaskLocalVariables()); } 复制代码
注意:查询历史流程变量,特别是查询pojo变量需要经过反序列化,不推荐使用。
4.组任务 4.1、需求 在流程定义中在任务结点的 assignee 固定设置任务负责人,在流程定义时将参与者固定设置在.bpmn 文件中,如果临时任务负责人变更则需要修改流程定义,系统可扩展性差。 针对这种情况可以给任务设置多个候选人,可以从候选人中选择参与者来完成任务。
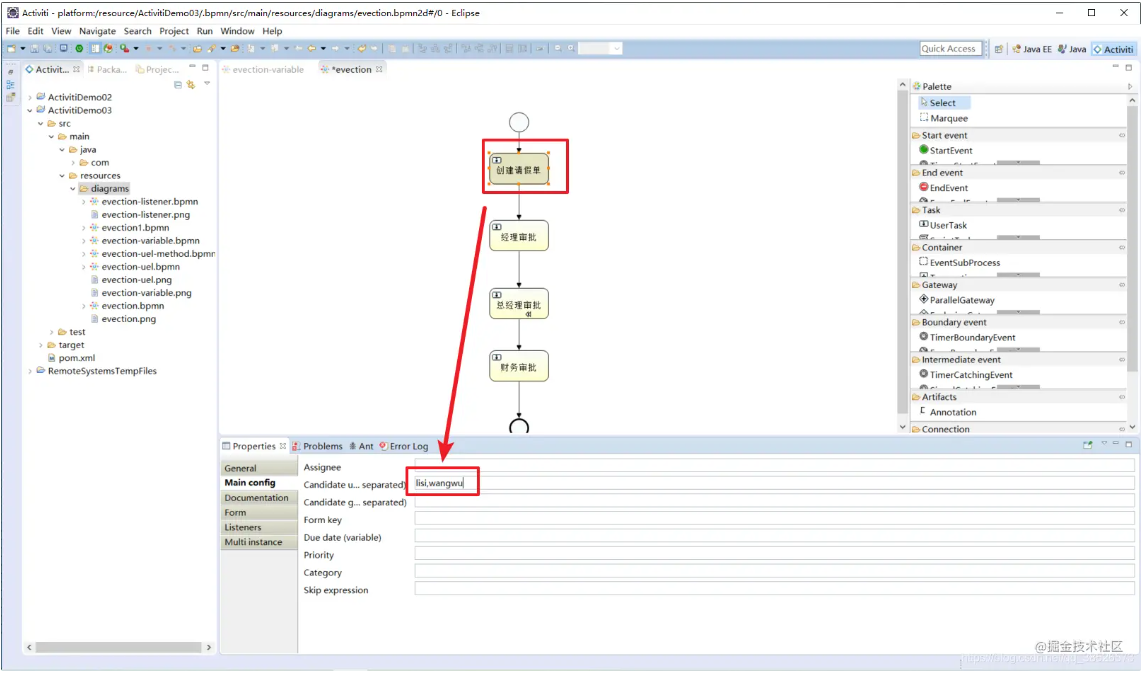
4.2、设置任务候选人 在流程图中任务节点的配置中设置 candidate-users(候选人),多个候选人之间用逗号分开。
查看bpmn文件
1 <userTask activiti:candidateUsers ="lisi,wangwu" activiti:exclusive ="true" id ="_3" name ="经理审批" />
我们可以看到部门经理的审核人已经设置为 lisi,wangwu 这样的一组候选人,可以使用activiti:candiateUsers=”用户 1,用户 2,用户 3”的这种方式来实现设置一组候选人
4.3、组任务 4.3.1、 组任务办理流程 a、查询组任务 指定候选人,查询该候选人当前的待办任务。候选人不能立即办理任务。
b、拾取(claim)任务 该组任务的所有候选人都能拾取。将候选人的组任务,变成个人任务。原来候选人就变成了该任务的负责人。如果拾取后不想办理该任务?需要将已经拾取的个人任务归还到组里边,将个人任务变成了组任务。
c、查询个人任务 查询方式同个人任务部分,根据assignee查询用户负责的个人任务。
d、办理个人任务 4.3.2、 查询组任务 根据候选人查询组任务
1 2 3 4 5 6 7 8 9 10 11 12 13 14 15 16 17 18 19 20 @Test public void test03 () { String key = "evection1" ; String candidateUser = "lisi" ; ProcessEngine engine = ProcessEngines.getDefaultProcessEngine(); TaskService taskService = engine.getTaskService(); List<Task> list = taskService.createTaskQuery() .processDefinitionKey(key) .taskCandidateUser(candidateUser) .list(); for (Task task : list) { System.out.println("流程实例Id:" + task.getProcessInstanceId()); System.out.println("任务ID:" + task.getId()); System.out.println("负责人:" + task.getAssignee()); System.out.println("任务名称:" + task.getName()); } }
4.3.3、 拾取组任务 候选人员拾取组任务后该任务变为自己的个人任务。
1 2 3 4 5 6 7 8 9 10 11 12 13 14 15 16 17 18 19 20 21 22 @Test public void test04 () { ProcessEngine engine = ProcessEngines.getDefaultProcessEngine(); TaskService taskService = engine.getTaskService(); String taskId = "72505" ; String userId = "lisi" ; Task task = taskService.createTaskQuery() .taskId(taskId) .taskCandidateUser(userId) .singleResult(); if (task != null ){ taskService.claim(taskId,userId); System.out.println("拾取成功" ); } } 复制代码
4.3.4、 查询个人待办任务 查询方式同个人任务查询
1 2 3 4 5 6 7 8 9 10 11 12 13 14 15 16 17 18 19 @Test public void test03 () { String key = "evection1" ; String candidateUser = "lisi" ; ProcessEngine engine = ProcessEngines.getDefaultProcessEngine(); TaskService taskService = engine.getTaskService(); List<Task> list = taskService.createTaskQuery() .processDefinitionKey(key) .taskAssignee(candidateUser) .list(); for (Task task : list) { System.out.println("流程实例Id:" + task.getProcessInstanceId()); System.out.println("任务ID:" + task.getId()); System.out.println("负责人:" + task.getAssignee()); System.out.println("任务名称:" + task.getName()); } }
4.3.5、 办理个人任务 同个人任务办理
1 2 3 4 5 6 7 8 9 10 11 @Test public void test05 () { String taskId = "72505" ; ProcessEngine engine = ProcessEngines.getDefaultProcessEngine(); TaskService taskService = engine.getTaskService(); taskService.complete(taskId); System.out.println("完成任务:" + taskId); }
4.3.6、 归还组任务 如果个人不想办理该组任务,可以归还组任务,归还后该用户不再是该任务的负责人
1 2 3 4 5 6 7 8 9 10 11 12 13 14 15 16 17 18 @Test public void test06 () { ProcessEngine engine = ProcessEngines.getDefaultProcessEngine(); TaskService taskService = engine.getTaskService(); String taskId = "75002" ; String userId= "zhangsan" ; Task task = taskService.createTaskQuery() .taskId(taskId) .taskAssignee(userId) .singleResult(); if (task != null ){ taskService.setAssignee(taskId,null ); } }
说明:建议归还任务前校验该用户是否是该任务的负责人,也可以通过setAssignee方法将该任务委托给其他用户方负责,注意被委托的用户可以不是候选人(建议不要这样使用)
4,3,7、 任务交接 任务负责人将任务交给其他负责人来处理
1 2 3 4 5 6 7 8 9 10 11 12 13 14 15 16 17 18 @Test public void test07 () { ProcessEngine engine = ProcessEngines.getDefaultProcessEngine(); TaskService taskService = engine.getTaskService(); String taskId = "75002" ; String userId= "zhangsan" ; Task task = taskService.createTaskQuery() .taskId(taskId) .taskAssignee(userId) .singleResult(); if (task != null ){ taskService.setAssignee(taskId,"赵六" ); } }
4.3.8、 数据库表操作 查询当前任务执行表
1 SELECT * FROM act_ru_task
任务执行表,记录当前执行的任务,由于该任务当前是组任务,所有assignee为空,当拾取任务后该字段就是拾取用户的id,查询任务参与者
1 SELECT * FROM act_ru_identitylink
任务参与者,记录当前参考任务用户或组,当前任务如果设置了候选人,会向该表插入候选人记录,有几个候选就插入几个与act_ru_identitylink对应的还有一张历史表act_hi_identitylink,向act_ru_identitylink插入记录的同时也会向历史表插入记录。任务完成
5.网关 网关用来控制流程的流向
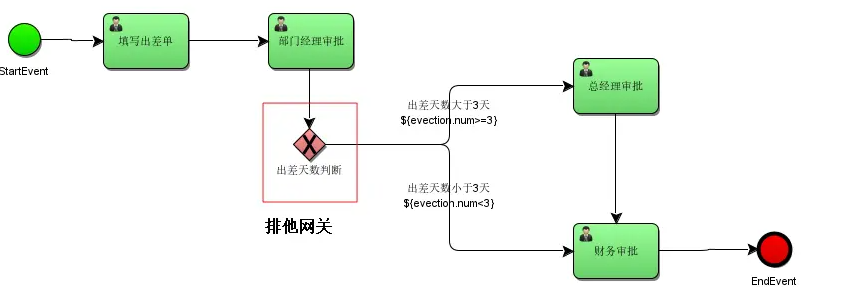
5.1 排他网关ExclusiveGateway 5.1.1 什么是排他网关: 排他网关,用来在流程中实现决策。 当流程执行到这个网关,所有分支都会判断条件是否为true,如果为true则执行该分支,
注意 :排他网关只会选择一个为true的分支执行。如果有两个分支条件都为true,排他网关会选择id值较小的一条分支去执行。(没有排他网关,2个都为true,2个都执行)
为什么要用排他网关?
不用排他网关也可以实现分支,如:在连线的condition条件上设置分支条件。在连线设置condition条件的缺点:如果条件都不满足,流程就结束了(是异常结束 )。如果 使用排他网关决定分支的走向,如下:
如果从网关出去的线所有条件都不满足则系统抛出异常 。
1 2 org.activiti.engine.ActivitiException: No outgoing sequence flow of the exclusive gateway 'exclusivegateway1' could be selected for continuing the process at org.activiti.engine.impl.bpmn.behavior.ExclusiveGatewayActivityBehavior.leave(ExclusiveGatewayActivityBehavior.java:85 )
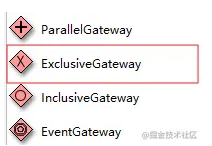
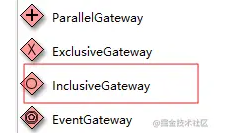
5.1.2 流程定义1 排他网关图标,红框内:
5.1.3 测试 在部门经理审核后,走排他网关,从排他网关出来的分支有两条,一条是判断出差天数是否大于3天,另一条是判断出差天数是否小于等于3天。设置分支条件时,如果所有分支条件都不是true,报错:
1 2 3 org.activiti.engine.ActivitiException: No outgoing sequence flow of the exclusive gateway 'exclusivegateway1' could be selected for continuing the process at org.activiti.engine.impl.bpmn.behavior.ExclusiveGatewayActivityBehavior.leave(ExclusiveGatewayActivityBehavior.java:85 )
5.2 并行网关ParallelGateway 5.2.1 什么是并行网关 并行网关允许将流程分成多条分支,也可以把多条分支汇聚到一起,并行网关的功能是基于进入和外出顺序流的:
并行后的所有外出顺序流,为每个顺序流都创建一个并发分支。
所有到达并行网关,在此等待的进入分支, 直到所有进入顺序流的分支都到达以后, 流程就会通过汇聚网关。 注意,如果同一个并行网关有多个进入和多个外出顺序流, 它就同时具有分支和汇聚功能。 这时,网关会先汇聚所有进入的顺序流,然后再切分成多个并行分支。
与其他网关的主要区别是,并行网关不会解析条件。 即使顺序流中定义了条件,也会被忽略。
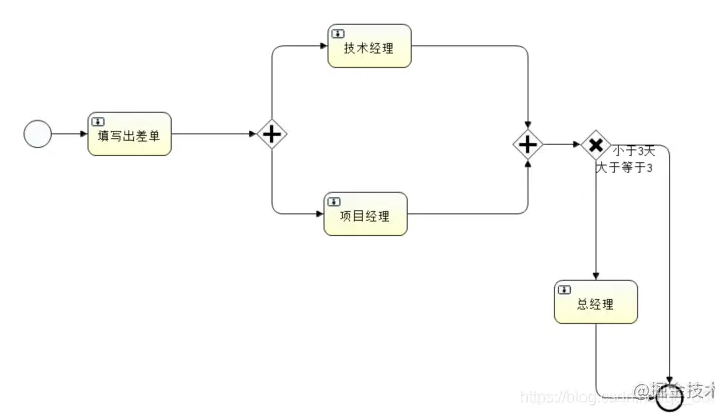
例子:
说明:
技术经理和项目经理是两个execution分支,在act_ru_execution表有两条记录分别是技术经理和项目经理,act_ru_execution还有一条记录表示该流程实例。待技术经理和项目经理任务全部完成,在汇聚点汇聚,通过parallelGateway并行网关。并行网关在业务应用中常用于会签任务,会签任务即多个参与者共同办理的任务。
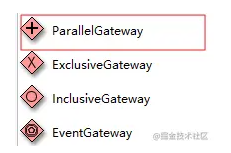
5.2.2 流程定义 并行网关图标,红框内:
5.2.3 测试 当执行到并行网关数据库跟踪如下:当前任务表:SELECT * FROM act_ru_task
上图中:有两个任务当前执行。查询流程实例执行表:SELECT * FROM act_ru_execution
上图中,说明当前流程实例有多个分支(两个)在运行。
对并行任务的执行: 并行任务执行不分前后,由任务的负责人去执行即可。 执行技术经理任务后,查询当前任务表 SELECT * FROM act_ru_task
已完成的技术经理任务在当前任务表act_ru_task_已被删除。
在流程实例执行表:SELECT * FROM act_ru_execution有中多个分支存在且有并行网关的汇聚结点。
有并行网关的汇聚结点:说明有一个分支已经到汇聚,等待其它的分支到达。 当所有分支任务都完成,都到达汇聚结点后: 流程实例执行表:SELECT * FROM act_ru_execution,执行流程实例已经变为总经理审批,说明流程执行已经通过并行网关
总结:所有分支到达汇聚结点,并行网关执行完成。
5.3 包含网关InclusiveGateway 5.3.1 什么是包含网关 包含网关可以看做是排他网关和并行网关的结合体。 和排他网关一样,你可以在外出顺序流上定义条件,包含网关会解析它们。 但是主要的区别是包含网关可以选择多于一条顺序流,这和并行网关一样。
包含网关的功能是基于进入和外出顺序流的:
所有外出顺序流的条件都会被解析,结果为true的顺序流会以并行方式继续执行, 会为每个顺序流创建一个分支。
所有并行分支到达包含网关,会进入等待状态, 直到每个包含流程token的进入顺序流的分支都到达。 这是与并行网关的最大不同。换句话说,包含网关只会等待被选中执行了的进入顺序流。 在汇聚之后,流程会穿过包含网关继续执行。
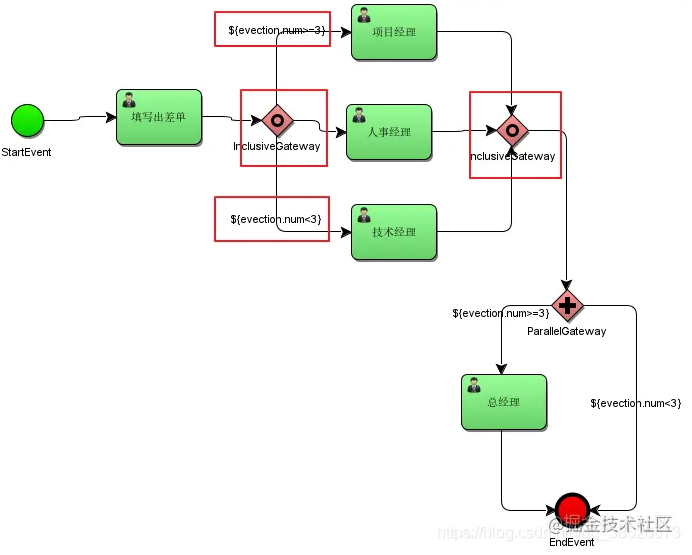
5.3.2 流程定义: 出差申请大于等于3天需要由项目经理审批,小于3天由技术经理审批,出差申请必须经过人事经理审批。 包含网关图标,红框内:
定义流程:
注意:通过包含网关的每个分支的连线上设置condition条件。
5.3.3 测试 如果包含网关设置的条件中,流程变量不存在,报错;
1 org.activiti.engine.ActivitiException: Unknown property used in expression: ${evection.num>=3 }
需要在流程启动时设置流程变量evection.num。
1)、当流程执行到第一个包含网关后,会根据条件判断,当前要走哪几个分支:
流程实例执行表:SELECT * FROM act_ru_execution
第一条记录:包含网关分支。
后两条记录代表两个要执行的分支: ACT_ID = "_13" 代表 项目经理神品 ACT_ID = "_5" 代表 人事经理审批 当前任务表:ACT_RU_TASK
上图中,项目经理审批、人事经理审批 都是当前的任务,在并行执行。 如果有一个分支执行先走到汇聚结点的分支,要等待其它执行分支走到汇聚。
2)、先执行项目经理审批,然后查询当前任务表:ACT_RU_TASK
当前任务还有人事经理审批需要处理。 流程实例执行表:SELECT * FROM act_ru_execution
发现人事经理的分支还存在,而项目经理分支已经走到ACT_ID = _18的节点。而ACT_ID=__18就是第二个包含网关这时,因为有2个分支要执行,包含网关会等所有分支走到汇聚才能执行完成。
3)、执行人事经理审批 然后查询当前任务表:ACT_RU_TASK
当前任务表已经不是人事经理审批了,说明人事经理审批已经完成。 流程实例执行表:SELECT * FROM act_ru_execution
包含网关执行完成,分支和汇聚就从act_ru_execution删除。
小结:在分支时,需要判断条件,符合条件的分支,将会执行 ,符合条件的分支最终才进行汇聚。
5.4 事件网关EventGateway 事件网关允许根据事件判断流向。网关的每个外出顺序流都要连接到一个中间捕获事件。 当流程到达一个基于事件网关,网关会进入等待状态:会暂停执行。与此同时,会为每个外出顺序流创建相对的事件订阅。
事件网关的外出顺序流和普通顺序流不同,这些顺序流不会真的”执行”, 相反它们让流程引擎去决定执行到事件网关的流程需要订阅哪些事件。 要考虑以下条件:
事件网关必须有两条或以上外出顺序流;
事件网关后,只能使用intermediateCatchEvent类型(activiti不支持基于事件网关后连接ReceiveTask)
连接到事件网关的中间捕获事件必须只有一个入口顺序流。
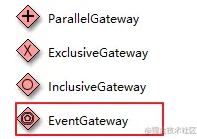
5.4.1流程定义 事件网关图标,红框内
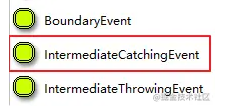
intermediateCatchEvent:
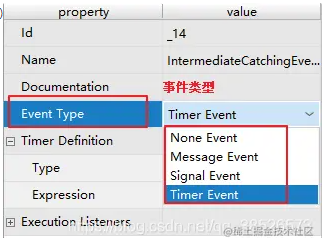
intermediateCatchEvent支持的事件类型: Message Event: 消息事件 Singal Event: 信号事件 Timer Event: 定时事件
使用事件网关定义流程:
~好了进阶篇的内容就给大家介绍到这儿了,如果感觉有帮助欢迎点赞关注加收藏哦 V_V
Activiti7 与 Spring 整合开发 1.1Activiti 与 Spring 整合的配置 引入 pom.xml 坐标,如下
1 2 3 4 5 6 7 8 9 10 11 12 13 14 15 16 17 18 19 20 21 22 23 24 25 26 27 28 29 30 31 32 33 34 35 36 37 38 39 40 41 42 43 44 45 46 47 48 49 50 51 52 53 54 55 56 57 58 59 60 61 62 63 64 65 66 67 68 69 70 71 72 73 74 75 76 77 78 79 80 81 82 83 84 85 86 87 88 89 90 91 92 93 94 95 96 97 98 99 100 101 102 103 104 105 <properties > <slf4j.version > 1.6.6</slf4j.version > <log4j.version > 1.2.12</log4j.version > </properties > <dependencies > <dependency > <groupId > org.activiti</groupId > <artifactId > activiti-engine</artifactId > <version > 7.0.0.Beta1</version > </dependency > <dependency > <groupId > org.activiti</groupId > <artifactId > activiti-spring</artifactId > <version > 7.0.0.Beta1</version > </dependency > <dependency > <groupId > org.activiti</groupId > <artifactId > activiti-bpmn-model</artifactId > <version > 7.0.0.Beta1</version > </dependency > <dependency > <groupId > org.activiti</groupId > <artifactId > activiti-bpmn-converter</artifactId > <version > 7.0.0.Beta1</version > </dependency > <dependency > <groupId > org.activiti</groupId > <artifactId > activiti-json-converter</artifactId > <version > 7.0.0.Beta1</version > </dependency > <dependency > <groupId > org.activiti</groupId > <artifactId > activiti-bpmn-layout</artifactId > <version > 7.0.0.Beta1</version > </dependency > <dependency > <groupId > org.activiti.cloud</groupId > <artifactId > activiti-cloud-services-api</artifactId > <version > 7.0.0.Beta1</version > </dependency > <dependency > <groupId > aspectj</groupId > <artifactId > aspectjweaver</artifactId > <version > 1.5.4</version > </dependency > <dependency > <groupId > mysql</groupId > <artifactId > mysql-connector-java</artifactId > <version > 5.1.40</version > </dependency > <dependency > <groupId > junit</groupId > <artifactId > junit</artifactId > <version > 4.12</version > </dependency > <dependency > <groupId > org.springframework</groupId > <artifactId > spring-test</artifactId > <version > 5.0.7.RELEASE</version > </dependency > <dependency > <groupId > log4j</groupId > <artifactId > log4j</artifactId > <version > ${log4j.version}</version > </dependency > <dependency > <groupId > org.slf4j</groupId > <artifactId > slf4j-api</artifactId > <version > ${slf4j.version}</version > </dependency > <dependency > <groupId > org.slf4j</groupId > <artifactId > slf4j-log4j12</artifactId > <version > ${slf4j.version}</version > </dependency > <dependency > <groupId > org.slf4j</groupId > <artifactId > slf4j-nop</artifactId > <version > ${slf4j.version}</version > </dependency > <dependency > <groupId > org.mybatis</groupId > <artifactId > mybatis</artifactId > <version > 3.4.5</version > </dependency > <dependency > <groupId > commons-dbcp</groupId > <artifactId > commons-dbcp</artifactId > <version > 1.4</version > </dependency > </dependencies > <repositories > <repository > <id > alfresco</id > <name > Activiti Releases</name > <url > https://artifacts.alfresco.com/nexus/content/repositories/activiti-releases/</ url> <releases > <enabled > true</enabled > </releases > </repository > </repositories >
我们除了使用 StandaloneProcessEngineConfiguration 来创建 ProcessEngine 流程引擎对象。
1 2 3 4 5 6 7 8 9 10 11 12 13 14 15 16 17 18 19 20 21 22 23 24 25 26 27 28 29 30 31 32 33 34 35 36 37 38 39 40 41 42 43 44 45 46 47 48 49 50 51 52 53 54 55 56 57 58 59 60 61 62 63 64 65 66 67 68 69 70 71 72 <beans xmlns ="http://www.springframework.org/schema/beans" xmlns:xsi ="http://www.w3.org/2001/XMLSchema-instance" xmlns:context ="http://www.springframework.org/schema/context" xmlns:tx ="http://www.springframework.org/schema/tx" xmlns:aop ="http://www.springframework.org/schema/aop" xsi:schemaLocation ="http://www.springframework.org/schema/beans http://www.springframework.org/schema/beans/spring-beans.xsd http://www.springframework.org/schema/tx http://www.springframework.org/schema/tx/spring-tx.xsd http://www.springframework.org/schema/context http://www.springframework.org/schema/context/spring-context.xsd http://www.springframework.org/schema/aop http://www.springframework.org/schema/aop/spring-aop.xsd " > <bean id ="dataSource" class ="org.apache.commons.dbcp.BasicDataSource" > <property name ="driverClassName" value ="com.mysql.jdbc.Driver" /> <property name ="url" value ="jdbc:mysql://localhost:3306/activiti" /> <property name ="username" value ="root" /> <property name ="password" value ="root" /> <property name ="maxActive" value ="3" /> <property name ="maxIdle" value ="1" /> </bean > <bean id ="processEngineConfiguration" class ="org.activiti.spring.SpringProcessEngineConfiguration" > <property name ="dataSource" ref ="dataSource" /> <property name ="transactionManager" ref ="transactionManager" /> <property name ="databaseSchemaUpdate" value ="drop-create" /> </bean > <bean id ="processEngine" class ="org.activiti.spring.ProcessEngineFactoryBean" > <property name ="processEngineConfiguration" ref ="processEngineConfiguration" /> </bean > <bean id ="repositoryService" factory-bean ="processEngine" factory-method ="getRepositoryService" /> <bean id ="runtimeService" factory-bean ="processEngine" factory-method ="getRuntimeService" /> <bean id ="taskService" factory-bean ="processEngine" factory-method ="getTaskService" /> <bean id ="historyService" factory-bean ="processEngine" factory-method ="getHistoryService" /> <bean id ="transactionManager" class ="org.springframework.jdbc.datasource.DataSourceTransactionManager" > <property name ="dataSource" ref ="dataSource" /> </bean > <tx:advice id ="txAdvice" transaction-manager ="transactionManager" > <tx:attributes > <tx:method name ="save*" propagation ="REQUIRED" /> <tx:method name ="insert*" propagation ="REQUIRED" /> <tx:method name ="delete*" propagation ="REQUIRED" /> <tx:method name ="update*" propagation ="REQUIRED" /> <tx:method name ="find*" propagation ="SUPPORTS" read-only ="true" /> <tx:method name ="get*" propagation ="SUPPORTS" read-only ="true" /> </tx:attributes > </tx:advice > <aop:config proxy-target-class ="true" > <aop:advisor advice-ref ="txAdvice" pointcut ="execution(* com.itheima.ihrm.service.impl.*.*(..))" /> </aop:config > </beans >
1.2测试 Activiti 与 Spring 整合 1.2.1 测试代码 1 2 3 4 5 6 7 8 9 10 11 12 13 @RunWith(SpringJUnit4ClassRunner.class) @ContextConfiguration(locations = "classpath:activiti-spring.xml") public class ActivitiTest { @Autowired private RepositoryService repositoryService; @Test public void test01 () { System.out.println("部署对象:" +repositoryService); } }
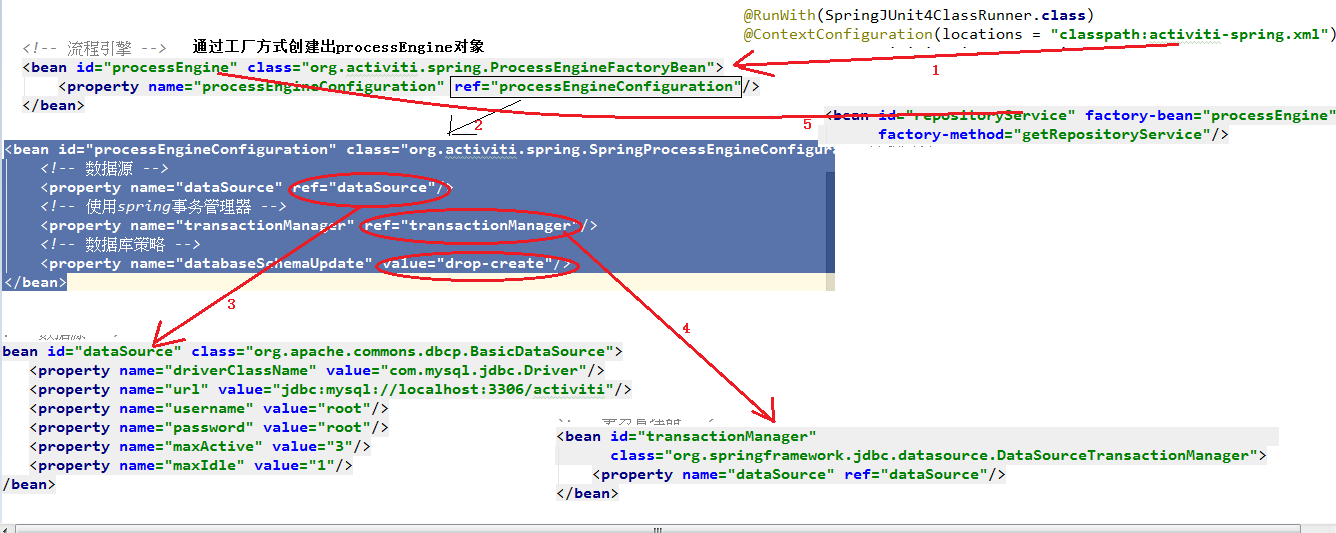
1.2.2 执行流程分析 下面我们一起来分析 Activiti 与 Spring 整合加载的过程。如下图所示:
从图中我们可以看出,首先我们加载 activiti-spring.xml 配置文件,而该配置文件中又会加载SpringProcessEngineConfiguration 对 象 ,
这个对象它需要依赖注入dataSource对象和transactionManager对象。其次会加载ProcessEngineFactoryBean工厂来创建 ProcessEngine 对象,
而ProcessEngineFactoryBean 工厂又需要依赖注入 processEngineConfiguration 对象 。
最后由processEngine 对象来负责创建我们的 Service 对象,从而简化 Activiti 的开发过程。在程序代码中我们可以根据实际需求来决定使用的 Service 对象。
Activiti7 与 SpringBoot整合Activiti7 发布正式版之后,它与 SpringBoot2.x 已经完全支持整合开发。我们可以将 Activiti7 与SpringBoot 整合开发的坐标引入到工程中,从而达到 SpringBoot 支持 Activti7 整合。
SpringBoot 整合 Activti7 的具体步骤如下:
1.添加 SpringBoot 整合 Activti7 的坐标
2.添加 SpringSecurity 安全框架的整合配置信息
3.使用 Activti7 新支持的类来实现工作流开发
ProcessRuntime 接口
TaskRuntime 接口
4.使用新的 API 实现工作流开发,主要包括
流程定义查询
启动流程实例
任务的查询
任务的完成
SpringBoot2.1.2.RELEASE + Activiti7 + Oracle12c
7.0.0.Beta2 SpringBoot 整合 Activiti7 的配置
1 2 3 4 5 6 7 8 9 10 11 12 13 14 15 16 17 18 19 20 21 22 23 24 25 26 27 28 29 30 31 32 33 34 35 36 37 38 39 40 41 42 43 44 45 46 47 48 49 50 <parent > <groupId > org.springframework.boot</groupId > <artifactId > spring-boot-starter-parent</artifactId > <version > 2.1.0.RELEASE</version > <relativePath /> </parent > <properties > <project.build.sourceEncoding > UTF-8</project.build.sourceEncoding > <project.reporting.outputEncoding > UTF-8</project.reporting.outputEncoding > <java.version > 1.8</java.version > </properties > <dependencies > <dependency > <groupId > org.springframework.boot</groupId > <artifactId > spring-boot-starter-jdbc</artifactId > </dependency > <dependency > <groupId > mysql</groupId > <artifactId > mysql-connector-java</artifactId > </dependency > <dependency > <groupId > org.springframework.boot</groupId > <artifactId > spring-boot-starter-web</artifactId > </dependency > <dependency > <groupId > org.springframework.boot</groupId > <artifactId > spring-boot-starter-test</artifactId > <scope > test</scope > </dependency > <dependency > <groupId > org.activiti</groupId > <artifactId > activiti-spring-boot-starter</artifactId > <version > 7.0.0.Beta2</version > </dependency > <dependency > <groupId > org.mybatis</groupId > <artifactId > mybatis</artifactId > <version > 3.4.5</version > </dependency > <dependency > <groupId > mysql</groupId > <artifactId > mysql-connector-java</artifactId > <version > 5.1.27</version > </dependency > </dependencies > <build > <plugins > <plugin > <groupId > org.springframework.boot</groupId > <artifactId > spring-boot-maven-plugin</artifactId > </plugin > </plugins > </build >
配置 SpringBoot 的 application.yml 文件配置
为了能够实现 Activiti7 生成的表放到 Mysql 数据库中,需要在 springboot 的配置文件 application.yml中添加相关的配置
1 2 3 4 5 6 7 8 9 10 11 spring: datasource: url: jdbc:mysql://localhost:3306/activiti?useUnicode=true&characterEncoding=utf8&serverTimezone=GMT username : root password : root driver-class-name: com.mysql.jdbc.Driver activiti: database-schema-update: true history-level: full db-history-used: true
添加 SpringSecurity 安全框架整合配置 因为 Activiti7 与 SpringBoot 整合后,默认情况下,集成了 SpringSecurity 安全框架,这样我们就要去准备 SpringSecurity 整合进来的相关用户权限配置信息。
可以查看一下整合 SpringBoot 的依赖包,发现同时也将 SpringSecurity 的依赖包也添加进项目中了,如下:
添加 SecurityUtil 类 添加 SecurityUtil 类。
1 2 3 4 5 6 7 8 9 10 11 12 13 14 15 16 17 18 19 20 21 22 23 24 25 26 27 28 29 30 31 32 33 34 35 36 37 38 39 40 41 42 43 44 45 @Component public class SecurityUtil { private Logger logger = LoggerFactory.getLogger(SecurityUtil.class); @Autowired @Qualifier("myUserDetailsService") private UserDetailsService userDetailsService; public void logInAs (String username) { UserDetails user = userDetailsService.loadUserByUsername(username); if (user == null ) { throw new IllegalStateException ("User " + username + " doesn't exist, please provide a valid user" ); } logger.info("> Logged in as: " + username); SecurityContextHolder.setContext(new SecurityContextImpl (new Authentication () { @Override public Collection<? extends GrantedAuthority > getAuthorities() { return user.getAuthorities(); } @Override public Object getCredentials () { return user.getPassword(); } @Override public Object getDetails () { return user; } @Override public Object getPrincipal () { return user; } @Override public boolean isAuthenticated () { return true ; } @Override public void setAuthenticated (boolean isAuthenticated) throws IllegalArgumentException { } @Override public String getName () { return user.getUsername(); } })); org.activiti.engine.impl.identity.Authentication.setAuthenticatedUserId(username); } }
这个类可以从我们下载的 Activiti7 官方提供的 Example 中找到。
添加 DemoApplicationConfig 类 在 Activiti7 官方下载的 Example 中找到 DemoApplicationConfig 类,它的作用是为了实现SpringSecurity 框架的用户权限的配置,这样我们就可以在系统中使用用户权限信息。本次项目中基本是在文件中定义出来的用户信息,当然也可以是数据库中查询的用户权限信息。
1 2 3 4 5 6 7 8 9 10 11 12 13 14 15 16 17 18 19 20 21 22 23 24 25 26 27 28 29 30 31 @Configuration public class DemoApplicationConfiguration { private Logger logger = LoggerFactory.getLogger(DemoApplicationConfiguration.class); @Bean public UserDetailsService myUserDetailsService () { InMemoryUserDetailsManager inMemoryUserDetailsManager = new InMemoryUserDetailsManager (); String[][] usersGroupsAndRoles = { {"salaboy" , "password" , "ROLE_ACTIVITI_USER" , "GROUP_activitiTeam" }, {"ryandawsonuk" , "password" , "ROLE_ACTIVITI_USER" , "GROUP_activitiTeam" }, {"erdemedeiros" , "password" , "ROLE_ACTIVITI_USER" , "GROUP_activitiTeam" }, {"other" , "password" , "ROLE_ACTIVITI_USER" , "GROUP_otherTeam" }, {"system" , "password" , "ROLE_ACTIVITI_USER" }, {"admin" , "password" , "ROLE_ACTIVITI_ADMIN" }, }; for (String[] user : usersGroupsAndRoles) { List<String> authoritiesStrings = Arrays.asList(Arrays.copyOfRange(user, 2 , user.length)); logger.info("> Registering new user: " + user[0 ] + " with the following Authorities[" + authoritiesStrings + "]" ); inMemoryUserDetailsManager.createUser(new User (user[0 ], passwordEncoder().encode(user[1 ]), authoritiesStrings.stream().map(s -> new SimpleGrantedAuthority (s)).collect(Collectors.toList()))); } return inMemoryUserDetailsManager; } @Bean public PasswordEncoder passwordEncoder () { return new BCryptPasswordEncoder (); } }
使用 SpringBoot 整合 Junit 方式测试新特性 创建测试类 1 2 3 4 5 6 7 8 9 10 @RunWith(SpringRunner.class) @SpringBootTest public class Actviti7DemoApplicationTests { @Autowired private ProcessRuntime processRuntime; @Autowired private TaskRuntime taskRuntime; @Autowired private SecurityUtil securityUtil; }
通过上面的类,我们可以实现 SpringBoot 与 Junit 整合测试 Activiti7 所需的各种 API,之后我们就可以实现各种测试了
放到processes下的流程定义在项目启动时会自动部署
查看流程定义信息 1 2 3 4 5 6 7 8 9 10 11 12 @Test public void contextLoads () { securityUtil.logInAs("system" ); Page<ProcessDefinition> processDefinitionPage =processRuntime.processDefinitions(Pageable.of(0 , 10 )); System.out.println(" 可用的流程定义数量:" + processDefinitionPage.getTotalItems()); for (org.activiti.api.process.model.ProcessDefinition pd : processDefinitionPage.getContent()) { System.out.println("流程定义:" + pd); } }
通过 ProcessRuntime 的方法,我们可以查看已经部署的流程定义信息。通过加入 Pageable.of()方法可以实现分页查询效果。
启动流程实例 1 2 3 4 5 6 7 8 9 @Test public void testStartProcess () { securityUtil.logInAs("system" ); ProcessInstance pi = processRuntime.start(ProcessPayloadBuilder.start().withProcessDefinitionKey("myProcess" ).build()); System.out.println("流程实例 ID:" + pi.getId()); }
现在要启动流程实例,我们可以使用 ProcessRuntime 的 start()方法就可以实现流程实例的启动
查询并完成任务 1 2 3 4 5 6 7 8 9 10 11 12 13 14 15 16 17 18 19 @Test public void testTask () { securityUtil.logInAs("ryandawsonuk" ); Page<Task> taskPage=taskRuntime.tasks(Pageable.of(0 ,10 )); if (taskPage.getTotalItems()>0 ){ for (Task task:taskPage.getContent()){ taskRuntime.claim(TaskPayloadBuilder.claim().withTaskId(task.getId()).build()); System.out.println("任务:" +task); taskRuntime.complete(TaskPayloadBuilder.complete().withTaskId(task.getId()).build()); } } Page<Task> taskPage2=taskRuntime.tasks(Pageable.of(0 ,10 )); if (taskPage2.getTotalItems()>0 ){ System.out.println("任务:" +taskPage2.getContent()); } }
使用 TaskRuntime 接口的 tasks()方法实现任务的查询。
使用 TaskRuntime 接口的 claim()方法实现任务拾取。
使用 TaskRuntime 接口的 complete()方法实现任务的完成
SpringMVC 层开发 添加 Controller 类 1 2 3 4 5 6 7 8 9 10 @RestController public class TestController { private Logger logger = LoggerFactory.getLogger(TestController.class); @Autowired private ProcessRuntime processRuntime; @Autowired private TaskRuntime taskRuntime; @Autowired private SecurityUtil securityUtil; }
实现任务完成 1 2 3 4 5 6 7 8 9 10 11 12 13 14 15 16 17 18 19 20 21 22 23 24 25 26 27 28 29 30 31 @RequestMapping(value = "/hello") public void hello () { Page<ProcessDefinition> processDefinitionPage = processRuntime.processDefinitions(Pageable.of(0 , 10 )); if (processDefinitionPage.getTotalItems() > 0 ) { for (ProcessDefinition definition : processDefinitionPage.getContent()) { logger.info("流程定义信息:" + definition); processRuntime.start(ProcessPayloadBuilder.start().withProcessDefinitionId(definition.getId()).build()); } } Page<Task> taskPage = taskRuntime.tasks(Pageable.of(0 , 10 )); if (taskPage.getTotalItems() > 0 ) { for (Task task : taskPage.getContent()) { logger.info("任务信息:" + task); taskRuntime.claim(TaskPayloadBuilder.claim().withTaskId(task.getId()).build()); taskRuntime.complete(TaskPayloadBuilder.complete().withTaskId(task.getId()).build()); } } Page<Task> taskPage2 = taskRuntime.tasks(Pageable.of(0 , 10 )); if (taskPage2.getTotalItems() > 0 ) { logger.info("任务信息:" + taskPage2.getContent()); } }
编写 SpringBoot 启动类 1 2 3 4 5 6 7 8 9 10 11 12 13 14 @SpringBootApplication(exclude = SecurityAutoConfiguration.class) public class Actviti7DemoApplication { private Logger logger = LoggerFactory.getLogger(Actviti7DemoApplication.class); public static void main (String[] args) { SpringApplication.run(Actviti7DemoApplication.class, args); } @Bean public Connector testConnector () { return integrationContext -> { logger.info("以前叫代理,现在叫连接器被调用啦~~" ); return integrationContext; }; } }
7.1.0.M5 1 2 3 4 5 6 7 8 9 10 11 12 13 14 15 16 17 18 19 20 21 22 23 24 25 26 27 28 29 30 31 32 33 34 <dependency > <groupId > org.activiti</groupId > <artifactId > activiti-spring-boot-starter</artifactId > <version > 7.1.0.M5</version > <exclusions > <exclusion > <groupId > org.mybatis</groupId > <artifactId > mybatis</artifactId > </exclusion > </exclusions > </dependency > <dependency > <groupId > com.oracle</groupId > <artifactId > ojdbc6</artifactId > <version > 11.2.0.3</version > </dependency > <dependency > <groupId > com.baomidou</groupId > <artifactId > mybatis-plus-boot-starter</artifactId > <version > 3.4.2</version > </dependency > <dependency > <groupId > org.activiti.dependencies</groupId > <artifactId > activiti-dependencies</artifactId > <version > 7.1.0.M6</version > <type > pom</type > </dependency >
通过该 pom.xml 文件所导入的坐标,我们就可以实现 activiti7 与 Springboot 整合。
配置
databaseSchemaUpdate属性的取值
1 2 3 4 flase: 默认值。activiti在启动时,会对比数据库表中保存的版本,如果没有表或者版本不匹配,将抛出异常。 true: activiti会对数据库中所有表进行更新操作。如果表不存在,则自动创建。 create_drop: 在activiti启动时创建表,在关闭时删除表(必须手动关闭引擎,才能删除表)。 drop-create: 在activiti启动时删除原来的旧表,然后在创建新表(不需要手动关闭引擎)。
1 2 3 4 5 6 7 8 9 10 11 12 13 复制代码 activiti: database-schema-update: true check-process-definitions: true process-definition-location-prefix: classpath:/processes/ history-level: full process-definition-location-prefix是指定activiti流程描述文件的前缀(即路径),启动时,activiti就会去寻找此路径下的流程描述文件,并且自动部署; process-definition-location-suffixes是一个String数组,表示描述文件的默认后缀名,默认以上两种。
问题 ORA-00942: 表或视图不存在 1 2 3 4 5 6 7 8 9 ### The error may exist in org/activiti/db/mapping/entity/Property.xml ### The error may involve org.activiti.engine.impl.persistence.entity.PropertyEntity.selectProperty-Inline ### The error occurred while setting parameters ### SQL: select * from ACT_GE_PROPERTY where NAME_ = ? ### Cause: java.sql.SQLException: ORA-00942: 表或视图不存在 原因是引擎在创建表之前 isTablePresent() 方法 发现 schema 的值为null,所以需要配置属性 <property name ="databaseSchema" value ="ACTIVITI" > </property >
https://juejin.cn/post/6976974303610814478
activiti 名称已由现有对象使用 1 生成过一次,删除了表。但是sequences没有删除。也要删除掉才行
Activiti7 自动创建表后缺少字段 1 2 3 4 5 6 7 ACT_RE_DEPLOYMENT表增加 VERSION_ varchar (255 ) PROJECT_RELEASE_VERSION_ varchar (255 ) 字段 ALTER TABLE `act_re_deployment` ADD COLUMN `VERSION_` int (11 ) NULL DEFAULT NULL ,ADD COLUMN `PROJECT_RELEASE_VERSION_` varchar (255 ) NULL DEFAULT NULL ;
找不到方法:getLanguageDriver(langClass) 1 导入 mybatis-plus-boot-starter 一个包即可,另外排除相关 mybatis 的一切依赖包括第三方封装包,要排除他依赖的包
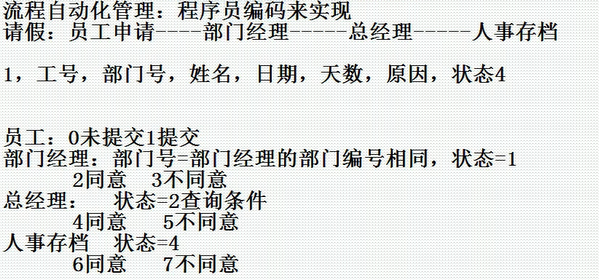
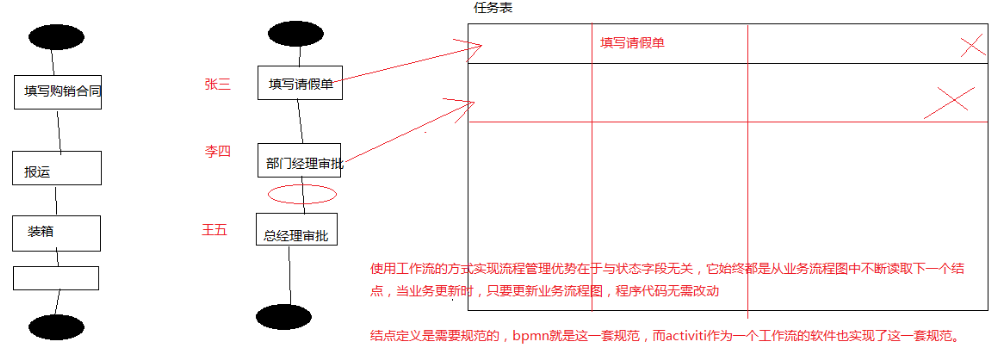
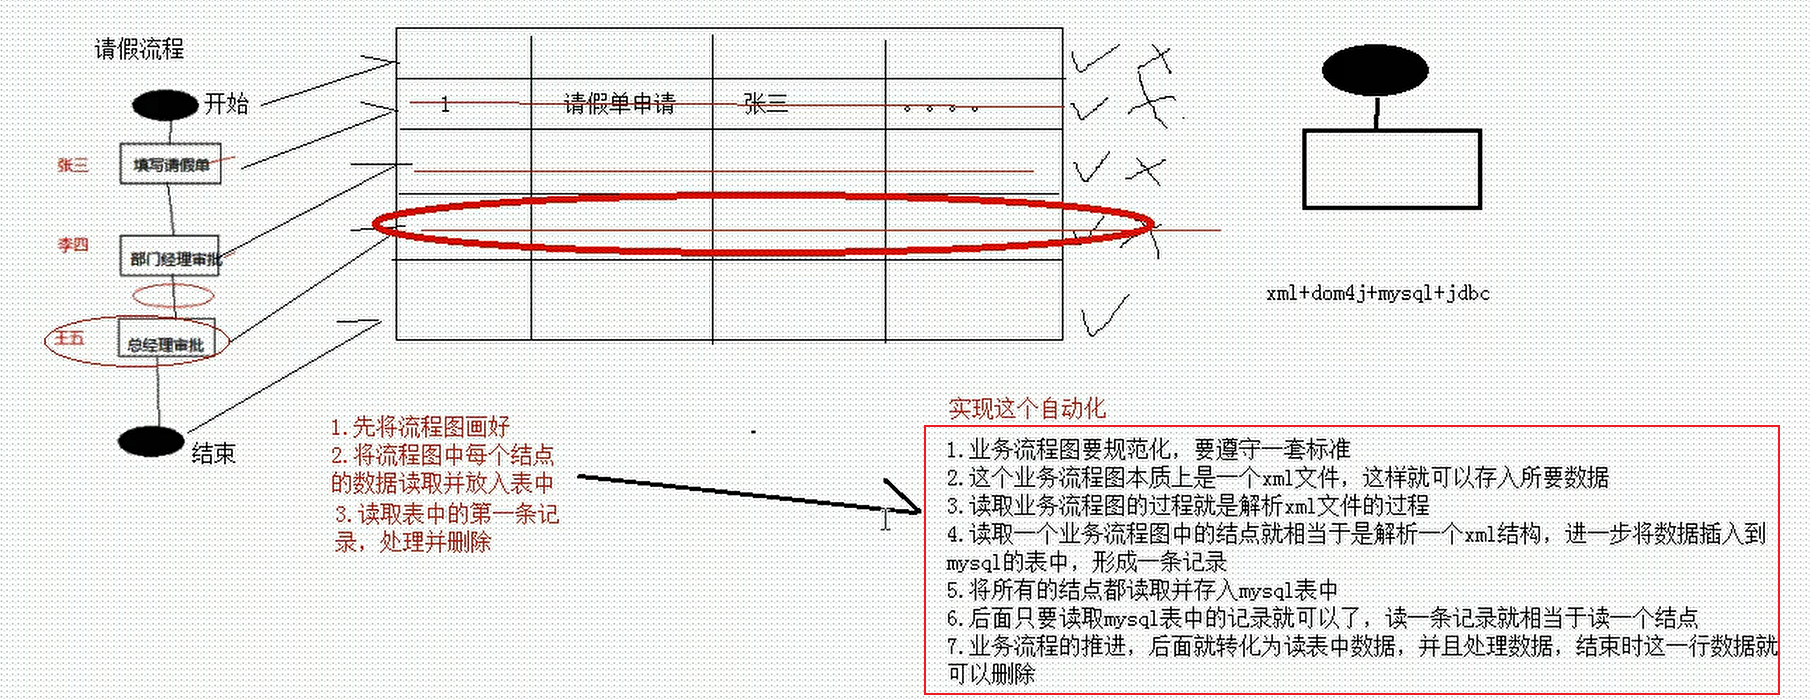

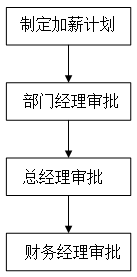
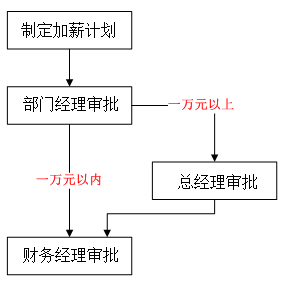
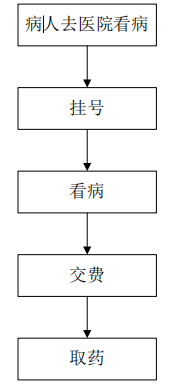
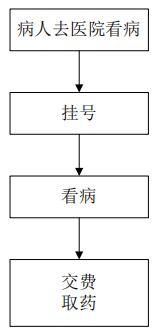


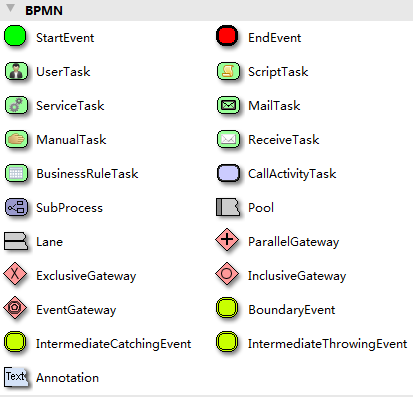

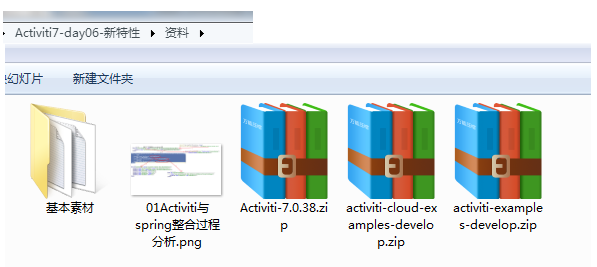

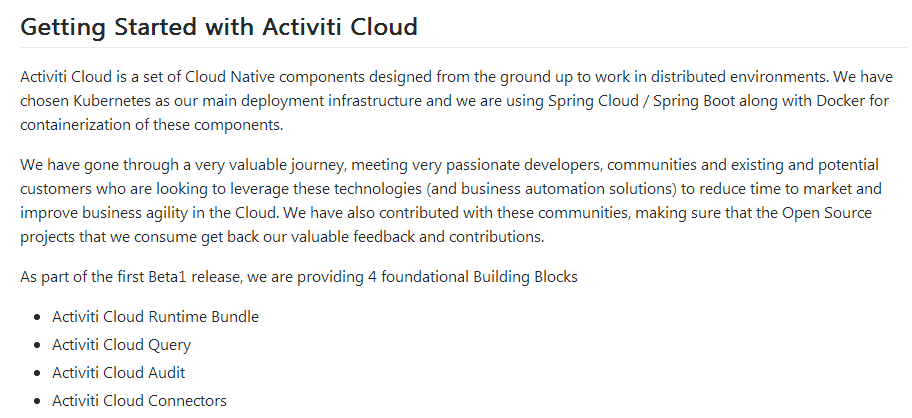
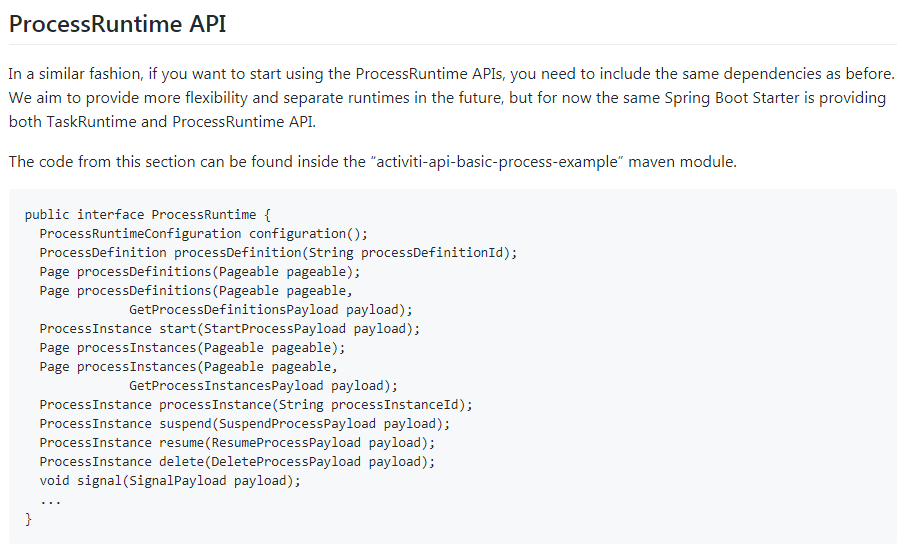
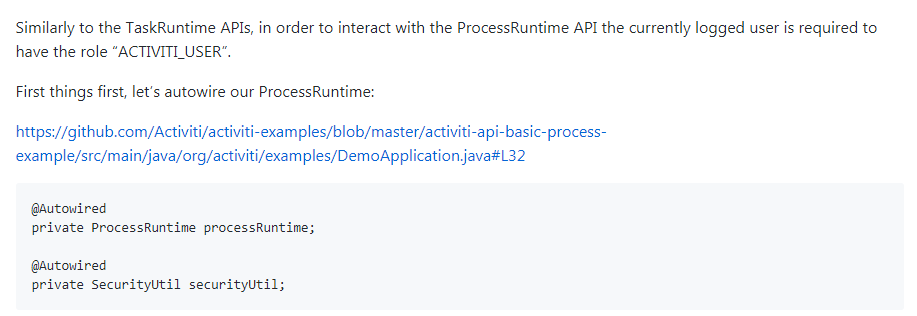
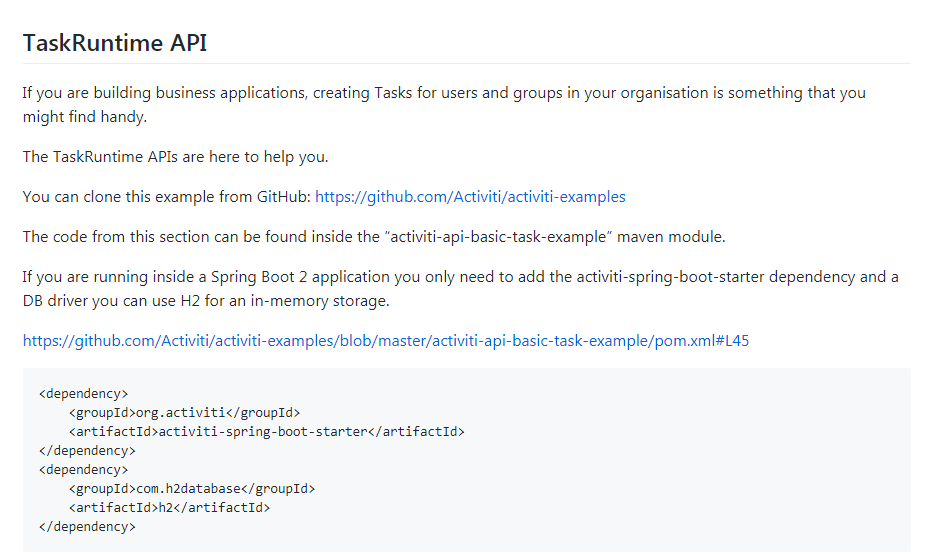
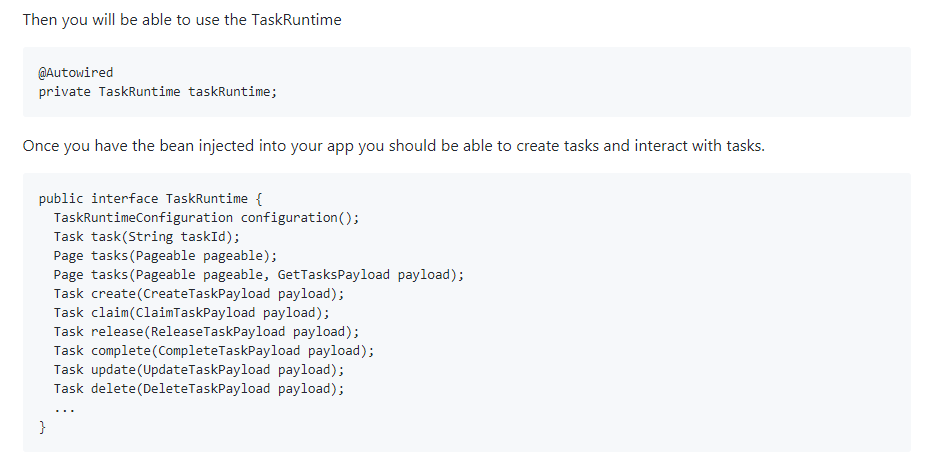
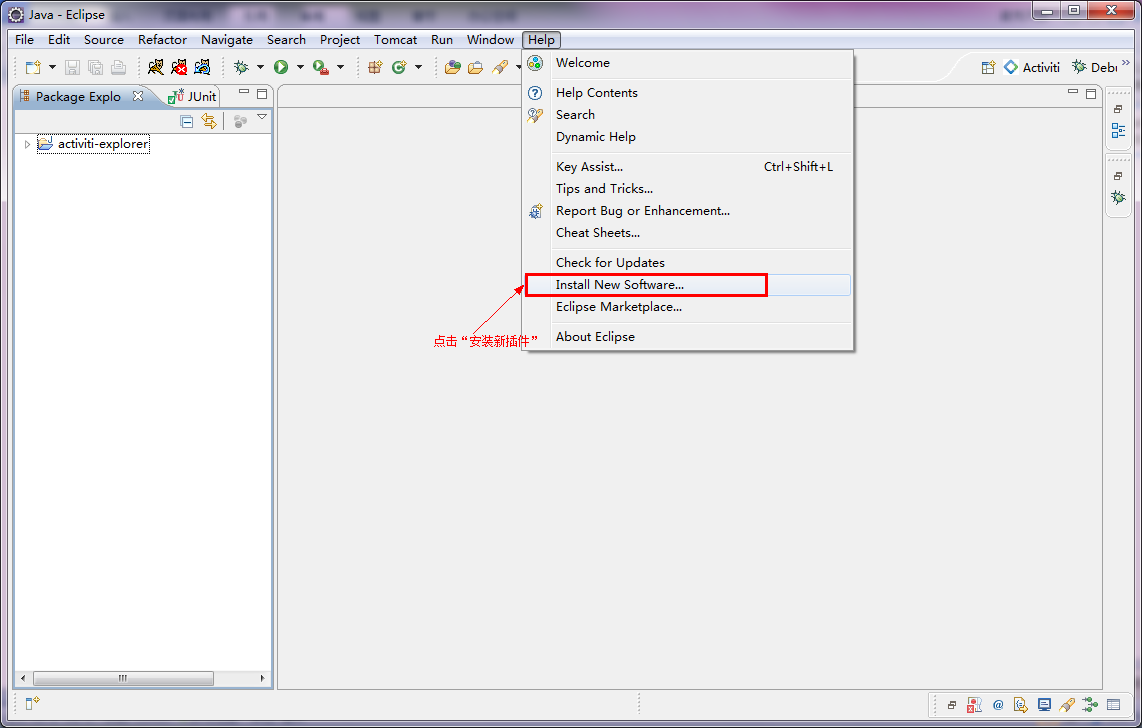
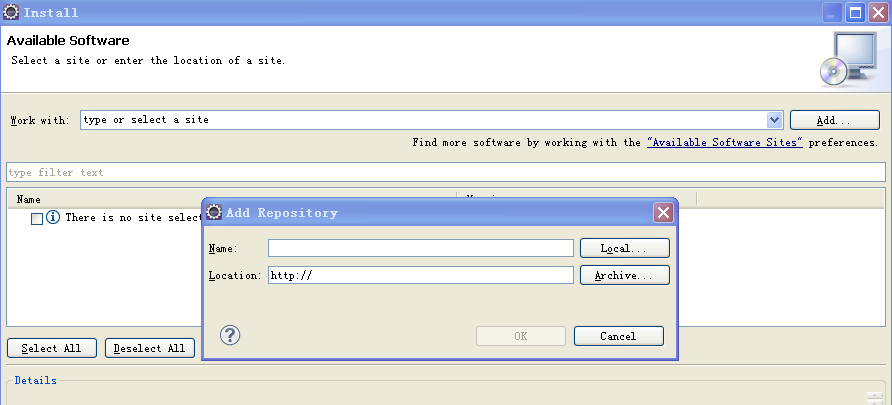
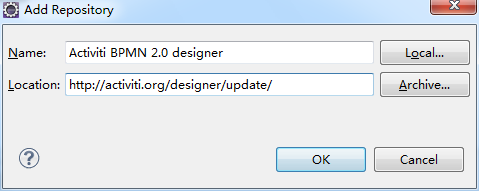
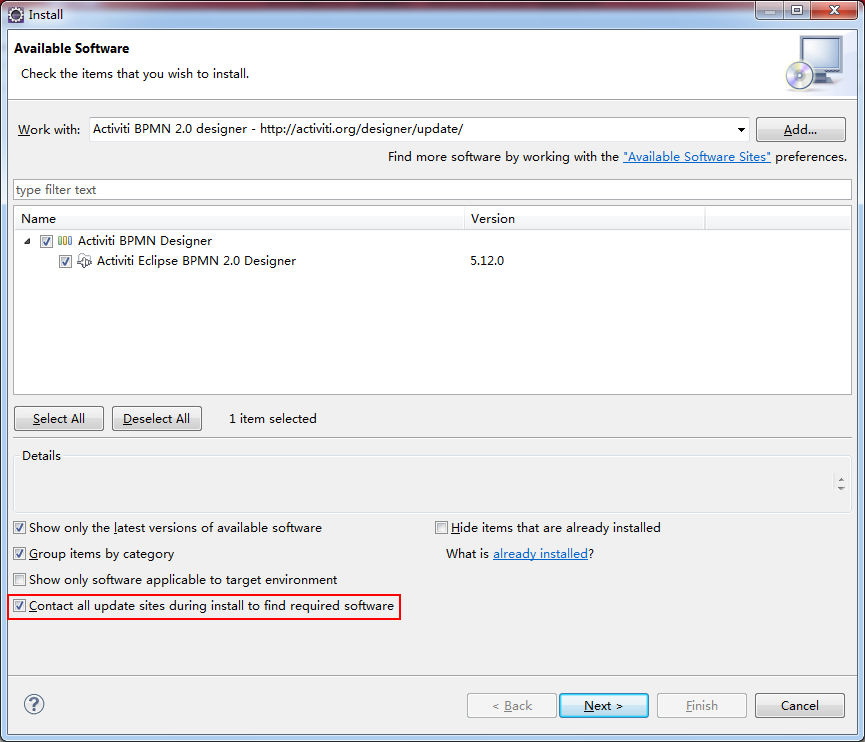
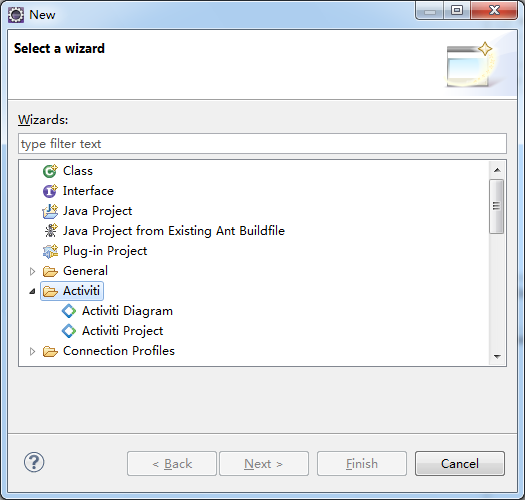

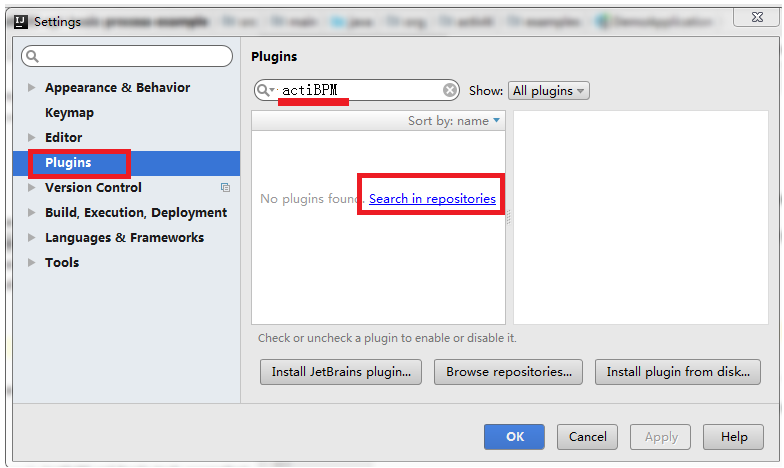
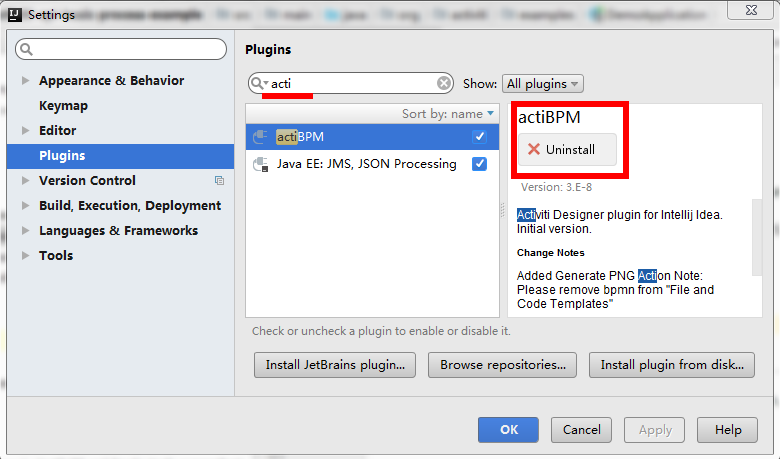
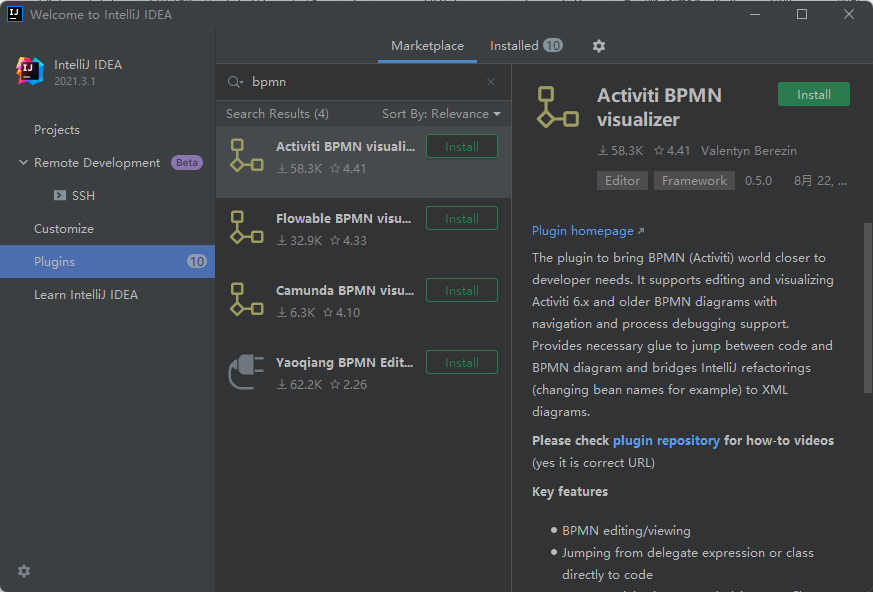
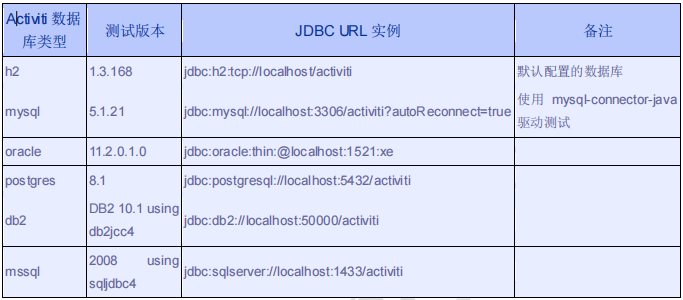

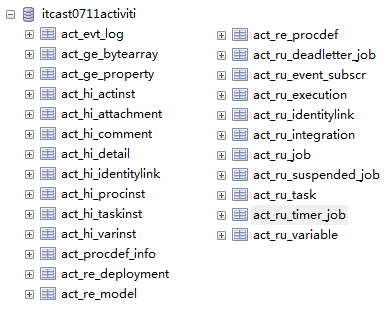
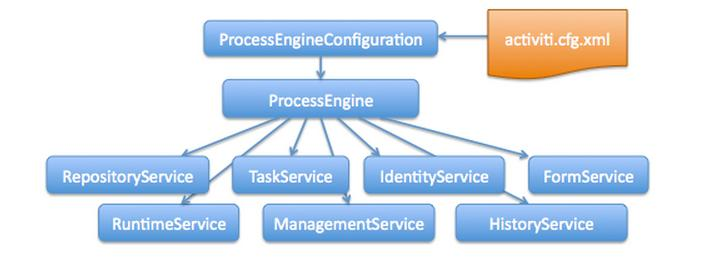

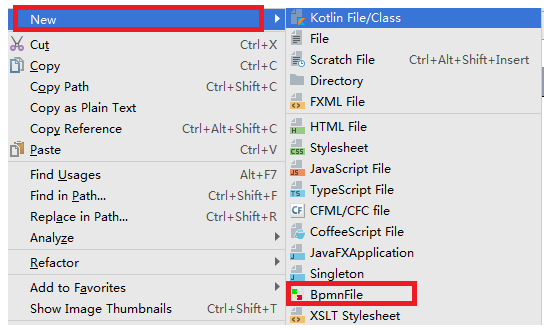
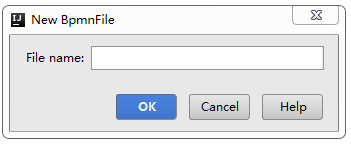
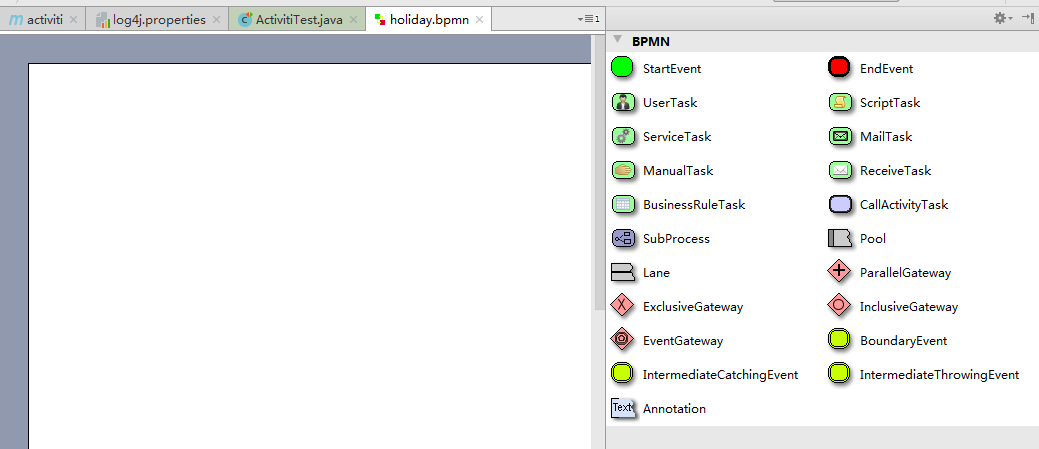
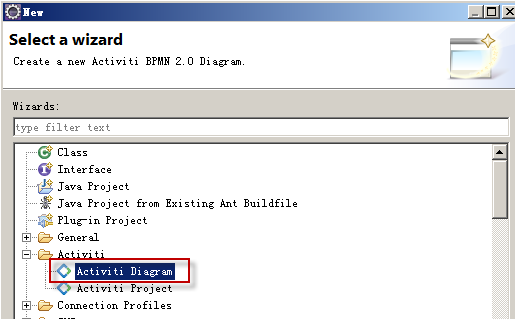
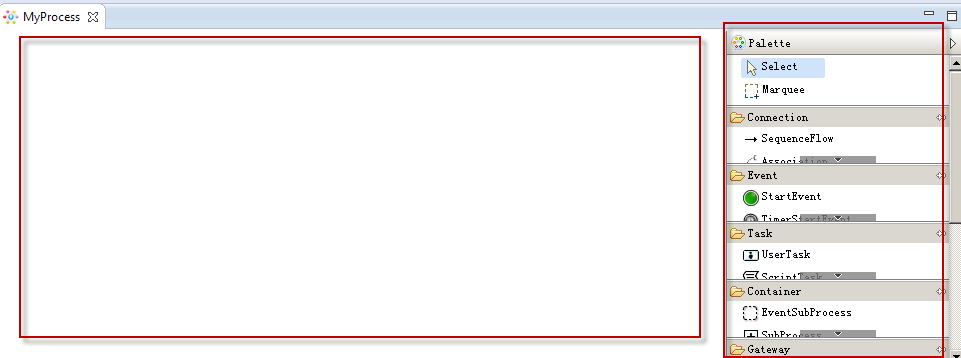


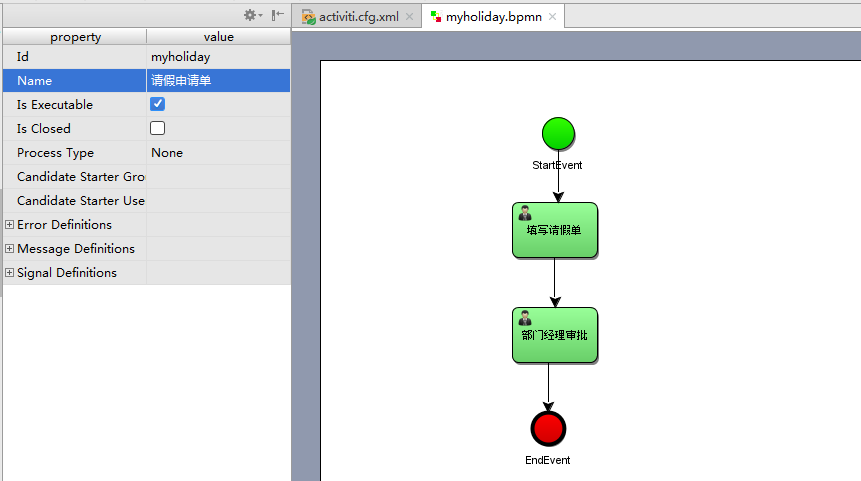
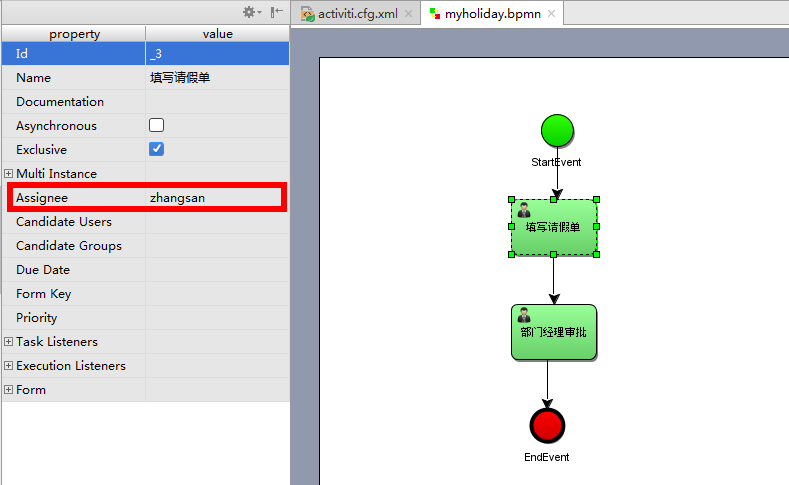

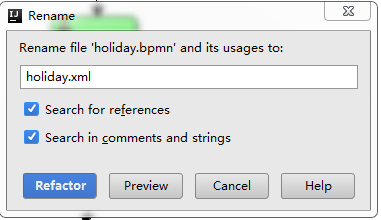

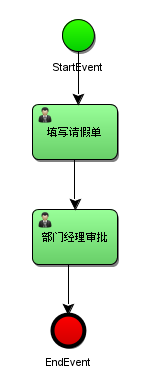

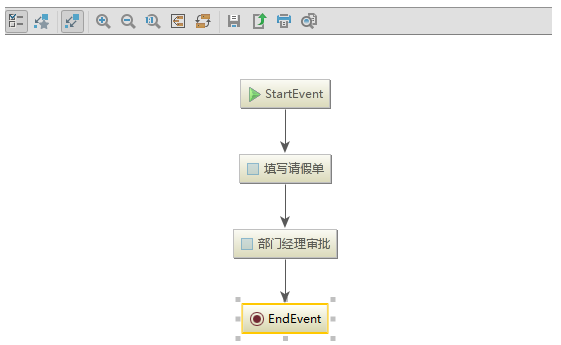

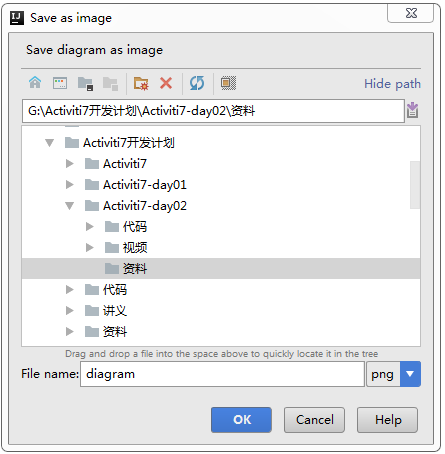
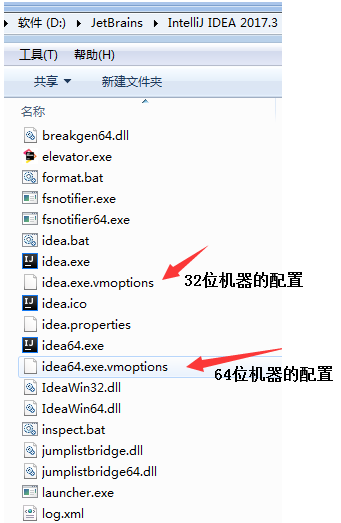
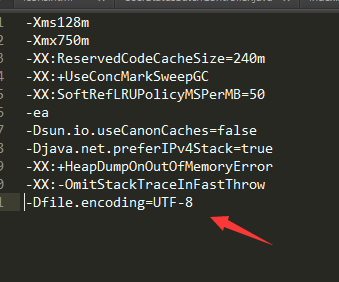
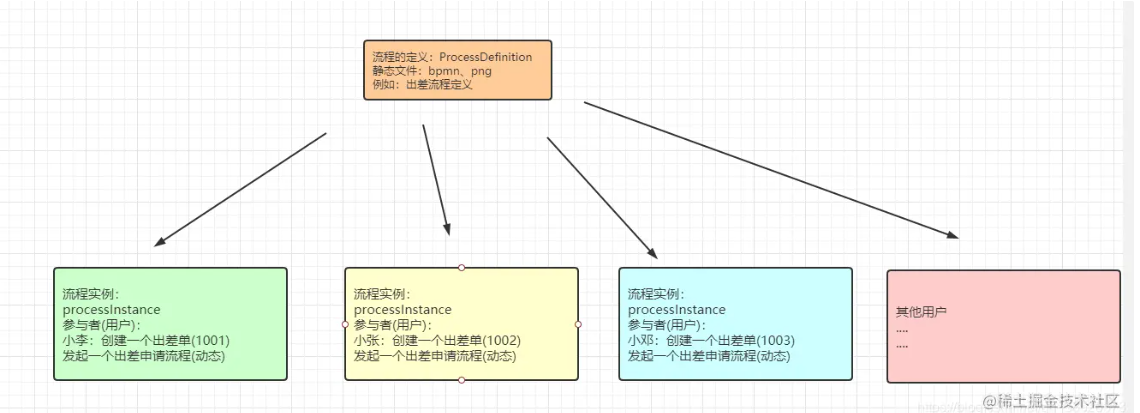
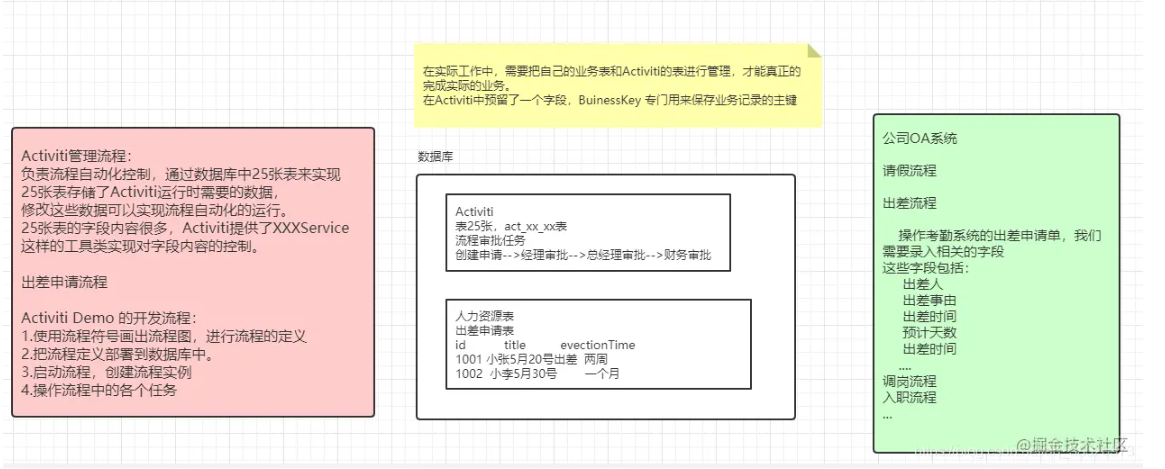
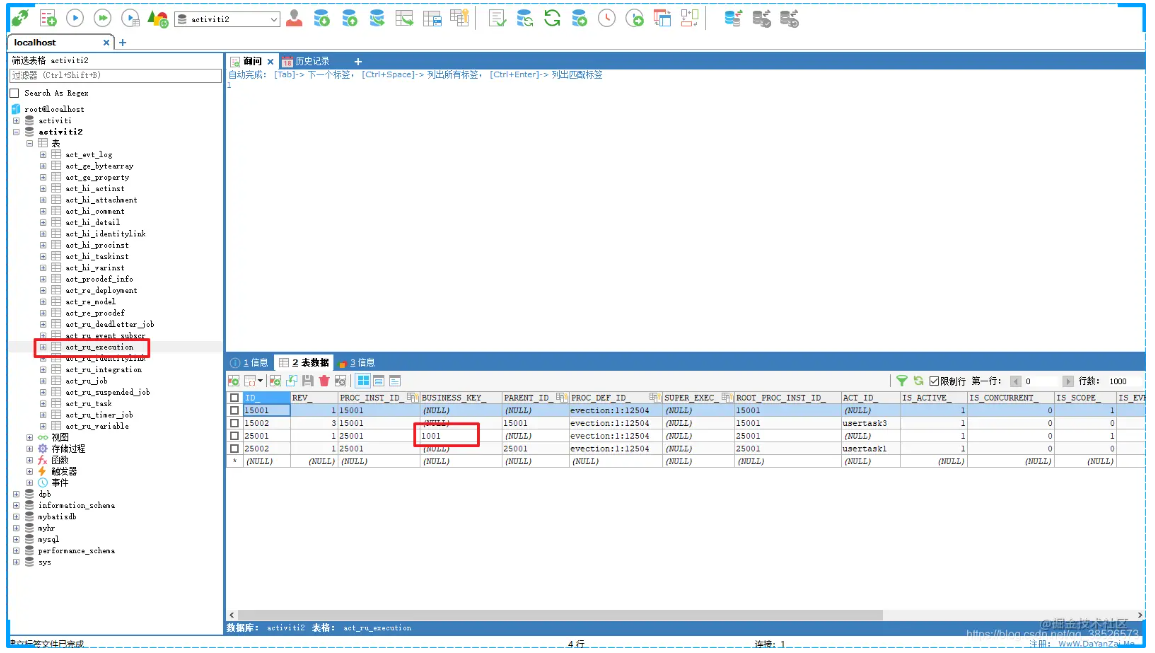
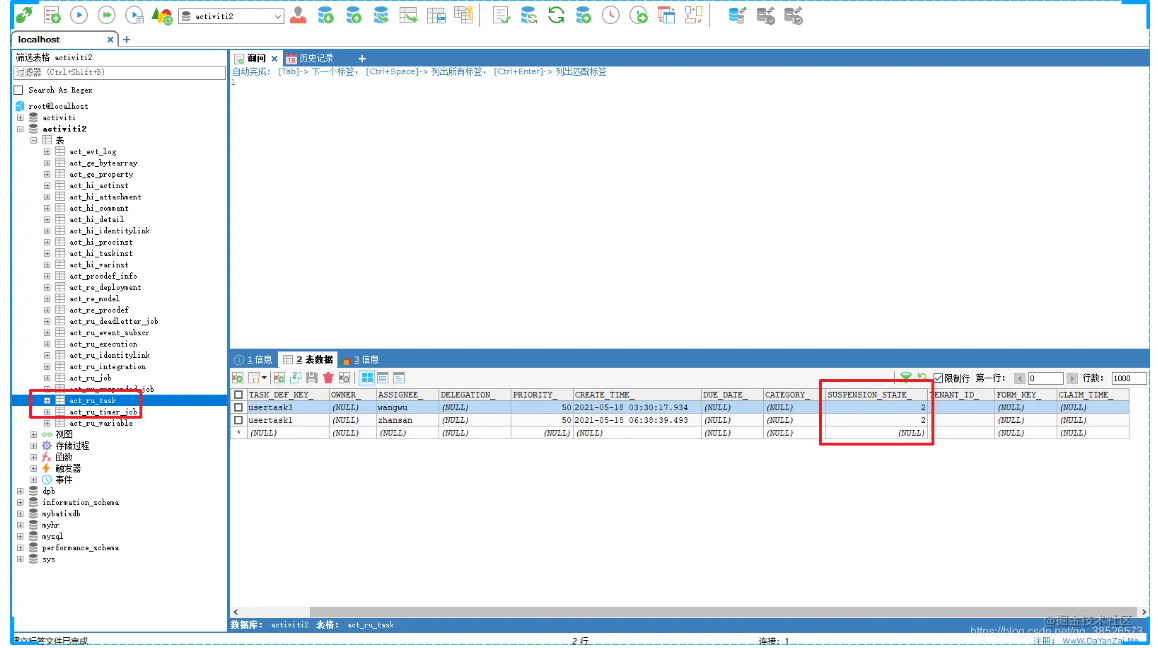
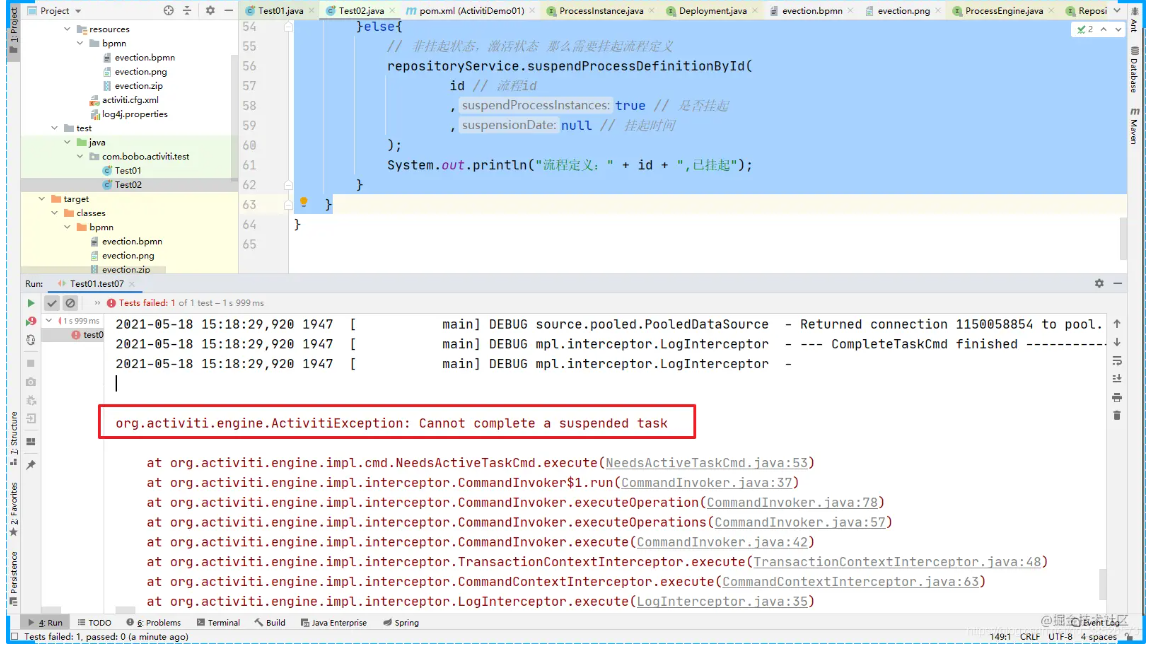 我们再将挂起的流程转变为激活状态,对于的状态值会从2更新为1