Typora
链接
基础设置
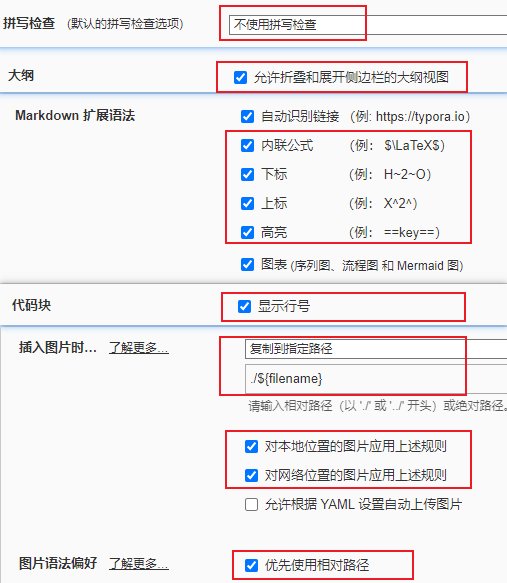
::: tip Coder 💬
图片路径如果是静态博客要用,看情况修改,比如我用vitepress,此处设置的就是./assets/了
:::
操作技巧
全局搜索
大纲菜单往上可以看到全局搜索框
windows把ctrl+shift+f关了,你就可以体验全局搜索了。裂开,我之前一直以为typora无法全局搜索。见:知乎吐槽
快速格式化代码
代码块中,设置好代码风格,比如java,然后可以通过shift+tab 快速格式化
插入Gif图片
是的Typora,是可以插入gif图片的,或者也可以用HTML插入
1
| <img src="图片地址" style="zoom: 100%" />
|
标题自动编号
详见官网介绍:Auto Numbering for Headings - Typora Support
如果无法访问官网:请阅读科学上网篇
在主题文件夹theme下创建base.user.css,增加代码
1
2
3
4
5
6
7
8
9
10
11
12
13
14
15
16
17
18
19
20
21
22
23
24
25
26
27
28
29
30
31
32
33
34
35
36
37
38
39
40
41
42
43
44
45
46
47
48
49
50
51
52
53
54
55
56
57
58
59
60
61
62
63
64
65
66
67
68
69
70
71
72
73
74
75
76
77
78
79
80
81
82
83
84
85
86
87
88
89
90
91
92
93
94
95
96
97
98
99
100
101
102
103
104
105
106
107
108
109
|
#write, .sidebar-content,.md-toc-content {
counter-reset: h1
}
#write h1, .outline-h1, .md-toc-item.md-toc-h1 {
counter-reset: h2
}
#write h2, .outline-h2, .md-toc-item.md-toc-h2 {
counter-reset: h3
}
#write h3, .outline-h3, .md-toc-item.md-toc-h3 {
counter-reset: h4
}
#write h4, .outline-h4, .md-toc-item.md-toc-h4 {
counter-reset: h5
}
#write h5, .outline-h5, .md-toc-item.md-toc-h5 {
counter-reset: h6
}
#write h1:before,
h1.md-focus.md-heading:before,
.outline-h1>.outline-item>.outline-label:before,
.md-toc-item.md-toc-h1>.md-toc-inner:before{
counter-increment: h1;
content: counter(h1) " "
}
#write h2:before,
h2.md-focus.md-heading:before,
.outline-h2>.outline-item>.outline-label:before,
.md-toc-item.md-toc-h2>.md-toc-inner:before{
counter-increment: h2;
content: counter(h1) "." counter(h2) " "
}
#write h3:before,
h3.md-focus.md-heading:before,
.outline-h3>.outline-item>.outline-label:before,
.md-toc-item.md-toc-h3>.md-toc-inner:before {
counter-increment: h3;
content: counter(h1) "." counter(h2) "." counter(h3) " "
}
#write h4:before,
h4.md-focus.md-heading:before,
.outline-h4>.outline-item>.outline-label:before,
.md-toc-item.md-toc-h4>.md-toc-inner:before {
counter-increment: h4;
content: counter(h1) "." counter(h2) "." counter(h3) "." counter(h4) " "
}
#write h5:before,
h5.md-focus.md-heading:before,
.outline-h5>.outline-item>.outline-label:before,
.md-toc-item.md-toc-h5>.md-toc-inner:before {
counter-increment: h5;
content: counter(h1) "." counter(h2) "." counter(h3) "." counter(h4) "." counter(h5) " "
}
#write h6:before,
h6.md-focus.md-heading:before,
.outline-h6>.outline-item>.outline-label:before,
.md-toc-item.md-toc-h6>.md-toc-inner:before {
counter-increment: h6;
content: counter(h1) "." counter(h2) "." counter(h3) "." counter(h4) "." counter(h5) "." counter(h6) " "
}
#write>h3.md-focus:before,
#write>h4.md-focus:before,
#write>h5.md-focus:before,
#write>h6.md-focus:before,
h3.md-focus:before,
h4.md-focus:before,
h5.md-focus:before,
h6.md-focus:before {
color: inherit;
border: inherit;
border-radius: inherit;
position: inherit;
left:initial;
float: none;
top:initial;
font-size: inherit;
padding-left: inherit;
padding-right: inherit;
vertical-align: inherit;
font-weight: inherit;
line-height: inherit;
}
|
设置菜单栏背景
首先,将背景图转为透明: https://www.aigei.com/bgremover
然后放置到D:\tools\Typora\resources\coder\image目录下
修改D:\tools\Typora\resources下的windows.html,导入自定义的样式文件
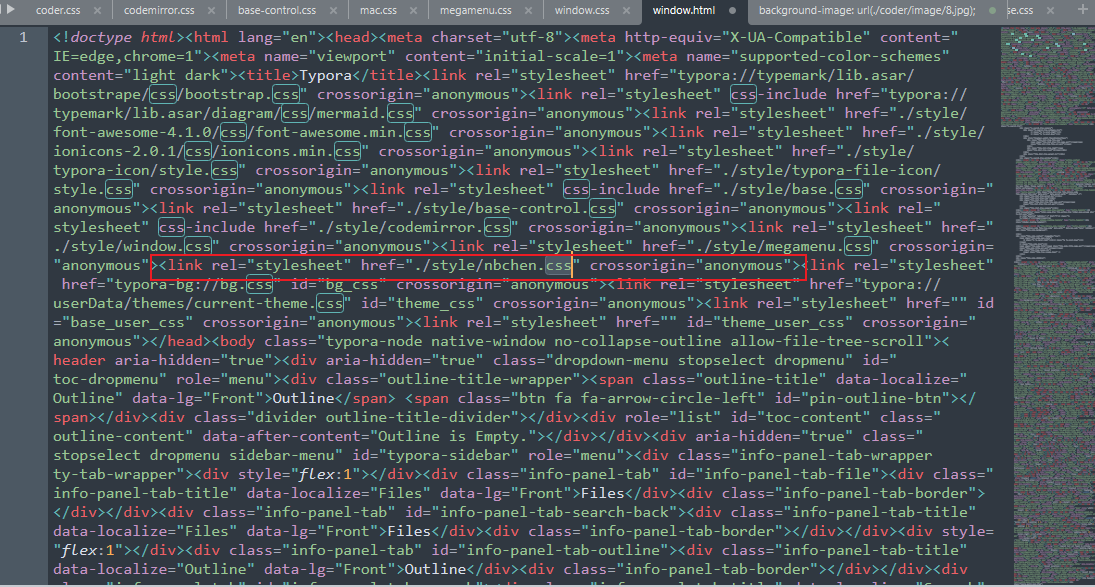
在D:\tools\Typora\resources\style目录下新增自定义样式文件nbchen.css,内容为:
1
2
3
4
5
6
| div#typora-sidebar {
background-image: url(./coder/image/8.jpg);
background-repeat: no-repeat;
background-size: contain;
background-position: bottom;
}
|
重启typora,效果图:
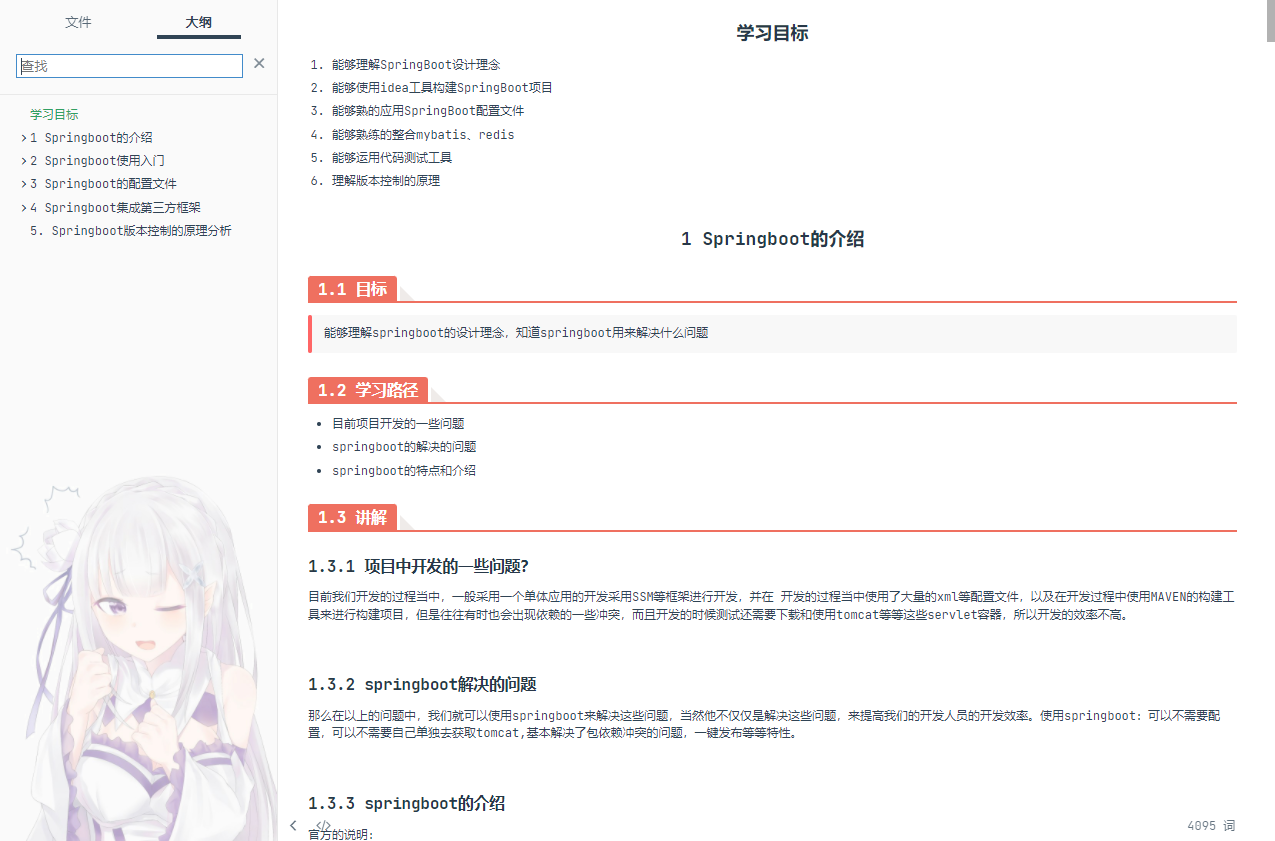
优化方案:
不改工程级代码,在主题css中设置样式
1
2
3
4
5
6
7
8
| #typora-sidebar {
font-size: 1.1rem;
background-image: url(./coder/image/3.jpg);
background-repeat: no-repeat;
background-size: contain;
background-position: bottom;
}
|
自定义插件
背景:
vuepres使用相对路径,才能解析到图片。而使用typora只能设置。所以希望有一款外挂,可以让我的图片路径正确生成,或者是可以更便捷的修正图片路径也行。
故尝试使用一下,
在D:\tools\Typora\resources\window.html文件添加自定义的脚步文件位置
1
| <script type="text/javascript" src="typora://userData\themes\coder.js"></script>
|
注意放到html的最后面的body元素前,这样如果你创建了动态元素才不会被覆盖掉
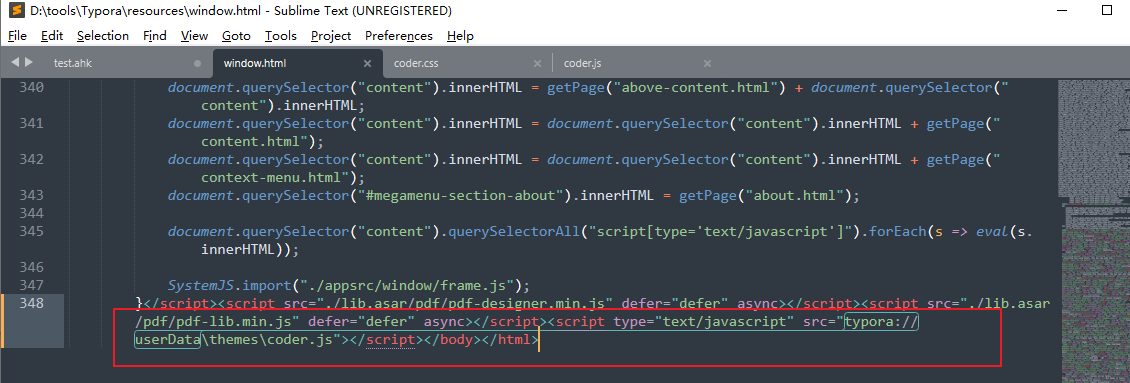
然后可以开始编写你的脚本了,在主题文件夹下创建coder.js
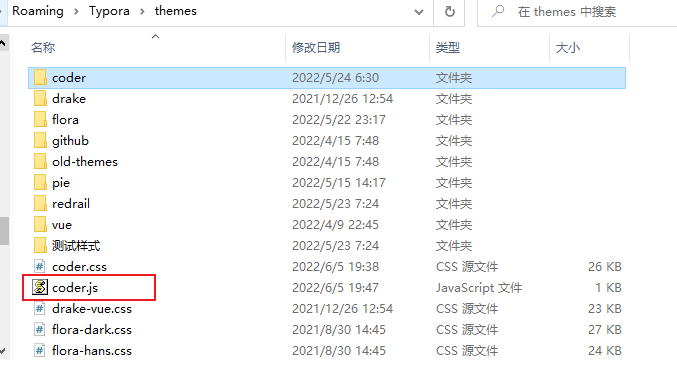
脚本内容打印一句话

测试结果:

可以!!,发挥你的创造力自定义脚本吧!
coder.js
添加增强按钮,点击替换全局assets/为./assets/
1
2
3
4
5
6
7
8
9
10
11
12
13
14
15
16
17
18
19
20
21
22
23
24
25
26
27
28
29
30
31
32
33
34
| console.log("hello nbchen's typora!");
var Test={
createDiv:function(){
var div = document.createElement('div');
div.id="nbtn-zq";
div.innerHTML = '增强';
div.style.cssText = `
position: fixed;
right: 0px;
bottom: 40%;
text-align: center;
background-color: #e25355;
font-size: 14px;
padding: 5px 10px;
cursor: pointer;
border-radius: 4px;
color: #fff;
user-select: none;
`;
div.addEventListener("click", function () {
console.log("点击了增强按钮,正在进行增强操作...")
var writeEl = document.getElementById('write');
var str = /\"NB的分隔符>assets\//mg;
let text = writeEl.innerHTML.replace(str, "\">./assets/");
writeEl.innerHTML = text;
})
document.body.appendChild(div);
},
};
Test.createDiv();
|
assets/和./assets/
1
2
| str = "assets/"
str = "./assets/"
|

设置源码编辑器宽度
Typora 安装目录,默认为 C:\Program Files\Typora\resources\app\style\ 下,找到 base-control.css 文件 ,打开后搜索 #typora-source ,找到 max-width (或者直接搜索 max-width ) ,将其值改为1200 ,如图所示:
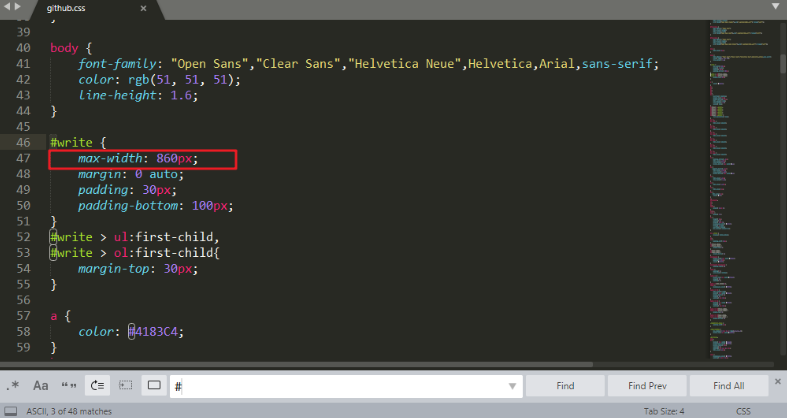
验证
重启 Typora 后,进入 源码模式:
测试一下,看到 灰底部分 的宽度确实是改成 1200px ,比之前宽了好多 。
设置编辑器主题宽度
普通编辑器的配置文件 并不在 Typora 的安装目录, 根据下面图所示( 文件 –> 编好设置 –> 打开主题文件夹):
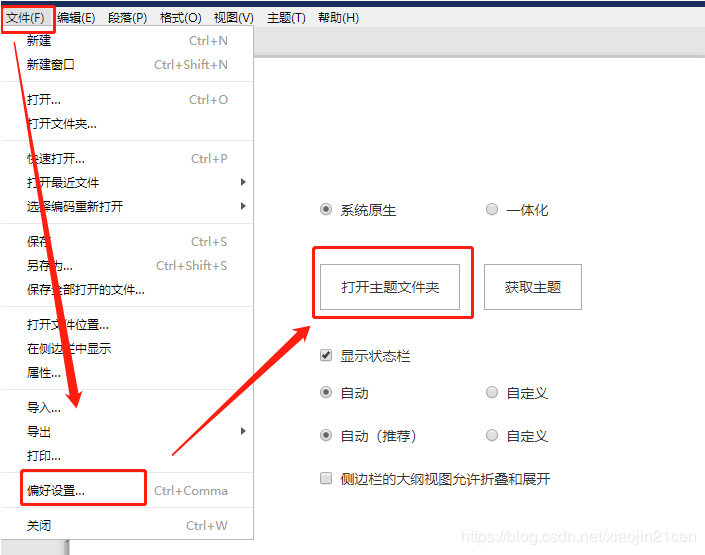
即是在 C:\Users\Administrator\AppData\Roaming\Typora\themes 目录下,
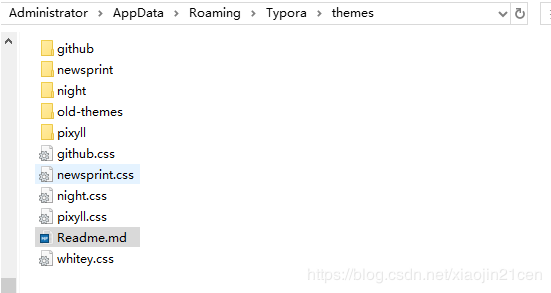
如上图所示: 主题有 github.css、newsprint.css、night.css、pixyll.css、whitey.css 。选择使用主题的css文件,搜索 #write ,修改其属性 max-width 的值改为 1060px 。
修改代码的颜色
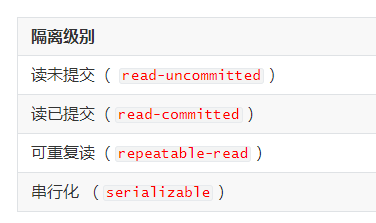
如下图所示,修改代码的颜色,不是代码块。
选择当前使用的主题:
我使用主题是 github,所以打开 github.css,在 230行 的code标签中,添加 color: red; ,所下图所示:
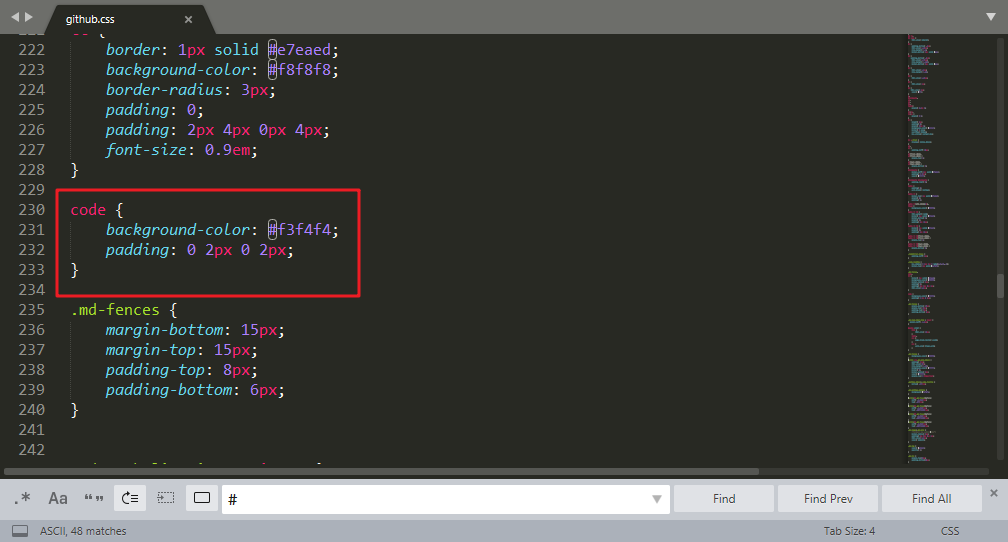
然后,重启编辑器, 查看效果,如下图所示:
备份恢复
记一次卡死,markdown直接损坏为空文件,我人都傻了。一条的笔记啊。我都快绝望了。
突然灵光一闪,去C:\Users\aas\AppData\Roaming\Typora\draftsRecover找到了备份恢复了下。
只有最近的!并不是保持过去所有的
::: tip Coder 💬
一台好的电脑真的可以节省很多不必要的事情,抵制无良厂家!
:::
常用快捷键
- 加粗:
Ctrl + B
- 标题:
Ctrl + 1~6
- 插入链接:
Ctrl + K
- 插入代码:
Ctrl + Shift + C – 无法执行
- 行内代码:
Ctrl + Shift + K
- 插入图片:
Ctrl + Shift + I
- 无序列表:
Ctrl + Shift + L – 无法执行
- 撤销:
Ctrl + Z
- 一级标题:
Ctrl + 1 – 以此类推
1
2
3
4
5
6
7
8
9
10
11
12
13
14
15
16
| Typora快捷键整合
```
Ctrl+1 一阶标题 Ctrl+B 字体加粗
Ctrl+2 二阶标题 Ctrl+I 字体倾斜
Ctrl+3 三阶标题 Ctrl+U 下划线
Ctrl+4 四阶标题 Ctrl+Home 返回Typora顶部
Ctrl+5 五阶标题 Ctrl+End 返回Typora底部
Ctrl+6 六阶标题 Ctrl+T 创建表格
Ctrl+L 选中某句话 Ctrl+K 创建超链接
Ctrl+D 选中某个单词 Ctrl+F 搜索
Ctrl+E 选中相同格式的文字 Ctrl+H 搜索并替换
Alt+Shift+5 删除线 Ctrl+Shift+I 插入图片
Ctrl+Shift+M 公式块 Ctrl+Shift+Q 引用
注:一些实体符号需要在实体符号之前加”\”才能够显示
```
|


