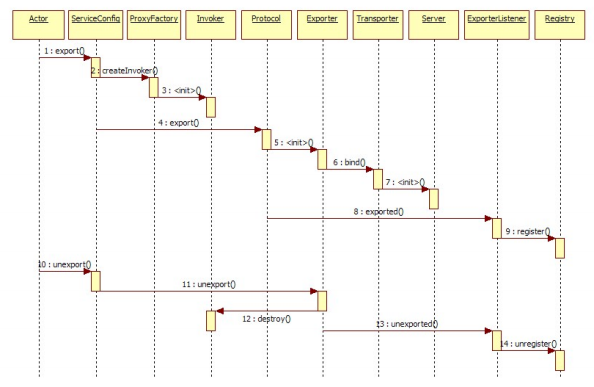
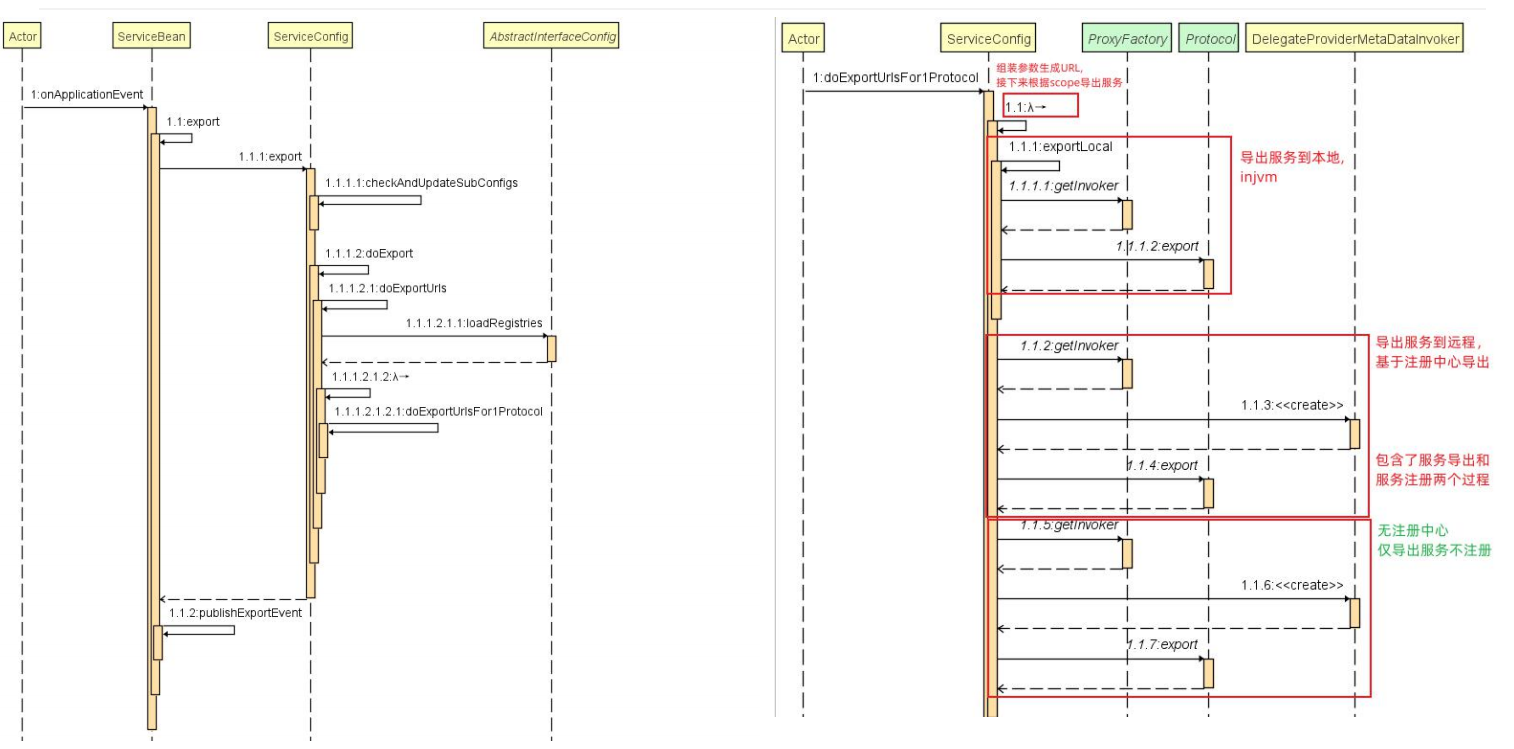
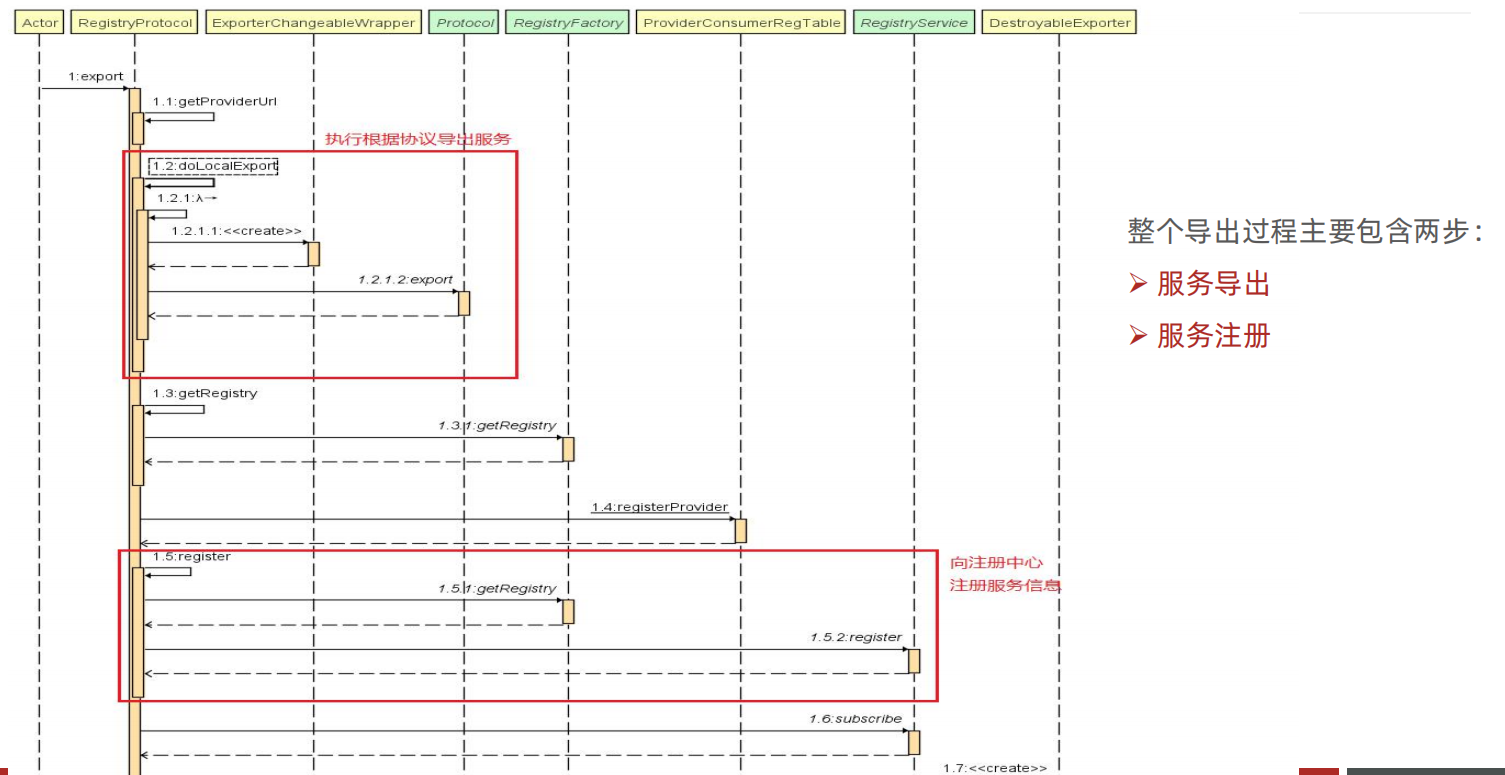
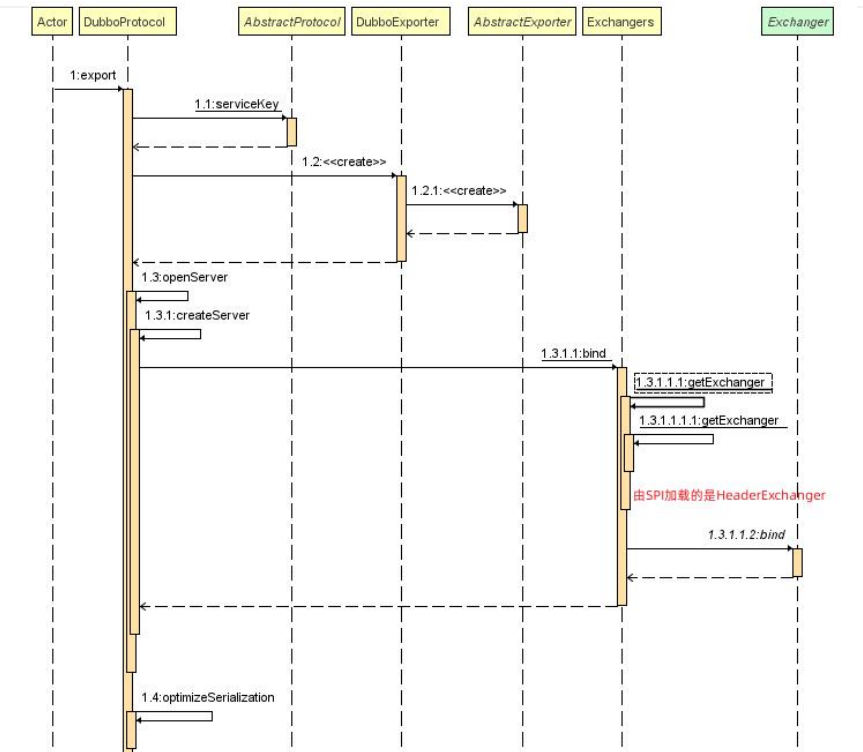
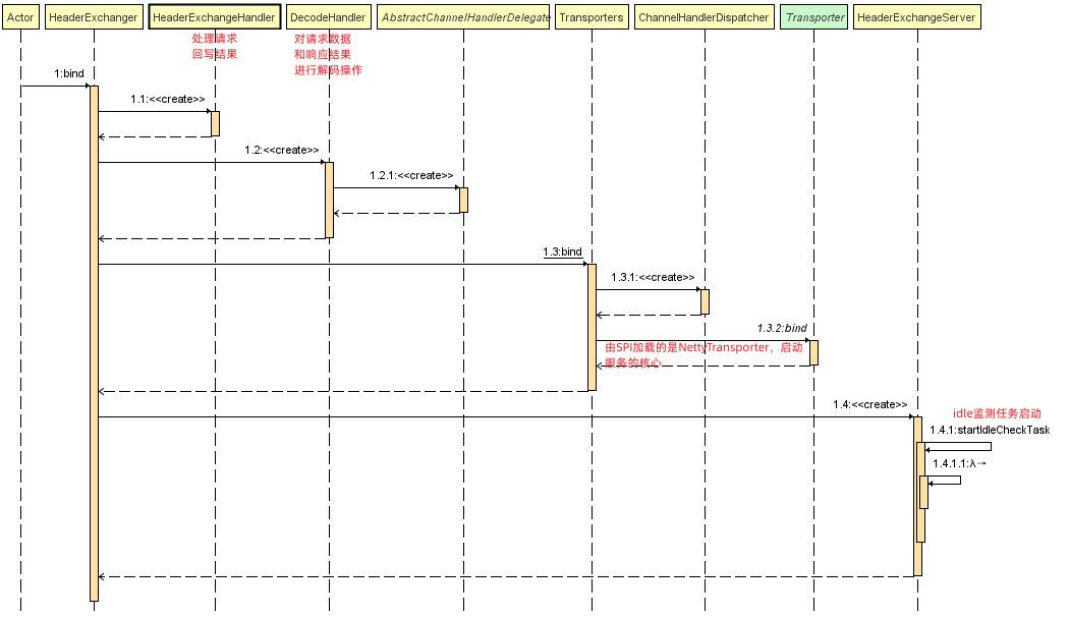
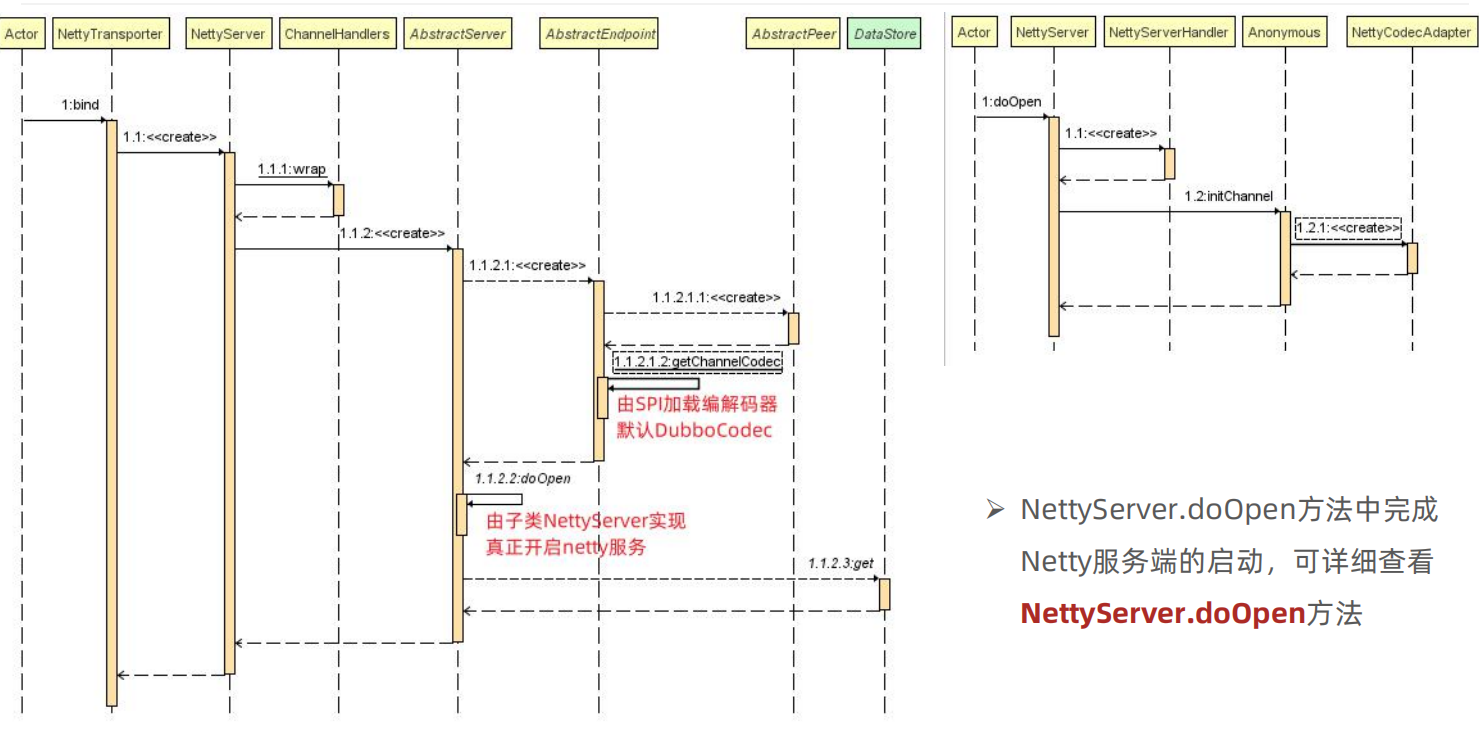
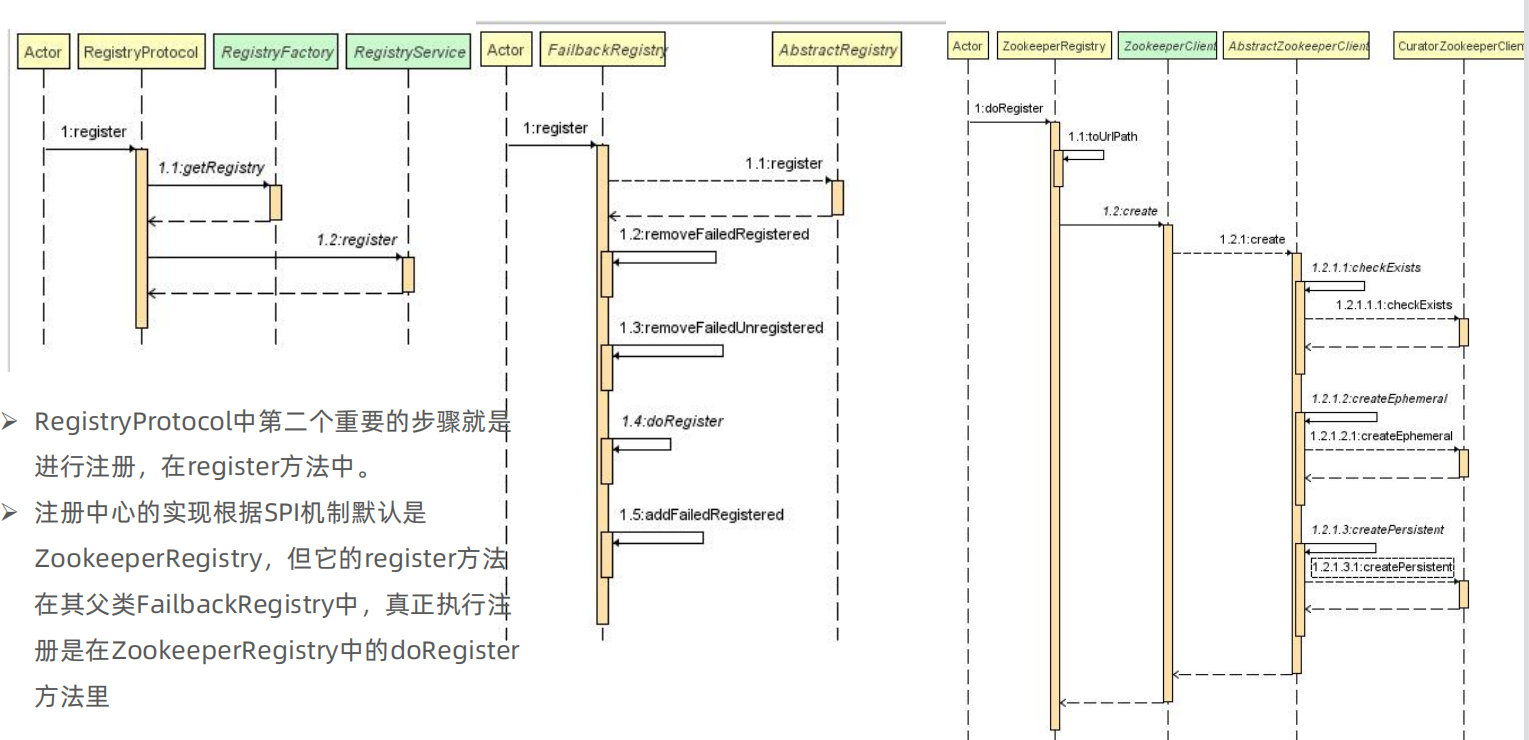
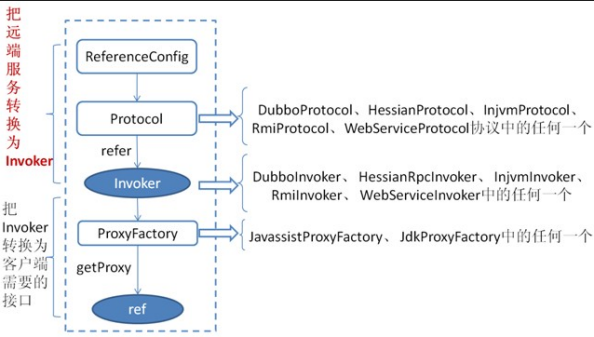
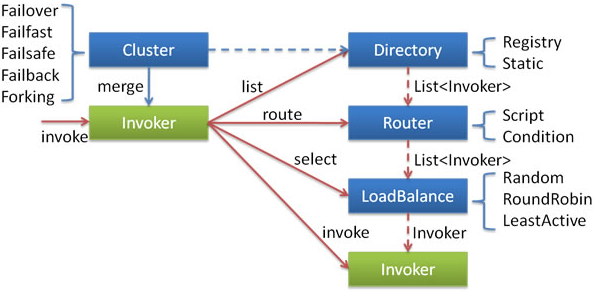
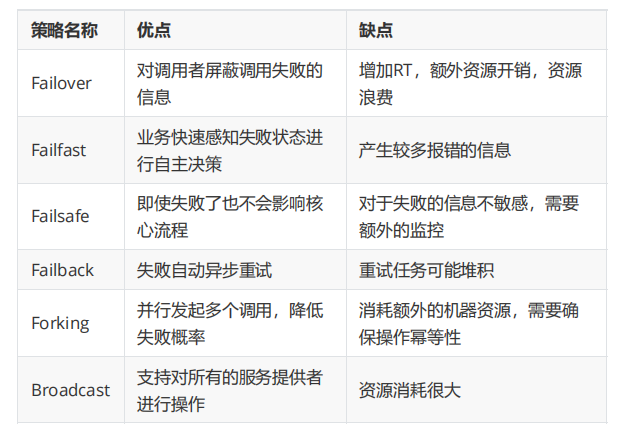
我们前面手写了RPC,但是终究只是个demo,学习一下专业的RPC框架
学习目标:
前置知识 应用架构的演进过程 主流的互联网技术特点 分布式 、高并发 、集群、负载均衡、高可用 (故障转移)。
分布式:一件事情拆开来做。
集群:一件事情大家一起做。
负载均衡:将请求平均分配到不同的服务器中,达到均衡的目的。
高并发:同一时刻,处理同一件事情的处理能力(解决方案:分布式、集群、负载均衡)
高可用:系统都是可用的。实现故障转移
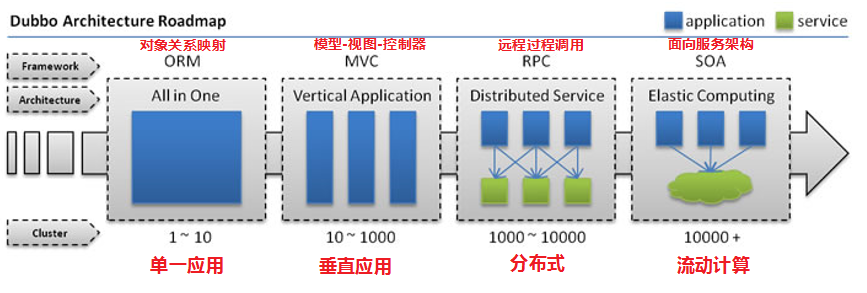
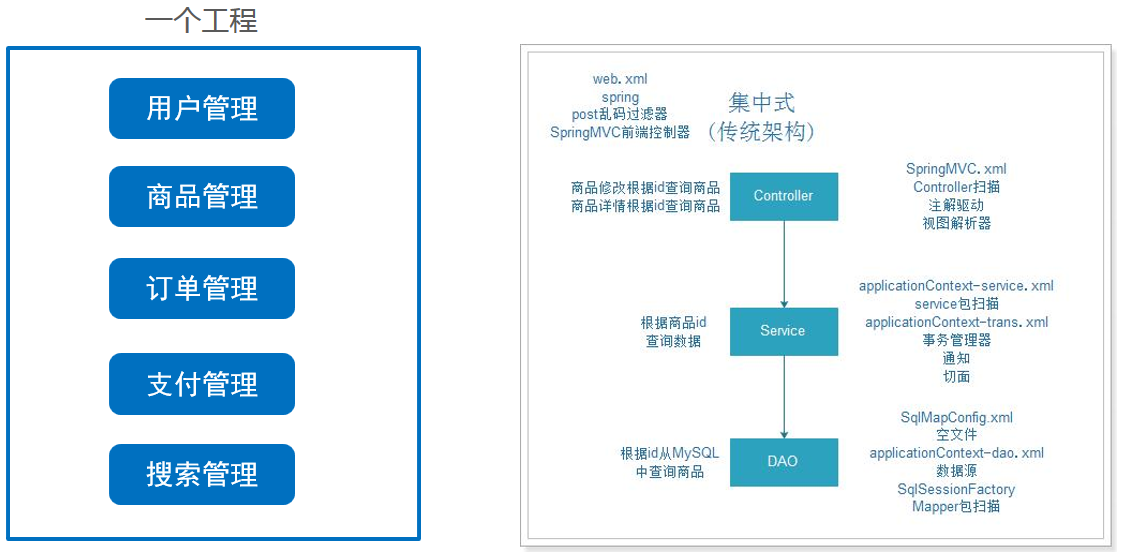
架构演变的过程 单一应用架构(all in one) 当网站流量很小时,只需一个应用,将所有功能都部署在一起,以减少部署节点和成本。此时,用于简化增删改查工作量的数据访问框架(ORM)是关键。
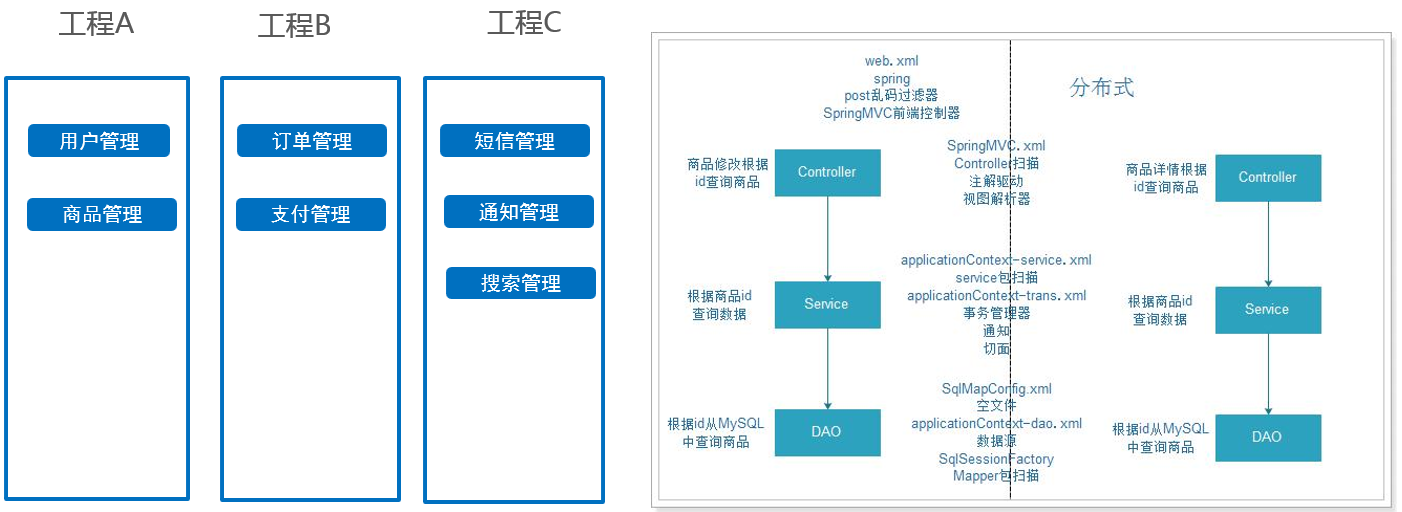
垂直应用架构 当访问量逐渐增大,单一应用增加机器带来的加速度越来越小,将应用拆成互不相干的几个应用,以提升效率。此时,用于加速前端页面开发的Web框架(MVC)是关键。
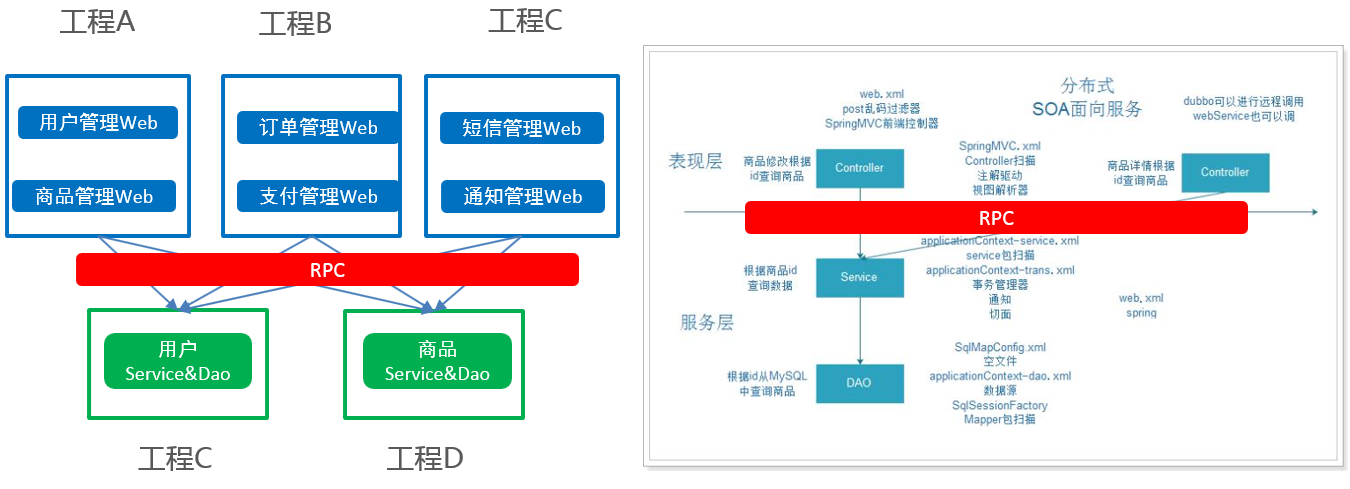
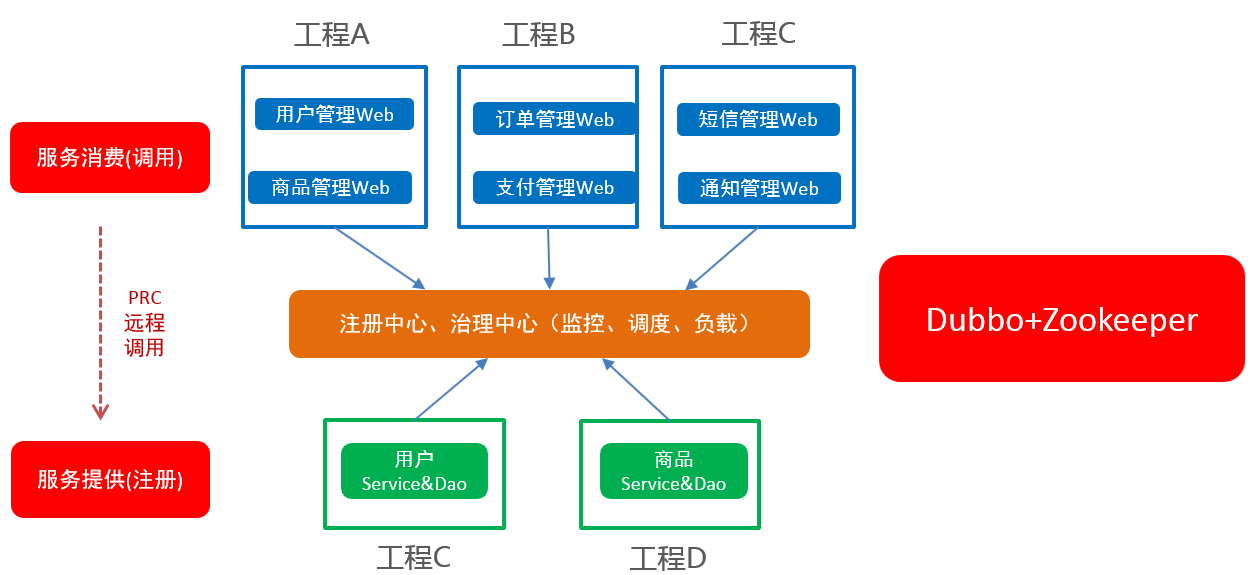
分布式服务架构 当垂直应用越来越多,应用之间交互不可避免 ,将核心业务抽取出来,作为独立的服务,逐渐形成稳定的服务中心,使前端应用能更快速的响应多变的市场需求。此时,用于提高业务复用及整合的分布式服务框架(RPC)是关键。
流动计算架构(SOA) 当服务越来越多,容量的评估,小服务资源的浪费等问题逐渐显现,此时需增加一个调度中心基于访问压力实时管理集群容量,提高集群利用率。此时,用于提高机器利用率的资源调度和治理中心(SOA)是关键。
资源调度和治理中心的框架:dubbo、spring cloudy
架构优点:
(1)业务代码完全解耦,并可实现通用
(2)维护成本易于拓展(修改一个功能,可以直接修改一个项目,单独部署)
(3)并发量大易于解决(搭建集群)
(4)技术栈完全扩展(不同的系统可以用不同的编程语言编写)。
( 5 ) 框架实现了服务治理,不去担心集群的使用情况(失败会尝试其它服务….)
小结 1:单体架构
全部功能集中在一个项目内(All in one)。 打一个war, 一个tomcat
2:垂直架构
按照业务进行切割,形成小的单体项目。 每个业务模块就是一个war,一个tomcat
3 : 分布式:应用调用服务(ip写死),服务挂了就不能用了,缺少服务治理。把业务服务(service+dao)拆分成一个war包,一个tomcat里。
4:SOA架构(项目一)
服务的提供者(以服务为主 service调用dao->数据库),消费者。
服务提供者与消费都注册到中心,由中心统一管理分配,失败重试,负载均衡。。。有服务治理
可以使用dubbo作为调度的工具(RPC协议), Zookeeper作为注册中心
5:微服务架构(项目二 畅购 Springboot+Spring Cloud)
将系统服务层完全独立出来,抽取为一个一个的微服务。 以功能为主(controller->service-dao->数据库 独立)
特点一:抽取的粒度更细,遵循单一原则,数据可以在服务之间完成数据传输(一般使用restful请求调用资源)。
特点二: 采用轻量级框架协议传输。(可以使用spring cloud)(http协议 restful json)
特点三: 每个服务都使用不同的数据库,完全独立和解耦 (分库分表)。
RPC(远程过程调用) RPC介绍 Remote Procedure Call 远程过程调用,是分布式架构的核心,按响应方式分如下两种:
同步调用:客户端调用服务方方法,等待直到服务方返回结果或者超时,再继续自己的操作。
异步调用:客户端把消息发送给中间件,不再等待服务端返回,直接继续自己的操作。
是一种进程间的通信方式
它允许应用程序调用网络上的另一个应用程序中的方法
对于服务的消费者而言,无需了解远程调用的底层细节,是透明的
需要注意的是RPC并不是一个具体的技术,而是指整个网络远程调用过程。
RPC是一个泛化的概念,严格来说一切远程过程调用手段都属于RPC范畴。各种开发语言都有自己的RPC框架。Java中的RPC框架比较多,广泛使用的有RMI、Hessian、Dubbo、spring Cloud(restapi http)等。
一台电脑调用另外一台脑上的方法
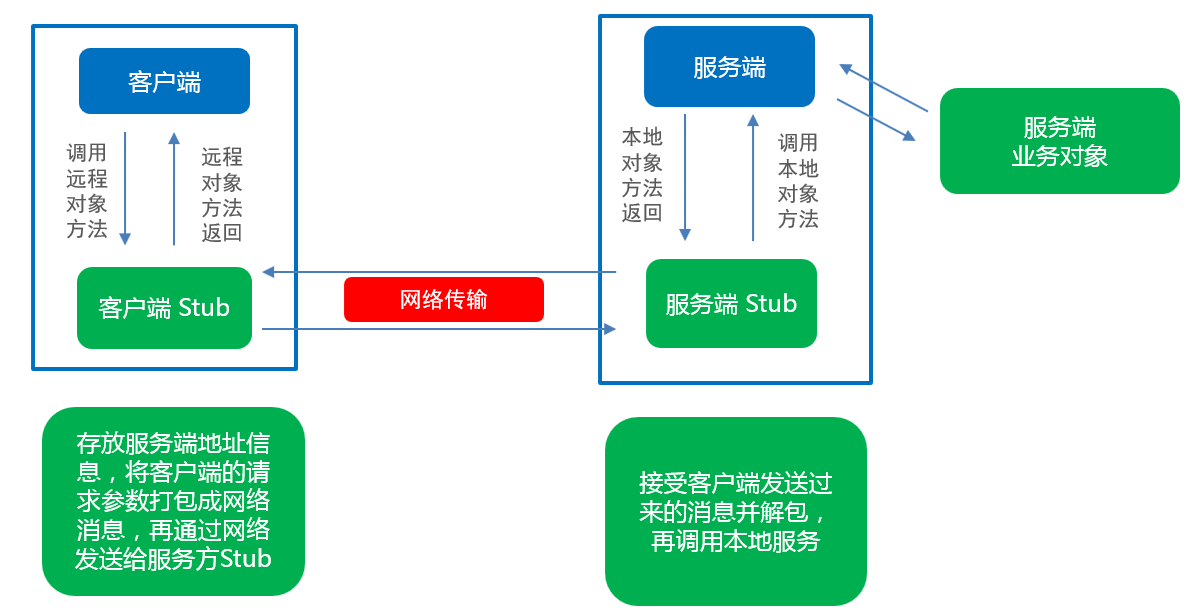
RPC组件【重点】 简单来说一个RPC架构里包含如下4个组件:
1、 客户端(Client):服务调用者
2、 客户端存根(Client Stub):存放服务端地址信息,将客户端的请求参数打包成网络消息,再通过网络发送给服务方
3、 服务端存根(Server Stub):接受客户端发送过来的消息并解包,再调用本地服务
4、 服务端(Server):服务提供者。
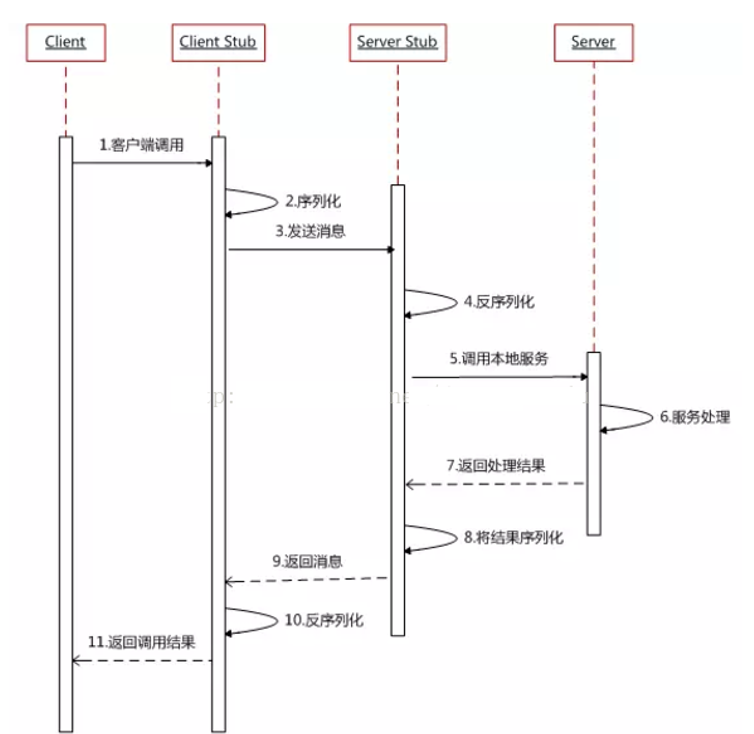
RPC调用
1、 服务调用方(client)调用以本地调用方式调用服务;
2、 client stub接收到调用后负责将方法、参数等组装成能够进行网络传输的消息体(在Java里就是序列化的过程)
3、 client stub找到服务地址,并将消息通过网络发送到服务端;
4、 server stub收到消息后进行解码,在Java里就是反序列化的过程;
5、 server stub根据解码结果调用本地的服务;
6、 本地服务执行处理逻辑;
7、 本地服务将结果返回给server stub;
8、 server stub将返回结果打包成消息,Java里的序列化;
9、 server stub将打包后的消息通过网络并发送至消费方;
10、 client stub接收到消息,并进行解码, Java里的反序列化;
11、 服务调用方(client)得到最终结果。
小结 1:RPC 远程过程调用 调用另一个应用的方法
2:RPC组件及调用过程
客户端->客户端存根->服务端存根->服务端->服务端存根->客户端存根->客户端
3:调用方式 接口调用
Web Service 接口 http+soap <xml>Dubbo 接口
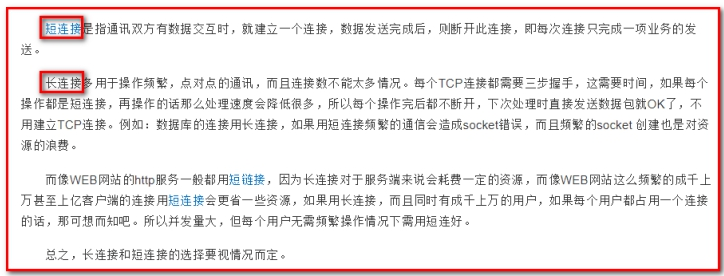
什么是长连接?
Dubbo基础使用 概述 Apache Dubbo是一款高性能的Java RPC框架。其前身是阿里巴巴公司开源的一个高性能、轻量级的开源Java RPC 框架,可以和Spring框架无缝集成。
RPC RPC全称为remote procedure call,即远程过程调用。比如两台服务器A和B,A服务器上部署一个应用,B服务器上部署一个应用,A服务器上的应用想调用B服务器上的应用提供的方法,由于两个应用不在一个内存空间,不能直接调用,所以需要通过网络来表达调用的语义和传达调用的数据。
需要注意的是RPC并不是一个具体的技术,而是指整个网络远程调用过程。
RPC是一个泛化的概念,严格来说一切远程过程调用手段都属于RPC范畴。各种开发语言都有自己的RPC框架。
Java中的RPC框架比较多,广泛使用的有RMI、Hessian、Dubbo等。
Dubbo官网地址:http://dubbo.apache.org
Dubbo提供了三大核心能力:面向接口的远程方法调用,智能容错和负载均衡,以及服务自动注册和发现(dubbo帮你注册在zookeeper创建节点数据)和发现(订阅 watch, dubbo帮我们做了)。
架构
节点角色说明:
节点
角色名称
Provider
暴露服务的服务提供方 服务方
Consumer
调用远程服务的服务消费方 调用方
Registry
服务注册与发现的注册中心
Monitor
统计服务的调用次数和调用时间的监控中心
Container
服务运行容器
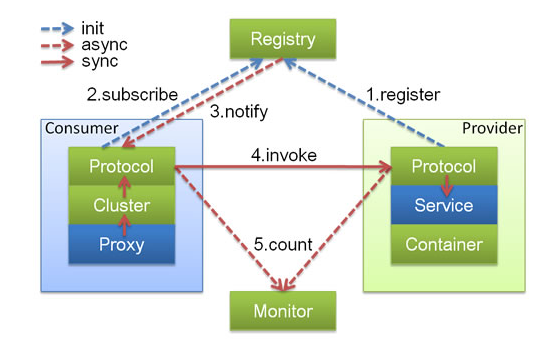
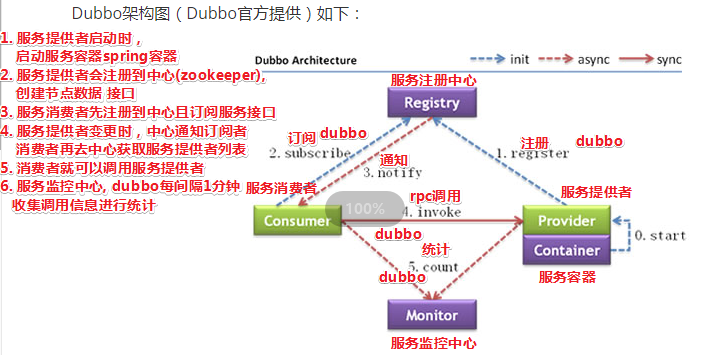
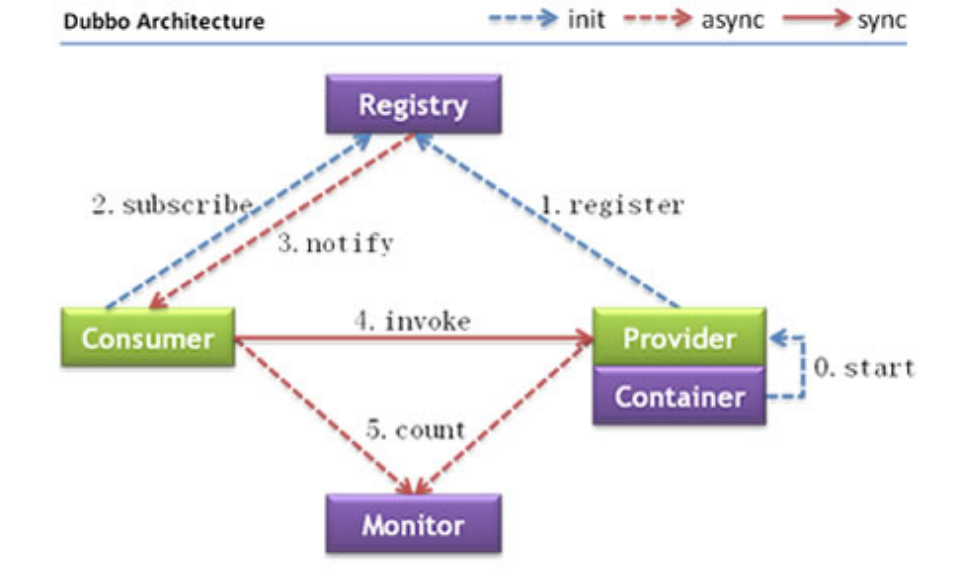
虚线都是异步访问,实线都是同步访问
蓝色虚线:在启动时完成的功能
红色虚线(实线)都是程序运行过程中执行的功能
调用关系说明:
服务容器负责启动,加载,运行服务提供者。
服务提供者在启动时,向注册中心注册自己提供的服务。
服务消费者在启动时,向注册中心订阅自己所需的服务。
注册中心返回服务提供者地址列表给消费者,如果有变更,注册中心将基于长连接推送变更数据给消费者。
服务消费者,从注册中心拉取服务提供者列表,从提供者地址列表中,基于软负载均衡算法,选一台提供者进行调用,如果调用失败,再选另一台调用。
服务消费者和提供者,在内存中累计调用次数和调用时间,定时每分钟发送一次统计数据到监控中心。
安装Zookeeper 通过前面的Dubbo架构图可以看到,Registry(服务注册中心)在其中起着至关重要的作用。Dubbo官方推荐使用Zookeeper作为服务注册中心。
Zookeeper 介绍Zookeeper 是 Apache Hadoop 的子项目,是一个树型的目录服务,支持变更推送,适合作为 Dubbo 服务的注册中心,工业强度较高,可用于生产环境,并推荐使用 。
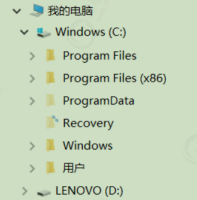
为了便于理解Zookeeper的树型目录服务,我们先来看一下我们电脑的文件系统(也是一个树型目录结构):
我的电脑可以分为多个盘符(例如C、D、E等),每个盘符下可以创建多个目录,每个目录下面可以创建文件,也可以创建子目录,最终构成了一个树型结构。通过这种树型结构的目录,我们可以将文件分门别类的进行存放,方便我们后期查找。而且磁盘上的每个文件都有一个唯一的访问路径,例如:C:\Windows\itcast\hello.txt。
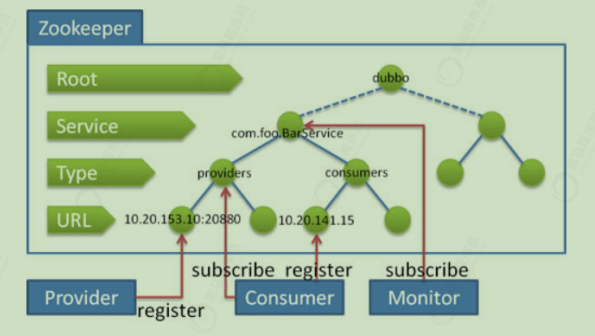
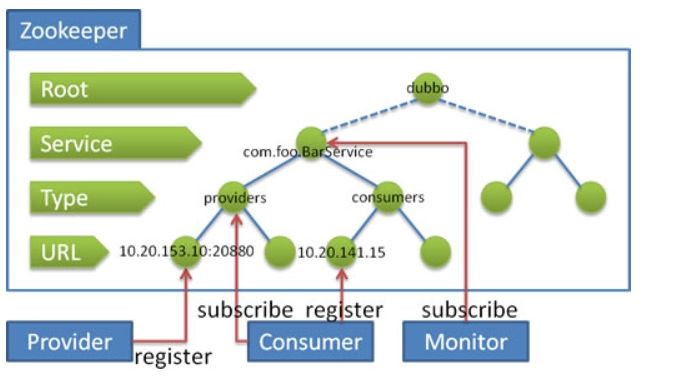
Zookeeper树型目录服务
流程说明:
服务提供者(Provider)启动时: 向 /dubbo/com.foo.BarService/providers 目录下写入自己的 URL 地址
服务消费者(Consumer)启动时: 订阅 /dubbo/com.foo.BarService/providers 目录下的提供者 URL 地址。并向 /dubbo/com.foo.BarService/consumers 目录下写入自己的 URL 地址
监控中心(Monitor)启动时: 订阅 /dubbo/com.foo.BarService 目录下的所有提供者和消费者 URL 地址
安装Zookeeper 下载地址:http://archive.apache.org/dist/zookeeper/
本课程使用的Zookeeper版本为3.4.6,下载完成后可以获得名称为zookeeper-3.4.6.tar.gz的压缩文件。
安装步骤:
1
2
3
4
5
6
7
8
9
# 第一步:安装 jdk(略) # 第二步:把 zookeeper 的压缩包(zookeeper-3.4.6.tar.gz)上传到 linux 系统 # 第三步: 解压缩压缩包 tar -zxvf zookeeper-3.4.6.tar.gz # 第四步:进入zookeeper-3.4.6目录,创建data目录 mkdir data # 第五步:进入conf目录 ,把zoo_sample.cfg 改名为zoo.cfg cd conf mv zoo_sample.cfg zoo.cfg # 第六步:打开 zoo.cfg文件, 修改data属性:dataDir=/root/zookeeper-3.4.6/data
启动、停止Zookeeper 1 2 3 4 5 6 # 进入Zookeeper的bin目录,启动服务命令 ./zkServer.sh start # 停止服务命令 ./zkServer.sh stop # 查看服务状态: ./zkServer.sh status
Dubbo快速入门(服务者+消费者) Dubbo作为一个RPC框架,其最核心的功能就是要实现跨网络的远程调用。本小节就是要创建两个应用,一个作为服务的提供方,一个作为服务的消费方。通过Dubbo来实现服务消费方远程调用服务提供方的方法。
服务提供方开发 pom配置文件 1 2 3 4 5 6 7 8 9 10 11 12 13 14 15 16 17 18 19 20 21 22 23 24 25 26 27 28 29 30 31 32 33 34 35 36 37 38 39 40 41 42 43 44 45 46 47 48 49 50 51 52 53 54 55 56 57 58 59 60 61 62 63 64 65 66 67 68 69 70 71 72 73 74 75 76 77 78 79 80 81 82 83 84 85 86 87 88 89 90 91 92 93 94 95 96 97 98 99 100 101 102 103 104 105 106 107 108 109 110 111 112 113 114 115 116 117 118 119 120 121 122 123 124 <?xml version="1.0" encoding="UTF-8" ?> <project xmlns ="http://maven.apache.org/POM/4.0.0" xmlns:xsi ="http://www.w3.org/2001/XMLSchema-instance" xsi:schemaLocation ="http://maven.apache.org/POM/4.0.0 http://maven.apache.org/xsd/maven-4.0.0.xsd" > <modelVersion > 4.0.0</modelVersion > <groupId > com.itheima</groupId > <artifactId > dubbodemo_provider</artifactId > <version > 1.0-SNAPSHOT</version > <packaging > war</packaging > <name > dubbodemo_provider Maven Webapp</name > <url > http://www.example.com</url > <properties > <project.build.sourceEncoding > UTF-8</project.build.sourceEncoding > <maven.compiler.source > 1.8</maven.compiler.source > <maven.compiler.target > 1.8</maven.compiler.target > <spring.version > 5.0.5.RELEASE</spring.version > </properties > <dependencies > <dependency > <groupId > org.springframework</groupId > <artifactId > spring-context</artifactId > <version > ${spring.version}</version > </dependency > <dependency > <groupId > org.springframework</groupId > <artifactId > spring-beans</artifactId > <version > ${spring.version}</version > </dependency > <dependency > <groupId > org.springframework</groupId > <artifactId > spring-webmvc</artifactId > <version > ${spring.version}</version > </dependency > <dependency > <groupId > org.springframework</groupId > <artifactId > spring-jdbc</artifactId > <version > ${spring.version}</version > </dependency > <dependency > <groupId > org.springframework</groupId > <artifactId > spring-aspects</artifactId > <version > ${spring.version}</version > </dependency > <dependency > <groupId > org.springframework</groupId > <artifactId > spring-jms</artifactId > <version > ${spring.version}</version > </dependency > <dependency > <groupId > org.springframework</groupId > <artifactId > spring-context-support</artifactId > <version > ${spring.version}</version > </dependency > <dependency > <groupId > com.alibaba</groupId > <artifactId > dubbo</artifactId > <version > 2.6.0</version > </dependency > <dependency > <groupId > org.apache.zookeeper</groupId > <artifactId > zookeeper</artifactId > <version > 3.4.7</version > </dependency > <dependency > <groupId > com.github.sgroschupf</groupId > <artifactId > zkclient</artifactId > <version > 0.1</version > </dependency > <dependency > <groupId > javassist</groupId > <artifactId > javassist</artifactId > <version > 3.12.1.GA</version > </dependency > <dependency > <groupId > com.alibaba</groupId > <artifactId > fastjson</artifactId > <version > 1.2.47</version > </dependency > <dependency > <groupId > mysql</groupId > <artifactId > mysql-connector-java</artifactId > <version > 5.1.47</version > </dependency > <dependency > <groupId > com.alibaba</groupId > <artifactId > druid</artifactId > <version > 1.1.6</version > </dependency > <dependency > <groupId > org.mybatis</groupId > <artifactId > mybatis-spring</artifactId > <version > 1.3.2</version > </dependency > </dependencies > <build > <plugins > <plugin > <groupId > org.apache.maven.plugins</groupId > <artifactId > maven-compiler-plugin</artifactId > <version > 2.3.2</version > <configuration > <source > 1.8</source > <target > 1.8</target > </configuration > </plugin > <plugin > <groupId > org.apache.tomcat.maven</groupId > <artifactId > tomcat7-maven-plugin</artifactId > <version > 2.1</version > <configuration > <port > 8083</port > <path > /</path > </configuration > </plugin > </plugins > </build > </project >
web.xml 1 2 3 4 5 6 7 8 9 10 11 12 13 <!DOCTYPE web-app PUBLIC "-//Sun Microsystems, Inc.//DTD Web Application 2.3//EN" "http://java.sun.com/dtd/web-app_2_3.dtd" > <web-app > <display-name > Archetype Created Web Application</display-name > <context-param > <param-name > contextConfigLocation</param-name > <param-value > classpath:applicationContext*.xml</param-value > </context-param > <listener > <listener-class > org.springframework.web.context.ContextLoaderListener</listener-class > </listener > </web-app >
log4j 1 2 3 4 5 6 7 8 9 10 11 12 13 14 15 log4j.appender.stdout =org.apache.log4j.ConsoleAppender log4j.appender.stdout.Target =System.err log4j.appender.stdout.layout =org.apache.log4j.PatternLayout log4j.appender.stdout.layout.ConversionPattern =%d{ABSOLUTE} %5p %c{1}:%L - %m%n log4j.appender.file =org.apache.log4j.FileAppender log4j.appender.file.File =c:\\mylog.log log4j.appender.file.layout =org.apache.log4j.PatternLayout log4j.appender.file.layout.ConversionPattern =%d{ABSOLUTE} %5p %c{1}:%L - %m%n log4j.rootLogger =debug, stdout
applciationContext-service 1 2 3 4 5 6 7 8 9 10 11 12 13 14 15 16 17 18 19 20 21 22 23 24 25 26 27 28 29 30 31 32 33 34 35 36 37 38 39 40 <?xml version="1.0" encoding="UTF-8" ?> <beans xmlns ="http://www.springframework.org/schema/beans" xmlns:xsi ="http://www.w3.org/2001/XMLSchema-instance" xmlns:p ="http://www.springframework.org/schema/p" xmlns:context ="http://www.springframework.org/schema/context" xmlns:dubbo ="http://code.alibabatech.com/schema/dubbo" xmlns:mvc ="http://www.springframework.org/schema/mvc" xmlns:tx ="http://www.springframework.org/schema/tx" xsi:schemaLocation ="http://www.springframework.org/schema/beans http://www.springframework.org/schema/beans/spring-beans.xsd http://www.springframework.org/schema/mvc http://www.springframework.org/schema/mvc/spring-mvc.xsd http://code.alibabatech.com/schema/dubbo http://code.alibabatech.com/schema/dubbo/dubbo.xsd http://www.springframework.org/schema/context http://www.springframework.org/schema/context/spring-context.xsd http://www.springframework.org/schema/tx http://www.springframework.org/schema/tx/spring-tx.xsd" > <dubbo:application name ="dubbodemo_provider" > </dubbo:application > <dubbo:registry address ="zookeeper://39.97.237.124:2181" > </dubbo:registry > <dubbo:protocol name ="dubbo" port ="20881" > </dubbo:protocol > <dubbo:annotation package ="com.itheima.service.impl" > </dubbo:annotation > <bean id ="dataSource" class ="com.alibaba.druid.pool.DruidDataSource" destroy-method ="close" > <property name ="username" value ="root" /> <property name ="password" value ="root" /> <property name ="driverClassName" value ="com.mysql.jdbc.Driver" /> <property name ="url" value ="jdbc:mysql://localhost:3306/test" /> </bean > <bean id ="transactionManager" class ="org.springframework.jdbc.datasource.DataSourceTransactionManager" > <property name ="dataSource" ref ="dataSource" /> </bean > <tx:annotation-driven transaction-manager ="transactionManager" proxy-target-class ="true" /> </beans >
端口默认20880,这里是环境是20881
接口使用
启动服务 => tomcat7:run
服务消费方 pom配置 1 2 3 4 5 6 7 8 9 10 11 12 13 14 15 16 17 18 19 20 21 22 23 24 25 26 27 28 29 30 31 32 33 34 35 36 37 38 39 40 41 42 43 44 45 46 47 48 49 50 51 52 53 54 55 56 57 58 59 60 61 62 63 64 65 66 67 68 69 70 71 72 73 74 75 76 77 78 79 80 81 82 83 84 85 86 87 88 89 90 91 92 93 94 95 96 97 98 99 100 101 102 103 104 105 106 107 108 109 <?xml version="1.0" encoding="UTF-8" ?> <project xmlns ="http://maven.apache.org/POM/4.0.0" xmlns:xsi ="http://www.w3.org/2001/XMLSchema-instance" xsi:schemaLocation ="http://maven.apache.org/POM/4.0.0 http://maven.apache.org/xsd/maven-4.0.0.xsd" > <modelVersion > 4.0.0</modelVersion > <groupId > com.itheima</groupId > <artifactId > dubbodemo_consumer</artifactId > <version > 1.0-SNAPSHOT</version > <packaging > war</packaging > <name > dubbodemo_consumer Maven Webapp</name > <url > http://www.example.com</url > <properties > <project.build.sourceEncoding > UTF-8</project.build.sourceEncoding > <maven.compiler.source > 1.8</maven.compiler.source > <maven.compiler.target > 1.8</maven.compiler.target > <spring.version > 5.0.5.RELEASE</spring.version > </properties > <dependencies > <dependency > <groupId > org.springframework</groupId > <artifactId > spring-context</artifactId > <version > ${spring.version}</version > </dependency > <dependency > <groupId > org.springframework</groupId > <artifactId > spring-beans</artifactId > <version > ${spring.version}</version > </dependency > <dependency > <groupId > org.springframework</groupId > <artifactId > spring-webmvc</artifactId > <version > ${spring.version}</version > </dependency > <dependency > <groupId > org.springframework</groupId > <artifactId > spring-jdbc</artifactId > <version > ${spring.version}</version > </dependency > <dependency > <groupId > org.springframework</groupId > <artifactId > spring-aspects</artifactId > <version > ${spring.version}</version > </dependency > <dependency > <groupId > org.springframework</groupId > <artifactId > spring-jms</artifactId > <version > ${spring.version}</version > </dependency > <dependency > <groupId > org.springframework</groupId > <artifactId > spring-context-support</artifactId > <version > ${spring.version}</version > </dependency > <dependency > <groupId > com.alibaba</groupId > <artifactId > dubbo</artifactId > <version > 2.6.0</version > </dependency > <dependency > <groupId > org.apache.zookeeper</groupId > <artifactId > zookeeper</artifactId > <version > 3.4.7</version > </dependency > <dependency > <groupId > com.github.sgroschupf</groupId > <artifactId > zkclient</artifactId > <version > 0.1</version > </dependency > <dependency > <groupId > javassist</groupId > <artifactId > javassist</artifactId > <version > 3.12.1.GA</version > </dependency > <dependency > <groupId > com.alibaba</groupId > <artifactId > fastjson</artifactId > <version > 1.2.47</version > </dependency > </dependencies > <build > <plugins > <plugin > <groupId > org.apache.maven.plugins</groupId > <artifactId > maven-compiler-plugin</artifactId > <version > 2.3.2</version > <configuration > <source > 1.8</source > <target > 1.8</target > </configuration > </plugin > <plugin > <groupId > org.apache.tomcat.maven</groupId > <artifactId > tomcat7-maven-plugin</artifactId > <version > 2.1</version > <configuration > <port > 8082</port > <path > /</path > </configuration > </plugin > </plugins > </build > </project >
dubbo配置 1 2 3 4 5 6 7 8 9 10 11 12 13 14 15 16 17 18 19 20 <?xml version="1.0" encoding="UTF-8"?> <beans xmlns="http://www.springframework.org/schema/beans" xmlns :xsi="http://www.w3.org/2001/XMLSchema-instance" xmlns :p="http://www.springframework.org/schema/p" xmlns :context="http://www.springframework.org/schema/context" xmlns :dubbo="http://code.alibabatech.com/schema/dubbo" xmlns :mvc="http://www.springframework.org/schema/mvc" xsi :schemaLocation="http://www.springframework.org/schema/beans http ://www.springframework.org/schema/beans/spring-beans.xsd http ://www.springframework.org/schema/mvc http ://www.springframework.org/schema/mvc/spring-mvc.xsd http ://code.alibabatech.com/schema/dubbo http ://code.alibabatech.com/schema/dubbo/dubbo.xsd http ://www.springframework.org/schema/context http ://www.springframework.org/schema/context/spring-context.xsd"> <dubbo :application name="dubbodemo_consumer"></dubbo:application> <dubbo :registry address="zookeeper://39.97.237.124:2181"></dubbo:registry> <dubbo :annotation package="com.itheima.controller"></dubbo:annotation> <dubbo :consumer check="false"></dubbo:consumer> </beans>
web.mxl 1 2 3 4 5 6 7 8 9 10 11 12 13 14 15 16 17 18 19 20 21 <!DOCTYPE web-app PUBLIC "-//Sun Microsystems, Inc.//DTD Web Application 2.3//EN" "http://java.sun.com/dtd/web-app_2_3.dtd" > <web-app > <display-name > Archetype Created Web Application</display-name > <servlet > <servlet-name > springmvc</servlet-name > <servlet-class > org.springframework.web.servlet.DispatcherServlet</servlet-class > <init-param > <param-name > contextConfigLocation</param-name > <param-value > classpath:applicationContext-web.xml</param-value > </init-param > <load-on-startup > 1</load-on-startup > </servlet > <servlet-mapping > <servlet-name > springmvc</servlet-name > <url-pattern > *.do</url-pattern > </servlet-mapping > </web-app >
消费者使用dubbo去zookeeper注册中心查找服务
在浏览器输入http://localhost:8082/demo/hello.do?name=Jack,查看浏览器输出结果
思考一:上面的Dubbo入门案例中我们是将HelloService接口 从服务提供者工程(dubbodemo_provider)复制 到服务消费者工程(dubbodemo_consumer)中,这种做法是否合适?还有没有更好的方式?
答:这种做法显然是不好的,同一个接口被复制了两份,不利于后期维护。更好的方式是单独创建一个maven工程,将此接口创建在这个maven工程中。需要依赖此接口的工程只需要在自己工程的pom.xml文件中引入maven坐标即可。
思考二:在服务消费者工程(dubbodemo_consumer)中只是引用了HelloService接口,并没有提供实现类,Dubbo是如何做到远程调用的?
答:Dubbo底层是基于代理技术为HelloService接口创建代理对象,远程调用是通过此代理对象完成的。可以通过开发工具的debug功能查看此代理对象的内部结构。另外,Dubbo实现网络传输底层是基于Netty框架完成的。
思考三:上面的Dubbo入门案例中我们使用Zookeeper作为服务注册中心,服务提供者需要将自己的服务信息注册到Zookeeper,服务消费者需要从Zookeeper订阅自己所需要的服务,此时Zookeeper服务就变得非常重要了,那如何防止Zookeeper单点故障呢?
答:Zookeeper其实是支持集群模式的,可以配置Zookeeper集群来达到Zookeeper服务的高可用,防止出现单点故障。
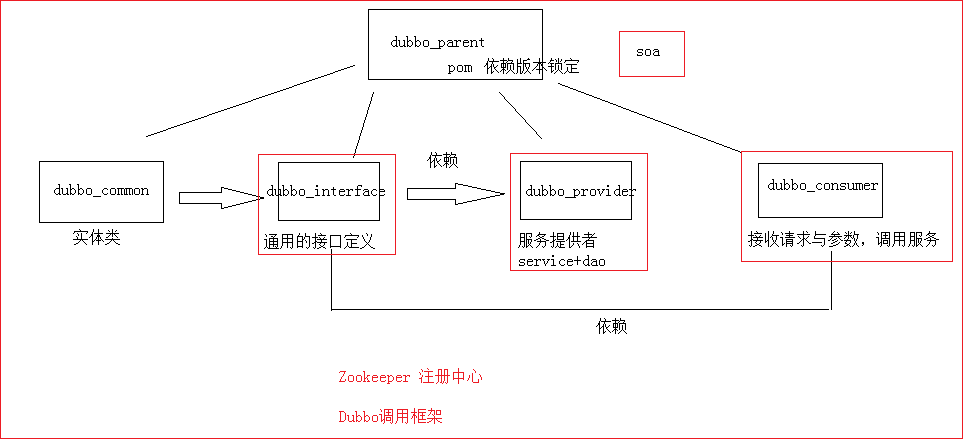
Dubbo与Spring整合 Dubbo作为一个RPC框架,其最核心的功能就是要实现跨网络的远程调用,服务提供者、服务消费者会使用共同的接口,故本小节先创建一个父工程,父工程下有4个子模块,一个是公共子模块,一个是接口模块,一个是服务提供者模块,一个是服务消费者模块。通过Dubbo来实现服务消费方远程调用服务提供方的方法。
实现的业务为:根据id查询用户对象
业务描述:页面发送请求:user/findById.do?id=1 根据id从数据库获取用户对象
实现步骤:
1. 环境准备:创建数据库,创建t_user表
2. 创建父工程,基于maven,打包方式为pom,工程名:dubbo_parent
3. 创建公共子模块,创建user实体类,打包方式为jar,工程名:dubbo_common
4. 创建接口子模块,在父工程的基础上,打包方式为jar,模块名:dubbo_interface
5. 创建服务提供者子模块,在父工程的基础上,打包方式为war,模块名:dubbo_provider
6. 创建服务消费者模子块,在父工程的基础上,打包方式为war,模块名:dubbo_consumer
环境准备 创建数据库表
1 2 3 4 5 6 7 8 9 10 11 12 create database itcastdubbo;CREATE TABLE `t_user` ( `id` int (11 ) NOT NULL AUTO_INCREMENT, `username` varchar (20 ) DEFAULT NULL , `age` int (11 ) DEFAULT NULL , PRIMARY KEY (`id`) ) ENGINE= InnoDB AUTO_INCREMENT= 1 DEFAULT CHARSET= utf8; INSERT INTO t_user(username,age) VALUES ("张三",22 );INSERT INTO t_user(username,age) VALUES ("李四",20 );INSERT INTO t_user(username,age) VALUES ("王五",25 );
创建父工程 父工程,不实现任何代码,主要是添加工程需要的库的依赖管理(DependencyManagement),依赖管理就是解决项目中多个模块间公共依赖的版本号、scope的控制范围。本项目需要使用spring-webmvc,使用dubbo(务必2.6.2以上版本)、zookeeper及其客户端(curator-framework)、Spring、Mybatis依赖库。
GroupID:com.itheima
ArtifactId:dubbo_parent
创建完工程后,如图所示:
修改pom.xml,抽取版本、增加赖库依赖管理,全部内容如下:
1 2 3 4 5 6 7 8 9 10 11 12 13 14 15 16 17 18 19 20 21 22 23 24 25 26 27 28 29 30 31 32 33 34 35 36 37 38 39 40 41 42 43 44 45 46 47 48 49 50 51 52 53 54 55 56 57 58 59 60 61 62 63 64 65 66 67 68 69 70 71 72 73 74 75 76 77 78 79 80 81 82 83 84 85 86 87 88 89 90 91 92 93 94 95 96 97 98 99 100 101 102 103 104 105 106 107 108 109 110 <?xml version="1.0" encoding="UTF-8" ?> <project xmlns ="http://maven.apache.org/POM/4.0.0" xmlns:xsi ="http://www.w3.org/2001/XMLSchema-instance" xsi:schemaLocation ="http://maven.apache.org/POM/4.0.0 http://maven.apache.org/xsd/maven-4.0.0.xsd" > <modelVersion > 4.0.0</modelVersion > <groupId > com.itheima</groupId > <artifactId > dubbo_parent</artifactId > <packaging > pom</packaging > <version > 1.0-SNAPSHOT</version > <modules > <module > dubbo_common</module > <module > dubbo_interface</module > <module > dubbo_provider</module > <module > dubbo_consumer</module > </modules > <properties > <maven.compiler.source > 1.8</maven.compiler.source > <maven.compiler.target > 1.8</maven.compiler.target > <spring.webmvc.version > 5.0.5.RELEASE</spring.webmvc.version > <dubbo.version > 2.6.2</dubbo.version > <zookeeper.version > 3.4.7</zookeeper.version > <curator.verion > 4.0.1</curator.verion > <mybatis.version > 3.4.5</mybatis.version > <mysql.version > 5.1.47</mysql.version > <mybatis-spring.version > 1.3.2</mybatis-spring.version > <druid.version > 1.1.9</druid.version > <slf4j.version > 1.6.6</slf4j.version > </properties > <dependencyManagement > <dependencies > <dependency > <groupId > org.springframework</groupId > <artifactId > spring-webmvc</artifactId > <version > ${spring.webmvc.version}</version > </dependency > <dependency > <groupId > com.alibaba</groupId > <artifactId > dubbo</artifactId > <version > ${dubbo.version}</version > </dependency > <dependency > <groupId > org.apache.zookeeper</groupId > <artifactId > zookeeper</artifactId > <version > ${zookeeper.version}</version > </dependency > <dependency > <groupId > org.apache.curator</groupId > <artifactId > curator-framework</artifactId > <version > ${curator.verion}</version > </dependency > <dependency > <groupId > org.apache.curator</groupId > <artifactId > curator-recipes</artifactId > <version > ${curator.verion}</version > </dependency > <dependency > <groupId > org.mybatis</groupId > <artifactId > mybatis</artifactId > <version > ${mybatis.version}</version > </dependency > <dependency > <groupId > org.mybatis</groupId > <artifactId > mybatis-spring</artifactId > <version > ${mybatis-spring.version}</version > </dependency > <dependency > <groupId > com.alibaba</groupId > <artifactId > druid</artifactId > <version > ${druid.version}</version > </dependency > <dependency > <groupId > mysql</groupId > <artifactId > mysql-connector-java</artifactId > <version > ${mysql.version}</version > </dependency > <dependency > <groupId > org.springframework</groupId > <artifactId > spring-tx</artifactId > <version > ${spring.webmvc.version}</version > </dependency > <dependency > <groupId > org.springframework</groupId > <artifactId > spring-jdbc</artifactId > <version > ${spring.webmvc.version}</version > </dependency > <dependency > <groupId > org.slf4j</groupId > <artifactId > slf4j-log4j12</artifactId > <version > ${slf4j.version}</version > </dependency > </dependencies > </dependencyManagement > <dependencies > <dependency > <groupId > junit</groupId > <artifactId > junit</artifactId > <version > 4.12</version > <scope > test</scope > </dependency > </dependencies > </project >
创建公共子模块
在当前父工程的基础上创建子模块
GroupID:com.itheima
ArtifactId:dubbo_common
1:pom.xml
1 <packaging > jar</packaging >
2:在com.itheima.pojo包中创建User实体类
1 2 3 4 5 6 7 8 9 10 11 12 13 14 15 16 17 18 19 20 21 22 23 24 25 26 27 28 29 30 31 32 33 34 35 36 37 38 39 40 41 42 43 44 package com.itheima.pojo;import java.io.Serializable;public class User implements Serializable { private Integer id; private String username; private Integer age; public Integer getId () { return id; } public void setId (Integer id) { this .id = id; } public String getUsername () { return username; } public void setUsername (String username) { this .username = username; } public Integer getAge () { return age; } public void setAge (Integer age) { this .age = age; } @Override public String toString () { return "User{" + "id=" + id + ", username='" + username + '\'' + ", age=" + age + '}' ; } }
创建接口子模块 此模块,主要放业务接口的定义,它是服务消费者模块和服务提供者模块的公共依赖模块。
在当前父工程的基础上创建子模块
GroupID:com.itheima
ArtifactId:dubbo_interface
创建子模块:
pom.xml,添加依赖
1 2 3 4 5 6 7 8 <packaging > jar</packaging > <dependencies > <dependency > <groupId > com.itheima</groupId > <artifactId > dubbo_common</artifactId > <version > 1.0-SNAPSHOT</version > </dependency > </dependencies >
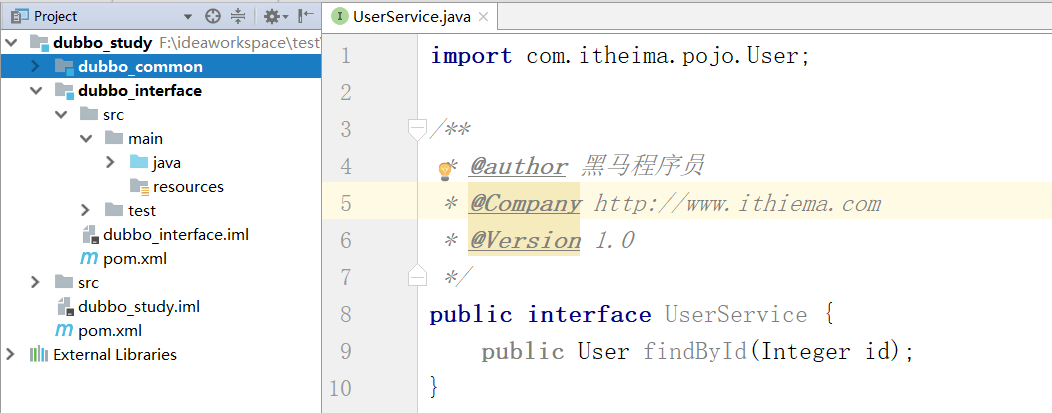
在包com.itheima.service创建业务接口
1 2 3 4 5 6 7 8 9 package com.itheima.service;import com.itheima.pojo.User;public interface UserService { User findById (Integer id) ; }
如图所示:
服务提供者模块 此模块是服务提供者模块,需要在容器启动时,把服务注册到zookeeper,故需要引入spring-webmvc,zookeeper及客户端依赖。
【路径】
实现步骤:
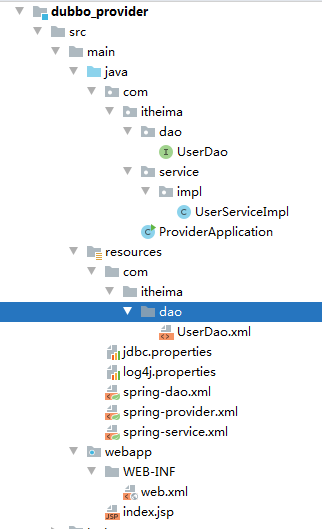
创建子模块dubbo_provider,使用war 需要依赖dubbo_interface
代码目录
resources资源目录
创建spring-dubbo.xml 配置文件:
配置dubbo的应用名称
配置dubbo注册中心Zookeeper地址
配置需要暴露的业务接口及实例
创建spring-dao.xml
配置数据源
配置sqlSessionFactory对象
扫描dao包,创建dao接口的动态代理对象
创建spring-service.xml
在web.xml文件中,只要加载spring的配置文件即可
配置tomcat启动服务提供者 或使用ClassPathXmlApplicationContext加载spring容器
实现过程:
创建子模块dubbo_provider 或者叫做dubbo_service
工程创建完成后,如图所示:
修改pom.xml文件,打包方式为war,增加依赖库,新增编译插件tomcat7,端口81
1 2 3 4 5 6 7 8 9 10 11 12 13 14 15 16 17 18 19 20 21 22 23 24 25 26 27 28 29 30 31 32 33 34 35 36 37 38 39 40 41 42 43 44 45 46 47 48 49 50 51 52 53 54 55 56 <packaging > war</packaging > <dependencies > <dependency > <groupId > com.itheima</groupId > <artifactId > dubbo_interface</artifactId > <version > 1.0-SNAPSHOT</version > </dependency > <dependency > <groupId > org.springframework</groupId > <artifactId > spring-webmvc</artifactId > </dependency > <dependency > <groupId > com.alibaba</groupId > <artifactId > dubbo</artifactId > </dependency > <dependency > <groupId > org.apache.zookeeper</groupId > <artifactId > zookeeper</artifactId > </dependency > <dependency > <groupId > org.apache.curator</groupId > <artifactId > curator-framework</artifactId > </dependency > <dependency > <groupId > org.apache.curator</groupId > <artifactId > curator-recipes</artifactId > </dependency > <dependency > <groupId > org.mybatis</groupId > <artifactId > mybatis</artifactId > </dependency > <dependency > <groupId > org.mybatis</groupId > <artifactId > mybatis-spring</artifactId > </dependency > <dependency > <groupId > com.alibaba</groupId > <artifactId > druid</artifactId > </dependency > <dependency > <groupId > mysql</groupId > <artifactId > mysql-connector-java</artifactId > </dependency > <dependency > <groupId > org.springframework</groupId > <artifactId > spring-tx</artifactId > </dependency > <dependency > <groupId > org.springframework</groupId > <artifactId > spring-jdbc</artifactId > </dependency > <dependency > <groupId > org.slf4j</groupId > <artifactId > slf4j-log4j12</artifactId > </dependency > </dependencies >
service与dao 1:在main下,创建子目录java(刷新maven工程),增加com.itheima.service.impl包及创建UserServiceImpl实现类
1 2 3 4 5 6 7 8 9 10 11 12 13 14 15 16 package com.itheima.service.impl;import com.itheima.pojo.User;import com.itheima.service.UserService;import org.springframework.beans.factory.annotation.Autowired;public class UserServiceImpl implements UserService { @Autowired UserDao userDao; @Override public User findById (Integer id) { return userDao.findById(id); } }
2:增加com.itheima.dao包,创建UserDao接口
1 2 3 4 5 6 7 8 package com.itheima.dao;import com.itheima.pojo.User;public interface UserDao { User findById (Integer id) ; }
3:在resource下创建com/itheima/dao目录,创建UserDao接口的映射文件,内容如下
1 2 3 4 5 6 7 8 <?xml version="1.0" encoding="utf-8" ?> <!DOCTYPE mapper PUBLIC "-//mybatis.org//DTD Mapper 3.0//EN" "http://mybatis.org/dtd/mybatis-3-mapper.dtd" > <mapper namespace ="com.itheima.dao.UserDao" > <select id ="findById" resultType ="com.itheima.pojo.User" parameterType ="int" > select * from t_user where id = #{id} </select > </mapper >
配置文件编写 在main下,创建子目录resources目录,在resources目录下
创建
spring-dao.xml
jdbc.properties
spring-service.xml
spring-provider.xml
log4j.properties
启动项目
spring-dao.xml 1 2 3 4 5 6 7 8 9 10 11 12 13 14 15 16 17 18 19 20 21 22 23 24 25 <?xml version="1.0" encoding="UTF-8" ?> <beans xmlns ="http://www.springframework.org/schema/beans" xmlns:xsi ="http://www.w3.org/2001/XMLSchema-instance" xmlns:context ="http://www.springframework.org/schema/context" xsi:schemaLocation ="http://www.springframework.org/schema/beans http://www.springframework.org/schema/beans/spring-beans.xsd http://www.springframework.org/schema/context http://www.springframework.org/schema/context/spring-context.xsd" > <context:property-placeholder location ="classpath:jdbc.properties" /> <bean id ="dataSource" class ="com.alibaba.druid.pool.DruidDataSource" > <property name ="driverClassName" value ="${jdbc.driver}" /> <property name ="url" value ="${jdbc.url}" /> <property name ="password" value ="${jdbc.password}" /> <property name ="username" value ="${jdbc.user}" /> </bean > <bean class ="org.mybatis.spring.SqlSessionFactoryBean" > <property name ="dataSource" ref ="dataSource" /> <property name ="typeAliasesPackage" value ="com.itheima.pojo" /> </bean > <bean class ="org.mybatis.spring.mapper.MapperScannerConfigurer" > <property name ="basePackage" value ="com.itheima.dao" /> </bean > </beans >
jdbc.properties 1 2 3 4 jdbc.driver =com.mysql.jdbc.Driver jdbc.url =jdbc:mysql://localhost:3306/itcastdubbo jdbc.user =root jdbc.password =root
spring-service.xml 1 2 3 4 5 6 7 8 9 10 11 12 13 14 <?xml version="1.0" encoding="UTF-8" ?> <beans xmlns ="http://www.springframework.org/schema/beans" xmlns:xsi ="http://www.w3.org/2001/XMLSchema-instance" xmlns:tx ="http://www.springframework.org/schema/tx" xsi:schemaLocation ="http://www.springframework.org/schema/beans http://www.springframework.org/schema/beans/spring-beans.xsd http://www.springframework.org/schema/tx http://www.springframework.org/schema/tx/spring-tx.xsd" > <bean id ="transactionManager" class ="org.springframework.jdbc.datasource.DataSourceTransactionManager" > <property name ="dataSource" ref ="dataSource" /> </bean > <tx:annotation-driven /> <import resource ="classpath:spring-dao.xml" /> </beans >
spring-provider.xml 1 2 3 4 5 6 7 8 9 10 11 12 13 14 15 16 17 18 19 20 21 22 23 <?xml version="1.0" encoding="UTF-8" ?> <beans xmlns ="http://www.springframework.org/schema/beans" xmlns:xsi ="http://www.w3.org/2001/XMLSchema-instance" xmlns:dubbo ="http://dubbo.apache.org/schema/dubbo" xsi:schemaLocation ="http://www.springframework.org/schema/beans http://www.springframework.org/schema/beans/spring-beans.xsd http://dubbo.apache.org/schema/dubbo http://dubbo.apache.org/schema/dubbo/dubbo.xsd" > <dubbo:application name ="dubbo_provide" /> <dubbo:registry address ="zookeeper://127.0.0.1:2181" /> <dubbo:service interface ="com.itheima.service.UserService" ref ="userService" /> <bean id ="userService" class ="com.itheima.service.impl.UserServiceImpl" /> <import resource ="classpath:spring-service.xml" /> </beans >
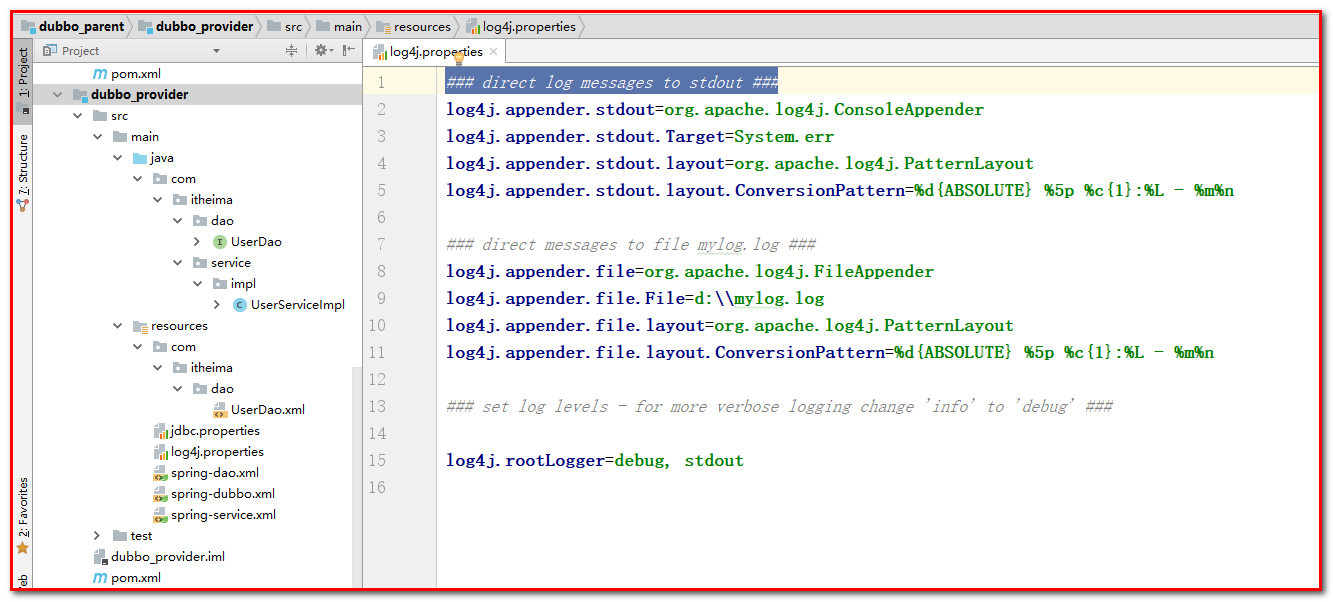
log4j.properties 将资料的log4j.properties配置文件拷贝到resources目录下
效果如下
启动项目 只要能启动spring的容器(加载spring的配置文件)就可以启动项目,因此有3种方式
ClassPathXmlApplication 1 2 3 4 5 6 7 8 9 10 11 12 13 14 15 16 17 package com.itheima;import org.springframework.context.support.ClassPathXmlApplicationContext;import java.io.IOException;public class ProviderApplication { public static void main (String[] args) throws IOException { new ClassPathXmlApplicationContext ("classpath:spring-provider.xml" ); System.in.read(); } }
监听器DispatcherServlet 配置web.xml文件
1 2 3 4 5 6 7 8 9 10 11 12 13 14 15 16 17 18 19 20 21 22 23 24 25 26 27 28 29 30 31 <?xml version="1.0" encoding="UTF-8" ?> <web-app xmlns ="http://java.sun.com/xml/ns/javaee" xmlns:xsi ="http://www.w3.org/2001/XMLSchema-instance" xsi:schemaLocation ="http://java.sun.com/xml/ns/javaee http://java.sun.com/xml/ns/javaee/web-app_3_0.xsd" version ="3.0" > <servlet > <servlet-name > dispatcherServlet</servlet-name > <servlet-class > org.springframework.web.servlet.DispatcherServlet</servlet-class > <init-param > <param-name > contextConfigLocation</param-name > <param-value > classpath:spring-provider.xml</param-value > </init-param > <load-on-startup > 1</load-on-startup > </servlet > <servlet-mapping > <servlet-name > dispatcherServlet</servlet-name > <url-pattern > *.do</url-pattern > </servlet-mapping > </web-app >
配置tomcat启动项目
注册中心验证 检查是否注册到zookeeper
(1)启动zookeeper,作为dubbo的注册中心
(2)登录zookeeper客户端,直接查看ls /dubbo/com.itheima.service.UserService节点
注意:
消费者与提供者应用名称不能相同
如果有多个服务提供者,名称不能相同,通信端口也不能相同
只有服务提供者才会配置服务发布的协议,默认是dubbo协议,端口号是20880
可以在spring-dubbo.xml中配置协议的端口
1 2 <dubbo:protocol name ="dubbo" port ="20881" > </dubbo:protocol >
其实就spring与mybatis整合,多了一dubbo的配置文件(注册Zookeeper)。
服务消费者模块 此模块是服务消费者模块,此模块基于是Web应用,需要引入spring-webmvc,需要在容器启动时,去zookeeper注册中心订阅服务,需要引入dubbo、zookeeper及客户端依赖。
实现步骤:
创建子模块dubbo_consumer,打包方式为war包,dubbo_interface(用来调用接口方法)
java源代码目录
resources资源目录
创建spring-dubbo.xml 配置文件:
配置dubbo的应用名称
配置dubbo注册中心Zookeeper地址
配置需要订阅的业务接口及引用
创建spring-mvc.xml
开启注解扫描
开启mvc注解驱动
将资料的log4j.properties配置文件拷贝到resources目录下
在web.xml文件中(拦截*.do),配置SpringMVC
启动服务消费者,并测试访问
实现过程:
创建子模块dubbo_consumer 或者叫做dubbo_controller
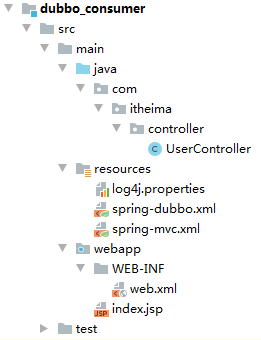
1:创建工程,如图所示:
2:修改pom.xml文件,引入依赖
1 2 3 4 5 6 7 8 9 10 11 12 13 14 15 16 17 18 19 20 21 22 23 24 25 26 27 28 29 30 31 32 33 34 35 36 37 38 39 40 41 42 43 44 45 46 47 48 49 50 51 52 53 54 55 56 <packaging > war</packaging > <dependencies > <dependency > <groupId > com.itheima</groupId > <artifactId > dubbo_interface</artifactId > <version > 1.0-SNAPSHOT</version > </dependency > <dependency > <groupId > org.springframework</groupId > <artifactId > spring-webmvc</artifactId > </dependency > <dependency > <groupId > com.fasterxml.jackson.core</groupId > <artifactId > jackson-core</artifactId > <version > 2.9.0</version > </dependency > <dependency > <groupId > com.fasterxml.jackson.core</groupId > <artifactId > jackson-databind</artifactId > <version > 2.9.0</version > </dependency > <dependency > <groupId > com.fasterxml.jackson.core</groupId > <artifactId > jackson-annotations</artifactId > <version > 2.9.0</version > </dependency > <dependency > <groupId > javax.servlet</groupId > <artifactId > servlet-api</artifactId > <version > 2.5</version > <scope > provided</scope > </dependency > <dependency > <groupId > com.alibaba</groupId > <artifactId > dubbo</artifactId > </dependency > <dependency > <groupId > org.apache.zookeeper</groupId > <artifactId > zookeeper</artifactId > </dependency > <dependency > <groupId > org.apache.curator</groupId > <artifactId > curator-framework</artifactId > </dependency > <dependency > <groupId > org.apache.curator</groupId > <artifactId > curator-recipes</artifactId > </dependency > <dependency > <groupId > org.slf4j</groupId > <artifactId > slf4j-log4j12</artifactId > </dependency > </dependencies >
Controller 创建com.itheima.controller包及创建UserController控制类,该类调用远程业务UserService,实现调用findById方法。
1 2 3 4 5 6 7 8 9 10 11 12 13 14 15 16 17 18 19 20 21 22 23 24 25 26 package com.itheima.controller;import com.itheima.pojo.User;import com.itheima.service.UserService;import org.springframework.beans.factory.annotation.Autowired;import org.springframework.web.bind.annotation.RequestMapping;import org.springframework.web.bind.annotation.RestController;@RestController @RequestMapping("/user") public class UserController { @Autowired private UserService userService; @RequestMapping("/findById") public User findById (int id) { User user = userService.findById(id); return user; } }
编写配置文件 在main下,创建子目录resources目录,在resources目录下
1:spring-dubbo.xml
2:spring-mvc.xml配置文件
3:log4j.properties
spring-dubbo.xml文件 1 2 3 4 5 6 7 8 9 10 11 12 13 14 15 16 17 18 19 20 21 <?xml version="1.0" encoding="UTF-8" ?> <beans xmlns ="http://www.springframework.org/schema/beans" xmlns:xsi ="http://www.w3.org/2001/XMLSchema-instance" xmlns:dubbo ="http://dubbo.apache.org/schema/dubbo" xsi:schemaLocation ="http://www.springframework.org/schema/beans http://www.springframework.org/schema/beans/spring-beans.xsd http://dubbo.apache.org/schema/dubbo http://dubbo.apache.org/schema/dubbo/dubbo.xsd" > <dubbo:application name ="dubbo_consumer" /> <dubbo:registry address ="zookeeper://127.0.0.1:2181" /> <dubbo:reference interface ="com.itheima.service.UserService" id ="userService" /> <dubbo:consumer check ="false" timeout ="2000" retries ="2" /> </beans >
spring-mvc.xml 1 2 3 4 5 6 7 8 9 10 11 12 13 14 15 16 17 <?xml version="1.0" encoding="UTF-8" ?> <beans xmlns ="http://www.springframework.org/schema/beans" xmlns:xsi ="http://www.w3.org/2001/XMLSchema-instance" xmlns:mvc ="http://www.springframework.org/schema/mvc" xmlns:context ="http://www.springframework.org/schema/context" xsi:schemaLocation ="http://www.springframework.org/schema/beans http://www.springframework.org/schema/beans/spring-beans.xsd http://www.springframework.org/schema/mvc http://www.springframework.org/schema/mvc/spring-mvc.xsd http://www.springframework.org/schema/context http://www.springframework.org/schema/context/spring-context.xsd" > <context:component-scan base-package ="com.itheima.controller" /> <mvc:annotation-driven /> <import resource ="classpath:spring-dubbo.xml" /> </beans >
导入log4j.properties 复制log4j.properteis到resources目录下
配置web.xml 配置springmvc的核心控制器,用来加载spring-mvc.xml
1 2 3 4 5 6 7 8 9 10 11 12 13 14 15 16 17 18 19 20 21 22 23 24 25 26 27 28 29 30 31 32 33 <?xml version="1.0" encoding="UTF-8" ?> <web-app xmlns:xsi ="http://www.w3.org/2001/XMLSchema-instance" xmlns ="http://java.sun.com/xml/ns/javaee" xsi:schemaLocation ="http://java.sun.com/xml/ns/javaee http://java.sun.com/xml/ns/javaee/web-app_3_0.xsd" id ="WebApp_ID" version ="3.0" > <servlet > <servlet-name > springMVC</servlet-name > <servlet-class > org.springframework.web.servlet.DispatcherServlet</servlet-class > <init-param > <param-name > contextConfigLocation</param-name > <param-value > classpath:spring-mvc.xml</param-value > </init-param > <load-on-startup > 1</load-on-startup > </servlet > <servlet-mapping > <servlet-name > springMVC</servlet-name > <url-pattern > /</url-pattern > </servlet-mapping > <filter > <filter-name > CharacterEncodingFilter</filter-name > <filter-class > org.springframework.web.filter.CharacterEncodingFilter</filter-class > <init-param > <param-name > encoding</param-name > <param-value > UTF-8</param-value > </init-param > </filter > <filter-mapping > <filter-name > CharacterEncodingFilter</filter-name > <url-pattern > /*</url-pattern > </filter-mapping > </web-app >
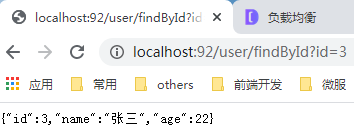
启动服务消费者并测试 在浏览器输入http://localhost:80/user/findById?id=3 ,查看浏览器输出结果
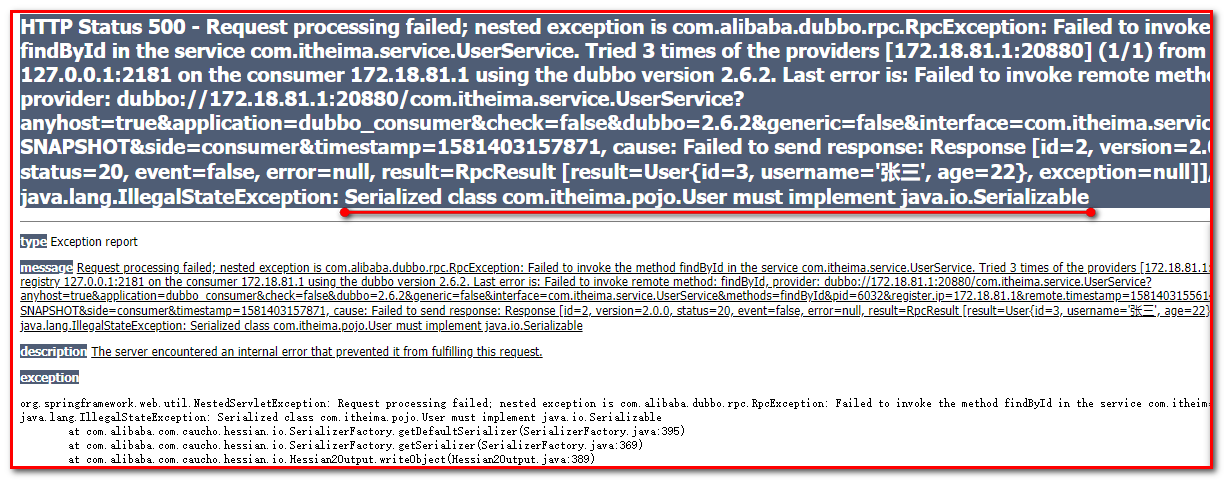
注意:因为是RPC的框架,要求传递的参数和实体类要实现序列化
参数:Integer类型(实现序列化接口java.io.Serializable)
返回值:User(实现序列化接口java.io.Serializable),如果不进行序列化,抛出异常
Zookeeper中存放Dubbo服务结构 作为Dubbo运行的注册中心
Zookeeper树型目录服务:
流程说明:
1:服务提供者(Provider)启动时: 向 /dubbo/com.foo.BarService/providers 目录下写入自己的 URL 地址
2:服务消费者(Consumer)启动时: 订阅 /dubbo/com.foo.BarService/providers 目录下的提供者 URL 地址。并向 /dubbo/com.foo.BarService/consumers 目录下写入自己的 URL 地址
3:监控中心(Monitor)启动时: 订阅 /dubbo/com.foo.BarService 目录下的所有提供者和消费者 URL 地址
小结
通过id查询用户信息
分模块工程构建 dubbo_parent 管理依赖的版本
dubbo2.6.2 仓库中没有,只有引入真正的依赖时才会触发下载,dependencyManagement 是不会触发下载的, dependencies(与dependencyManagement 同级)里才会下载
dubbo_common 实体类
dubbo_interface 消费者与提供者都需要用到它,RPC远程调用 使用接口来调用
dubbo_provider
要查询数据库dao 接口与映射文件 , mybatis整合spring
实现接口的方法UserServiceImpl 事务控制
注册到dubbo上 application name=””, registry zookeeper://ip:端口, dubbo:service 接口名 ref=实现的bean对象 bean 实现类
启动:3种方式:ClasspathXmlApplicationContext, ContextLoaderListener, DispatcherServlet
dubbo_consumer
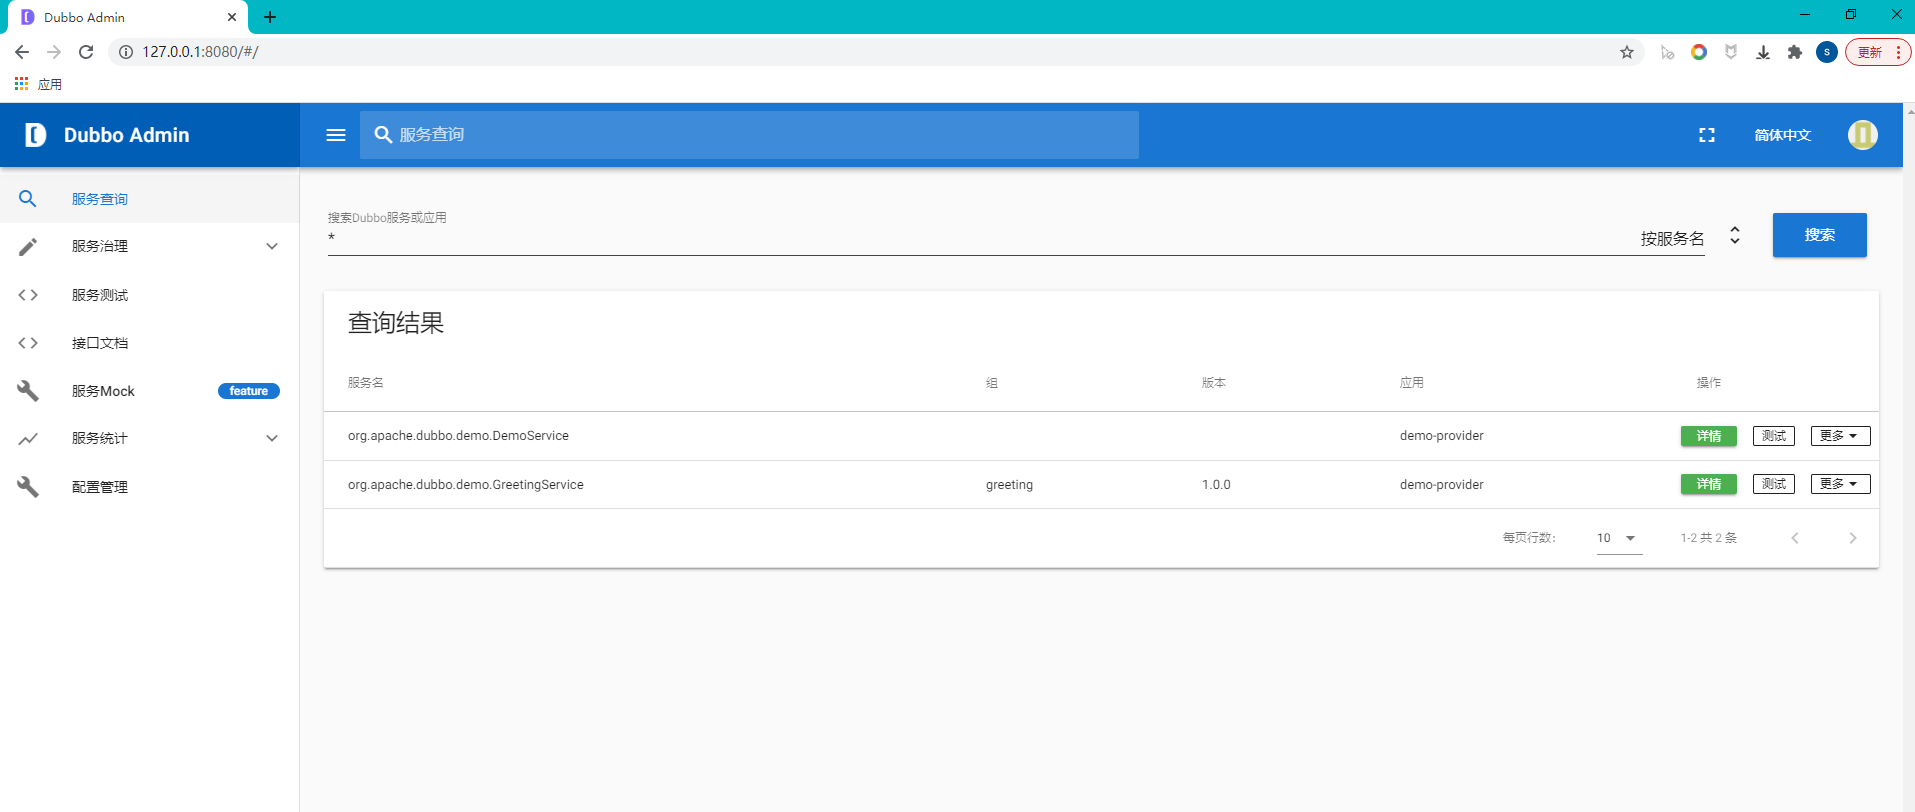
Dobbo管理控制台 我们在开发时,需要知道Zookeeper注册中心都注册了哪些服务,有哪些消费者来消费这些服务。我们可以通过部署一个管理中心来实现。其实管理中心就是一个web应用,部署到tomcat即可。
安装 安装步骤:
(1)将资料中的dubbo-admin-2.6.0.war文件复制到tomcat的webapps目录下
(2)启动tomcat,此war文件会自动解压
(3)修改WEB-INF下的dubbo.properties文件,注意dubbo.registry.address对应的值需要对应当前使用的 Zookeeper的ip
1 2 3 4 地址和端口号 dubbo.registry.address=zookeeper://192.168.134.129:2181 dubbo.admin.root.password=root dubbo.admin.guest.password=guest
(4)重启tomcat
1 org.springframework.beans.factory.BeanDefinitionStoreException: Unexpected exception parsing XML document from ServletContext resource [/WEB-INF/webx.xml]; nested exception is java.lang.IllegalArgumentException: Unknown flag 0x1000
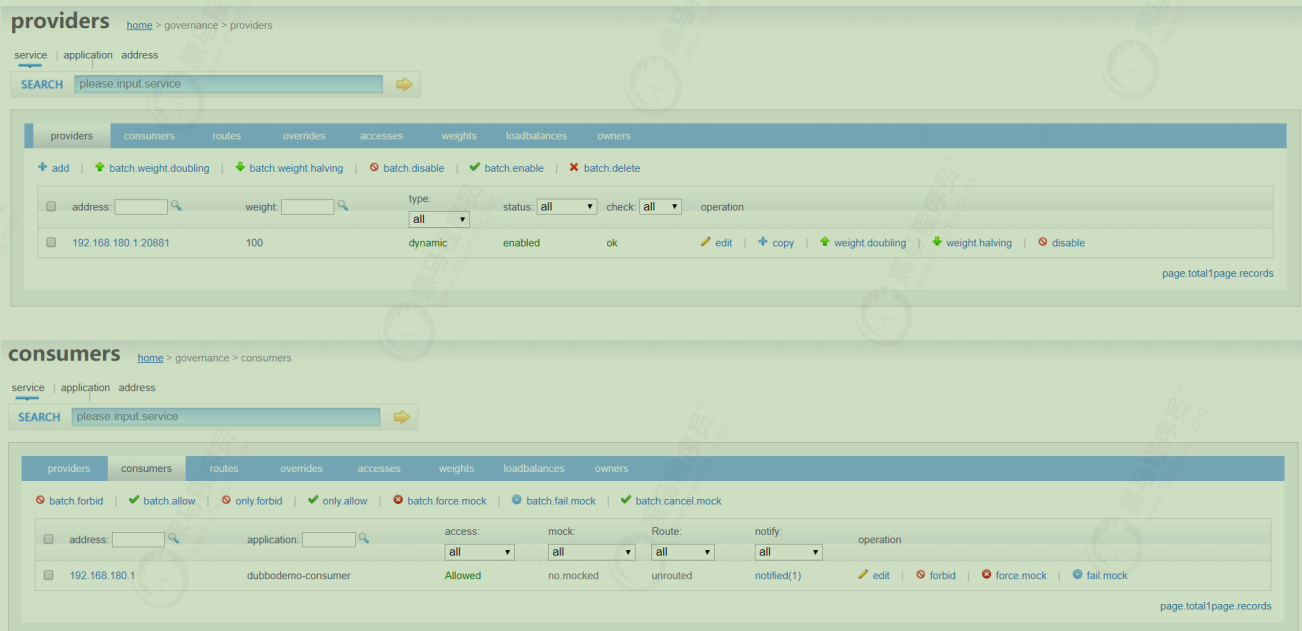
使用 启动服务提供者工程和服务消费者工程,可以在查看到对应的信息
访问http://localhost:8080/dubbo-admin-2.6.0/,输入用户名(root)和密码(root)
Dubbo配置 包扫描 1 2 <dubbo:annotation package ="com.itheima.service" />
服务提供者和服务消费者都需要配置,表示包扫描,作用是扫描指定包(包括子包)下的类。
服务提供者和消费者使用xml配置 如果不使用包扫描,也可以通过如下配置的方式来发布服务:
1 2 <bean id="helloService" class="com.itheima.service.impl.HelloServiceImpl" /> <dubbo:service interface="com.itheima.api.HelloService" ref="helloService" />
作为服务消费者,可以通过如下配置来引用服务
1 2 <!‐‐ 生成远程服务代理,可以和本地bean一样使用helloService ‐‐> <dubbo:reference id ="helloService" interface ="com.itheima.api.HelloService" />
上面这种方式发布和引用服务,一个配置项(dubbo:service、dubbo:reference)只能发布或者引用一个服务,如果有多个服务,这种方式就比较繁琐了。推荐使用包扫描方式。
如果使用包扫描,可以使用注解方式实现,推荐使用这种方式。
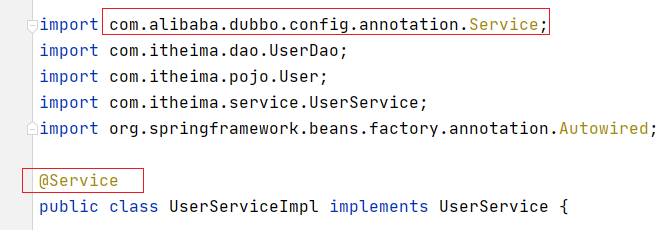
当扫到 @Service注解时,即会调用dubbo去zookeeper上注册服务。
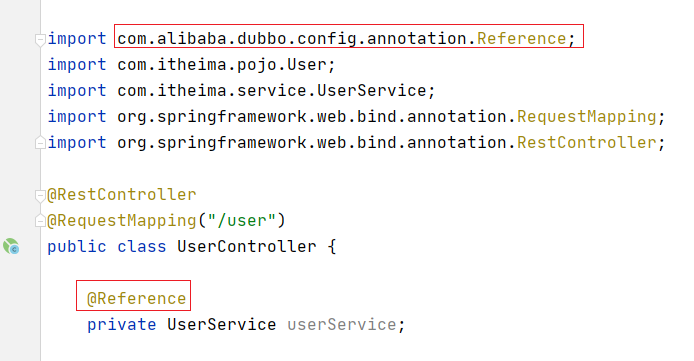
当扫到 @Reference时,则会调用dubbo去zookeeper上订阅相应的接口服务
服务提供者,使用注解实现 第一步:在spring-dubbo.xml中配置
1 2 3 4 <dubbo:annotation package ="com.itheima.service" />
服务提供者和服务消费者都需要配置,表示包扫描,作用是扫描指定包(包括子包)下的类。
【注意】:==去掉==以下2项配置:
1 2 3 4 <dubbo:service interface ="com.itheima.service.UserService" ref ="userSerivce" /> <bean id ="userSerivce" class ="com.itheima.service.impl.UserServiceImpl" />
第二步:在HelloServiceImpl的类上使用注解: ==注意包名是dubbo的==
【注意】:其中@Service是dubbo包下(com.alibaba.dubbo.config.annotation.Service)的注解。表示提供服务
服务消费者,使用注解实现 第一步:在spring-dubbo.xml中配置
1 2 <dubbo:annotation package ="com.itheima.controller" />
这里的dubbo注解扫描
【注意】==去掉==:
1 2 <dubbo:reference id ="userService" interface ="com.itheima.service.UserService" />
第二步:在Controller类中使用
@Reference注解
==【注意】==:其中@Reference是dubbo包下(com.alibaba.dubbo.config.annotation.Reference)的注解。表示订阅服务
重启服务测试使用
服务接口访问协议【提供方修改】 1 <dubbo:protocol name ="dubbo" port ="20880" />
一般在服务提供者一方配置,可以指定使用的协议名称和端口号。
其中Dubbo支持的协议有:dubbo、rmi、hessian、http、webservice、rest、redis等。
推荐使用的是dubbo协议,默认端口号:20880。
dubbo 协议采用单一长连接和 NIO 异步通讯,适合于小数据量大并发的服务调用,以及服务消费者机器数远大于 服务提供者机器数的情况。不适合传送大数据量的服务,比如传文件,传视频等,除非请求量很低。 也可以在同一个工程中配置多个协议,不同服务可以使用不同的协议,例如
1 2 3 4 5 6 7 <!‐‐ 多协议配置 ‐‐> <dubbo:protocol name ="dubbo" port ="20880" /> <dubbo:protocol name ="rmi" port ="1099" /> <!‐‐ 使用dubbo协议暴露服务 ‐‐> <dubbo:service interface ="com.itheima.api.HelloService" ref ="helloService" protocol ="dubbo" /> <!‐‐ 使用rmi协议暴露服务 ‐‐> <dubbo:service interface ="com.itheima.api.DemoService" ref ="demoService" protocol ="rmi" />
dubbo协议:
连接个数:单连接
连接方式:长连接
传输协议:TCP
传输方式:NIO异步传输
序列化:Hessian二进制序列化
适用范围:传入传出参数数据包较小(建议小于100K),消费者比提供者个数多,单一消费者无法压满提供者,尽量不要用dubbo协议传输大文件或超大字符串。
适用场景:常规远程服务方法调用
rmi协议:
连接个数:多连接
连接方式:短连接
传输协议:TCP
传输方式:同步传输
序列化:Java标准二进制序列化
适用范围:传入传出参数数据包大小混合,消费者与提供者个数差不多,可传文件。
适用场景:常规远程服务方法调用,与原生RMI服务互操作
详情使用可通过博客文章:https://www.cnblogs.com/duanxz/p/3555876.html 了解
启动时检查 这个配置需要配置在服务消费者一方,如果不配置默认check值为true。Dubbo 缺省会在启动时检查依赖的服务是否可用,不可用时会抛出异常,阻止 Spring 初始化完成,以便上线时,能及早发现问题。可以通过将check值 改为false来关闭检查。
1 <dubbo:consumer check="false"/>
建议在开发阶段将check值设置为false,在生产环境下改为true
如果设置为true,启动服务消费者,会抛出异常,表示没有服务提供者
超时调用 默认的情况下,dubbo调用的时间为一秒钟,如果超过一秒钟就会报错,所以我们可以设置超时时间长些,保证调用不出问题,这个时间需要根据业务来进行确定。
(1)修改消费者 配置文件,增加如下配置:
1 2 <dubbo:consumer timeout ="10000" > </dubbo:consumer >
(2)修改提供者配置文件,增加如下配置
1 2 <dubbo:provider timeout ="10000" > </dubbo:provider >
负载均衡 负载均衡(Load Balance):其实就是将请求分摊到多个操作单元上进行执行,从而共同完成工作任务。
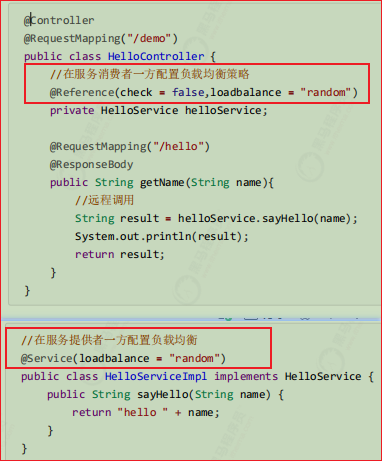
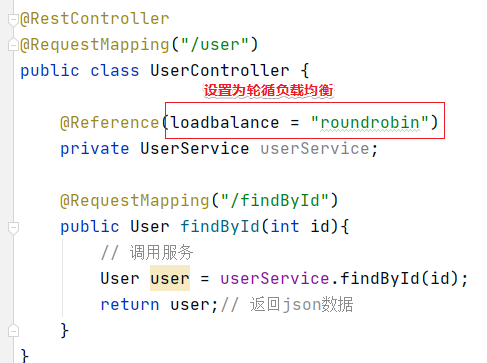
在集群负载均衡时,Dubbo 提供了多种均衡策略(包括随机random、轮询roundrobin、最少活跃调用数leastactive, 一致性哈希consistent hash),缺省【默认】为random随机调用。
配置负载均衡策略,既可以在服务提供者一方配置(@Service(loadbalance = “roundrobin”)),也可以在服务消费者一方配置(@Reference(loadbalance = “roundrobin”)),两者取一。
如下在服务消费者指定负载均衡策略,可在@Reference添加@Reference(loadbalance = “roundrobin”)
可以通过启动多个服务提供者来观察Dubbo负载均衡效果。
注意: 因为我们是在一台机器上启动多个服务提供者,所以需要修改tomcat的端口号和Dubbo服务的端口号来防止端口冲突。
在实际生产环境中,多个服务提供者是分别部署在不同的机器上,所以不存在端口冲突问题
测试负载均衡效果 增加一个提供者,提供相同的服务;
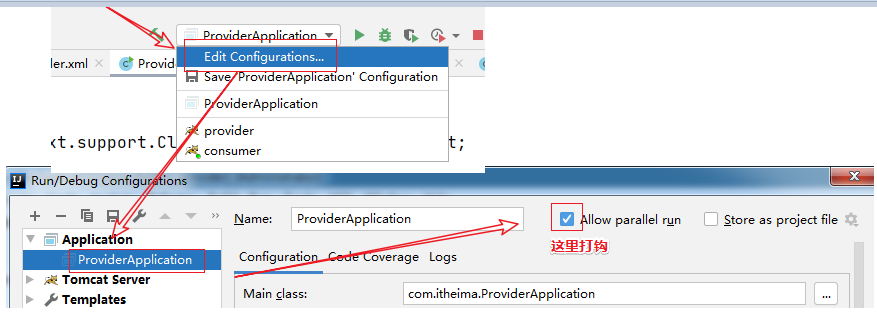
正式生产环境中,最终会把服务端部署到多台机器上,故不需要修改任何代码,只需要部署到不同机器即可测试。下面我们通过启动 ProviderApplication 类来做测试
① 修改
② 先启动1个ProviderApplication
③ 设置可以启动多个实例
④ 修改spring-provider.xml 端口依次改为20881,20882,20883
⑤ 启动ProviderApplication,最终有3个,分别端口为20881,20882,20883
其中:
1 2 @Reference(loadbalance = "roundrobin") @Reference(loadbalance = "random")
访问测试
启动消费者,访问:http://localhost:92/user/findById?id=3
小结 1:负载均衡: 把请求均匀分配到各服务提供者上
可以在@Reference(loadbalance=””) 也可@Service(loadbalance=””)
2:loadbalance:
random 随机 默认
roundrobin 轮循
leastactive 最少活跃数
consistenhash 一致哈希
解决Dubbo事务问题 前面我们已经完成了Dubbo的入门案例,通过入门案例我们可以看到通过Dubbo提供的标签配置就可以进行包扫描,扫描到@Service注解的类就可以被发布为服务。
但是我们如果在服务提供者类上加入@Transactional事务控制注解后,服务就发布不成功了。原因是事务控制的底层原理是为服务提供者类创建代理对象,而默认情况下Spring是基于JDK动态代理方式创建代理对象,而此代理对象的完整类名为com.sun.proxy.$Proxy42(最后两位数字不是固定的),导致Dubbo在发布服务前进行包匹配时无法完成匹配,进而没有进行服务的发布。
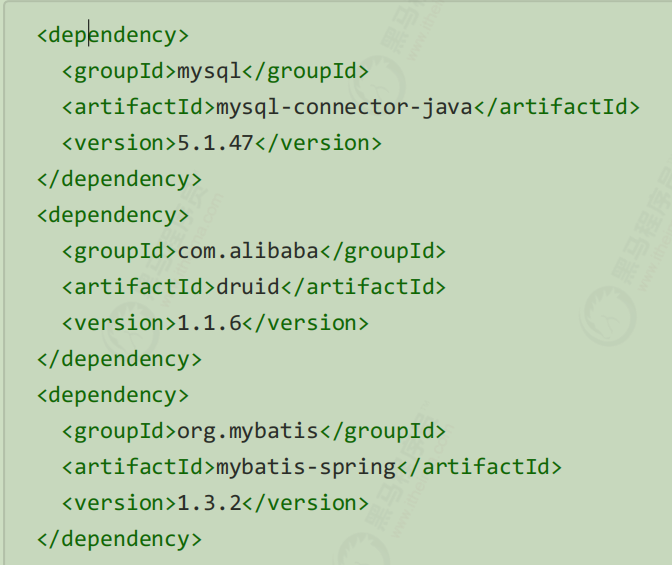
(1)在pom.xml文件中增加maven坐标
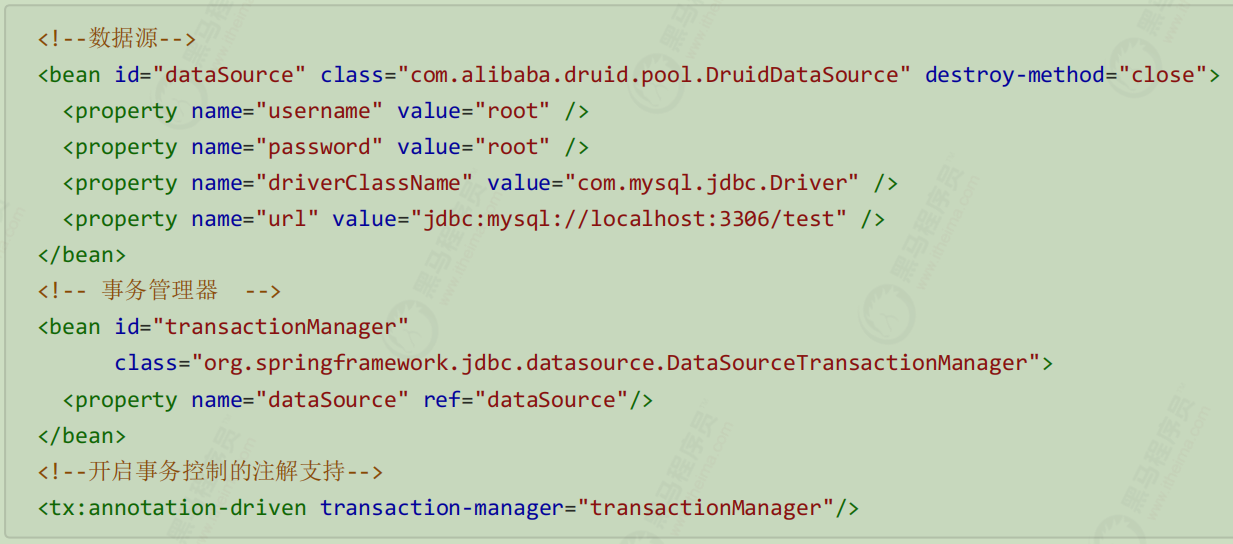
(2)在applicationContext-service.xml配置文件中加入数据源、事务管理器、开启事务注解的相关配置
上面连接的数据库可以自行创建
(3)在HelloServiceImpl类上加入@Transactional注解
(4)启动服务提供者和服务消费者,并访问
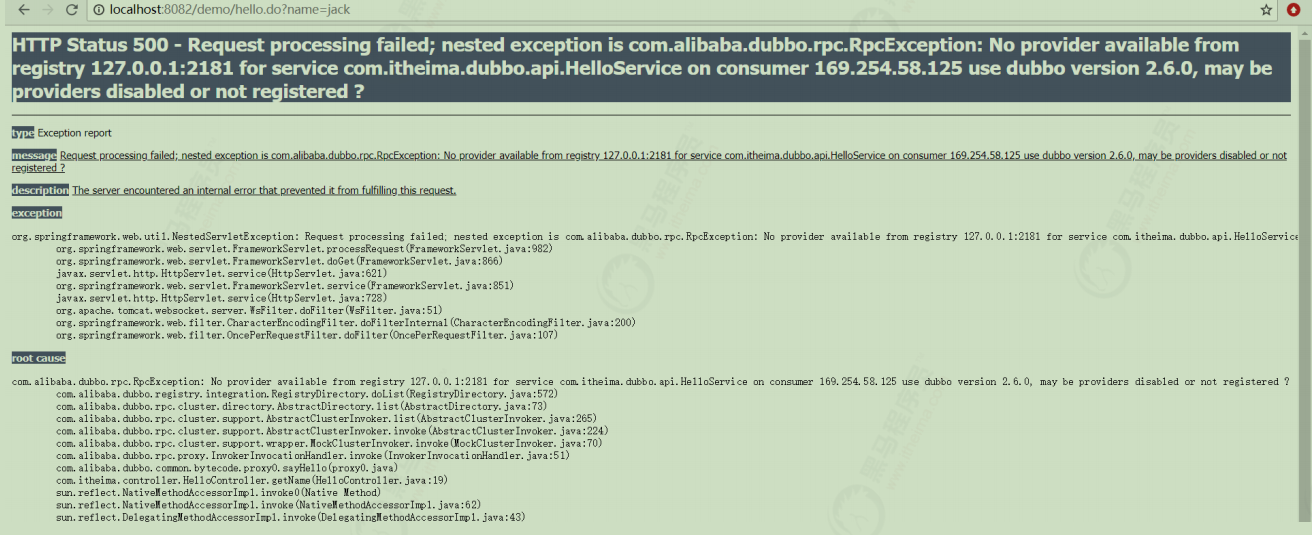
查看dubbo管理控制台发现服务并没有发布,如下:
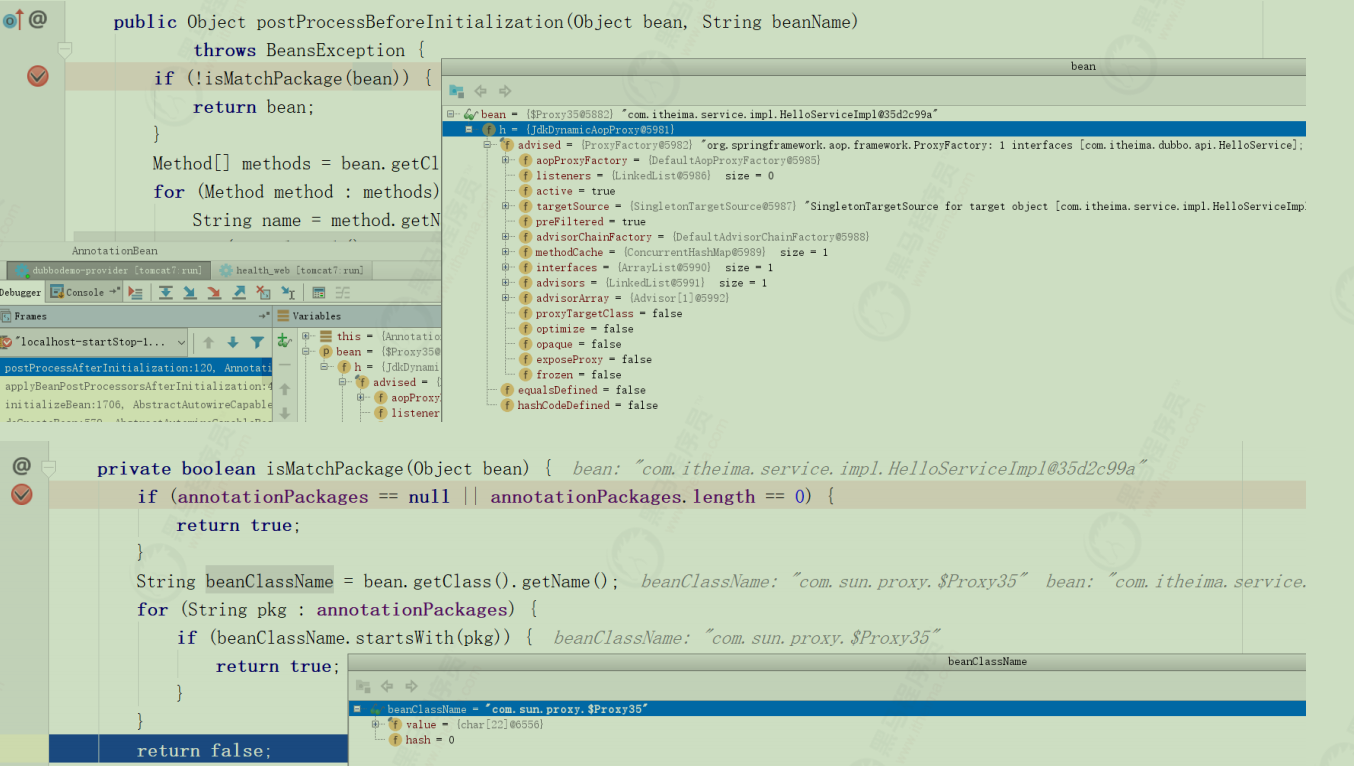
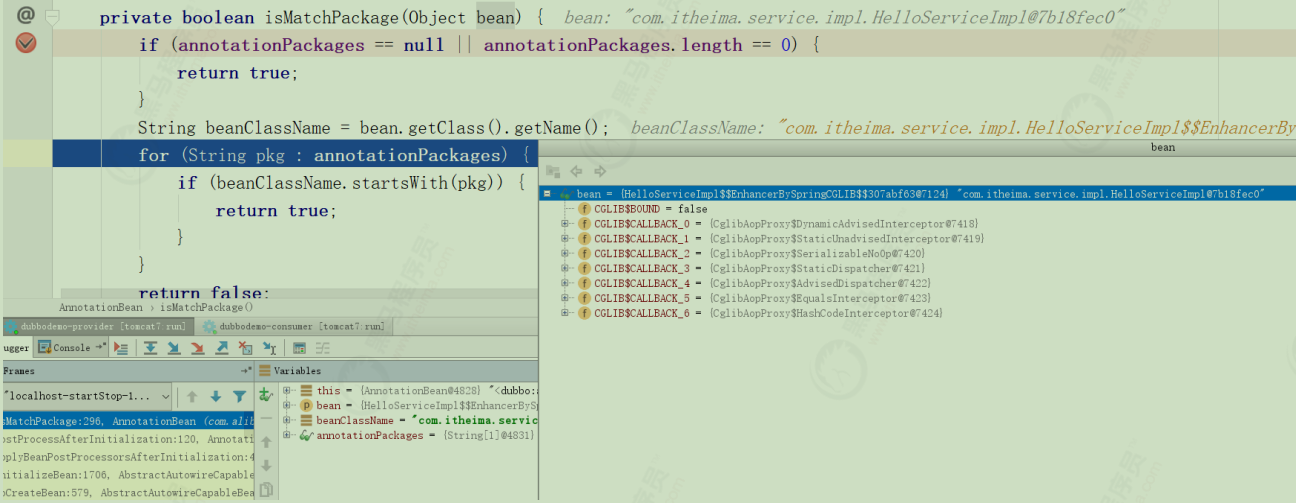
可以通过断点调试的方式查看Dubbo执行过程,Dubbo通过AnnotationBean的postProcessAfterInitialization方法进行处理
解决方案 通过上面的断点调试可以看到,在HelloServiceImpl类上加入事务注解后,Spring会为此类基于JDK动态代理技术创建代理对象,创建的代理对象完整类名为com.sun.proxy.$Proxy35,导致Dubbo在进行包匹配时没有成功(因为我们在发布服务时扫描的包为com.itheima.service),所以后面真正发布服务的代码没有执行。
解决方式操作步骤:
(1)修改applicationContext-service.xml配置文件,开启事务控制注解支持时指定proxy-target-class属性,值为true。其作用是使用cglib代理方式 为Service类创建代理对象
1 2 <!‐‐开启事务控制的注解支持‐‐> <tx:annotation‐driven transaction‐manager="transactionManager" proxy‐target‐class="true"/>
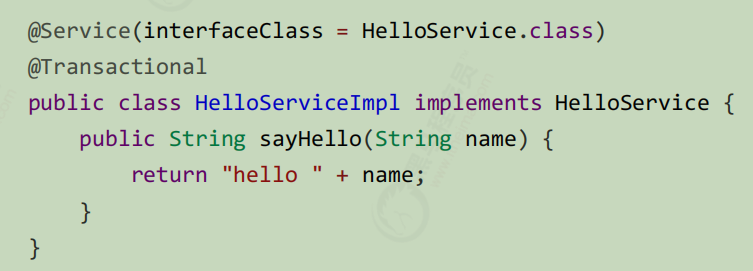
(2)修改HelloServiceImpl类,在Service注解中加入interfaceClass属性 ,值为HelloService.class,作用是指定服务的接口类型
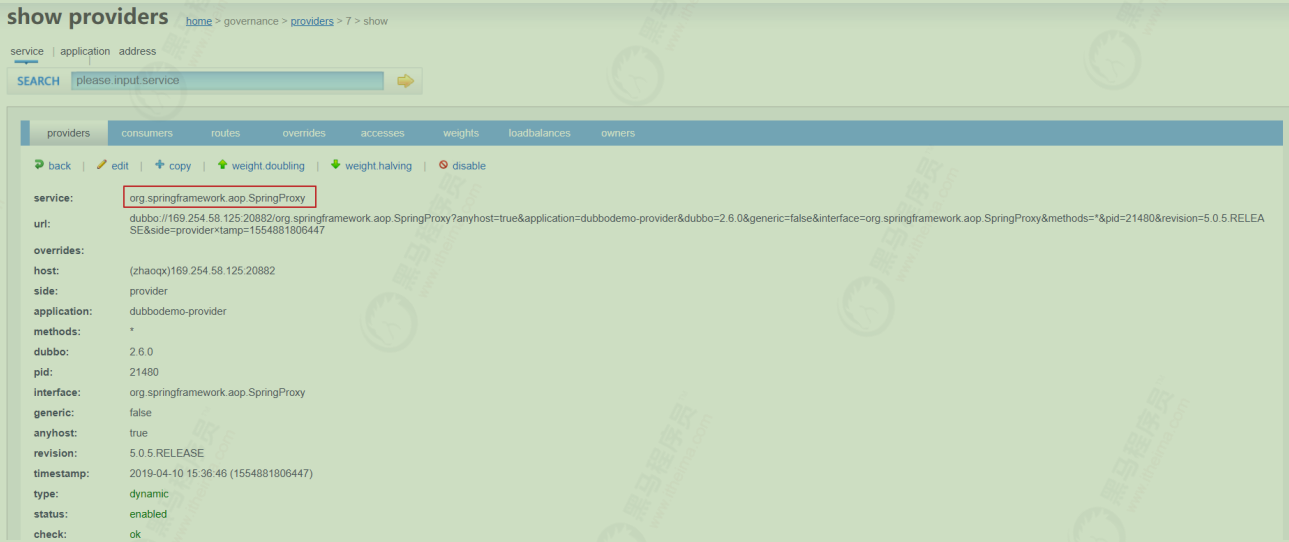
此处也是必须要修改的,否则会导致发布的服务接口为SpringProxy ,而不是HelloService接口,如下:
环境介绍 数据发布/订阅即所谓的配置中心:发布者将数据发布到ZooKeeper一系列节点上面,订阅者进行数据订阅,当数据有变化时,可以及时得到数据的变化通知,达到动态及时获取数据 的目的。
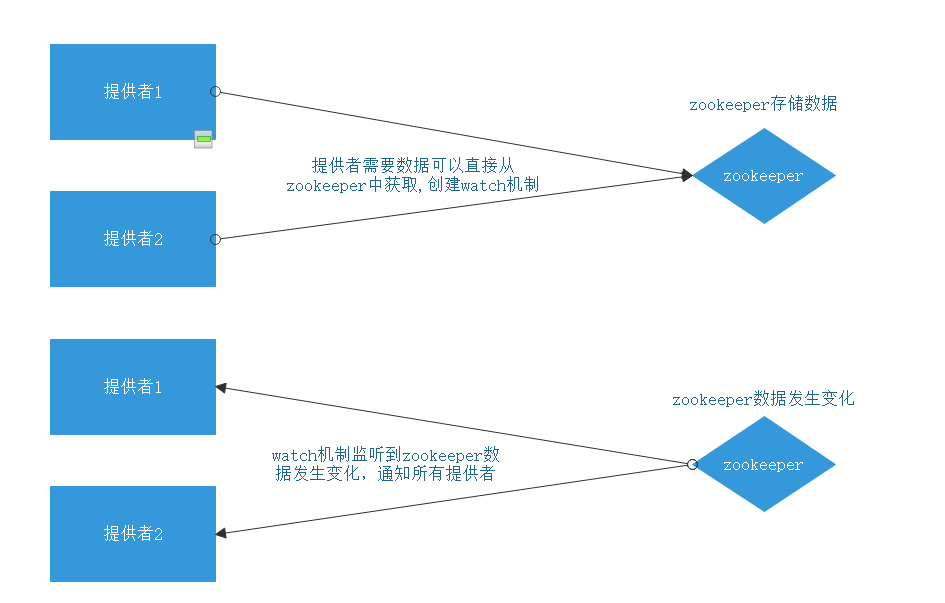
现在项目中有两个提供者,配置了相同的数据源,如果此时要修改数据源,必须同时修改两个才可以。
我们可以将数据源中需要的配置信息配置存储在zookeeper中,如果修改数据源配置,使用zookeeper的watch机制,同时对提供者的数据源信息更新。如下图所示:
实现配置中心 【路径】
1:在zookeeper中添加数据源所需配置
2:在dubbo_common中导入jar包
3:修改数据源,读取zookeeper中数据源所需配置数据
(1)在dubbo_common中创建工具类:SettingCenterUtil,继承PropertyPlaceholderConfigurer
(2)编写载入zookeeper中配置文件,传递到Properties属性中
(3)重写processProperties方法
(4)修改spring-dao.xml
4:watch机制
(1)添加监听
(2)获取容器对象,刷新spring容器:SettingCenterUtil,实现ApplicationContextAware
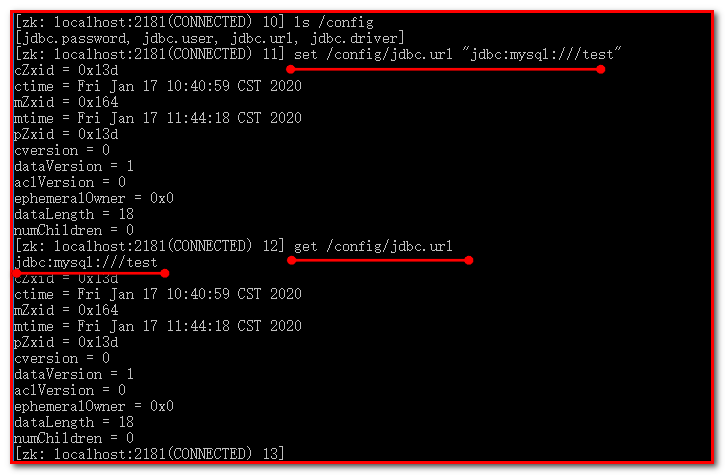
在zookeeper中添加数据源所需配置
让我们的程序读取Zookeeper中的配置,而不再从程序的中的jdbc.properties文件中读取。
在dubbo_common中导入jar包 1 2 3 4 5 6 7 8 9 10 11 12 13 14 15 16 17 18 19 20 21 22 23 24 25 26 27 28 29 30 31 32 33 34 35 36 37 38 39 40 41 42 43 44 45 46 <dependencies > <dependency > <groupId > org.springframework</groupId > <artifactId > spring-webmvc</artifactId > </dependency > <dependency > <groupId > com.alibaba</groupId > <artifactId > dubbo</artifactId > </dependency > <dependency > <groupId > org.apache.zookeeper</groupId > <artifactId > zookeeper</artifactId > </dependency > <dependency > <groupId > org.apache.curator</groupId > <artifactId > curator-framework</artifactId > </dependency > <dependency > <groupId > org.apache.curator</groupId > <artifactId > curator-recipes</artifactId > </dependency > <dependency > <groupId > org.mybatis</groupId > <artifactId > mybatis</artifactId > </dependency > <dependency > <groupId > org.mybatis</groupId > <artifactId > mybatis-spring</artifactId > </dependency > <dependency > <groupId > com.alibaba</groupId > <artifactId > druid</artifactId > </dependency > <dependency > <groupId > mysql</groupId > <artifactId > mysql-connector-java</artifactId > </dependency > <dependency > <groupId > org.springframework</groupId > <artifactId > spring-tx</artifactId > </dependency > <dependency > <groupId > org.springframework</groupId > <artifactId > spring-jdbc</artifactId > </dependency > </dependencies >
创建测试类,设置zookeeper上的数据库配置信息
1 2 3 4 5 6 7 8 9 10 11 12 13 14 15 16 17 18 19 20 21 22 23 24 25 26 27 28 29 30 31 32 33 34 package com.itheima;import org.apache.curator.RetryPolicy;import org.apache.curator.framework.CuratorFramework;import org.apache.curator.framework.CuratorFrameworkFactory;import org.apache.curator.retry.ExponentialBackoffRetry;import org.junit.Test;public class CreateJDBCPath { @Test public void createJDBCPath () throws Exception { RetryPolicy retryPolicy = new ExponentialBackoffRetry (3000 ,1 ); CuratorFramework client = CuratorFrameworkFactory.newClient("127.0.0.1:2181" ,30000 ,3000 ,retryPolicy); client.start(); client.create().creatingParentsIfNeeded().forPath("/config/jdbc.driver" ,"com.mysql.jdbc.Driver" .getBytes()); client.create().creatingParentsIfNeeded().forPath("/config/jdbc.url" ,"jdbc:mysql://localhost:3306/itcastdubbo" .getBytes()); client.create().creatingParentsIfNeeded().forPath("/config/jdbc.user" ,"root" .getBytes()); client.create().creatingParentsIfNeeded().forPath("/config/jdbc.password" ,"root" .getBytes()); client.close(); } }
修改数据源,读取zookeeper中数据 在dubbo_common中创建工具类:SettingCenterUtil,继承PropertyPlaceholderConfigurer
编写载入zookeeper中配置文件,传递到Properties属性中
1 2 3 4 5 6 7 8 9 10 11 12 13 14 15 16 17 18 19 20 21 22 23 24 25 26 27 28 29 30 31 32 33 34 35 36 37 38 39 40 41 42 43 44 45 46 47 48 49 50 51 52 53 package com.itheima.utils;import org.apache.curator.RetryPolicy;import org.apache.curator.framework.CuratorFramework;import org.apache.curator.framework.CuratorFrameworkFactory;import org.apache.curator.retry.ExponentialBackoffRetry;import org.springframework.beans.BeansException;import org.springframework.beans.factory.config.ConfigurableListableBeanFactory;import org.springframework.beans.factory.config.PropertyPlaceholderConfigurer;import org.springframework.util.StringValueResolver;import java.util.Properties;public class SettingCenterUtil extends PropertyPlaceholderConfigurer { private void loadZk (Properties props) { String connectString = "127.0.0.1:2181" ; int sessionTimeoutMs = 1000 ; int connectionTimeoutMs = 1000 ; RetryPolicy retryPolicy = new ExponentialBackoffRetry (1000 ,1 ); CuratorFramework client = CuratorFrameworkFactory.newClient(connectString, sessionTimeoutMs, connectionTimeoutMs, retryPolicy); client.start(); try { String driver = new String (client.getData().forPath("/config/jdbc.driver" )); String url = new String (client.getData().forPath("/config/jdbc.url" )); String user = new String (client.getData().forPath("/config/jdbc.user" )); String password = new String (client.getData().forPath("/config/jdbc.password" )); props.setProperty("jdbc.driver" , driver); props.setProperty("jdbc.url" , url); props.setProperty("jdbc.user" , user); props.setProperty("jdbc.password" , password); } catch (Exception e) { e.printStackTrace(); } } }
重写processProperties方法
1 2 3 4 5 6 7 8 9 10 11 12 13 14 15 16 @Override protected void processProperties (ConfigurableListableBeanFactory beanFactoryToProcess, Properties props) throws BeansException { loadFormZk(props); super .processProperties(beanFactoryToProcess, props); }
修改spring-dao.xml
注释掉:
1 <context:property-placeholder location ="classpath:jdbc.properties" > </context:property-placeholder >
添加:
1 <bean class ="com.itheima.utils.SettingCenterUtil" > </bean >
spring-dao.xml中配置
watch机制 在SettingCenterUtil中添加监听
1 2 3 4 5 6 7 8 9 10 11 12 13 14 15 16 17 18 19 20 21 22 23 24 25 26 27 28 29 30 31 32 33 private void addWatch () { RetryPolicy retryPolicy = new ExponentialBackoffRetry (1000 , 3 , 3000 ); CuratorFramework client = CuratorFrameworkFactory.newClient("127.0.0.1:2181" , 3000 , 3000 , retryPolicy); client.start(); TreeCache treeCache = new TreeCache (client, "/config" ); try { treeCache.start(); } catch (Exception e) { e.printStackTrace(); } treeCache.getListenable().addListener(new TreeCacheListener () { @Override public void childEvent (CuratorFramework client, TreeCacheEvent event) throws Exception { if (event.getType() == TreeCacheEvent.Type.NODE_UPDATED) { String path = event.getData().getPath(); System.out.println("==================================修改路径:" + path); if (path.startsWith("/config/jdbc" )){ applicationContext.refresh(); } } } }); }
注意:
1:不要关闭client,否则无法进行监控
2:修改完成后必须刷新spring容器的对象
获取容器对象,刷新spring容器
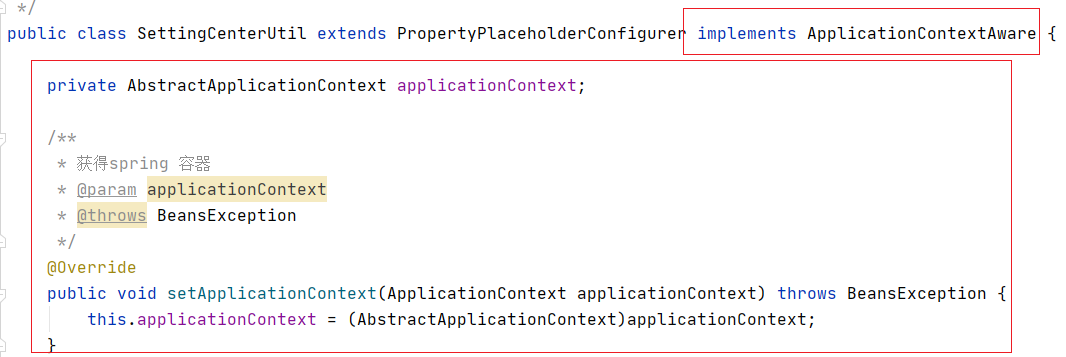
1:修改SettingCenterUtil实现ApplicationContextAware接口,重写setApplicationContext方法,获取applicationContext对象。
2:AbstractApplicationContext容器对象父类,提供了refresh方法,可以刷新容器中的对象,故强制转换。
3:在processProperties的方法中,添加addWatch(props);
1 2 3 4 5 6 7 8 9 10 11 12 13 14 15 16 17 18 19 20 21 22 23 24 25 26 private static boolean flag = true ;@Override protected void processProperties (ConfigurableListableBeanFactory beanFactoryToProcess, Properties props) throws BeansException { loadFormZk(props); if (flag) { addWatch(); flag=false ; } super .processProperties(beanFactoryToProcess, props); }
4:修改Zookeeper的配置
小结 1:配置中心环境介绍 回看zookeeper配置中心的图
2:实现配置中心
(1)在Zookeeper中添加数据源所需配置
(2)在dubbo-common中导入jar包
(3)修改数据源,读取Zookeeper中数据 继承ProperteisPlaceHolderConfigurer.processProperties, 读取zk中的数据库配置,设置进props参数
3:watch机制
(1)添加监听 TreeCache, event.type=node_update, 注意:判断path 不要关闭客户端,防止重复订阅
(2)获取容器对象(ApplicationContextAware)且刷新
Dubbo源码学习 Dubbo架构系统
框架介绍 概述 Dubbo是阿里巴巴公司开源的一个高性能优秀的服务框架,使得应用可通过高性能的 RPC 实现服务的输出和输入功能,可以和 Spring框架无缝集成。
Dubbo是一款高性能、轻量级的开源Java RPC框架,它提供了三大核心能力:面向接口的远程方法调用,智能容错和负载均衡,以及服务自动注册和发现。
运行架构 dubbo运行架构如下图示:
节点
角色说明
provider
暴露服务的服务提供方
consumer
调用远程服务的服务消费方
register
服务注册与发现的注册中心
monitor
统计服务的调用次数和调用时间的监控中心
container
服务运行容器
调用关系说明:
服务容器负责启动,加载,运行服务提供者。
服务提供者在启动时,向注册中心注册自己提供的服务。
服务消费者在启动时,向注册中心订阅自己所需的服务。
注册中心返回服务提供者地址列表给消费者,如果有变更,注册中心将基于长连接推送变更数据给消费者。
服务消费者,从提供者地址列表中,基于软负载均衡算法,选一台提供者进行调用,如果调用失败,再选另一台调用。
服务消费者和提供者,在内存中累计调用次数和调用时间,定时每分钟
发送一次统计数据到监控中心。
关于dubbo 的特点分别有连通性、健壮性、伸缩性、以及向未来架构的升级性。特点的详细介绍也可以参考官方文档。
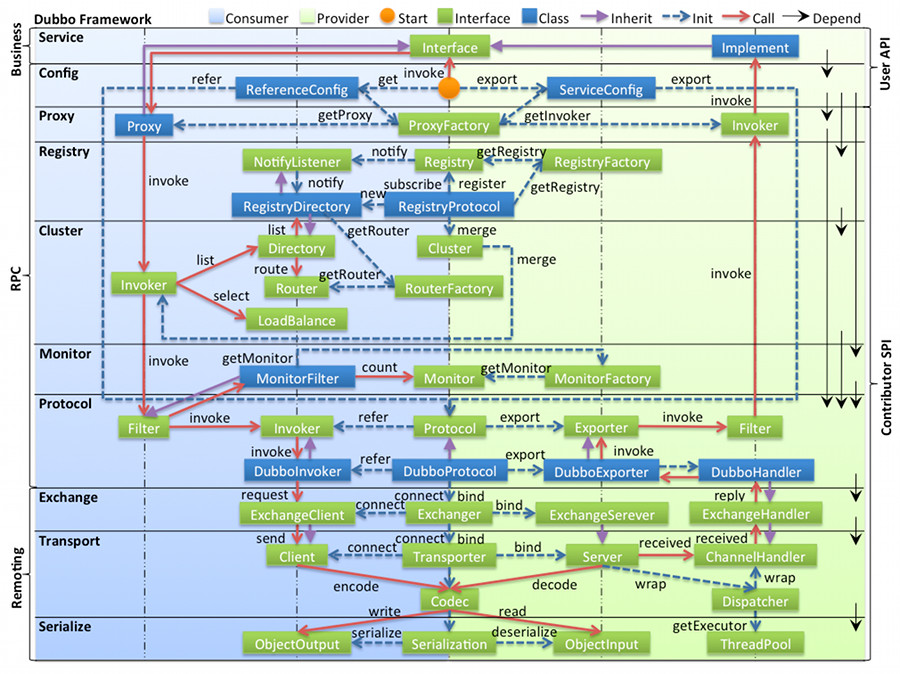
整体设计
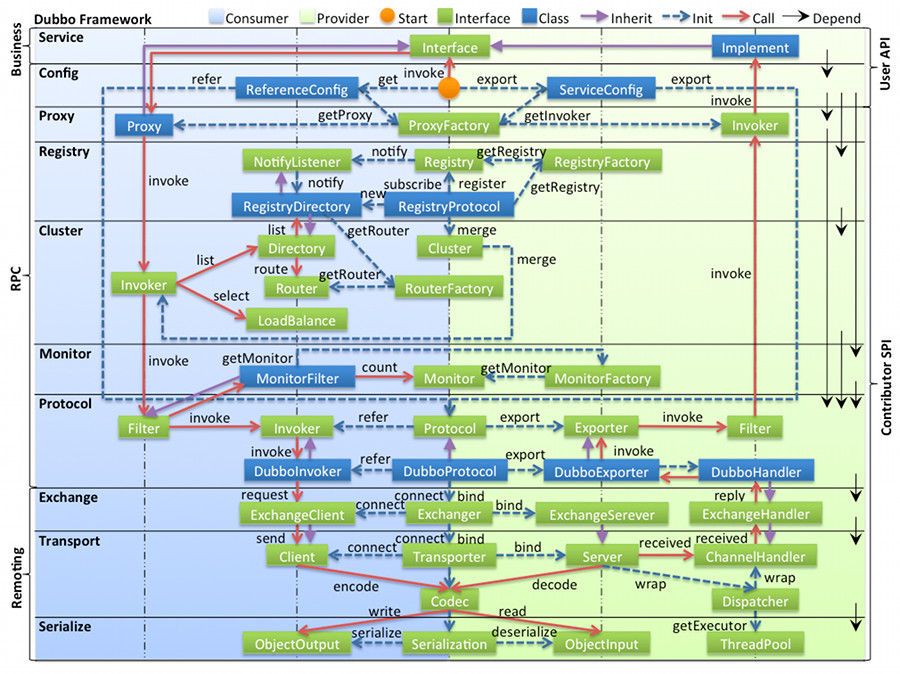
图例说明:
图中左边淡蓝背景的为服务消费方使用的接口,右边淡绿色背景的为服务提供方使用的接口,位于中轴线上的为双方都用到的接口。
图中从下至上分为十层,各层均为单向依赖,右边的黑色箭头代表层之间的依赖关系,每一层都可以剥离上层被复用,其中,Service 和Config 层为 API,其它各层均为 SPI。
图中绿色小块的为扩展接口,蓝色小块为实现类,图中只显示用于关联各层的实现类。
图中蓝色虚线为初始化过程,即启动时组装链,红色实线为方法调用过程,即运行时调时链,紫色三角箭头为继承,可以把子类看作父类的同一个节点,线上的文字为调用的方法。
各层说明:
config 配置层 :对外配置接口,以 ServiceConfig , ReferenceConfig 为中心,可以直接初始化配置类,也可以通过spring 解析配置生成配置类proxy 服务代理层 :服务接口透明代理,生成服务的客户端 Stub 和服务器端 Skeleton, 以 ServiceProxy 为中心,扩展接口为ProxyFactoryregistry 注册中心层 :封装服务地址的注册与发现,以服务 URL 为中心,扩展接口为 RegistryFactory , Registry , RegistryServicecluster 路由层 :封装多个提供者的路由及负载均衡,并桥接注册中心,以 Invoker 为中心,扩展接口为 Cluster , Directory , Router , LoadBalancemonitor 监控层 :RPC 调用次数和调用时间监控,以 Statistics 为中心,扩展接口为 MonitorFactory , Monitor , MonitorServiceprotocol 远程调用层 :封装 RPC 调用,以 Invocation , Result 为中心,扩展接口为 Protocol , Invoker , Exporterexchange 信息交换层 :封装请求响应模式,同步转异步,以Request , Response 为中心,扩展接口为 Exchanger , ExchangeChannel , ExchangeClient , ExchangeServertransport 网络传输层 :抽象 mina 和 netty 为统一接口,以Message 为中心,扩展接口为 Channel , Transporter , Client , Server , Codecserialize 数据序列化层 :可复用的一些工具,扩展接口为Serialization , ObjectInput , ObjectOutput , ThreadPool
环境搭建 接下来逐步对dubbo各个模块的源码以及原理进行解析,目前dubbo框架已经交由Apache基金会进行孵化,被在github开源。
Dubbo 社区目前主力维护的有 2.6.x 和 2.7.x 两大版本,其中,
2.6.x 主要以 bugfix 和少量 enhancements 为主,因此能完全保证稳定性
2.7.x 作为社区的主要开发版本,得到持续更新并增加了大量新 feature和优化,同时也带来了一些稳定性挑战
源码拉取 通过以下的这个命令签出最新的dubbo项目源码,并导入到IDEA中
1 git clone https://github.com/apache/dubbo.git dubbo
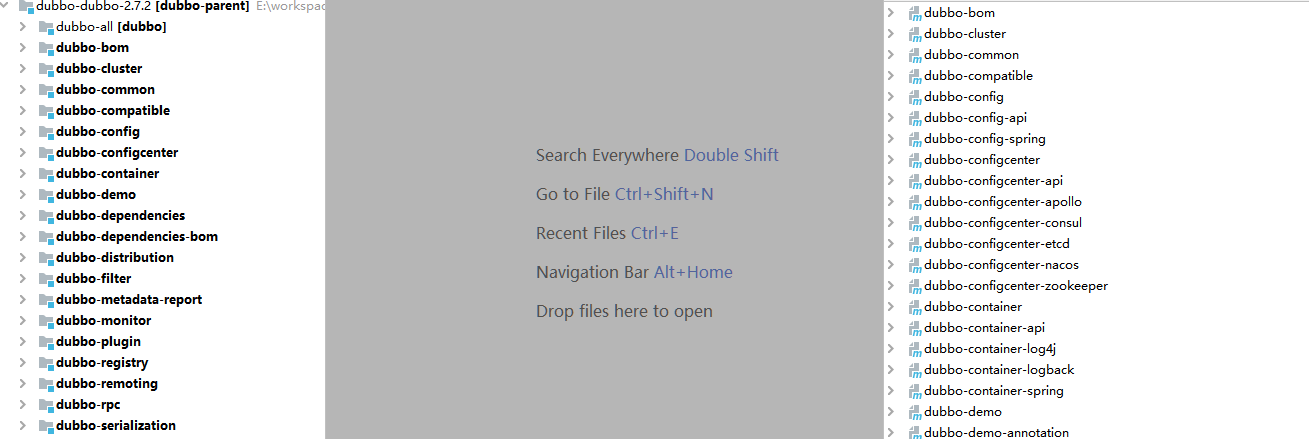
可以看到Dubbo被拆分成很多的Maven项目,在后续课程中会介绍左边每个模块的大致作用。
下载源码导入工程后,进行编译,并跳过测试,这个过程中可能会遇到以下问题
1 2 3 4 5 6 7 8 9 10 11 12 13 14 15 16 17 18 19 20 21 22 23 24 25 [ERROR] ---------- [ERROR] 1) com.google.protobuf:protoc:exe:windows- x86_64:3.7.1 [ERROR] [ERROR] Try downloading the file manually from the project website. [ERROR] [ERROR] Then, install it using the command: [ERROR] mvn install:install-file - DgroupId=com.google.protobuf -DartifactId=protoc - Dversion=3.7.1 -Dclassifier=windows-x86_64 - Dpackaging=exe -Dfile=/path/to/file [ERROR] [ERROR] Alternatively, if you host your own repository you can deploy the file there: [ERROR] mvn deploy:deploy-file - DgroupId=com.google.protobuf -DartifactId=protoc - Dversion=3.7.1 -Dclassifier=windows-x86_64 - Dpackaging=exe -Dfile=/path/to/file -Durl=[url] - DrepositoryId=[id] [ERROR] [ERROR] Path to dependency: [ERROR] 1) org.apache.dubbo:dubbo-serialization- protobuf:jar:2.7.8 [ERROR] 2) com.google.protobuf:protoc:exe:windows- x86_64:3.7.1 [ERROR] [ERROR] ---------- [ERROR] 1 required artifact is missing. [ERROR] [ERROR] for artifact: [ERROR] org.apache.dubbo:dubbo-serialization- protobuf:jar:2.7.8 [ERROR] [ERROR] from the specified remote repositories: [ERROR] apache.snapshots (https://repository.apache.org/snapshots, releases=false, snapshots=true), [ERROR] alimaven (http://maven.aliyun.com/nexus/content/groups/public/, releases=true, snapshots=false)
手动下载,按照提示的命令执行
1 mvn install:install-file -DgroupId=com.google.protobuf -DartifactId=protoc -Dversion=3.7.1 -Dclassifier=windows-x86_64 -Dpackaging=exe -Dfile=D:\tools\dubbo\protoc-3.7.1-windows-x86_64.exe
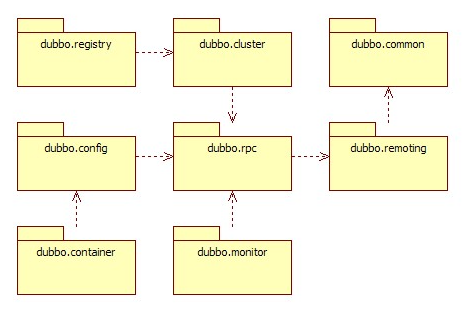
源码结构 通过如下图形可以大致的了解到,dubbo源码各个模块的相关作用:
模块说明:
dubbo-common 公共逻辑模块 :包括 Util 类和通用模型。dubbo-remoting 远程通讯模块 :相当于 Dubbo 协议的实现,如果RPC 用 RMI协议则不需要使用此包。dubbo-rpc 远程调用模块 :抽象各种协议,以及动态代理,只包含一对一的调用,不关心集群的管理。dubbo-cluster 集群模块 :将多个服务提供方伪装为一个提供方,包括:负载均衡, 容错,路由等,集群的地址列表可以是静态配置的,也可以是由注册中心下发。dubbo-registry 注册中心模块 :基于注册中心下发地址的集群方式,以及对各种注册中心的抽象。dubbo-monitor 监控模块 :统计服务调用次数,调用时间的,调用链跟踪的服务。dubbo-config 配置模块 :是 Dubbo 对外的 API,用户通过 Config 使 用Dubbo,隐藏 Dubbo 所有细节。dubbo-container 容器模块 :是一个 Standlone 的容器,以简单的Main 加载 Spring 启动,因为服务通常不需要 Tomcat/JBoss 等 Web容器的特性,没必要用 Web 容器去加载服务。
环境导入 在本次课程中,不仅讲解dubbo源码还会涉及到相关的基础知识,为了方便学员快速理解并掌握各个内容,已经准备好了相关工程,只需导入到IDEA中即可。对于工程中代码的具体作用,在后续课程会依次讲解
测试 (1) 安装zookeeper
(2) 修改官网案例,配置zookeeper地址
(3) 启动服务提供者,启动服务消费者
管理控制台
下载管理控制台, GITHUB地址
照着github指引初始化环境https://github.com/apache/dubbo-admin/blob/develop/README_ZH.md
进入源码目录, 进行打包编译
1 mvn clean package -Dmaven.test.skip=true
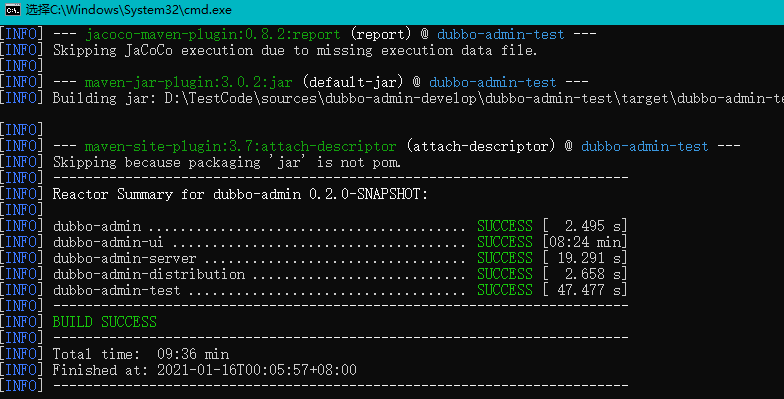
构建成功提示:
如果构建过程中出现nodejs安装包下载错误, 可以将安装包直接放置maven仓库内(资料中已提供安装包)。
1 2 https://nodejs.org/dist/v9.11.1/node-v9.11.1-win-x86.zip 修改为:node-9.11.1-win-x86.zip
实在安装不了直接去网上下载一个jar包
还是安装失败?可能是admin-ui下的包失败了。可以先npm install安装admin-ui,然后在mvn安装 => 成功
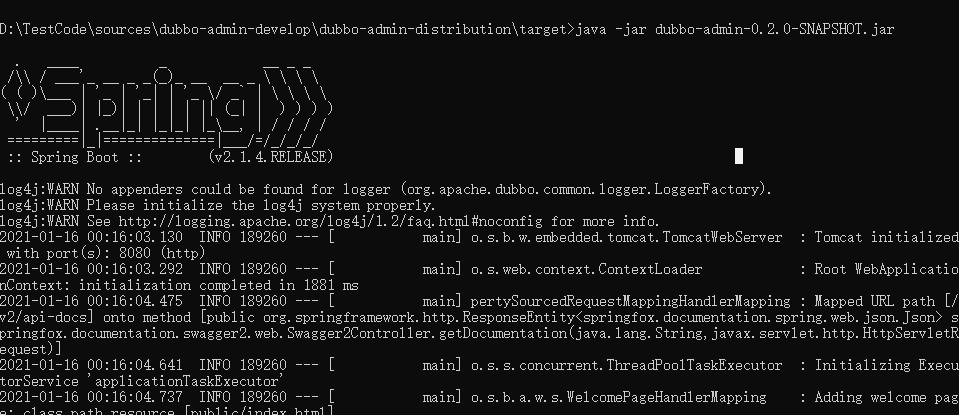
启动后台管理服务
1 2 3 4 java -jar dubbo-admin-0.2.0-SNAPSHOT.jar 也可以编写成bat文件 @echo off java -jar dubbo-admin-0.4.0.jar
管理后台
地址: http://127.0.0.1:8080/
默认账户名和密码都为root
todo: TMD服了,这个管理后台总是起不来
=> tomcat部署dubbo-admin 修改tomcat端口,修改dubbo-admin配置的zookeeper地址,
启动后访问 http://localhost:8081/dubbo-admin-2.6.0/ ,输入配置的用户名密码 , 成功
Dubbo实战运用 Dubbo与SpringBoot的整合 基于Zookeeper实现Dubbo与Spring Boot的集成整合
工程POM依赖 1 2 3 4 5 6 7 8 9 10 11 12 13 14 15 16 17 18 19 20 21 22 23 24 25 26 27 28 29 30 31 32 33 34 35 36 37 38 39 40 41 42 43 44 45 46 47 48 49 50 51 52 53 54 55 56 57 58 59 60 61 62 63 64 65 66 67 68 69 70 71 72 73 74 75 76 77 78 79 80 81 82 83 84 85 86 87 88 89 90 91 92 93 <properties > <dubbo-version > 2.7.8</dubbo-version > <spring-boot.version > 2.3.0.RELEASE</spring-boot.version > </properties > <dependencyManagement > <dependencies > <dependency > <groupId > org.springframework.boot</groupId > <artifactId > spring-boot-dependencies</artifactId > <version > ${spring-boot.version}</version > <type > pom</type > <scope > import</scope > </dependency > <dependency > <groupId > org.apache.dubbo</groupId > <artifactId > dubbo-dependencies- bom </artifactId > <version > ${dubbo-version}</version > <type > pom</type > <scope > import</scope > </dependency > <dependency > <groupId > org.apache.dubbo</groupId > <artifactId > dubbo</artifactId > <version > ${dubbo-version}</version > <exclusions > <exclusion > <groupId > org.springframework</groupId > <artifactId > spring</artifactId > </exclusion > <exclusion > <groupId > javax.servlet</groupId > <artifactId > servlet- api </artifactId > </exclusion > <exclusion > <groupId > log4j</groupId > <artifactId > log4j</artifactId > </exclusion > </exclusions > </dependency > </dependencies > </dependencyManagement > <dependencies > <dependency > <groupId > org.apache.dubbo</groupId > <artifactId > dubbo-spring-boot- starter </artifactId > <version > ${dubbo-version}</version > </dependency > <dependency > <groupId > org.apache.dubbo</groupId > <artifactId > dubbo</artifactId > </dependency > <dependency > <groupId > org.springframework.boot</groupId > <artifactId > spring-boot-starter- web </artifactId > <version > ${spring-boot.version}</version > </dependency > <dependency > <groupId > org.apache.curator</groupId > <artifactId > curator-framework</artifactId > <version > 4.0.1</version > </dependency > <dependency > <groupId > org.apache.dubbo</groupId > <artifactId > dubbo-dependencies- zookeeper </artifactId > <version > ${dubbo-version}</version > <type > pom</type > <exclusions > <exclusion > <groupId > org.slf4j</groupId > <artifactId > slf4j-log4j12</artifactId > </exclusion > </exclusions > </dependency > </dependencies >
Dubbo采用2.7.8版本, Spring Boot采用的是2.3.0.RELEASE版本。
如果依赖下载出现问题, 可以指定具体的仓库:
1 2 3 4 5 6 7 8 9 10 11 12 13 <repositories > <repository > <id > apache.snapshots.https</id > <name > Apache Development Snapshot Repository</name > <url > https://repository.apache.org/content/repositories/s napshots</url > <releases > <enabled > false</enabled > </releases > <snapshots > <enabled > true</enabled > </snapshots > </repository > </repositories >
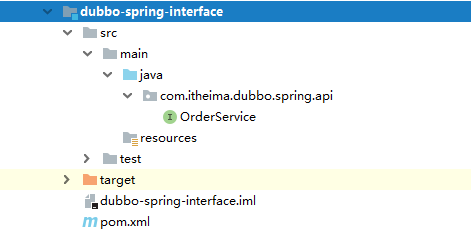
公用RPC接口工程 为便于客户端与服务端的RPC接口引用, 这里对RPC接口做统一封装
定义了一个订单服务接口, 用于测试验证。
1 2 3 4 public interface OrderService { String getOrder (Long orderId) ; }
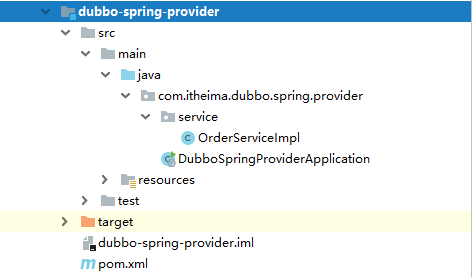
服务端工程
工程结构
POM依赖
1 2 3 4 5 6 7 8 9 10 11 12 13 14 15 16 17 18 19 <dependencies > <dependency > <groupId > org.apache.dubbo</groupId > <artifactId > dubbo-spring-boot- starter</artifactId > <version > ${dubbo-version}</version > </dependency > <dependency > <groupId > org.apache.dubbo</groupId > <artifactId > dubbo</artifactId > </dependency > <dependency > <groupId > com.itheima</groupId > <artifactId > dubbo-spring- interface</artifactId > <version > ${project.version}</version > </dependency > </dependencies >
RPC服务接口
1 2 3 4 5 6 7 8 9 10 11 12 13 14 15 @DubboService(version = "${dubbo.spring.provider.version}") public class OrderServiceImpl implements OrderService { @Value("${server.port}") private String serverPort; @Value("${dubbo.spring.provider.version}") private String serviceVersion; public String getOrder (Long orderId) { String result = "get order detail ,orderId=" + orderId + ",serverPort=" + serverPort + ",serviceVersion=" + serviceVersion; System.out.println(result); return result; } }
通过DubboService注解, 声明为RPC服务,version可以标识具体的版本号, 消费端需匹配保持一致。
工程配置
1 2 3 4 5 6 7 8 9 10 11 12 13 14 15 16 17 18 19 20 21 22 23 24 server: port: 18081 spring: application: name: dubbo-spring-provider dubbo: scan: base-packages: com.itheima.service protocol: name: dubbo port: 20880 dispatcher: "message" threads: 300 registry: address: zookeeper://127.0.0.1:2181 file: ${user.home}/dubbo-cache/${spring.application.name}/dubbo.cache
Spring Boot启动程序
1 2 3 4 5 6 7 @SpringBootApplication @ComponentScan(basePackages = {"com.itheima"}) public class DubboSpringProviderApplication { public static void main (String[] args) { SpringApplication.run(DubboSpringProviderApplicatio n.class, args); } }
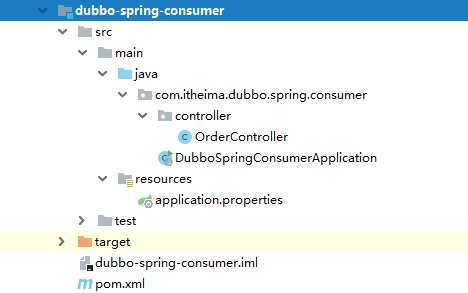
消费端工程
工程结构
POM依赖:
1 2 3 4 5 6 7 8 9 10 11 12 13 14 <dependencies > <dependency > <groupId > org.apache.dubbo</groupId > <artifactId > dubbo-spring-boot-starter</artifactId > <version > ${dubbo-version}</version > </dependency > <dependency > <groupId > com.itheima</groupId > <artifactId > dubbo-spring-interface</artifactId > <version > ${project.version}</version > </dependency > </dependencies >
消费端调用
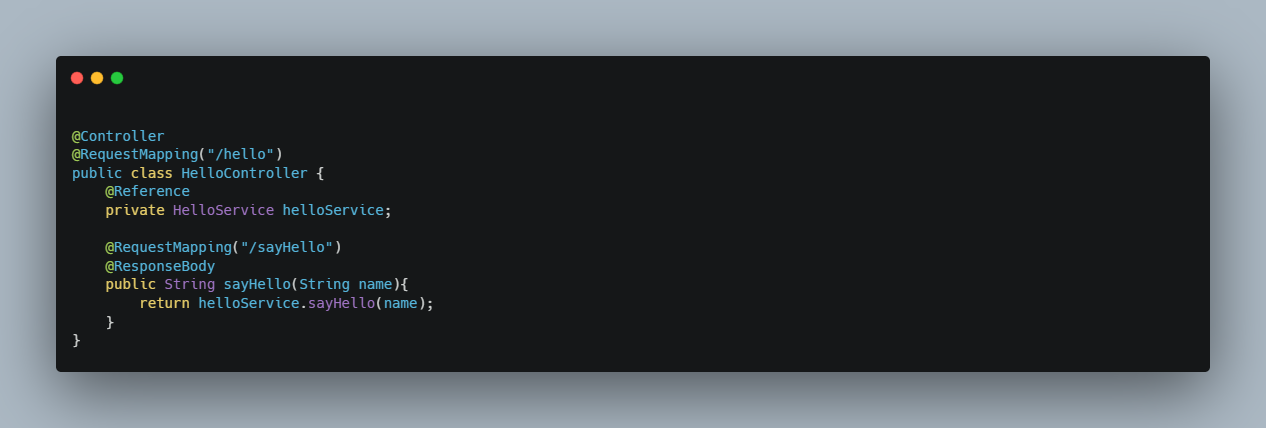
1 2 3 4 5 6 7 8 9 10 11 12 13 14 15 16 17 18 19 20 21 @Controller @RequestMapping("/order") public class OrderController { private final Logger logger = LoggerFactory.getLogger(getClass()); @DubboReference(version = "${dubbo.spring.provider.version}") private OrderService orderService; @RequestMapping("/getOrder") @ResponseBody public String getOrder (Long orderId) { String result = null ; try { result = orderService.getOrder(orderId); } catch (Exception e) { logger.error(e.getMessage(), e); } return result; } }
工程配置
1 2 3 4 5 6 7 8 server.port =18084 spring.application.name =dubbo-spring-consumer dubbo.spring.provider.version = 1.0.0 dubbo.registry.address =zookeeper://127.0.0.1:2181 dubbo.registry.file = ${user.home}/dubbo- cache/${spring.application.name}/dubbo.cache
Spring Boot启动程序
1 2 3 4 5 6 7 @SpringBootApplication @ComponentScan(basePackages = {"com.itheima"}) public class DubboSpringConsumerApplication { public static void main (String[] args) { SpringApplication.run(DubboSpringConsumerApplicatio n.class, args); } }
工程调用验证
启动ZK注册中心
启动服务端, 运行DubboSpringProviderApplication
启动消费端, 运行DubboSpringConsumerApplication
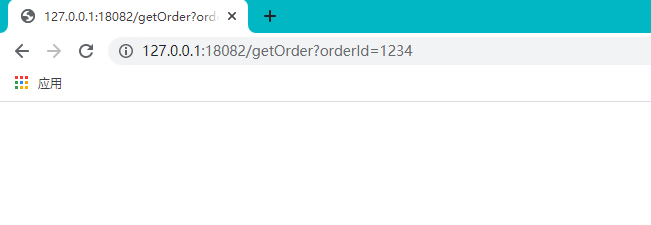
请求获取订单接口, 地址: http://127.0.0.1:18084/order/getOrder?orderId=1001
调用成功:
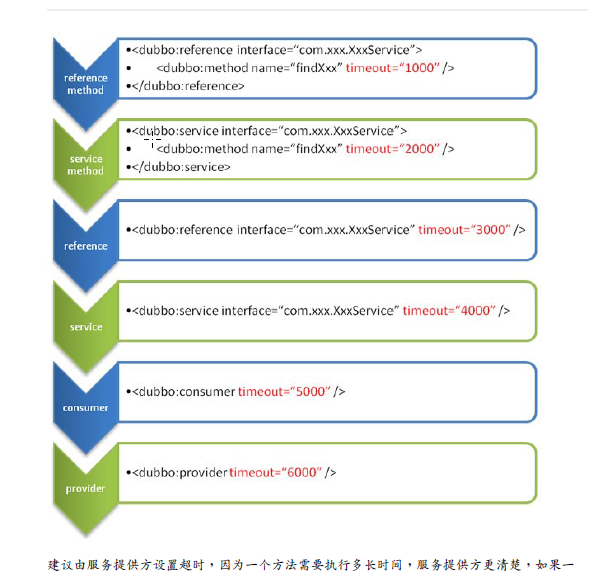
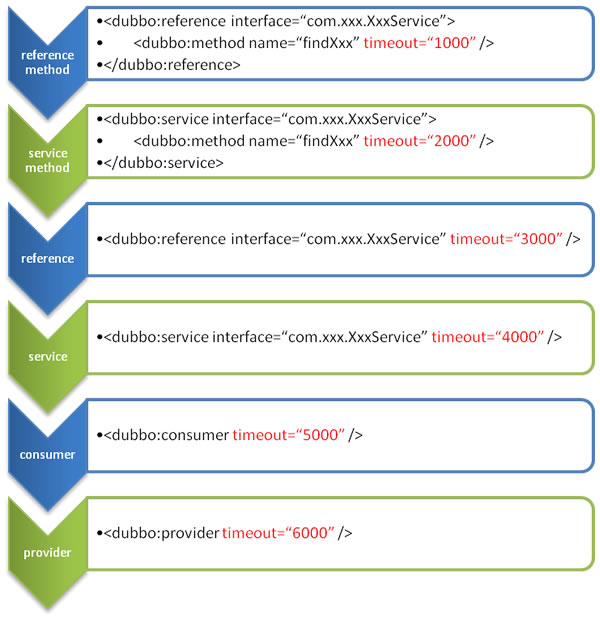
Dubbo高阶配置运用 不同配置覆盖关系
覆盖规则:
配置规则:
方法级优先,接口级次之,全局配置再次之。
如果级别一样,则消费方优先,提供方次之。
服务端超时设定
增加配置类:
1 2 3 4 5 6 7 8 9 10 11 12 13 14 @Configuration public class DubboCustomConfig { @Bean public ProviderConfig registryConfig () { ProviderConfig providerConfig = new ProviderConfig (); providerConfig.setTimeout(1000 ); return providerConfig; } }
修改服务接口实现:
设定模拟睡眠时间
1 2 3 4 5 6 7 8 9 10 11 12 13 14 15 publicStringgetOrder(LongorderId) { try { Thread.sleep(1500L ); } catch (InterruptedExceptione) { e.printStackTrace(); } return "GetOrderDetail,Id:" + orderId + ",serverPort:" + serverPort; }
客户端调用验证
服务端全局超时设为2秒(不触发超时), 消费端设定超时时间为1秒(触发超时)。
修改调用代码:
1 2 3 4 5 @DubboReference(version = "${dubbo.spring.provider.version}", timeout = 1000) private OrderService orderService;
调用结果, 触发超时:
表明消费端配置优先。
服务端全局超时设定为1秒(触发超时), 消费端去掉超时时间配置。
触发超时, 表明服务提供方优先级次之。
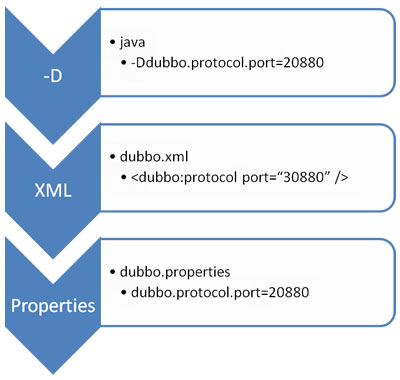
属性配置优先级
优先级规则
优先级从高到低:
1 -Ddubbo.protocol.port=20881
XML(application.yml/application.properties)配置会重写dubbo.properties 中的,一般配置项目特有的
1 2 3 4 5 dubbo: protocol: name: dubbo port: 20882
Properties默认配置(dubbo.properties),仅仅作用于以上两者没有配置时,一般配置全局公共配置
1 dubbo.protocol.port=20883
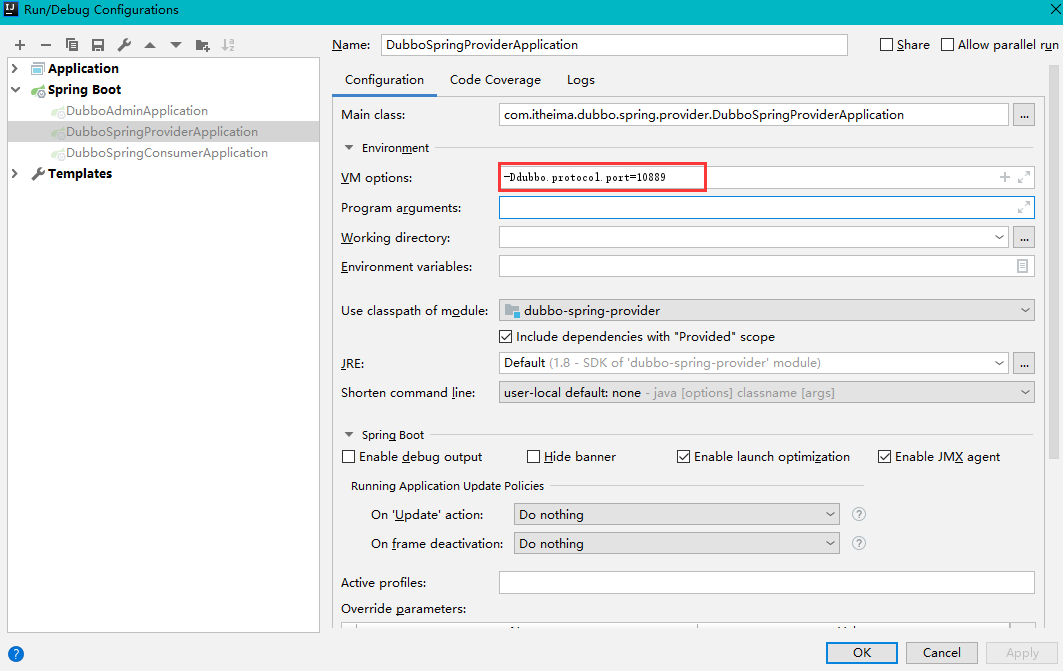
JVM参数优先级验证
application.properties里面配置了dubbo.protocol.port端口10888
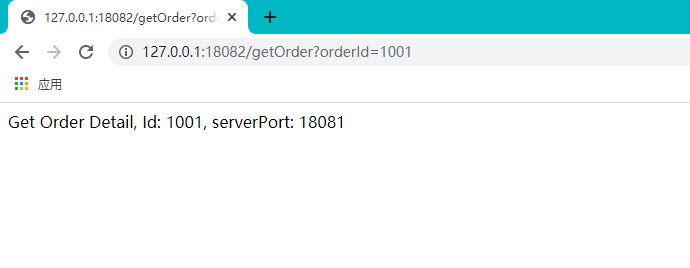
JVM运行参数端口设定为-Ddubbo.protocol.port=10889
服务启动完成, 可以看到端口优先以JVM参数为准
Properties配置文件验证
注释掉application.properties里面配置的dubbo.protocol.name和dubbo.protocol.port配置
dubbo.properties里面配置dubbo.protocol.name和dubbo.protocol.port
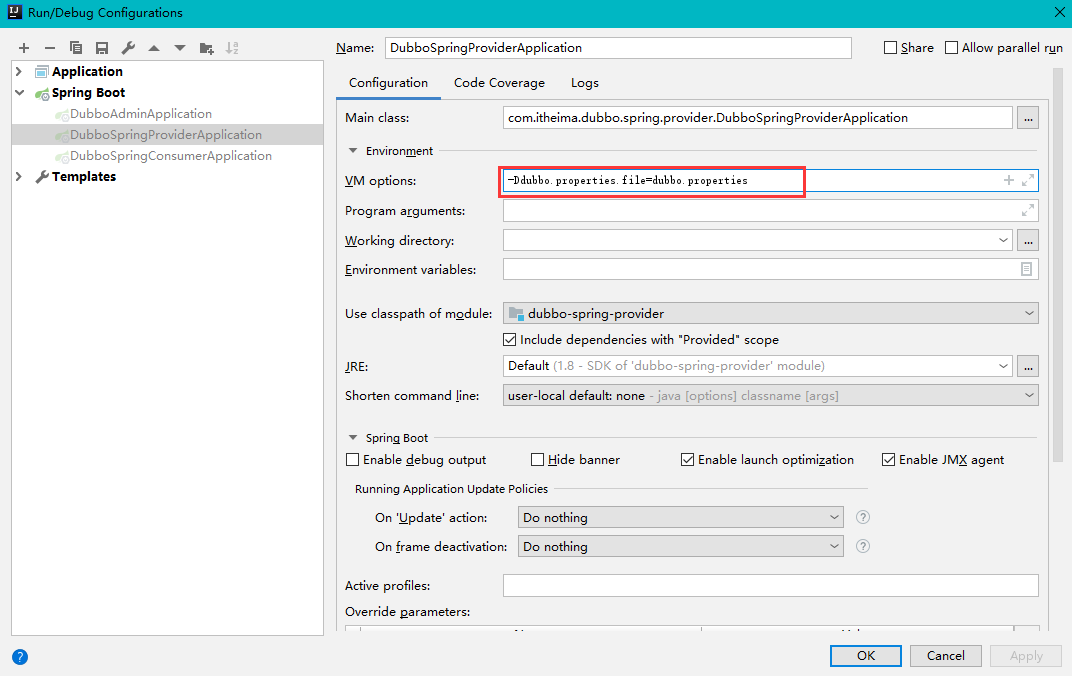
在启动参数里, 添加-Ddubbo.properties.file=dubbo.properties
查看dubbo.properties配置的端口, 可以看到正常生效:
1 2 3 4 5 C:\Users\hxx68>netstat -ano |findstr 30889 TCP 0.0.0.0:30889 0.0.0.0:0 LISTENING 49816 TCP [::]:30889 [::]:0 LISTENING 49816
重试与容错处理机制
容错机制:
Failfast Cluster
快速失败,只发起一次调用,失败立即报错。通常用于非幂等性的写操作,比如新增记录。
Failsafe Cluster
失败安全,出现异常时,直接忽略。通常用于写入审计日志等操作。
Failback Cluster
失败自动恢复,后台记录失败请求,定时重发。通常用于消息通知操作。
Forking Cluster
并行调用多个服务器,只要一个成功即返回。通常用于实时性要求较高的读操作,但需要浪费更多服务资源。可通过forks=”2” 来设置最大并行数。
Broadcast Cluster
广播调用所有提供者,逐个调用,任意一台报错则报错。通常用于通知所有提供者更新缓存或日志等本地资源信息。
后面章节还会对其原理做详细讲解。
调整客户端重试次数
1 2 3 4 5 @DubboReference(version = "${dubbo.spring.provider.version}", retries = 3) private OrderService orderService;
这里的重试次数设定为3次。
修改服务端超时时间
模拟超时, 让客户端触发重试。
1 2 3 4 5 6 7 8 9 10 11 @Bean public ProviderConfig registryConfig () { ProviderConfig providerConfig = new ProviderConfig (); providerConfig.setTimeout(1000 ); return providerConfig; }
将超时时间设小一些为1秒。
客户端调用(单个服务)
http://127.0.0.1:18084/order/getOrder?orderId=123
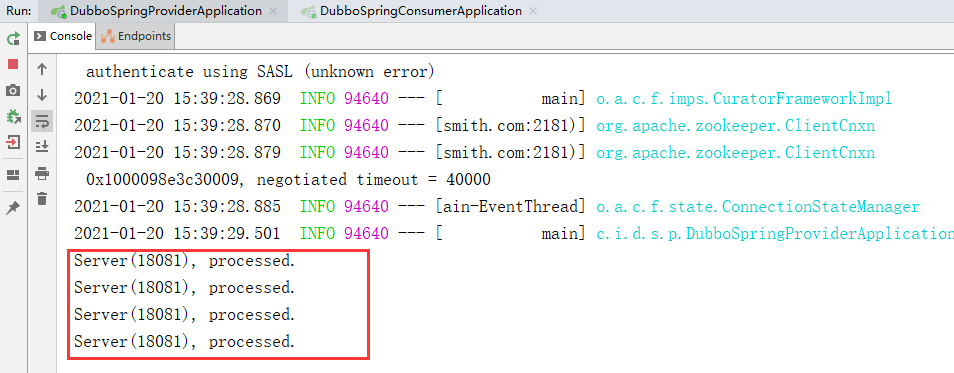
查看服务端控制台,可以看到触发重试机制:
加上第一次的调用和3次重试, 共4次。
客户端调用(多个,涉及到负载均衡机制,后面再测试)
允许多个实例运行, 开启多个服务
访问接口, http://127.0.0.1:18084/order/getOrder?orderId=123
第一个服务实例,访问两次, 其他每个服务访问一次。
多版本控制
启动三个服务端
第一个服务端版本为1.0.0, 第二、三个服务端版本分别为:2.0.0 和3.0.0
主要是修改application.properties配置:
1 2 dubbo.spring.provider.version = 2.0.0
启动三个服务提供者,通过 -Ddubbo.spring.provider.version = 2.0.0 -Dserver.port=18082 来启动三个
相关的端口不能重复
消费端指定版本号
同样修改application.properties配置:
1 2 dubbo.spring.provider.version = 2.0.0
仍然通过 -Ddubbo.spring.provider.version = 2.0.0 来调用不同版本的服务
测试时,注释掉超时的代码
仍是采用超时配置, 通过重试测试验证
测试验证结果:
请求只会访问至版本号为2.0.0的服务节点上面。
本地存根调用
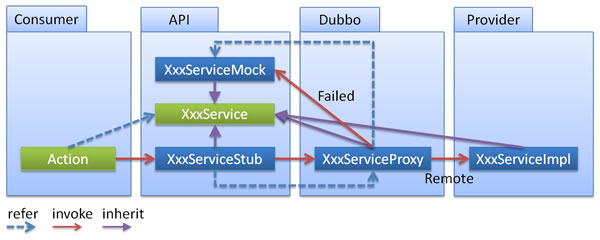
实现流程
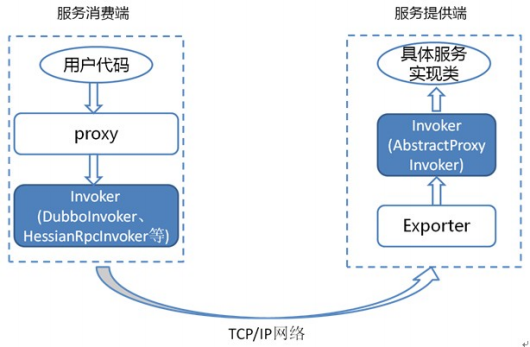
把 Stub 暴露给用户,Stub 可以决定要不要去调 Proxy。
客户端存根实现:
增加service接口
1 2 3 4 5 6 7 public class OrderServiceStub implements OrderService { private final OrderService orderService; public OrderServiceStub (OrderService orderService) { this .orderService = orderService; }
修改客户端调用配置
1 2 3 @DubboReference(version = "${dubbo.spring.provider.version}", retries = 3, stub = "com.itheima.dubbo.spring.consumer.service.OrderServiceStub") private OrderService orderService;
stub要配置存根接口的完整路径。
测试调用
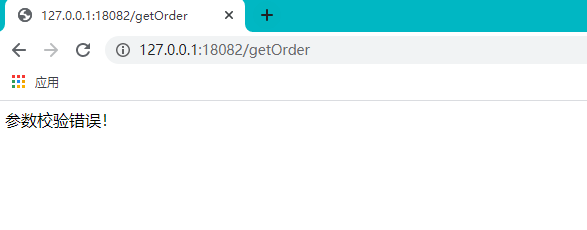
访问不带参数的地址: http://127.0.0.1:18084/order/getOrder
会进入存根接口的处理逻辑, 提示校验异常。
负载均衡机制
默认负载策略
Dubbo默认采用的是随机负载策略。
开启三个服务节点,通过消费端访问验证: http://127.0.0.1:18084/order/getOrder?orderId=123
通过控制后台日志输出, 可以看到每个服务节点呈现不规则的调用。
Dubbo 支持的负载均衡策略,可用参看源码: AbstractLoadBalance
Random LoadBalance:默认随机,按权重设置随机概率。在一个截面上碰撞的概率高,但调用量越大分布越均匀,而且按概率使用权重后也比较均匀,有利于动态调整提供者权重。
RoundRobin LoadBalance : 加权轮询负载均衡,按公约后的权重设置轮询比率。存在慢的提供者累积请求的问题,比如:第二台机器很慢,但没挂,当请求调到第二台时就卡在那,久而久之,所有请求都卡在调到第二台上。
LeastActive LoadBalance : 最少活跃调用数,相同活跃数的随机,活跃数指调用前后计数差。活跃数其实就是在当前这个服务调用者中当前这个时刻某个invoker(某个服务提供者的某个接口)某个方法的调用并发数,在调用之前+1 调用之后-1的一个计数器,如果出现多个活跃数相等invoker的时候使用随机算法来选取一个
ConsistentHash LoadBalance: 一致性 Hash,相同参数的请求总是发到同一提供者。当某一台提供者挂时,原本发往该提供者的请求,基于虚拟节点,平摊到其它提供者,不会引起剧烈变动。
一致性Hash负载均衡涉及到两个主要的配置参数为hash.arguments 与hash.nodes 。
ShortestResponseLoadBalance(2.7.7 +新增):最短响应时间负载均衡
从多个服务提供者中选择出调用成功的且响应时间最短的服务提供者,由于满足这样条件的服务提供者有可能有多个。所以当选择出多个服务提供者后要根据他们的权重做分析,如果权重一样,则随机
源码实现:org.apache.dubbo.rpc.cluster.loadbalance.AbstractLoadBalance
Dubbo提供了四种实现:
四种配置方式
优先级从下至上:
1 <dubbo:service interface ="..." loadbalance ="roundrobin" />
1 2 <dubbo:reference interface ="..." loadbalance ="roundrobin" /> # 注意:服务提供者配置后最终也只是同步到消费者端。故一般在消费端配置
1 2 3 <dubbo:service interface ="..." > <dubbo:method name ="..." loadbalance ="roundrobin" /> </dubbo:service >
1 2 3 <dubbo:reference interface ="..." > <dubbo:method name ="..." loadbalance ="roundrobin" /> </dubbo:reference >
当然这里还有全局配置(略)
调用验证
修改客户端的负载策略, 改为轮询策略:注意很多配置都有三个级别,针对方法的,针对接口的,全局的。
1 @DubboReference(version = "${dubbo.spring.provider.version}",retries = 3, loadbalance = "roundrobin", stub = "com.itheima.dubbo.spring.consumer.service.OrderServ iceStub")
开启三个服务节点, 进行访问验证: http://127.0.0.1:18084/order/getOrder?orderId=123会依次轮询进行调用。
注意:测试时将服务提供者的版本号都调成一致(1.0.0),超时配置注释掉!
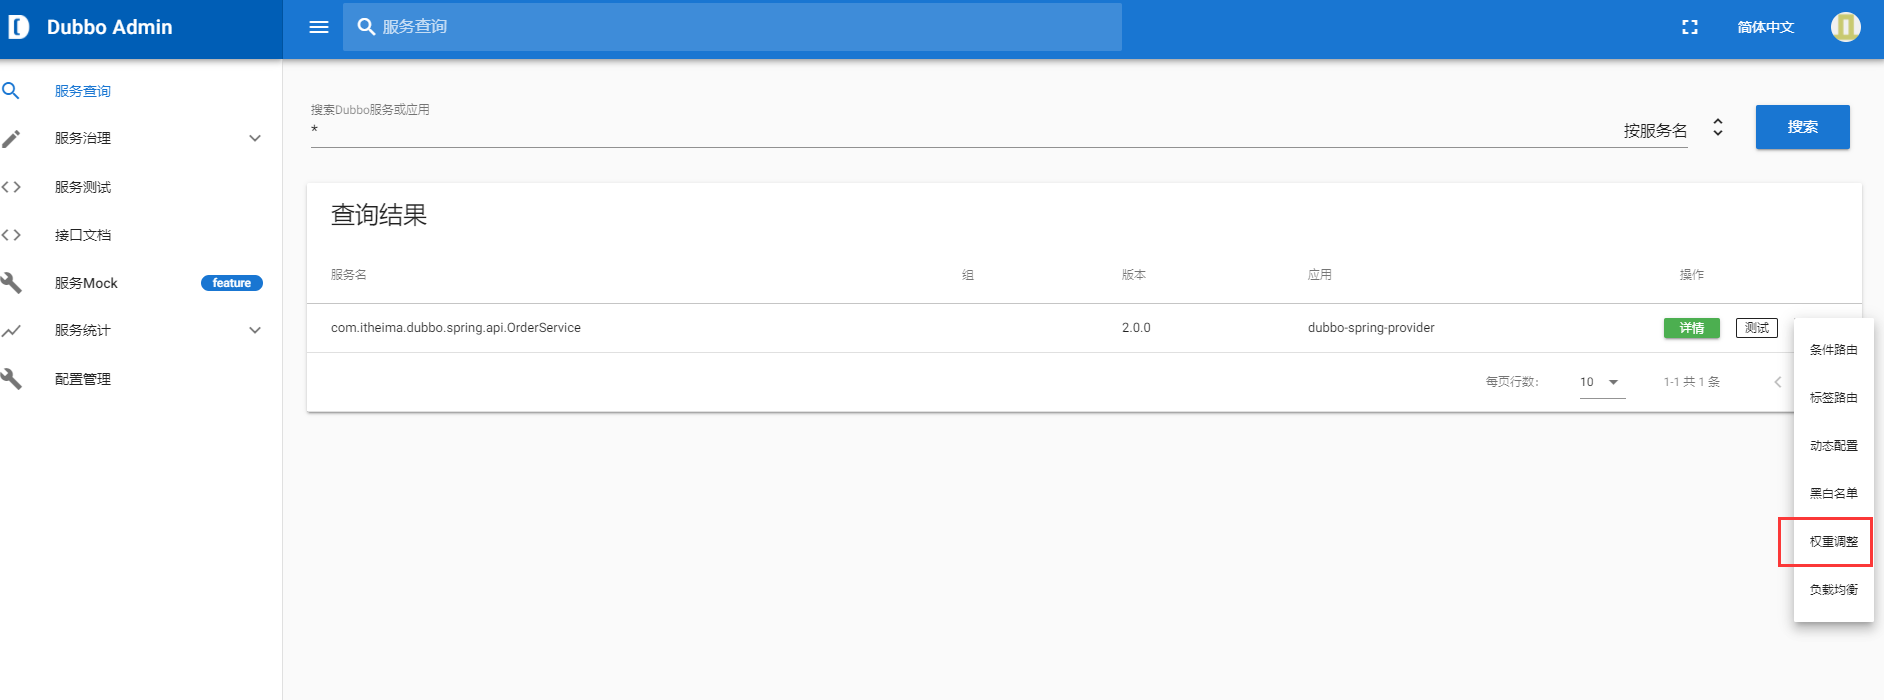
动态权重调整验证
管理后台地址: http://127.0.0.1:8080/#
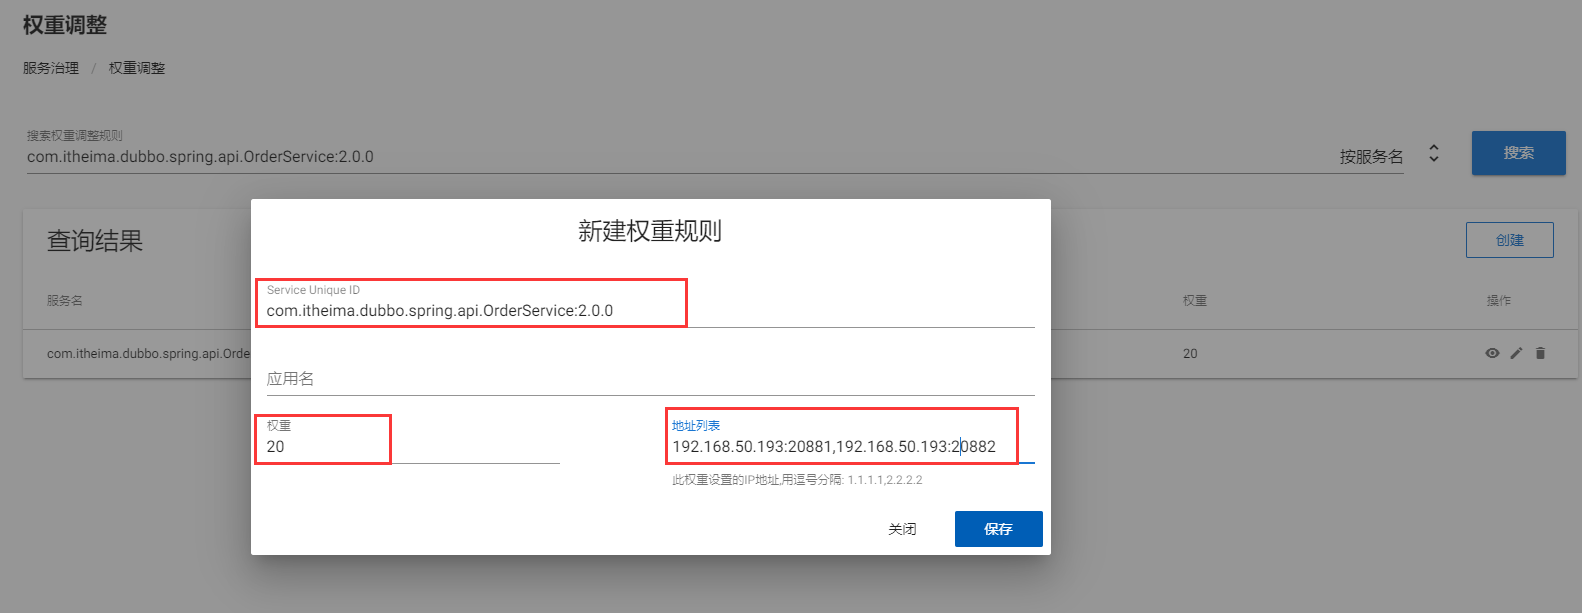
通过管理后台修改服务的权重配置:
将两台节点的权重降低至20:
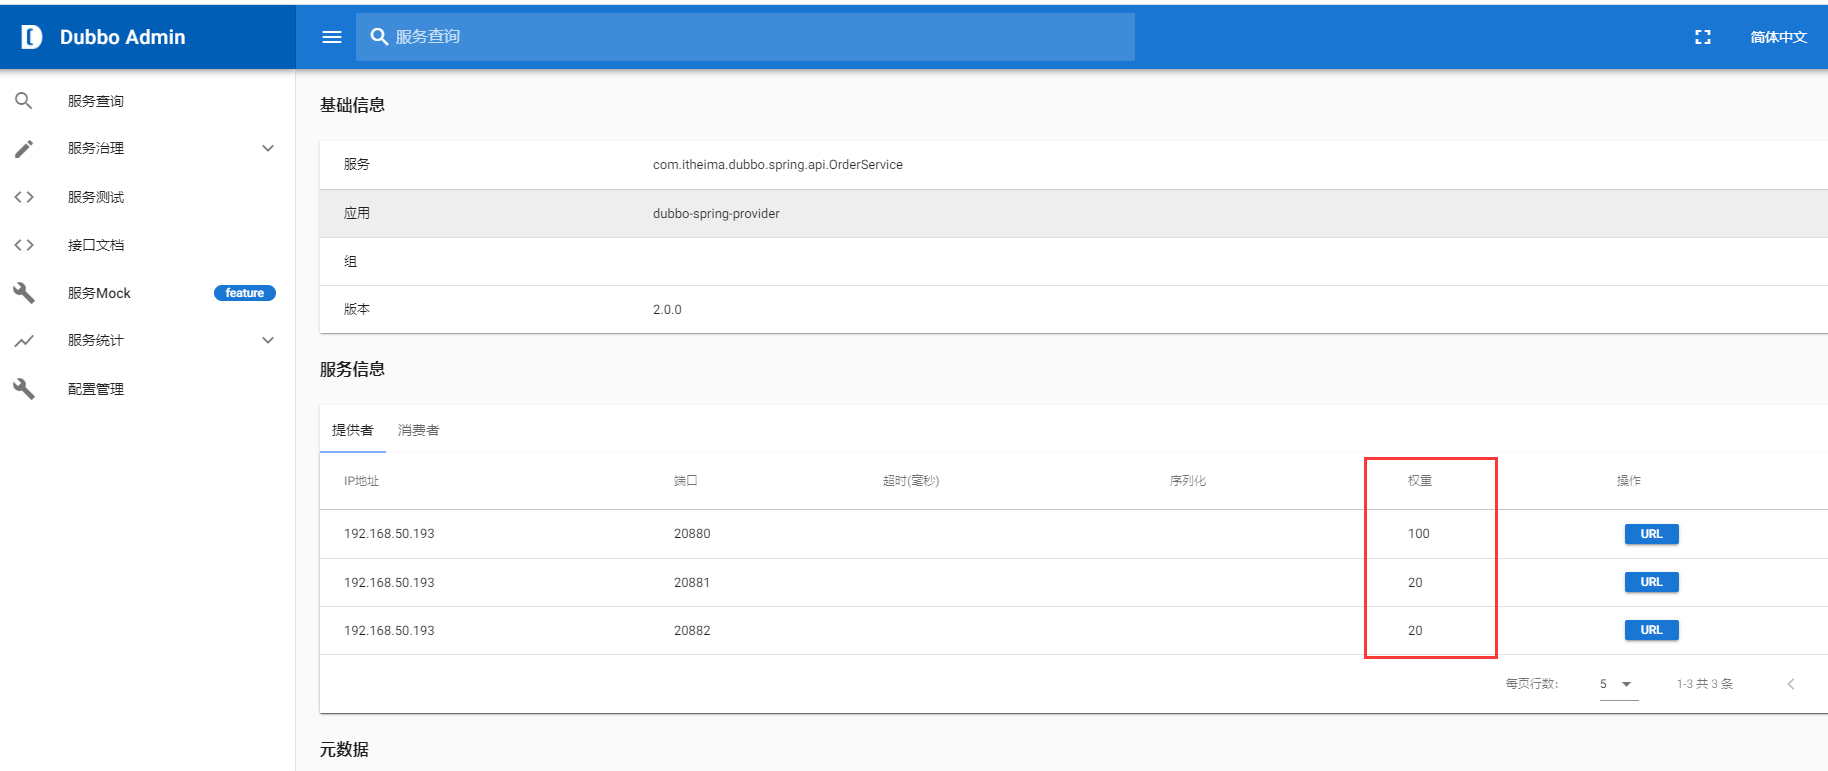
调整后可以看到权重配置已经生效:
通过消费者接口访问, 会发现第一台权重较大的节点, 访问次数会明显增多
服务降级运用
服务动态禁用
启动单个服务节点,进入Dubbo Admin, 创建动态配置规则:
1 2 3 4 5 6 7 8 9 configVersion: v2.7 enabled: true configs: - side: provider addresses: - '0.0.0.0:20880' parameters: timeout: 3000 disabled: true
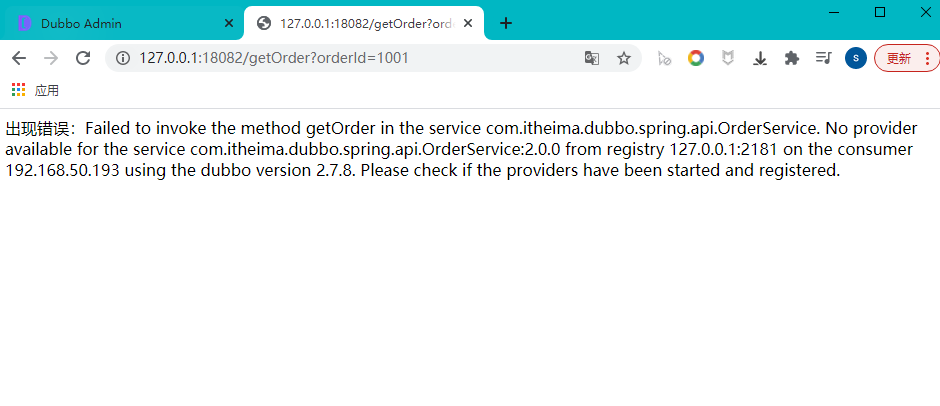
将disabled属性设为true, 服务禁用, 可以错误提示:
将disabled属性改为false,
1 2 3 4 5 6 7 8 9 configVersion: v2.7 enabled: true configs: - side: provider addresses: - '0.0.0.0:20880' parameters: timeout: 3000 disabled: false
恢复正常访问:
服务降级
1 2 3 RegistryFactory registryFactory = ExtensionLoader.getExtensionLoader(RegistryFa ctory.class).getAdaptiveExtension(); Registry registry = registryFactory.getRegistry(URL.valueOf("zook eeper://10.20.153.10:2181" )); registry.register(URL.valueOf("override://0.0 .0.0/com.foo.BarService? category=configurators&dynamic=false&applicat ion=foo&mock=force:return+null" ));
mock=force:return+null 表示消费方对该服务的方法调用都直接返回 null 值,不发起远程调用。用来屏蔽不重要服务不可用时对调用方的影响。
还可以改为 mock=fail:return+null 表示消费方对该服务的方法调用在失败后,再返回 null值,不抛异常。用来容忍不重要服务不稳定时对调用方的影响。
进入Dubbo Admin进行配置:
1 2 3 4 5 6 7 8 9 configVersion: v2.7 enabled: true configs: - side: consumer addresses: - '0.0.0.0' parameters: timeout: 3000 mock: 'force:retrun null'
客户端调用, 会直接屏蔽, 并且服务端控制台不会有任何调用记录:
进入Dubbo Admin配置:
1 2 3 4 5 6 7 8 9 configVersion: v2.7 enabled: true configs: - side: consumer addresses: - '0.0.0.0' parameters: timeout: 1000 mock: 'fail:retrun null'
这里为了触发调用异常, 超时时间缩短为1秒。
注意这里的超时时间可能不会起作用,最终的超时时间还是得看项目中配置,故在服务提供方将线程休眠时间延长,造成调用超时。
客户端调用, 会出现降级显示为空:
同时服务端会有调用记录显示(请求会进入服务端,但由于超时, 调用是失败):
并发与连接控制 实际运用, 会碰到高并发与峰值场景, Dubbo是可以做到并发与连接数控制。
可使用jmeter进行测试!
并发数控制
服务端控制
1 <dubbo:service interface ="com.foo.BarService" executes ="10" />
服务器端并发执行(或占用线程池线程数)不能超过 10 个。
1 2 3 <dubbo:service interface ="com.foo.BarService" > <dubbo:method name ="sayHello" executes ="3" /> </dubbo:service >
限制具体的方法,服务器端并发执行(或占用线程池线程数)不能超过3 个。
客户端控制
1 <dubbo:reference interface ="com.foo.BarService" actives ="10" />
每客户端并发执行(或占用连接的请求数)不能超过 10 个。
1 2 3 <dubbo:reference interface ="com.foo.BarService" > <dubbo:method name ="sayHello" actives ="10" /> </dubbo:service >
dubbo:reference比dubbo:service优先。
客户端负载配置
1 <dubbo:reference interface ="com.foo.BarService" loadbalance ="leastactive" />
负载策略为最小连接数时, Loadbalance 会调用并发数最小的Provider。
连接数控制
服务端连接控制
1 <dubbo:provider protocol ="dubbo" accepts ="10" />
限制服务器端接受的连接不能超过 10 个
客户端连接控制
1 <dubbo:reference interface ="com.foo.BarService" connections ="10" />
限制客户端服务使用连接不能超过 10 个
如果 dubbo:service 和 dubbo:reference 都配了 connections,dubbo:reference 优先
Dubbo SPI机制 在 Dubbo 中,SPI 是一个非常重要的模块。基于 SPI,我们可以很容易的对 Dubbo 进行拓展。如果大家想要学习 Dubbo 的源码,SPI 机制务必弄懂。接下来,我们先来了解一下 Java SPI 与 Dubbo SPI 的用法,然后再来分析Dubbo SPI 的源码。
spi的概述 SPI的主要作用 SPI 全称为 Service Provider Interface,是一种服务发现机制。SPI 的本质是将接口实现类的全限定名配置在文件中,并由服务加载器读取配置文件,加载实现类。这样可以在运行时,动态为接口替换实现类。正因此特性,我们可以很容易的通过 SPI 机制为我们的程序提供拓展功能
在面向的对象的设计里,不同模块之间推崇面向接口编程,不建议在模块中对实现类进行硬编码。一旦代码里涉及具体的实现类,就违反了可拔插的原则,如果需要替换一种实现,就需要修改代码。SPI使得程序能在ClassPath路径下的META-INF/services文件夹查找接口的实现类,自动加载文件里所定义的实现类。
场景
数据库驱动java.sql.Driver,Mysql,Oracle都有自己的驱动实现jar包,只需引入不同的jar包即可加载不同的数据库驱动,例如mysql-connector-java中,其META-INF/services下制定了mysql驱动的实现类
java中DriverManager.getConnection,实际上实现类都是各大数据库厂商提供的,比如mysql-conector-java.
然后想让java发现你的驱动类,java spi可以在META-INF下查找 以接口为命名的 配置实现类的 文件
这就是为什么java中只有Driver接口,但是引入驱动包后就可以正常调用数据库了
Java SPI 实际上是“基于接口的编程+策略模式+配置文件 ”组合实现的动态加载机制。
入门案例 首先,我们定义一个接口,名称为 Robot。
1 2 3 public interface Robot { void sayHello () ; }
接下来定义两个实现类,分别为 OptimusPrime 和 Bumblebee。
1 2 3 4 5 6 7 8 9 10 11 12 public class OptimusPrime implements Robot { @Override public void sayHello () { System.out.println("Hello, I am Optimus Prime." ); } } public class Bumblebee implements Robot { @Override public void sayHello () { System.out.println("Hello, I am Bumblebee." ); } }
接下来 META-INF/services 文件夹下创建一个文件,名称为 Robot 的全限定名 com.itheima.java.spi.Robot。文件内容为实现类的全限定的类名,如下:
1 2 com.itheima.java.spi.impl.Bumblebee com.itheima.java.spi.impl.OptimusPrime
做好所需的准备工作,接下来编写代码进行测试
1 2 3 4 5 6 7 8 public class JavaSPITest { @Test public void sayHello () throws Exception { ServiceLoader<Robot> serviceLoader = ServiceLoader.load(Robot.class); System.out.println("Java SPI" ); serviceLoader.forEach(Robot::sayHello); } }
最后来看一下测试结果,如下:
从测试结果可以看出,我们的两个实现类被成功的加载,并输出了相应的内容。
总结 调用过程
应用程序调用ServiceLoader.load方法,创建一个新的ServiceLoader,并实例化该类中的成员变量
应用程序通过迭代器接口获取对象实例,ServiceLoader先判断成员变量providers对象中(LinkedHashMap<String,S>类型)是否有缓存实例对象,如果有缓存,直接返回。如果没有缓存,执行类的装载,
优点
使用 Java SPI 机制的优势是实现解耦,使得接口的定义与具体业务实现分离,而不是耦合在一起。应用进程可以根据实际业务情况启用或替换具体组件。
缺点
不能按需加载。虽然 ServiceLoader 做了延迟载入,但是基本只能通过遍历全部获取,也就是接口的实现类得全部载入并实例化一遍。如果你并不想用某些实现类,或者某些类实例化很耗时,它也被载入并实例化了,这就造成了浪费。
获取某个实现类的方式不够灵活,只能通过 Iterator 形式获取,不能根据某个参数来获取对应的实现类。
多个并发多线程使用 ServiceLoader 类的实例是不安全的。
加载不到实现类时抛出并不是真正原因的异常,错误很难定位。
Dubbo 中的spi 概述 Dubbo 并未使用 Java SPI,而是重新实现了一套功能更强的 SPI 机制。Dubbo SPI 的相关逻辑被封装在了 ExtensionLoader 类中,通过ExtensionLoader,我们可以加载指定的实现类。
入门案例 与 Java SPI 实现类配置不同,Dubbo SPI 是通过键值对的方式进行配置,这样我们可以按需加载指定的实现类。下面来演示 Dubbo SPI 的用法:
1、在使用Dubbo SPI 时,需要在接口上标注 @SPI 注解
1 2 3 4 @SPI public interface Robot { void sayHello () ; }
2、Dubbo SPI 所需的配置文件需放置在 META-INF/dubbo 路径下,与Java SPI 实现类配置不同,Dubbo SPI 是通过键值对的方式进行配置(key自己指定,value为实现类的全路径),配置内容如下。
注意:每一对key=value,我们把它称之为dubbo的扩展点
1 2 optimusPrime = org.apache.spi.OptimusPrime bumblebee = org.apache.spi.Bumblebee
3、通过 ExtensionLoader,我们可以加载指定的实现类,下面来演示Dubbo SPI :
1 2 3 4 5 6 7 8 9 10 11 12 public class DubboSPITest { @Test public void sayHello () throws Exception { ExtensionLoader<Robot> extensionLoader = ExtensionLoader.getExtensionLoader(Robot.class); Robot optimusPrime = extensionLoader.getExtension("optimusPrime" ); optimusPrime.sayHello(); Robot bumblebee = extensionLoader.getExtension("bumblebee" ); bumblebee.sayHello(); } }
这样就可以通过kv结构按需获取了,而这里的按需是可以通过配置文件来调整的!就相当灵活而且不用加载所有类了。
测试结果如下:
Dubbo SPI优点:
能够实现按需加载,JDK SPI仅仅通过接口类名获取所有实现,在通过迭代器获取指定实现,而ExtensionLoader则通过接口类名和key值获取一个实现
支持AOP(将实现类包装在Wrapper中,Wrapper中实现公共增强逻辑)
支持IOC(能够通过set方法注入其他扩展点)
IOC 和 AOP 等特性,这些特性将会在接下来的源码分析章节中一一进行介绍。
源码分析 上一章简单演示了 Dubbo SPI 的使用方法,首先通过 ExtensionLoader 的getExtensionLoader 方法获取一个ExtensionLoader 实例,然后再通过ExtensionLoader 的 getExtension 方法获取拓展类对象。下面我们从ExtensionLoader 的 getExtension 方法作为入口,对拓展类对象的获取过程进行详细的分析。
1 2 3 4 5 6 7 8 9 10 11 12 13 14 15 16 17 18 19 20 21 22 23 24 public T getExtension (String name) { if (StringUtils.isEmpty(name)) { throw new IllegalArgumentException ("Extension name == null" ); } if ("true" .equals(name)) { return getDefaultExtension(); } Holder<Object> holder = getOrCreateHolder(name); Object instance = holder.get(); if (instance == null ) { synchronized (holder) { instance = holder.get(); if (instance == null ) { instance = createExtension(name); holder 中 holder.set(instance); } } } return (T) instance; }
上面代码的逻辑比较简单,首先检查缓存,缓存未命中则创建拓展对象。下面我们来看一下创建拓展对象的过程是怎样的
1 2 3 4 5 6 7 8 9 10 11 12 13 14 15 16 17 18 19 20 21 22 23 24 25 26 27 28 29 private T createExtension (String name) { Class<?> clazz = getExtensionClasses().get(name); if (clazz == null ) { throw findException(name); } try { T instance = (T) EXTENSION_INSTANCES.get(clazz); if (instance == null ) { EXTENSION_INSTANCES.putIfAbsent(clazz, clazz.newInstance()); instance = (T) EXTENSION_INSTANCES.get(clazz); } injectExtension(instance); Set<Class<?>> wrapperClasses = cachedWrapperClasses; if (CollectionUtils.isNotEmpty(wrapperClasses)) { for (Class<?> wrapperClass : wrapperClasses) { instance = injectExtension((T) wrapperClass.getConstructor(type).newInstance(instance)); } } return instance; } catch (Throwable t) { throw new IllegalStateException ("..." ); } }
createExtension 方法的逻辑稍复杂一下,包含了如下的步骤:
通过 getExtensionClasses 获取所有的拓展类
通过反射创建拓展对象
向拓展对象中注入依赖
将拓展对象包裹在相应的 Wrapper 对象中
以上步骤中,第一个步骤是加载拓展类的关键,第三和第四个步骤是Dubbo IOC 与 AOP 的具体实现。由于此类设计源码较多,这里简单的总结下ExtensionLoader整个执行逻辑:
1 2 3 4 5 6 7 8 getExtension(String name) #根据key获取拓展对象 -->createExtension(String name) #创建拓展实例 -->getExtensionClasses #根据路径获取所有的拓展类 -->loadExtensionClasses #加载拓展类 -->cacheDefaultExtensionName #解析@SPI注解 -->loadDirectory #方法加载指定文件夹配置文件 ->loadResource #加载资源 -->loadClass #加载类,并通过 loadClass 方法对类进行缓存
spi中的ioc 和 aop 依赖注入 Dubbo IOC 是通过 setter 方法注入依赖。Dubbo 首先会通过反射获取到实例的所有方法,然后再遍历方法列表,检测方法名是否具有 setter 方法特征。若有,则通过 ObjectFactory 获取依赖对象,最后通过反射调用 setter 方法将依赖设置到目标对象中。整个过程对应的代码如下:
1 2 3 4 5 6 7 8 9 10 11 12 13 14 15 16 17 18 19 20 21 22 23 24 25 26 27 28 29 private T injectExtension (T instance) { try { if (objectFactory != null ) { for (Method method : instance.getClass().getMethods()) { if (method.getName().startsWith("set" ) && method.getParameterTypes().length == 1 && Modifier.isPublic(method.getModifiers())) { Class<?> pt = method.getParameterTypes()[0 ]; try { String property = getSetterProperty(method); Object object = objectFactory.getExtension(pt, property); if (object != null ) { method.invoke(instance, object); } } catch (Exception e) { logger.error("fail to inject via method..." ); } } } } } catch (Exception e) { logger.error(e.getMessage(), e); } return instance; }
在上面代码中,objectFactory 变量的类型为 AdaptiveExtensionFactory,AdaptiveExtensionFactory 内部维护了一个 ExtensionFactory 列表,用于存储其他类型的 ExtensionFactory。Dubbo 目前提供了两种 ExtensionFactory,分别是 SpiExtensionFactory 和 SpringExtensionFactory。前者用于创建自适应的拓展,后者是用于从 Spring 的 IOC 容器中获取所需的拓展。这两个类的类的代码不是很复杂,这里就不一一分析了。
Dubbo IOC 目前仅支持 setter 方式注入,总的来说,逻辑比较简单易懂。
动态编译 在用Spring的时候,我们经常会用到AOP功能。在目标类的方法前后插入其他逻辑。比如通常使用Spring AOP来实现日志,监控和鉴权等功能。 Dubbo的扩展机制,是否也支持类似的功能呢?答案是yes。在Dubbo中,有一种特殊的类,被称为Wrapper类。通过装饰者模式 ,使用包装类包装原始的扩展点实例。在原始扩展点实现前后插入其他逻辑,实现AOP功能。
装饰者模式
装饰者模式:在不改变原类文件以及不使用继承的情况下,动态地将责任附加到对象上,从而实现动态拓展一个对象的功能。它是通过创建一个包装对象,也就是装饰来包裹真实的对象。
一般来说装饰者模式有下面几个参与者:
Component:装饰者和被装饰者共同的父类,是一个接口或者抽象类,用来定义基本行为
ConcreteComponent:定义具体对象,即被装饰者
Decorator:抽象装饰者,继承自Component,从外类来扩展
ConcreteComponent。对于ConcreteComponent来说,不需要知道
Decorator的存在,Decorator是一个接口或抽象类
ConcreteDecorator:具体装饰者,用于扩展ConcreteComponent
注:装饰者和被装饰者对象有相同的超类型,因为装饰者和被装饰者必须是一样的类型,这里利用继承是为了达到类型匹配,而不是利用继承获得行为。
dubbo中的AOP
Dubbo AOP 是通过装饰者模式完成的,接下来通过一个简单的案例来学习dubbo中AOP的实现方式。
首先定义一个接口
1 2 3 4 5 6 7 package com.itheima.dubbo;import org.apache.dubbo.common.extension.SPI;@SPI public interface Phone { void call () ; }
定义接口的实现类,也就是被装饰者
1 2 3 4 5 6 7 8 package com.itheima.dubbo;public class IphoneX implements Phone { @Override public void call () { System.out.println("iphone正在拨打电话" ); } }
为了简单,这里省略了装饰者接口。仅仅定义一个装饰者,实现phone接口,内部配置增强逻辑方法
1 2 3 4 5 6 7 8 9 10 11 12 13 14 15 package com.itheima.dubbo;public class MusicPhone implements Phone { private Phone phone; public MusicPhone (Phone phone) { this .phone = phone; } @Override public void call () { System.out.println("播放彩铃" ); this .phone.call(); } }
添加拓展点配置文件META-INF/dubbo/com.itheima.dubbo.Phone,内容如下
1 2 iphone=com.itheima.dubbo.IphoneX wrapper=com.itheima.dubbo.MusicPhone
配置测试方法
1 2 3 4 5 public static void main (String[] args) { ExtensionLoader<Phone> extensionLoader = ExtensionLoader.getExtensionLoader(Phone.class); Phone phone = extensionLoader.getExtension("iphone" ); phone.call(); }
具体执行效果如下
先调用装饰者增强,再调用目标方法完成业务逻辑。
通过测试案例,可以看到在Dubbo SPI中具有增强AOP的功能,我们只需要关注dubbo源码中这样一行代码就够了
1 2 3 4 5 6 if (CollectionUtils.isNotEmpty(wrapperClasses)) { for (Class<?> wrapperClass : wrapperClasses) { instance = injectExtension((T) wrapperClass.getConstructor(type).newInstance(instance)); } }
动态编译 SPI中的自适应 我们知道在 Dubbo 中,很多拓展都是通过 SPI 机制 进行加载的,比如Protocol、Cluster、LoadBalance、ProxyFactory 等。有时,有些拓展并不想在框架启动阶段被加载,而是希望在拓展方法被调用时,根据运行时参数进行加载,即根据参数动态加载实现类。如下所示:
根据参数动态选择的意思是:
通过ExtensionLoader.getExtensionLoader(XXXClass).getExtension(key)的形式来获取接口的某个实现类。
但这种形式本质上还是通过硬编码的形式在代码中固定的获取了接口的一个实现,诸如Protocol(实现有Dubbo、Redis、Thrift等),或者Transporter(实现有Netty、Mina等)这些接口,我们是可以在Dubbo服务声明时指定具体实现的
这种在运行时,根据方法参数才动态决定使用具体的拓展,在dubbo中就叫做扩展点自适应实例。其实是一个扩展点的代理,将扩展的选择从Dubbo启动时,延迟到RPC调用时。Dubbo中每一个扩展点都有一个自适应类,如果没有显式提供,Dubbo会自动为我们创建一个,默认使用Javaassist。
自适应拓展机制的实现逻辑是这样的
首先 Dubbo 会为拓展接口生成具有代理功能的代码;
通过 javassist 或 jdk 编译这段代码,得到 Class 类;
通过反射创建代理类;
在代理类中,通过URL对象的参数来确定到底调用哪个实现类;
javassist入门 Javassist是一个开源的分析、编辑和创建Java字节码的类库。是由东京工业大学的数学和计算机科学系的 Shigeru Chiba (千叶滋)所创建的。它已加入了开放源代码JBoss 应用服务器项目,通过使用Javassist对字节码操作为JBoss实现动态AOP框架。javassist是jboss的一个子项目,其主要的优点,在于简单,而且快速。直接使用java编码的形式,而不需要了解虚拟机指令,就能动态改变类的结构,或者动态生成类 。为了方便更好的理解dubbo中的自适应,这里通过案例的形式来熟悉下Javassist的基本使用
1 2 3 4 5 6 7 8 9 10 11 12 13 14 15 16 17 18 19 20 21 22 23 24 25 26 27 28 29 30 31 32 33 34 35 36 37 38 39 40 41 42 43 44 45 46 47 48 49 50 51 52 53 54 55 56 57 58 59 60 61 62 63 64 65 66 67 68 69 70 package com.itheima.compiler;import java.io.File;import java.io.FileOutputStream;import java.lang.reflect.Constructor;import java.lang.reflect.Modifier;import javassist.ClassPool;import javassist.CtClass;import javassist.CtConstructor;import javassist.CtField;import javassist.CtMethod;import javassist.CtNewMethod;public class CompilerByJavassist { public static void main (String[] args) throws Exception { ClassPool pool = ClassPool.getDefault(); CtClass ctClass = pool.makeClass("com.itheima.domain.User" ); CtField enameField = new CtField (pool.getCtClass("java.lang.String" ), "username" , ctClass); enameField.setModifiers(Modifier.PRIVATE); ctClass.addField(enameField); CtField enoField = new CtField (pool.getCtClass("int" ), "age" , ctClass); enoField.setModifiers(Modifier.PRIVATE); ctClass.addField(enoField); ctClass.addMethod(CtNewMethod.getter("getUsername" , enameField)); ctClass.addMethod(CtNewMethod.setter("setUsername" , enameField)); ctClass.addMethod(CtNewMethod.getter("getAge" , enoField)); ctClass.addMethod(CtNewMethod.setter("setAge" , enoField)); CtConstructor constructor = new CtConstructor (null , ctClass); constructor.setBody("{}" ); ctClass.addConstructor(constructor); CtConstructor ctConstructor = new CtConstructor (new CtClass []{pool.get(String.class.getName()), CtClass.intType}, ctClass); ctConstructor.setBody("{\n this.username=$1; \n this.age=$2;\n}" ); ctClass.addConstructor(ctConstructor); CtMethod ctMethod = new CtMethod (CtClass.voidType, "printUser" , new CtClass []{}, ctClass); ctMethod.setModifiers(Modifier.PUBLIC); StringBuffer buffer2 = new StringBuffer (); buffer2.append("{\nSystem.out.println(\"用户信息如 下\");\n" ).append("System.out.println(\"用户名 =\"+username);\n" ).append("System.out.println(\"年龄 =\"+age);\n" ).append("}" ); ctMethod.setBody(buffer2.toString()); ctClass.addMethod(ctMethod); Class<?> clazz = ctClass.toClass(); Constructor cons2 = clazz.getDeclaredConstructor(String.class, Integer.TYPE); Object obj = cons2.newInstance("itheima" , 20 ); obj.getClass().getMethod("printUser" , new Class []{}).invoke(obj, new Object []{}); byte [] byteArr = ctClass.toBytecode(); FileOutputStream fos = new FileOutputStream (new File ("C://User.class" )); fos.write(byteArr); fos.close(); } }
通过以上代码,我们可以知道使用javassist可以方便的在运行时,按需动态的创建java对象,并执行内部方法。而这也是dubbo中动态编译的核心
源码分析 Adaptive注解
在开始之前,我们有必要先看一下与自适应拓展息息相关的一个注解,即Adaptive 注解。
1 2 3 4 5 6 @Documented @Retention(RetentionPolicy.RUNTIME) @Target({ElementType.TYPE, ElementType.METHOD}) public @interface Adaptive { String[] value() default {}; }
从上面的代码中可知,Adaptive 可注解在类或方法上。
标注在类上:Dubbo 不会为该类生成代理类。Adaptive 注解在类上的情况很少,在 Dubbo 中,仅有两个类被 Adaptive 注解了,分别是AdaptiveCompiler 和 AdaptiveExtensionFactory。此种情况,表示拓展的加载逻辑由人工编码完成。更多时候,Adaptive 是注解在接口方法上的,表示拓展的加载逻辑需由框架自动生成
标注在方法上:Dubbo 则会为该方法生成代理逻辑,表示当前方法需要根据 参数URL 调用对应的扩展点实现。例如 Protocol的SPI类有injvm dubbo registry filter listener等等 很多扩展未知类,它设计了Protocol$Adaptive的类,通过ExtensionLoader.getExtensionLoader(Protocol.class).getExtension(spi类);来提取对象
获取自适应拓展类
dubbo中每一个扩展点都有一个自适应类,如果没有显式提供,Dubbo会自动为我们创建一个,默认使用Javaassist。 先来看下创建自适应扩展类的代码
1 2 3 4 5 6 7 8 9 10 11 12 13 14 public T getAdaptiveExtension () { Object instance = cachedAdaptiveInstance.get(); if (instance == null ) { synchronized (cachedAdaptiveInstance) { instance = cachedAdaptiveInstance.get(); if (instance == null ) { instance = createAdaptiveExtension(); cachedAdaptiveInstance.set(instance); } } } return (T) instance; }
继续看createAdaptiveExtension方法
1 2 3 private T createAdaptiveExtension () { return injectExtension((T) getAdaptiveExtensionClass().newInstance()); }
继续看getAdaptiveExtensionClass方法
1 2 3 4 5 6 7 private Class<?> getAdaptiveExtensionClass() { getExtensionClasses(); if (cachedAdaptiveClass != null ) { return cachedAdaptiveClass; } return cachedAdaptiveClass = createAdaptiveExtensionClass(); }
继续看createAdaptiveExtensionClass方法,绕了一大圈,终于来到了具体的实现了。看这个createAdaptiveExtensionClass方法,它首先会生成自适应类的Java源码,然后再将源码编译成Java的字节码,加载到JVM中。
1 2 3 4 5 6 7 private Class<?> createAdaptiveExtensionClass() { String code = createAdaptiveExtensionClassCode(); ClassLoader classLoader = findClassLoader(); org.apache.dubbo.common.compiler.Compiler compiler = ExtensionLoader.getExtensionLoader(org.apache.dubbo.common.compiler.Compiler.class).getAdaptiveExtension(); return compiler.compile(code, classLoader); }
Compiler的代码,默认实现是javassist。
1 2 3 4 @SPI("javassist") public interface Compiler { Class<?> compile(String code, ClassLoader classLoader); }
createAdaptiveExtensionClassCode()方法中使用一个StringBuilder来构建自适应类的Java源码。方法实现比较长,这里就不贴代码了。这种生成字节码的方式也挺有意思的,先生成Java源代码,然后编译,加载到jvm中。通过这种方式,可以更好的控制生成的Java类。而且这样也不用care各个字节码生成框架的api等。因为xxx.java文件是Java通用的,也是我们最熟悉的。只是代码的可读性不强,需要一点一点构建xx.java的内容。
示例:以 Protocol 接口为例,Protocol接口定义如下:
1 2 3 4 5 6 7 8 9 10 11 12 13 14 15 16 @SPI("dubbo") public interface Protocol { int getDefaultPort () ; @Adaptive <T> Exporter<T> export (Invoker<T> invoker) throws RpcException; @Adaptive <T> Invoker<T> refer (Class<T> type, URL url) throws RpcException; void destroy () ; default List<ProtocolServer> getServers () { return Collections.emptyList(); } }
下面给大家展示一下生成的 Protocol$Adaptive 的源码,如下
1 2 3 4 5 6 7 8 9 10 11 12 13 14 15 16 17 18 19 20 21 22 23 24 25 26 27 28 29 30 31 32 33 34 35 36 37 38 39 40 41 package org.apache.dubbo.rpc; import org.apache.dubbo.common.extension.ExtensionLoader; public class Protocol$Adaptive implements org .apache.dubbo.rpc.Protocol { public org.apache.dubbo.rpc.Invoker refer (java.lang.Class arg0, org.apache.dubbo.common.URL arg1) throws org.apache.dubbo.rpc.RpcException { if (arg1 == null ) throw new IllegalArgumentException ("url == null" ); org.apache.dubbo.common.URLurl = arg1; String extName = (url.getProtocol() == null ? "dubbo" : url.getProtocol()); if (extName == null ) throw new IllegalStateException ("Failedtogetextension(org.apache.dubbo.rpc.Protocol) namefromurl(" + url.toString() + ")usekeys([protocol])" ); org.apache.dubbo.rpc.Protocolextension = (org.apache.dubbo.rpc.Protocol) ExtensionLoader.getExtensionLoader(org.apache.dubbo.rpc.Protocol.class).getExtension(extName); return extension.refer(arg0, arg1); } public java.util.List getServers () { throw new UnsupportedOperationException ("The methodpublicdefaultjava.util.List org.apache.dubbo.rpc.Protocol.getServers()ofinterface org.apache.dubbo.rpc.Protocolisnotadaptivemethod !" ); } public org.apache.dubbo.rpc.Exporter export (org.apache.dubbo.rpc.Invokerarg0) throws org.apache.dubbo.rpc.RpcException { if (arg0 == null ) throw new IllegalArgumentException ("org.apache.dubbo.rpc.Invoker argument == null" ); if (arg0.getUrl() == null ) throw new IllegalArgumentException ("org.apache.dubbo.rpc.Invoker argumentgetUrl() == null" ); org.apache.dubbo.common.URLurl = arg0.getUrl(); String extName = (url.getProtocol() == null ? "dubbo" : url.getProtocol()); if (extName == null ) throw new IllegalStateException ("Failedtogetextension(org.apache.dubbo.rpc.Protocol) namefromurl(" + url.toString() + ")usekeys([protocol])" ); org.apache.dubbo.rpc.Protocolextension = (org.apache.dubbo.rpc.Protocol) ExtensionLoader.getExtensionLoader(org.apache.dubbo.rpc.Protocol.class).getExtension(extName); return extension.export(arg0); } public void destroy () { throw new UnsupportedOperationException ("The methodpublicabstractvoid org.apache.dubbo.rpc.Protocol.destroy()ofinterface org.apache.dubbo.rpc.Protocolisnotadaptivemethod !" ); } public int getDefaultPort () { throw new UnsupportedOperationException ("The methodpublicabstractint org.apache.dubbo.rpc.Protocol.getDefaultPort()of interfaceorg.apache.dubbo.rpc.Protocolisnotadaptive method !" ); } }
以调用 Protocol 的接口的 refer方法为例,下面给大家看一下自适应拓展的整个过程:
1)先通过 Protocol REF_PROTOCOL =ExtensionLoader.getExtensionLoader(Protocol.class).getAdaptiveExtension(); 生成了 Protocol$Adaptive 代理类
2)传参 Url 为:dubbo://192.168.1.247:20887/org.apache.dubbo.config.spring.api.DemoService,调用 Protocol 的 refer 方法,此时直接调用是 Protocol$Adaptive 代理类的 refer 方法
3)在 Protocol$Adaptive 的 refer 方法中先调用 url 中的 getProtocol()方法获取拓展类名称,赋值给 extName 变量
4)然后调用 org.apache.dubbo.rpc.Protocol extension =(org.apache.dubbo.rpc.Protocol)ExtensionLoader.getExtensionLoader(org.apache.dubbo.rpc.Protocol.class).getExtension(extName); 语句获取到具体的实现类的实例
5)最后执行 extension.refer(arg0, arg1) 语句,调用 4 中获取到的具体实现类的 refer 方法,最终返回结果
服务暴露与发现 概述 dubbo是一个简单易用的RPC框架,通过简单的提供者,消费者配置就能完成无感的网络调用。那么在dubbo中是如何将提供者的服务暴露出去,消费者又是如何获取到提供者相关信息的呢?这就是本章我们要讨论的内容。
Spring 中自定义Schema 在了解dubbo的服务注册和服务发现之前,我们首先需要掌握一个知识点:Spring中自定义Schema。
dubbo Provider 在容器启动后开始暴露服务,并准备接受请求处理。所以可以理解为容器的启动带动dubbo Provider开始工作。
Dubbo 现在的设计是完全无侵入,也就是使用者只依赖于配置契约。在Dubbo 中,可以使用 XML 配置相关信息来引入服务或者导出服务(也可以使用注解)。配置完成,启动工程,Spring 会读取配置文件,生成注入相关Bean。那 Dubbo 如何实现自定义 XML 被 Spring 加载读取呢? (涉及到dubbo和spring的集成)
从 Spring 2.0 开始,Spring 开始提供了一种基于 XML Schema 格式扩展机制,用于自定义和配置 bean,从而被spring框架所解析。
案例使用 学习和使用Spring XML Schema 扩展机制并不难,需要下面几个步骤:
创建配置属性的JavaBean对象
创建一个 XML Schema 文件,描述自定义的合法构建模块,也就是xsd文件。
自定义处理器类,并实现 NamespaceHandler 接口。
自定义解析器,实现 BeanDefinitionParser 接口(最关键的部分)。
编写Spring.handlers和spring.schemas文件配置所有部件
1 2 3 4 5 6 public class User { private String id; private String name; private Integer age; }
在META-INF下定义 user.xsd 文件,使用xsd用于描述标签的规则
1 2 3 4 5 6 7 8 9 10 11 12 13 14 15 16 17 18 19 20 <?xml version="1.0" encoding="UTF-8" ?> <xsd:schema xmlns ="http://www.itheima.com/schema/user" xmlns:xsd ="http://www.w3.org/2001/XMLSchema" xmlns:beans ="http://www.springframework.org/schema/beans" targetNamespace ="http://www.itheima.com/schema/user" elementFormDefault ="qualified" attributeFormDefault ="unqualified" > <xsd:import namespace ="http://www.springframework.org/schema/beans" /> <xsd:element name ="user" > <xsd:complexType > <xsd:complexContent > <xsd:extension base ="beans:identifiedType" > <xsd:attribute name ="name" type ="xsd:string" /> <xsd:attribute name ="age" type ="xsd:int" /> </xsd:extension > </xsd:complexContent > </xsd:complexType > </xsd:element > </xsd:schema >
Spring读取xml文件时,会根据标签的命名空间找到其对应的NamespaceHandler,我们在NamespaceHandler内会注册标签对应的解析器BeanDefinitionParser。
1 2 3 4 5 6 7 8 9 10 11 12 13 14 15 package com.itheima.schema;import org.springframework.beans.factory.xml.NamespaceHandlerSupport;public class UserNamespaceHandler extends NamespaceHandlerSupport { public void init () { registerBeanDefinitionParser("user" , new UserBeanDefinitionParser ()); } }
BeanDefinitionParser是标签对应的解析器,Spring读取到对应标签时会使用该类进行解析;
1 2 3 4 5 6 7 8 9 10 11 12 13 14 15 16 17 18 19 20 21 22 23 24 25 26 27 28 29 30 package com.itheima.schema;import org.springframework.beans.factory.support.BeanDefinitionBuilder;import org.springframework.beans.factory.xml.AbstractSingleBeanDefinitionParser;import org.springframework.util.StringUtils;import org.w3c.dom.Element;public class UserBeanDefinitionParser extends AbstractSingleBeanDefinitionParser { protected Class getBeanClass (Element element) { return User.class; } protected void doParse (Element element, BeanDefinitionBuilder bean) { String name = element.getAttribute("name" ); String age = element.getAttribute("age" ); String id = element.getAttribute("id" ); if (StringUtils.hasText(id)) { bean.addPropertyValue("id" , id); } if (StringUtils.hasText(name)) { bean.addPropertyValue("name" , name); } if (StringUtils.hasText(age)) { bean.addPropertyValue("age" , Integer.valueOf(age)); } } }
定义spring.handlers文件,内部保存命名空间与NamespaceHandler类的对应关系;必须放在classpath下的META-INF文件夹中。
1 http\://www.itheima.com/schema/user=com.itheima.schema.UserNamespaceHandler
定义spring.schemas文件,内部保存命名空间对应的xsd文件位置;必须放在classpath下的META-INF文件夹中。
1 http\://www.itheima.com/schema/user.xsd=META-INF/user.xsd
代码准备好了之后,就可以在spring工程中进行使用和测试,定义spring配置文件,导入对应约束
1 2 3 4 5 6 7 8 9 10 11 12 13 14 15 16 17 18 19 20 21 22 <?xml version="1.0" encoding="UTF-8" ?> <beans xmlns ="http://www.springframework.org/schema/beans" xmlns:xsi ="http://www.w3.org/2001/XMLSchema-instance" xmlns:context ="http://www.springframework.org/schema/context" xmlns:util ="http://www.springframework.org/schema/util" xmlns:task ="http://www.springframework.org/schema/task" xmlns:aop ="http://www.springframework.org/schema/aop" xmlns:tx ="http://www.springframework.org/schema/tx" xmlns:itheima ="http://www.itheima.com/schema/user" xsi:schemaLocation ="http://www.springframework.org/schema/beans http://www.springframework.org/schema/beans/spring-beans.xsd http://www.springframework.org/schema/context http://www.springframework.org/schema/context/spring-context.xsd http://www.springframework.org/schema/util http://www.springframework.org/schema/util/spring-util.xsd http://www.springframework.org/schema/task http://www.springframework.org/schema/task/spring-task.xsd http://www.springframework.org/schema/aop http://www.springframework.org/schema/aop/spring-aop.xsd http://www.springframework.org/schema/tx http://www.springframework.org/schema/tx/spring-tx.xsd http://www.itheima.com/schema/user http://www.itheima.com/schema/user.xsd" > <itheima:user id ="user" name ="zhangsan" age ="12" > </itheima:user > </beans >
编写测试类,通过spring容器获取对象user
1 2 3 4 5 6 7 8 9 10 11 12 13 14 15 16 17 18 19 package com.itheima.schema.test;import com.itheima.schema.User;import org.springframework.context.ApplicationContext;import org.springframework.context.support.ClassPathXmlApplicationContext;public class SchemaDemoTest { public static void main (String[] args) { ApplicationContext ctx = new ClassPathXmlApplicationContext ("classpath:spring/applicationContext.xml" ); User user = (User)ctx.getBean("user" ); System.out.println(user); } }
dubbo中的相关对象 Dubbo是运行在spring容器中,dubbo的配置文件也是通过spring的配置文件applicationContext.xml来加载,所以dubbo的自定义配置标签实现,其实同样依赖spring的xml schema机制
1、在 dubbo-demo-xml 模块中可以查看dubbo如何在spring的配置文件中进行配置
2、spring如何来解析这些配置并注册对应的bean呢?通过前面的知识我们知道了是通过spring 的 Schema机制
找到 dubbo-config/dubbo-config-spring 模块,
核心在 DubboNamespaceHandler 中
可以看出Dubbo所有的组件都是由 DubboBeanDefinitionParser 解析,
并通过registerBeanDefinitionParser方法来注册到spring中最后解析对应的对象。这些对象中我们重点关注的有以下两个:
ServiceBean:服务提供者暴露服务的核心对象
ReferenceBean:服务消费者发现服务的核心对象
RegistryConfig:定义注册中心的核心配置对象
服务暴露机制 前面主要探讨了 Dubbo 中 schema 、 XML 的相关原理 , 这些内容对理解框架整体至关重要 , 在此基础上我们继续探讨服务是如何依靠前面的配置进行服务暴露
术语解释 在 Dubbo 的核心领域模型中:
Invoker 是实体域,它是 Dubbo 的核心模型,其它模型都向它靠扰,或转换成它,它代表一个可执行体,可向它发起 invoke 调用,它有可能是一个本地的实现,也可能是一个远程的实现,也可能一个集群实现。在服务提供方,Invoker用于调用服务提供类。在服务消费方,Invoker用于执行远程调用。
由于 Invoker 是 Dubbo 领域模型中非常重要的一个概念,很多设计思路都是向它靠拢。这就使得 Invoker 渗透在整个实现代码里,对于刚开始接触 Dubbo 的人,确实容易给搞混了。 下面我们用一个精简的图来说明最重要的两种 Invoker :服务提供 Invoker 和服务消费Invoker
Protocol 是服务域,它是 Invoker 暴露和引用的主功能入口,它负责Invoker 的生命周期管理。
export:暴露远程服务
refer:引用远程服务
proxyFactory:获取一个接口的代理类
getInvoker:针对server端,将服务对象,如DemoServiceImpl包装成一个Invoker对象
getProxy:针对client端,创建接口的代理对象,例如DemoService接口的代理实现。
Invocation 是会话域,它持有调用过程中的变量,比如方法名,参数等
流程机制 在详细探讨服务暴露细节之前 , 我们先看一下整体dubbo的服务暴露原理
在整体上看,Dubbo 框架做服务暴露分为两大部分 ,
1、第一步将持有的服务实例通过代理转换成 Invoker,
2、第二步会把 Invoker 通过具体的协议 ( 比如 Dubbo ) 转换成Exporter, 框架做了这层抽象也大大方便了功能扩展 。
服务提供方暴露服务的蓝色初始化链,时序图如下:
图解 ServiceConfig.doExportUrlsFor1Protocol—->RegistryProtocol .export
RegistryProtocol .export—>DubboProtocol.export
1、DubboProtocol.export—->HeaderExchanger.bind
HeaderExchanger.bind—->NettyTransporter.bind
NettyTransporter.bind—->NettyServer.doOpen
2、RegistryProtocol.register—>FailbackRegistry.register—>ZookeeperRegistry.doRegister
源码分析 (1) 导出入口
服务导出的入口方法是 ServiceBean 的 onApplicationEvent。onApplicationEvent 是一个事件响应方法,该方法会在收到 Spring 上下文刷新事件后执行服务导出操作。方法代码如下:
1 2 3 4 5 6 7 public void onApplicationEvent (ContextRefreshedEvent event) { if (isDelay() && !isExported() && !isUnexported()) { export(); } }
onApplicationEvent 方法在经过一些判断后,会决定是否调用 export 方法导出服务。在export 根据配置执行相应的动作。最终进入到ServiceConfig.doExportUrls 导出服务方法
1 2 3 4 5 6 7 8 9 10 11 private void doExportUrls () { List<URL> registryURLs = loadRegistries(true ); for (ProtocolConfig protocolConfig : protocols) { ..... doExportUrlsFor1Protocol(protocolConfig, registryURLs); } }
关于多协议多注册中心导出服务首先是根据配置,以及其他一些信息组装URL。前面说过,URL 是 Dubbo 配置的载体,通过 URL 可让 Dubbo 的各种配置在各个模块之间传递。
1 2 3 4 5 6 7 8 9 10 11 12 13 14 15 16 17 18 19 20 21 22 23 24 25 26 27 28 29 30 31 32 33 34 35 36 37 38 39 40 41 42 43 44 45 46 47 48 49 50 51 52 53 54 55 56 57 58 59 60 61 62 63 64 65 66 67 68 69 70 71 72 73 74 75 76 77 78 79 80 81 82 83 84 85 86 87 88 89 90 91 92 93 94 95 96 97 98 99 100 101 102 103 104 105 106 107 108 109 110 111 112 113 114 115 116 117 118 119 120 121 122 123 124 125 126 127 128 129 130 131 132 133 134 135 136 137 138 139 140 141 142 143 144 145 146 147 148 149 150 151 152 153 154 155 156 157 158 159 160 161 162 163 164 165 166 167 168 169 170 171 172 173 174 175 176 177 178 179 180 181 182 183 184 185 186 187 188 189 190 191 192 193 194 195 196 197 198 199 200 201 private void doExportUrlsFor1Protocol (ProtocolConfig protocolConfig, List<URL> registryURLs) { String name = protocolConfig.getName(); if (StringUtils.isEmpty(name)) { name = DUBBO; } Map<String, String> map = new HashMap <String, String>(); map.put(SIDE_KEY, PROVIDER_SIDE); appendRuntimeParameters(map); appendParameters(map, metrics); appendParameters(map, application); appendParameters(map, module ); appendParameters(map, provider); appendParameters(map, protocolConfig); appendParameters(map, this ); if (CollectionUtils.isNotEmpty(methods)) { for (MethodConfig method : methods) { appendParameters(map, method, method.getName()); String retryKey = method.getName() + ".retry" ; if (map.containsKey(retryKey)) { String retryValue = map.remove(retryKey); if ("false" .equals(retryValue)) { map.put(method.getName() + ".retries" , "0" ); } } List<ArgumentConfig> arguments = method.getArguments(); if (CollectionUtils.isNotEmpty(arguments)) { for (ArgumentConfig argument : arguments) { if (argument.getType() != null && argument.getType().length() > 0 ) { Method[] methods = interfaceClass.getMethods(); if (methods != null && methods.length > 0 ) { for (int i = 0 ; i < methods.length; i++) { String methodName = methods[i].getName(); if (methodName.equals(method.getName())) { Class<?>[] argtypes = methods[i].getParameterTypes(); if (argument.getIndex() != -1 ) { if (argtypes[argument.getIndex()].getName().equals(argument.getType())) { appendParameters(map, argument, method.getName() + "." + argument.getIndex()); } else { throw new IllegalArgumentException ("Argument config error : the index attribute and type attribute not match :index :" + argument.getIndex() + ", type:" + argument.getType()); } } else { for (int j = 0 ; j < argtypes.length; j++) { Class<?> argclazz = argtypes[j]; if (argclazz.getName().equals(argument.getType())) { appendParameters(map, argument, method.getName() + "." + j); if (argument.getIndex() != -1 && argument.getIndex() != j) { throw new IllegalArgumentException ("Argument config error : the index attribute and type attribute not match :index :" + argument.getIndex() + ", type:" + argument.getType()); } } } } } } } } else if (argument.getIndex() != -1 ) { appendParameters(map, argument, method.getName() + "." + argument.getIndex()); } else { throw new IllegalArgumentException ("Argument config must set index or type attribute.eg: <dubbo:argument index='0' .../> or <dubbo:argument type=xxx .../>" ); } } } } } if (ProtocolUtils.isGeneric(generic)) { map.put(GENERIC_KEY, generic); map.put(METHODS_KEY, ANY_VALUE); } else { String revision = Version.getVersion(interfaceClass, version); if (revision != null && revision.length() > 0 ) { map.put(REVISION_KEY, revision); } String[] methods = Wrapper.getWrapper(interfaceClass).getMethodNames(); if (methods.length == 0 ) { logger.warn("No method found in service interface " + interfaceClass.getName()); map.put(METHODS_KEY, ANY_VALUE); } else { map.put(METHODS_KEY, StringUtils.join(new HashSet <String>(Arrays.asList(methods)), "," )); } } if (!ConfigUtils.isEmpty(token)) { if (ConfigUtils.isDefault(token)) { map.put(TOKEN_KEY, UUID.randomUUID().toString()); } else { map.put(TOKEN_KEY, token); } } String host = this .findConfigedHosts(protocolConfig, registryURLs, map); Integer port = this .findConfigedPorts(protocolConfig, name, map); URL url = new URL (name, host, port, getContextPath(protocolConfig).map(p -> p + "/" + path).orElse(path), map); if (ExtensionLoader.getExtensionLoader(ConfiguratorFactory.class).hasExtension(url.getProtocol())) { url = ExtensionLoader.getExtensionLoader(ConfiguratorFactory.class).getExtension(url.getProtocol()).getConfigurator(url).configure(url); } String scope = url.getParameter(SCOPE_KEY); if (!SCOPE_NONE.equalsIgnoreCase(scope)) { if (!SCOPE_REMOTE.equalsIgnoreCase(scope)) { exportLocal(url); } if (!SCOPE_LOCAL.equalsIgnoreCase(scope)) { if (!isOnlyInJvm() && logger.isInfoEnabled()) { logger.info("Export dubbo service " + interfaceClass.getName() + " to url " + url); } if (CollectionUtils.isNotEmpty(registryURLs)) { for (URL registryURL : registryURLs) { if (LOCAL_PROTOCOL.equalsIgnoreCase(url.getProtocol())) { continue ; } url = url.addParameterIfAbsent(DYNAMIC_KEY, registryURL.getParameter(DYNAMIC_KEY)); URL monitorUrl = loadMonitor(registryURL); if (monitorUrl != null ) { url = url.addParameterAndEncoded(MONITOR_KEY, monitorUrl.toFullString()); } if (logger.isInfoEnabled()) { logger.info("Register dubbo service " + interfaceClass.getName() + " url " + url + " to registry " + registryURL); } String proxy = url.getParameter(PROXY_KEY); if (StringUtils.isNotEmpty(proxy)) { registryURL = registryURL.addParameter(PROXY_KEY, proxy); } Invoker<?> invoker = PROXY_FACTORY.getInvoker(ref, (Class) interfaceClass, registryURL.addParameterAndEncoded(EXPORT_KEY, url.toFullString())); DelegateProviderMetaDataInvoker wrapperInvoker = new DelegateProviderMetaDataInvoker (invoker, this ); Exporter<?> exporter = protocol.export(wrapperInvoker); exporters.add(exporter); } } else { Invoker<?> invoker = PROXY_FACTORY.getInvoker(ref, (Class) interfaceClass, url); DelegateProviderMetaDataInvoker wrapperInvoker = new DelegateProviderMetaDataInvoker (invoker, this ); Exporter<?> exporter = protocol.export(wrapperInvoker); exporters.add(exporter); } MetadataReportService metadataReportService = null ; if ((metadataReportService = getMetadataReportService()) != null ) { metadataReportService.publishProvider(url); } } } this .urls.add(url); }
上面的代码首先是将一些信息,比如版本、时间戳、方法名以及各种配置对象的字段信息放入到 map 中,最后将 map 和主机名等数据传给 URL 构造方法创建 URL 对象。前置工作做完,接下来就可以进行服务导出了。服务导出分为导出到本地 (JVM),和导出到远程。在深入分析服务导出的源码前,我们先来从宏观层面上看一下服务导出逻辑。如下:
上面代码根据 url 中的 scope 参数决定服务导出方式,分别如下:
scope = none,不导出服务
scope != remote,导出到本地
scope != local,导出到远程
不管是导出到本地,还是远程。进行服务导出之前,均需要先创建Invoker,这是一个很重要的步骤。因此下面先来分析 Invoker 的创建过程。Invoker 是由 ProxyFactory 创建而来,Dubbo 默认的 ProxyFactory 实现类是JavassistProxyFactory。下面我们到 JavassistProxyFactory 代码中,探索Invoker 的创建过程。如下:
1 2 3 4 5 6 7 8 9 10 11 12 13 public <T> Invoker<T> getInvoker (T proxy, Class<T> type, URL url) { final Wrapper wrapper = Wrapper.getWrapper(proxy.getClass().getName().indexOf('$' ) < 0 ? proxy.getClass() : type); return new AbstractProxyInvoker <T>(proxy, type, url) { @Override protected Object doInvoke (T proxy, String methodName, Class<?>[] parameterTypes, Object[] arguments) throws Throwable { return wrapper.invokeMethod(proxy, methodName, parameterTypes, arguments); } }; }
如上,JavassistProxyFactory 创建了一个继承自 AbstractProxyInvoker 类的匿名对象,并覆写了抽象方法 doInvoke。
(2) 导出服务到本地
Invoke创建成功之后,接下来我们来看本地导出
1 2 3 4 5 6 7 8 9 10 11 12 13 private void exportLocal (URL url) { if (!Constants.LOCAL_PROTOCOL.equalsIgnoreCase(url.getProtocol())) { URL local = URL.valueOf(url.toFullString()) .setProtocol(Constants.LOCAL_PROTOCOL) .setHost(LOCALHOST) .setPort(0 ); ServiceClassHolder.getInstance().pushServiceClass(getServiceClass(ref)); Exporter<?> exporter = protocol.export(proxyFactory.getInvoker(ref, (Class) interfaceClass, local)); exporters.add(exporter); } }
exportLocal 方法比较简单,首先根据 URL 协议头决定是否导出服务。若需导出,则创建一个新的 URL 并将协议头、主机名以及端口设置成新的值。然后创建 Invoker,并调用 InjvmProtocol 的 export 方法导出服务。下面我们来看一下 InjvmProtocol 的 export 方法都做了哪些事情。
1 2 3 4 5 public <T> Exporter<T> export (Invoker<T> invoker) throws RpcException { return new InjvmExporter <T>(invoker, invoker.getUrl().getServiceKey(), exporterMap); }
如上,InjvmProtocol 的 export 方法仅创建了一个 InjvmExporter,无其他逻辑。到此导出服务到本地就分析完了。
(3) 导出服务到远程(重点)
接下来,我们继续分析导出服务到远程的过程。导出服务到远程包含了服务导出与服务注册两个过程。先来分析服务导出逻辑。我们把目光移动到RegistryProtocol 的 export 方法上
1 2 3 4 5 6 7 8 9 10 11 12 13 14 15 16 17 18 19 20 21 22 23 24 25 26 27 28 29 30 public <T> Exporter<T> export (final Invoker<T> originInvoker) throws RpcException { final ExporterChangeableWrapper<T> exporter = doLocalExport(originInvoker); URL registryUrl = getRegistryUrl(originInvoker); final Registry registry = getRegistry(originInvoker); final URL registeredProviderUrl = getRegisteredProviderUrl(originInvoker); boolean register = registeredProviderUrl.getParameter("register" , true ); ProviderConsumerRegTable.registerProvider(originInvoker, registryUrl, registeredProviderUrl); if (register) { register(registryUrl, registeredProviderUrl); ProviderConsumerRegTable.getProviderWrapper(originInvoker).setReg(true ); } final URL overrideSubscribeUrl = getSubscribedOverrideUrl(registeredProviderUrl); final OverrideListener overrideSubscribeListener = new OverrideListener (overrideSubscribeUrl, originInvoker); overrideListeners.put(overrideSubscribeUrl, overrideSubscribeListener); registry.subscribe(overrideSubscribeUrl, overrideSubscribeListener); return new DestroyableExporter <T>(exporter, originInvoker, overrideSubscribeUrl, registeredProviderUrl); }
上面代码看起来比较复杂,主要做如下一些操作:
调用 doLocalExport 导出服务
向注册中心注册服务
向注册中心进行订阅 override 数据
创建并返回 DestroyableExporter
下面先来分析 doLocalExport 方法的逻辑,如下:
1 2 3 4 5 6 7 8 9 10 11 12 13 14 15 16 17 18 19 20 private <T> ExporterChangeableWrapper<T> doLocalExport (final Invoker<T> originInvoker) { String key = getCacheKey(originInvoker); ExporterChangeableWrapper<T> exporter = (ExporterChangeableWrapper<T>) bounds.get(key); if (exporter == null ) { synchronized (bounds) { exporter = (ExporterChangeableWrapper<T>) bounds.get(key); if (exporter == null ) { final Invoker<?> invokerDelegete = new InvokerDelegete <T>(originInvoker, getProviderUrl(originInvoker)); exporter = new ExporterChangeableWrapper <T>((Exporter<T>) protocol.export(invokerDelegete), originInvoker); bounds.put(key, exporter); } } } return exporter; }
接下来,我们把重点放在 Protocol 的 export 方法上。假设运行时协议为dubbo,此处的 protocol 变量会在运行时加载 DubboProtocol,并调用DubboProtocol 的 export 方法。
1 2 3 4 5 6 7 8 9 10 11 12 13 14 15 16 public <T> Exporter<T> export (Invoker<T> invoker) throws RpcException { URL url = invoker.getUrl(); String key = serviceKey(url); DubboExporter<T> exporter = new DubboExporter <T> (invoker, key, exporterMap); exporterMap.put(key, exporter); openServer(url); optimizeSerialization(url); return exporter; }
(4) 开启Netty服务
如上,我们重点关注 DubboExporter 的创建以及 openServer 方法,其他逻辑看不懂也没关系,不影响理解服务导出过程。下面分析 openServer 方法。
1 2 3 4 5 6 7 8 9 10 11 12 13 14 15 16 private void openServer (URL url) { String key = url.getAddress(); boolean isServer = url.getParameter(Constants.IS_SERVER_KEY, true ); if (isServer) { ExchangeServer server = serverMap.get(key); if (server == null ) { serverMap.put(key, createServer(url)); } else { server.reset(url); } } }
接下来分析服务器实例的创建过程。如下:
1 2 3 4 5 6 7 8 9 10 11 12 13 14 15 16 17 18 19 20 21 22 23 24 25 26 27 28 29 30 31 32 private ExchangeServer createServer (URL url) { url = url.addParameterIfAbsent(Constants.CHANNEL_READONLYEVENT_SENT_KEY, url = url.addParameterIfAbsent(Constants.HEARTBEAT_KEY,String.valueOf(Constants.DEFAULT_HEARTBEAT)); String str = url.getParameter(Constants.SERVER_KEY, Constants.DEFAULT_REMOTING_SERVER); if (str != null && str.length() > 0 && !ExtensionLoader.getExtensionLoader(Transporter.class).hasExtension(str)) throw new RpcException ("Unsupported server type: " + str + ", url: " + url); url = url.addParameter(Constants.CODEC_KEY, DubboCodec.NAME); ExchangeServer server; try { server = Exchangers.bind(url, requestHandler); } catch (RemotingException e) { throw new RpcException ("Fail to start server..." ); } str = url.getParameter(Constants.CLIENT_KEY); if (str != null && str.length() > 0 ) { Set<String> supportedTypes = ExtensionLoader.getExtensionLoader(Transporter.class).getSupportedExtensions(); if (!supportedTypes.contains(str)) { throw new RpcException ("Unsupported client type..." ); } } return server; }
如上,createServer 包含三个核心的逻辑。第一是检测是否存在 server 参数所代表的 Transporter 拓展,不存在则抛出异常。第二是创建服务器实例。
第三是检测是否支持 client 参数所表示的 Transporter 拓展,不存在也是抛出异常。两次检测操作所对应的代码比较直白了,无需多说。但创建服务器的操作目前还不是很清晰,我们继续往下看。
1 2 3 4 5 6 7 8 9 10 11 12 public static ExchangeServer bind (URL url, ExchangeHandler handler) throws RemotingException { if (url == null ) { throw new IllegalArgumentException ("url == null" ); } if (handler == null ) { throw new IllegalArgumentException ("handler == null" ); } url = url.addParameterIfAbsent(Constants.CODEC_KEY, "exchange" ); return getExchanger(url).bind(url, handler); }
上面代码比较简单,就不多说了。下面看一下 HeaderExchanger 的 bind方法。
1 2 3 4 5 6 7 public ExchangeServer bind(URL url, ExchangeHandler handler) throws RemotingException { // 创建 HeaderExchangeServer 实例,该方法包含了多个逻辑,分 别如下: // 1. new HeaderExchangeHandler(handler) // 2. new DecodeHandler(new HeaderExchangeHandler(handler)) // 3. Transporters.bind(url, new DecodeHandler(new HeaderExchangeHandler(handler))) return new HeaderExchangeServer(Transporters.bind(url, new DecodeHandler(new HeaderExchangeHandler(handler)))); }
HeaderExchanger 的 bind 方法包含的逻辑比较多,但目前我们仅需关心Transporters 的 bind 方法逻辑即可。该方法的代码如下:
1 2 3 4 5 6 7 8 9 10 11 12 13 14 15 16 17 public static Server bind(URL url, ChannelHandler... handlers) throws RemotingException { if (url == null) { throw new IllegalArgumentException("url == null"); } if (handlers == null || handlers.length == 0) { throw new IllegalArgumentException("handlers == null"); } ChannelHandler handler; if (handlers.length == 1) { handler = handlers[0]; } else { // 如果 handlers 元素数量大于1,则创建 ChannelHandler 分发器 handler = new ChannelHandlerDispatcher(handlers); } // 获取自适应 Transporter 实例,并调用实例方法 return getTransporter().bind(url, handler); }
如上,getTransporter() 方法获取的 Transporter 是在运行时动态创建的,类名为 TransporterAdaptive,也就是自适应拓展类。
TransporterAdaptive 会在运行时根据传入的 URL 参数决定加载什么类型的Transporter,默认为 NettyTransporter
调用 NettyTransporter.bind(URL, ChannelHandler) 方法。创建一个NettyServer 实例。调用 NettyServer.doOPen() 方法,服务器被开启,服务也被暴露出来了。
(5) 服务注册
本节内容以 Zookeeper 注册中心作为分析目标,其他类型注册中心大家可自行分析。下面从服务注册的入口方法开始分析,我们把目光再次移到RegistryProtocol 的 export 方法上。如下:
1 2 3 4 5 6 7 8 9 10 11 12 13 14 15 16 public <T> Exporter<T> export(final Invoker<T> originInvoker) throws RpcException { // ${导出服务} // 省略其他代码 boolean register = registeredProviderUrl.getParameter("register", true); if (register) { // 注册服务 register(registryUrl, registeredProviderUrl); ProviderConsumerRegTable.getProviderWrapper(originInvoker).setReg(true); } final URL overrideSubscribeUrl = getSubscribedOverrideUrl(registeredProviderUrl); final OverrideListener overrideSubscribeListener = new OverrideListener(overrideSubscribeUrl, originInvoker); overrideListeners.put(overrideSubscribeUrl, overrideSubscribeListener); // 订阅 override 数据 registry.subscribe(overrideSubscribeUrl, overrideSubscribeListener); // 省略部分代码 }
RegistryProtocol 的 export 方法包含了服务导出,注册,以及数据订阅等逻辑。其中服务导出逻辑上一节已经分析过了,本节将分析服务注册逻辑,相关代码如下:
1 2 3 4 5 6 public void register(URL registryUrl, URL registedProviderUrl) { // 获取 Registry Registry registry = registryFactory.getRegistry(registryUrl); // 注册服务 registry.register(registedProviderUrl); }
register 方法包含两步操作,第一步是获取注册中心实例,第二步是向注册中心注册服务。接下来分两节内容对这两步操作进行分析。
这里以 Zookeeper 注册中心为例进行分析。下面先来看一下 getRegistry方法的源码,这个方法由 AbstractRegistryFactory 实现。如下:
1 2 3 4 5 6 7 8 9 10 11 12 13 14 15 16 17 18 19 20 21 22 23 24 25 public Registry getRegistry(URL url) { url = url.setPath(RegistryService.class.getName()) .addParameter(Constants.INTERFACE_KEY, RegistryService.class.getName()) .removeParameters(Constants.EXPORT_KEY, Constants.REFER_KEY); String key = url.toServiceString(); LOCK.lock(); try { // 访问缓存 Registry registry = REGISTRIES.get(key); if (registry != null) { return registry; } // 缓存未命中,创建 Registry 实例 registry = createRegistry(url); if (registry == null) { throw new IllegalStateException("Can not create registry..."); } // 写入缓存 REGISTRIES.put(key, registry); return registry; } finally { LOCK.unlock(); } } protected abstract Registry createRegistry(URL url);
如上,getRegistry 方法先访问缓存,缓存未命中则调用 createRegistry 创 建 Registry。在此方法中就是通过 new ZookeeperRegistry(url, zookeeperTransporter) 实例化一个注册中心
1 2 3 4 5 6 7 8 9 10 11 12 13 14 15 16 17 18 19 20 21 22 23 24 25 26 27 28 public ZookeeperRegistry(URL url, ZookeeperTransporter zookeeperTransporter) { super(url); if (url.isAnyHost()) { throw new IllegalStateException("registry address == null"); } // 获取组名,默认为 dubbo String group = url.getParameter(Constants.GROUP_KEY, DEFAULT_ROOT); if (!group.startsWith(Constants.PATH_SEPARATOR)) { // group = "/" + group group = Constants.PATH_SEPARATOR + group; } this.root = group; // 创建 Zookeeper 客户端,默认为 CuratorZookeeperTransporter zkClient = zookeeperTransporter.connect(url); // 添加状态监听器 zkClient.addStateListener(new StateListener() { @Override public void stateChanged(int state) { if (state == RECONNECTED) { try { recover(); } catch (Exception e) { logger.error(e.getMessage(), e); } } } }); }
在上面的代码代码中,我们重点关注 ZookeeperTransporter 的 connect方法调用,这个方法用于创建 Zookeeper 客户端。创建好 Zookeeper 客户端,意味着注册中心的创建过程就结束了。接下来,再来分析一下 Zookeeper客户端的创建过程。
1 2 3 4 public ZookeeperClient connect(URL url) { // 创建 CuratorZookeeperClient return new CuratorZookeeperClient(url); }
继续向下看
1 2 3 4 5 6 7 8 9 10 11 12 13 14 15 16 17 18 19 20 21 22 public class CuratorZookeeperClient extends AbstractZookeeperClient<CuratorWatcher> { private final CuratorFramework client; public CuratorZookeeperClient(URL url) { super(url); try { // 创建 CuratorFramework 构造器 CuratorFrameworkFactory.Builder builder = CuratorFrameworkFactory.builder() .connectString(url.getBackupAddress()) .retryPolicy(new RetryNTimes(1, 1000)) .connectionTimeoutMs(5000); String authority = url.getAuthority(); if (authority != null && authority.length() > 0) { builder = builder.authorization("digest", authority.getBytes()); } // 构建 CuratorFramework 实例 client = builder.build(); //省略无关代码 // 启动客户端 client.start(); } catch (Exception e) { throw new IllegalStateException(e.getMessage(), e); } } }
CuratorZookeeperClient 构造方法主要用于创建和启动CuratorFramework 实例。至此Zookeeper客户端就已经启动了
下面我们将 Dubbo 的 demo 跑起来,然后通过 Zookeeper 可视化客户端ZooInspector 查看节点数据。如下:
从上图中可以看到DemoService 这个服务对应的配置信息最终被注册到了zookeeper节点下。搞懂了服务注册的本质,那么接下来我们就可以去阅读服务注册的代码了。
1 2 3 4 5 6 7 8 9 10 11 protected void doRegister(URL url) { try { // 通过 Zookeeper 客户端创建节点,节点路径由 toUrlPath 方法生成,路径格式如下: // /${group}/${serviceInterface}/providers/${url} // 比如 // /dubbo/org.apache.dubbo.DemoService/providers/dubbo%3A%2F%2F127.0.0.1...... zkClient.create(toUrlPath(url), url.getParameter(Constants.DYNAMIC_KEY, true)); } catch (Throwable e) { throw new RpcException("Failed to register..."); } }
如上,ZookeeperRegistry 在 doRegister 中调用了 Zookeeper 客户端创建服务节点。节点路径由 toUrlPath 方法生成,该方法逻辑不难理解,就不分析了。接下来分析 create 方法,如下:
1 2 3 4 5 6 7 8 9 10 11 12 13 14 15 16 17 18 19 public void create(String path, boolean ephemeral) { if (!ephemeral) { // 如果要创建的节点类型非临时节点,那么这里要检测节点是否存在 if (checkExists(path)) { return; } } int i = path.lastIndexOf('/'); if (i > 0) { // 递归创建上一级路径 create(path.substring(0, i), false); } // 根据 ephemeral 的值创建临时或持久节点 if (ephemeral) { createEphemeral(path); } else { createPersistent(path); } }
好了,到此关于服务注册的过程就分析完了。整个过程可简单总结为:先创建注册中心实例,之后再通过注册中心实例注册服务。
总结
在有注册中心,需要注册提供者地址的情况下,ServiceConfig 解析出的 URL 格式为: registry:// registry- host/org.apache.dubbo.registry.RegistryService?export=URL.encode(“dubbo://service-host/{服务名}/{版本号}”)
基于 Dubbo SPI 的自适应机制,通过 URL registry:// 协议头识别,就调用 RegistryProtocol#export() 方法
将具体的服务类名,比如 DubboServiceRegistryImpl ,通过 ProxyFactory 包装成 Invoker 实例
调用 doLocalExport 方法,使用 DubboProtocol 将 Invoker转化为 Exporter 实例,并打开 Netty 服务端监听客户请求
创建 Registry 实例,连接 Zookeeper,并在服务节点下写入提供者的 URL 地址,注册服务
向注册中心订阅 override 数据,并返回一个 Exporter 实例
根据 URL 格式中的 “dubbo://service-host/{服务名}/{版本号}” 中协议头 dubbo:// 识别,调用 DubboProtocol#export() 方法,开发服务端口
RegistryProtocol#export() 返回的 Exporter 实例存放到ServiceConfig 的 List<Exporter> exporters 中
服务发现 在学习了服务暴露原理之后 , 接下来重点探讨服务是如何消费的 。 这里主要讲解如何通过注册中心进行服务发现进行远程服务调用等细节 。
服务发现流程 在详细探讨服务暴露细节之前 , 我们先看一下整体duubo的服务消费原理
在整体上看 , Dubbo 框架做服务消费也分为两大部分 , 第一步通过持有远程服务实例生成Invoker, 这个 Invoker 在客户端是核心的远程代理对象 。 第二步会把 Invoker 通过动态代理转换成实现用户接口的动态代理引用 。服务消费方引用服务的蓝色初始化链,时序图如下:
图解 ReferenceBean.getObject—>RegistryRrotocol.refer
1、引用服务实例得到Invoker,RegistryRrotocol.refer
RegistryDirectory.notify—>DubboProtocol.protocolBindingRefer
HeaderExchanger.connect—>
HeaderExchanger.connect—>NettyClient.doOpen&.doConnect
2、根据invoker创建代理
源码分析 (1) 引用入口
1 2 3 4 5 6 7 8 9 10 11 12 public Object getObject() throws Exception { return get(); } public synchronized T get() { // 检测 ref 是否为空,为空则通过 init 方法创建 if (ref == null) { // init 方法主要用于处理配置,以及调用 createProxy 生 成代理类 init(); } return ref; }
Dubbo 提供了丰富的配置,用于调整和优化框架行为,性能等。Dubbo 在引用或导出服务时,首先会对这些配置进行检查和处理,以保证配置的正确性。
1 2 3 4 private void init() { // 创建代理类 ref = createProxy(map); }
此方法代码很长,主要完成的配置加载,检查,以及创建引用的代理对象。这里要从 createProxy 开始看起。从字面意思上来看,createProxy 似乎只是用于创建代理对象的。但实际上并非如此,该方法还会调用其他方法构建以及合并 Invoker 实例。具体细节如下。
上面代码很多,不过逻辑比较清晰。
1、如果是本地调用,直接jvm 协议从内存中获取实例
2、如果只有一个注册中心,直接通过 Protocol 自适应拓展类构建 Invoker实例接口
3、如果有多个注册中心,此时先根据 url 构建 Invoker。然后再通过Cluster 合并多个 Invoker,最后调用 ProxyFactory 生成代理类
(2) 创建客户端
1 2 3 4 @Override public <T> Invoker<T> refer(Class<T> type, URL url) throws RpcException { return new AsyncToSyncInvoker<> (protocolBindingRefer(type, url)); }
查看 DubboInvoker 中的 refer 方法
1 2 3 4 5 6 7 public <T> Invoker<T> refer(Class<T> serviceType, URL url) throws RpcException { optimizeSerialization(url); // 创建 DubboInvoker DubboInvoker<T> invoker = new DubboInvoker<T> (serviceType, url, getClients(url), invokers); invokers.add(invoker); return invoker; }
上面方法看起来比较简单,创建一个DubboInvoker。通过构造方法传入远程调用的client对象。默认情况下,Dubbo 使用 NettyClient 进行通信。接下来,我们简单看一下 getClients 方法的逻辑。
1 2 3 4 5 6 7 8 9 10 11 12 13 14 15 16 17 18 19 20 21 22 private ExchangeClient[] getClients(URL url) { // 是否共享连接 boolean service_share_connect = false; // 获取连接数,默认为0,表示未配置 int connections = url.getParameter(Constants.CONNECTIONS_KEY, 0); // 如果未配置 connections,则共享连接 if (connections == 0) { service_share_connect = true; connections = 1; } ExchangeClient[] clients = new ExchangeClient[connections]; for (int i = 0; i < clients.length; i++) { if (service_share_connect) { // 获取共享客户端 clients[i] = getSharedClient(url); } else { // 初始化新的客户端 clients[i] = initClient(url); } } return clients; }
这里根据 connections 数量决定是获取共享客户端还是创建新的客户端实例,getSharedClient 方法中也会调用 initClient 方法,因此下面我们一起看一下这个方法。
1 2 3 4 5 6 7 8 9 10 11 12 13 14 15 16 17 18 private ExchangeClient initClient(URL url) { // 获取客户端类型,默认为 netty String str = url.getParameter(Constants.CLIENT_KEY, url.getParameter(Constants.SERVER_KEY, Constants.DEFAULT_REMOTING_CLIENT)); //省略无关代码 ExchangeClient client; try { // 获取 lazy 配置,并根据配置值决定创建的客户端类型 if (url.getParameter(Constants.LAZY_CONNECT_KEY, false)) { // 创建懒加载 ExchangeClient 实例 client = new LazyConnectExchangeClient(url, requestHandler); } else { // 创建普通 ExchangeClient 实例 client = Exchangers.connect(url, requestHandler); } } catch (RemotingException e) { throw new RpcException("Fail to create remoting client for service..."); } return client; }
initClient 方法首先获取用户配置的客户端类型,默认为 netty。下面我们分析一下 Exchangers 的 connect 方法。
1 2 3 4 public static ExchangeClient connect(URL url, ExchangeHandler handler) throws RemotingException { // 获取 Exchanger 实例,默认为 HeaderExchangeClient return getExchanger(url).connect(url, handler); }
如上,getExchanger 会通过 SPI 加载 HeaderExchangeClient 实例,这个方法比较简单,大家自己看一下吧。接下来分析 HeaderExchangeClient 的实现
1 2 3 4 5 6 7 8 public ExchangeClient connect(URL url, ExchangeHandler handler) throws RemotingException { // 这里包含了多个调用,分别如下: // 1. 创建 HeaderExchangeHandler 对象 // 2. 创建 DecodeHandler 对象 // 3. 通过 Transporters 构建 Client 实例 // 4. 创建 HeaderExchangeClient 对象 return new HeaderExchangeClient(Transporters.connect(url, new DecodeHandler(new HeaderExchangeHandler(handler))), true); }
这里的调用比较多,我们这里重点看一下 Transporters 的 connect 方法。如下:
1 2 3 4 5 6 7 8 9 10 11 12 13 14 15 16 public static Client connect(URL url, ChannelHandler... handlers) throws RemotingException { if (url == null) { throw new IllegalArgumentException("url == null"); } ChannelHandler handler; if (handlers == null || handlers.length == 0) { handler = new ChannelHandlerAdapter(); } else if (handlers.length == 1) { handler = handlers[0]; } else { // 如果 handler 数量大于1,则创建一个 ChannelHandler分发器 handler = new ChannelHandlerDispatcher(handlers); } // 获取 Transporter 自适应拓展类,并调用 connect 方法生成Client 实例 return getTransporter().connect(url, handler); }
如上,getTransporter 方法返回的是自适应拓展类,该类会在运行时根据客户端类型加载指定的 Transporter 实现类。若用户未配置客户端类型,则默认加载 NettyTransporter,并调用该类的 connect 方法。如下:
1 2 3 4 public Client connect(URL url, ChannelHandler listener) throws RemotingException { // 创建 NettyClient 对象 return new NettyClient(url, listener); }
(3) 注册
1 2 3 4 5 6 7 8 9 10 11 12 13 14 15 16 17 18 19 20 21 22 23 public <T> Invoker<T> refer(Class<T> type, URL url) throws RpcException { // 取 registry 参数值,并将其设置为协议头 url = url.setProtocol(url.getParameter(Constants.REGISTRY_KEY, Constants.DEFAULT_REGISTRY)).removeParameter(Constants.REGISTRY_KEY); // 获取注册中心实例 Registry registry = registryFactory.getRegistry(url); if (RegistryService.class.equals(type)) { return proxyFactory.getInvoker((T) registry, type, url); } // 将 url 查询字符串转为 Map Map<String, String> qs = StringUtils.parseQueryString(url.getParameterAndDecoded(Constants.REFER_KEY)); // 获取 group 配置 String group = qs.get(Constants.GROUP_KEY); if (group != null && group.length() > 0) { if ((Constants.COMMA_SPLIT_PATTERN.split(group)).length > 1 || "*".equals(group)) { // 通过 SPI 加载 MergeableCluster 实例,并调用 doRefer 继续执行服务引用逻辑 return doRefer(getMergeableCluster(), registry, type, url); } } // 调用 doRefer 继续执行服务引用逻辑 return doRefer(cluster, registry, type, url); }
上面代码首先为 url 设置协议头,然后根据 url 参数加载注册中心实例。然
后获取 group 配置,根据 group 配置决定 doRefer 第一个参数的类型。这里的
重点是 doRefer 方法,如下:
1 2 3 4 5 6 7 8 9 10 11 12 13 14 15 16 17 18 19 20 private <T> Invoker<T> doRefer(Cluster cluster, Registry registry, Class<T> type, URL url) { // 创建 RegistryDirectory 实例 RegistryDirectory<T> directory = new RegistryDirectory<T>(type, url); // 设置注册中心和协议 directory.setRegistry(registry); directory.setProtocol(protocol); Map<String, String> parameters = new HashMap<String, String>(directory.getUrl().getParameters()); // 生成服务消费者链接 URL subscribeUrl = new URL(Constants.CONSUMER_PROTOCOL, parameters.remove(Constants.REGISTER_IP_KEY), 0, 1type.getName(), parameters); // 注册服务消费者,在 consumers 目录下新节点 if (!Constants.ANY_VALUE.equals(url.getServiceInterface()) && url.getParameter(Constants.REGISTER_KEY, true)) { registry.register(subscribeUrl.addParameters(Constants.CATEGORY_KEY, Constants.CONSUMERS_CATEGORY, Constants.CHECK_KEY, String.valueOf(false))); } // 订阅 providers、configurators、routers 等节点数据 directory.subscribe(subscribeUrl.addParameter(Constants.CATEGORY_KEY,Constants.PROVIDERS_CATEGORY + "," + Constants.CONFIGURATORS_CATEGORY + "," + Constants.ROUTERS_CATEGORY)); // 一个注册中心可能有多个服务提供者,因此这里需要将多个服务提供者合并为一个 Invoker invoker = cluster.join(directory); ProviderConsumerRegTable.registerConsumer(invoker, url, subscribeUrl, directory); return invoker; }
如上,doRefer 方法创建一个 RegistryDirectory 实例,然后生成服务者消费者链接,并向注册中心进行注册。注册完毕后,紧接着订阅 providers、configurators、routers 等节点下的数据。完成订阅后,RegistryDirectory 会收到这几个节点下的子节点信息。由于一个服务可能部署在多台服务器上,这样就会在 providers 产生多个节点,这个时候就需要 Cluster 将多个服务节点合并为一个,并生成一个 Invoker。
(4)创建代理对象
1 2 3 4 5 6 7 8 9 10 11 12 13 14 15 16 17 18 19 20 21 22 23 24 25 26 27 28 29 30 31 32 33 34 35 36 37 38 39 40 public <T> T getProxy(Invoker<T> invoker) throws RpcException { // 调用重载方法 return getProxy(invoker, false); } public <T> T getProxy(Invoker<T> invoker, boolean generic) throws RpcException { Class<?>[] interfaces = null; // 获取接口列表 String config = invoker.getUrl().getParameter("interfaces"); if (config != null && config.length() > 0) { // 切分接口列表 String[] types = Constants.COMMA_SPLIT_PATTERN.split(config); if (types != null && types.length > 0) { interfaces = new Class<?>[types.length + 2]; // 设置服务接口类和 EchoService.class 到 interfaces 中 interfaces[0] = invoker.getInterface(); interfaces[1] = EchoService.class; for (int i = 0; i < types.length; i++) { // 加载接口类 interfaces[i + 1] = ReflectUtils.forName(types[i]); } } } if (interfaces == null) { interfaces = new Class<?>[] {invoker.getInterface(), EchoService.class}; } // 为 http 和 hessian 协议提供泛化调用支持,参考 pull request #1827 if (!invoker.getInterface().equals(GenericService.class) && generic) { int len = interfaces.length; Class<?>[] temp = interfaces; // 创建新的 interfaces 数组 interfaces = new Class<?>[len + 1]; System.arraycopy(temp, 0, interfaces, 0, len); // 设置 GenericService.class 到数组中 interfaces[len] = GenericService.class; } // 调用重载方法 return getProxy(invoker, interfaces); } public abstract <T> T getProxy(Invoker<T> invoker, Class<?>[] types);
如上,上面大段代码都是用来获取 interfaces 数组的,我们继续往下看。
getProxy(Invoker, Class<?>[]) 这个方法是一个抽象方法,下面我们到JavassistProxyFactory 类中看一下该方法的实现代码。
1 2 3 4 public <T> T getProxy(Invoker<T> invoker, Class<?>[] interfaces) { // 生成 Proxy 子类(Proxy 是抽象类)。并调用 Proxy 子类的 newInstance 方法创建 Proxy 实例 return (T) Proxy.getProxy(interfaces).newInstance(new InvokerInvocationHandler(invoker)); }
上面代码并不多,首先是通过 Proxy 的 getProxy 方法获取 Proxy 子类,然后创建 InvokerInvocationHandler 对象,并将该对象传给 newInstance 生成 Proxy 实例。InvokerInvocationHandler 实现 JDK 的 InvocationHandler 接口,具体的用途是拦截接口类调用。下面以org.apache.dubbo.demo.DemoService 这个接口为例,来看一下该接口代理类代码大致是怎样的(忽略 EchoService 接口)。
1 2 3 4 5 6 7 8 9 10 11 12 13 14 15 16 package org.apache.dubbo.common.bytecode; public class proxy0 implements org.apache.dubbo.demo.DemoService { public static java.lang.reflect.Method[] methods; private java.lang.reflect.InvocationHandler handler; public proxy0() { } public proxy0(java.lang.reflect.InvocationHandler arg0) { handler = $1; } public java.lang.String sayHello(java.lang.String arg0) { Object[] args = new Object[1]; args[0] = ($w) $1; Object ret = handler.invoke(this, methods[0], args); return (java.lang.String) ret; } }
总结 好了,到这里代理类生成逻辑就分析完了。整个过程比较复杂,大家需要耐心看一下。
从注册中心发现引用服务:在有注册中心,通过注册中心发现提供者地址的情况下,ReferenceConfig 解析出的 URL 格式为:
registry://registry-host:/org.apache.registry.RegistryService?refer=URL.encode(“conumer-host/com.foo.FooService?version=1.0.0”) 。
通过 URL 的registry://协议头识别,就会调用RegistryProtocol#refer()方法
查询提供者 URL,如 dubbo://service-host/com.foo.FooService?version=1.0.0 ,来获取注册中心
创建一个 RegistryDirectory 实例并设置注册中心和协议
生成 conusmer 连接,在 consumer 目录下创建节点,向注册中心注册
注册完毕后,订阅 providers,configurators,routers 等节点的数据
通过 URL 的 dubbo:// 协议头识别,调用DubboProtocol#refer() 方法,创建一个 ExchangeClient
客户端并返回 DubboInvoker 实例
由于一个服务可能会部署在多台服务器上,这样就会在 providers 产生多个节点,这样也就会得到多个 DubboInvoker 实例,就需要RegistryProtocol 调用 Cluster 将多个服务提供者节点伪装成一个节点,并返回一个 Invoker
Invoker 创建完毕后,调用 ProxyFactory 为服务接口生成代理对象,返回提供者引用
Dubbo高可用集群 服务集群的概述 概述 为了避免单点故障,现在的应用通常至少会部署在两台服务器上,这样就组成了集群。集群就是单机的多实例,在多个服务器上部署多个服务,每个服务就是一个节点,部署N个节点,处理业务的能力就提升 N倍(大约),这些节点的集合就叫做集群。
调用过程 在对集群相关代码进行分析之前,这里有必要先来介绍一下集群容错的所有组件。包含 Cluster、Cluster Invoker、Directory、Router 和 LoadBalance等。
集群工作过程可分为两个阶段,第一个阶段是在服务消费者初始化期间,集群 Cluster 实现类为服务消费者创建 Cluster Invoker 实例,即上图中的merge 操作。第二个阶段是在服务消费者进行远程调用时。以FailoverClusterInvoker 为例,该类型 Cluster Invoker 首先会调用 Directory的 list 方法列举 Invoker 列表(可将 Invoker 简单理解为服务提供者)。Directory 的用途是保存 Invoker,可简单类比为 List。其实现类RegistryDirectory 是一个动态服务目录,可感知注册中心配置的变化,它所持有的 Invoker 列表会随着注册中心内容的变化而变化。每次变化后,RegistryDirectory 会动态增删 Invoker,并调用 Router 的 route 方法进行路由,过滤掉不符合路由规则的 Invoker。当 FailoverClusterInvoker 拿到Directory 返回的 Invoker 列表后,它会通过 LoadBalance 从 Invoker 列表中选择一个 Invoker。最后 FailoverClusterInvoker 会将参数传给 LoadBalance选择出的 Invoker 实例的 invoke 方法,进行真正的远程调用。
组件介绍 Directory:它代表多个Invoker,从methodInvokerMap提取,但是他的值是动态,例如注册中心的变更。
集群容错机制 在分布式系统中,集群某个某些节点出现问题是大概率事件,因此在设计分布式RPC框架的过程中,必须要把失败作为设计的一等公民来对待。一次调用失败之后,应该如何选择对失败的选择策略,这是一个见仁见智的问题,每种策略可能都有自己独特的应用场景。因此,作为框架来说,应当针对不同场景提供多种策略,供用户进行选择。
内置集群容错策略 Dubbo默认内置了若干容错策略,如果不能满足用户需求,则可以通过自定义容错策略进行配置
Failover(失败自动切换)
Failsafe(失败安全)
Failfast(快速失败)
Failback(失败自动恢复)
Forking(并行调用)
Broadcast(广播调用)
这些名称比较相似,概念也比较容易混淆,下面逐一进行解释。
Failover(失败自动切换) Failover 是高可用系统中的一个常用概念,服务器通常拥有主备两套机器配置,如果主服务器出现故障,则自动切换到备服务器中,从而保证了整体的高可用性。
Dubbo也借鉴了这个思想,并且把它作为Dubbo 默认的容错策略 。当调用出现失败的时候,根据配置的重试次数,会自动从其他可用地址中重新选择一个可用的地址进行调用,直到调用成功,或者是达到重试的上限位置 。
Dubbo里默认配置的重试次数是2,也就是说,算上第一次调用,最多会调用3次。
其配置方法,容错策略既可以在服务提供方配置,也可以服务调用方进行配置。而重试次数的配置则更为灵活,既可以在服务级别进行配置,也可以在方法级别进行配置。具体优先顺序为:
1 服务调用方方法级配置 > 服务调用方服务级配置 > 服务提供方方法级配置 > 服务提供方服务级配置
以XML方式为例,具体配置方法如下:
服务提供方,服务级配置
1 <dubbo:service interface="org.apache.dubbo.demo.DemoService" ref="demoService" cluster="failover" retries="2" />
服务提供方,方法级配置
1 2 <dubbo:service interface="org.apache.dubbo.demo.DemoService" ref="demoService"cluster="failover"> <dubbo:method name="sayHello" retries="2" /> </dubbo:service>
服务调用方,服务级配置
1 <dubbo:reference id="demoService" interface="org.apache.dubbo.demo.DemoService" cluster="failover" retries="1"/>
服务调用方,方法级配置
1 2 <dubbo:reference id="demoService" interface="org.apache.dubbo.demo.DemoService" cluster="failover"><dubbo:method name="sayHello" retries="3" /> </dubbo:reference>
Failover可以自动对失败进行重试,对调用者屏蔽了失败的细节,但是Failover策略也会带来一些副作用:
重试会额外增加一下开销,例如增加资源的使用,在高负载系统下,额外的重试可能让系统雪上加霜。
重试会增加调用的响应时间。
某些情况下,重试甚至会造成资源的浪费。考虑一个调用场景,A->B->C,如果A处设置了超时100ms,再B->C的第一次调用完成时已经超过了100ms,但很不幸B->C失败,这时候会进行重试,但其实这时候重试已经没有意义,因此在A看来这次调用已经超时,A可能已经开始执行其他逻辑。
2. Failsafe(失败安全)
失败安全策略的核心是即使失败了也不会影响整个调用流程。通常情况下用于旁路系统或流程中,它的失败不影响核心业务的正确性。在实现上,当出现调用失败时,会忽略 此错误 ,并记录一条日志,同时返回 一个空结果 ,在上游看来调用是成功的。
应用场景,可以用于写入审计日志等操作。
具体配置方法:
服务提供方,服务级配置
1 <dubbo:service interface="org.apache.dubbo.demo.DemoService" ref="demoService" cluster="failsafe" />
服务调用方,服务级配置
1 <dubbo:reference id="demoService" interface="org.apache.dubbo.demo.DemoService" cluster="failsafe"/>
其中服务调用方配置优先于服务提供方配置。
3. Failfast(快速失败)
某些业务场景中,某些操作可能是非幂等的,如果重复发起调用,可能会导致出现脏数据等。例如调用某个服务,其中包含一个数据库的写操作,如果写操作完成,但是在发送结果给调用方的过程中出错了,那么在调用方看来这次调用失败了,但其实数据写入已经完成。这种情况下,重试可能并不是一个好策略,这时候就需要使用到 Failfast 策略,调用失败立即报错 。让调用方来决定下一步的操作并保证业务的幂等性。
具体配置方法:
服务提供方,服务级配置
1 <dubbo:service interface="org.apache.dubbo.demo.DemoService" ref="demoService" cluster="failfast" />
服务调用方,服务级配置
1 <dubbo:reference id="demoService" interface="org.apache.dubbo.demo.DemoService" cluster="failfast"/>
其中服务调用方配置优先于服务提供方配置。
4. Failback(失败自动恢复)
Failback 通常和 Failover 两个概念联系在一起。在高可用系统中,当主机发生故障,通过 Failover 进行主备切换后,待故障恢复后,系统应该具备自动恢复原始配置的能力。
Dubbo中的 Failback 策略中,如果调用失败 ,则此次失败相当于Failsafe ,将返回一个空结果 。而与 Failsafe 不同的是,Failback策略会将这次调用加入内存中的失败列表中,对于这个列表中的失败调用,会在另一个线程中进行异步重试,重试如果再发生失败,则会忽略,即使重试调用成功,原来的调用方也感知不到了。因此它通常适合于,对于实时性要求不高,且不需要返回值的一些异步操作 。
具体配置方法:
服务提供方,服务级配置
1 <dubbo:service interface="org.apache.dubbo.demo.DemoService" ref="demoService" cluster="failback" />
服务调用方,服务级配置
1 <dubbo:reference id="demoService" interface="org.apache.dubbo.demo.DemoService" cluster="failback"/>
其中服务调用方配置优先于服务提供方配置。
按照目前的实现,Failback策略还有一些局限,例如内存中的失败调用列表没有上限,可能导致堆积(2.7.X版本默认是3次),异步重试的执行间隔无法调整,默认是5秒,可参看配置
org.apache.dubbo.rpc.cluster.Constants
5. Forking(并行调用)
上述几种策略中,主要都是针对调用失败发生后如何进行弥补的角度去考虑的,而 Forking 策略则跟上述几种策略不同,是一种典型的用成本换时间的思路。即第一次调用的时候就同时发起多个调用,只要其中一个调用成功,就认为成功 。在资源充足,且对于失败的容忍度较低的场景下,可以采用此策略;
具体配置方法:
服务提供方,服务级配置
1 <dubbo:service interface="org.apache.dubbo.demo.DemoService" ref="demoService" cluster="forking" />
服务调用方,服务级配置
1 <dubbo:reference id="demoService" interface="org.apache.dubbo.demo.DemoService" cluster="forking"/>
其中服务调用方配置优先于服务提供方配置。
6. Broadcast(广播调用)
在某些场景下,可能需要对服务的所有提供者进行操作,此时可以使用广播调用策略。此策略会逐个调用所有提供者,只要任意有一个提供者出错,则认为此次调用出错。通常用于通知所有提供者更新缓存或日志等本地资源信息
具体配置方法:
服务提供方,服务级配置
1 <dubbo:service interface="org.apache.dubbo.demo.DemoService" ref="demoService" cluster="broadcast" />
服务调用方,服务级配置
1 <dubbo:reference id="demoService" interface="org.apache.dubbo.demo.DemoService" cluster="broadcast"/>
其中服务调用方配置优先于服务提供方配置。
集群容错调优 下表对各种策略做一个简单对比,
综上我们得知,不同的容错策略往往对应不同的业务处理,这里做一个总结如下:
Failover :通常用于对调用retry不敏感的场景,如读操作;但重试会带来更长延迟
Failfast :通常用于非幂等性操作,需要快速感知失败的场景;比如新增记录
Failsafe :通常用于旁路系统,失败不影响核心流程正确性的场景;如日志记录
Failback :通常用于对于实时性要求不高,且不需要返回值的一些异步操作的场景
Forking :通常用于资源充足,且对于失败的容忍度较低,实时性要求高的读操作,但需要浪费更多服务资源
Broadcast :如通知所有提供者更新缓存或日志等本地资源信息
源码分析 我们在上一章看到了两个概念,分别是集群接口 Cluster 和 Cluster Invoker,这两者是不同的。
Cluster 是接口,而 Cluster Invoker 是一种 Invoker。服务提供者的选择逻辑,以及远程调用失败后的的处理逻辑均是封装在 Cluster Invoker 中。
那么 Cluster 接口和相关实现类有什么用呢?用途比较简单,仅用于生成Cluster Invoker。下面我们来看一下源码。
1 2 3 4 5 6 7 8 public class FailoverCluster implements Cluster { public final static String NAME = "failover"; @Override public <T> Invoker<T> join(Directory<T> directory) throws RpcException { // 创建并返回 FailoverClusterInvoker 对象 return new FailoverClusterInvoker<T>(directory); } }
如上,FailoverCluster 总共就包含这几行代码,用于创建FailoverClusterInvoker 对象,很简单。下面再看一个。
1 2 3 4 5 6 7 8 public class FailbackCluster implements Cluster { public final static String NAME = "failback"; @Override public <T> Invoker<T> join(Directory<T> directory) throws RpcException { // 创建并返回 FailbackClusterInvoker 对象 return new FailbackClusterInvoker<T>(directory); } }
如上,FailbackCluster 的逻辑也是很简单,无需解释了。所以接下来,我们把重点放在各种 Cluster Invoker 上
1. AbstractClusterInvoker
我们首先从各种 Cluster Invoker 的父类 AbstractClusterInvoker 源码开始说起。
前面说过,集群工作过程可分为两个阶段,第一个阶段是在服务消费者初始化期间,这个在服务引用那篇文章中分析过,就不赘述。
第二个阶段是在服务消费者进行远程调用时,此时AbstractClusterInvoker 的 invoke 方法会被调用。列举 Invoker,负载均衡等操作均会在此阶段被执行。因此下面先来看一下 invoke 方法的逻辑。
1 2 3 4 5 6 7 8 9 10 11 12 13 14 15 16 17 18 19 20 21 22 public Result invoke(final Invocation invocation) throws RpcException { checkWhetherDestroyed(); LoadBalance loadbalance = null; // 绑定 attachments 到 invocation 中. Map<String, String> contextAttachments = RpcContext.getContext().getAttachments(); if (contextAttachments != null && contextAttachments.size() != 0) { ((RpcInvocation) invocation).addAttachments(contextAttachments); } // 列举 Invoker List<Invoker<T>> invokers = list(invocation); if (invokers != null && !invokers.isEmpty()) { // 加载 LoadBalance loadbalance = ExtensionLoader.getExtensionLoader(LoadBalance.class).getE xtension(invokers.get(0).getUrl() .getMethodParameter(RpcUtils.getMethodName(invocation), Constants.LOADBALANCE_KEY, Constants.DEFAULT_LOADBALANCE)); } RpcUtils.attachInvocationIdIfAsync(getUrl(), invocation); // 调用 doInvoke 进行后续操作 return doInvoke(invocation, invokers, loadbalance); } // 抽象方法,由子类实现 protected abstract Result doInvoke(Invocation invocation, List<Invoker<T>> invokers, LoadBalance loadbalance) throws RpcException;
AbstractClusterInvoker 的 invoke 方法主要用于列举 Invoker,以及加载LoadBalance。最后再调用模板方法 doInvoke 进行后续操作。下面我们来看一下 Invoker 列举方法 list(Invocation) 的逻辑,如下:
1 2 3 4 5 protected List<Invoker<T>> list(Invocation invocation) throws RpcException { // 调用 Directory 的 list 方法列举 Invoker List<Invoker<T>> invokers = directory.list(invocation); return invokers; }
如上,AbstractClusterInvoker 中的 list 方法做的事情很简单,只是简单的调用了 Directory 的 list 方法,没有其他更多的逻辑了。Directory 即相关实现类在前文已经分析过,这里就不多说了。接下来,我们把目光转移到AbstractClusterInvoker 的各种实现类上,来看一下这些实现类是如何实现doInvoke 方法逻辑的。
2. FailoverClusterInvoker
FailoverClusterInvoker 在调用失败时,会自动切换 Invoker 进行重试。默认配置下,Dubbo 会使用这个类作为缺省 Cluster Invoker。下面来看一下该类的逻辑。
1 2 3 4 5 6 7 8 9 10 11 12 13 14 15 16 17 18 19 20 21 22 23 24 25 26 27 28 29 30 31 32 33 34 35 36 37 38 39 40 41 42 43 44 45 46 47 48 49 public class FailoverClusterInvoker<T> extends AbstractClusterInvoker<T> { // 省略部分代码 @Override public Result doInvoke(Invocation invocation, final List<Invoker<T>> invokers, LoadBalance loadbalance) throws RpcException { List<Invoker<T>> copyinvokers = invokers; checkInvokers(copyinvokers, invocation); // 获取重试次数 int len = getUrl().getMethodParameter(invocation.getMethodName(), Constants.RETRIES_KEY, Constants.DEFAULT_RETRIES) + 1; if (len <= 0) { len = 1; } RpcException le = null; List<Invoker<T>> invoked = new ArrayList<Invoker<T>>(copyinvokers.size()); Set<String> providers = new HashSet<String>(len); // 循环调用,失败重试 for (int i = 0; i < len; i++) { if (i > 0) { checkWhetherDestroyed(); // 在进行重试前重新列举 Invoker,这样做的好处是,如果某个服务挂了, // 通过调用 list 可得到最新可用的 Invoker 列表 copyinvokers = list(invocation); // 对 copyinvokers 进行判空检查 checkInvokers(copyinvokers, invocation); } // 通过负载均衡选择 Invoker Invoker<T> invoker = select(loadbalance, invocation, copyinvokers, invoked); // 添加到 invoker 到 invoked 列表中 invoked.add(invoker); // 设置 invoked 到 RPC 上下文中 RpcContext.getContext().setInvokers((List) invoked); try { // 调用目标 Invoker 的 invoke 方法 Result result = invoker.invoke(invocation); return result; } catch (RpcException e) { if (e.isBiz()) { throw e; } le = e; } catch (Throwable e) { le = new RpcException(e.getMessage(), e); } finally { providers.add(invoker.getUrl().getAddress()); } } // 若重试失败,则抛出异常 throw new RpcException(..., "Failed to invoke the method ..."); } }
如上,FailoverClusterInvoker 的 doInvoke 方法首先是获取重试次数,然后根据重试次数进行循环调用,失败后进行重试。在 for 循环内,首先是通过负载均衡组件选择一个 Invoker,然后再通过这个 Invoker 的 invoke 方法进行远程调用。如果失败了,记录下异常,并进行重试。重试时会再次调用父类的 list方法列举 Invoker。整个流程大致如此,不是很难理解。下面我们看一下 select方法的逻辑。
1 2 3 4 5 protected Invoker<T> select(LoadBalance loadbalance, Invocation invocation, List<Invoker<T>> invokers, List<Invoker<T>> selected) throws RpcException { if (invokers == null || invokers.isEmpty()) return null; // 获取调用方法名 ================ 补全 =========
如上,select 方法的主要逻辑集中在了对粘滞连接特性的支持上。首先是获取 sticky 配置,然后再检测 invokers 列表中是否包含 stickyInvoker,如果
不包含,则认为该 stickyInvoker 不可用,此时将其置空。这里的 invokers 列表可以看做是存活着的服务提供者 列表,如果这个列表不包含 stickyInvoker,
那自然而然的认为 stickyInvoker 挂了,所以置空。如果 stickyInvoker 存在于invokers 列表中,此时要进行下一项检测 — 检测 selected 中是否包含
stickyInvoker。如果包含的话,说明 stickyInvoker 在此之前没有成功提供服务(但其仍然处于存活状态)。此时我们认为这个服务不可靠,不应该在重试期
间内再次被调用,因此这个时候不会返回该 stickyInvoker。如果 selected 不包含 stickyInvoker,此时还需要进行可用性检测,比如检测服务提供者网络连通
性等。当可用性检测通过,才可返回 stickyInvoker,否则调用 doSelect 方法选择 Invoker。如果 sticky 为 true,此时会将 doSelect 方法选出的 Invoker 赋值
给 stickyInvoker。
以上就是 select 方法的逻辑,这段逻辑看起来不是很复杂,但是信息量比较大。不搞懂 invokers 和 selected 两个入参的含义,以及粘滞连接特性,这段
代码是不容易看懂的。所以大家在阅读这段代码时,不要忽略了对背景知识的理解。关于 select 方法先分析这么多,继续向下分析。
1 2 3 4 5 6 7 8 private Invoker<T> doSelect(LoadBalance loadbalance, Invocation invocation, List<Invoker<T>> invokers, List<Invoker<T>> selected) throws RpcException { if (invokers == null || invokers.isEmpty()) return null; if (invokers.size() == 1) return invokers.get(0); if (loadbalance == null) { // 如果 loadbalance 为空,这里通过 SPI 加载 Loadbalance,默认为 RandomLoadBalance ======= 补全 ==========
doSelect 主要做了两件事,第一是通过负载均衡组件选择 Invoker。第二
是,如果选出来的 Invoker 不稳定,或不可用,此时需要调用 reselect 方法进
行重选。若 reselect 选出来的 Invoker 为空,此时定位 invoker 在 invokers 列
表中的位置 index,然后获取 index + 1 处的 invoker,这也可以看做是重选逻
辑的一部分。下面我们来看一下 reselect 方法的逻辑。
1 2 3 4 5 6 7 8 9 10 11 12 13 14 15 16 17 18 19 20 21 22 23 24 25 26 27 28 29 30 31 32 33 34 35 36 37 38 39 40 41 42 43 44 45 46 47 48 49 50 51 52 private Invoker<T> reselect (LoadBalance loadbalance, Invocation invocation, List<Invoker<T>> invokers, List<Invoker<T>> selected, boolean availablecheck) throws RpcException { List<Invoker<T>> reselectInvokers = new ArrayList <Invoker<T>>(invokers.size() > 1 ? (invokers.size() - 1 ) : invokers.size()); if (availablecheck) { for (Invoker<T> invoker : invokers) { if (invoker.isAvailable()) { if (selected == null || !selected.contains(invoker)) { reselectInvokers.add(invoker); } } } if (!reselectInvokers.isEmpty()) { return loadbalance.select(reselectInvokers, getUrl(), invocation); } } else { for (Invoker<T> invoker : invokers) { if (selected == null || !selected.contains(invoker)) { reselectInvokers.add(invoker); } } if (!reselectInvokers.isEmpty()) { return loadbalance.select(reselectInvokers,getUrl(), invocation); } } { if (selected != null ) { for (Invoker<T> invoker : selected) { if ((invoker.isAvailable()) && !reselectInvokers.contains(invoker)) { reselectInvokers.add(invoker); } } } if (!reselectInvokers.isEmpty()) { return loadbalance.select(reselectInvokers, getUrl(), invocation); } } return null ; }
reselect 方法总结下来其实只做了两件事情,第一是查找可用的 Invoker,并将其添加到 reselectInvokers 集合中。第二,如果 reselectInvokers 不为空,则通过负载均衡组件再次进行选择。其中第一件事情又可进行细分,一开始,reselect 从 invokers 列表中查找有效可用的 Invoker,若未能找到,此时再到 selected 列表中继续查找。关于 reselect 方法就先分析到这,继续分析其他的 Cluster Invoker。
3. FailbackClusterInvoker
FailbackClusterInvoker 会在调用失败后,返回一个空结果给服务消费者。并通过定时任务对失败的调用进行重传,适合执行消息通知等操作。下面来看一下它的实现逻辑。
