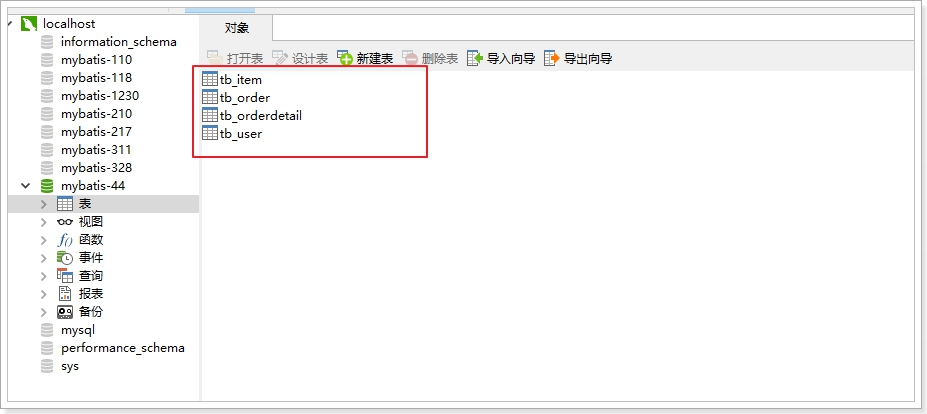
JDBC回顾 步骤1:导入sql文件,创建mybatis库 执行SQL文件:
将sql文件直接拉进去或者右键运行sql文件都可。
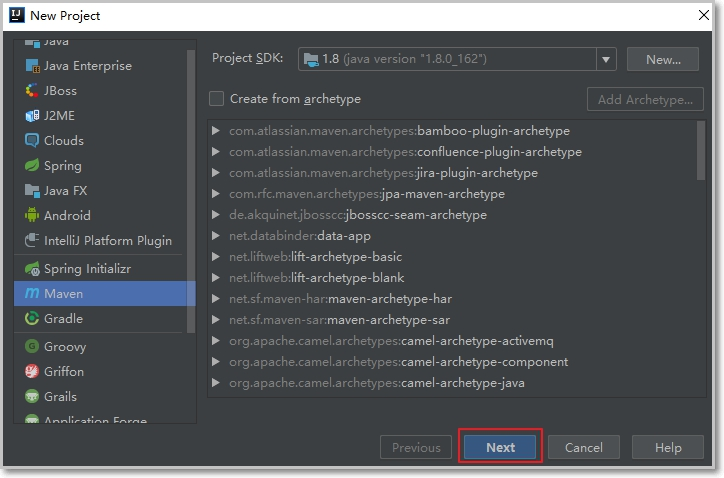
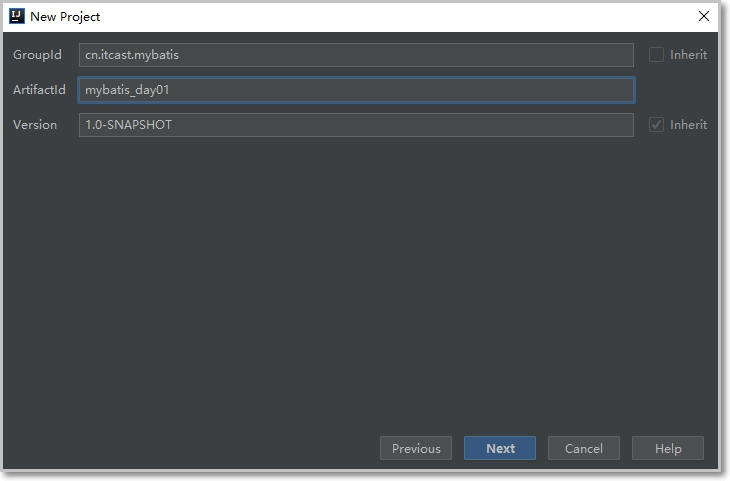
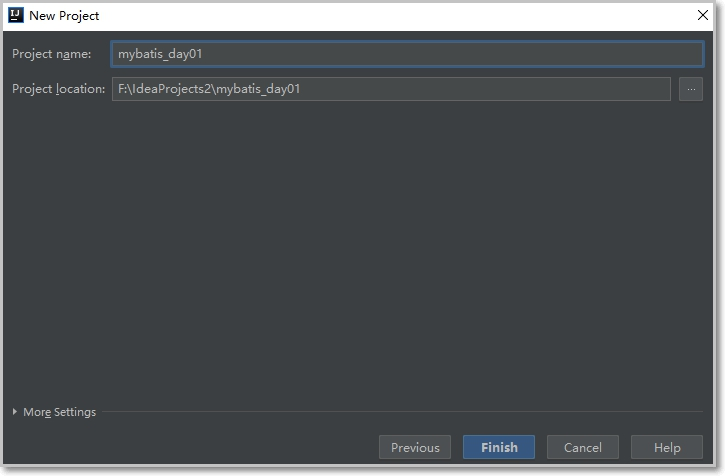
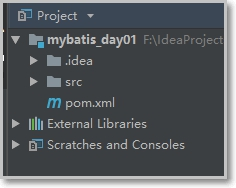
步骤2:创建maven工程 创建maven工程,引入mysql驱动包和junit测试的依赖
Next:
Next:
最后选择OK:
添加工程需要的jdbc依赖
1
2
3
4
5
6
7
8
9
10
11
12
13
14
15
16
17
18
<?xml version="1.0" encoding="UTF-8" ?> <project xmlns ="http://maven.apache.org/POM/4.0.0" xmlns:xsi ="http://www.w3.org/2001/XMLSchema-instance" xsi:schemaLocation ="http://maven.apache.org/POM/4.0.0 http://maven.apache.org/xsd/maven-4.0.0.xsd" > <modelVersion > 4.0.0</modelVersion > <groupId > cn.itcast.mybatis</groupId > <artifactId > mybatis_day01</artifactId > <version > 1.0-SNAPSHOT</version > <dependencies > <dependency > <groupId > mysql</groupId > <artifactId > mysql-connector-java</artifactId > <version > 5.1.32</version > </dependency > </dependencies > </project >
步骤3:编写jdbc程序 需求:根据id查询用户信息
1
2
3
4
5
6
7
8
9
10
11
12
13
14
15
16
17
18
19
20
21
22
23
24
25
26
27
28
29
30
31
32
33
34
35
36
37
38
39
40
41
42
43
44
45
46
47
48
49
50
51
52
53
54
55
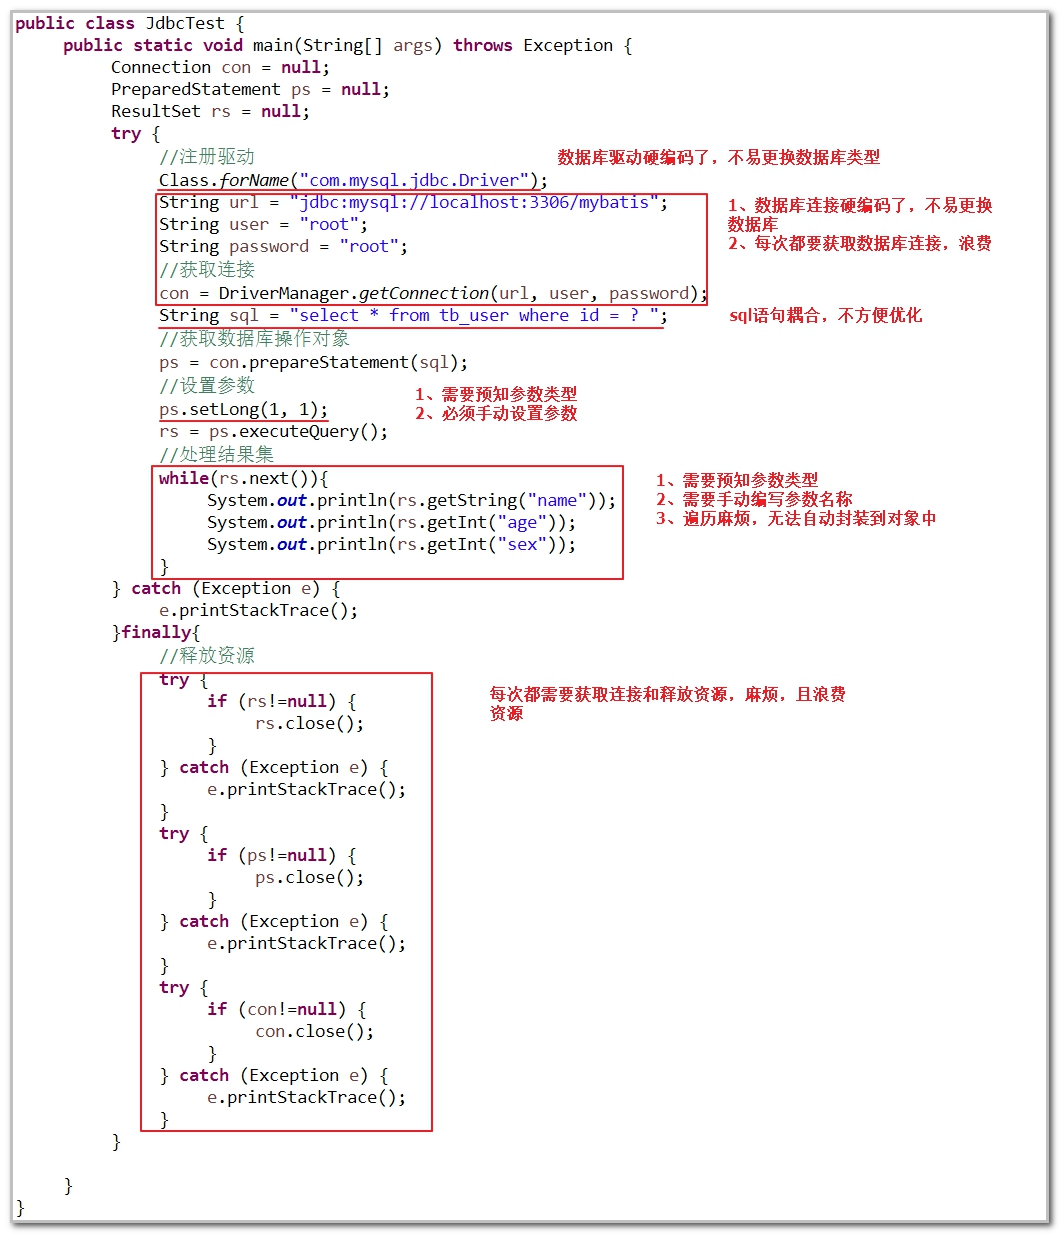
public class JdbcTest { public static void main (String[] args) { Connection con = null ; PreparedStatement ps = null ; ResultSet rs = null ; try { Class.forName("com.mysql.jdbc.Driver" ); String url = "jdbc:mysql://localhost:3306/mybatis" ; String user = "root" ; String password = "root" ; con = DriverManager.getConnection(url, user, password); String sql = "select * from tb_user where id = ? " ; ps = con.prepareStatement(sql); ps.setLong(1 , 1 ); rs = ps.executeQuery(); while (rs.next()){ System.out.println(rs.getString("name" )); System.out.println(rs.getInt("age" )); System.out.println(rs.getInt("sex" )); } } catch (Exception e) { e.printStackTrace(); }finally { try { if (rs!=null ) { rs.close(); } } catch (Exception e) { e.printStackTrace(); } try { if (ps!=null ) { ps.close(); } } catch (Exception e) { e.printStackTrace(); } try { if (con!=null ) { con.close(); } } catch (Exception e) { e.printStackTrace(); } } } }
步骤4:分析
jdbc编程存在的缺点:
数据库链接创建、释放频繁造成系统资源浪费从而影响系统性能,如果使用数据库链接池可解决此问题。
Sql 语句在代码中硬编码,造成代码不易维护,实际应用 sql 变化的可能较大, sql 变动需要改变java 代码。
使用 preparedStatement 向占有位符号传参数存在硬编码,因为 sql 语句的 where 条件不一定,可能多也可能少,修改 sql 还要修改代码,系统不易维护。
对结果集解析存在硬编码(查询列名), sql 变化导致解析代码变化,系统不易维护,如果能将数据库记录封装成 pojo 对象解析比较方便
框架概述 什么是框架 框架(Framework)是整个或部分系统的可重用设计,表现为一组抽象构件及构件实例间交互的方法;另一种定义认为,框架是可被应用开发者定制的应用骨架。前者是从应用方面而后者是从目的方面给出的定义。
简而言之,框架通常与具体业务无关,是软件(系统)的半成品,框架封装了很多的细节,使开发者可以使用简单的方式实现功能,大大提高开发效率。
开发好比表演节目, 开发者好比演员, 框架好比舞台.
框架的好处:规范开发流程
框架要解决的问题 框架要解决的最重要的一个问题是技术整合的问题,在 J2EE 的 框架中,有着各种各样的技术,不同的软件企业需要从J2EE 中选择不同的技术,这就使得软件企业最终的应用依赖于这些技术,技术自身的复杂性和技术的风险性将会直接对应用造成冲击。而应用是软件企业的核心,是竞争力的关键所在,因此应该将应用自身的设计和具体的实现技术解耦。这样,软件企业的研发将集中在应用的设计上,而不是具体的技术实现,技术实现是应用的底层支撑,它不应该直接对应用产生影响。
框架一般处在低层应用平台(如 J2EE)和高层业务逻辑之间的中间层。
简单的说:
框架: 框架可以封装重复代码,提供更简洁的API;框架可以实现代码间的解耦
SSM框架
ssh: strus2、spring、hibernate
MyBatis框架 概述
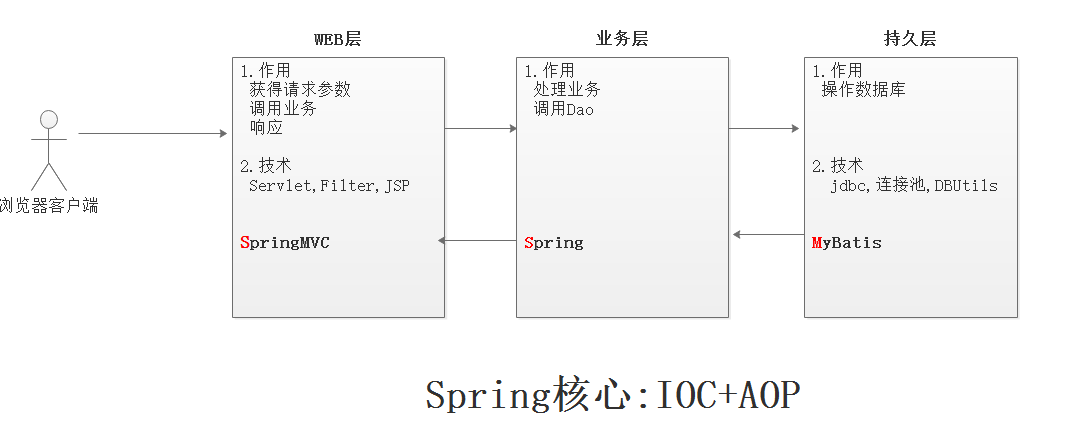
mybatis 是一个优秀的基于 java 的持久层框架 ,它内部封装了 jdbc,使开发者只需要关注 sql 语句本身,而不需要花费精力去处理加载驱动、创建连接、创建 statement 等繁杂的过程。
mybatis 通过xml 或注解的方式将要执行的各种statement 配置起来,并通过java 对象和statement 中sql的动态参数进行映射生成最终执行的 sql 语句,最后由 mybatis 框架执行 sql并将结果映射为 java 对象并返回。
采用 ORM 思想解决了实体和数据库映射的问题,对jdbc 进行了封装,屏蔽了jdbc api 底层访问细节,使我们不用与 jdbc api打交道,就可以完成对数据库的持久化操作。
官网: http://www.mybatis.org/mybatis-3/
为什么学MyBatis
JDBC和DBUtils都有一些很明显的缺点, JDBC和DBUtils不适合做项目
MyBatis是工作里面的主流的持久层框架, 使用几率特别大
MyBatis特点 Mybatis:
1) 支持自定义SQL、存储过程、及高级映射
2) 实现自动对SQL的参数设置
3) 实现自动对结果集进行解析和封装
4) 通过XML或者注解进行配置和映射,大大减少代码量
5) 数据源的连接信息通过配置文件进行配置
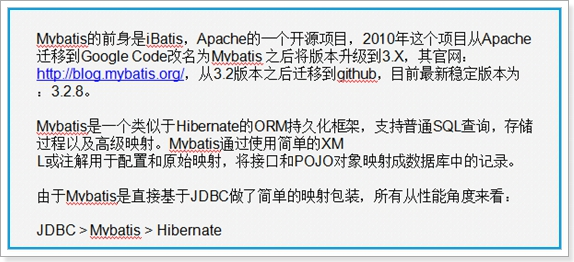
可以发现,MyBatis是对JDBC进行了简单的封装,帮助用户进行SQL参数的自动设置,以及结果集与Java对象的自动映射。与Hibernate相比,配置更加简单、灵活、执行效率高。但是正因为此,所以是半自动化的ORM框架,需要手写SQL,这是优点也是缺点。
因此,对性能要求较高的电商类项目,一般会使用MyBatis,而对与业务逻辑复杂,不太在乎执行效率的传统行业,一般会使用Hibernate
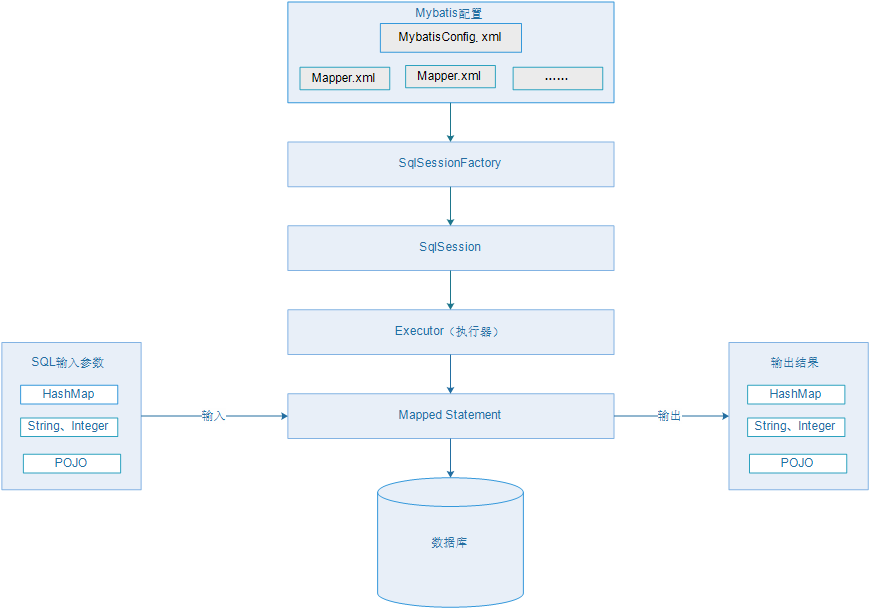
MyBatis整体架构
1、 配置文件
全局配置文件(核心配置文件):mybatis-config.xml,作用:配置数据源(配置数据库连接信息),引入映射文件
映射文件:XxMapper.xmlàxx.hbm.xml,作用:配置sql语句、参数、结果集封装类型等
2、 SqlSessionFactory
作用:获取SqlSession
通过newSqlSessionFactoryBuilder().build(inputStream)来构建,inputStream:读取配置文件的IO流
3、 SqlSession
作用:执行CRUD操作
它是线程不安全的。因此最佳的使用范围是请求或方法范围。
4、 Executor
执行器,SqlSession通过调用它来完成具体的CRUD
它是一个接口,提供了两种实现:缓存的实现、数据库的实现
5、 Mapped Statement
在映射文件里面配置,包含3部分内容:
具体的sql,sql执行所需的参数类型,sql执行结果的封装类型
参数类型和结果集封装类型包括3种:
HashMap,基本数据类型,pojo
mybatis整体架构分析
1
2
3
4
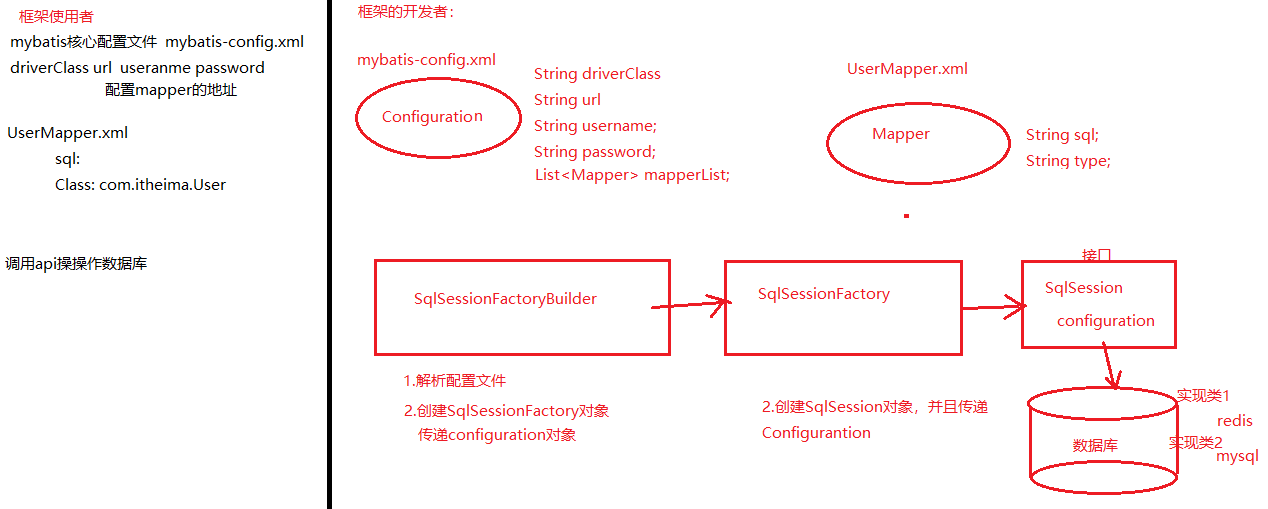
当MyBatis运行开始时, 先要通过Resources加载核心配置文件, 之后使用XMLConfigBuilder对配置文件进行解析, 将解析结果封装为Configuration对象, 接着, 使用Configuration对象构建一个DefaultSqlSessionFactory对象, 至此, SqlSession工厂构建完成. 接下来, 通过工厂对象调用openSession方法创建SqlSession对象. 在这个过程中, 需要通过TransactionFactory生成Transaction对象, 并且, 还需要创建核心执行器Executor对象, 之后, 通过这些对象来创建DefaultSqlSession对象, 至此, SqlSession对象创建成功. 之后, 通过SqlSession对象执行相应的操作, 如果执行成功, 调用commit方法提交事务; 如果失败, 调用rollback方法事务回滚. 最后, 调用close方法关闭session资源. 以上, 就是MyBatis的运行原理.
案例-快速入门 需求:使用MyBatis查询所有的用户, 封装到List<User>集合
步骤分析:
创建Maven工程(jar), 添加坐标
创建pojo
创建UserDao接口
创建UserDao映射文件
创建MyBatis核心配置文件SqlMapConfig.xml
编写java代码测试
准备工作
1
2
3
4
5
6
7
8
9
10
11
12
13
CREATE DATABASE mybatis_day;USE mybatis; CREATE TABLE t_user( uid int PRIMARY KEY auto_increment, username varchar (40 ), sex varchar (10 ), birthday date , address varchar (40 ) ); INSERT INTO `t_user` VALUES (null , 'zs' , '男' , '2018-08-08' , '北京' );INSERT INTO `t_user` VALUES (null , 'ls' , '女' , '2018-08-30' , '武汉' );INSERT INTO `t_user` VALUES (null , 'ww' , '男' , '2018-08-08' , '北京' );
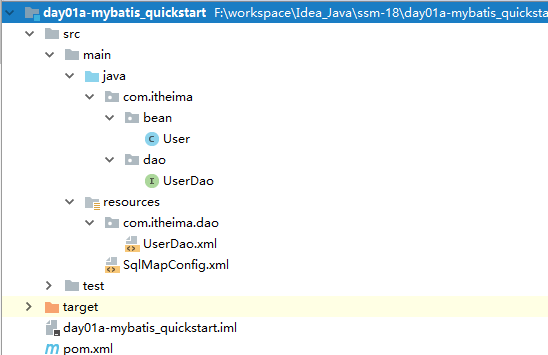
整体目录
创建 Maven工程(jar)导入坐标 1 2 3 4 5 6 7 8 9 10 11 12 13 14 15 16 17 18 19 20 21 22 23 24 25 26 27 <dependencies > <dependency > <groupId > junit</groupId > <artifactId > junit</artifactId > <version > 4.12</version > <scope > test</scope > </dependency > <dependency > <groupId > org.projectlombok</groupId > <artifactId > lombok</artifactId > <version > 1.18.10</version > <scope > provided</scope > </dependency > <dependency > <groupId > mysql</groupId > <artifactId > mysql-connector-java</artifactId > <version > 5.1.47</version > </dependency > <dependency > <groupId > org.mybatis</groupId > <artifactId > mybatis</artifactId > <version > 3.5.3</version > </dependency > </dependencies >
创建 User实体类
1 2 3 4 5 6 7 8 public class User implements Serializable { private int uid; private String username; private String sex; private Date birthday; private String address; }
创建 UserDao 接口
UserDao 接口就是我们的持久层接口(也可以写成 UserMapper) .我们就写成UserDao ,具体代码如下:
1 2 3 public interface UserDao { public List<User> findAll () ; }
创建 UserDao.xml 映射文件 注意:
映射配置文件存储的路径在resources里面,要和对应的Dao接口的路径保持一致(在resources目录中创建目录的时候要使用”/“而不是”.”)
映射配置文件的文件名必须和Dao接口名保持一致
一定要引入约束文件
1 2 3 4 5 6 7 8 9 10 11 12 13 14 15 16 17 18 19 20 21 <?xml version="1.0" encoding="UTF-8" ?> <!DOCTYPE mapper PUBLIC "-//mybatis.org//DTD Mapper 3.0//EN" "http://mybatis.org/dtd/mybatis-3-mapper.dtd" > <mapper namespace ="com.itheima.dao.UserDao" > <select id ="findAll" resultType ="com.itheima.pojo.User" > select * from t_user </select > </mapper >
创建 SqlMapConfig.xml 配置文件(核心配置文件) 注意事项
存放路径必须是resources的根路径
配置文件的名字,随便写
一定要引入约束文件
1 2 3 4 5 6 7 8 9 10 11 12 13 14 15 16 17 18 19 20 21 22 23 24 25 26 27 28 29 30 31 32 33 34 35 36 37 38 39 40 41 42 43 44 45 46 47 48 49 50 51 52 <?xml version="1.0" encoding="UTF-8" ?> <!DOCTYPE configuration PUBLIC "-//mybatis.org//DTD Config 3.0//EN" "http://mybatis.org/dtd/mybatis-3-config.dtd" > <configuration > <environments default ="dev" > <environment id ="dev" > <transactionManager type ="JDBC" > </transactionManager > <dataSource type ="POOLED" > <property name ="username" value ="root" /> <property name ="password" value ="123" /> <property name ="driver" value ="com.mysql.jdbc.Driver" /> <property name ="url" value ="jdbc:mysql:///mybatis_day01?characterEncoding=utf8" /> </dataSource > </environment > <environment id ="pro" > <transactionManager type ="" > </transactionManager > <dataSource type ="" > </dataSource > </environment > <environment id ="test" > <transactionManager type ="" > </transactionManager > <dataSource type ="" > </dataSource > </environment > </environments > <mappers > <mapper resource ="com/itheima/dao/UserDao.xml" > </mapper > </mappers > </configuration >
测试 1 2 3 4 5 6 7 8 9 10 11 12 13 14 15 16 17 18 19 20 21 22 23 24 25 26 27 28 29 30 31 32 33 34 35 36 37 38 39 40 41 42 43 44 45 package com.itheima;import com.itheima.dao.UserDao;import com.itheima.pojo.User;import org.apache.ibatis.io.Resources;import org.apache.ibatis.session.SqlSession;import org.apache.ibatis.session.SqlSessionFactory;import org.apache.ibatis.session.SqlSessionFactoryBuilder;import org.junit.Test;import java.io.InputStream;import java.util.List;public class TestMybatis { @Test public void testFindAll () throws Exception { InputStream is = Resources.getResourceAsStream("SqlMapConfig.xml" ); SqlSessionFactoryBuilder factoryBuilder = new SqlSessionFactoryBuilder (); SqlSessionFactory sessionFactory = factoryBuilder.build(is); SqlSession sqlSession = sessionFactory.openSession(); UserDao userDao = sqlSession.getMapper(UserDao.class); List<User> userList = userDao.findAll(); for (User user : userList) { System.out.println(user); } sqlSession.close(); is.close(); } }
Mapper动态代理方式规范 Mapper.xml(映射文件) 1. 映射配置文件存储的路径在resources里面,要和对应的Dao接口的路径保持一致
2. 映射配置文件的文件名必须和Dao接口名保持一致
3. 一定要引入约束文件
4. namespace属性的值和对应Dao接口的全限定名一致
5. 每一个子标签,就对应Dao接口中的一个方法
1 2 3 4 5 6 7 8 9 10 11 12 13 查询方法就对应select标签 添加方法就对应insert标签 删除方法就对应delete标签 修改方法就对应update标签 标签的id就对应方法的名字 标签的parameterType就对应方法的参数类型 标签的resultType(只有select标签才有)就对应方法的返回值类型,如果返回值类型是List,那么 resultType就是List的泛型类型 标签体中的内容就是要执行的sql语句
1 2 3 4 5 6 7 8 9 <?xml version="1.0" encoding="UTF-8" ?> <!DOCTYPE mapper PUBLIC "-//mybatis.org//DTD Mapper 3.0//EN" "http://mybatis.org/dtd/mybatis-3-mapper.dtd" > <mapper namespace ="com.itheima.dao.UserDao" > <select id ="findAll" resultType ="User" > SELECT *FROM t_user </select > </mapper >
Mapper.java(dao接口) 1 2 3 4 5 6 7 8 9 public interface UserDao { List<User> findAll () ; }
规范 Mapper接口开发需要遵循以下规范:
存储路径建议和对应的Dao接口保持一致
文件名建议和对应Dao接口的名字保持一致
配置文件的根标签的namespace属性必须和对应的Dao接口的全限定名保持一致
接口中的每一个方法,就对应映射配置文件中的一个标签:
查询方法,对应select标签
添加方法,对应insert标签
删除方法,对应delete标签
修改方法,对应update标签
映射配置文件中的标签的id属性,就必须和对应的方法的方法名保持一致
映射配置文件中的标签的parameterType属性,必须和对应的方法的参数类型(全限定名)保持一致
映射配置文件中的标签的resultType属性,必须和对应的方法的返回值类型(全限定名)保持一致,但是如果返回值是List则和其泛型保持一致
核心配置文件详解 掌握SqlMapConfig.xml配置文件
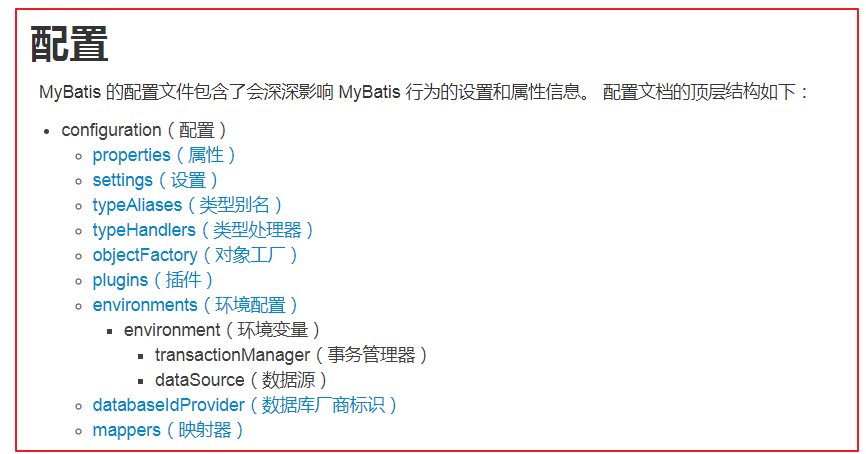
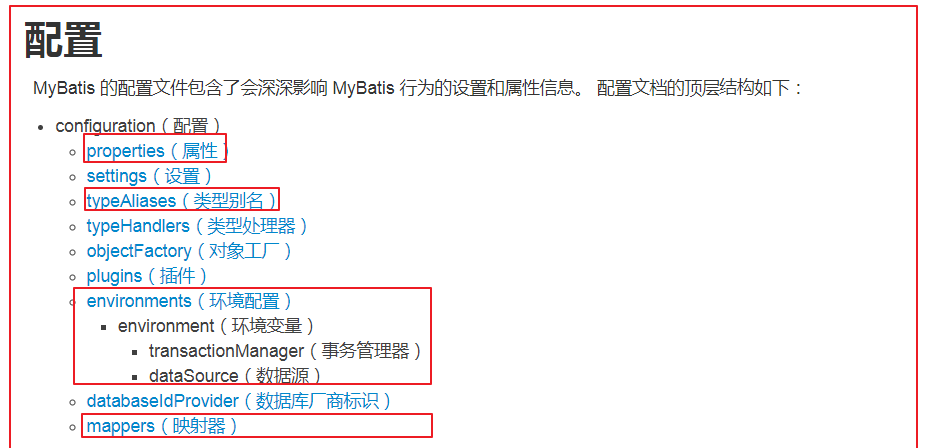
核心配置文件的顺序
properties(引入外部properties文件)
settings(全局配置参数)
typeAliases(类型别名)
typeHandlers(类型处理器)
objectFactory(对象工厂)
plugins(插件)
environments(环境集合属性对象)
environment(环境子属性对象)
transactionManager(事务管理)
dataSource(数据源)
mappers(映射器)
properties
1 2 3 4 jdbc.driver =com.mysql.jdbc.Driver jdbc.url =jdbc:mysql://localhost:3306/mybatis_day01?characterEncoding=utf-8 jdbc.user =root jdbc.password =123
1 2 3 4 5 6 7 8 9 10 11 12 13 14 15 16 17 <configuration > <properties resource ="jdbc.properties" > </properties > <environments default ="development" > <environment id ="development" > <transactionManager type ="JDBC" /> <dataSource type ="UNPOOLED" > <property name ="driver" value ="${jdbc.driver}" /> <property name ="url" value ="${jdbc.url}" /> <property name ="username" value ="${jdbc.user}" /> <property name ="password" value ="${jdbc.password}" /> </dataSource > </environment > </environments > .... </configuration >
typeAliases(类型别名) 定义单个别名
1 2 3 <typeAliases > <typeAlias type ="com.itheima.bean.User" alias ="user" > </typeAlias > </typeAliases >
1 2 3 <select id="findAll" resultType="user" > SELECT * FROM user </select>
批量定义别名 使用package定义的别名:就是pojo的类名,大小写都可以
1 2 3 <typeAliases > <package name ="com.itheima.bean" /> </typeAliases >
1 2 3 <select id="findAll" resultType="user" > SELECT * FROM user </select>
Mapper 方式一:引入映射文件路径 1 2 3 <mappers > <mapper resource ="com/itheima/dao/UserDao.xml" /> </mappers >
方式二:扫描接口
1 2 3 <mappers > <mapper class ="com.itheima.dao.UserDao" > </mapper > </mappers >
1 2 3 <mappers > <package name ="com.itheima.dao" > </package > </mappers >
小结
核心配置文件的顺序
properties 引入properties文件的
创建properties文件
使用 <properties resource="文件的路径"/>
使用 ${key}
typeAliases(类型别名) 在Dao映射文件里面 直接写类(pojo)的名字, 不需要写类全限定名了
1 2 3 <typeAliases> <package name="com.itheima.bean"/> </typeAliases>
Mapper 引入Dao映射文件的
1 2 3 <mappers> <package name="com.itheima.dao"></package> </mappers>
MyBatis进阶 日志的使用(只要会用就行) 我们在使用MyBatis的时候, 其实MyBatis框架会打印一些必要的日志信息, 在开发阶段这些日志信息对我们分析问题,理解代码的执行是特别有帮助的; 包括项目上线之后,我们也可以收集项目的错误日志到文件里面去; 所有我们采用专门的日志系统来处理.
1 2 3 4 5 6 7 8 9 10 11 12 13 14 15 16 17 18 19 <dependency > <groupId > log4j</groupId > <artifactId > log4j</artifactId > <version > 1.2.12</version > </dependency > <dependency > <groupId > org.slf4j</groupId > <artifactId > slf4j-api</artifactId > <version > 1.6.6</version > </dependency > <dependency > <groupId > org.slf4j</groupId > <artifactId > slf4j-log4j12</artifactId > <version > 1.6.6</version > </dependency >
拷贝log4j.properties到resources目录
1 2 3 4 5 6 7 8 9 10 log4j.rootLogger =DEBUG,stdout log4j.appender.stdout =org.apache.log4j.ConsoleAppender log4j.appender.stdout.layout =org.apache.log4j.PatternLayout log4j.appender.stdout.layout.ConversionPattern =[%-5p] %t %l %d %rms:%m%n log4j.appender.file =org.apache.log4j.FileAppender log4j.appender.file.File =D:\\idea_project\\itheima_mm_backend.log log4j.appender.file.layout =org.apache.log4j.PatternLayout log4j.appender.file.layout.ConversionPattern =%d{yyyy-MM-dd HH:mm:ss,SSS\} %-5p [%t] {%c}-%m%n
级别:error > warn > info>debug>trace
配置文件一般的配置
开发阶段: log4j.rootLogger= debug,std,file
上线之后: log4j.rootLogger= error ,file
案例-使用Mybatis完成CRUD 1.需求
2.分析
在Dao接口定义方法
在Dao映射文件配置
3.实现 3.1新增用户 3.1.1实现步骤
1 2 3 4 5 6 7 8 public interface UserDao { int addUser (User user) ; }
1 2 3 4 5 6 7 <insert id ="addUser" parameterType ="User" > insert into t_user (username,sex,birthday,address) values (#{username},#{sex},#{birthday},#{address}) </insert >
1 2 3 4 5 6 7 8 9 10 11 12 13 14 15 16 17 18 19 20 21 22 23 24 25 26 27 28 29 30 31 32 33 34 35 36 37 38 39 40 41 42 43 44 45 46 47 48 49 50 51 52 53 54 55 56 57 58 59 60 61 62 63 64 65 66 package com.itheima;import com.itheima.dao.UserDao;import com.itheima.pojo.User;import org.apache.ibatis.io.Resources;import org.apache.ibatis.session.SqlSession;import org.apache.ibatis.session.SqlSessionFactory;import org.apache.ibatis.session.SqlSessionFactoryBuilder;import org.junit.After;import org.junit.Before;import org.junit.Test;import java.io.IOException;import java.io.InputStream;import java.util.Date;import java.util.List;public class TestMybatis { private UserDao userDao; private SqlSession sqlSession; private InputStream is; @Before public void init () throws Exception { is = Resources.getResourceAsStream("SqlMapConfig.xml" ); SqlSessionFactoryBuilder factoryBuilder = new SqlSessionFactoryBuilder (); SqlSessionFactory sessionFactory = factoryBuilder.build(is); sqlSession = sessionFactory.openSession(); userDao = sqlSession.getMapper(UserDao.class); } @Test public void testAddUser () { User user = new User (null , "贾克斯" , "召唤师峡谷" , "女" , new Date ()); userDao.addUser(user); System.out.println(user.getUid()); } @After public void destroy () throws IOException { sqlSession.commit(); sqlSession.close(); is.close(); } }
3.1.2 新增用户 id 的返回值 新增用户后, 同时还要返回当前新增用户的 id 值,因为 id 是由数据库的自动增长来实现的,所以就相当于我们要在新增后将自动增长 auto_increment 的值返回。
属性 描述
keyProperty
selectKey 语句结果应该被设置的目标属性。
resultType
结果的类型。MyBatis 通常可以算出来,但是写上也没有问题。MyBatis 允许任何简单类型用作主键的类型,包括字符串。
order
这可以被设置为 BEFORE 或 AFTER。如果设置为 BEFORE,那么它会首先选择主键,设置 keyProperty 然后执行插入语句。如果设置为 AFTER,那么先执行插入语句,然后是 selectKey 元素-这和如 Oracle 数据库相似,可以在插入语句中嵌入序列调用。
UserDao.xml
1 2 3 4 5 6 7 8 9 10 11 12 13 14 15 16 17 18 19 <insert id ="addUser" parameterType ="User" > <selectKey resultType ="int" order ="AFTER" keyProperty ="uid" keyColumn ="uid" > select last_insert_id() </selectKey > insert into t_user (username,sex,birthday,address) values (#{username},#{sex},#{birthday},#{address}) </insert >
3.2根据id查询用户
1 User findById(Integer id);
1 2 3 <select id ="findById" parameterType ="int" resultType ="User" > select * from t_user where uid=#{id} </select >
3.3修改用户
1 2 3 4 5 6 7 public interface UserDao { void updateUser (User user) ; }
1 2 3 <update id ="updateUser" parameterType ="User" > update t_user set username=#{username},sex=#{sex},address=#{address} where uid=#{uid} </update >
1 2 3 4 5 6 7 8 @Test public void testUpdate () { User user = userDao.findById(6 ); user.setUsername("aobama" ); user.setAddress("召唤师峡谷" ); userDao.updateUser(user); }
3.3删除用户
1 2 3 4 5 6 7 8 9 public interface UserDao { int deleteById (int id) ; }
1 2 3 <delete id ="deleteById" parameterType ="int" > DELETE FROM t_user WHERE uid = #{id} </delete >
1 2 3 4 5 @Test public void testDeleteById () { userDao.deleteById(1 ); }
3.4模糊查询 3.4.1 方式一(工作中不会采用这种做法)
1 2 3 4 5 6 7 8 public interface UserDao { List<User> searchByUsername (String name) ; }
1 2 3 <select id ="searchByUsername" parameterType ="string" resultType ="User" > SELECT * FROM t_user WHERE username LIKE #{name} </select >
1 2 3 4 5 6 7 @Test public void testSearch () { List<User> userList = userDao.searchByUsername("%a%" ); for (User user : userList) { System.out.println(user); } }
3.4.2 方式二
1 2 3 4 5 6 7 8 public interface UserDao { List<User> searchByUsername (String username) ; }
在 UserMapper.xml 文件中加入新增配置
1 2 3 4 5 6 7 8 9 10 11 12 <select id ="searchByUsername" parameterType ="string" resultType ="User" > select * from t_user where username like '%${value}%' </select >
我们在上面将原来的#{}占位符,改成了${value}。注意如果用模糊查询的这种写法,那么${value}的写法就是固定的,不能写成其它名字。
1 2 3 4 5 6 7 @Test public void testSearch () { List<User> userList = userDao.searchByUsername("a" ); for (User user : userList) { System.out.println(user); } }
3.4.3 #{}与${}的区别【面试】
#{}一定不能写在引号里面,${}一定要写在引号里面
如果是pojo、map类型的参数,无论是#{}还是${}里面都是些属性名
如果是简单类型的参数,#{}里面可以写任意字符串,但是${}里面只能写value(以前的版本)
如果使用#{}引入参数的话,其实是先使用?占位符,然后再设置参数;而使用${}引入参数的话,是直接拼接SQL语句
3.5.SqlSessionFactory工具类的抽取 步骤:
创建SqlSessionFactoryUtils
定义一个getSqlSession()方法获得sqlSession
定义释放资源方法
保证SqlSessionFactory只有一个(静态代码块)
实现
1 2 3 4 5 6 7 8 9 10 11 12 13 14 15 16 17 18 19 20 21 22 23 24 25 26 27 28 29 30 31 32 33 34 35 36 37 38 39 40 41 42 43 44 45 46 47 48 49 50 51 52 53 54 55 56 57 58 59 60 package com.itheima.utils;import org.apache.ibatis.io.Resources;import org.apache.ibatis.session.SqlSession;import org.apache.ibatis.session.SqlSessionFactory;import org.apache.ibatis.session.SqlSessionFactoryBuilder;import java.io.IOException;import java.io.InputStream;public class SqlSessionFactoryUtil { private static SqlSessionFactory sqlSessionFactory; static { try { InputStream is = Resources.getResourceAsStream("SqlMapConfig.xml" ); SqlSessionFactoryBuilder factoryBuilder = new SqlSessionFactoryBuilder (); sqlSessionFactory = factoryBuilder.build(is); is.close(); } catch (IOException e) { e.printStackTrace(); } } public static SqlSession openSqlSession () { return sqlSessionFactory.openSession(); } public static void commitAndClose (SqlSession sqlSession) { sqlSession.commit(); sqlSession.close(); } public static void rollbackAndClose (SqlSession sqlSession) { sqlSession.rollback(); sqlSession.close(); } }
4.小结 4.1增删改查
1 2 3 <insert id ="" parameterType ="" resultType ="" keyProperty ="" useGeneratedKeys ="true" > sql语句 </insert >
1 2 3 <update id ="" parameterType ="" resultType ="" > sql语句 </update >
1 2 3 <delete id ="" parameterType ="" resultType ="" > sql语句 </delete >
1 2 3 <select id ="" parameterType ="" resultType ="" > sql语句 </select >
知识点-parameterType深入 1.目标
2.路径
传递简单类型
传递 pojo 对象、或者是Map类型
传递 pojo 包装对象类型
3.讲解 3.1 传递简单类型 单个参数,方法就以简单类型传入即可,那么在映射配置文件中的parameterType的值就是这个简单类型的别名;在SQL语句中引入简单类型的参数#{任意字符串}
1 2 3 <select id ="findById" parameterType ="int" resultType ="User" > select * from t_user where uid=#{id} </select >
3.2 传递 pojo 对象 或者 Map
将多个参数封装到一个POJO中,那么在映射配置文件中parameterType的值就是这个POJO的全限定名或者别名; 在SQL语句中引入参数#{POJO的属性名}或者’${POJO的属性名}’
将多个参数封装到一个Map中(要封装的参数没有对应的POJO),那么在映射配置文件中parameterType的值是map; 在SQL语句中引入参数#{map的key}或者’${map的key}’
1 2 3 void addUser (User user) ;void updateUser (Map map) ;
1 2 3 4 5 6 7 <insert id ="addUser" parameterType ="User" > insert into t_user(username,sex,birthday,address) values (#{username},#{sex},#{birthday},#{address}) </insert > <update id ="updateUser" parameterType ="map" > update t_user set username=#{username},sex=#{sex} where uid=#{uid} </update >
3.3 传递多个参数 使用Param注解指定参数名称
1 User findByUsernameAndAddress (@Param("uname") String username, @Param("addr") String address) ;
1 2 3 <select id ="findByUsernameAndAddress" resultType ="User" > select * from t_user where username=#{uname} and address=#{addr} </select >
3.4传递 pojo 包装对象类型 开发中通过 pojo 传递查询条件 ,查询条件是综合的查询条件,不仅包括用户查询条件还包括其它的查询条件(比如将用户购买商品信息也作为查询条件),这时可以使用包装对象传递输入参数。Pojo 类中包含 pojo。
京东查询的例子:
需求:根据用户id查询用户信息并进行分页,查询条件放到 QueryVo 的 user 属性中。
1 2 3 4 5 6 7 8 9 10 11 12 13 14 15 16 17 18 19 20 21 22 23 24 25 26 27 28 29 30 31 32 33 34 35 36 37 package com.itheima.pojo;import lombok.AllArgsConstructor;import lombok.Data;import lombok.NoArgsConstructor;@Data @AllArgsConstructor @NoArgsConstructor public class QueryVo { public QueryVo (Long currentPage, Integer pageSize, User queryCondition) { this .currentPage = currentPage; this .pageSize = pageSize; this .queryCondition = queryCondition; } private Long currentPage; private Integer pageSize; private User queryCondition; private Long offset; public Long getOffset () { return (currentPage - 1 )*pageSize; } }
1 2 3 public interface UserDao { List<User> searchByCondition (QueryVo queryVo) ; }
1 2 3 4 <select id ="searchByCondition" parameterType ="QueryVo" resultType ="User" > select * from t_user where sex=#{queryCondition.sex} and address=#{queryCondition.address} limit #{offset},#{pageSize} </select >
1 2 3 4 5 6 7 8 9 10 11 12 13 14 15 16 17 18 @Test public void test03 () { SqlSession sqlSession = SqlSessionFactoryUtil.openSqlSession(); UserDao mapper = sqlSession.getMapper(UserDao.class); User user = new User (); user.setSex("男" ); user.setAddress("北京" ); QueryVo queryVo = new QueryVo (1l ,5 ,user); List<User> userList = mapper.searchByCondition(queryVo); for (User user1 : userList) { System.out.println(user1); } SqlSessionFactoryUtil.commitAndClose(sqlSession); }
4.小结
如果我们执行的SQL语句需要一个参数,那么我们可以使用简单类型的参数
如果我们执行的SQL语句需要多个参数
如果我们执行的SQL语句需要的数据很复杂,pojo里面的属性还是pojo类型,那么我们就使用pojo的包装类型
知识点 - resultType深入 1.目标
2.路径
输出简单类型
输出pojo对象
输出pojo列表
resultMap结果类型
3.讲解 3.1输出简单类型 查询的结果是单个数据, 映射配置文件中的resultType属性的值就是这个数据的类型
1 2 3 <select id ="findTotal" resultType ="long" > select count(*) from t_user </select >
3.2输出pojo对象(一个pojo对象就对应一行数据)或者一个Map 查询的结果是一行数据:
将这一行数据存储到POJO对象中, 映射配置文件的resultType的值就是POJO的全限定名或者别名,此时就要求查询结果的字段名和类型 要和POJO的属性名和类型一致
将这一行数据存储到Map对象,映射配置文件的resultType的值就是map,那么此时查询结果中的字段名就是 map的key,字段值就是map的value
1 2 3 4 5 6 7 8 9 10 11 12 13 User findById (int id) ; Map findByUsername (String username) ;
1 2 3 4 5 6 7 <select id ="findById" parameterType ="int" resultType ="User" > select * from t_user where uid=#{id} </select > <select id ="findByUsername" parameterType ="string" resultType ="map" > select * from t_user where username=#{username} </select >
3.3输出pojo列表(一个pojo列表就对应多行数据)或者Map的列表 查询的结果是多行数据:
3.4 resultMap结果类型 resultType可以指定pojo将查询结果映射为pojo,但需要pojo的属性名和sql查询的列名一致方可映射成功。
如果sql查询字段名和pojo的属性名不一致,可以通过resultMap将字段名和属性名作一个对应关系 ,resultMap实质上还需要将查询结果映射到pojo对象中。
resultMap可以实现将查询结果映射为复杂类型的pojo,比如在查询结果映射对象中包括pojo和list实现一对一查询和一对多查询。(下次课讲)
那我们今天就来看返回的列名与实体类的属性不一致时的情况. 下次课再接着研究复杂的封装(多表查询) , 将查询到的t_user表的信息封装到UserInfo对象中
1 2 3 4 5 6 7 8 9 10 11 12 13 14 15 16 17 18 19 20 21 22 23 24 25 package com.itheima.pojo;import lombok.AllArgsConstructor;import lombok.Data;import lombok.NoArgsConstructor;import java.io.Serializable;@Data @AllArgsConstructor @NoArgsConstructor public class UserInfo implements Serializable { private Integer userId; private String username; private String userSex; private String userBirthday; private String userAddress; }
1 2 3 4 5 6 7 public interface UserDao { List<UserInfo> findAllUserInfo () ; }
1 2 3 4 5 6 7 8 9 10 11 12 13 14 15 16 17 18 19 20 21 22 23 24 25 26 27 28 29 <resultMap id ="userInfoMap" type ="UserInfo" autoMapping ="true" > <id column ="uid" property ="userId" > </id > <result column ="sex" property ="userSex" > </result > <result column ="birthday" property ="userBirthday" > </result > <result column ="address" property ="userAddress" > </result > </resultMap > <select id ="findAllUserInfo" resultMap ="userInfoMap" > select * from t_user </select >
4.小结
输出简单类型 直接写 java类型名 eg: int
输出pojo对象 直接写 pojo类型名 eg: User
输出pojo列表类型 写 列表里面的泛型的类型 eg: List 写User
ResultMap
解决查询出来的结果的列名和javaBean属性不一致的请求
复杂的pojo复杂(明天讲)
Mybatis 连接池与事务(了解) Mybatis 的连接池技术【了解】 我们在前面的 WEB 课程中也学习过类似的连接池技术,而在 Mybatis 中也有连接池技术,但是它采用的是自己的连接池技术 。
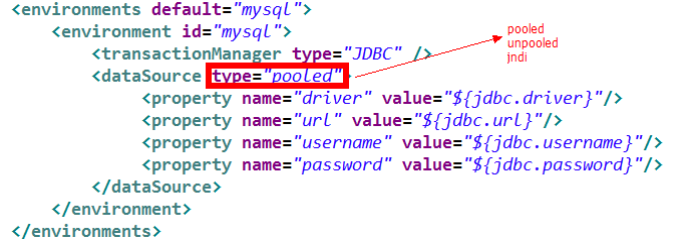
在 Mybatis 的 SqlMapConfig.xml 配置文件中, 通过 <dataSource type=”pooled”>来实现 Mybatis 中连接池的配置.
Mybatis 连接池的分类
可以看出 Mybatis 将它自己的数据源分为三类:
UNPOOLED 不使用连接池的数据源
POOLED 使用连接池的数据源
JNDI 使用 JNDI 实现的数据源,不要的服务器获得的DataSource是不一样的. 注意: 只有是web项目或者Maven的war工程, 才能使用. 我们用的是tomcat, 用的连接池是dbcp.
在这三种数据源中,我们目前阶段一般采用的是 POOLED 数据源(很多时候我们所说的数据源就是为了更好的管理数据库连接,也就是我们所说的连接池技术),等后续学了Spring之后,会整合一些第三方连接池。
Mybatis 中数据源的配置
我们的数据源配置就是在 SqlMapConfig.xml 文件中, 具体配置如下:
MyBatis 在初始化时,解析此文件,根据的 type 属性来创建相应类型的的数据源DataSource,即:
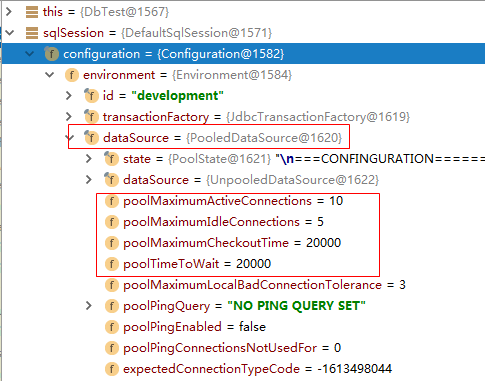
type=”POOLED”: MyBatis 会创建 PooledDataSource 实例, 使用连接池
Mybatis 中 DataSource 配置分析
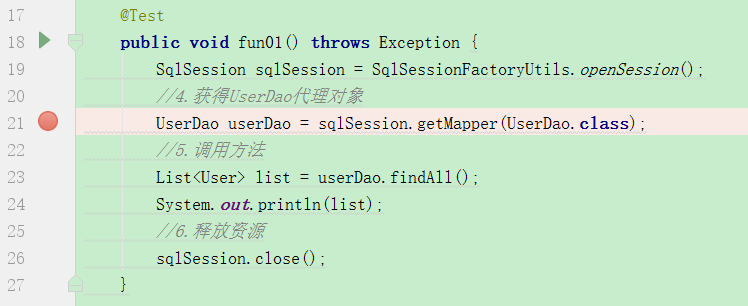
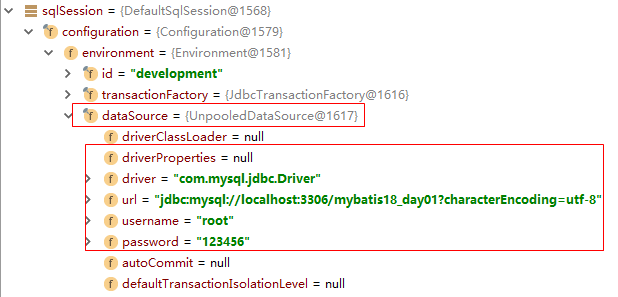
代码,在21行加一个断点, 当代码执行到21行时候,我们根据不同的配置(POOLED和UNPOOLED)来分析DataSource
当配置文件配置的是type=”POOLED”, 可以看到数据源连接信息
当配置文件配置的是type=”UNPOOLED”, 没有使用连接池
小结
配置
type=”POOLED” 使用连接池(MyBatis内置的)
后面做项目, 工作里面的连接池, 我们都是使用的第三方的(C3P0,Druid,光连接池), 都有让Spring管理.此章节只做了解
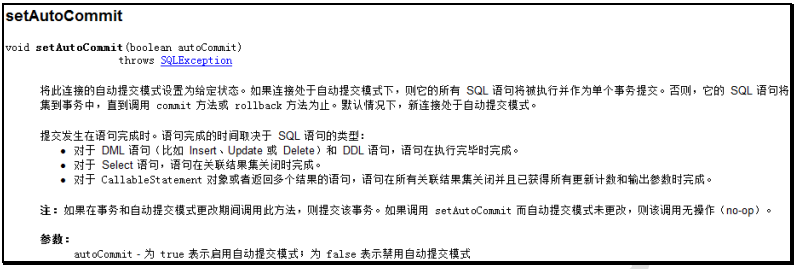
Mybatis 的事务控制 【了解】 JDBC 中事务的回顾 在 JDBC 中我们可以通过手动方式将事务的提交改为手动方式,通过 setAutoCommit()方法就可以调整。通过 JDK 文档,我们找到该方法如下:
那么我们的 Mybatis 框架因为是对 JDBC 的封装,所以 Mybatis 框架的事务控制方式,本身也是用 JDBC的 setAutoCommit()方法来设置事务提交方式的。
Mybatis 中事务提交方式
Mybatis 中事务的提交方式,本质上就是调用 JDBC 的 setAutoCommit()来实现事务控制。我们运行之前所写的代码:
Mybatis 自动提交事务的设置 通过上面的研究和分析,现在我们一起思考,为什么 CUD 过程中必须使用 sqlSession.commit()提交事务?主要原因就是在连接池中取出的连接,都会将调用 connection.setAutoCommit(false)方法,这样我们就必须使用 sqlSession.commit()方法,相当于使用了 JDBC 中的 connection.commit()方法实现事务提交。明白这一点后,我们现在一起尝试不进行手动提交,一样实现 CUD 操作。
我们发现,此时事务就设置为自动提交了,同样可以实现 CUD 操作时记录的保存。虽然这也是一种方式,但就编程而言,设置为自动提交方式为 false 再根据情况决定是否进行提交,这种方式更常用。因为我们可以根据业务情况来决定提交是否进行提交。
小结
MyBatis的事务使用的是JDBC事务策略.
通过设置autoCommit()去控制的
默认情况下, MyBatis使用的时候 就把autoCommit(false)
也就是意味着, 我们要进行增删改的时候, 需要手动的commit
后面做项目, 工作里面的事务管理, 基本上都是交给Spring管理. 所以此章节只做了解
Mybatis 映射文件的 SQL 深入【重点】 Mybatis 的映射文件中,前面我们的 SQL 都是比较简单的,有些时候业务逻辑复杂时,我们的 SQL是动态变化的,此时在前面的学习中我们的 SQL 就不能满足要求了。
动态 SQL 之 if标签 我们根据实体类的不同取值,使用不同的 SQL 语句来进行查询。
比如在 id 如果不为空时可以根据 id查询,如果 username 不为空时还要加入用户名作为条件。这种情况在我们的多条件组合查询中经常会碰到
1 2 3 4 5 6 7 8 9 10 11 12 13 14 15 public interface UserDao { List<User> findUserListByAddress (@Param("address") String address) ; List<User> findUserListByAddressAndSex (User user) ; }
1 2 3 4 5 6 7 8 9 10 11 12 13 14 15 16 17 18 19 20 21 22 23 24 25 26 27 <?xml version="1.0" encoding="UTF-8" ?> <!DOCTYPE mapper PUBLIC "-//mybatis.org//DTD Mapper 3.0//EN" "http://mybatis.org/dtd/mybatis-3-mapper.dtd" > <mapper namespace ="com.itheima.dao.UserDao" > <select id ="findUserListByAddress" parameterType ="string" resultType ="User" > select * from t_user <if test ="address != null" > where address=#{address} </if > </select > <select id ="findUserListByAddressAndSex" parameterType ="User" resultType ="User" > select * from t_user where 1=1 <if test ="address != null" > and address=#{address} </if > <if test ="sex != null" > and sex=#{sex} </if > </select > </mapper >
1 2 3 4 5 6 7 8 9 10 11 12 13 14 15 16 17 18 19 20 21 22 23 24 25 26 @Test public void test01 () { SqlSession sqlSession = SqlSessionFactoryUtil.openSqlSession(); UserDao mapper = sqlSession.getMapper(UserDao.class); List<User> userList = mapper.findUserListByAddress(null ); for (User user : userList) { System.out.println(user); } SqlSessionFactoryUtil.commitAndClose(sqlSession); } @Test public void test02 () { SqlSession sqlSession = SqlSessionFactoryUtil.openSqlSession(); UserDao mapper = sqlSession.getMapper(UserDao.class); User user = new User (); user.setAddress("北京" ); user.setSex("男" ); mapper.findUserListByAddressAndSex(user); SqlSessionFactoryUtil.commitAndClose(sqlSession); }
动态 SQL 之where标签 为了简化上面 where 1=1 的条件拼装,我们可以采用标签来简化开发。
修改 UserDao.xml 映射文件如下:
注意: <where/>可以自动处理第一个 and
1 2 3 4 5 6 7 8 9 10 11 12 13 14 15 16 17 18 <select id ="findUserListByAddressAndSex" parameterType ="User" resultType ="User" > <include refid ="select_all" /> <where > <if test ="address != null" > and address=#{address} </if > <if test ="sex != null" > and sex=#{sex} </if > </where > </select >
where标签用在自己写sql语句的时候 where关键字不好处理的情况,代替where ‘1’ = ‘1’
<where />可以自动处理第一个 and , 建议全部加上and
动态标签之foreach标签 需求:批量删除: 根据id的集合删除所有元素
LinkManDao代码 1 2 3 4 5 void deleteByIds (List<Integer> ids) ;
LinkManDao映射配置文件 1 2 3 4 5 6 7 8 9 10 11 12 13 14 15 16 17 18 <delete id ="deleteByIds" parameterType ="int" > delete from t_user <foreach collection ="list" item ="id" separator ="," open ="where uid in(" close =")" > #{id} </foreach > </delete >
测试代码 1 2 3 4 5 6 7 8 9 10 11 12 13 14 15 @Test public void test03 () { SqlSession sqlSession = SqlSessionFactoryUtil.openSqlSession(); UserDao mapper = sqlSession.getMapper(UserDao.class); List<Integer> ids = new ArrayList <>(); ids.add(1 ); ids.add(2 ); ids.add(3 ); ids.add(4 ); mapper.deleteByIds(ids); SqlSessionFactoryUtil.commitAndClose(sqlSession); }
动态标签之Sql片段 Sql 中可将重复的 sql 提取出来,使用时用 include 引用即可,最终达到 sql 重用的目的。我们先到 UserDao.xml 文件中使用标签,定义出公共部分.
1 2 3 4 5 6 7 8 <sql id ="select_all" > select uid,username,sex,address,birthday from t_user </sql >
1 2 3 4 5 6 7 8 9 10 11 12 13 14 15 16 17 18 19 20 21 22 23 24 25 26 27 28 <select id ="findUserListByAddress" parameterType ="string" resultType ="User" > <include refid ="select_all" /> <if test ="address != null" > where address=#{address} </if > </select > <select id ="findUserListByAddressAndSex" parameterType ="User" resultType ="User" > <include refid ="select_all" /> <where > <if test ="address != null" > and address=#{address} </if > <if test ="sex != null" > and sex=#{sex} </if > </where > </select >
sql标签可以把公共的sql语句进行抽取, 再使用include标签引入. 好处:好维护, 提示效率
MyBatis缓存(了解) 缓存概述 掌握MyBatis缓存类别
缓存概述 缓存就是一块内存空间.保存临时数据
为什么使用缓存 将数据源(数据库或者文件)中的数据读取出来存放到缓存中,再次获取的时候 ,直接从缓存中获取,可以减少和数据库交互的次数,这样可以提升程序的性能!
缓存的适用情况
适用于缓存的:经常查询但不经常修改的(eg: 省市,类别数据),数据的正确与否对最终结果影响不大的
不适用缓存的:经常改变的数据 , 敏感数据(例如:股市的牌价,银行的汇率,银行卡里面的钱)等等,
MyBatis缓存类别 一级缓存:它是sqlSession对象的缓存,自带的(不需要配置)不可关闭的(不想使用还不行). 一级缓存的生命周期与sqlSession一致。
二级缓存:它是SqlSessionFactory的缓存。只要是同一个SqlSessionFactory创建的SqlSession就共享二级缓存的内容,并且可以操作二级缓存。二级缓存如果要使用的话,需要我们自己手动开启(需要配置的)。
小结
缓存: 内存空间, 保存临时数据
为什么要使用缓存? 提高性能
适合使用缓存? 经常查询的, 不经常改变
MyBatis的缓存类别
一级缓存 证明一级缓存的存在 1 2 3 4 5 6 7 8 9 10 11 12 13 14 15 16 17 18 19 20 21 22 23 24 25 26 27 28 29 30 31 32 33 34 35 36 37 38 39 40 41 42 43 44 45 46 47 48 49 50 51 52 53 54 55 56 57 58 59 60 61 62 63 64 65 66 67 68 69 70 71 72 package com.itheima.test;import com.itheima.dao.UserDao;import com.itheima.pojo.User;import org.apache.ibatis.io.Resources;import org.apache.ibatis.session.SqlSession;import org.apache.ibatis.session.SqlSessionFactory;import org.apache.ibatis.session.SqlSessionFactoryBuilder;import org.junit.After;import org.junit.Before;import org.junit.Test;import java.io.IOException;import java.io.InputStream;import java.util.Date;import java.util.List;public class TestMybatis { private UserDao userDao; private InputStream is; private SqlSession sqlSession; @Before public void init () throws IOException { SqlSessionFactoryBuilder sqlSessionFactoryBuilder = new SqlSessionFactoryBuilder (); is = Resources.getResourceAsStream("SqlMapConfig.xml" ); SqlSessionFactory sessionFactory = sqlSessionFactoryBuilder.build(is); sqlSession = sessionFactory.openSession(); userDao = sqlSession.getMapper(UserDao.class); } @Test public void testFirstLevelCache () { List<User> userList = userDao.findAll(); for (User user : userList) { System.out.println(user); } System.out.println("---------------------------------------------------" ); UserDao userDao2 = sqlSession.getMapper(UserDao.class); List<User> userList2 = userDao2.findAll(); for (User user : userList2) { System.out.println(user); } } @After public void destroy () throws IOException { sqlSession.close(); is.close(); } }
一级缓存分析
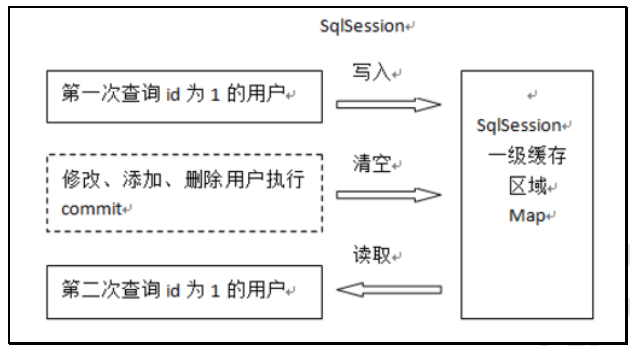
第一次发起查询用户 id 为 1 的用户信息,先去找缓存中是否有 id 为 1 的用户信息,如果没有,从数据库查询用户信息。得到用户信息,将用户信息存储到一级缓存中。第二次发起查询用户 id 为 1 的用户信息,先去找缓存中是否有 id 为 1 的用户信息,缓存中有,直接从缓存中获取用户信息。
如果 sqlSession 去执行 commit操作(执行插入、更新、删除),清空 SqlSession 中的一级缓存,这样做的目的为了让缓存中存储的是最新的信息,避免脏读。
测试一级缓存清空
调用sqlSession的commit()或者clearCache()或者close()都能清除一级缓存
更新数据也会清空一级缓存
1 2 3 4 5 6 7 8 9 10 11 12 13 14 15 16 17 18 19 20 21 22 23 24 25 26 27 28 29 30 31 32 33 34 35 36 37 38 package com.itheima.test;import com.itheima.dao.UserDao;import com.itheima.pojo.User;import org.apache.ibatis.io.Resources;import org.apache.ibatis.session.SqlSession;import org.apache.ibatis.session.SqlSessionFactory;import org.apache.ibatis.session.SqlSessionFactoryBuilder;import org.junit.After;import org.junit.Before;import org.junit.Test;import java.io.IOException;import java.io.InputStream;import java.util.Date;import java.util.List;public class TestMybatis { @Test public void test01 () { SqlSession sqlSession = SqlSessionFactoryUtil.openSqlSession(); UserDao userDao = sqlSession.getMapper(UserDao.class); System.out.println(userDao.findAll()); userDao.deleteById(26 ); System.out.println("--------------------------------------" ); System.out.println(userDao.findAll()); sqlSession.commit(); } }
小结
一级缓存: 依赖sqlSession对象的, 自带的不可卸载的. 一级缓存的生命周期和sqlSession一致
一级缓存清空
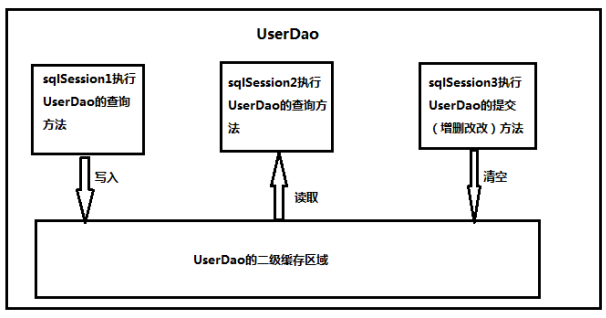
二级缓存 二级缓存是SqlSessionFactory的缓存。只要是同一个SqlSessionFactory创建的SqlSession就共享二级缓存的内容,并且可以操作二级缓存.
二级缓存的结构
二级缓存的使用
因为 cacheEnabled 的取值默认就为 true ,所以这一步可以省略不配置。为 true 代表开启二级缓存;为 false 代表不开启二级缓存。
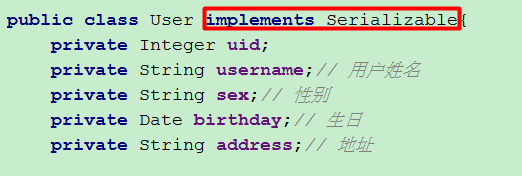
要进行二级缓存的POJO类必须实现Serializable接口
测试 1 2 3 4 5 6 7 8 9 10 11 12 13 14 15 16 17 18 19 20 21 22 23 24 25 26 27 28 29 30 31 32 33 34 35 36 37 38 39 40 41 42 43 44 45 46 47 48 package com.itheima.test;import com.itheima.dao.UserDao;import com.itheima.pojo.User;import org.apache.ibatis.io.Resources;import org.apache.ibatis.session.SqlSession;import org.apache.ibatis.session.SqlSessionFactory;import org.apache.ibatis.session.SqlSessionFactoryBuilder;import org.junit.After;import org.junit.Before;import org.junit.Test;import java.io.IOException;import java.io.InputStream;import java.util.Date;import java.util.List;public class TestMybatis { @Test public void test02 () { SqlSession sqlSession1 = SqlSessionFactoryUtil.openSqlSession(); SqlSession sqlSession2 = SqlSessionFactoryUtil.openSqlSession(); SqlSession sqlSession3 = SqlSessionFactoryUtil.openSqlSession(); UserDao userDao1 = sqlSession1.getMapper(UserDao.class); UserDao userDao2 = sqlSession2.getMapper(UserDao.class); UserDao userDao3 = sqlSession3.getMapper(UserDao.class); System.out.println(userDao1.findAll()); sqlSession1.close(); System.out.println("------------------------------------------------------------------------------" ); System.out.println(userDao2.findAll()); sqlSession2.close(); userDao3.deleteById(24 ); System.out.println("------------------------------------------------------------------------------" ); System.out.println(userDao3.findAll()); sqlSession3.close(); } }
经过上面的测试,我们发现执行了两次查询,并且在执行第一次查询后,我们关闭了一级缓存,再去执行第二次查询时,我们发现并没有对数据库发出 sql 语句,所以此时的数据就只能是来自于我们所说的二级缓存。
小结 注意事项
当我们在使用二级缓存时,缓存的类一定要实现 java.io.Serializable 接口,这种就可以使用序列化 方式来保存对象。
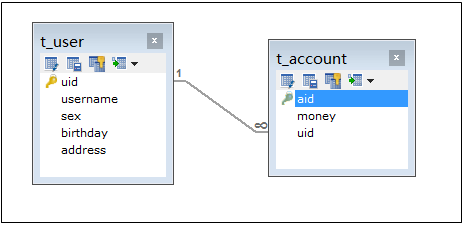
Mybatis 的多表关联查询【重点】 一(多)对一 需求 本次案例以简单的用户和账户的模型来分析 Mybatis 多表关系。用户为 User 表,账户为Account 表。一个用户(User)可以有多个账户(Account),但是一个账户(Account)只能属于一个用户(User)。具体关系如下:
查询所有账户信息, 关联查询账户的用户名和地址 。
因为一个账户信息只能供某个用户使用,所以从查询账户信息出发关联查询用户信息为一对一查询。
1 2 3 4 5 6 7 8 9 10 11 12 CREATE TABLE t_account ( aid INT PRIMARY KEY auto_increment, money DOUBLE, uid INT ) ;ALTER TABLE t_account ADD FOREIGN KEY (uid) REFERENCES t_user (uid) ; INSERT INTO `t_account` VALUES (null , '1000' , '1' ); INSERT INTO `t_account` VALUES (null , '2000' , '1' ); INSERT INTO `t_account` VALUES (null , '1000' , '2' ); INSERT INTO `t_account` VALUES (null , '2000' , '2' ); INSERT INTO `t_account` VALUES (null , '800' , '3' );
分析
1 select * from t_account a,t_user u where a.uid=u.uid AND aid=#{aid}
实现
1 2 3 4 5 6 7 8 9 10 11 12 @Data @AllArgsConstructor @NoArgsConstructor public class Account implements Serializable { private Integer aid; private Double money; private Integer uid; private User user; }
1 2 3 4 5 6 7 8 9 10 11 12 13 14 15 16 17 18 package com.itheima.dao;import com.itheima.pojo.Account;public interface AccountDao { Account findAccountUserByAid (int aid) ; }
1 2 3 4 5 6 7 8 9 10 11 12 13 14 15 16 17 18 19 20 21 22 23 24 25 26 <?xml version="1.0" encoding="UTF-8" ?> <!DOCTYPE mapper PUBLIC "-//mybatis.org//DTD Mapper 3.0//EN" "http://mybatis.org/dtd/mybatis-3-mapper.dtd" > <mapper namespace ="com.itheima.dao.AccountDao" > <resultMap id ="accountUserMap" type ="Account" autoMapping ="true" > <association property ="user" autoMapping ="true" javaType ="User" > </association > </resultMap > <select id ="findAccountUserByAid" parameterType ="int" resultMap ="accountUserMap" > select * from t_account a,t_user u where a.uid=u.uid AND a.aid=#{aid} </select > </mapper >
一对多 需求 查询所有用户信息及用户关联的账户信息。
分析 分析: 用户信息和他的账户信息为一对多关系,并且查询过程中如果用户没有账户信息,此时也要将用户信息查询出来,我们想到了左外连接查询比较合适。
1 select * from t_user u,t_account a where a.uid= u.uid AND u.uid= #{uid}
实现
1 2 3 4 5 public class Account { private Integer aid; private Integer uid; private Double money; }
1 2 3 4 5 6 7 8 9 10 public class User implements Serializable { private int uid; private String username; private String sex; private Date birthday; private String address; private List<Account> accountList; }
1 2 3 4 5 6 7 8 9 10 11 12 13 14 15 16 17 18 package com.itheima.dao;import com.itheima.pojo.User;public interface UserDao { User findUserAccountListByUid (int uid) ; }
1 2 3 4 5 6 7 8 9 10 11 12 13 14 15 16 17 18 19 20 21 22 23 24 25 26 27 28 29 30 31 <?xml version="1.0" encoding="UTF-8" ?> <!DOCTYPE mapper PUBLIC "-//mybatis.org//DTD Mapper 3.0//EN" "http://mybatis.org/dtd/mybatis-3-mapper.dtd" > <mapper namespace ="com.itheima.dao.UserDao" > <resultMap id ="userAccountListMap" type ="User" > <id column ="uid" property ="uid" /> <result column ="username" property ="username" /> <result column ="address" property ="address" /> <result column ="sex" property ="sex" /> <result column ="birthday" property ="birthday" /> <collection property ="accountList" autoMapping ="true" ofType ="Account" > </collection > </resultMap > <select id ="findUserAccountListByUid" resultMap ="userAccountListMap" parameterType ="int" > SELECT * FROM t_user u,t_account a WHERE a.uid=u.uid AND u.uid=#{uid} </select > </mapper >
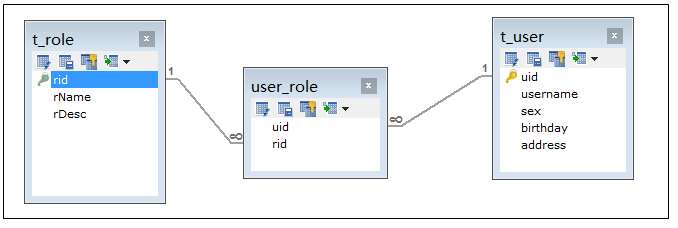
多对多(可以看成俩一对多) 需求 通过前面的学习,我们使用 Mybatis 实现一对多关系的维护。多对多关系其实我们看成是双向的一对多关系。用户与角色的关系模型就是典型的多对多关系.
需求:实现查询所有角色对象并且加载它所分配的用户信息。
1 2 3 4 5 6 7 8 9 10 11 12 13 14 15 16 17 18 19 20 21 22 23 24 25 26 CREATE TABLE t_role( rid INT PRIMARY KEY AUTO_INCREMENT, rName varchar (40 ), rDesc varchar (40 ) ); INSERT INTO `t_role` VALUES (null , '校长' , '负责学校管理工作' );INSERT INTO `t_role` VALUES (null , '副校长' , '协助校长负责学校管理' );INSERT INTO `t_role` VALUES (null , '班主任' , '负责班级管理工作' );INSERT INTO `t_role` VALUES (null , '教务处主任' , '负责教学管理' );INSERT INTO `t_role` VALUES (null , '班主任组长' , '负责班主任小组管理' );CREATE TABLE user_role( uid INT , rid INT ); ALTER TABLE user_role ADD FOREIGN KEY(uid) REFERENCES t_user(uid);ALTER TABLE user_role ADD FOREIGN KEY(rid) REFERENCES t_role(rid);INSERT INTO `user_role` VALUES ('1' , '1' );INSERT INTO `user_role` VALUES ('3' , '3' );INSERT INTO `user_role` VALUES ('2' , '3' );INSERT INTO `user_role` VALUES ('2' , '5' );INSERT INTO `user_role` VALUES ('3' , '4' );
分析 查询角色我们需要用到 Role 表,但角色分配的用户的信息我们并不能直接找到用户信息,而是要通过中间表(USER_ROLE 表)才能关联到用户信息。
1 select * from t_user u,t_role r,user_role ur where ur.uid= u.uid and ur.rid= r.rid AND u.uid= #{uid}
实现
1 2 3 4 5 6 7 8 9 10 11 12 13 14 15 16 17 18 19 20 21 22 23 24 25 26 27 28 29 30 31 package com.itheima.pojo;import lombok.AllArgsConstructor;import lombok.Data;import lombok.NoArgsConstructor;import java.io.Serializable;import java.util.Date;import java.util.List;@Data @AllArgsConstructor @NoArgsConstructor public class User implements Serializable { private Integer uid; private String username; private String sex; private Date birthday; private String address; private List<Role> roleList; }
1 2 3 4 5 public class Role { private Integer rid; private String rName; private String rDesc; }
1 2 3 4 5 6 7 8 9 10 11 12 13 package com.itheima.dao;import com.itheima.pojo.User;public interface UserDao { User findUserRoleListByUid (int uid) ; }
1 2 3 4 5 6 7 8 9 10 11 12 13 14 15 16 17 18 19 20 21 22 23 24 25 26 27 <?xml version="1.0" encoding="UTF-8" ?> <!DOCTYPE mapper PUBLIC "-//mybatis.org//DTD Mapper 3.0//EN" "http://mybatis.org/dtd/mybatis-3-mapper.dtd" > <mapper namespace ="com.itheima.dao.UserDao" > <resultMap id ="userRoleListMap" type ="User" > <id column ="uid" property ="uid" /> <result column ="username" property ="username" /> <result column ="address" property ="address" /> <result column ="sex" property ="sex" /> <result column ="birthday" property ="birthday" /> <collection property ="roleList" autoMapping ="true" ofType ="Role" > </collection > </resultMap > <select id ="findUserRoleListByUid" parameterType ="int" resultMap ="userRoleListMap" > SELECT * FROM t_user u,t_role r,user_role ur WHERE ur.uid=u.uid AND ur.rid=r.rid AND u.uid=#{uid} </select > </mapper >
小结
以哪张表作为主体查询,那么就将查询到的结果封装到哪张表对应的POJO对象中
如果表的关系是一对一,那么就在一个POJO中添加另外一个POJO的对象属性
如果表的关系是一对多,那么就在一个POJO中添加另外一个POJO的集合属性
使用association标签可以进行一对一的映射
使用collection标签可以进行一对多的映射
Mybatis 延迟加载策略(重点) Mybatis 延迟加载策略 通过前面的学习,我们已经掌握了 Mybatis 中一对一,一对多,多对多关系的配置及实现,可以实现对象的关联查询。实际开发过程中很多时候我们并不需要总是在加载一方信息时就一定要加载另外一方的信息。 此时就是我们所说的延迟加载。
等用到另外一方(和当前关联的那一份)的数据的时候, 再去查询;
如果用不到, 不查询.
什么是延迟加载 延迟加载:就是在需要用到数据时才进行加载,不需要用到数据时就不加载数据。延迟加载也称懒加载.
坏处: 执行查询的次数会增加,所以在执行批量查询的时候,查询次数比使用连接查询要多特别多
好处: 先从单表查询,需要时再从关联表去关联查询,大大提高数据库性能,因为查询单表要比关联查询多张表速度要快.
懒加载的配置
使用 Assocation 实现延迟加载 (多对一,一对一) 需求 查询账户(Account)信息并且关联查询用户(User)信息。
先查询账户(Account)信息,当我们需要用到用户(User)信息时再查询用户(User)信息。
1 2 3 4 5 -- 1. 查询账户 select * from t_account where aid=#{aid} -- 2, 再查询用户 -- 再根据查询结果里面的uid查询当前账户所属的用户 SELECT * FROM t_user WHERE uid = #{uid}
实现
1 2 3 4 5 6 7 public class User { private int uid; private String username; private String sex; private Date birthday; private String address; }
1 2 3 4 5 6 7 8 9 public class Account { private Integer aid; private Integer uid; private Double money; private User user; }
1 2 3 4 5 6 7 8 9 10 11 12 13 14 15 16 17 18 package com.itheima.dao;import com.itheima.pojo.Account;public interface AccountDao { Account findAccountByAid (int aid) ; }
1 2 3 4 5 6 7 8 9 10 11 12 13 14 15 16 17 18 19 20 21 22 <?xml version="1.0" encoding="UTF-8" ?> <!DOCTYPE mapper PUBLIC "-//mybatis.org//DTD Mapper 3.0//EN" "http://mybatis.org/dtd/mybatis-3-mapper.dtd" > <mapper namespace ="com.itheima.dao.AccountDao" > <resultMap id ="accountUserMap" type ="Account" autoMapping ="true" > <id column ="uid" property ="uid" /> <association property ="user" autoMapping ="true" select ="com.itheima.dao.UserDao.findUserByUid" column ="uid" > </association > </resultMap > <select id ="findAccountByAid" parameterType ="int" resultMap ="accountUserMap" > select * from t_account where aid=#{aid} </select > </mapper >
1 2 3 4 5 6 7 8 9 10 11 12 13 14 15 16 17 18 package com.itheima.dao;import com.itheima.pojo.User;public interface UserDao { User findUserByUid (int uid) ; }
1 2 3 4 5 6 7 8 9 <?xml version="1.0" encoding="UTF-8" ?> <!DOCTYPE mapper PUBLIC "-//mybatis.org//DTD Mapper 3.0//EN" "http://mybatis.org/dtd/mybatis-3-mapper.dtd" > <mapper namespace ="com.itheima.dao.UserDao" > <select id ="findUserByUid" parameterType ="int" resultType ="User" > select * from t_user where uid=#{uid} </select > </mapper >
1 2 3 4 5 6 7 8 9 10 11 12 13 14 15 16 17 18 19 20 21 22 23 24 25 26 27 28 29 30 31 32 33 34 35 36 37 38 39 40 41 42 43 44 package com.itheima;import com.itheima.dao.AccountDao;import com.itheima.pojo.Account;import com.itheima.utils.SqlSessionFactoryUtil;import org.apache.ibatis.session.SqlSession;import org.junit.Test;public class TestMybatis { @Test public void test01 () { SqlSession sqlSession = SqlSessionFactoryUtil.openSqlSession(); AccountDao accountDao = sqlSession.getMapper(AccountDao.class); Account account = accountDao.findAccountByAid(1 ); System.out.println(account.getMoney()); SqlSessionFactoryUtil.commitAndClose(sqlSession); } }
Collection 实现延迟加载 (一对多,多对多) 需求 完成加载用户对象时,查询该用户所拥有的账户信息。
等账户信息使用的时候再查询.
1 2 3 4 5 SELECT * FROM t_user where uid= #{uid}SELECT * FROM t_account WHERE uid = #{uid}
实现
1 2 3 4 5 public class Account { private Integer aid; private Integer uid; private Double money; }
1 2 3 4 5 6 7 8 9 10 public class User implements Serializable { private int uid; private String username; private String sex; private Date birthday; private String address; private List<Account> accounts; }
1 2 3 4 5 6 7 8 9 10 11 12 13 14 15 16 17 18 package com.itheima.dao;import com.itheima.pojo.User;public interface UserDao { User findUserByUid (int uid) ; }
1 2 3 4 5 6 7 8 9 10 11 12 13 14 15 16 <?xml version="1.0" encoding="UTF-8" ?> <!DOCTYPE mapper PUBLIC "-//mybatis.org//DTD Mapper 3.0//EN" "http://mybatis.org/dtd/mybatis-3-mapper.dtd" > <mapper namespace ="com.itheima.dao.UserDao" > <resultMap id ="userAccountListMap" type ="User" autoMapping ="true" > <id column ="uid" property ="uid" /> <collection property ="accountList" autoMapping ="true" select ="com.itheima.dao.AccountDao.findAccountListByUid" column ="uid" > </collection > </resultMap > <select id ="findUserByUid" parameterType ="int" resultMap ="userAccountListMap" > select * from t_user where uid=#{uid} </select > </mapper >
1 2 3 4 5 6 7 8 9 10 11 12 13 14 15 16 17 18 19 20 package com.itheima.dao;import com.itheima.pojo.Account;import java.util.List;public interface AccountDao { List<Account> findAccountListByUid (int uid) ; }
1 2 3 4 5 6 7 8 9 <?xml version="1.0" encoding="UTF-8" ?> <!DOCTYPE mapper PUBLIC "-//mybatis.org//DTD Mapper 3.0//EN" "http://mybatis.org/dtd/mybatis-3-mapper.dtd" > <mapper namespace ="com.itheima.dao.AccountDao" > <select id ="findAccountListByUid" parameterType ="int" resultType ="Account" > select * from t_account where uid=#{uid} </select > </mapper >
1 2 3 4 5 6 7 8 9 10 11 12 13 14 15 16 17 18 19 20 21 22 23 24 25 26 27 28 29 30 package com.itheima;import com.itheima.dao.UserDao;import com.itheima.pojo.User;import com.itheima.utils.SqlSessionFactoryUtil;import org.apache.ibatis.session.SqlSession;import org.junit.Test;public class TestMybatis { @Test public void test01 () { SqlSession sqlSession = SqlSessionFactoryUtil.openSqlSession(); UserDao userDao = sqlSession.getMapper(UserDao.class); User user = userDao.findUserByUid(1 ); System.out.println(user.getUsername()); SqlSessionFactoryUtil.commitAndClose(sqlSession); } }
总结
类别
特点
立即加载
只要一调用方法,则马上发起查询
延迟加载
只有在真正使用时,才发起查询,如果不用,则不查询。
MyBatis注解开发(了解) 这几年来注解开发越来越流行, Mybatis 也可以使用注解开发方式,这样我们就可以减少编写 Mapper映射文件了。 本次我们先围绕一些基本的 CRUD来学习,再学习复杂映射关系及延迟加载。
使用 Mybatis 注解实现基本CRUD 使用 Mybatis 注解实现基本CRUD
路径
@Insert:实现新增
@Update:实现更新
@Delete:实现删除
@Select:实现查询
@SelectKey:保存之后 获得保存的id
实现
1 2 3 4 5 6 7 8 9 10 11 12 13 14 15 16 17 18 19 20 21 22 23 24 25 26 27 28 29 30 31 32 33 34 35 36 37 38 39 40 41 42 43 44 45 46 47 48 49 50 package com.itheima.dao;import com.itheima.pojo.User;import org.apache.ibatis.annotations.*;public interface UserDao { @Insert("insert into t_user (username,address,sex,birthday) values (#{username},#{address},#{sex},#{birthday})") @SelectKey(keyProperty = "uid",keyColumn = "uid",resultType = int.class,before = false,statement = "select last_insert_id()") int addUser (User user) ; @Delete("delete from t_user where uid=#{id}") int deleteById (int id) ; @Update("update t_user set username=#{username},sex=#{sex},address=#{address} where uid=#{uid}") void updateUser (User user) ; @Select("select * from t_user where uid=#{id}") User findById (int id) ; }
小结
查询
新增
1 2 @SelectKey(keyProperty = "主键属性名",resultType = 主键Java类型,before = false,statement = "SELECT LAST_INSERT_ID()") @Insert("sql语句")
更新
删除
使用Mybatis注解实现复杂关系映射开发 实现复杂关系映射之前我们可以在映射文件中通过配置来实现, @ResultMap 这个注解不是封装用的。
下面我们一起来学习@Results 注解, @Result 注解, @One 注解, @Many注解。
复杂关系映射的注解说明
1 2 @Results({@Result(), @Result()}) 或@Results(@Result())
1 2 3 4 5 @Result(column="列名",property="属性名",one=@One(select="指定用来多表查询的 sqlmapper"),many=@Many(select="")) @Resutl 注解属性说明 column 数据库的列名 Property 需要装配的属性名
1 2 3 4 5 6 7 8 @Data public class UserInfo implements Serializable { private Integer userId; private String username; private String userSex; private String userAddress; private Date userBirthday; }
1 2 3 4 5 6 7 @Results(id = "userInfoMap",value = { @Result(column = "uid",property = "userId",id = true),//id为true表示该字段是主键 @Result(column = "sex",property = "userSex"), @Result(column = "address",property = "userAddress"), @Result(column = "birthday",property = "userBirthday") }) List<UserInfo> findAllUserInfos () ;
@One 注解(一对一),代替了标签,是多表查询的关键,在注解中用来指定子查询返回单一对象。
1 2 @Result(column="列名",property="属性名",one=@One(select="指定用来多表查询的 sqlmapper"))
@Many 注解(一对多) ,代替了标签,是是多表查询的关键,在注解中用来指定子查询返回对象集合
注意:聚集元素用来处理“一对多”的关系。需要指定映射的 Java 实体类的属性,属性的 javaType(一般
1 @Result(property="",column="",many=@Many(select=""))
使用注解实现一对一复杂关系映射及延迟加载 需求 查询账户(Account)信息并且关联查询用户(User)信息。
先查询账户(Account)信息,当我们需要用到用户(User)信息时再查询用户(User)信息。
实现
1 2 3 4 5 6 7 8 public class User implements Serializable { private int uid; private String username; private String sex; private Date birthday; private String address; }
1 2 3 4 5 6 7 8 9 public class Account { private Integer aid; private Integer uid; private Double money; private User user; }
1 2 3 4 5 6 7 8 9 10 11 12 13 14 15 16 17 18 19 20 21 22 23 24 25 26 27 28 29 30 31 32 33 package com.itheima.dao;import com.itheima.pojo.Account;import org.apache.ibatis.annotations.One;import org.apache.ibatis.annotations.Result;import org.apache.ibatis.annotations.Results;import org.apache.ibatis.annotations.Select;public interface AccountDao { @Select("select * from t_account where aid=#{aid}") @Results( { //映射主键 @Result(column = "uid",property = "uid",id = true), //调用第二步查询进行一对一映射 @Result(property = "user",column = "uid",one = @One(select = "com.itheima.dao.UserDao.findUserByUid")) } ) Account findAccountByAid (int aid) ; }
1 2 3 4 5 6 7 8 9 10 11 12 13 14 15 16 17 18 19 20 package com.itheima.dao;import com.itheima.pojo.User;import org.apache.ibatis.annotations.Select;public interface UserDao { @Select("select * from t_user where uid=#{uid}") User findUserByUid (int uid) ; }
1 2 3 4 5 6 7 8 9 10 11 12 13 14 15 16 17 18 19 20 21 22 23 24 25 26 27 28 29 30 31 package com.itheima;import com.itheima.dao.AccountDao;import com.itheima.pojo.Account;import com.itheima.utils.SqlSessionFactoryUtil;import org.apache.ibatis.session.SqlSession;import org.junit.Test;public class TestMybatis { @Test public void test01 () { SqlSession sqlSession = SqlSessionFactoryUtil.openSqlSession(); AccountDao accountDao = sqlSession.getMapper(AccountDao.class); Account account = accountDao.findAccountByAid(1 ); System.out.println(account); SqlSessionFactoryUtil.commitAndClose(sqlSession); } }
使用注解实现一对多复杂关系映射及延迟加载 需求 完成加载用户对象时,查询该用户所拥有的账户信息。
等账户信息使用的时候再查询.
实现
1 2 3 4 5 6 7 8 9 10 11 public class User { private Integer uid; private String username; private String sex; private Date birthday; private String address; private List<Account> accounts; }
1 2 3 4 5 6 7 8 9 10 11 12 13 14 15 16 17 18 19 20 21 22 23 24 25 26 27 package com.itheima.dao;import com.itheima.pojo.User;import org.apache.ibatis.annotations.Many;import org.apache.ibatis.annotations.Result;import org.apache.ibatis.annotations.Results;import org.apache.ibatis.annotations.Select;public interface UserDao { @Select("select * from t_user where uid=#{uid}") @Results({ @Result(id = true,column = "uid",property = "uid"), @Result(property = "accountList",column = "uid",many = @Many(select = "com.itheima.dao.AccountDao.findAccountListByUid")) }) User findUserByUid (int uid) ; }
1 2 3 4 5 6 7 8 9 10 11 12 13 14 15 16 17 18 19 20 21 22 package com.itheima.dao;import com.itheima.pojo.Account;import org.apache.ibatis.annotations.Select;import java.util.List;public interface AccountDao { @Select("select * from t_account where uid=#{uid}") List<Account> findAccountListByUid (int uid) ; }
1 2 3 4 5 6 7 8 9 10 11 12 13 14 15 16 17 18 19 20 21 22 23 24 25 26 27 28 29 30 package com.itheima;import com.itheima.dao.UserDao;import com.itheima.pojo.User;import com.itheima.utils.SqlSessionFactoryUtil;import org.apache.ibatis.session.SqlSession;import org.junit.Test;public class TestMybatis { @Test public void test01 () { SqlSession sqlSession = SqlSessionFactoryUtil.openSqlSession(); UserDao userDao = sqlSession.getMapper(UserDao.class); User user = userDao.findUserByUid(1 ); System.out.println(user); SqlSessionFactoryUtil.commitAndClose(sqlSession); } }
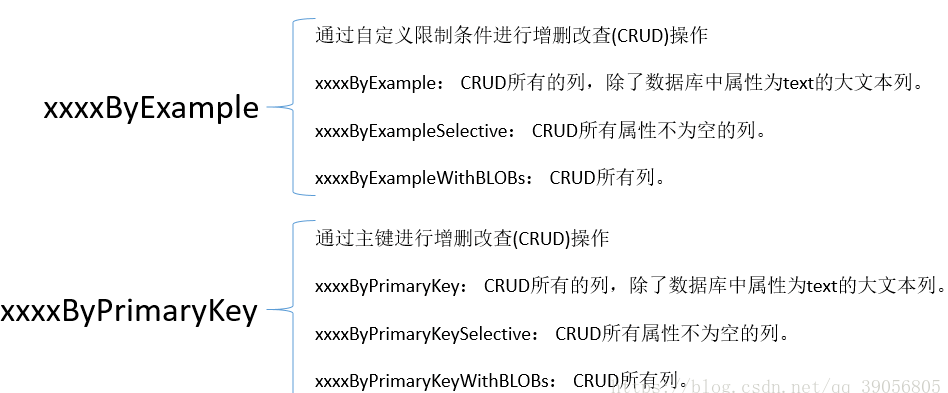
mybatis逆向工程方法使用
查询
不足: 有三个查询方法,第二个selectByExampleWithBLOBs只会在特定条件下出现
方法一:List selectByExample(CheckItemExample example);
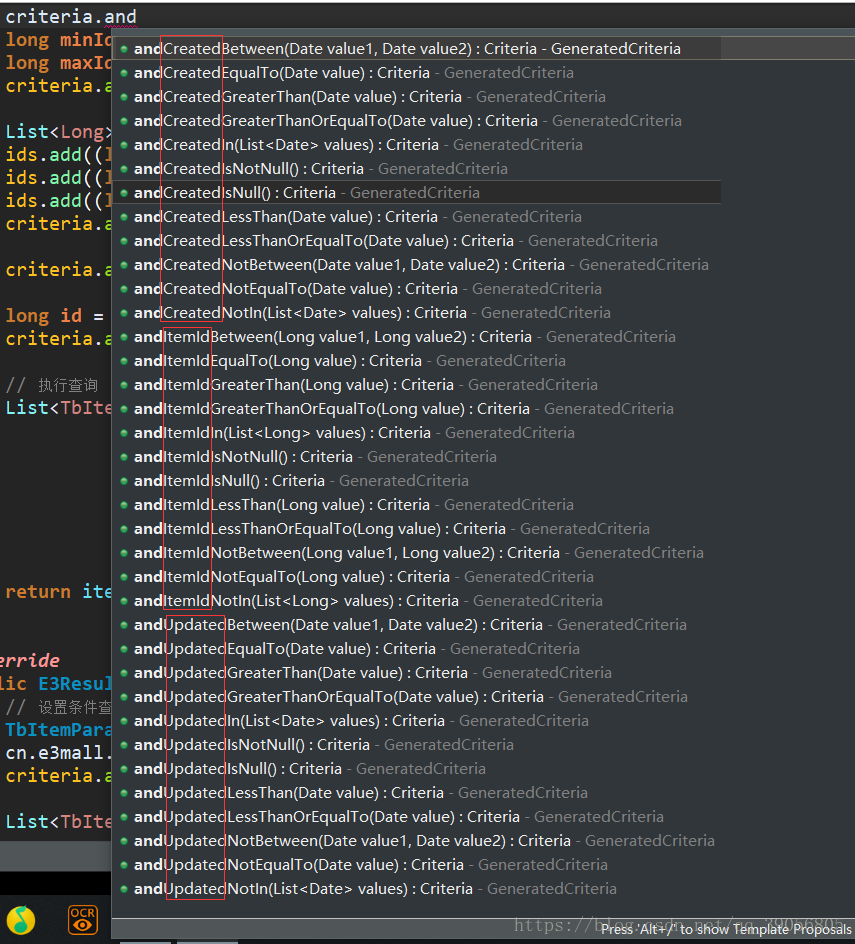
通过特定限制条件查询信息,example用于生成一个Criteria对象来设置查询条件
1 2 3 4 5 6 7 8 9 10 11 12 13 14 15 16 17 18 19 TbItemDescExample example = new TbItemDescExample ();cn.e3mall.pojo.TbItemDescExample.Criteria criteria = example.createCriteria(); long minId = 0 ;long maxId = 50 ;criteria.andItemIdBetween(minId, maxId); List<Long> ids = new ArrayList <>(); ids.add((long )20 ); ids.add((long )40 ); ids.add((long )60 ); criteria.andItemIdIn(ids); criteria.andCreatedIsNotNull(); long id = 40 ;criteria.andItemIdEqualTo(id); List<TbItemDesc> selectByExample = itemDescMapper.selectByExample(example);
根据表的字段的,可以设置的条件很多
方法二:CheckItem selectByPrimaryKey(Integer id);
通过主键查询
方法三: List selectByExampleWithBLOBs(TbItemDescExample example )
根据特定限制条件查询,返回值包含类型为text的列(默认查询并不会返回该列的信息)。example用于生成一个Criteria对象来设置查询条件,具体使用方法和方法1是一样的,唯一的把不同就是返回值是所有列
增加/插入
插入很简单,只有两个方法,方法传入的参数都是POJO,返回值都是int类型的受影响的行数。
不同之处在于:
insert会插入所有的信息,如果传入的对象某一属性为空,则插入空,如果数据库中设置了默认值,默认值就失效了!
而insertSelective不同,它只会插入含有数据的属性,对于空的属性,不予以处理.这样的话,如果数据库中设置了默认值,就不会被空值覆盖了。
删除
int deleteByExample(CheckItemExample example);
根据限定条件删除,具体使用方法参考查询
int deleteByPrimaryKey(Integer id);
根据主键删除
修改
1 2 3 4 5 6 7 8 9 10 11 12 13 14 15 16 17 18 19 20 21 22 23 // 根据ID进行更新除了text类型(数据库)的所有列 int updateByPrimaryKey(CheckItem record); // 根据ID更新所有设置了值的列 int updateByPrimaryKeySelective(CheckItem record); // 根据ID更新所有列 int updateByPrimaryKeyWithBLOBs(CheckItem record); // 根据特定限制条件进行更新除了text类型(数据库)的所有列 int updateByExample(@Param("record") CheckItem record, @Param("example") CheckItemExample example); // 根据特定限制条件进行更新所有设置了值的列 int updateByExampleSelective(@Param("record") CheckItem record, @Param("example") CheckItemExample example); // 根据特定限制条件进行更新所有列,包括text int updateByExampleWithBLOBs(@Param("record") CheckItem record, @Param("example") CheckItemExample example);
统计
计数就一个方法,根据限制条件计数,example在前面已经说过了,在这里就不叙述了
总结:
PageHelp分页插件笔记【待补充】 
