什么是 TypeScript

随着应用的庞大,项目中 JavaScript 的代码也会越来越臃肿,这时候许多 JavaScript 的语言弊端就会愈发明显,而 TypeScript 的出现,就是着力于解决 JavaScript 语言天生的弱势:静态类型。

TypeScript 中文网:https://tslang.cn/

TypeScript 视频教程:《TypeScript 精通指南

为什么选择 TypeScript

几个月前,团队里觉得很多项目跑的越来越臃肿,团队协作遇到了一个很大的难题:如何让一个别人提供的方法产出一个一目了然的文档?因为一个项目总会涉及到多人协作:同学 A 编写了函数 a(),而 同学 B 在调用函数 a() 的时候得一直撸着 API 文档才能知道 a() 需要什么参数,会返回什么参数。

同学 A 后续又改动了函数 a(),但是却忘记了更新文档,这时候新接手项目的 同学 C 看着 API 文档和函数 a() 一脸懵逼,问题浮出水面:团队协作中,提供的接口如何描述自身?

这其中涉及到的问题有:

  1. 接口如何描述自己的参数和返回值?
  2. 接口参数和返回值在无数需求迭代中改变了多次,而这个 API 对应的文档该如何更新?
  3. 数据格式如何描述

我们意识到 JavaScript 在逐渐复杂的 Web 应用中缺少一个很重要的东西:静态类型。

因为需要有静态类型我们才可以知道这个函数需要的参数是什么,有什么类型,返回值是什么类型,哪些字段是可能空,哪些字段又需要什么样的格式。

我们首先找到了业界融合于 JavaScript 的方案:Flow

后来对比之后发现:

  1. 生态圈,TypeScript 的生态圈明显在 Flow 之上,各大主流类库都提供了 TypeScript 的类型声明文件,配合 visual studio code 编码体验上比 Flow 强太多。
  2. Flow 是侵入 JavaScript 的,对 JavaScript 做了一层增强;而 TypeScript 则为 JavaScript 超集,在 JavaScript 之上进行的语言抽象,最终编译成 JavaScript。

其中第二点很重要,因为团队成员对添加了 Flow 的 JavaScript 语法想当排斥,而我个人同样觉得 Flow 侵入 JavaScript 太过强烈,不如 TypeScript 直接做语言超集好,虽然二者出发点上没有太大区别,但从设计思想上来说 TypeScript 更吸引人。

TypeScript 的定位是做静态类型语言,而 Flow 的定位是类型检查器。

毕竟写着 Flow 的时候心里想的是我在写 JavaScript,而写 TypeScript 心里想的是我在写 TypeScript 🤣。

什么是 TypeScript

TypeScript 简称 TS。TypeScript 是 JavaScript 的超集,就是在 JavaScript 上做了一层封装,封装出 TypeScript 的特性,当然最终代码可以编译为 JavaScript。

TypeScript 早期的目标是为了让习惯编写强类型语言的后端程序员,能够快速的编写出前端应用(微软大法好),因为 JavaScript 没有强数据类型,所以 TypeScript 提供了静态数据类型,这是 TypeScript 的核心。

随着项目工程越来越大,越来越多的前端意识到静态数据类型的重要性,随着 TypeScript 的逐渐完善,支持者越来越多,静态数据类型的需求越来越强。于此同时, angular 2.x 这个领头羊率先使用 AtScript 开辟了静态数据类型战场。

JavaScript 行至今日,灵活,动态让它活跃在编程语言界一线。而灵活,动态使得它又十分神秘,只有运行才能得到答案。类型的补充填充了 JavaScript 的缺点,从 TypeScript 编译到 JavaScript,多了静态类型检查,而又保留了 JavaScript 的灵活动态。

简单来说:动态代码一时爽,重构全家火葬场。

静态类型

TypeScript 凭借 Microsoft 深厚的语言设计功底,设计的十分优雅和简单易用,学习成本非常低。

上面我们所说了,TypeScript 的核心就是静态数据类型,我们来简单了解一下静态数据类型和简单的类型推导,TypeScript 是以 *.ts 作为文件后缀的,我们创建一个 demo.ts 文件,写下这段代码:

1
let num: number

从上面的代码中,我们可以知道变量 numnumber 类型的,如果我们给 num 赋其他类型的值,则会报错:

image-20230928101533545

是不是很简单?是的,这就是 TypeScript 的核心。

我们再来看看一个函数该如何表达:

1
const fetch = function (url: string): Promise { }

fetch() 函数接收一个 string 类型的参数 url,返回一个 Promise

以下是一个 JavaScript 的函数,不看方法内的写法我们完全不知道这个 API 会有哪些坑。

1
2
3
4
5
6
7
8
9
export const fetch = function (url, params, user) {
// dosomething

return http(options).then(data => {
return data
}).catch(err => {
return err
})
}

这是 TypeScript 的写法:

1
2
3
4
5
6
7
8
9
export const fetch = function (url: string | object, params?: any, user?: User): Promise<object | Error> {
// dosomething

return http(options).then(data => {
return data
}).catch(err => {
return err
})
}

这个 TypeScript 包含了很多信息:

  1. url 可能是 stringobject 类型
  2. params 是可以不传的,也可以传递任何类型
  3. user 要求是 User 类型的,当然也是可以不传
  4. 返回了一个 PromisePromise 的求值结果可能是 object,也有可能是 Error

看到上面的信息后,我们大概知道可以这么调用并处理 fetch 的返回结果:

1
2
3
4
5
6
let result = await fetch('https://tasaid.com', { id: 1 })

// fetch 可能会返回 Error
if (result instanceof Error) {
// 错误处理
}

是不是很有意思?鹅妹子嘤!TypeScript 在说话,TypeScript 在让代码描述自身。

image-20230928101546748

这就是静态数据类型的意义。静态类型在越复杂的应用中,需求越强烈。

这是 react 对于数据类型的约束:

1
2
3
4
5
6
7
8
import PropTypes from 'prop-types'

component.propTypes = {
optionalArray: PropTypes.array,
optionalBool: PropTypes.bool,
optionalFunc: PropTypes.func,
requiredFunc: PropTypes.func.isRequired,
}

这是 vue 对于数据类型的约束:

1
2
3
4
5
6
7
8
9
10
11
Vue.component('component', {
props: {
optionalArray: Array,
optionalBool: Boolean,
optionalFunc: Function,
requiredFunc: {
type: Function,
required: true
}
}
})

而引入了 TypeScript 之后,就会感受到真正流畅的数据类型约束:

1
2
3
4
5
6
class Component {
optionalArray?: Array<string> // string 类型的 数组
optionalBool?: boolean // 写上 ? 号,就表示着这个属性可能为空
optionalFunc?: (foo: string, bar: number) => boolean // 函数的参数,返回值都一目了然
requiredFunc: () => void
}

和 ECMAScript 相比

TypeScript 是 JavaScript 的超集,目标也是对齐 ECMAScript 的标准规范和提案对齐,最终 TypeScript 也是编译为 JavaScript。

同时,和 JavaScript 规范标准 ECMAScript 提案 相比,TypeScript 也一直在跟进 ECMAScript 的许多新特性。

例如当前来说比较深受大家喜爱的新特性:

  • import() 动态表达式
  • decorators 装饰器
  • async/await 异步

而这些都可以编译到 ECMAScript 3(少数细节存在兼容性问题)。

小 tips

  • 使用 visual studio code 编辑器会体验到 TypeScript 强大的类型推导,毕竟两个都是微软亲儿子
  • 一些 JavaScript 编写的大型的第三方库,都提供了 TypeScript 的类型声明文件(*.d.ts 文件), 一般都放在包目录的 types 文件夹中。或者在 @types/* 仓库名下可以找到
  • babel 是将高级版本的 JavaScript 编译为目标版本的 JavaScript,TypeScript 是将 TypeScript 编译为目标版本的 JavaScript。它们的编译是重叠的,也就是说 TypeScript 可以不再依赖 babel 编译。

基础特性和类型推导

基础类型

我们先简单的声明一些变量:

1
2
3
4
5
let a: number
let b = true // 有默认值的情况,甚至不需要声明类型,ts 会自动推导
let c: [string, number] // 元组
enum Color {Red, Green, Blue} // 枚举
let d: { name: string } = { name: 'linkFly' }

当我们给这些变量赋错误的类型值的时候,会抛出类型错误异常。

image-20230928101550758

是不是很简单,TypeScript 优秀的设计使得即使你没有接触过它,但是仍然能够读懂它。

复杂类型

1
2
3
4
5
6
7
8
9
10
11
12
13
14
15
// array
let list_a: number[] = [1, 2, 3]
let list_b: Array<number> = [1, 2, 3] // number 类型的数组
let list_c: [string, number] = ['linkFly', 0]

// any
let notSure: any = 4
notSure = true // any 类型可以自由赋值

// 函数类型
let fn: (id: string) => number = (id) => 1
// 这里使用了 ECMAScript 6 的箭头函数,和下面的代码等价
let fn: (id: string) => number = function (id) {
return 1
}

image-20230928101555359

高级类型

1
2
3
4
5
6
7
8
9
10
11
12
13
14
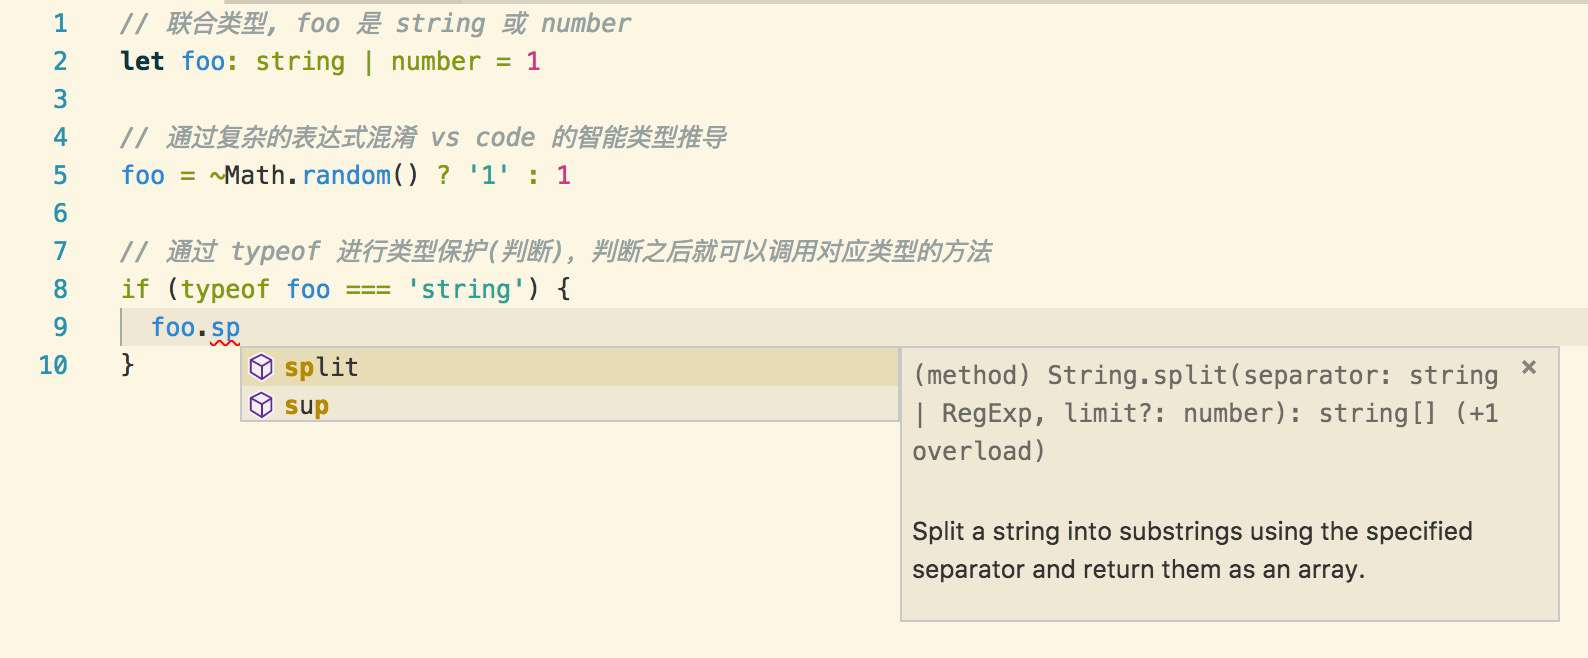
// 联合类型, foo 是 string 或 number
let foo: string | number = 1

// 类型断言,强制使用兼容类型中的某一类型
(foo as string)

// 类型保护(判断)
if (typeof foo === 'string') {
// dosomething
}
// 类型保护(判断)
if (foo instanceof String) {
// dosomething
}

image-20230928101559374

Model

从前几年热门的 MVC 一直到现在热门的 MVVM,我们发现无论是 MVC(Model-View-Controller) 还是 MVVM(Model-View-ViewModel),我们始终抛不开一个关键的地方 —— 数据层:Model

因为本质上整个页面的操作都是在进行数据流动,页面展现本质上都是数据,而我们通过 Model 来描述数据。

这是一个简单的 Model 演示:

1
let user : { id: number, name: string } = { id: 1, name: 'linkFly' }

在 TypeScript (或者是所有强 OO 语言)中,推荐以 Model 来描述数据的方式也就是 Class

这一小节只简单介绍 Class 和 泛型,实际项目中可能还会牵扯更多更强大的 OO 概念:接口、抽象类、继承类、继承属性。

这些知识不是一蹴而就的,而是需要在项目中不断探索不断组合的。

Class 类

所有类型的根本都是类,TS 中声明一个类的语法非常简单,可读性很高。

注意,TS 中类型是核心,当你想把一个项目从 JavaScript 迁移到 TypeScript 的时候,需要为项目中补充大量的类型,而这些类型大部分都是基于 Class 构建的。

这是一个简单的类:

1
2
3
4
5
6
class User {
id: number
name: string
}

let user: User = { id: 1, name: 'linkFly' }

当然随着需求的不同,也可以补充很多细节:

1
2
3
4
5
6
7
8
9
10
11
12
13
14
15
16
17
18
19
20
21
22
23
24
25
26
27
28
29
30
31
32
33
34
35
36
37
38
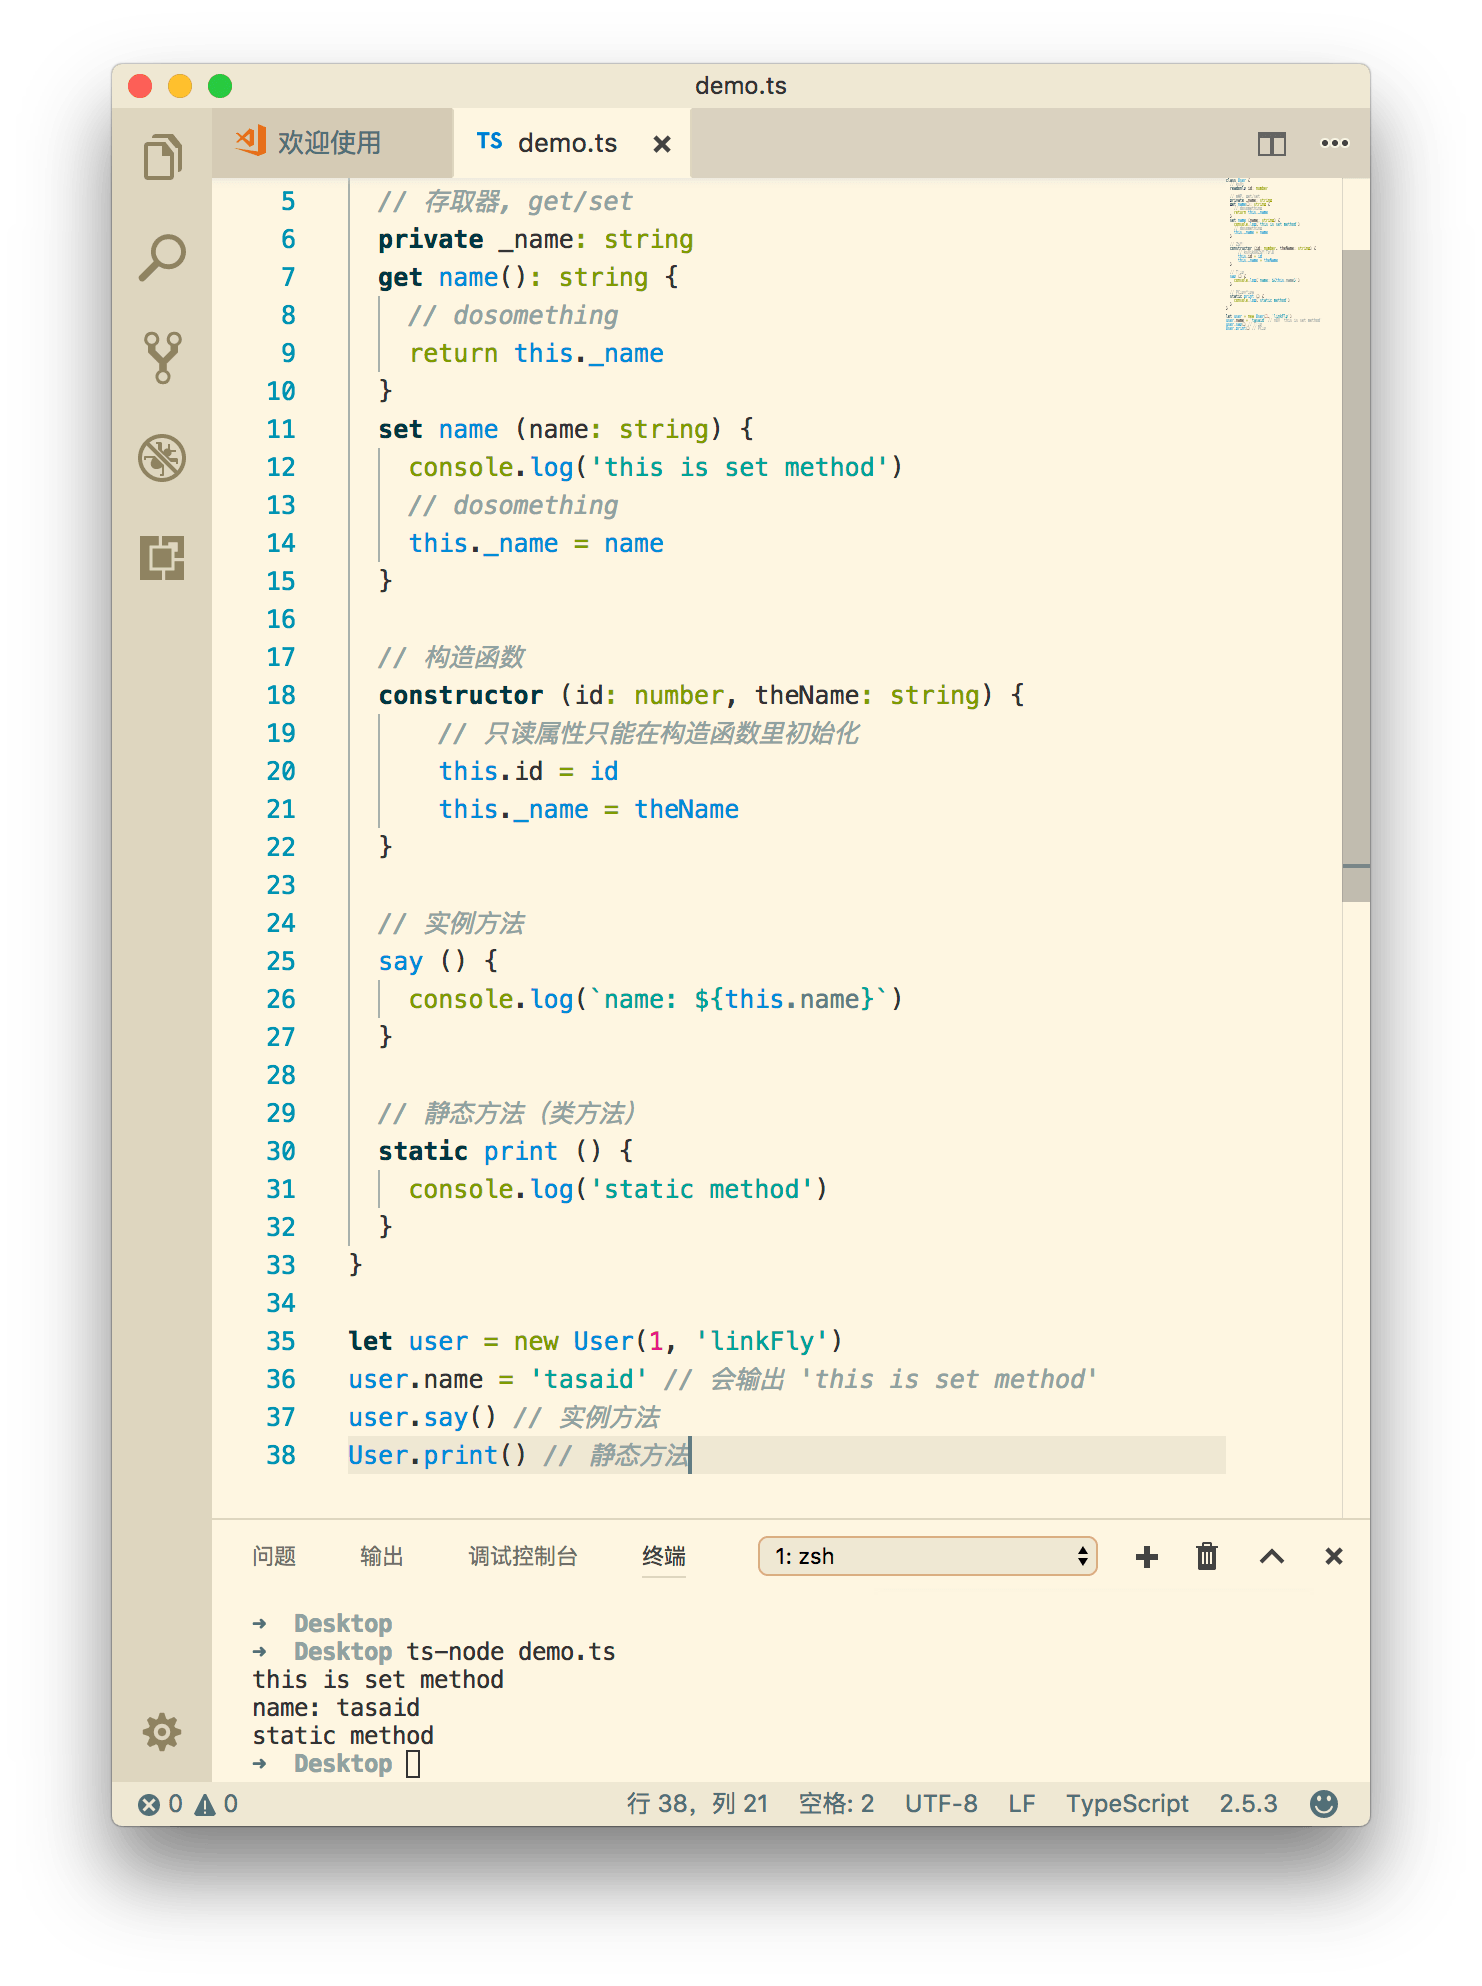
class User {
// 只读属性
readonly id: number

// 存取器, get/set
private _name: string
get name(): string {
// dosomething
return this._name
}
set name (name: string) {
console.log('this is set method')
// dosomething
this._name = name
}

// 构造函数
constructor (id: number, theName: string) {
// 只读属性只能在构造函数里初始化
this.id = id
this._name = theName
}

// 实例方法
say () {
console.log(`name: ${this.name}`)
}

// 静态方法(类方法)
static print () {
console.log('static method')
}
}

let user = new User(1, 'linkFly')
user.name = 'tasaid' // 会输出 'this is set method'
user.say() // 实例方法
User.print() // 静态方法

image-20230928101608958

泛型

泛型是用来解决类型重用的问题。

例如下面一个函数,只能传递 number 的参数并返回:

1
2
3
4
function identity(arg: number): number {
// dosomething
return arg
}

现在想传递一个 string 类型的参数,然后也返回它,这个时候就可以使用泛型,使用泛型可以接收任意类型并返回:

1
2
3
4
5
6
7
8
9
10
// 这个 T 就是泛型,也可以叫其他名字
function identity<T>(arg: T): T {
// dosomething
return arg
}

identity<string>('linkfly')
identity('linkfly') // 自动推导
identity(0)
identity(true)

我们可以轻松的使用泛型来实现数据包装:

1
2
3
4
5
6
7
8
9
10
11
12
13
function fetch<T>(url: string): Promise<T> {
// 远程请求数据并返回结果
return http(url).then(data => {
return data as T
})
}

class User {
name: string
}

// 泛型使用
let user = fetch<User>('https://tasaid.com/user')

小 tips

  • TypeScript 中文网 可以看到完整 TS 类型。
  • 在项目初期使用 TS 中,会需要很大的时间和精力,去编写和架构基本业务类型(Models),在此之后会越来越方便快捷。
  • 一些没有行为只需要做类型检查的类型(没有方法的 Models),可以使用 TypeScript 声明文件 (*.d.ts),例如:
1
2
3
4
5
6
declare namespace Models {
interface GPS {
lat: number
lng: number
}
}

这个系列的文章不会讲解 TypeScript 的声明文件,但是它是 TypeScript 中不可缺少的一部分。

  • 尽量减少使用 any 类型,它意味着类型不可控
  • 某些变量或者第三方库中属性无法感知,使用 as 强制进行类型推导即可。
1
2
3
4
5
window.tempName = 'linkFly' 
// Errors: [ts] Property 'tempName' does not exist on type 'Window'.

// 强制推导
(window as any).tempName = 'linkFly'

引入和编译

快速使用

安装:

1
$ npm i -g typescript

编译:

1
$ tsc helloworld.ts

如果我们想快速测试一个文件,可以使用 ts-nodets-node 可以让我们通过命令直接执行 *.ts 文件:

1
2
3
4
5
$ npm i -g ts-node

# 执行当前文件夹下 demo.ts 文件
$ ts-node demo.ts
# 输出的执行结果

关于 tsc,一般来说,全局安装的方案并不是很棒,我们可以把 typescript 安装到本地项目目录中:

1
$ npm i  --save-dev typescript

这样在 package.jsonscripts 中可以引用 tsc 命令:

1
2
3
4
5
6
7
8
9
10
{
// ...
"scripts": {
"build": "tsc"
},
"devDependencies": {
// ...
"typescript": "^2.4.2",
},
}

使用 npm run build 命令即可启用 tsc 命令编译本地目录,typescript 会去查找目录下的 tsconfig.json 配置文件。

引入 TypeScript 非常简单,TypeScript 的文件后缀为 ts,迁移 TypeScript 只需要将项目中,业务代码的 *.js 修改为 *.ts 即可。不过在此之后你会看到大量的报错,然后就是按照 TypeScript 的规则,解决这些报错即可:)
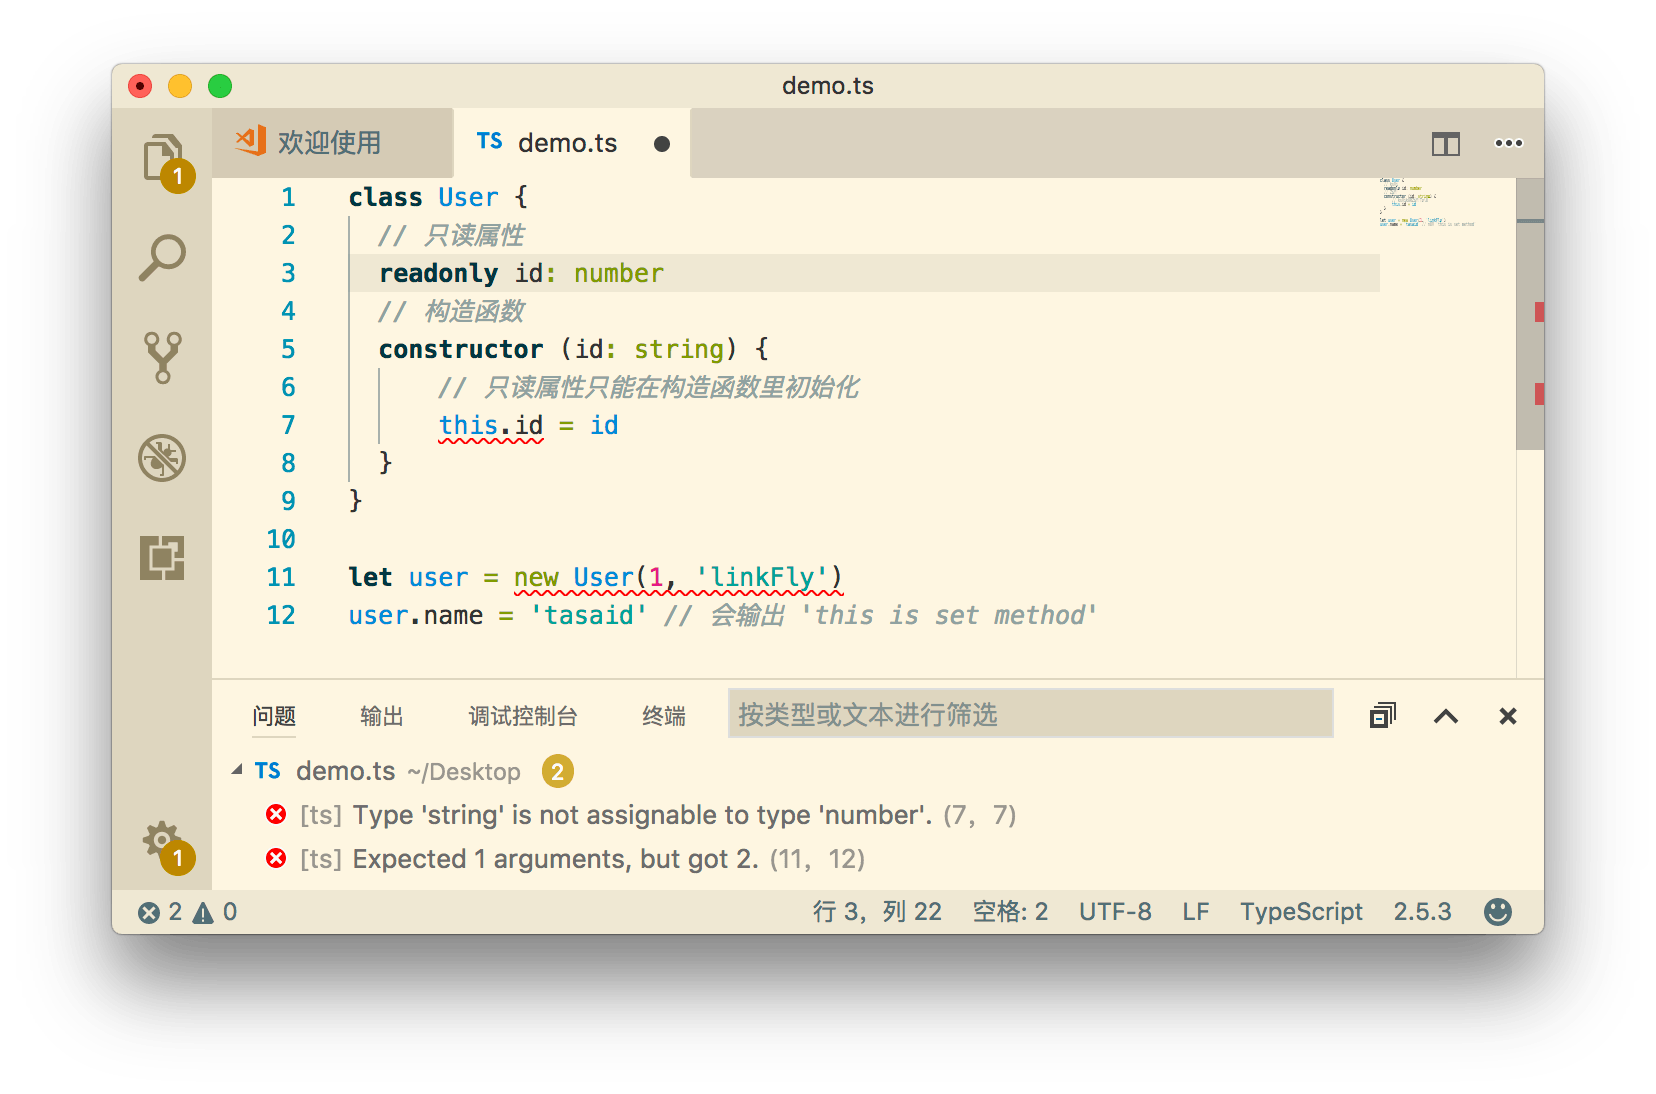
image-20230928101614701

tsconfig.json

tsconfig.json 是 TypeScript 的编译选项文件,通过配置它来定制 TypeScript 的编译细节。

  • 直接调用 tsc,编译器会从当前目录开始去查找 tsconfig.json 文件,逐级向上搜索父目录。
  • 调用 tsc -p,可以指定一个包含 tsconfig.json文件的目录进行编译。如果没有找到 tsconfig.json 文件,TypeScript 会编译每个文件并在对应文件的同级目录产出。

如果你要编译的是一个 Node 项目,请先安装 Node 编译依赖: npm i @types/node --save-dev,否则会出现 Node 内置模块无法找到的情况。

一个 tsconfig.json 文件描述:

1
2
3
4
5
6
7
8
9
10
11
12
13
14
15
16
17
18
19
20
21
22
23
24
25
26
27
28
29
30
31
32
33
34
35
36
37
38
39
40
41
42
43
44
45
46
47
48
49
50
51
{
// 编译选项
"compilerOptions": {
// 输出目录
"outDir": "./output",
// 是否包含可以用于 debug 的 sourceMap
"sourceMap": true,
// 以严格模式解析
"strict": true,
// 采用的模块系统
"module": "esnext",
// 如何处理模块
"moduleResolution": "node",
// 编译输出目标 ES 版本
"target": "es5",
// 允许从没有设置默认导出的模块中默认导入
"allowSyntheticDefaultImports": true,
// 将每个文件作为单独的模块
"isolatedModules": false,
// 启用装饰器
"experimentalDecorators": true,
// 启用设计类型元数据(用于反射)
"emitDecoratorMetadata": true,
// 在表达式和声明上有隐含的any类型时报错
"noImplicitAny": false,
// 不是函数的所有返回路径都有返回值时报错。
"noImplicitReturns": true,
// 从 tslib 导入外部帮助库: 比如__extends,__rest等
"importHelpers": true,
// 编译过程中打印文件名
"listFiles": true,
// 移除注释
"removeComments": true,
"suppressImplicitAnyIndexErrors": true,
// 允许编译javascript文件
"allowJs": true,
// 解析非相对模块名的基准目录
"baseUrl": "./",
// 指定特殊模块的路径
"paths": {
"jquery": [
"node_modules/jquery/dist/jquery"
]
},
// typescript 语法检测支持的版本库,注意不是 polyfill!只是为了有对应版本的代码特性提示!
"lib": [
"es2015",
"es2015.promise"
]
}
}

完整 tsconfig 配置选项的可以参考 这里,或者 tsconfig 的 json-schema

注意: TypeScript 不会做 Polyfill,例如从 es6 编译到 es5,TypeScript 编译后不会处理 es6 的那些新增的对象的方法,如果需要 polyfill 需要自行处理!

完整的编译选项请参阅 TypeScript 中文网TypeScript 官网

编译

大多数前端已经使用各种各样的构建工具,完整构建工具集成列表参见 这里

对于 Node 项目,建议搭配 gulp 使用。不过个人更喜欢通过 npm scripts 脚本组合命令,然后直接使用 tsc 编译,例如我自己的编译方案。

项目目录为:

1
2
3
4
5
|---output # 编译输出
|---client
|---server # node ts 文件目录
|--tsconfig.json
|---package.json

package.jsonscripts 脚本如下:

1
2
3
4
5
6
7
"scripts": {
"dev": "nodemon --ext ts --watch server --exec \"npm run clean && npm run build:ts && npm run server\"",
"server": "cross-env NODE_ENV=development node ./output/app.js",
"clean": "rm -rf ./output.server",
"build:ts": "tsc -p ./server",
"build": "npm run clean && npm run build:ts"
}
  • 使用 nodemon 监听整个 server 目录文件改动并执行脚本
  • npm run clean 用于清空编译输出目录
  • npm run build:ts 用于编译 server 目录下的 TypeScript 文件
  • npm run server 用于启动编译后的 node 服务器。

平常开发只需要 npm run dev,生产使用 npm run build 产出文件即可。

visual studio code 集成和 debug

编译任务

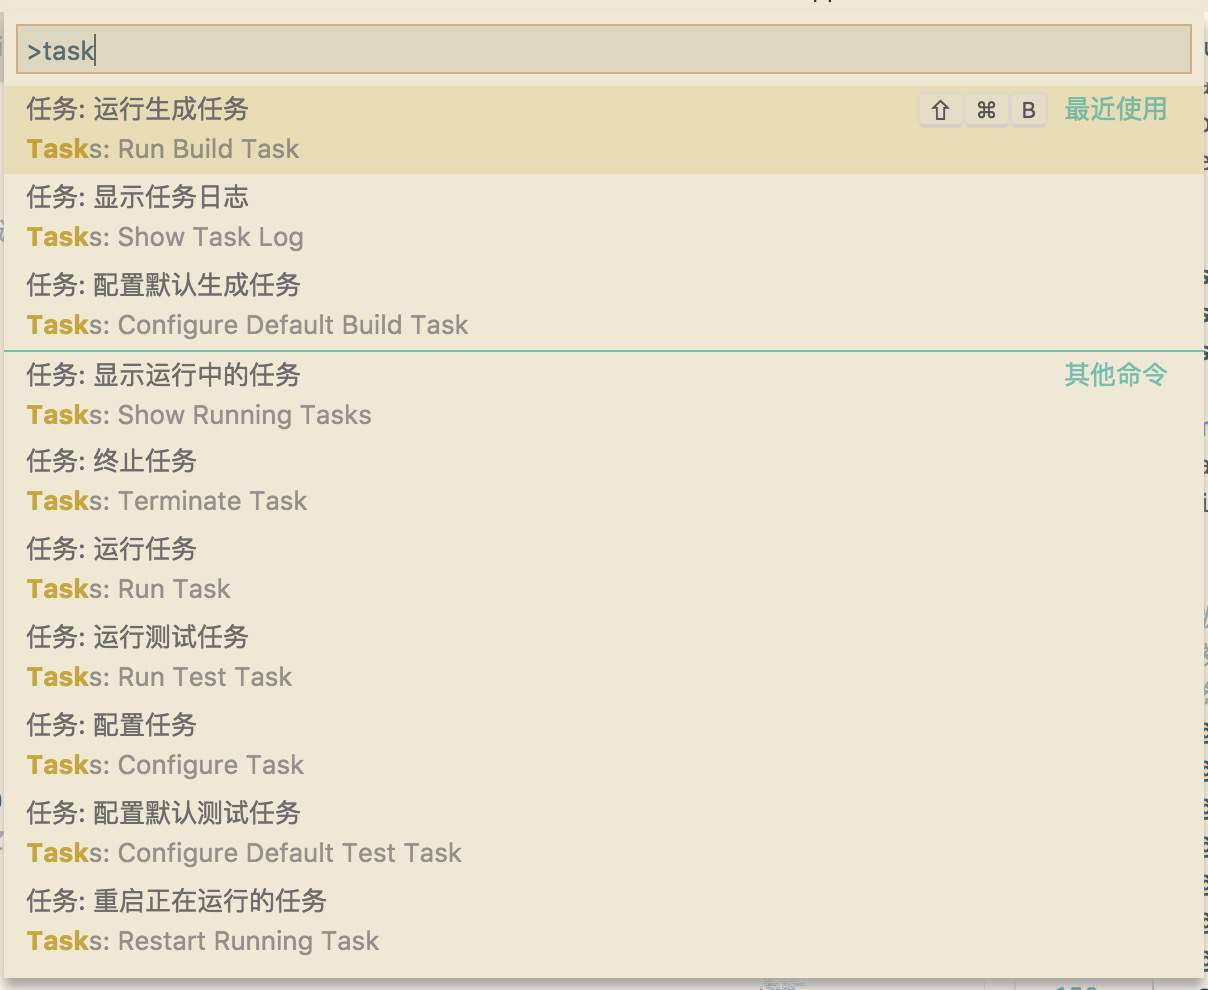
visual studio code 编译 TypeScript 非常简单,根据上面我自己的组合命令,只需要在 vs code 的任务中加入编译脚本即可(npm run build-ts):

./.vscode/task.json 如下:

1
2
3
4
5
6
7
8
9
10
11
12
13
14
15
16
17
18
{
"version": "2.0.0",
"tasks": [
{
// npm 命令
"type": "npm",
// npm run 的脚本
"script": "build-ts",
// 标签
"label": "build-typescript",
// 默认任务
"group": {
"kind": "build",
"isDefault": true
}
}
]
}

control+shift+B 即可编译。

image-20230928101619999

debug

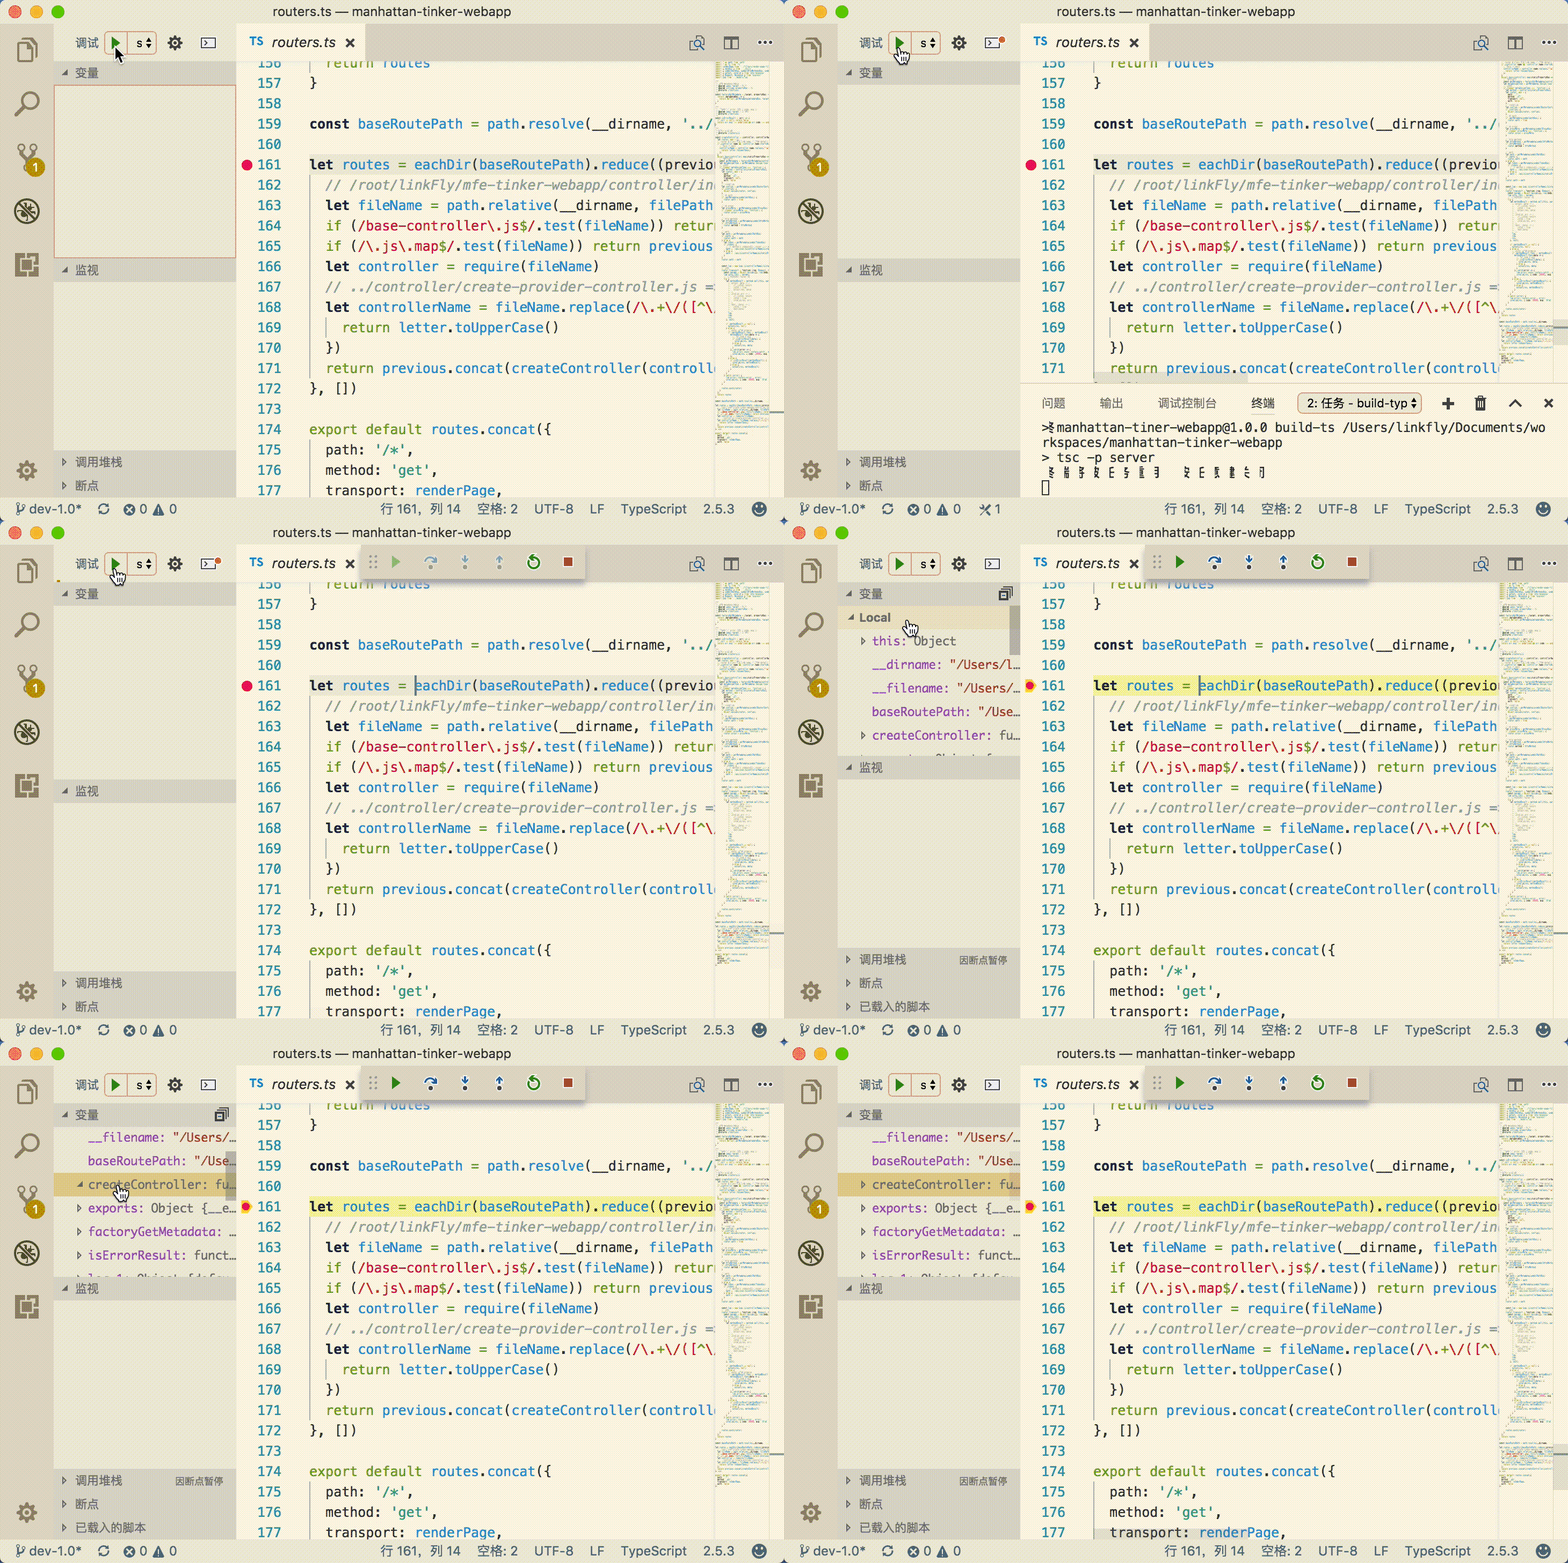
./.vscode/launch.json 中加入如下代码即可调试,记得要在 tsconfig.json 里打开 sourceMap 选项:

1
2
3
4
5
6
7
8
9
10
11
12
13
14
15
16
17
{
"version": "0.2.0",
"configurations": [
{
// 调试前运行的任务 (task),就是上面编译任务中的 label
"preLaunchTask": "build-typescript",
// 调试任务名称
"name": "server debug",
"env": {
// 传递的参数
"NODE_ENV": "development"
},
// 调试的 node 入口文件,注意 tsconfig.json 里面要打开 sourceMap
"program": "${workspaceRoot}/output/app.js"
}
]
}

然后在 vs code 中给代码打上断点,按 F5,一步步调试即可。

vscode debug

结语

我们简单总结一下:

  • 使用 ts-node 可以让我们直接运行 *.ts 文件(不过只建议临时运行代码或特殊应用场景使用)
  • 使用 typescript 产出的 tsc 命令来编译 *.ts 文件到 *.js,然后我们运行编译出来的 *.js 文件即可
  • 使用 tsconfig.json 配置 TypeScript 的编译选项

装饰器和反射

前言

在了解装饰器之前,我们先看一段代码:

1
2
3
4
5
6
7
8
9
10
11
12
13
class User {
name: string
id: number

constructor(name:string, id: number) {
this.name = name
this.id = id
}

changeName (newName: string) {
this.name = newName
}
}

这段代码声明了一个 Class 为 UserUser 提供了一个实例方法 changeName() 用来修改字段 name 的值。

现在我们要在修改 name 之前,先对 newName 做校验,判断如果 newName 的值为空字符串,就抛出异常。

按照我们过去的做法,我们会修改 changeName() 函数,或者提供一个 validaName() 方法:

1
2
3
4
5
6
7
8
9
10
11
12
13
14
15
16
17
18
19
class User {
name: string
id: number
constructor(name:string, id: number) {
this.name = name
this.id = id
}
// 验证 Name
validateName (newName: string) {
if (!newName){
throw Error('name is invalid')
}
}
changeName (newName: string) {
// 如果 newName 为空字符串,则会抛出异常
this.validateName(newName)
this.name = newName
}
}

可以看到,我们新编写的 validateName(),侵入到了 changeName() 的逻辑中。如此带来一个弊端:

  1. 我们不知道 changeName() 里面可能还包含了什么样的隐性逻辑
  2. changeName() 被扩展后逻辑不清晰

然后我们把调用时机从 changeName() 中抽出来,先调用 validateName(),再调用 changeName()

1
2
3
4
let user = new User('linkFly', 1)
if (user.validateName('tasaid')) {
user.changeName('tasaid')
}

但是上面的问题 1 仍然没有被解决,调用方代码变的十分啰嗦。那么有没有更好的方式来表现这层逻辑呢?

装饰器就用来解决这个问题:”无侵入式” 的增强。

装饰器

顾名思义,”装饰器” (也叫 “注解”)就是对一个 类/方法/属性/参数 的装饰。它是对这一系列代码的增强,并且通过自身描述了被装饰的代码可能存在的行为改变。

简单来说,装饰器就是对代码的描述。

由于装饰器是实验性特性,所以要在 tsconfig.json 里启用这个实验性特性:

1
2
3
4
5
6
{
"compilerOptions": {
// 支持装饰器
"experimentalDecorators": true,
}
}

钢铁侠托尼·史塔克只是一个有血有肉的人,而他的盔甲让他成为了钢铁侠,盔甲就是对托尼·史塔克的装饰(增强)。

我们使用装饰器修改一下上面的例子:

1
2
3
4
5
6
7
8
9
10
11
12
13
14
15
16
17
18
19
20
21
22
23
24
25
26
27
28
29
30
// 声明一个装饰器,第三个参数是 "成员的属性描述符",如果代码输出目标版本(target)小于 ES5 返回值会被忽略。
const validate = function (target: any, propertyKey: string, descriptor: PropertyDescriptor) {
// 保存原来的方法
let method = descriptor.value
// 重写原来的方法
descriptor.value = function (newValue: string) {
// 检查是否是空字符串
if (!newValue) {
throw Error('name is invalid')
} else {
// 否则调用原来的方法
method.call(this, newValue)
}
}
}

class User {
name: string
id: number
constructor(name:string, id: number) {
this.name = name
this.id = id
}

// 调用装饰器
@validate
changeName (newName: string) {
this.name = newName
}
}

这里我们可以看到,changeName 的逻辑没有任何改变,但其实它的行为已经通过装饰器 @validate 增强。

这就是装饰器的作用。装饰器可以用很直观的方式来描述代码:

1
2
3
4
5
6
7
8
class User {
name: string

@validateString
set name (@required name: string) {
this.name = name
}
}

装饰器工厂

装饰器的执行时机如下:

1
2
3
4
5
6
7
8
9
10
11
12
13
// 这是一个装饰器工厂,在外面使用 @god() 的时候就会调用这个工厂
function god(name: string) {
console.log(`god(): evaluated ${name}`)
// 这是装饰器,在 User 生成之后会执行
return function (target, propertyKey: string, descriptor: PropertyDescriptor) {
console.log('god(): called')
}
}

class User {
@god('test')
test () { }
}

以上代码输出结果

1
2
god(): evaluated test
god(): called

我们也可以直接声明一个装饰器来使用(要注意和装饰器工厂的区别):

1
2
3
4
5
6
7
8
9
10
function god(target, propertyKey: string, descriptor: PropertyDescriptor) {
console.log("god(): called")
}


class User {
// 注意这里不是 @god(),没有 ()
@god
test () { }
}

装饰器全家族

装饰器家族有 4 种装饰形式,注意,装饰器能装饰在类、方法、属性和参数上,但不能只装饰在函数上!

类装饰器

类装饰器表达式会在运行时当作函数被调用,类的构造函数作为其唯一的参数。

1
2
3
4
5
6
7
function sealed(constructor: Function) {
Object.seal(constructor)
Object.seal(constructor.prototype)
}

@sealed
class User { }

方法装饰器

方法装饰器表达式会在运行时当作函数被调用,传入下列 3个参数

  1. 对于静态成员来说是类的构造函数,对于实例成员是类的原型对象
  2. 成员的名字
  3. 成员的属性描述符 {value: any, writable: boolean, enumerable: boolean, configurable: boolean}
1
2
3
4
5
6
7
8
9
10
11
12
function god(name: string) {
return function (target, propertyKey: string, descriptor: PropertyDescriptor) {
// target: 对于静态成员来说是类的构造函数,对于实例成员是类的原型对象
// propertyKey: 成员的名字
// descriptor: 成员的属性描述符 {value: any, writable: boolean, enumerable: boolean, configurable: boolean}
}
}

class User {
@god('tasaid.com')
sayHello () { }
}

访问器装饰器

和函数装饰器一样,只不过是装饰于访问器上的。

1
2
3
4
5
6
7
8
9
10
11
12
13
14
15
16
function god(name: string) {
return function (target, propertyKey: string, descriptor: PropertyDescriptor) {
// target: 对于静态成员来说是类的构造函数,对于实例成员是类的原型对象
// propertyKey: 成员的名字
// descriptor: 成员的属性描述符 {value: any, writable: boolean, enumerable: boolean, configurable: boolean}
}
}

class User {
private _name: string
// 装饰在访问器上
@god('tasaid.com')
get name () {
return this._name
}
}

属性装饰器

属性装饰器表达式会在运行时当作函数被调用,传入下列 2个参数

  1. 对于静态成员来说是类的构造函数,对于实例成员是类的原型对象
  2. 成员的名字
1
2
3
4
5
6
7
8
9
function god(target, propertyKey: string) {
// target: 对于静态成员来说是类的构造函数,对于实例成员是类的原型对象
// propertyKey: 成员的名字
}

class User {
@god
name: string
}

参数装饰器

参数装饰器表达式会在运行时当作函数被调用,传入下列 3个参数:

  1. 对于静态成员来说是类的构造函数,对于实例成员是类的原型对象
  2. 成员的名字
  3. 参数在函数参数列表中的索引
1
2
3
4
5
6
7
8
9
10
11
12
const required = function (target, propertyKey: string, parameterIndex: number) {
// target: 对于静态成员来说是类的构造函数,对于实例成员是类的原型对象
// propertyKey: 成员的名字
// parameterIndex: 参数在函数参数列表中的索引
}

class User {
private _name : string;
set name(@required name : string) {
this._name = name;
}
}

例如上面 validate 的例子可以用在参数装饰器上

1
2
3
4
5
6
7
8
9
10
11
12
13
14
15
16
17
18
19
20
21
22
23
24
25
26
27
28
29
30
31
32
33
34
35
36
37
38
39
40
41
42
43
44
45
// 定义一个私有 key
const requiredMetadataKey = Symbol.for('router:required')

// 定义参数装饰器,大概思路就是把要校验的参数索引保存到成员中
const required = function (target, propertyKey: string, parameterIndex: number) {
// 属性附加
const rules = Reflect.getMetadata(requiredMetadataKey, target, propertyKey) || []
rules.push(parameterIndex)
Reflect.defineMetadata(requiredMetadataKey, rules, target, propertyKey)
}

// 定义一个方法装饰器,从成员中获取要校验的参数进行校验
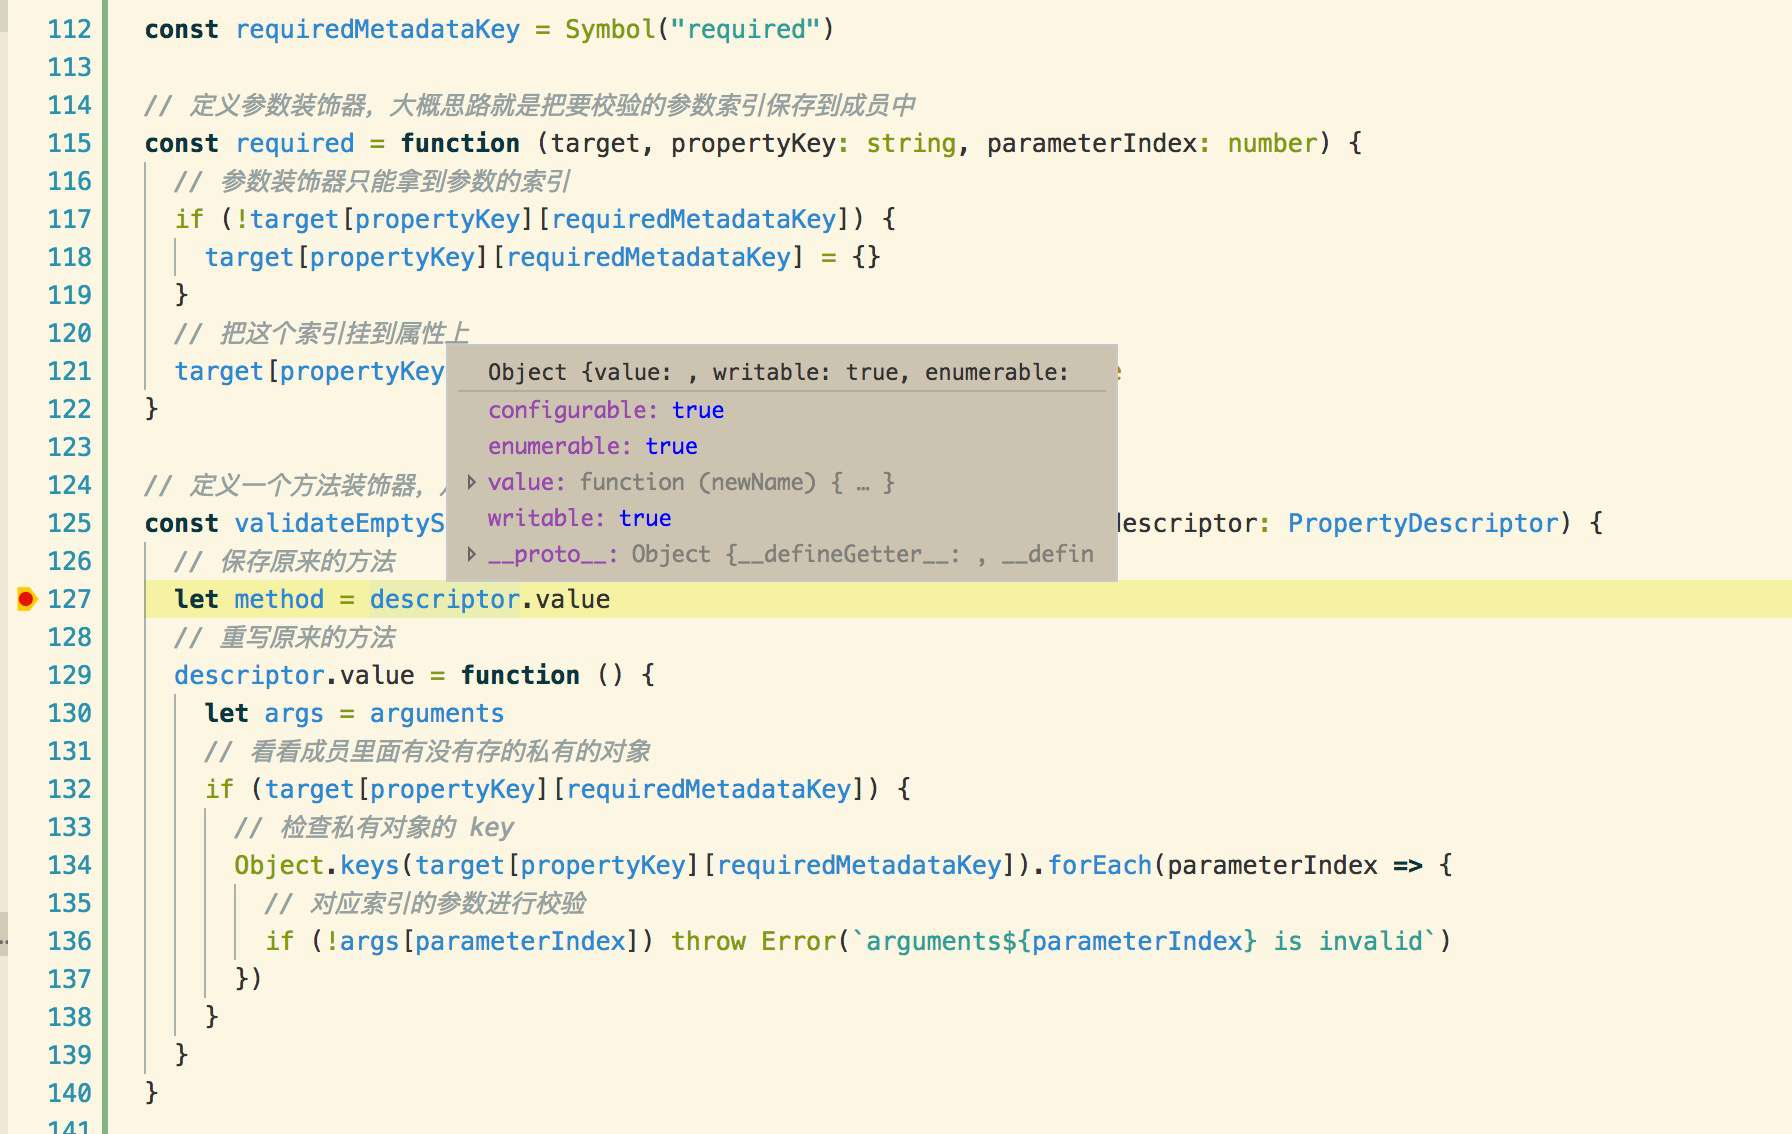
const validateEmptyStr = function (target, propertyKey: string, descriptor: PropertyDescriptor) {
// 保存原来的方法
let method = descriptor.value
// 重写原来的方法
descriptor.value = function () {
let args = arguments
// 看看成员里面有没有存的私有的对象
const rules = Reflect.getMetadata(requiredMetadataKey, target, propertyKey) as Array<number>
if (rules && rules.length) {
// 检查私有对象的 key
rules.forEach(parameterIndex => {
// 对应索引的参数进行校验
if (!args[parameterIndex]) throw Error(`arguments${parameterIndex} is invalid`)
})
}
return method.apply(this, arguments)
}
}

class User {
name: string
id: number
constructor(name:string, id: number) {
this.name = name
this.id = id
}

// 方法装饰器做校验
@validateEmptyStr
changeName (@required newName: string) { // 参数装饰器做描述
this.name = newName
}
}

image-20230928101700426

元数据反射

反射,就是在运行时动态获取一个对象的一切信息:方法/属性等等,特点在于动态类型反推导。在 TypeScript 中,反射的原理是通过设计阶段对对象注入元数据信息,在运行阶段读取注入的元数据,从而得到对象信息。

反射可以获取对象的:

  • 对象的类型
  • 成员/静态属性的信息(类型)
  • 方法的参数类型、返回类型
1
2
3
4
5
6
7
class User {
name: string = 'linkFly'

say (myName: string): string {
return `hello, ${myName}`
}
}

例如上面的例子,在 TypeScript 中可以获取到这些信息:

  • Class Name 为 User
  • User 有一个属性名为 name,有一个方法 say()
  • 属性 namestring 类型的,且值为 linkFly
  • 方法 say() 接受一个 string 类型的参数,在 TypeScript 中,参数名是获取不到的
  • 方法 say() 返回类型为 string

TypeScript 结合自身静态类型语言的特点,为使用了装饰器的代码声明注入了 3 组元数据:

  • design:type: 成员类型
  • design:paramtypes: 成员所有参数类型
  • design:returntype: 成员返回类型

由于元数据反射也是实验性 API,所以要在 tsconfig.json 里启用这个实验性特性:

1
2
3
4
5
6
7
8
9
{
"compilerOptions": {
"target": "ES5",
// 支持装饰器
"experimentalDecorators": true,
// 装饰器元数据
"emitDecoratorMetadata": true
}
}

然后安装 reflect-metadata

1
npm i reflect-metadata --save

这样在装饰器中,就可以访问到由 TypeScript 注入的基本信息元数据:

1
2
3
4
5
6
7
8
9
10
11
12
13
14
15
16
17
18
19
20
21
22
23
24
25
26
27
28
29
30
31
import 'reflect-metadata'

let meta = function (target: any, propertyKey: string) {

// 获取成员类型
let type = Reflect.getMetadata('design:type', target, propertyKey)
// 获取成员参数类型
let paramtypes = Reflect.getMetadata('design:paramtypes', target, propertyKey)
// 获取成员返回类型
let returntype = Reflect.getMetadata('design:returntype', target, propertyKey)
// 获取所有元数据 key (由 TypeScript 注入)
let keys = Reflect.getMetadataKeys(target, propertyKey)


console.log(keys) // [ 'design:returntype', 'design:paramtypes', 'design:type' ]
// 成员类型
console.log(type) // Function
// 参数类型
console.log(paramtypes) // [String]
// 成员返回类型
console.log(returntype) // String
}


class User {
// 使用这个装饰器就可以反射出成员详细信息
@meta
say (myName: string): string {
return `hello, ${myName}`
}
}

结语

Java 和 C# 由于是强类型编译型语言,所以反射就成了它们动态反推导数据类型的一个重要特性。

目前来说,JavaScript 因为其动态性,所以本身就包含了一些反射的特点:

  • 遍历对象内所有属性
  • 判断数据类型

TypeScript 补充了基础的类型元数据,只不过还是有些地方不够完善:在 TypeScript 中,参数名通过反射是获取不到的。

为什么获取不到呢?因为 JavaScript 本质上还是解释型语言,还迎合 Web 有一大特色:编译和压缩…

  • 编译完了之后 Class Name 可能叫做 User_1
  • 压缩完了之后参数 myName 可能叫 m
  • 运行时可能传了 2 个,3 个,或者 N 个参数

angular 1.x 中使用的依赖注入,采用传字符串那么蹩脚的方式,也是对 JavaScript 反射机制的不完善做出的一种妥协。

路由进化

express 路由

首先我们来看一个简单的 express 路由 (router):

1
2
3
4
5
6
7
8
9
// 对网站首页的访问返回 "Hello World!"
app.get('/', function (req: Request, res: Response) {
res.send('Hello World!')
});


app.post('/user', function (req: Request, res: Response) {
res.send(`User Id ${req.query.id}`)
})

在上面的路由代码我们演示了一个普通流水线式的路由。

基于上一篇文章中我们学到的装饰器和反射的知识,我们将要实现 路由的配置通过装饰器实现,并且实现一层路由逻辑的封装。

路由进化

基于装饰器和反射,我们要实现的路由最终效果是这样的:

1
2
3
4
5
6
7
8
9
class Home {
@path('/user')
@httpGet
user (id: string) {
return `User Id ${id}`
}
}
GET HTTP/1.1
Host: /user?id=tasaid.com

这段代码相比传统的路由配置,优点如下:

  • 将路由的配置抽离成为了装饰器,让整个 router 函数内部只需要处理业务逻辑即可,路由配置简单明了
  • 隐藏 reqres,每个 router 直接返回结果即可,无需自己再输出结果

装饰器: HTTP Method

我们先编写 HTTP Method 的装饰器,我们将实现两个装饰器,分别叫做 httpGethttpPost,对应 HTTP Method 的 GET/POST

原理上,我们会将 router 配置的数据都挂到使用装饰器的方法上。

1
2
3
4
5
6
7
8
9
10
11
12
import 'reflect-metadata'

export const symbolHttpMethodsKey = Symbol("router:httpMethod")

export const httpGet = function (target: any, propertyKey: string) {
// 挂载到调用装饰器的方法上
Reflect.defineMetadata(symbolHttpMethodsKey, 'get', target, propertyKey)
}

export const httpPost = function (target: any, propertyKey: string) {
Reflect.defineMetadata(symbolHttpMethodsKey, 'post', target, propertyKey)
}

装饰器: path

有了上面 HTTP Method 装饰器的实现,我们再实现 path 装饰器将会很简单。

当然,我们还可以在 path 中实现对原方法的封装:隐藏 reqres,并对 router 的输出结果进行封装。

注意这里使用的是装饰器工厂:

1
2
3
4
5
6
7
8
9
10
11
12
13
14
15
16
17
18
19
20
import 'reflect-metadata'

export const symbolPathKey = Symbol.for('router:path')

export let path = (path: string): Function => {
return function (target: any, propertyKey: string, descriptor: TypedPropertyDescriptor<Function>) {

Reflect.defineMetadata(symbolPathKey, path, target, propertyKey)

if (!descriptor.value) return
// 覆盖掉原来的 router method,在外层做封装
let oldMethod = descriptor.value
descriptor.value = function (req: Request, res: Response) {
const params = Object.assign({}, req.body, req.query)
let methodResult = oldMethod.call(this, params)
// 输出返回结果
res.send(methodResult)
}
}
}

Router? Controller!

现在,我们需要将所有的 Router 按照自己的业务规则/或者自定义的其他规则进行归类 —— 然后提取出对应的 Class,例如下面的 User Class 就是把用户信息所有的 router 都归类在一起:

1
2
3
4
5
6
7
8
9
class User {
@httpPost
@path('/user/login')
login() { }

@httpGet
@path('/user/exit')
exit() { }
}

然后在 express 配置的入口逻辑那里,把 class 对应的方法遍历一遍,然后使用 reflect-metadata 反射对应的 router 配置即可:

1
2
3
4
5
6
7
8
9
10
11
12
13
14
15
16
17
import 'reflect-metadata'
// 装饰器挂载数据的 key
import { symbolHttpMethodsKey, symbolPathKey } from './decorators'

const createController = (app: Express) => {
let user = new User()
for (let methodName in user) {
let method = user[methodName]
if (typeof method !== 'function') break
// 反射得到挂载的数据
let httpMethod = Reflect.getMetadata(symbolHttpMethodsKey, user, methodName)
let path = Reflect.getMetadata(symbolPathKey, user, methodName)

// app.get('/', () => any)
app[httpMethod](path, method)
}
}

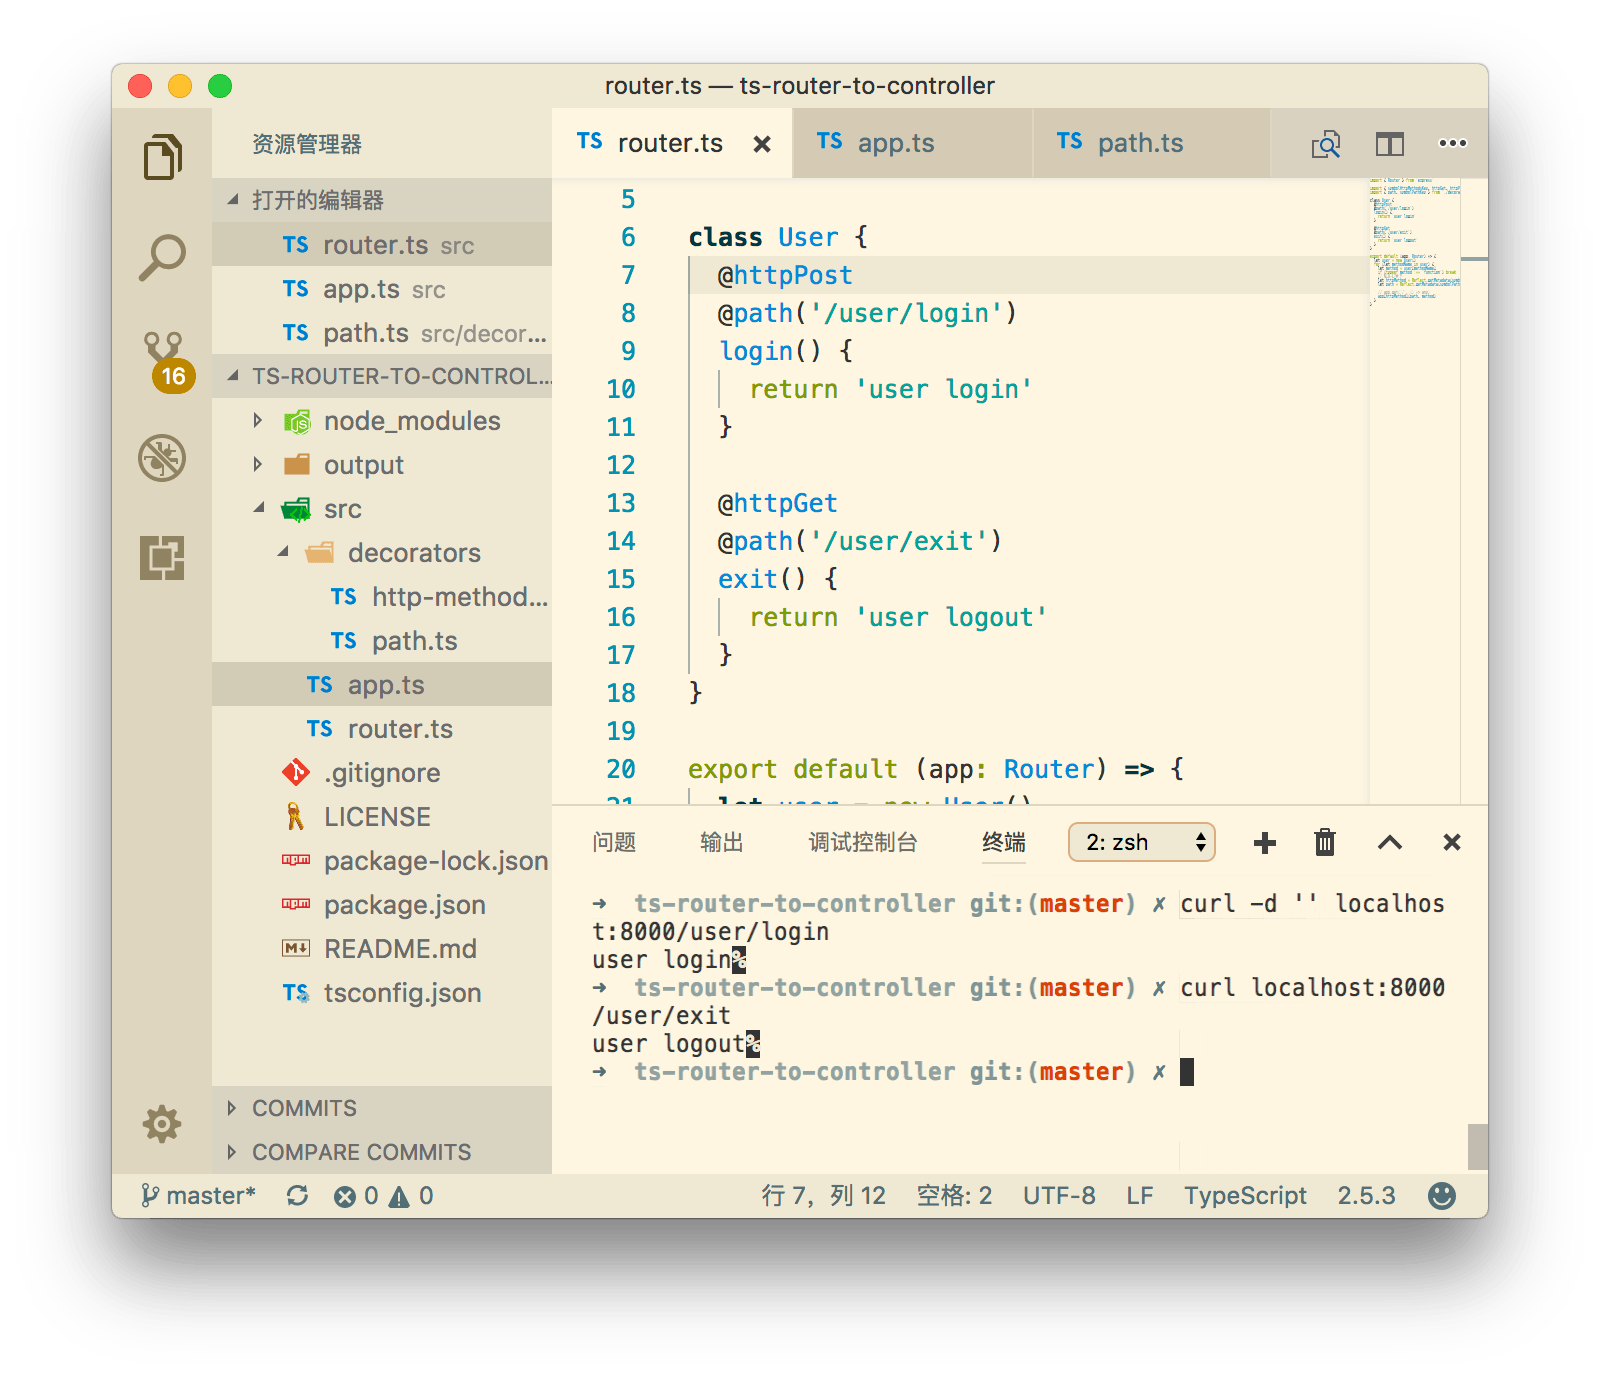
至此,我们的 express 路由进化完毕,效果如下:

image-20230928101706235

完整的例子可以参考我的 Github

结语

装饰器目前在 ECMAScript 新提案中的 建议征集的第二阶段(Stage 2),由于装饰器在其他语言中早已实现,例如 Java 的注解(Annotation) 和 C# 的特性(Attribute),所以纳入 ECMAScript 规范只是时间问题了。

装饰器来装饰路由,并且封装 router 操作的的思路缘起 .NET MVC 架构:

image-20230928101709985

angular 2.x 使用也引入了装饰器作为核心开发,随着规范的推进,相信装饰器进入大家视野,应用的场景也会越来越多。

Vue 引入 TypeScript

Vue 引入 TypeScript

Vue 在 官方文档中有一节简单的介绍了如何引入 TypeScript,可惜文档太过简单,真正投入生产还有许多的细节没有介绍。

我们对此进行了一系列探索,最后我们的风格是这样的:

1
2
3
4
5
6
7
8
9
10
11
12
13
14
15
16
17
18
19
20
21
22
23
24
25
26
27
28
29
30
31
import { Component, Prop, Vue, Watch } from 'vue-property-decorator'
import { State, Action, Mutation, namespace } from 'vuex-class'
import Toast from 'components/Toast.vue'

const userState = namespace('business/user', State)

@Component({
components: { Toast },
})
export default class extends Vue {
// data
title = 'demo'

@Prop({ default: '' })
text: string

// store
@userState userId

// computed
get name (): boolean {
return this.title + this.text
}

// watch
@Watch('text')
onChangeText () { }

// hooks
mounted() { }
}

大体来说,Vue 引入 TypeScript 可以用到这些生态库:

下面我们一步步来介绍 Vue 如何引入 TypeScript

webpack 和 tsconfig.json 配置

TypeScript 为 Webpack 提供了 ts-loader

1
npm i ts-loader --save-dev

webpack 配置如下:

1
2
3
4
5
6
7
8
9
10
11
12
13
14
15
16
17
18
{
module: {
rules: [
{
test: /\.vue$/,
loader: 'vue-loader',
options: { /* ... */ },
},
{
test: /\.ts$/,
loader: 'ts-loader',
options: {
appendTsSuffixTo: [/\.vue$/],
}
},
],
}
}

ts-loader 会检索当前目录下的 tsconfig.json 文件,如果找不到会一层层往上找。

这里有一份参考的 tsconfig.json 配置:

1
2
3
4
5
6
7
8
9
10
11
12
13
14
15
16
17
18
19
20
21
22
23
24
25
26
27
28
29
30
31
32
33
34
35
36
37
38
39
40
41
42
43
44
45
46
47
48
49
50
51
52
{
// 编译选项
"compilerOptions": {
// 输出目录
"outDir": "./output",
// 是否包含可以用于 debug 的 sourceMap
"sourceMap": true,
// 以严格模式解析
"strict": true,
// 采用的模块系统
"module": "esnext",
// 如何处理模块
"moduleResolution": "node",
// 编译输出目标 ES 版本
"target": "es5",
// 允许从没有设置默认导出的模块中默认导入
"allowSyntheticDefaultImports": true,
// 将每个文件作为单独的模块
"isolatedModules": false,
// 启用装饰器
"experimentalDecorators": true,
// 启用设计类型元数据(用于反射)
"emitDecoratorMetadata": true,
// 在表达式和声明上有隐含的any类型时报错
"noImplicitAny": false,
// 不是函数的所有返回路径都有返回值时报错。
"noImplicitReturns": true,
// 从 tslib 导入外部帮助库: 比如__extends,__rest等
"importHelpers": true,
// 编译过程中打印文件名
"listFiles": true,
// 移除注释
"removeComments": true,
"suppressImplicitAnyIndexErrors": true,
// 允许编译javascript文件
"allowJs": true,
// 解析非相对模块名的基准目录
"baseUrl": "./",
// 指定特殊模块的路径
"paths": {
"jquery": [
"node_modules/jquery/dist/jquery"
]
},
// 编译过程中需要引入的库文件的列表
"lib": [
"dom",
"es2015",
"es2015.promise"
]
}
}

由于 TypeScript 默认并不支持 *.vue 后缀的文件,所以在 vue 项目中引入的时候需要创建一个 vue-shims.d.ts 文件,放在项目项目对应使用目录下,例如 src/vue-shims.d.ts

1
2
3
4
declare module "*.vue" {
import Vue from "vue";
export default Vue;
}

意思是告诉 TypeScript *.vue 后缀的文件可以交给 vue 模块来处理。

而在代码中导入 *.vue 文件的时候,需要写上 .vue 后缀。原因还是因为 TypeScript 默认只识别 *.ts 文件,不识别 *.vue 文件:

1
import Component from 'components/component.vue'

vue-class-component

vue-class-component 对 Vue 组件进行了一层封装,让 Vue 的组件语法在结合了 TypeScript 语法之后更加扁平化:

1
2
3
4
5
6
7
8
9
10
11
12
13
14
15
16
17
18
19
20
21
22
23
24
25
26
27
28
29
30
31
32
33
34
<template>
<div>
<input v-model="msg">
<p>msg: {{ msg }}</p>
<p>computed msg: {{ computedMsg }}</p>
<button @click="greet">Greet</button>
</div>
</template>

<script lang="ts">
import Vue from 'vue'
import Component from 'vue-class-component'

@Component
export default class App extends Vue {
// 初始化数据
msg = 123

// 声明周期钩子
mounted () {
this.greet()
}

// 计算属性
get computedMsg () {
return 'computed ' + this.msg
}

// 方法
greet () {
alert('greeting: ' + this.msg)
}
}
</script>

上面的代码和下面没有引入 vue-class-component 的语法一样:

1
2
3
4
5
6
7
8
9
10
11
12
13
14
15
16
17
18
19
20
21
22
23
24
25
26
export default {
data () {
return {
msg: 123
}
}

// 声明周期钩子
mounted () {
this.greet()
}

// 计算属性
computed: {
computedMsg () {
return 'computed ' + this.msg
}
}

// 方法
methods: {
greet () {
alert('greeting: ' + this.msg)
}
}
}

vue-property-decorator

vue-property-decorator 是在 vue-class-component 上增强了更多的结合 Vue 特性的装饰器,新增了这 7 个装饰器:

  • @Emit
  • @Inject
  • @Model
  • @Prop
  • @Provide
  • @Watch
  • @Component (从 vue-class-component 继承)

这里仅列举常用的 @Prop/@Watch/@Component

1
2
3
4
5
6
7
8
9
10
11
12
13
14
15
16
17
18
19
20
import { Component, Emit, Inject, Model, Prop, Provide, Vue, Watch } from 'vue-property-decorator'

@Component
export class MyComponent extends Vue {

@Prop()
propA: number = 1

@Prop({ default: 'default value' })
propB: string

@Prop([String, Boolean])
propC: string | boolean

@Prop({ type: null })
propD: any

@Watch('child')
onChildChanged(val: string, oldVal: string) { }
}

相当于:

1
2
3
4
5
6
7
8
9
10
11
12
13
14
15
16
17
18
19
20
21
22
export default {
props: {
checked: Boolean,
propA: Number,
propB: {
type: String,
default: 'default value'
},
propC: [String, Boolean],
propD: { type: null }
}
methods: {
onChildChanged(val, oldVal) { },
},
watch: {
'child': {
handler: 'onChildChanged',
immediate: false,
deep: false
},
}
}

vuex-class

vuex-classvue-class-component 上,提供了 Vuex 的绑定的装饰器语法。

我们编写一个简单的 Vuex store:

1
2
3
4
5
6
7
8
9
10
11
12
13
14
15
16
17
18
19
20
21
22
23
24
25
26
27
28
29
30
31
32
33
34
35
36
37
import Vue from 'vue'
import Vuex from 'vuex'

// vuex
const store = new Vuex.Store({
state: {
name: 'linkFly'
}
modules: {
demo: {
// 带命名空间
namespaced: true,
state: {
count: 0
},
mutations: {
increment (state, n?: number) {
if (n != null )
state.count = n
else
state.count++
}
},
actions: {
increment ({ commit }) {
commit.commit('increment')
}
}
}
}
})

const app = new Vue({
el: '#app',
store,
template: `<div class="app"></div>`
})

使用 vuex-class 之后:

1
2
3
4
5
6
7
8
9
10
11
12
13
14
15
16
17
18
19
20
21
22
23
24
25
26
27
28
import { Component, Vue } from 'vue-property-decorator'

import {
State,
Getter,
Action,
Mutation,
namespace
} from 'vuex-class'

const ModuleState = namespace('demo', State)
const ModuleAction = namespace('demo', Action)
const ModuleMutation = namespace('demo', Mutation)

@Component
export class MyComp extends Vue {
@ModuleState('count') count
@ModuleAction increment
@ModuleMutation('increment') mutationIncrement
@State name

created () {
this.name // -> store.state.name => linkFly
this.count // -> store.state.demo.count => 0
this.increment() // -> store.dispatch('demo/increment')
this.mutationIncrement(2) // -> store.commit('demo/increment', 2)
}
}

vuex-ts-decorators

由于使用 vue-class-component,在 Vue 组件中我们已经感受到了装饰器的强大语法糖,于是我们还希望在 Vuex Store 中也能使用装饰器的语法: vuex-ts-decorators 就是干这个事情的。

vuex-ts-decorators 可以让你结合装饰器来编写 Vuex Store。

由于 vuex-ts-decorators 提供的包是未经编译的 *.ts 代码,如果你排除了 node_modules 的编译,则需要在 ts-loader 中单独加上对它的编译:

1
2
3
4
5
6
7
8
9
{
test: /\.ts$/,
loader: 'ts-loader',
// 加上对 vuex-ts-decorators 这个包的编译
exclude: [/node_modules/, /node_modules\/(?!vuex-ts-decorators)/],
options: {
appendTsSuffixTo: [/\.vue$/],
}
},

然后就可以愉快使用它来编写 Vuex Store 了。

1
2
3
4
5
6
7
8
9
10
11
12
13
14
15
16
17
18
19
20
21
22
23
24
25
26
27
28
29
30
31
32
33
34
35
36
37
38
39
40
41
42
43
44
45
46
47
48
import { module, action, mutation } from 'mfe-vuex-ts-decorators'


type actions = { }

type mutations = {
// 定义对应 mutations 的参数类型
incrementMutation: number
}


type TypedDispatch = <T extends keyof actions>(type: T, value?: actions[T]) => Promise<any[]>;
type TypedCommit = <T extends keyof mutations>(type: T, value?: mutations[T]) => void;


@module({
store: false,
namespaced: true
})
class demo {
// 用于类型检查,使 commit/dispatch 的方法可以找到并且可以被类型检查
dispatch: TypedDispatch
commit: TypedCommit

// state
count = 0

// getter
get countGetter(): string {
return this.count
}

// action
@action
increment() {
this.commit('incrementMutation');
}

// mutation
@mutation
incrementMutation(payload?: mutations['incrementMutation']) {
if (n != null )
this.count = payload
else
this.count++
}
}

vuex-ts-decorators 文档没有提及 @module 装饰器的参数:

1
2
3
4
5
@module({
store?: boolean = false; // 是否自动挂载到 Vuex Store 下,如果为 false 则
modules?: Object; // 子 modules
namespaced?: boolean; // 命名空间
} | (any, { decorators: any } => any)) // 也可以使用函数

注意事项

vuex-ts-decorators 这个项目目前最后一次更新时间是 2017 年 2 月 21 日,原作者说自己正在开发对应的新项目,这个项目已经不再维护,但是目前还没有看到新项目的进展。

但可以肯定的是,原作者已经不再维护 vuex-ts-decorators 这个项目。

我们的做法是在这个项目上重新 fork 一个新项目,并且修正了遇到的隐藏 bug。后续我们会自己维护这个项目。(fork 到了内部项目中,后续在这个项目基础上进行二次开发,到时候会公布出来,当然,其实它的功能很简单完全可以自己开发一个)

目前已知 bug:

当使用 @module({ store: false }) 后,被包装的 class 会返回处理后的 Vuex Store,结构为: { state: any, getters: any, modules: any, actions: any, mutations: any }

如果最后 new Vuex.Store({ options: object }) 的时候传递的不是 @module 包装后的 Vuex Store(例如对这个 Vuex Store 做了一层深拷贝),则会导致 mutations 中 this 丢失。

bug 点在 这一行,处理办法:

1
2
3
4
5
store.mutations[name] = (state: any, ...args: any[]) => {
method.apply(store.state, args);
// 替换为
method.apply(state, args);
}

原因是因为 vuex-ts-decorators 一直在自己内部引用着生成的 Vuex Store,如果最终 new Vuex.Store() 的时候没有传递它自己生成的 Vuex Store 就会导致引用不正确。

结语

围绕 vue-class-component 展开的生态圈,如同一把利剑,通过各种装饰器,能够结合 TypeScript 将 Vue 武装的更加强大。在这篇文章发布之际,很巧的是:Vue 作者尤雨溪也宣布在 Vue 2.5 以后将全面支持 TypeScript(译文看这里),并且声明Vue 将尽力做到和 vue-class-component 兼容

前端的场景已经不再像当年一样简单的切图、画简单的样式和写简单的脚本。应用越来越庞大,需求越来越复杂。TypeScript 有一个很好的切入点:从语言的角度解决了大型 Web 应用的静态类型约束痛点。

相信随着时间的推移,会有越来越多的人和框架加入到 TypeScript 大军。

至此,我们的 《从 JavaScript 到 TypeScript》 系列文章已经结束。最后,Welcome to TypeScript!