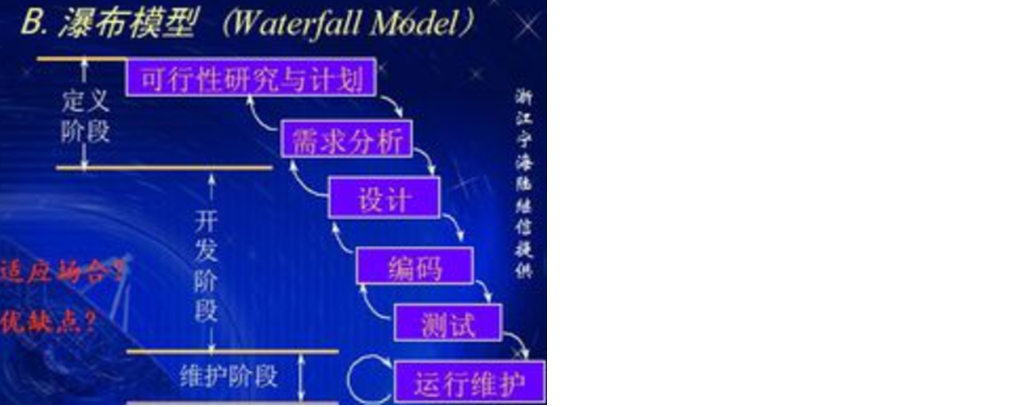
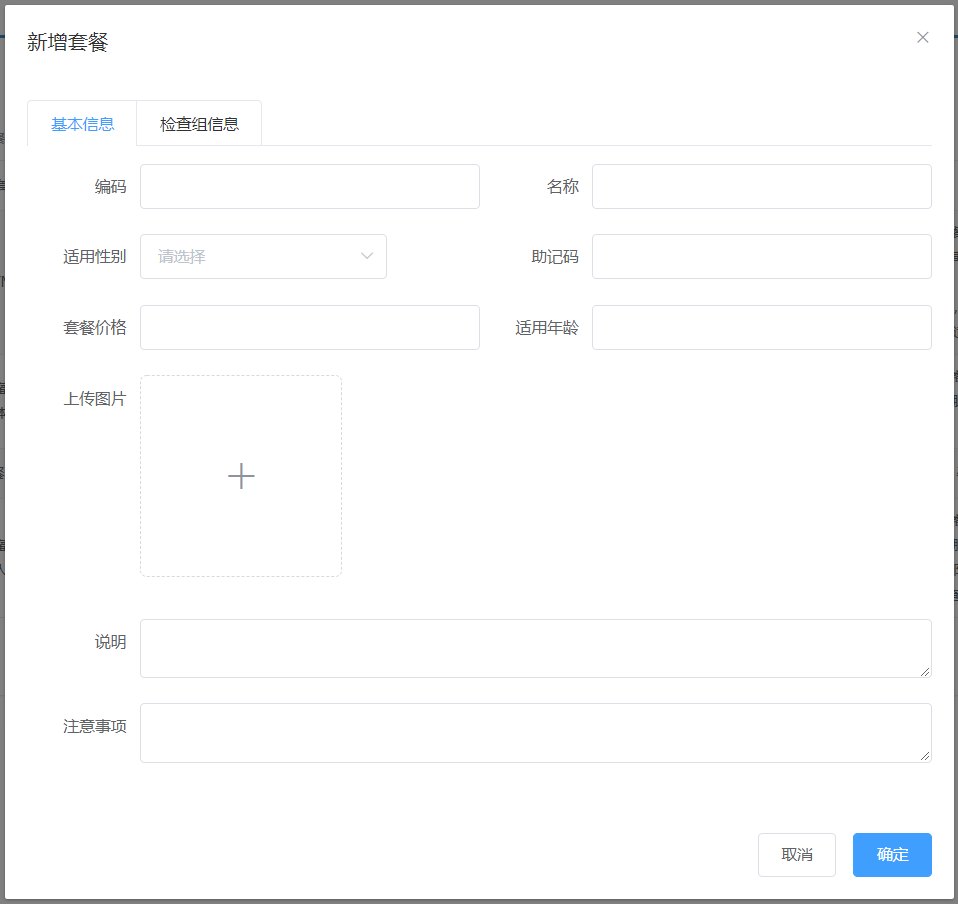
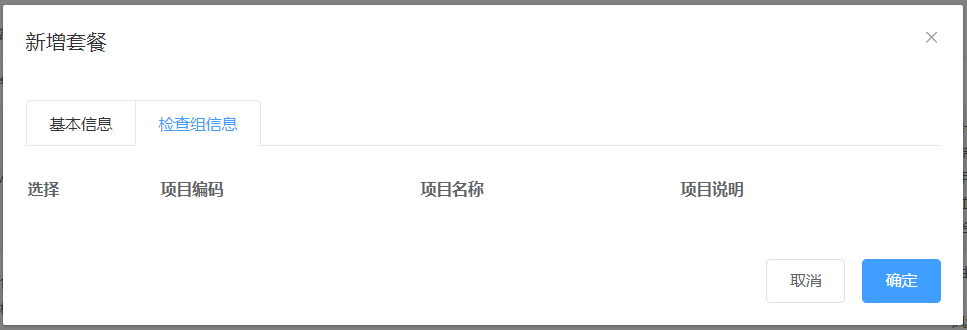
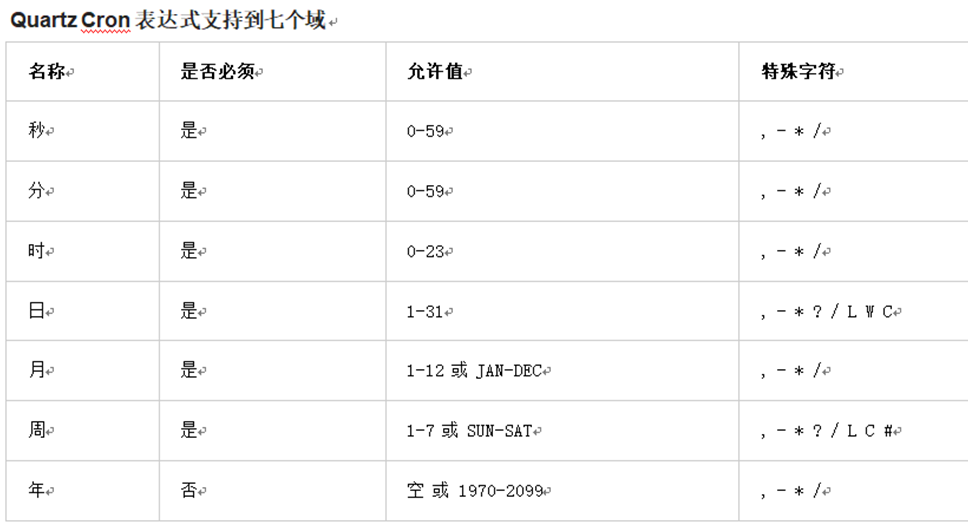
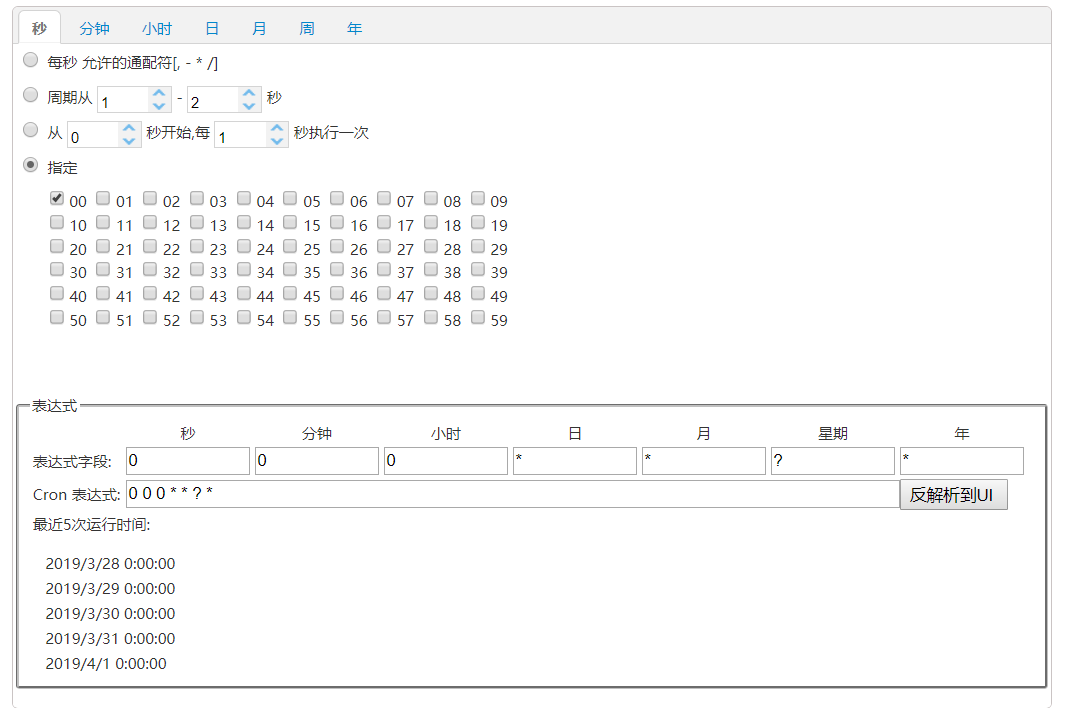
第1章 项目概述和环境搭建 1. 项目概述 1.1 软件开发流程 1.1.1 瀑布模型 软件开发一般会经历如下几个阶段,整个过程是顺序展开,所以通常称为瀑布模型。
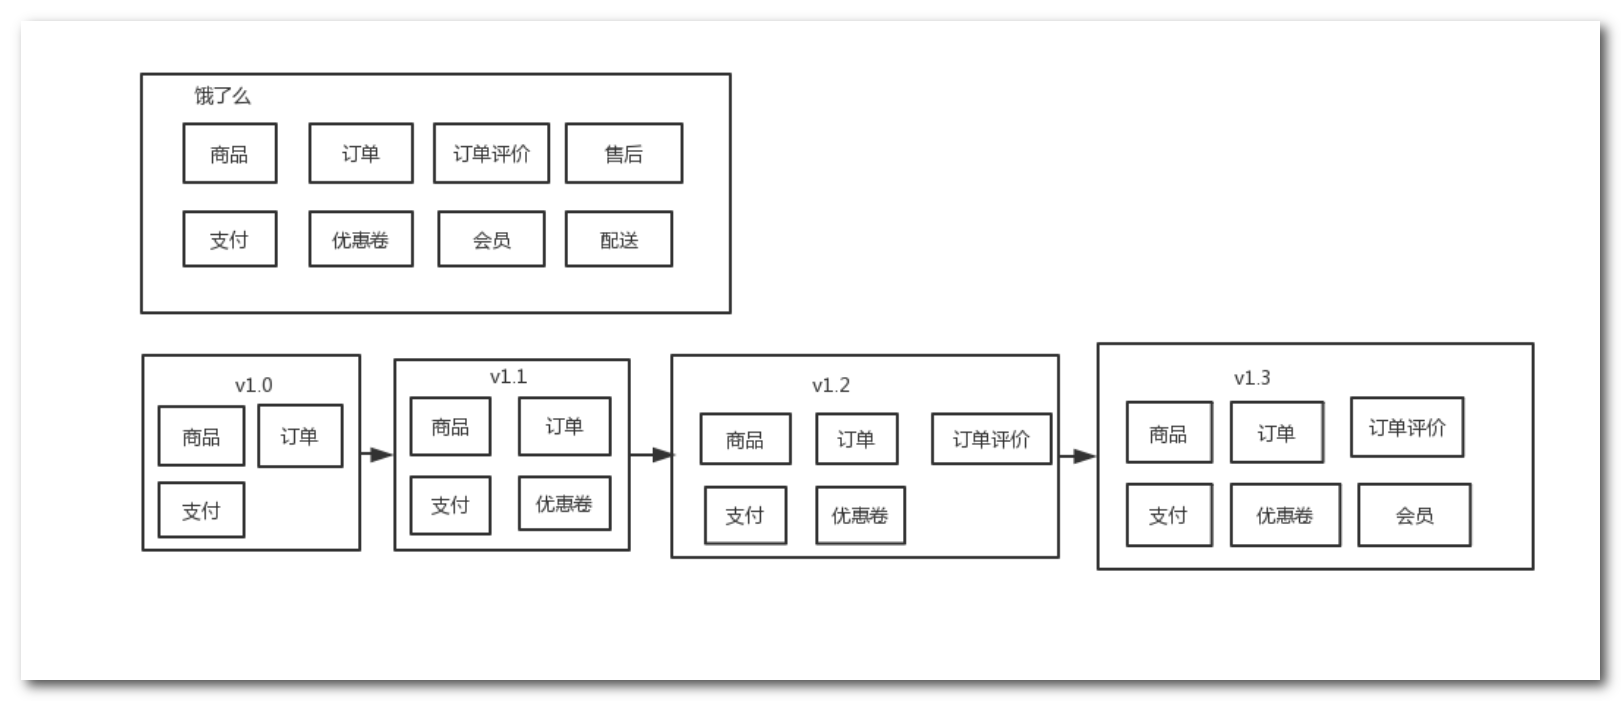
1.1.2 敏捷开发 敏捷开发以用户的需求进化为核心,采用迭代、循序渐进的方法进行软件开发
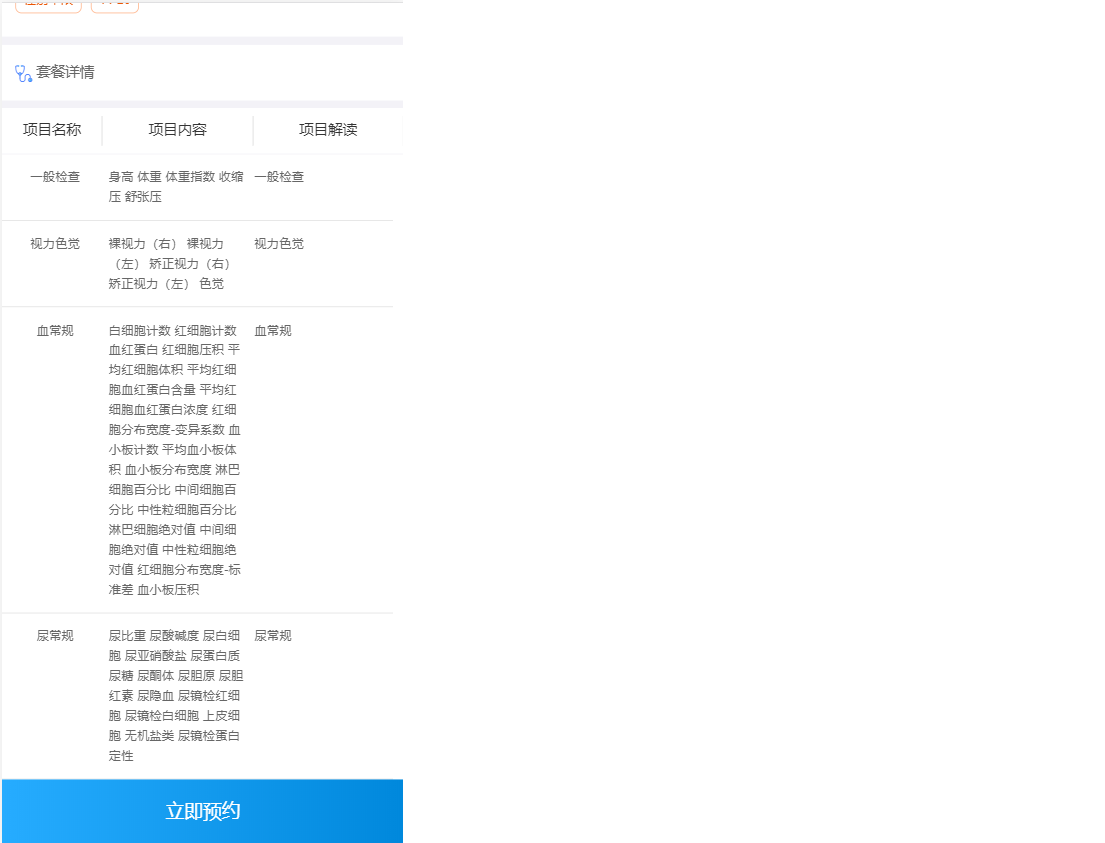
1.2 项目介绍 传智健康管理系统是一款应用于健康管理机构的业务系统,实现健康管理机构工作内容可视化、会员管理专业化、健康评估数字化、健康干预流程化、知识库集成化,从而提高健康管理师的工作效率,加强与会员间的互动,增强管理者对健康管理机构运营情况的了解。
详见:资料中的传智健康PRD文档.docx (Product Requirements Document PRD)
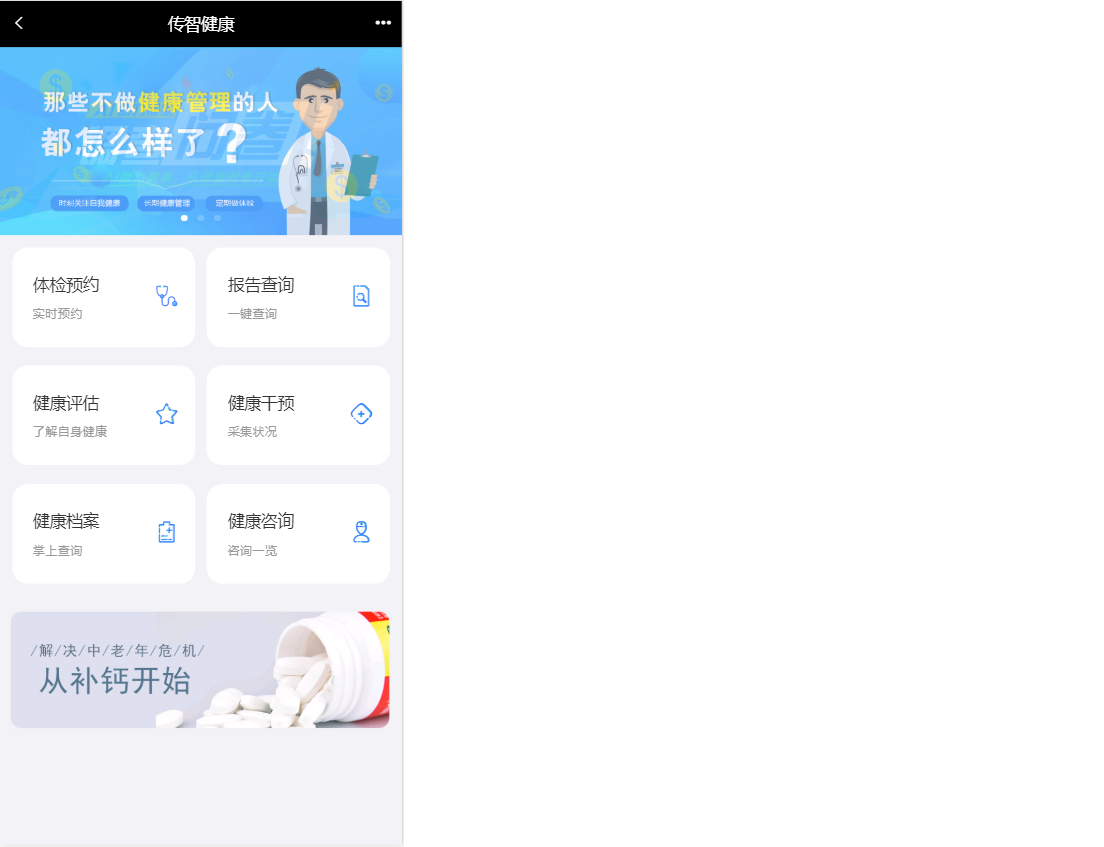
1.3 原型展示 参见资料中的静态原型。
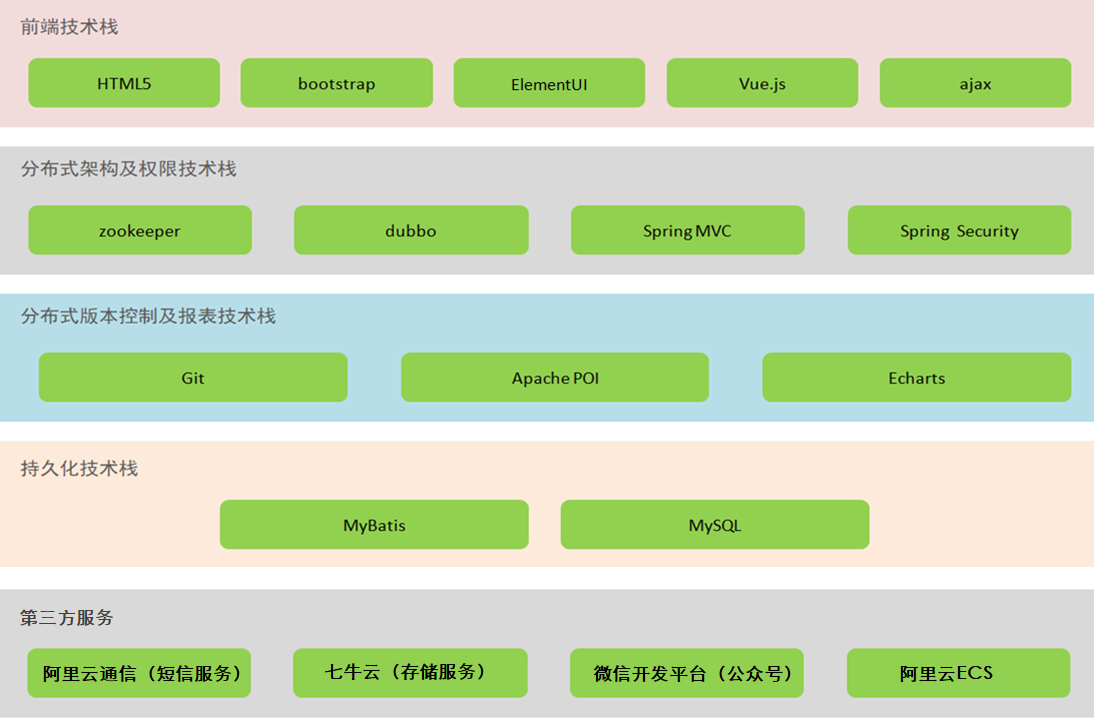
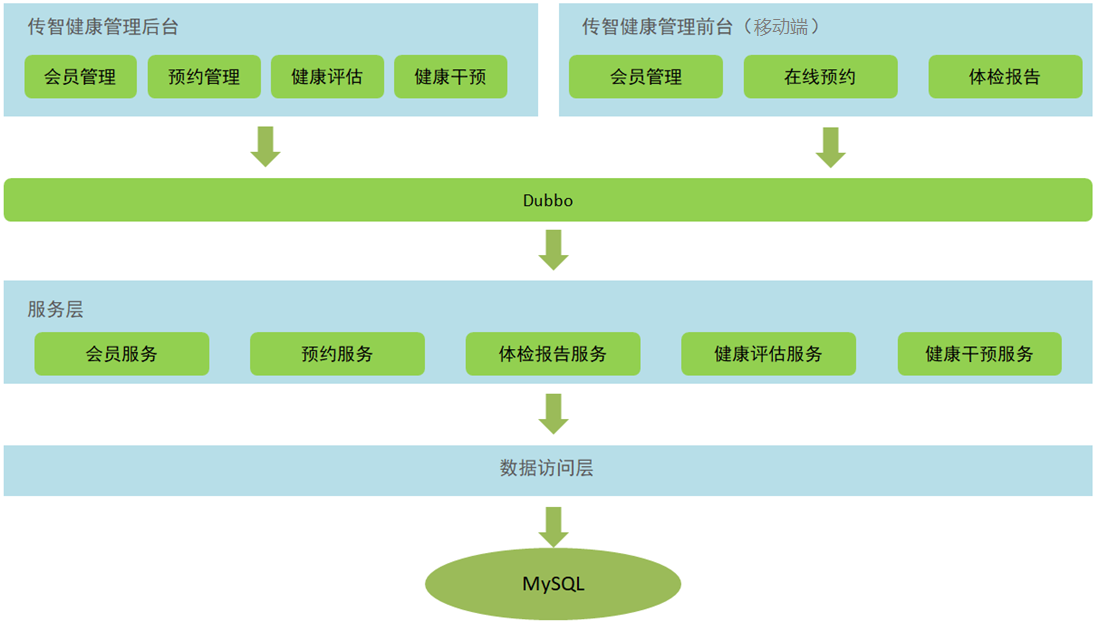
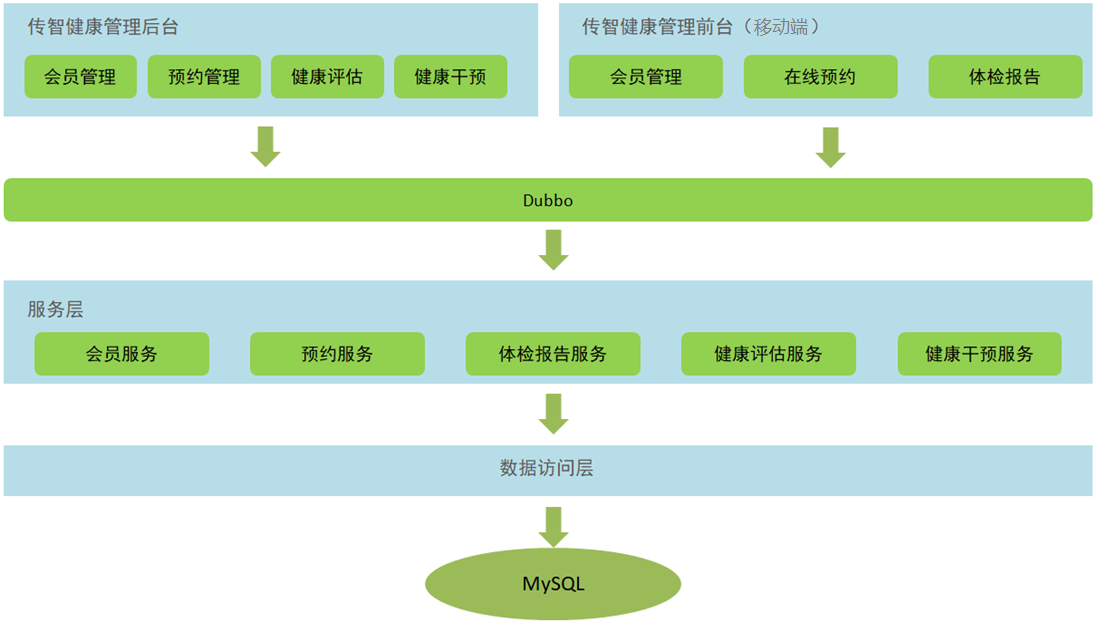
1.4 技术架构
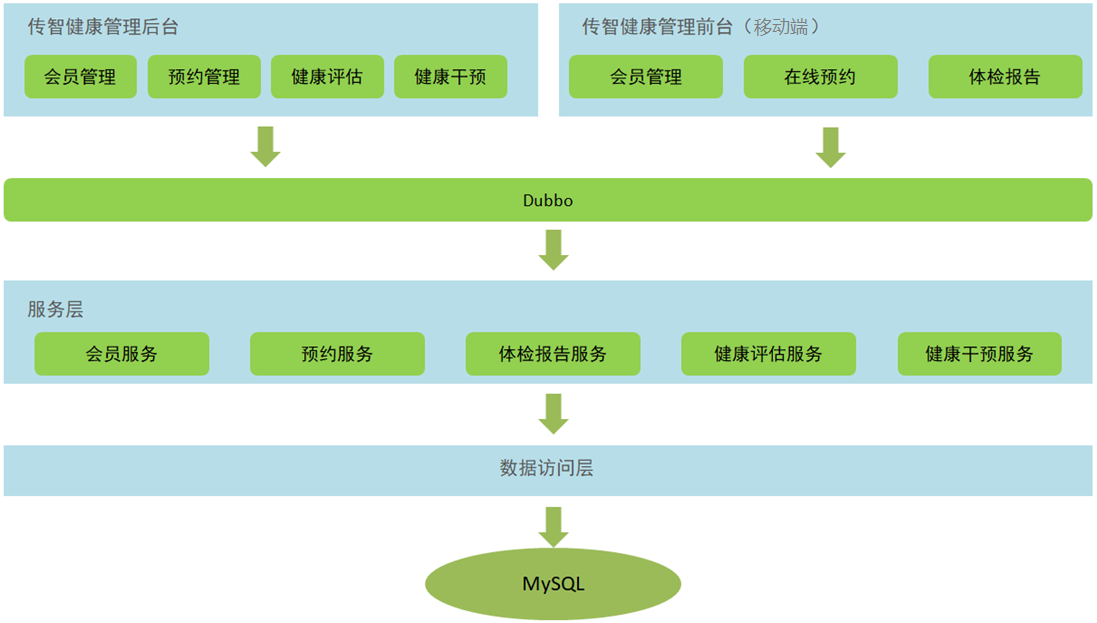
1.5 功能架构
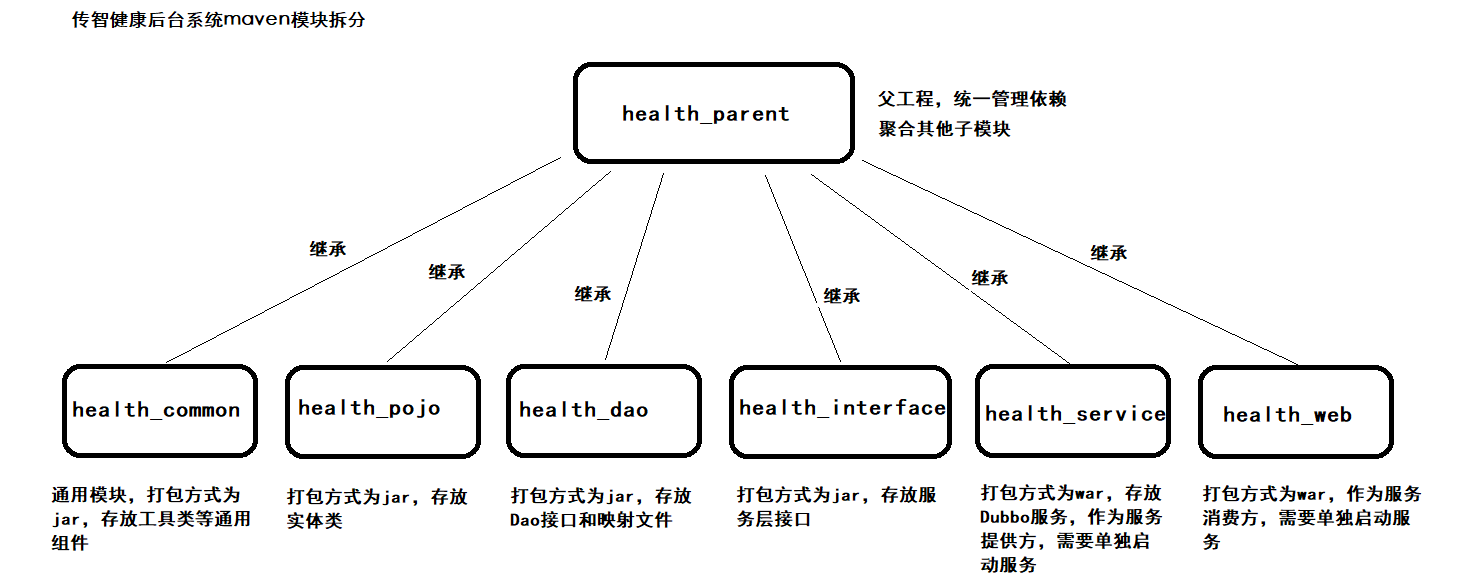
2. 环境搭建 2.1 项目结构 本项目采用maven分模块开发方式,即对整个项目拆分为几个maven工程,每个maven工程存放特定的一类代码,具体如下:
各模块职责定位:
health_parent:父工程,打包方式为pom,统一锁定依赖的版本,同时聚合其他子模块便于统一执行maven命令
health_common:通用模块,打包方式为jar,存放项目中使用到的一些工具类和常量类
health_pojo:打包方式为jar,存放实体类和返回结果类等
health_dao:持久层模块,打包方式为jar,存放Dao接口和Mapper映射文件等
health_interface:打包方式为jar,存放服务接口
health_service:Dubbo服务模块,打包方式为war,存放服务实现类,作为服务提供方,需要部署到tomcat运行
health_web:打包方式为war,作为Dubbo服务消费方,存放Controller、HTML页面、js、css、spring配置文件等,需要部署到tomcat运行
2.2 maven项目搭建 通过前面的项目功能架构图可以知道本项目分为传智健康管理后台和传智健康管理前台(微信端),本小节我们先搭建管理后台项目
2.2.1 health_parent 创建health_parent,父工程,打包方式为pom,用于统一管理依赖版本
用到哪个导入哪个,要知道,依赖越多包越大,上传服务器越慢。
pom.xml
1
2
3
4
5
6
7
8
9
10
11
12
13
14
15
16
17
18
19
20
21
22
23
24
25
26
27
28
29
30
31
32
33
34
35
36
37
38
39
40
41
42
43
44
45
46
47
48
49
50
51
52
53
54
55
56
57
58
59
60
61
62
63
64
65
66
67
68
69
70
71
72
73
74
75
76
77
78
79
80
81
82
83
84
85
86
87
88
89
90
91
92
93
94
95
96
97
98
99
100
101
102
103
104
105
106
107
108
109
110
111
112
113
114
115
116
117
118
119
120
121
122
123
124
125
126
127
128
129
130
131
132
133
134
135
136
137
138
139
140
141
142
143
144
145
146
147
148
149
150
151
152
153
154
155
156
157
158
159
160
161
162
163
164
165
166
167
168
169
170
171
172
173
174
175
176
177
178
179
180
181
182
183
184
185
186
187
188
189
190
191
192
193
194
195
196
197
198
199
200
201
202
203
204
205
206
207
208
209
210
211
212
213
214
215
216
217
218
219
220
221
222
223
224
225
226
<?xml version="1.0" encoding="UTF-8" ?> <project xmlns ="http://maven.apache.org/POM/4.0.0" xmlns:xsi ="http://www.w3.org/2001/XMLSchema-instance" xsi:schemaLocation ="http://maven.apache.org/POM/4.0.0 http://maven.apache.org/xsd/maven-4.0.0.xsd" > <modelVersion > 4.0.0</modelVersion > <groupId > com.itheima</groupId > <artifactId > health_parent</artifactId > <version > 1.0-SNAPSHOT</version > <packaging > pom</packaging > <properties > <junit.version > 4.12</junit.version > <spring.version > 5.0.5.RELEASE</spring.version > <pagehelper.version > 5.1.4</pagehelper.version > <servlet-api.version > 2.5</servlet-api.version > <dubbo.version > 2.6.0</dubbo.version > <zookeeper.version > 3.4.7</zookeeper.version > <zkclient.version > 0.1</zkclient.version > <mybatis.version > 3.4.5</mybatis.version > <mybatis.spring.version > 1.3.1</mybatis.spring.version > <mysql.version > 5.1.32</mysql.version > <druid.version > 1.0.9</druid.version > <commons-fileupload.version > 1.3.1</commons-fileupload.version > <spring.security.version > 5.0.5.RELEASE</spring.security.version > <poi.version > 3.14</poi.version > <jedis.version > 2.9.0</jedis.version > <quartz.version > 2.2.1</quartz.version > <hutool.version > 4.5.5</hutool.version > </properties > <dependencyManagement > <dependencies > <dependency > <groupId > org.springframework</groupId > <artifactId > spring-context</artifactId > <version > ${spring.version}</version > </dependency > <dependency > <groupId > org.springframework</groupId > <artifactId > spring-beans</artifactId > <version > ${spring.version}</version > </dependency > <dependency > <groupId > org.springframework</groupId > <artifactId > spring-web</artifactId > <version > ${spring.version}</version > </dependency > <dependency > <groupId > org.springframework</groupId > <artifactId > spring-webmvc</artifactId > <version > ${spring.version}</version > </dependency > <dependency > <groupId > org.springframework</groupId > <artifactId > spring-jdbc</artifactId > <version > ${spring.version}</version > </dependency > <dependency > <groupId > org.springframework</groupId > <artifactId > spring-aspects</artifactId > <version > ${spring.version}</version > </dependency > <dependency > <groupId > org.springframework</groupId > <artifactId > spring-jms</artifactId > <version > ${spring.version}</version > </dependency > <dependency > <groupId > org.springframework</groupId > <artifactId > spring-context-support</artifactId > <version > ${spring.version}</version > </dependency > <dependency > <groupId > org.springframework</groupId > <artifactId > spring-test</artifactId > <version > ${spring.version}</version > </dependency > <dependency > <groupId > com.alibaba</groupId > <artifactId > dubbo</artifactId > <version > ${dubbo.version}</version > </dependency > <dependency > <groupId > org.apache.zookeeper</groupId > <artifactId > zookeeper</artifactId > <version > ${zookeeper.version}</version > </dependency > <dependency > <groupId > com.github.sgroschupf</groupId > <artifactId > zkclient</artifactId > <version > ${zkclient.version}</version > </dependency > <dependency > <groupId > junit</groupId > <artifactId > junit</artifactId > <version > 4.12</version > </dependency > <dependency > <groupId > com.alibaba</groupId > <artifactId > fastjson</artifactId > <version > 1.2.47</version > </dependency > <dependency > <groupId > javassist</groupId > <artifactId > javassist</artifactId > <version > 3.12.1.GA</version > </dependency > <dependency > <groupId > commons-codec</groupId > <artifactId > commons-codec</artifactId > <version > 1.10</version > </dependency > <dependency > <groupId > com.github.pagehelper</groupId > <artifactId > pagehelper</artifactId > <version > ${pagehelper.version}</version > </dependency > <dependency > <groupId > org.mybatis</groupId > <artifactId > mybatis</artifactId > <version > ${mybatis.version}</version > </dependency > <dependency > <groupId > org.mybatis</groupId > <artifactId > mybatis-spring</artifactId > <version > ${mybatis.spring.version}</version > </dependency > <dependency > <groupId > mysql</groupId > <artifactId > mysql-connector-java</artifactId > <version > ${mysql.version}</version > </dependency > <dependency > <groupId > com.alibaba</groupId > <artifactId > druid</artifactId > <version > ${druid.version}</version > </dependency > <dependency > <groupId > commons-fileupload</groupId > <artifactId > commons-fileupload</artifactId > <version > ${commons-fileupload.version}</version > </dependency > <dependency > <groupId > org.quartz-scheduler</groupId > <artifactId > quartz</artifactId > <version > ${quartz.version}</version > </dependency > <dependency > <groupId > org.quartz-scheduler</groupId > <artifactId > quartz-jobs</artifactId > <version > ${quartz.version}</version > </dependency > <dependency > <groupId > com.qiniu</groupId > <artifactId > qiniu-java-sdk</artifactId > <version > 7.2.0</version > </dependency > <dependency > <groupId > org.apache.poi</groupId > <artifactId > poi</artifactId > <version > ${poi.version}</version > </dependency > <dependency > <groupId > org.apache.poi</groupId > <artifactId > poi-ooxml</artifactId > <version > ${poi.version}</version > </dependency > <dependency > <groupId > redis.clients</groupId > <artifactId > jedis</artifactId > <version > ${jedis.version}</version > </dependency > <dependency > <groupId > org.springframework.security</groupId > <artifactId > spring-security-web</artifactId > <version > ${spring.security.version}</version > </dependency > <dependency > <groupId > org.springframework.security</groupId > <artifactId > spring-security-config</artifactId > <version > ${spring.security.version}</version > </dependency > <dependency > <groupId > cn.hutool</groupId > <artifactId > hutool-all</artifactId > <version > ${hutool.version}</version > </dependency > </dependencies > </dependencyManagement > <dependencies > <dependency > <groupId > javax.servlet</groupId > <artifactId > servlet-api</artifactId > <version > ${servlet-api.version}</version > <scope > provided</scope > </dependency > </dependencies > <build > <plugins > <plugin > <groupId > org.apache.maven.plugins</groupId > <artifactId > maven-compiler-plugin</artifactId > <version > 3.2</version > <configuration > <source > 1.8</source > <target > 1.8</target > <encoding > UTF-8</encoding > </configuration > </plugin > </plugins > </build > </project >
2.2.2 health_common 创建health_common,子工程,打包方式为jar,存放通用组件,例如工具类等
pom.xml
1
2
3
4
5
6
7
8
9
10
11
12
13
14
15
16
17
18
19
20
21
22
23
24
25
26
27
28
29
30
31
32
33
34
35
36
37
38
39
40
41
42
43
44
45
46
47
48
49
50
51
52
53
54
55
56
57
58
59
60
61
62
63
64
65
66
67
68
69
70
71
72
73
74
75
76
77
78
79
80
81
82
83
84
85
86
87
88
89
90
91
92
93
94
95
96
97
98
99
100
101
102
103
104
105
106
107
108
109
110
111
112
113
114
115
116
117
118
119
120
121
122
123
124
125
126
127
128
129
130
131
132
133
134
135
136
137
138
139
140
141
<?xml version="1.0" encoding="UTF-8" ?> <project xmlns ="http://maven.apache.org/POM/4.0.0" xmlns:xsi ="http://www.w3.org/2001/XMLSchema-instance" xsi:schemaLocation ="http://maven.apache.org/POM/4.0.0 http://maven.apache.org/xsd/maven-4.0.0.xsd" > <parent > <artifactId > health_parent</artifactId > <groupId > com.itheima</groupId > <version > 1.0-SNAPSHOT</version > </parent > <modelVersion > 4.0.0</modelVersion > <artifactId > health_common</artifactId > <packaging > jar</packaging > <dependencies > <dependency > <groupId > com.github.pagehelper</groupId > <artifactId > pagehelper</artifactId > </dependency > <dependency > <groupId > org.mybatis</groupId > <artifactId > mybatis</artifactId > </dependency > <dependency > <groupId > org.mybatis</groupId > <artifactId > mybatis-spring</artifactId > </dependency > <dependency > <groupId > mysql</groupId > <artifactId > mysql-connector-java</artifactId > </dependency > <dependency > <groupId > com.alibaba</groupId > <artifactId > druid</artifactId > </dependency > <dependency > <groupId > commons-fileupload</groupId > <artifactId > commons-fileupload</artifactId > </dependency > <dependency > <groupId > org.springframework</groupId > <artifactId > spring-context</artifactId > </dependency > <dependency > <groupId > org.springframework</groupId > <artifactId > spring-beans</artifactId > </dependency > <dependency > <groupId > org.springframework</groupId > <artifactId > spring-web</artifactId > </dependency > <dependency > <groupId > org.springframework</groupId > <artifactId > spring-webmvc</artifactId > </dependency > <dependency > <groupId > org.springframework</groupId > <artifactId > spring-jdbc</artifactId > </dependency > <dependency > <groupId > org.springframework</groupId > <artifactId > spring-aspects</artifactId > </dependency > <dependency > <groupId > org.springframework</groupId > <artifactId > spring-jms</artifactId > </dependency > <dependency > <groupId > org.springframework</groupId > <artifactId > spring-context-support</artifactId > </dependency > <dependency > <groupId > org.springframework</groupId > <artifactId > spring-test</artifactId > </dependency > <dependency > <groupId > com.alibaba</groupId > <artifactId > dubbo</artifactId > </dependency > <dependency > <groupId > org.apache.zookeeper</groupId > <artifactId > zookeeper</artifactId > </dependency > <dependency > <groupId > com.github.sgroschupf</groupId > <artifactId > zkclient</artifactId > </dependency > <dependency > <groupId > junit</groupId > <artifactId > junit</artifactId > </dependency > <dependency > <groupId > com.alibaba</groupId > <artifactId > fastjson</artifactId > </dependency > <dependency > <groupId > javassist</groupId > <artifactId > javassist</artifactId > </dependency > <dependency > <groupId > commons-codec</groupId > <artifactId > commons-codec</artifactId > </dependency > <dependency > <groupId > org.apache.poi</groupId > <artifactId > poi</artifactId > </dependency > <dependency > <groupId > redis.clients</groupId > <artifactId > jedis</artifactId > </dependency > <dependency > <groupId > com.qiniu</groupId > <artifactId > qiniu-java-sdk</artifactId > </dependency > <dependency > <groupId > org.apache.poi</groupId > <artifactId > poi-ooxml</artifactId > </dependency > <dependency > <groupId > org.springframework.security</groupId > <artifactId > spring-security-web</artifactId > </dependency > <dependency > <groupId > org.springframework.security</groupId > <artifactId > spring-security-config</artifactId > </dependency > <dependency > <groupId > cn.hutool</groupId > <artifactId > hutool-all</artifactId > </dependency > </dependencies > </project >
2.2.3 health_pojo 创建health_pojo,子工程,打包方式为jar,存放POJO实体类
pom.xml
1
2
3
4
5
6
7
8
9
10
11
12
13
14
15
16
17
18
19
20
21
<?xml version="1.0" encoding="UTF-8" ?> <project xmlns ="http://maven.apache.org/POM/4.0.0" xmlns:xsi ="http://www.w3.org/2001/XMLSchema-instance" xsi:schemaLocation ="http://maven.apache.org/POM/4.0.0 http://maven.apache.org/xsd/maven-4.0.0.xsd" > <parent > <artifactId > health_parent</artifactId > <groupId > com.itheima</groupId > <version > 1.0-SNAPSHOT</version > </parent > <modelVersion > 4.0.0</modelVersion > <artifactId > health_pojo</artifactId > <packaging > jar</packaging > <dependencies > <dependency > <groupId > com.itheima</groupId > <artifactId > health_common</artifactId > <version > 1.0-SNAPSHOT</version > </dependency > </dependencies > </project >
2.2.4 health_dao 创建health_dao,子工程,打包方式为jar,存放Dao接口和Mybatis映射文件
pom.xml
1
2
3
4
5
6
7
8
9
10
11
12
13
14
15
16
17
18
19
20
21
<?xml version="1.0" encoding="UTF-8" ?> <project xmlns ="http://maven.apache.org/POM/4.0.0" xmlns:xsi ="http://www.w3.org/2001/XMLSchema-instance" xsi:schemaLocation ="http://maven.apache.org/POM/4.0.0 http://maven.apache.org/xsd/maven-4.0.0.xsd" > <parent > <artifactId > health_parent</artifactId > <groupId > com.itheima</groupId > <version > 1.0-SNAPSHOT</version > </parent > <modelVersion > 4.0.0</modelVersion > <artifactId > health_dao</artifactId > <packaging > jar</packaging > <dependencies > <dependency > <groupId > com.itheima</groupId > <artifactId > health_pojo</artifactId > <version > 1.0-SNAPSHOT</version > </dependency > </dependencies > </project >
log4j.properties
1 2 3 4 5 6 7 8 9 10 11 12 13 14 15 log4j.appender.stdout =org.apache.log4j.ConsoleAppender log4j.appender.stdout.Target =System.err log4j.appender.stdout.layout =org.apache.log4j.PatternLayout log4j.appender.stdout.layout.ConversionPattern =%d{ABSOLUTE} %5p %c{1}:%L - %m%n log4j.appender.file =org.apache.log4j.FileAppender log4j.appender.file.File =c:\\mylog.log log4j.appender.file.layout =org.apache.log4j.PatternLayout log4j.appender.file.layout.ConversionPattern =%d{ABSOLUTE} %5p %c{1}:%L - %m%n log4j.rootLogger =debug, stdout
SqlMapConfig.xml
1
2
3
4
5
6
7
8
9
10
11
12
<?xml version="1.0" encoding="UTF-8" ?> <!DOCTYPE configuration PUBLIC "-//mybatis.org//DTD Config 3.0//EN" "http://mybatis.org/dtd/mybatis-3-config.dtd" > <configuration > <plugins > <plugin interceptor ="com.github.pagehelper.PageInterceptor" > <property name ="helperDialect" value ="mysql" /> </plugin > </plugins > </configuration >
PageHelper 文档地址:https://github.com/pagehelper/Mybatis-PageHelper/blob/master/wikis/zh/HowToUse.md
applicationContext-dao.xml
1
2
3
4
5
6
7
8
9
10
11
12
13
14
15
16
17
18
19
20
21
22
23
24
25
26
27
28
29
30
31
32
33
34
35
36
37
38
39
40
41
42
43
44
45
46
47
48
49
<?xml version="1.0" encoding="UTF-8" ?> <beans xmlns ="http://www.springframework.org/schema/beans" xmlns:context ="http://www.springframework.org/schema/context" xmlns:p ="http://www.springframework.org/schema/p" xmlns:aop ="http://www.springframework.org/schema/aop" xmlns:tx ="http://www.springframework.org/schema/tx" xmlns:xsi ="http://www.w3.org/2001/XMLSchema-instance" xsi:schemaLocation ="http://www.springframework.org/schema/beans http://www.springframework.org/schema/beans/spring-beans-4.2.xsd http://www.springframework.org/schema/context http://www.springframework.org/schema/context/spring-context.xsd http://www.springframework.org/schema/aop http://www.springframework.org/schema/aop/spring-aop.xsd http://www.springframework.org/schema/tx http://www.springframework.org/schema/tx/spring-tx.xsd http://www.springframework.org/schema/util http://www.springframework.org/schema/util/spring-util.xsd" > <bean id ="dataSource" class ="com.alibaba.druid.pool.DruidDataSource" destroy-method ="close" > <property name ="username" value ="root" /> <property name ="password" value ="root" /> <property name ="driverClassName" value ="com.mysql.jdbc.Driver" /> <property name ="url" value ="jdbc:mysql://localhost:3306/health" /> </bean > <bean class ="org.mybatis.spring.SqlSessionFactoryBean" id ="sqlSessionFactory" > <property name ="dataSource" ref ="dataSource" /> <property name ="mapperLocations" value ="classpath*:mapper/*.xml" /> <property name ="plugins" > <array > <bean class ="com.github.pagehelper.PageInterceptor" > <property name ="properties" > <value > helperDialect=mysql </value > </property > </bean > </array > </property > </bean > <bean class ="org.mybatis.spring.mapper.MapperScannerConfigurer" > <property name ="basePackage" value ="com.itheima.dao" /> </bean > </beans >
2.2.5 health_interface 创建health_interface,子工程,打包方式为jar,存放服务接口
pom.xml
1
2
3
4
5
6
7
8
9
10
11
12
13
14
15
16
17
18
19
20
21
<?xml version="1.0" encoding="UTF-8" ?> <project xmlns ="http://maven.apache.org/POM/4.0.0" xmlns:xsi ="http://www.w3.org/2001/XMLSchema-instance" xsi:schemaLocation ="http://maven.apache.org/POM/4.0.0 http://maven.apache.org/xsd/maven-4.0.0.xsd" > <parent > <artifactId > health_parent</artifactId > <groupId > com.itheima</groupId > <version > 1.0-SNAPSHOT</version > </parent > <modelVersion > 4.0.0</modelVersion > <artifactId > health_interface</artifactId > <packaging > jar</packaging > <dependencies > <dependency > <groupId > com.itheima</groupId > <artifactId > health_pojo</artifactId > <version > 1.0-SNAPSHOT</version > </dependency > </dependencies > </project >
2.2.6 health_service 创建health_service,子工程,打包方式为war,作为服务单独部署,存放服务类
pom.xml
1
2
3
4
5
6
7
8
9
10
11
12
13
14
15
16
17
18
19
20
21
22
23
24
25
26
27
28
29
30
31
32
33
34
35
36
37
38
39
40
<?xml version="1.0" encoding="UTF-8" ?> <project xmlns ="http://maven.apache.org/POM/4.0.0" xmlns:xsi ="http://www.w3.org/2001/XMLSchema-instance" xsi:schemaLocation ="http://maven.apache.org/POM/4.0.0 http://maven.apache.org/xsd/maven-4.0.0.xsd" > <parent > <groupId > com.itheima</groupId > <artifactId > health_parent</artifactId > <version > 1.0-SNAPSHOT</version > </parent > <modelVersion > 4.0.0</modelVersion > <artifactId > health_service</artifactId > <packaging > war</packaging > <dependencies > <dependency > <groupId > com.itheima</groupId > <artifactId > health_interface</artifactId > <version > 1.0-SNAPSHOT</version > </dependency > <dependency > <groupId > com.itheima</groupId > <artifactId > health_dao</artifactId > <version > 1.0-SNAPSHOT</version > </dependency > </dependencies > <build > <plugins > <plugin > <groupId > org.apache.tomcat.maven</groupId > <artifactId > tomcat7-maven-plugin</artifactId > <configuration > <port > 81</port > <path > /</path > </configuration > </plugin > </plugins > </build > </project >
log4j.properties
1 2 3 4 5 6 7 8 9 10 11 12 13 14 15 log4j.appender.stdout =org.apache.log4j.ConsoleAppender log4j.appender.stdout.Target =System.err log4j.appender.stdout.layout =org.apache.log4j.PatternLayout log4j.appender.stdout.layout.ConversionPattern =%d{ABSOLUTE} %5p %c{1}:%L - %m%n log4j.appender.file =org.apache.log4j.FileAppender log4j.appender.file.File =c:\\mylog.log log4j.appender.file.layout =org.apache.log4j.PatternLayout log4j.appender.file.layout.ConversionPattern =%d{ABSOLUTE} %5p %c{1}:%L - %m%n log4j.rootLogger =debug, stdout
applicationContext-tx.xml
1
2
3
4
5
6
7
8
9
10
11
12
13
14
15
16
17
18
19
20
21
22
23
24
25
26
27
<?xml version="1.0" encoding="UTF-8" ?> <beans xmlns ="http://www.springframework.org/schema/beans" xmlns:xsi ="http://www.w3.org/2001/XMLSchema-instance" xmlns:context ="http://www.springframework.org/schema/context" xmlns:tx ="http://www.springframework.org/schema/tx" xmlns:mvc ="http://www.springframework.org/schema/mvc" xsi:schemaLocation ="http://www.springframework.org/schema/beans http://www.springframework.org/schema/beans/spring-beans.xsd http://www.springframework.org/schema/mvc http://www.springframework.org/schema/mvc/spring-mvc.xsd http://www.springframework.org/schema/tx http://www.springframework.org/schema/tx/spring-tx.xsd http://www.springframework.org/schema/context http://www.springframework.org/schema/context/spring-context.xsd" > <bean id ="transactionManager" class ="org.springframework.jdbc.datasource.DataSourceTransactionManager" > <property name ="dataSource" ref ="dataSource" /> </bean > <tx:annotation-driven transaction-manager ="transactionManager" proxy-target-class ="true" /> </beans >
applicationContext-service.xml
1
2
3
4
5
6
7
8
9
10
11
12
13
14
15
16
17
18
19
20
21
22
23
<?xml version="1.0" encoding="UTF-8" ?> <beans xmlns ="http://www.springframework.org/schema/beans" xmlns:xsi ="http://www.w3.org/2001/XMLSchema-instance" xmlns:context ="http://www.springframework.org/schema/context" xmlns:dubbo ="http://code.alibabatech.com/schema/dubbo" xmlns:mvc ="http://www.springframework.org/schema/mvc" xsi:schemaLocation ="http://www.springframework.org/schema/beans http://www.springframework.org/schema/beans/spring-beans.xsd http://www.springframework.org/schema/mvc http://www.springframework.org/schema/mvc/spring-mvc.xsd http://code.alibabatech.com/schema/dubbo http://code.alibabatech.com/schema/dubbo/dubbo.xsd http://www.springframework.org/schema/context http://www.springframework.org/schema/context/spring-context.xsd" > <dubbo:application name ="health_service" /> <dubbo:protocol name ="dubbo" port ="20887" /> <dubbo:registry address ="zookeeper://127.0.0.1:2181" /> <dubbo:annotation package ="com.itheima.service" /> </beans >
web.xml
1
2
3
4
5
6
7
8
9
10
11
12
13
14
<!DOCTYPE web-app PUBLIC "-//Sun Microsystems, Inc.//DTD Web Application 2.3//EN" "http://java.sun.com/dtd/web-app_2_3.dtd" > <web-app > <display-name > Archetype Created Web Application</display-name > <context-param > <param-name > contextConfigLocation</param-name > <param-value > classpath*:applicationContext*.xml</param-value > </context-param > <listener > <listener-class > org.springframework.web.context.ContextLoaderListener</listener-class > </listener > </web-app >
2.2.7 health_web 创建health_web,子工程,打包方式为war,单独部署,存放Controller
pom.xml
1
2
3
4
5
6
7
8
9
10
11
12
13
14
15
16
17
18
19
20
21
22
23
24
25
26
27
28
29
30
31
32
33
34
35
<?xml version="1.0" encoding="UTF-8" ?> <project xmlns ="http://maven.apache.org/POM/4.0.0" xmlns:xsi ="http://www.w3.org/2001/XMLSchema-instance" xsi:schemaLocation ="http://maven.apache.org/POM/4.0.0 http://maven.apache.org/xsd/maven-4.0.0.xsd" > <parent > <artifactId > health_parent</artifactId > <groupId > com.itheima</groupId > <version > 1.0-SNAPSHOT</version > </parent > <modelVersion > 4.0.0</modelVersion > <artifactId > health_web</artifactId > <packaging > war</packaging > <dependencies > <dependency > <groupId > com.itheima</groupId > <artifactId > health_interface</artifactId > <version > 1.0-SNAPSHOT</version > </dependency > </dependencies > <build > <plugins > <plugin > <groupId > org.apache.tomcat.maven</groupId > <artifactId > tomcat7-maven-plugin</artifactId > <configuration > <port > 82</port > <path > /</path > </configuration > </plugin > </plugins > </build > </project >
log4j.properties
1 2 3 4 5 6 7 8 9 10 11 12 13 14 15 log4j.appender.stdout =org.apache.log4j.ConsoleAppender log4j.appender.stdout.Target =System.err log4j.appender.stdout.layout =org.apache.log4j.PatternLayout log4j.appender.stdout.layout.ConversionPattern =%d{ABSOLUTE} %5p %c{1}:%L - %m%n log4j.appender.file =org.apache.log4j.FileAppender log4j.appender.file.File =c:\\mylog.log log4j.appender.file.layout =org.apache.log4j.PatternLayout log4j.appender.file.layout.ConversionPattern =%d{ABSOLUTE} %5p %c{1}:%L - %m%n log4j.rootLogger =info, stdout
springmvc.xml
1
2
3
4
5
6
7
8
9
10
11
12
13
14
15
16
17
18
19
20
21
22
23
24
25
26
27
28
29
30
31
32
33
34
35
36
37
38
39
40
41
42
43
44
45
46
47
48
49
<?xml version="1.0" encoding="UTF-8" ?> <beans xmlns ="http://www.springframework.org/schema/beans" xmlns:xsi ="http://www.w3.org/2001/XMLSchema-instance" xmlns:context ="http://www.springframework.org/schema/context" xmlns:dubbo ="http://code.alibabatech.com/schema/dubbo" xmlns:mvc ="http://www.springframework.org/schema/mvc" xsi:schemaLocation ="http://www.springframework.org/schema/beans http://www.springframework.org/schema/beans/spring-beans.xsd http://www.springframework.org/schema/mvc http://www.springframework.org/schema/mvc/spring-mvc.xsd http://code.alibabatech.com/schema/dubbo http://code.alibabatech.com/schema/dubbo/dubbo.xsd http://www.springframework.org/schema/context http://www.springframework.org/schema/context/spring-context.xsd" > <mvc:annotation-driven > <mvc:message-converters register-defaults ="true" > <bean class ="com.alibaba.fastjson.support.spring.FastJsonHttpMessageConverter" > <property name ="supportedMediaTypes" value ="application/json" /> <property name ="features" > <list > <value > WriteMapNullValue</value > <value > WriteDateUseDateFormat</value > </list > </property > </bean > </mvc:message-converters > </mvc:annotation-driven > <dubbo:application name ="health_web" /> <dubbo:registry address ="zookeeper://127.0.0.1:2181" /> <dubbo:annotation package ="com.itheima.controller" /> <dubbo:consumer timeout ="600000" check ="false" /> <bean id ="multipartResolver" class ="org.springframework.web.multipart.commons.CommonsMultipartResolver" > <property name ="maxUploadSize" value ="104857600" /> <property name ="maxInMemorySize" value ="4096" /> <property name ="defaultEncoding" value ="UTF-8" /> </bean > </beans >
web.xml
1
2
3
4
5
6
7
8
9
10
11
12
13
14
15
16
17
18
19
20
21
22
23
24
25
26
27
28
29
30
31
32
33
34
35
36
37
<!DOCTYPE web-app PUBLIC "-//Sun Microsystems, Inc.//DTD Web Application 2.3//EN" "http://java.sun.com/dtd/web-app_2_3.dtd" > <web-app > <display-name > Archetype Created Web Application</display-name > <filter > <filter-name > CharacterEncodingFilter</filter-name > <filter-class > org.springframework.web.filter.CharacterEncodingFilter</filter-class > <init-param > <param-name > encoding</param-name > <param-value > utf-8</param-value > </init-param > <init-param > <param-name > forceEncoding</param-name > <param-value > true</param-value > </init-param > </filter > <filter-mapping > <filter-name > CharacterEncodingFilter</filter-name > <url-pattern > /*</url-pattern > </filter-mapping > <servlet > <servlet-name > springmvc</servlet-name > <servlet-class > org.springframework.web.servlet.DispatcherServlet</servlet-class > <init-param > <param-name > contextConfigLocation</param-name > <param-value > classpath:springmvc.xml</param-value > </init-param > <load-on-startup > 1</load-on-startup > </servlet > <servlet-mapping > <servlet-name > springmvc</servlet-name > <url-pattern > *.do</url-pattern > </servlet-mapping > </web-app >
搭建完成后如下:
3. PowerDesigner 3.1 PowerDesigner介绍 PowerDesigner是Sybase公司的一款软件,使用它可以方便地对系统进行分析设计,他几乎包括了数据库模型设计的全过程。利用PowerDesigner可以制作数据流程图、概念数据模型、物理数据模型、面向对象模型。
在项目设计阶段通常会使用PowerDesigner进行数据库设计。使用PowerDesigner可以更加直观的表现出数据库中表之间的关系,并且可以直接导出相应的建表语句。
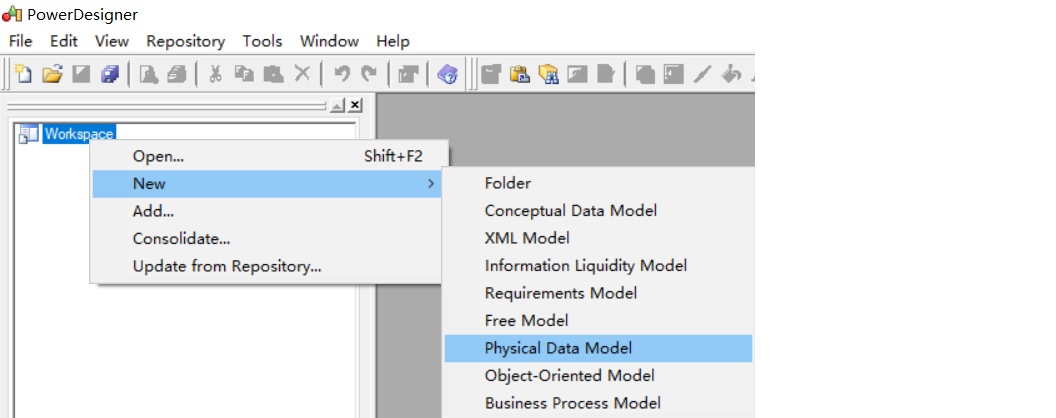
3.2 PowerDesigner使用 3.2.1 创建物理数据模型 操作步骤:
(1)创建数据模型PDM
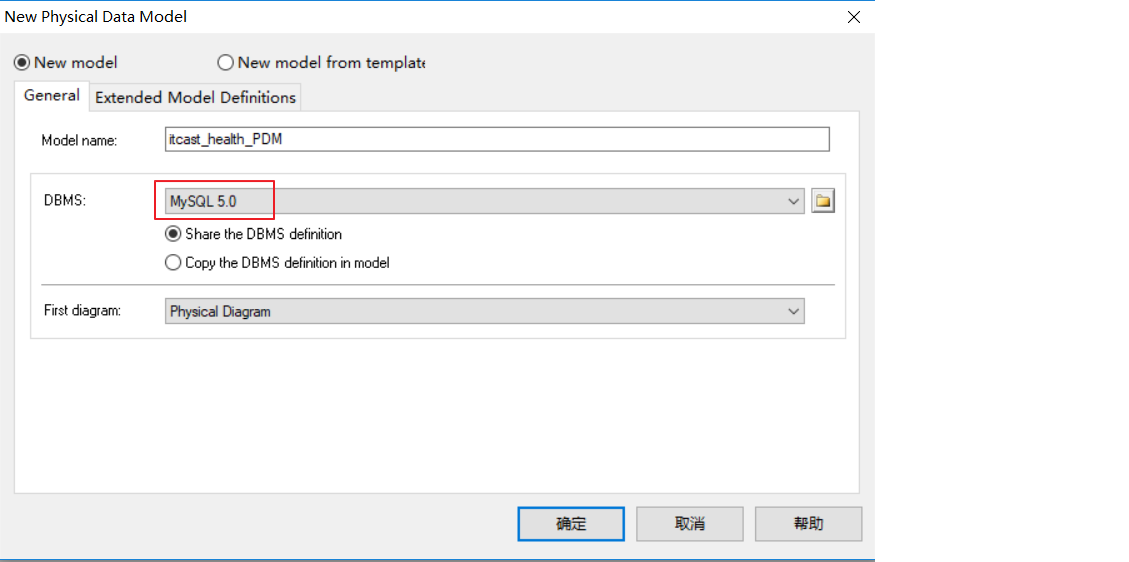
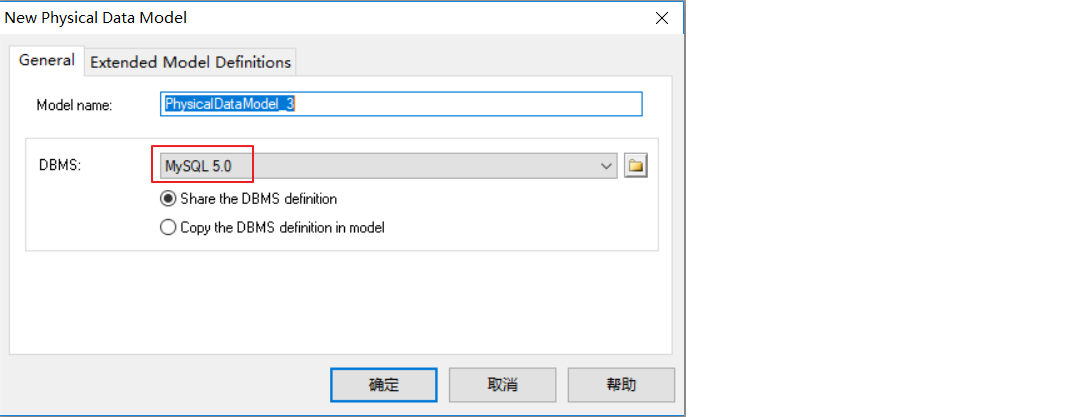
(2)选择数据库类型
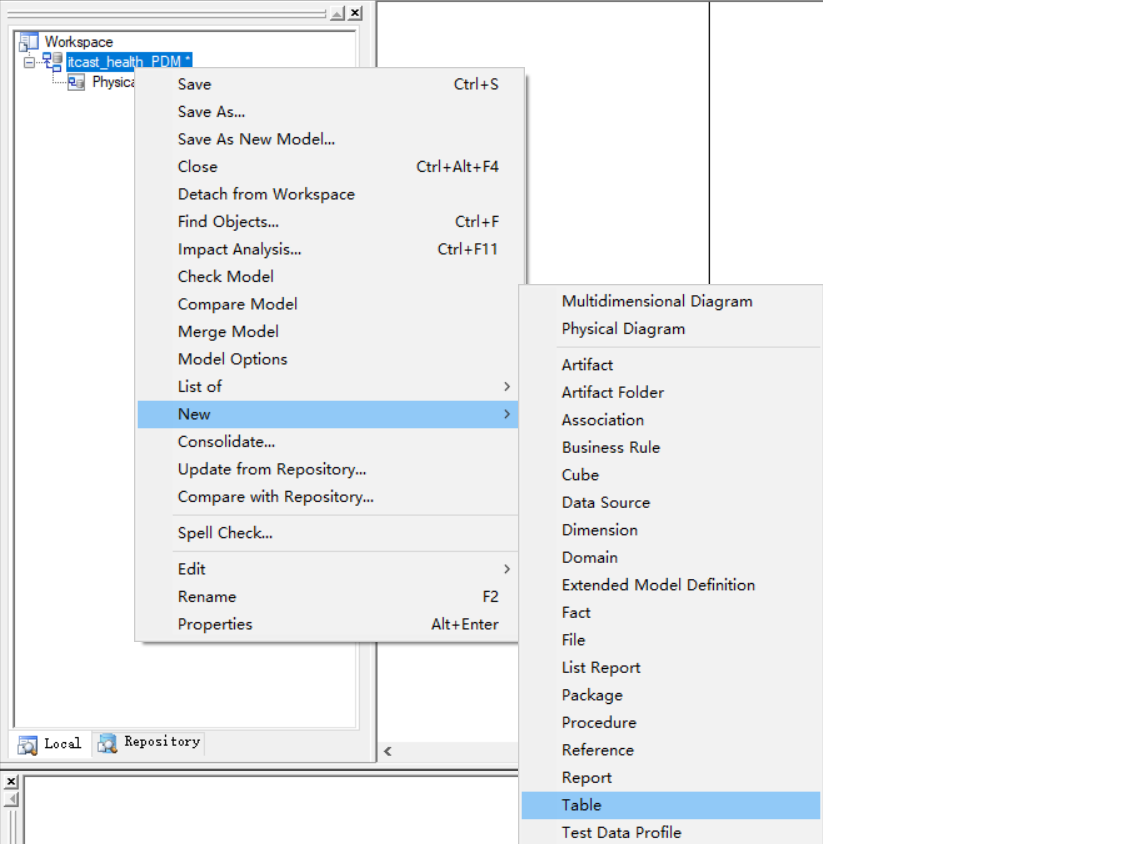
(3)创建表和字段
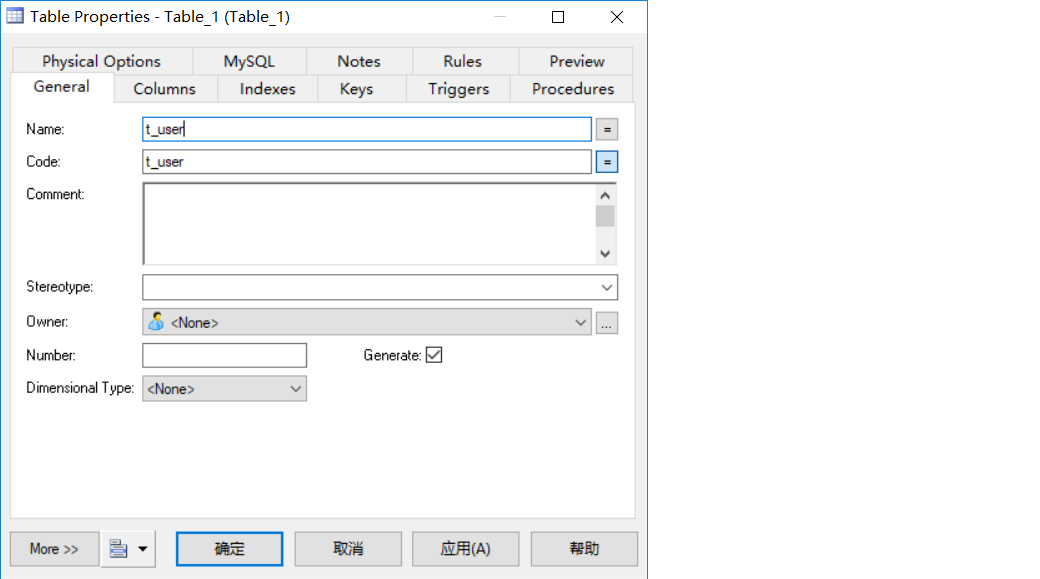
指定表名
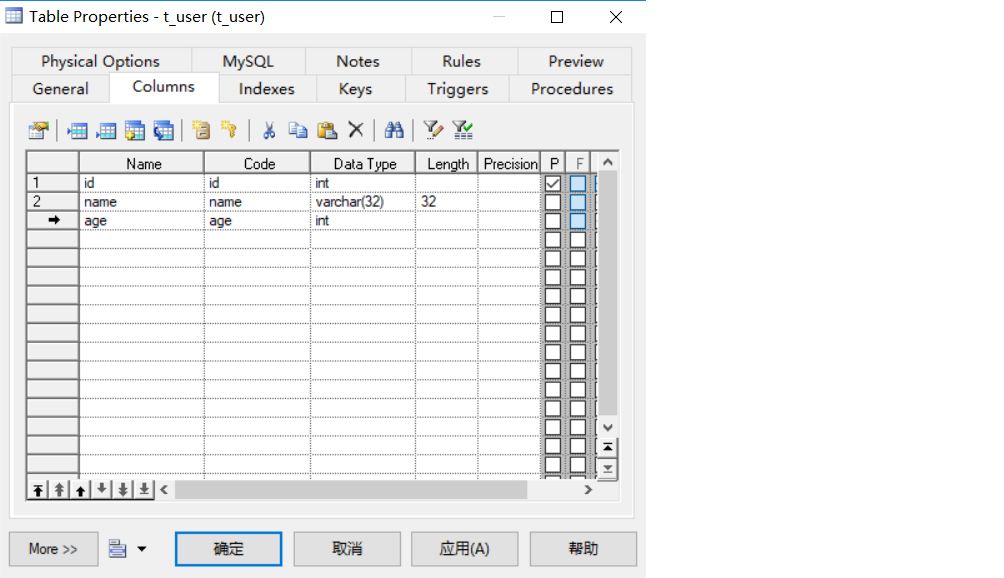
创建字段
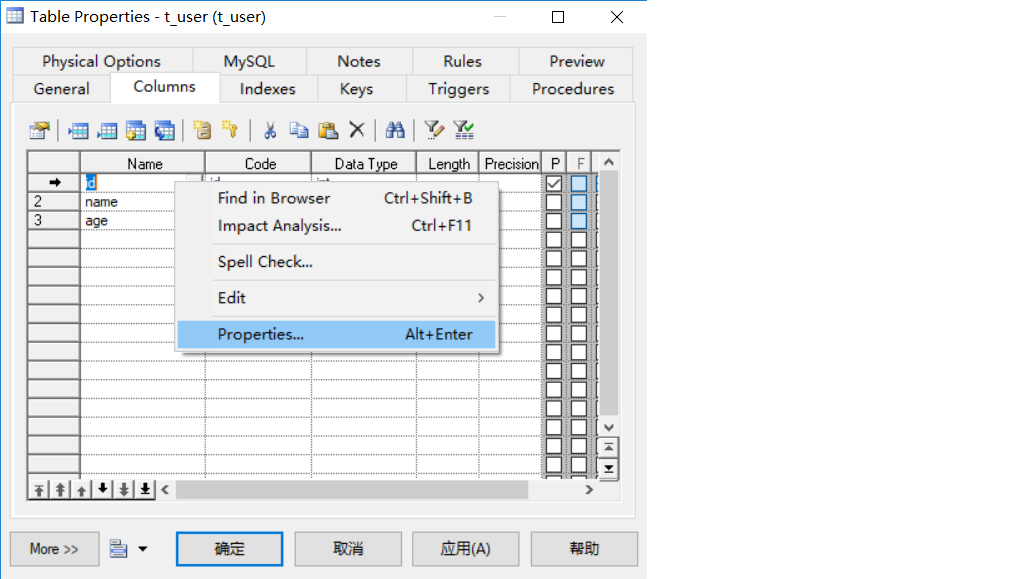
设置某个字段属性,在字段上右键
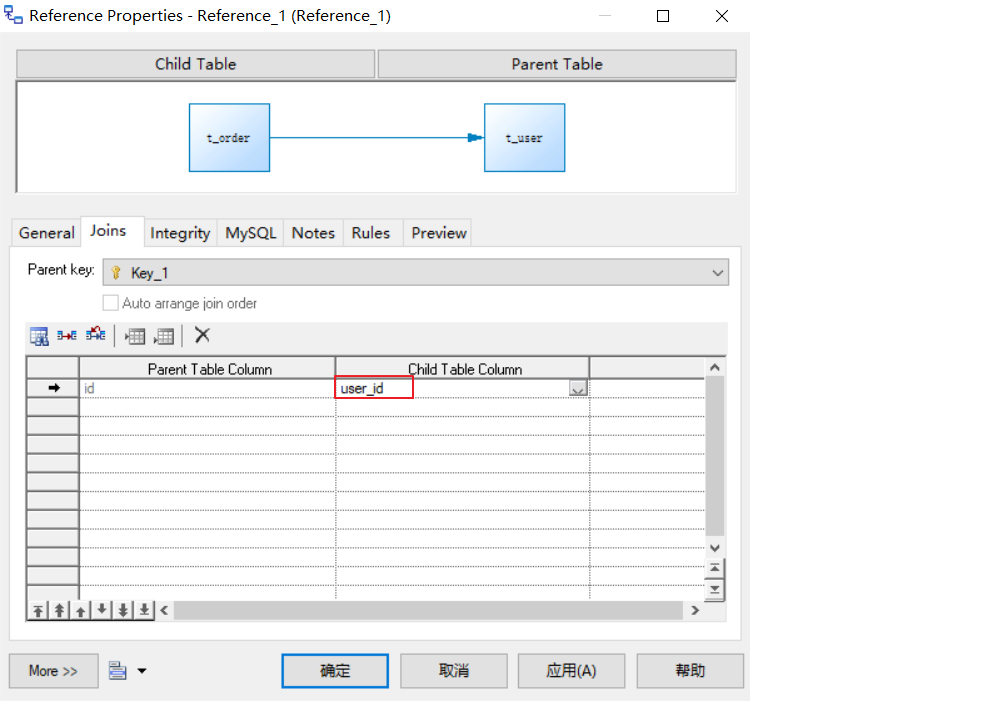
添加外键约束
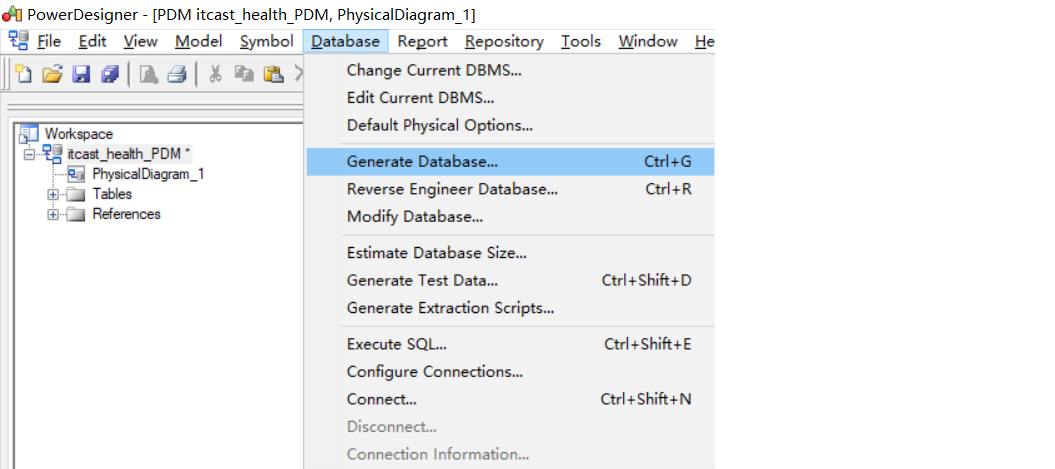
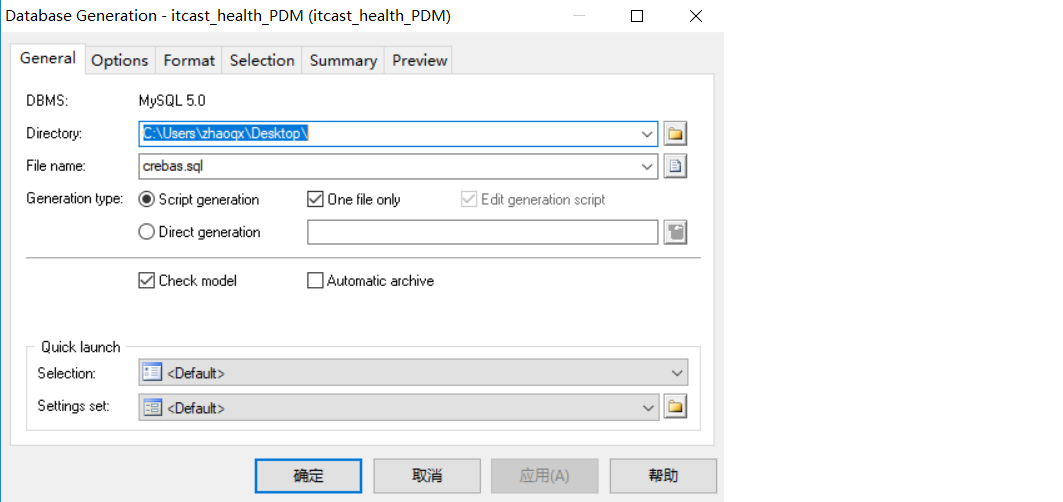
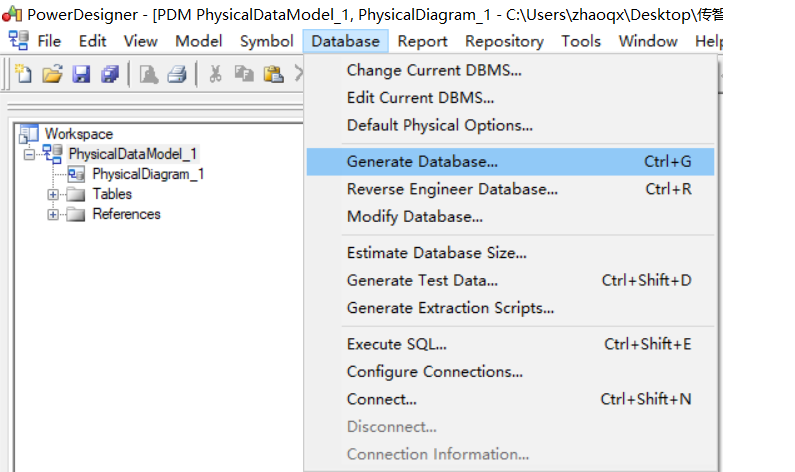
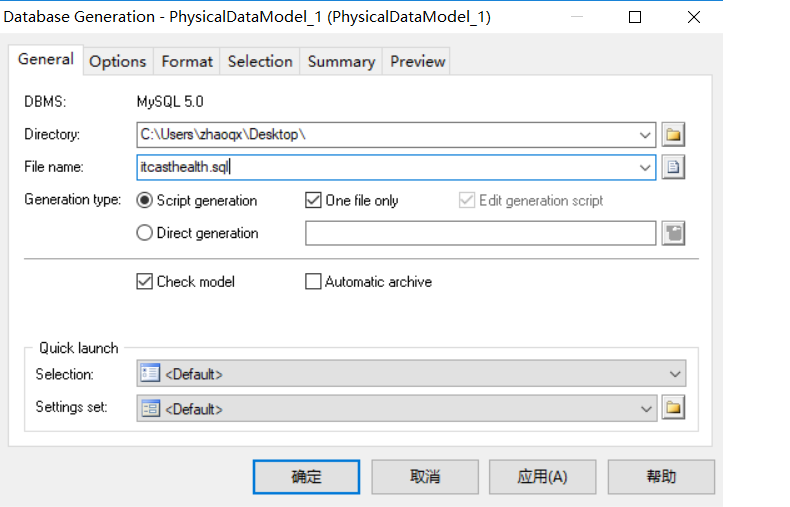
3.2.2 从PDM导出SQL脚本 可以通过PowerDesigner设计的PDM模型导出为SQL脚本,如下:
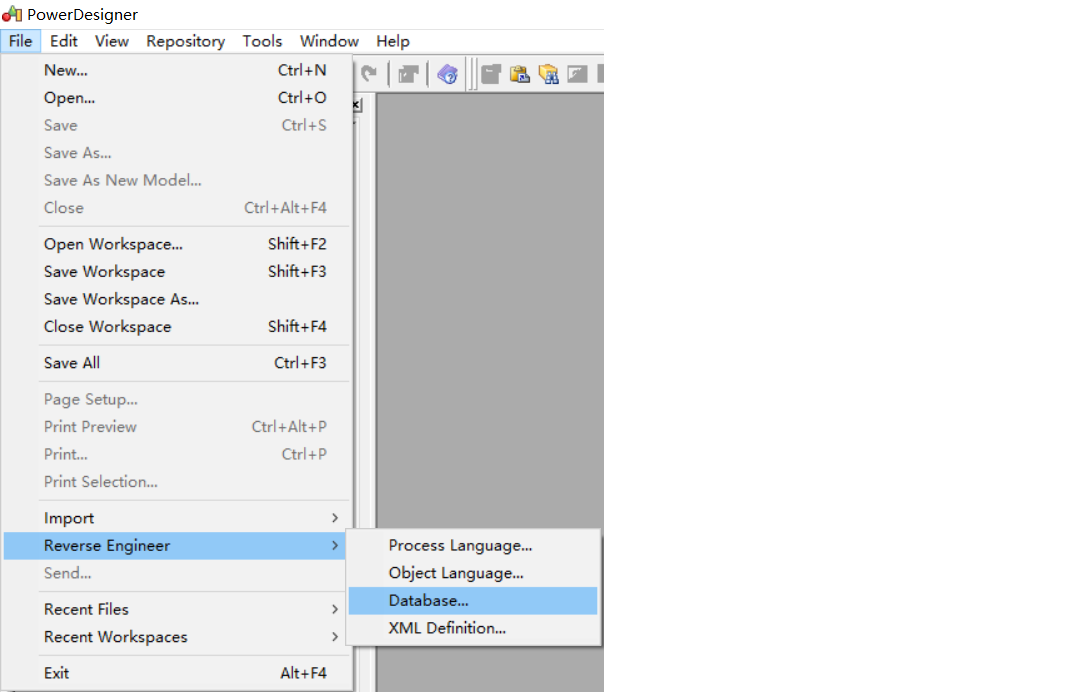
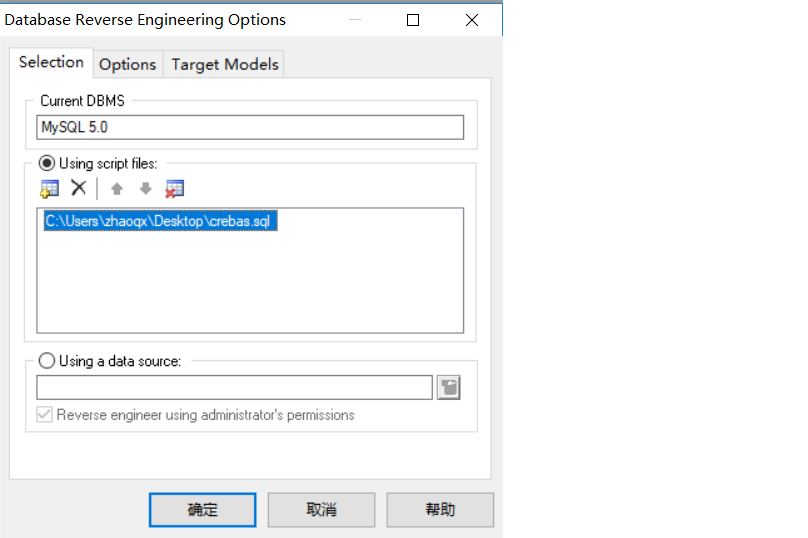
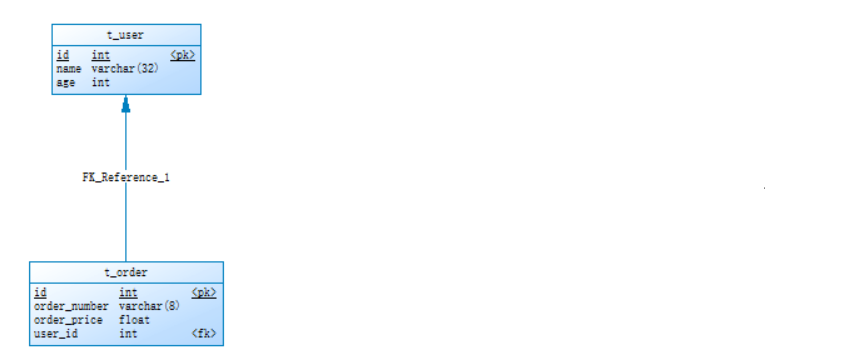
3.2.3 逆向工程 上面我们是首先创建PDM模型,然后通过PowerDesigner提供的功能导出SQL脚本。实际上这个过程也可以反过来,也就是我们可以通过SQL脚本逆向生成PDM模型,这称为逆向工程,操作如下:
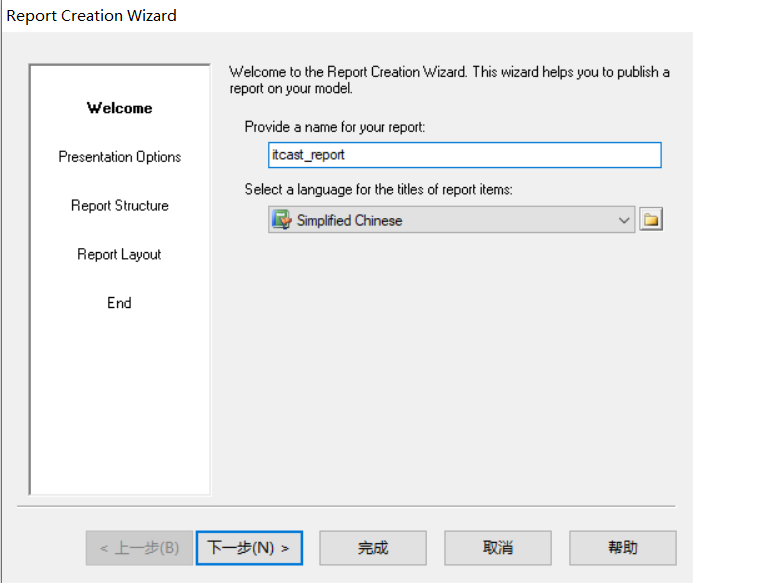
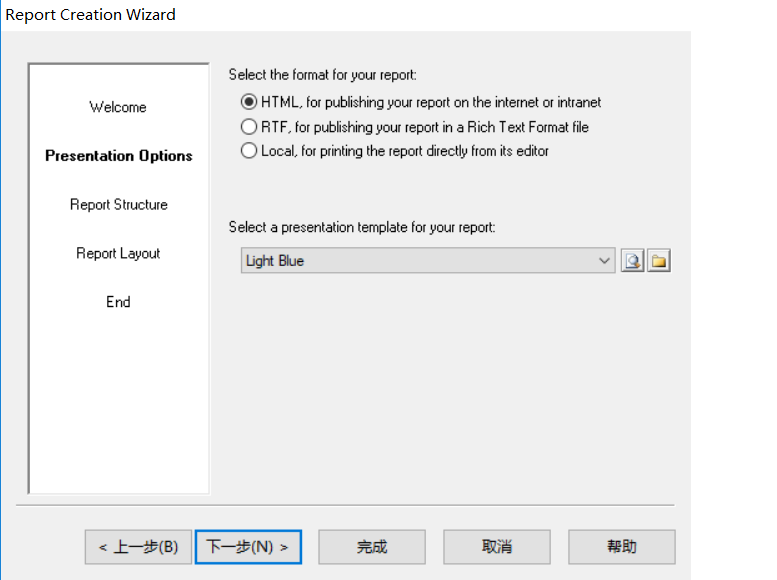
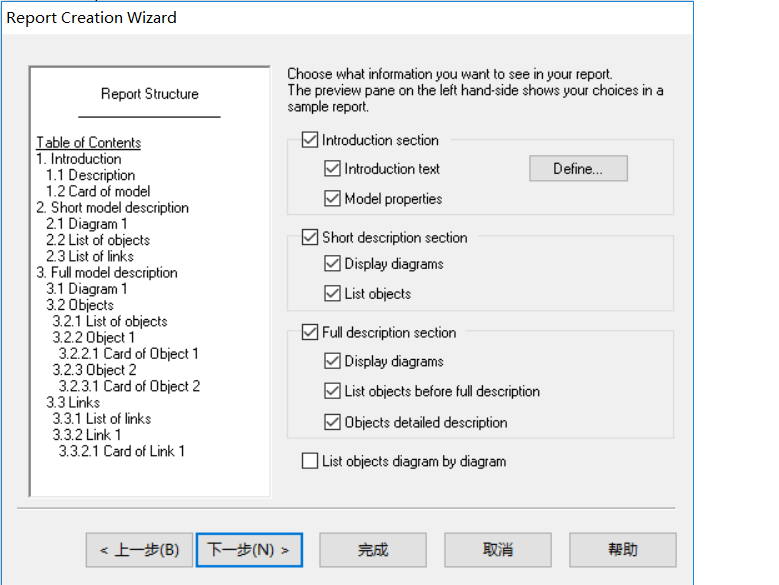
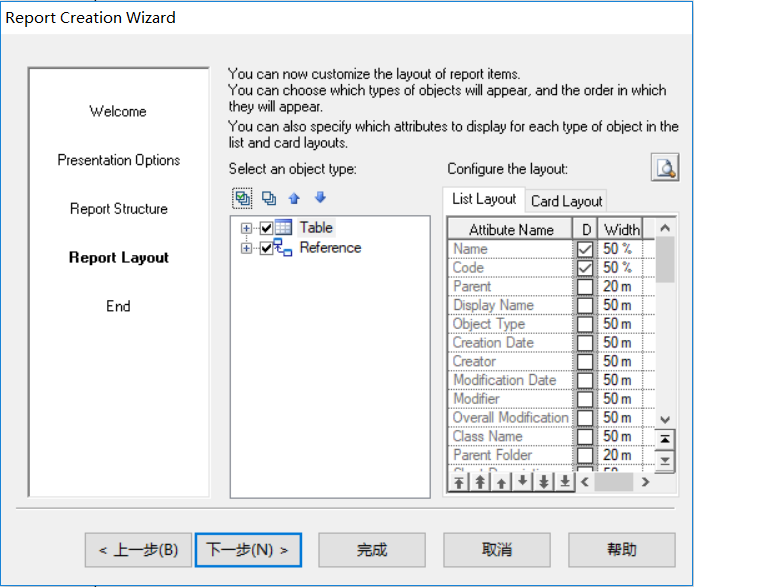
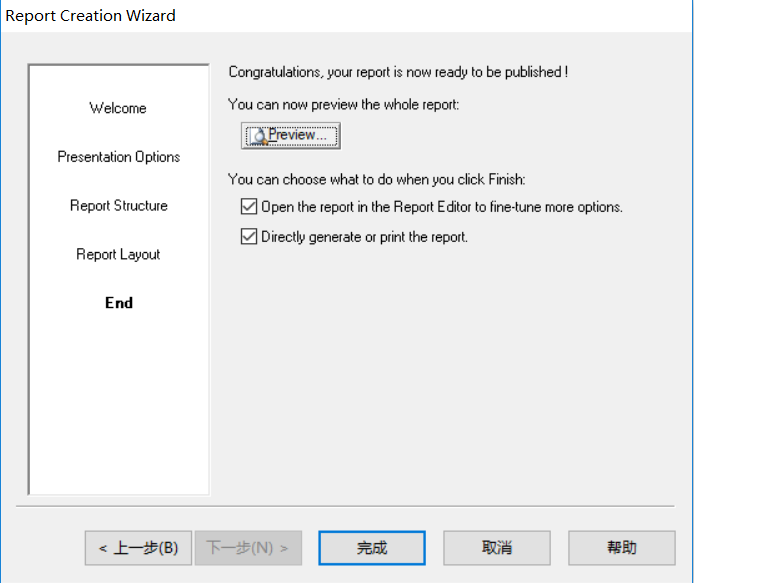
3.2.4 生成数据库报表文件 通过PowerDesigner提供的功能,可以将PDM模型生成报表文件,具体操作如下:
(1)打开报表向导窗口
(2)指定报表名称和语言
(3)选择报表格式和样式
(4)选择对象类型
(5)执行生成操作
强关联一般不做,主外键,如果后期要分库分表就完蛋了,会报错。一般互联网都不搞,靠脑子维护关系。
4. ElementUI 4.1 ElementUI介绍 ElementUI是一套基于VUE2.0的桌面端组件库,ElementUI提供了丰富的组件帮助开发人员快速构建功能强大、风格统一的页面。
官网地址:http://element-cn.eleme.io/#/zh-CN
传智健康项目后台系统就是使用ElementUI来构建页面,在页面上引入 js 和 css 文件即可开始使用,如下:
1 2 3 4 5 <link rel ="stylesheet" href ="https://unpkg.com/element-ui/lib/theme-chalk/index.css" > <script src ="https://unpkg.com/vue/dist/vue.js" > </script > <script src ="https://unpkg.com/element-ui/lib/index.js" > </script >
4.2 常用组件 4.2.1 Container 布局容器 用于布局的容器组件,方便快速搭建页面的基本结构:
<el-container>:外层容器。当子元素中包含 <el-header> 或 <el-footer> 时,全部子元素会垂直上下排列,否则会水平左右排列
<el-header>:顶栏容器
<el-aside>:侧边栏容器
<el-main>:主要区域容器
<el-footer>:底栏容器
1 2 3 4 5 6 7 8 9 10 11 12 13 14 15 16 17 18 19 20 21 22 23 24 25 26 27 28 29 30 31 32 33 34 35 36 37 38 39 40 <body > <div id ="app" > <el-container > <el-header > Header</el-header > <el-container > <el-aside width ="200px" > Aside</el-aside > <el-container > <el-main > Main</el-main > <el-footer > Footer</el-footer > </el-container > </el-container > </el-container > </div > <style > .el-header , .el-footer { background-color : #B3C0D1 ; color : #333 ; text-align : left; line-height : 60px ; } .el-aside { background-color : #D3DCE6 ; color : #333 ; text-align : center; line-height : 200px ; } .el-main { background-color : #E9EEF3 ; color : #333 ; text-align : center; } </style > </body > <script > new Vue ({ el :'#app' }); </script >
4.2.2 Dropdown 下拉菜单 将动作或菜单折叠到下拉菜单中。
1 2 3 4 5 6 7 8 9 10 <el-dropdown trigger ="click" > <span class ="el-dropdown-link" > 个人中心<i class ="el-icon-arrow-down el-icon--right" > </i > </span > <el-dropdown-menu slot ="dropdown" size ="small" > <el-dropdown-item > 联系管理员</el-dropdown-item > <el-dropdown-item > 修改密码</el-dropdown-item > <el-dropdown-item > 退出</el-dropdown-item > </el-dropdown-menu > </el-dropdown >
为网站提供导航功能的菜单。
1 2 3 4 5 6 7 8 9 10 11 12 13 14 15 16 17 18 19 20 <el-menu > <el-submenu index ="1" > <template slot ="title" > <i class ="el-icon-location" > </i > <span slot ="title" > 导航一</span > </template > <el-menu-item index ="1-1" > 选项1</el-menu-item > <el-menu-item index ="1-2" > 选项2</el-menu-item > <el-menu-item index ="1-3" > 选项3</el-menu-item > </el-submenu > <el-submenu index ="2" > <template slot ="title" > <i class ="el-icon-menu" > </i > <span slot ="title" > 导航二</span > </template > <el-menu-item index ="2-1" > 选项1</el-menu-item > <el-menu-item index ="2-2" > 选项2</el-menu-item > <el-menu-item index ="2-3" > 选项3</el-menu-item > </el-submenu > </el-menu >
4.2.4 Table 表格 用于展示多条结构类似的数据,可对数据进行排序、筛选、对比或其他自定义操作。
1 2 3 4 5 6 7 8 9 10 11 12 13 14 15 16 17 18 19 20 21 22 23 24 25 26 27 28 29 30 31 32 33 34 35 36 37 38 39 40 41 42 43 <el-table :data ="tableData" stripe > <el-table-column prop ="date" label ="日期" > </el-table-column > <el-table-column prop ="name" label ="姓名" > </el-table-column > <el-table-column prop ="address" label ="地址" > </el-table-column > <el-table-column label ="操作" align ="center" > <template slot-scope ="scope" > <el-button type ="primary" size ="mini" @click ="handleUpdate(scope.row)" > 编辑</el-button > <el-button type ="danger" size ="mini" @click ="handleDelete(scope.row)" > 删除</el-button > </template > </el-table-column > </el-table > <script > new Vue ({ el :'#app' , data :{ tableData : [{ date : '2016-05-02' , name : '王小虎' , address : '上海市普陀区金沙江路 1518 弄' }, { date : '2016-05-04' , name : '王小虎' , address : '上海市普陀区金沙江路 1517 弄' }, { date : '2016-05-01' , name : '王小虎' , address : '上海市普陀区金沙江路 1519 弄' }] }, methods :{ handleUpdate (row ){ alert (row.date ); }, handleDelete (row ){ alert (row.date ); } } }); </script >
当数据量过多时,使用分页分解数据。
1 2 3 4 5 6 7 8 9 10 11 12 13 14 15 16 17 18 19 20 <el-pagination @current-change ="handleCurrentChange" :current-page ="5" :page-size ="10" layout ="total, prev, pager, next, jumper" :total ="305" > </el-pagination > <script > new Vue ({ el :'#app' , methods :{ handleCurrentChange (page ){ alert (page); } } }); </script >
4.2.6 Message 消息提示 常用于主动操作后的反馈提示。
1 2 3 4 5 6 7 8 9 10 11 12 13 14 15 16 17 18 19 20 21 22 23 24 25 26 27 28 29 <el-button :plain ="true" @click ="open1" > 消息</el-button > <el-button :plain ="true" @click ="open2" > 成功</el-button > <el-button :plain ="true" @click ="open3" > 警告</el-button > <el-button :plain ="true" @click ="open4" > 错误</el-button > <script > new Vue ({ el : '#app' , methods : { open1 ( this .$message('这是一条消息提示' ); }, open2 ( this .$message({ message : '恭喜你,这是一条成功消息' , type : 'success' }); }, open3 ( this .$message({ message : '警告哦,这是一条警告消息' , type : 'warning' }); }, open4 ( this .$message .error ('错了哦,这是一条错误消息' ); } } }) </script >
4.2.7 Tabs 标签页 分隔内容上有关联但属于不同类别的数据集合。
1 2 3 4 5 6 7 8 9 10 11 12 13 14 15 16 17 18 19 20 21 22 23 24 25 26 27 28 29 <h3 > 基础的、简洁的标签页</h3 > <el-tabs value ="first" > <el-tab-pane label ="用户管理" name ="first" > 用户管理</el-tab-pane > <el-tab-pane label ="配置管理" name ="second" > 配置管理</el-tab-pane > <el-tab-pane label ="角色管理" name ="third" > 角色管理</el-tab-pane > <el-tab-pane label ="定时任务补偿" name ="fourth" > 定时任务补偿</el-tab-pane > </el-tabs > <h3 > 选项卡样式的标签页</h3 > <el-tabs value ="first" type ="card" > <el-tab-pane label ="用户管理" name ="first" > 用户管理</el-tab-pane > <el-tab-pane label ="配置管理" name ="second" > 配置管理</el-tab-pane > <el-tab-pane label ="角色管理" name ="third" > 角色管理</el-tab-pane > <el-tab-pane label ="定时任务补偿" name ="fourth" > 定时任务补偿</el-tab-pane > </el-tabs > <h3 > 卡片化的标签页</h3 > <el-tabs value ="first" type ="border-card" > <el-tab-pane label ="用户管理" name ="first" > 用户管理</el-tab-pane > <el-tab-pane label ="配置管理" name ="second" > 配置管理</el-tab-pane > <el-tab-pane label ="角色管理" name ="third" > 角色管理</el-tab-pane > <el-tab-pane label ="定时任务补偿" name ="fourth" > 定时任务补偿</el-tab-pane > </el-tabs > <script > new Vue ({ el : '#app' }) </script >
由输入框、选择器、单选框、多选框等控件组成,用以收集、校验、提交数据。在 Form 组件中,每一个表单域由一个 Form-Item 组件构成,表单域中可以放置各种类型的表单控件,包括 Input、Select、Checkbox、Radio、Switch、DatePicker、TimePicker。
1 2 3 4 5 6 7 8 9 10 11 12 13 14 15 16 17 18 19 20 21 22 23 24 25 26 27 28 29 30 31 32 33 34 35 36 37 38 39 40 41 42 43 44 45 46 47 48 49 50 51 52 53 54 55 56 57 58 59 60 61 62 63 64 65 66 67 68 69 70 71 72 73 74 75 76 77 78 79 80 81 82 83 84 85 86 87 88 89 90 91 92 93 94 95 96 97 98 99 100 101 102 103 104 105 106 107 108 109 110 111 112 113 114 115 116 117 118 119 120 121 122 123 124 125 126 127 128 129 130 131 132 133 134 135 136 137 138 139 140 141 142 143 144 145 146 147 148 149 150 151 152 153 154 155 156 157 158 159 160 161 162 163 164 165 166 167 168 169 170 171 172 173 174 175 176 177 <el-form :model ="ruleForm" :rules ="rules" ref ="ruleForm" label-width ="100px" > <el-form-item label ="活动名称" prop ="name" > <el-input v-model ="ruleForm.name" > </el-input > </el-form-item > <el-form-item label ="活动区域" prop ="region" > <el-select v-model ="ruleForm.region" placeholder ="请选择活动区域" > <el-option label ="区域一" value ="shanghai" > </el-option > <el-option label ="区域二" value ="beijing" > </el-option > </el-select > </el-form-item > <el-form-item label ="活动时间" required > <el-form-item prop ="date1" > <el-date-picker v-model ="ruleForm.date1" type ="datetime" placeholder ="选择日期时间" > </el-date-picker > </el-form-item > </el-form-item > <el-form-item label ="年龄" prop ="age" > <el-input v-model.number ="ruleForm.age" placeholder ="请输入年龄" > </el-input > </el-form-item > <el-form-item prop ="email" label ="邮箱" > <el-input v-model ="ruleForm.email" > </el-input > </el-form-item > <el-form-item prop ="url" label ="网址" > <el-input v-model ="ruleForm.url" > </el-input > </el-form-item > <el-form-item prop ="pwd1" label ="密码" > <el-input v-model ="ruleForm.pwd1" type ="password" > </el-input > </el-form-item > <el-form-item prop ="pwd2" label ="确认密码" > <el-input v-model ="ruleForm.pwd2" type ="password" > </el-input > </el-form-item > <el-form-item label ="即时配送" prop ="delivery" > <el-switch v-model ="ruleForm.delivery" > </el-switch > </el-form-item > <el-form-item label ="活动性质" prop ="type" > <el-checkbox-group v-model ="ruleForm.type" > <el-checkbox label ="美食/餐厅线上活动" name ="type" > </el-checkbox > <el-checkbox label ="地推活动" name ="type" > </el-checkbox > <el-checkbox label ="线下主题活动" name ="type" > </el-checkbox > <el-checkbox label ="单纯品牌曝光" name ="type" > </el-checkbox > </el-checkbox-group > </el-form-item > <el-form-item label ="特殊资源" prop ="resource" > <el-radio-group v-model ="ruleForm.resource" > <el-radio label ="线上品牌商赞助" > </el-radio > <el-radio label ="线下场地免费" > </el-radio > </el-radio-group > </el-form-item > <el-form-item label ="活动形式" prop ="desc" > <el-input type ="textarea" v-model ="ruleForm.desc" > </el-input > </el-form-item > <el-form-item > <el-button type ="primary" @click ="submitForm('ruleForm')" > 立即创建</el-button > <el-button @click ="resetForm('ruleForm')" > 重置</el-button > </el-form-item > </el-form > <script > new Vue ({ el :"#app" , data ( return { ruleForm : { name : '' , region : '' , date1 : '' , delivery : false , type : [], resource : '' , desc : '' , age :'' , url :'' , pwd1 :'' , pwd2 :'' }, rules : { name : [ { required : true , message : '请输入活动名称' , trigger : 'blur' }, { min : 3 , max : 5 , message : '长度在 3 到 5 个字符' , trigger : 'blur' } ], region : [ { required : true , message : '请选择活动区域' , trigger : 'change' } ], date1 : [ { type : 'date' , required : true , message : '请选择日期' , trigger : 'change' } ], type : [ { type : 'array' , required : true , message : '请至少选择一个活动性质' , trigger : 'change' } ], resource : [ { required : true , message : '请选择活动资源' , trigger : 'change' } ], desc : [ { required : true , message : '请填写活动形式' , trigger : 'blur' } ], age :[ { required : true , message : '年龄不能为空' }, { pattern : /^[0-9]*[1-9][0-9]*$/ , message : '年龄必须为正整数' } ], email :[ { required : true , message : '请输入邮箱地址' , trigger : 'blur' }, { type : 'email' , message : '请输入正确的邮箱地址' , trigger : ['blur' , 'change' ] } ], url :[ { required : true , message : '请输入网址' , trigger : 'blur' }, { type : 'url' , message : '请输入正确的网址' , trigger : ['blur' , 'change' ] } ], pwd1 :[ { required : true , message : '请输入密码' , trigger : 'blur' }, { validator : (rule, value, callBack )=> { var patrn=/^(\w){6,20}$/ ; if (!patrn.exec (value)){ callBack ('只能输入6-20个字母、数字、下划线' ); } else { callBack (); } } } ], pwd2 :[ {required : true , message : '请输入确认密码' , trigger : 'blur' }, { validator : (rule,value,callback )=> { if (value != this .ruleForm .pwd1 ){ callback ('两次密码输入不一致' ); } else { callback (); } } } ] } } }, methods :{ submitForm :function (formName ) { this .$refs [formName].validate ((flag )=> { if (flag){ this .$message({ showClose : true , message : '校验成功' , type : 'success' }); } else { this .$message({ showClose : true , message : '校验失败' , type : 'warning' }); return false ; } }) }, resetForm (formName ) { this .$refs [formName].resetFields (); } } }) </script >
第2章 预约管理-检查项管理 1. 需求分析 传智健康管理系统是一款应用于健康管理机构的业务系统,实现健康管理机构工作内容可视化、患者管理专业化、健康评估数字化、健康干预流程化、知识库集成化,从而提高健康管理师的工作效率,加强与患者间的互动,增强管理者对健康管理机构运营情况的了解。
系统分为传智健康后台管理系统和移动端应用两部分。其中后台系统提供给健康管理机构内部人员(包括系统管理员、健康管理师等)使用,微信端应用提供给健康管理机构的用户(体检用户)使用。
本项目功能架构图:
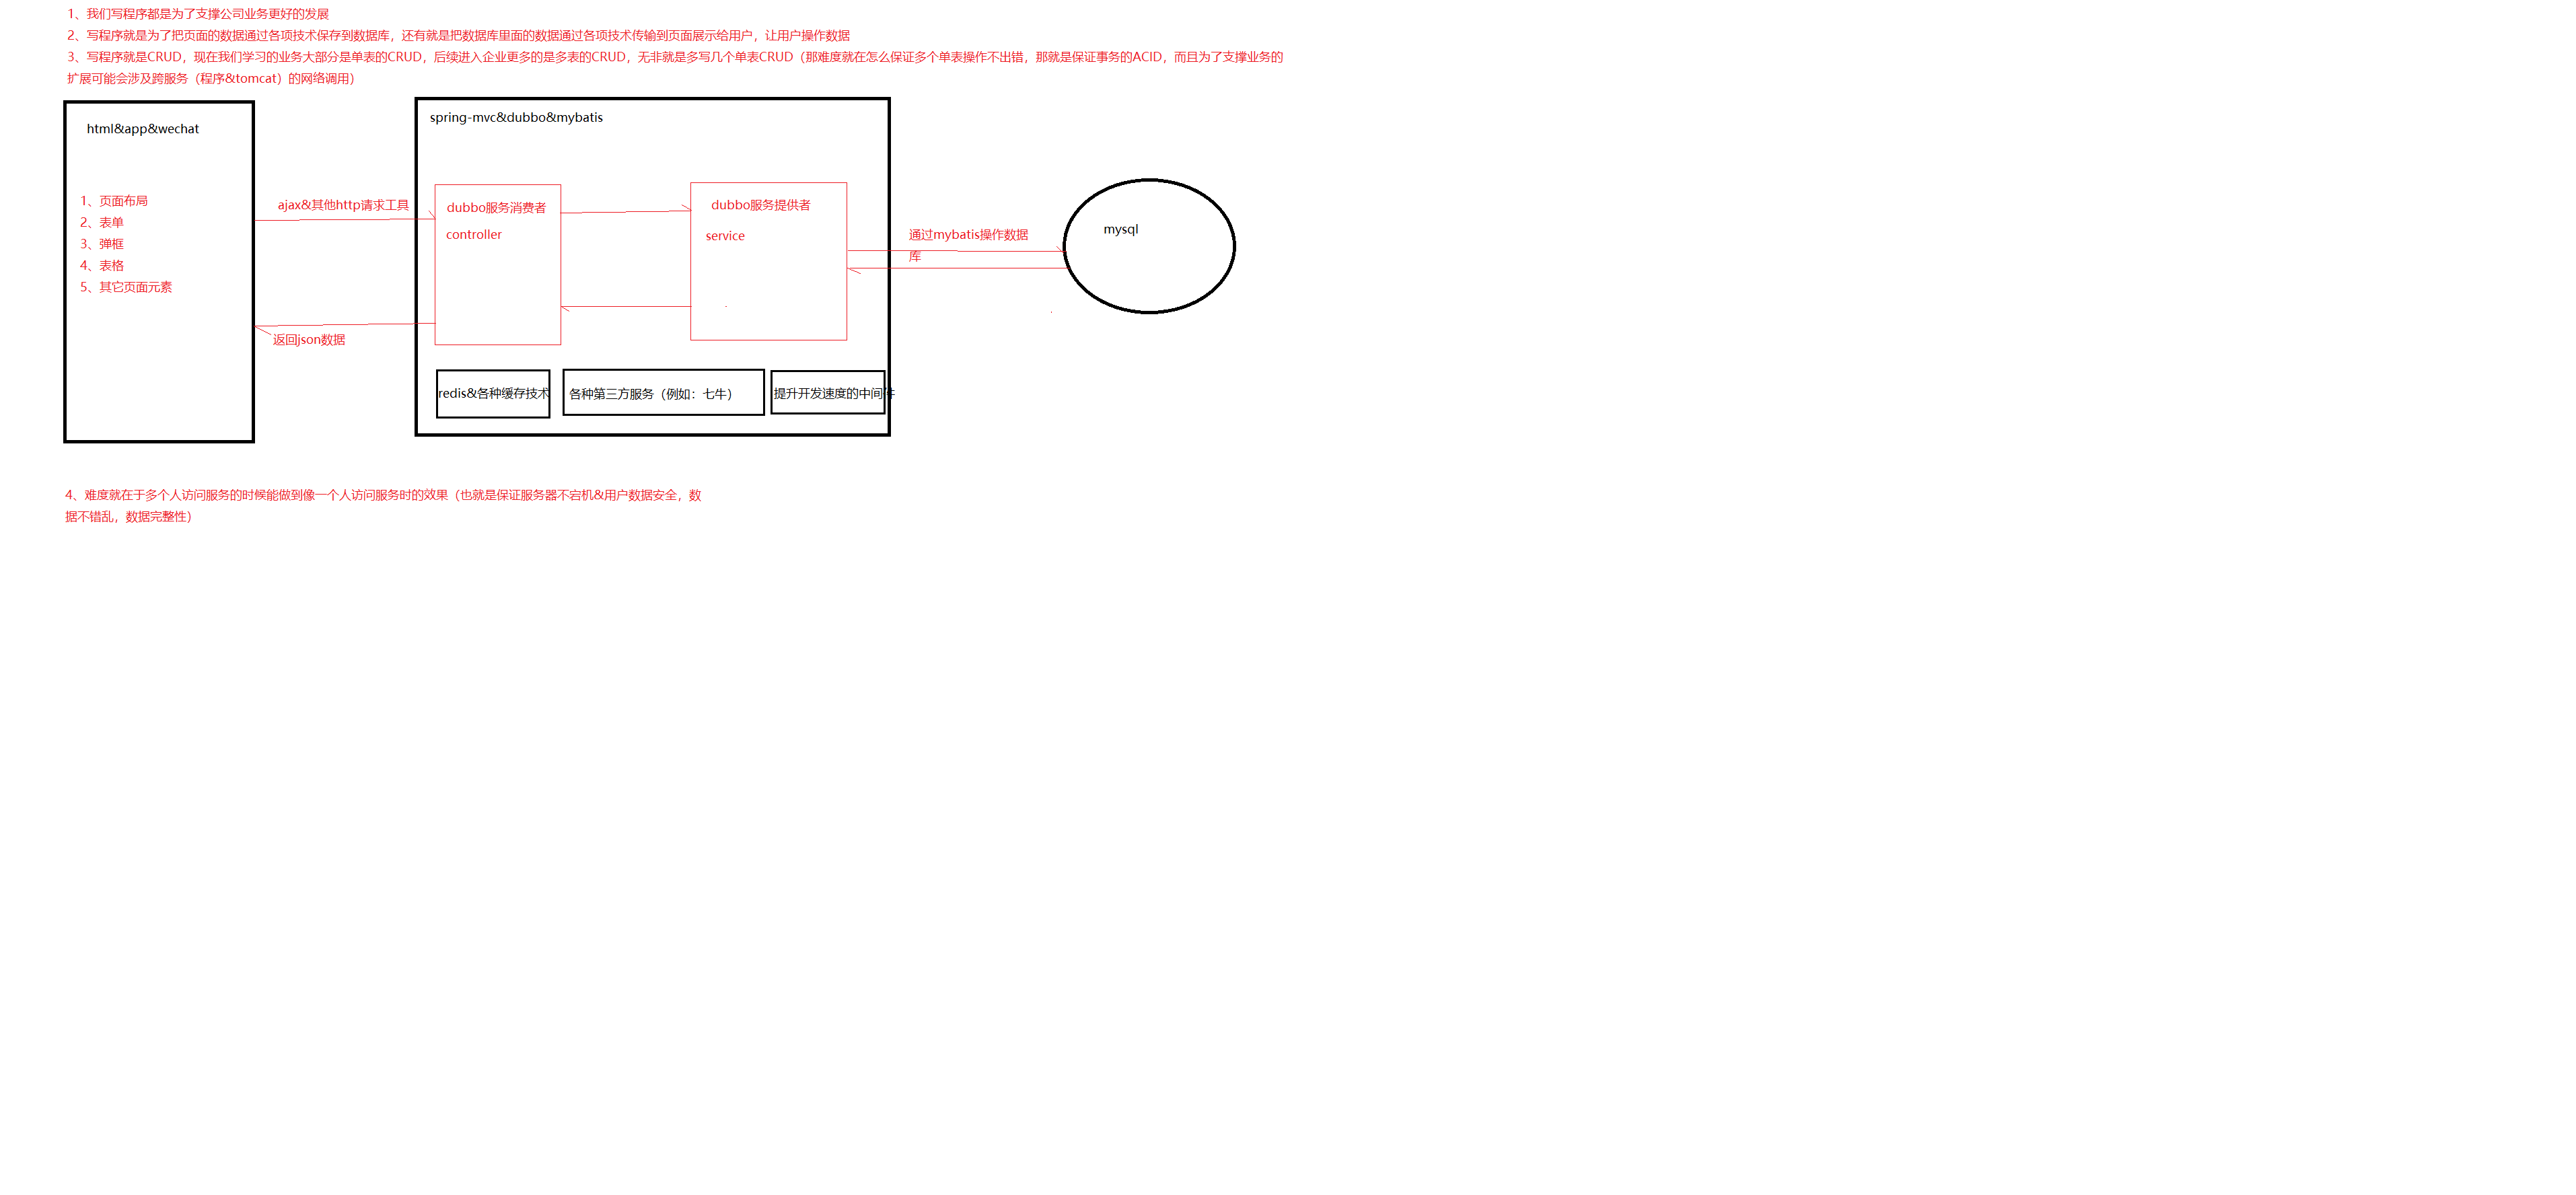
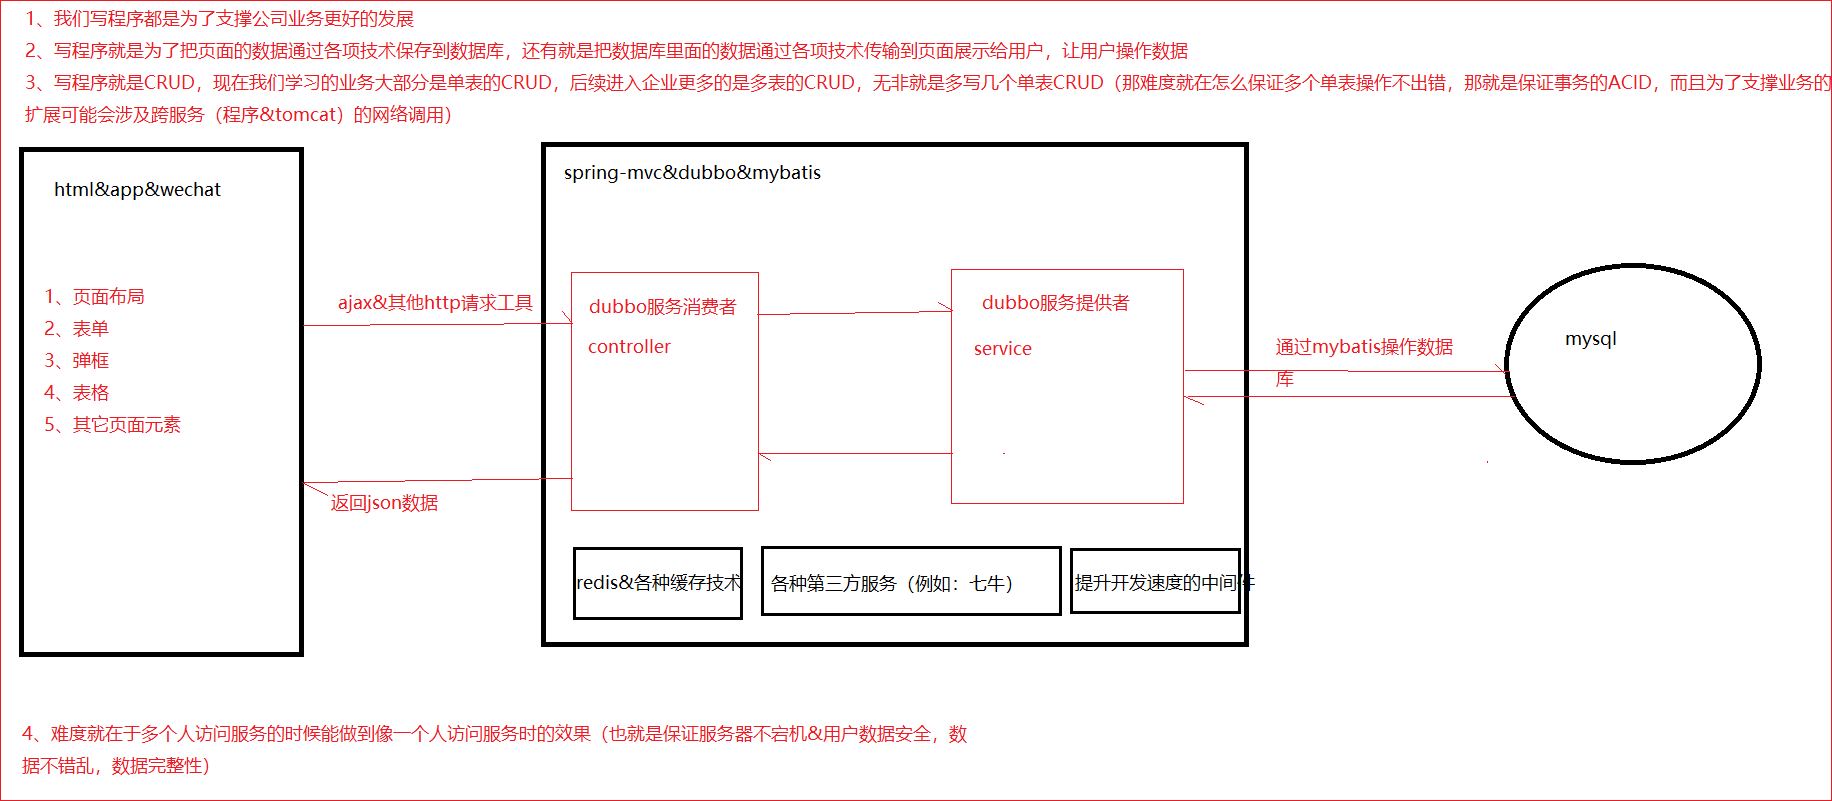
通过上面的功能架构图可以看到,传智健康后台管理系统有会员管理、预约管理、健康评估、健康干预等功能。移动端有会员管理、体检预约、体检报告等功能。后台系统和移动端应用都会通过Dubbo调用服务层发布的服务来完成具体的操作。本项目属于典型的SOA架构形式。
本章节完成的功能开发是预约管理功能,包括检查项管理、检查组管理、体检套餐管理、预约设置等(参见产品原型)。预约管理属于系统的基础功能,主要就是管理一些体检的基础数据。
2. 基础环境搭建 2.1 导入预约管理模块数据表 操作步骤:
(1)根据资料中提供的itcasthealth.pdm文件导出SQL脚本
(2)创建本项目使用的数据库itcast_health
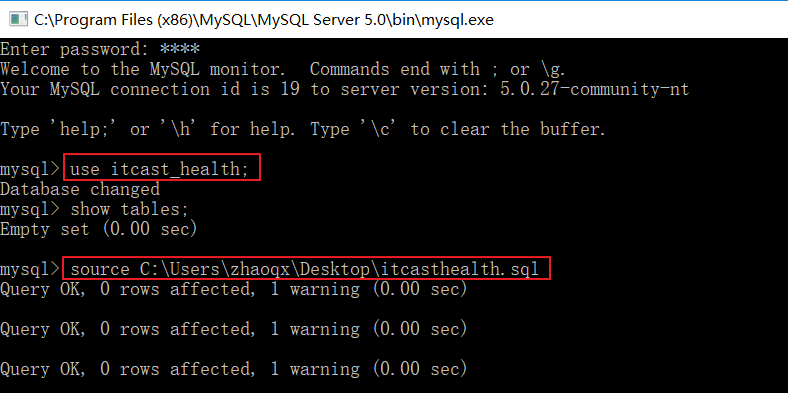
(3)将PowerDesigner导出的SQL脚本导入itcast_health数据库进行建表
2.2 导入预约管理模块实体类 将资料中提供的POJO实体类复制到health_pojo工程中。
2.3 导入项目所需公共资源 项目开发过程中一般会提供一些公共资源,供多个模块或者系统来使用。
本章节我们导入的公共资源有:
(1)返回消息常量类MessageConstant,放到health_common工程中
1
2
3
4
5
6
7
8
9
10
11
12
13
14
15
16
17
18
19
20
21
22
23
24
25
26
27
28
29
30
31
32
33
34
35
36
37
38
39
40
41
42
43
44
45
46
47
48
49
50
51
52
53
54
55
56
57
58
59
60
61
62
63
64
65
66
67
package com.itheima.constant;public class MessageConstant { public static final String DELETE_CHECKITEM_FAIL = "删除检查项失败" ; public static final String DELETE_CHECKITEM_SUCCESS = "删除检查项成功" ; public static final String ADD_CHECKITEM_SUCCESS = "新增检查项成功" ; public static final String ADD_CHECKITEM_FAIL = "新增检查项失败" ; public static final String EDIT_CHECKITEM_FAIL = "编辑检查项失败" ; public static final String EDIT_CHECKITEM_SUCCESS = "编辑检查项成功" ; public static final String QUERY_CHECKITEM_SUCCESS = "查询检查项成功" ; public static final String QUERY_CHECKITEM_FAIL = "查询检查项失败" ; public static final String UPLOAD_SUCCESS = "上传成功" ; public static final String ADD_CHECKGROUP_FAIL = "新增检查组失败" ; public static final String ADD_CHECKGROUP_SUCCESS = "新增检查组成功" ; public static final String DELETE_CHECKGROUP_FAIL = "删除检查组失败" ; public static final String DELETE_CHECKGROUP_SUCCESS = "删除检查组成功" ; public static final String QUERY_CHECKGROUP_SUCCESS = "查询检查组成功" ; public static final String QUERY_CHECKGROUP_FAIL = "查询检查组失败" ; public static final String EDIT_CHECKGROUP_FAIL = "编辑检查组失败" ; public static final String EDIT_CHECKGROUP_SUCCESS = "编辑检查组成功" ; public static final String PIC_UPLOAD_SUCCESS = "图片上传成功" ; public static final String PIC_UPLOAD_FAIL = "图片上传失败" ; public static final String ADD_SETMEAL_FAIL = "新增套餐失败" ; public static final String ADD_SETMEAL_SUCCESS = "新增套餐成功" ; public static final String IMPORT_ORDERSETTING_FAIL = "批量导入预约设置数据失败" ; public static final String IMPORT_ORDERSETTING_SUCCESS = "批量导入预约设置数据成功" ; public static final String GET_ORDERSETTING_SUCCESS = "获取预约设置数据成功" ; public static final String GET_ORDERSETTING_FAIL = "获取预约设置数据失败" ; public static final String ORDERSETTING_SUCCESS = "预约设置成功" ; public static final String ORDERSETTING_FAIL = "预约设置失败" ; public static final String ADD_MEMBER_FAIL = "新增会员失败" ; public static final String ADD_MEMBER_SUCCESS = "新增会员成功" ; public static final String DELETE_MEMBER_FAIL = "删除会员失败" ; public static final String DELETE_MEMBER_SUCCESS = "删除会员成功" ; public static final String EDIT_MEMBER_FAIL = "编辑会员失败" ; public static final String EDIT_MEMBER_SUCCESS = "编辑会员成功" ; public static final String TELEPHONE_VALIDATECODE_NOTNULL = "手机号和验证码都不能为空" ; public static final String LOGIN_SUCCESS = "登录成功" ; public static final String VALIDATECODE_ERROR = "验证码输入错误" ; public static final String QUERY_ORDER_SUCCESS = "查询预约信息成功" ; public static final String QUERY_ORDER_FAIL = "查询预约信息失败" ; public static final String QUERY_SETMEALLIST_SUCCESS = "查询套餐列表数据成功" ; public static final String QUERY_SETMEALLIST_FAIL = "查询套餐列表数据失败" ; public static final String QUERY_SETMEAL_SUCCESS = "查询套餐数据成功" ; public static final String QUERY_SETMEAL_FAIL = "查询套餐数据失败" ; public static final String SEND_VALIDATECODE_FAIL = "验证码发送失败" ; public static final String SEND_VALIDATECODE_SUCCESS = "验证码发送成功" ; public static final String SELECTED_DATE_CANNOT_ORDER = "所选日期不能进行体检预约" ; public static final String ORDER_FULL = "预约已满" ; public static final String HAS_ORDERED = "已经完成预约,不能重复预约" ; public static final String ORDER_SUCCESS = "预约成功" ; public static final String GET_USERNAME_SUCCESS = "获取当前登录用户名称成功" ; public static final String GET_USERNAME_FAIL = "获取当前登录用户名称失败" ; public static final String GET_MENU_SUCCESS = "获取当前登录用户菜单成功" ; public static final String GET_MENU_FAIL = "获取当前登录用户菜单失败" ; public static final String GET_MEMBER_NUMBER_REPORT_SUCCESS = "获取会员统计数据成功" ; public static final String GET_MEMBER_NUMBER_REPORT_FAIL = "获取会员统计数据失败" ; public static final String GET_SETMEAL_COUNT_REPORT_SUCCESS = "获取套餐统计数据成功" ; public static final String GET_SETMEAL_COUNT_REPORT_FAIL = "获取套餐统计数据失败" ; public static final String GET_BUSINESS_REPORT_SUCCESS = "获取运营统计数据成功" ; public static final String GET_BUSINESS_REPORT_FAIL = "获取运营统计数据失败" ; public static final String GET_SETMEAL_LIST_SUCCESS = "查询套餐列表数据成功" ; public static final String GET_SETMEAL_LIST_FAIL = "查询套餐列表数据失败" ; }
(2)返回结果Result和PageResult类,放到health_pojo工程中
1
2
3
4
5
6
7
8
9
10
11
12
13
14
15
16
17
18
19
20
21
22
23
24
25
26
27
28
29
30
31
32
33
34
35
36
37
38
package com.itheima.entity;import java.io.Serializable;public class Result implements Serializable { private boolean flag; private String message; private Object data; public Result (boolean flag, String message) { super (); this .flag = flag; this .message = message; } public Result (boolean flag, String message, Object data) { this .flag = flag; this .message = message; this .data = data; } public boolean isFlag () { return flag; } public void setFlag (boolean flag) { this .flag = flag; } public String getMessage () { return message; } public void setMessage (String message) { this .message = message; } public Object getData () { return data; } public void setData (Object data) { this .data = data; } }
1
2
3
4
5
6
7
8
9
10
11
12
13
14
15
16
17
18
19
20
21
22
23
24
25
26
27
package com.itheima.entity;import java.io.Serializable;import java.util.List;public class PageResult implements Serializable { private Long total; private List rows; public PageResult (Long total, List rows) { super (); this .total = total; this .rows = rows; } public Long getTotal () { return total; } public void setTotal (Long total) { this .total = total; } public List getRows () { return rows; } public void setRows (List rows) { this .rows = rows; } }
(3)封装查询条件的QueryPageBean类,放到health_pojo工程中
1
2
3
4
5
6
7
8
9
10
11
12
13
14
15
16
17
18
19
20
21
22
23
24
25
26
27
28
package com.itheima.entity;import java.io.Serializable;public class QueryPageBean implements Serializable { private Integer currentPage; private Integer pageSize; private String queryString; public Integer getCurrentPage () { return currentPage; } public void setCurrentPage (Integer currentPage) { this .currentPage = currentPage; } public Integer getPageSize () { return pageSize; } public void setPageSize (Integer pageSize) { this .pageSize = pageSize; } public String getQueryString () { return queryString; } public void setQueryString (String queryString) { this .queryString = queryString; } }
(4)html、js、css、图片等静态资源,放到health_web工程中
注意:后续随着项目开发还会陆续导入其他一些公共资源。
3. 新增检查项 3.1 完善页面 检查项管理页面对应的是checkitem.html页面,根据产品设计的原型已经完成了页面基本结构的编写,现在需要完善页面动态效果。
3.1.1 弹出新增窗口 页面中已经提供了新增窗口,只是处于隐藏状态。只需要将控制展示状态的属性dialogFormVisible改为true就可以显示出新增窗口。
新建按钮绑定的方法为handleCreate,所以在handleCreate方法中修改dialogFormVisible属性的值为true即可。同时为了增加用户体验度,需要每次点击新建按钮时清空表单输入项。
1 2 3 4 5 6 7 8 9 resetForm ( this .formData = {}; }, handleCreate ( this .resetForm (); this .dialogFormVisible = true ; }
3.1.2 输入校验 1 2 3 4 rules : { code : [{ required : true , message : '项目编码为必填项' , trigger : 'blur' }], name : [{ required : true , message : '项目名称为必填项' , trigger : 'blur' }] }
3.1.3 提交表单数据 点击新增窗口中的确定按钮时,触发handleAdd方法,所以需要在handleAdd方法中进行完善。
1 2 3 4 5 6 7 8 9 10 11 12 13 14 15 16 17 18 19 20 21 22 23 24 25 26 handleAdd () { this .$refs ['dataAddForm' ].validate ((valid ) => { if (valid) { axios.post ("/checkitem/add.do" ,this .formData ).then ((response )=> { this .dialogFormVisible = false ; if (response.data .flag ){ this .$message({ message : response.data .message , type : 'success' }); }else { this .$message .error (response.data .message ); } }).finally (()=> { this .findPage (); }); } else { this .$message .error ("表单数据校验失败" ); return false ; } }); }
3.2 后台代码 3.2.1 Controller 在health_web工程中创建CheckItemController
1 2 3 4 5 6 7 8 9 10 11 12 13 14 15 16 17 18 19 20 21 22 23 24 25 26 27 28 29 30 31 32 33 package com.itheima.controller;import com.alibaba.dubbo.config.annotation.Reference;import com.itheima.constant.MessageConstant;import com.itheima.entity.PageResult;import com.itheima.entity.QueryPageBean;import com.itheima.entity.Result;import com.itheima.pojo.CheckItem;import com.itheima.service.CheckItemService;import org.springframework.web.bind.annotation.RequestBody;import org.springframework.web.bind.annotation.RequestMapping;import org.springframework.web.bind.annotation.RequestParam;import org.springframework.web.bind.annotation.RestController;import java.util.List;@RestController @RequestMapping("/checkitem") public class CheckItemController { @Reference private CheckItemService checkItemService; @RequestMapping("/add") public Result add (@RequestBody CheckItem checkItem) { try { checkItemService.add(checkItem); }catch (Exception e){ return new Result (false ,MessageConstant.ADD_CHECKITEM_FAIL); } return new Result (true ,MessageConstant.ADD_CHECKITEM_SUCCESS); } }
3.2.2 服务接口 在health_interface工程中创建CheckItemService接口
1 2 3 4 5 6 7 8 9 package com.itheima.service;import com.itheima.pojo.CheckItem;import java.util.List;public interface CheckItemService { public void add (CheckItem checkItem) ; }
3.2.3 服务实现类 在health_service工程中创建CheckItemServiceImpl实现类
1 2 3 4 5 6 7 8 9 10 11 12 13 14 15 16 17 18 19 package com.itheima.service;import com.alibaba.dubbo.config.annotation.Service;import com.itheima.dao.CheckItemDao;import com.itheima.pojo.CheckItem;import org.springframework.beans.factory.annotation.Autowired;import org.springframework.transaction.annotation.Transactional;@Service(interfaceClass = CheckItemService.class) @Transactional public class CheckItemServiceImpl implements CheckItemService { @Autowired private CheckItemDao checkItemDao; public void add (CheckItem checkItem) { checkItemDao.add(checkItem); } }
3.2.4 Dao接口 在health_dao工程中创建CheckItemDao接口,本项目是基于Mybatis的Mapper代理技术实现持久层操作,故只需要提供接口和Mapper映射文件,无须提供实现类
1 2 3 4 5 6 7 8 package com.itheima.dao;import com.itheima.pojo.CheckItem;public interface CheckItemDao { public void add (CheckItem checkItem) ; }
3.2.5 Mapper映射文件 在health_dao工程中创建CheckItemDao.xml映射文件,需要和CheckItemDao接口在同一目录下
1 2 3 4 5 6 7 8 9 10 11 <?xml version="1.0" encoding="UTF-8" ?> <!DOCTYPE mapper PUBLIC "-//mybatis.org//DTD Mapper 3.0//EN" "http://mybatis.org/dtd/mybatis-3-mapper.dtd" > <mapper namespace ="com.itheima.dao.CheckItemDao" > <insert id ="add" parameterType ="com.itheima.pojo.CheckItem" > insert into t_checkitem(code,name,sex,age,price,type,remark,attention) values (#{code},#{name},#{sex},#{age},#{price},#{type},#{remark},#{attention}) </insert > </mapper >
4. 检查项分页 本项目所有分页功能都是基于ajax的异步请求来完成的,请求参数和后台响应数据格式都使用json数据格式。
请求参数包括页码、每页显示记录数、查询条件。
请求参数的json格式为:{currentPage:1,pageSize:10,queryString:’’itcast’’}
后台响应数据包括总记录数、当前页需要展示的数据集合。
响应数据的json格式为:{total:1000,rows:[]}
如下图:
4.1 完善页面 4.1.1 定义分页相关模型数据 1 2 3 4 5 6 7 pagination : { currentPage : 1 , pageSize :10 , total :0 , queryString :null }, dataList : [],
4.1.2 定义分页方法 在页面中提供了findPage方法用于分页查询,为了能够在checkitem.html页面加载后直接可以展示分页数据,可以在VUE提供的钩子函数created中调用findPage方法
1 2 3 4 created ( this .findPage (); }
1 2 3 4 5 6 7 8 9 10 11 12 13 14 15 findPage ( var param = { currentPage :this .pagination .currentPage , pageSize :this .pagination .pageSize , queryString :this .pagination .queryString }; axios.post ("/checkitem/findPage.do" ,param).then ((response )=> { this .dataList = response.data .rows ; this .pagination .total = response.data .total ; }); }
4.1.3 完善分页方法执行时机 除了在created钩子函数中调用findPage方法查询分页数据之外,当用户点击查询按钮或者点击分页条中的页码时也需要调用findPage方法重新发起查询请求。
为查询按钮绑定单击事件,调用findPage方法
1 <el-button @click ="findPage()" class ="dalfBut" > 查询</el-button >
为分页条组件绑定current-change事件,此事件是分页条组件自己定义的事件,当页码改变时触发,对应的处理函数为handleCurrentChange
1 2 3 4 5 6 7 8 <el-pagination class ="pagiantion" @current-change ="handleCurrentChange" :current-page ="pagination.currentPage" :page-size ="pagination.pageSize" layout ="total, prev, pager, next, jumper" :total ="pagination.total" > </el-pagination >
定义handleCurrentChange方法
1 2 3 4 5 6 handleCurrentChange (currentPage ) { this .pagination .currentPage = currentPage; this .findPage (); }
4.2 后台代码 4.2.1 Controller 在CheckItemController中增加分页查询方法
1 2 3 4 5 6 7 8 9 @RequestMapping("/findPage") public PageResult findPage (@RequestBody QueryPageBean queryPageBean) { PageResult pageResult = checkItemService.findPage( queryPageBean.getCurrentPage(), queryPageBean.getPageSize(), queryPageBean.getQueryString()); return pageResult; }
4.2.2 服务接口 在CheckItemService服务接口中扩展分页查询方法
1 public PageResult findPage (Integer currentPage, Integer pageSize, String queryString) ;
4.2.3 服务实现类 在CheckItemServiceImpl服务实现类中实现分页查询方法,基于Mybatis分页助手插件实现分页
1 2 3 4 5 public PageResult findPage (Integer currentPage, Integer pageSize, String queryString) { PageHelper.startPage(currentPage,pageSize); Page<CheckItem> page = checkItemDao.findPage(queryString); return new PageResult (page.getTotal(),page.getResult()); }
4.2.4 Dao接口 在CheckItemDao接口中扩展分页查询方法
1 public Page<CheckItem> findPage (@Param("queryString") String queryString) ;
4.2.5 Mapper映射文件 在CheckItemDao.xml文件中增加SQL定义
1 2 3 4 5 6 <select id ="findPage" parameterType ="string" resultType ="com.itheima.pojo.CheckItem" > select * from t_checkitem <if test ="queryString != null and queryString.length > 0" > where code = #{queryString} or name = #{queryString} </if > </select >
5. 删除检查项 5.1 完善页面 为了防止用户误操作,点击删除按钮时需要弹出确认删除的提示,用户点击取消则不做任何操作,用户点击确定按钮再提交删除请求。
5.1.1 绑定单击事件 需要为删除按钮绑定单击事件,并且将当前行数据作为参数传递给处理函数
1 <el-button size ="mini" type ="danger" @click ="handleDelete(scope.row)" > 删除</el-button >
1 2 3 4 handleDelete (row ) { alert (row.id ); }
5.1.2 弹出确认操作提示 用户点击删除按钮会执行handleDelete方法,此处需要完善handleDelete方法,弹出确认提示信息。ElementUI提供了$confirm方法来实现确认提示信息弹框效果
1 2 3 4 5 6 7 8 handleDelete (row ) { this .$confirm("确认删除当前选中记录吗?" ,"提示" ,{type :'warning' }).then (()=> { alert ('用户点击的是确定按钮' ); }); }
5.1.3 发送请求 如果用户点击确定按钮就需要发送ajax请求,并且将当前检查项的id作为参数提交到后台进行删除操作
1 2 3 4 5 6 7 8 9 10 11 12 13 14 15 16 17 18 19 20 21 22 handleDelete (row ) { this .$confirm("确认删除吗?" ,"提示" ,{type :'warning' }).then (()=> { axios.get ("/checkitem/delete.do?id=" + row.id ).then ((res )=> { if (!res.data .flag ){ this .$message .error (res.data .message ); }else { this .$message({ message : res.data .message , type : 'success' }); this .findPage (); } }); }); }
5.2 后台代码 5.2.1 Controller 在CheckItemController中增加删除方法
1 2 3 4 5 6 7 8 9 10 11 12 @RequestMapping("/delete") public Result delete (Integer id) { try { checkItemService.delete(id); }catch (RuntimeException e){ return new Result (false ,e.getMessage()); }catch (Exception e){ return new Result (false , MessageConstant.DELETE_CHECKITEM_FAIL); } return new Result (true ,MessageConstant.DELETE_CHECKITEM_SUCCESS); }
5.2.2 服务接口 在CheckItemService服务接口中扩展删除方法
1 public void delete (Integer id) ;
5.2.3 服务实现类 注意:不能直接删除,需要判断当前检查项是否和检查组关联,如果已经和检查组进行了关联则不允许删除
1 2 3 4 5 6 7 8 9 10 public void delete (Integer id) throws RuntimeException{ long count = checkItemDao.findCountByCheckItemId(id); if (count > 0 ){ throw new RuntimeException ("当前检查项被引用,不能删除" ); } checkItemDao.deleteById(id); }
5.2.4 Dao接口 在CheckItemDao接口中扩展方法findCountByCheckItemId和deleteById
1 2 public void deleteById (@Param("id") Integer id) ;public long findCountByCheckItemId (@Param("checkItemId") Integer checkItemId) ;
5.2.5 Mapper映射文件 在CheckItemDao.xml中扩展SQL语句
1 2 3 4 5 6 7 8 <delete id ="deleteById" parameterType ="int" > delete from t_checkitem where id = #{id} </delete > <select id ="findCountByCheckItemId" resultType ="long" parameterType ="int" > select count(*) from t_checkgroup_checkitem where checkitem_id = #{checkItemId} </select >
6. 编辑检查项 6.1 完善页面 用户点击编辑按钮时,需要弹出编辑窗口并且将当前记录的数据进行回显,用户修改完成后点击确定按钮将修改后的数据提交到后台进行数据库操作。
6.1.1 绑定单击事件 需要为编辑按钮绑定单击事件,并且将当前行数据作为参数传递给处理函数
1 <el-button type ="primary" size ="mini" @click ="handleUpdate(scope.row)" > 编辑</el-button >
1 2 3 handleUpdate (row ) { alert (row); }
6.1.2 弹出编辑窗口回显数据 当前页面中的编辑窗口已经提供好了,默认处于隐藏状态。在handleUpdate方法中需要将编辑窗口展示出来,并且需要发送ajax请求查询当前检查项数据用于回显
1 2 3 4 5 6 7 8 9 10 11 12 13 14 handleUpdate (row ) { axios.get ("/checkitem/findById.do?id=" + row.id ).then ((res )=> { if (res.data .flag ){ this .dialogFormVisible4Edit = true ; this .formData = res.data .data ; }else { this .$message .error ("获取数据失败,请刷新当前页面" ); } }); }
6.1.3 发送请求 在编辑窗口中修改完成后,点击确定按钮需要提交请求,所以需要为确定按钮绑定事件并提供处理函数handleEdit
1 <el-button type ="primary" @click ="handleEdit()" > 确定</el-button >
1 2 3 4 5 6 7 8 9 10 11 12 13 14 15 16 17 18 19 20 21 22 23 24 25 26 27 28 29 30 handleEdit ( this .$refs ['dataEditForm' ].validate ((valid )=> { if (valid){ axios.post ("/checkitem/edit.do" ,this .formData ).then ((response )=> { this .dialogFormVisible4Edit = false ; if (response.data .flag ){ this .$message({ message : response.data .message , type : 'success' }); }else { this .$message .error (response.data .message ); } }).finally (()=> { this .findPage (); }); }else { this .$message .error ("表单数据校验失败" ); return false ; } }); }
6.2 后台代码 6.2.1 Controller 在CheckItemController中增加编辑方法
1 2 3 4 5 6 7 8 9 10 @RequestMapping("/edit") public Result edit (@RequestBody CheckItem checkItem) { try { checkItemService.edit(checkItem); }catch (Exception e){ return new Result (false ,MessageConstant.EDIT_CHECKITEM_FAIL); } return new Result (true ,MessageConstant.EDIT_CHECKITEM_SUCCESS); }
6.2.2 服务接口 在CheckItemService服务接口中扩展编辑方法
1 public void edit (CheckItem checkItem) ;
6.2.3 服务实现类 在CheckItemServiceImpl实现类中实现编辑方法
1 2 3 4 public void edit (CheckItem checkItem) { checkItemDao.edit(checkItem); }
6.2.4 Dao接口 在CheckItemDao接口中扩展edit方法
1 public void edit (CheckItem checkItem) ;
6.2.5 Mapper映射文件 在CheckItemDao.xml中扩展SQL语句
1 2 3 4 5 6 7 8 9 10 11 12 13 14 15 16 17 18 19 20 21 22 23 24 25 26 27 28 29 30 31 <update id ="edit" parameterType ="com.itheima.pojo.CheckItem" > update t_checkitem <set > <if test ="name != null" > name = #{name}, </if > <if test ="sex != null" > sex = #{sex}, </if > <if test ="code != null" > code = #{code}, </if > <if test ="age != null" > age = #{age}, </if > <if test ="price != null" > price = #{price}, </if > <if test ="type != null" > type = #{type}, </if > <if test ="attention != null" > attention = #{attention}, </if > <if test ="remark != null" > remark = #{remark}, </if > </set > where id = #{id} </update >
1 如果遇到插入数据库中文乱码请把数据库连接换成这样:jdbc:mysql://127.0.0.1:3306/health?useUnicode=true&characterEncoding=utf-8&rewriteBatchedStatements=true
第3章 预约管理-检查组管理 1. 需求分析 检查组其实就是多个检查项的集合,例如有一个检查组为“一般检查”,这个检查组可以包括多个检查项:身高、体重、收缩压、舒张压等。所以在添加检查组时需要选择这个检查组包括的检查项。
检查组对应的实体类为CheckGroup,对应的数据表为t_checkgroup。检查组和检查项为多对多关系,所以需要中间表t_checkgroup_checkitem进行关联。
2. 新增检查组 2.1 完善页面 检查组管理页面对应的是checkgroup.html页面,根据产品设计的原型已经完成了页面基本结构的编写,现在需要完善页面动态效果。
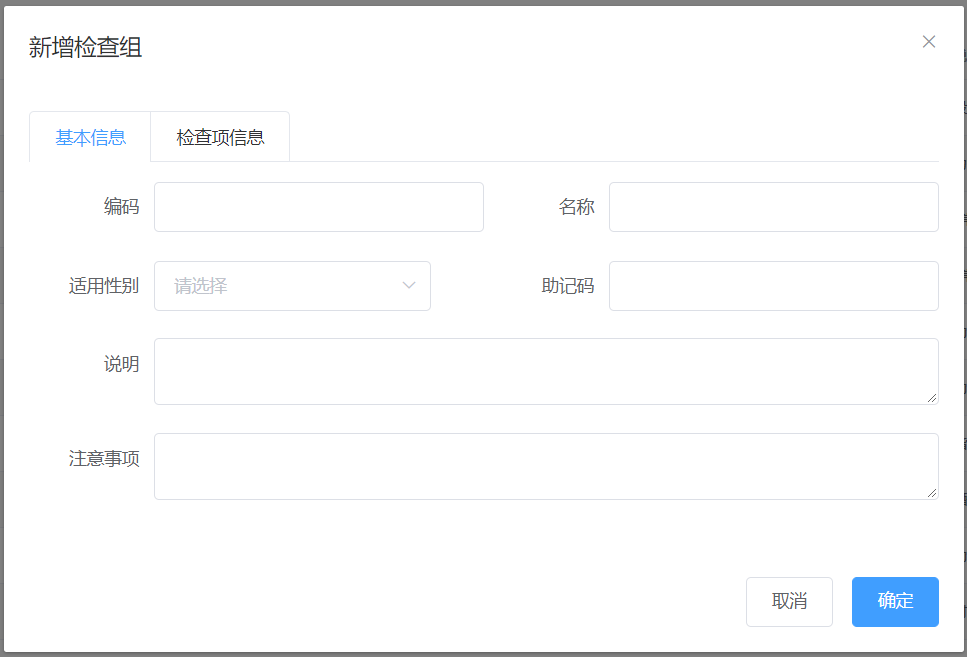
2.1.1 弹出新增窗口 页面中已经提供了新增窗口,只是出于隐藏状态。只需要将控制展示状态的属性dialogFormVisible改为true即可显示出新增窗口。点击新建按钮时绑定的方法为handleCreate,所以在handleCreate方法中修改dialogFormVisible属性的值为true即可。同时为了增加用户体验度,需要每次点击新建按钮时清空表单输入项。
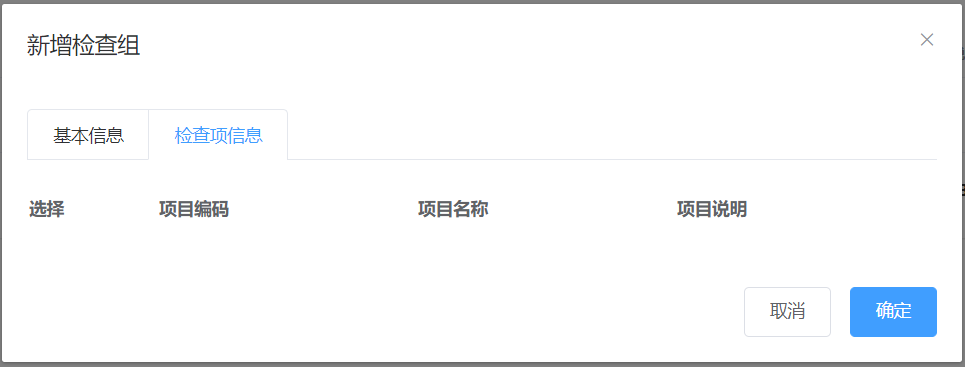
由于新增检查组时还需要选择此检查组包含的检查项,所以新增检查组窗口分为两部分信息:基本信息和检查项信息,如下图:
新建按钮绑定单击事件,对应的处理函数为handleCreate
1 <el-button type ="primary" class ="butT" @click ="handleCreate()" > 新建</el-button >
1 2 3 4 5 6 7 8 9 resetForm ( this .formData = {}; }, handleCreate ( this .resetForm (); this .dialogFormVisible = true ; }
2.1.2 动态展示检查项列表 现在虽然已经完成了新增窗口的弹出,但是在检查项信息标签页中需要动态展示所有的检查项信息列表数据,并且可以进行勾选。具体操作步骤如下:
(1)定义模型数据
1 2 tableData :[],checkitemIds :[],
(2)动态展示检查项列表数据,数据来源于上面定义的tableData模型数据
1 2 3 4 5 6 7 8 9 10 11 12 13 14 15 16 17 18 19 20 <table class ="datatable" > <thead > <tr > <th > 选择</th > <th > 项目编码</th > <th > 项目名称</th > <th > 项目说明</th > </tr > </thead > <tbody > <tr v-for ="c in tableData" > <td > <input :id ="c.id" v-model ="checkitemIds" type ="checkbox" :value ="c.id" > </td > <td > <label :for ="c.id" > {{c.code}}</label > </td > <td > <label :for ="c.id" > {{c.name}}</label > </td > <td > <label :for ="c.id" > {{c.remark}}</label > </td > </tr > </tbody > </table >
(3)完善handleCreate方法,发送ajax请求查询所有检查项数据并将结果赋值给tableData模型数据用于页面表格展示
1 2 3 4 5 6 7 8 9 10 11 12 13 14 15 16 17 18 handleCreate ( this .dialogFormVisible = true ; this .resetForm (); this .activeName ='first' ; this .checkitemIds = []; axios.get ("/checkitem/findAll.do" ).then ((res )=> { if (res.data .flag ){ this .tableData = res.data .data ; }else { this .$message .error (res.data .message ); } }); }
(4)分别在CheckItemController、CheckItemService、CheckItemServiceImpl、CheckItemDao、CheckItemDao.xml中扩展方法查询所有检查项数据
CheckItemController:
1 2 3 4 5 6 7 8 9 10 11 @RequestMapping("/findAll") public Result findAll () { List<CheckItem> checkItemList = checkItemService.findAll(); if (checkItemList != null && checkItemList.size() > 0 ){ Result result = new Result (true , MessageConstant.QUERY_CHECKITEM_SUCCESS); result.setData(checkItemList); return result; } return new Result (false ,MessageConstant.QUERY_CHECKITEM_FAIL); }
CheckItemService:
1 public List<CheckItem> findAll () ;
CheckItemServiceImpl:
1 2 3 public List<CheckItem> findAll () { return checkItemDao.findAll(); }
CheckItemDao:
1 public List<CheckItem> findAll () ;
CheckItemDao.xml:
1 2 3 <select id ="findAll" resultType ="com.itheima.pojo.CheckItem" > select * from t_checkitem </select >
2.1.3 提交请求 当用户点击新增窗口中的确定按钮时发送ajax请求将数据提交到后台进行数据库操作。提交到后台的数据分为两部分:检查组基本信息(对应的模型数据为formData)和检查项id数组(对应的模型数据为checkitemIds)。
为确定按钮绑定单击事件,对应的处理函数为handleAdd
1 <el-button type ="primary" @click ="handleAdd()" > 确定</el-button >
完善handleAdd方法
1 2 3 4 5 6 7 8 9 10 11 12 13 14 15 16 17 18 19 20 21 22 23 24 handleAdd () { axios.post ( "/checkgroup/add.do?checkitemIds=" + this .checkitemIds , this .formData ) .then ((response )=> { this .dialogFormVisible = false ; if (response.data .flag ){ this .$message({ message : response.data .message , type : 'success' }); }else { this .$message .error (response.data .message ); } }).finally (()=> { this .findPage (); }); }
2.2 后台代码 2.2.1 Controller 在health_web工程中创建CheckGroupController
1 2 3 4 5 6 7 8 9 10 11 12 13 14 15 16 17 18 19 20 21 22 23 24 25 26 27 28 29 30 31 32 33 34 35 36 37 38 39 40 41 package com.itheima.controller;import com.alibaba.dubbo.config.annotation.Reference;import com.itheima.constant.MessageConstant;import com.itheima.entity.PageResult;import com.itheima.entity.QueryPageBean;import com.itheima.entity.Result;import com.itheima.pojo.CheckGroup;import com.itheima.pojo.CheckItem;import com.itheima.service.CheckGroupService;import org.springframework.web.bind.annotation.RequestBody;import org.springframework.web.bind.annotation.RequestMapping;import org.springframework.web.bind.annotation.RestController;import java.util.List;@RestController @RequestMapping("/checkgroup") public class CheckGroupController { @Reference private CheckGroupService checkGroupService; @RequestMapping("/add") public Result add (@RequestBody CheckGroup checkGroup,Integer[] checkitemIds) { try { checkGroupService.add(checkGroup,checkitemIds); }catch (Exception e){ return new Result (false , MessageConstant.ADD_CHECKGROUP_FAIL); } return new Result (true ,MessageConstant.ADD_CHECKGROUP_SUCCESS); } }
2.2.2 服务接口 在health_interface工程中创建CheckGroupService接口
1 2 3 4 5 6 7 8 9 10 package com.itheima.service;import com.itheima.entity.PageResult;import com.itheima.pojo.CheckGroup;import java.util.List;public interface CheckGroupService { void add (CheckGroup checkGroup,Integer[] checkitemIds) ; }
2.2.3 服务实现类 在health_service工程中创建CheckGroupServiceImpl实现类
1 2 3 4 5 6 7 8 9 10 11 12 13 14 15 16 17 18 19 20 21 22 23 24 25 26 27 28 29 30 31 32 33 34 35 36 37 38 39 40 package com.itheima.service;import com.alibaba.dubbo.config.annotation.Service;import com.github.pagehelper.Page;import com.github.pagehelper.PageHelper;import com.itheima.dao.CheckGroupDao;import com.itheima.entity.PageResult;import com.itheima.pojo.CheckGroup;import com.itheima.pojo.CheckItem;import org.springframework.beans.factory.annotation.Autowired;import org.springframework.transaction.annotation.Transactional;import java.util.HashMap;import java.util.List;import java.util.Map;@Service(interfaceClass = CheckGroupService.class) @Transactional public class CheckGroupServiceImpl implements CheckGroupService { @Autowired private CheckGroupDao checkGroupDao; @Override public void add (CheckGroup checkGroup, Integer[] checkitemIds) { checkGroupDao.add(checkGroup); setCheckGroupAndCheckItem(checkGroup.getId(),checkitemIds); } public void setCheckGroupAndCheckItem (Integer checkGroupId,Integer[] checkitemIds) { if (checkitemIds != null && checkitemIds.length > 0 ){ for (Integer checkitemId : checkitemIds) { Map<String,Integer> map = new HashMap <>(); map.put("checkgroup_id" ,checkGroupId); map.put("checkitem_id" ,checkitemId); checkGroupDao.setCheckGroupAndCheckItem(map); } } } }
2.2.4 Dao接口 在health_dao工程中创建CheckGroupDao接口
1 2 3 4 5 6 7 8 9 10 11 12 package com.itheima.dao;import com.github.pagehelper.Page;import com.itheima.pojo.CheckGroup;import java.util.List;import java.util.Map;public interface CheckGroupDao { void add (CheckGroup checkGroup) ; void setCheckGroupAndCheckItem (Map map) ; }
2.2.5 Mapper映射文件 在health_dao工程中创建CheckGroupDao.xml映射文件,需要和CheckGroupDao接口在同一目录下
1 2 3 4 5 6 7 8 9 10 11 12 13 14 15 16 17 18 19 20 <?xml version="1.0" encoding="UTF-8" ?> <!DOCTYPE mapper PUBLIC "-//mybatis.org//DTD Mapper 3.0//EN" "http://mybatis.org/dtd/mybatis-3-mapper.dtd" > <mapper namespace ="com.itheima.dao.CheckGroupDao" > <insert id ="add" parameterType ="com.itheima.pojo.CheckGroup" > <selectKey resultType ="java.lang.Integer" order ="AFTER" keyProperty ="id" > SELECT LAST_INSERT_ID() </selectKey > insert into t_checkgroup(code,name,sex,helpCode,remark,attention) values (#{code},#{name},#{sex},#{helpCode},#{remark},#{attention}) </insert > <insert id ="setCheckGroupAndCheckItem" parameterType ="hashmap" > insert into t_checkgroup_checkitem(checkgroup_id,checkitem_id) values (#{checkgroup_id},#{checkitem_id}) </insert > </mapper >
2.2.6 批量插入 1 2 3 4 5 6 7 8 9 10 11 12 13 14 15 16 17 18 19 20 21 22 public void setCheckGroupAndCheckItemBatch (Integer checkGroupId,Integer[] checkitemIds) { if (checkitemIds != null && checkitemIds.length > 0 ){ List<Map> batchParam = new ArrayList <>(); for (Integer checkitemId : checkitemIds) { Map<String,Integer> map = new HashMap <>(); map.put("checkgroup_id" ,checkGroupId); map.put("checkitem_id" ,checkitemId); batchParam.add(map); } checkGroupDao.setCheckGroupAndCheckItemBatch(batchParam); } } <!--批量设置检查组和检查项的关联关系--> <update id="setCheckGroupAndCheckItemBatch" > insert into t_checkgroup_checkitem (checkgroup_id,checkitem_id) values <foreach collection="list" item="item" separator="," > (#{item.checkgroup_id},#{item.checkitem_id}) </foreach> </update>
3. 检查组分页 3.1 完善页面 3.1.1 定义分页相关模型数据 1 2 3 4 5 6 7 pagination : { currentPage : 1 , pageSize :10 , total :0 , queryString :null }, dataList : [],
3.1.2 定义分页方法 在页面中提供了findPage方法用于分页查询,为了能够在checkgroup.html页面加载后直接可以展示分页数据,可以在VUE提供的钩子函数created中调用findPage方法
1 2 3 4 created ( this .findPage (); }
1 2 3 4 5 6 7 8 9 10 11 12 13 14 15 findPage ( var param = { currentPage :this .pagination .currentPage , pageSize :this .pagination .pageSize , queryString :this .pagination .queryString }; axios.post ("/checkgroup/findPage.do" ,param).then ((response )=> { this .dataList = response.data .rows ; this .pagination .total = response.data .total ; }); }
3.1.3 完善分页方法执行时机 除了在created钩子函数中调用findPage方法查询分页数据之外,当用户点击查询按钮或者点击分页条中的页码时也需要调用findPage方法重新发起查询请求。
为查询按钮绑定单击事件,调用findPage方法
1 <el-button @click ="findPage()" class ="dalfBut" > 查询</el-button >
为分页条组件绑定current-change事件,此事件是分页条组件自己定义的事件,当页码改变时触发,对应的处理函数为handleCurrentChange
1 2 3 4 5 6 7 8 <el-pagination class ="pagiantion" @current-change ="handleCurrentChange" :current-page ="pagination.currentPage" :page-size ="pagination.pageSize" layout ="total, prev, pager, next, jumper" :total ="pagination.total" > </el-pagination >
定义handleCurrentChange方法
1 2 3 4 5 6 handleCurrentChange (currentPage ) { this .pagination .currentPage = currentPage; this .findPage (); }
3.2 后台代码 3.2.1 Controller 在CheckGroupController中增加分页查询方法
1 2 3 4 5 6 7 8 9 10 @RequestMapping("/findPage") public PageResult findPage (@RequestBody QueryPageBean queryPageBean) { PageResult pageResult = checkGroupService.pageQuery( queryPageBean.getCurrentPage(), queryPageBean.getPageSize(), queryPageBean.getQueryString() ); return pageResult; }
3.2.2 服务接口 在CheckGroupService服务接口中扩展分页查询方法
1 public PageResult findPage (Integer currentPage, Integer pageSize, String queryString) ;
3.2.3 服务实现类 在CheckGroupServiceImpl服务实现类中实现分页查询方法,基于Mybatis分页助手插件实现分页
1 2 3 4 5 public PageResult findPage (Integer currentPage, Integer pageSize, String queryString) { PageHelper.startPage(currentPage,pageSize); Page<CheckGroup> page = checkGroupDao.findPage(queryString); return new PageResult (page.getTotal(),page.getResult()); }
3.2.4 Dao接口 在CheckGroupDao接口中扩展分页查询方法
1 public Page<CheckGroup> findPage (@Param("queryString") String queryString) ;
3.2.5 Mapper映射文件 在CheckGroupDao.xml文件中增加SQL定义
1 2 3 4 5 6 <select id ="selectByCondition" parameterType ="string" resultType ="com.itheima.pojo.CheckGroup" > select * from t_checkgroup <if test ="queryString != null and queryString.length > 0" > where code = #{queryString} or name = #{queryString} or helpCode = #{queryString} </if > </select >
4. 编辑检查组 4.1 完善页面 用户点击编辑按钮时,需要弹出编辑窗口并且将当前记录的数据进行回显,用户修改完成后点击确定按钮将修改后的数据提交到后台进行数据库操作。此处进行数据回显的时候,除了需要检查组基本信息的回显之外,还需要回显当前检查组包含的检查项(以复选框勾选的形式回显)。
4.1.1 绑定单击事件 需要为编辑按钮绑定单击事件,并且将当前行数据作为参数传递给处理函数
1 <el-button type ="primary" size ="mini" @click ="handleUpdate(scope.row)" > 编辑</el-button >
1 2 3 handleUpdate (row ) { alert (row); }
4.1.2 弹出编辑窗口回显数据 当前页面的编辑窗口已经提供好了,默认处于隐藏状态。在handleUpdate方法中需要将编辑窗口展示出来,并且需要发送多个ajax请求分别查询当前检查组数据、所有检查项数据、当前检查组包含的检查项id用于基本数据回显
1 2 3 4 5 6 7 8 9 10 11 12 13 14 15 16 17 18 19 20 21 22 23 24 25 26 27 28 29 handleUpdate (row ) { axios.get ("/checkgroup/findById.do?id=" + row.id ).then ((res )=> { if (res.data .flag ){ this .dialogFormVisible4Edit = true ; this .activeName ='first' ; this .formData = res.data .data ; axios.get ("/checkitem/findAll.do" ).then ((res )=> { if (res.data .flag ){ this .tableData = res.data .data ; axios.get ("/checkgroup/findCheckItemIdsByCheckGroupId.do?id=" + row.id ).then ((res )=> { this .checkitemIds = res.data ; }); }else { this .$message .error (res.data .message ); } }); }else { this .$message .error ("获取数据失败,请刷新当前页面" ); } }); }
优化:
1 2 3 4 5 6 7 8 9 10 11 12 13 14 15 16 17 18 19 20 21 22 23 24 25 # 一次请求搞定 # 前端部分代码 axios.get("/checkgroup/findDetailForUpdate.do?id=" + row.id).then((res)=>{ if (res.data.flag){ this .dialogFormVisible4Edit = true ; this .activeName='first' ; this .formData = res.data.data.checkGroup; this .tableData = res.data.data.checkItems; this .checkitemIds = res.data.data.checkItemIds; }else { this .$message.error("获取数据失败,请刷新当前页面" ); } }); # 后台部分代码 @Override public CheckGroupVo findDetailForUpdate (Integer id) { CheckGroup checkGroup = checkGroupDao.findById(id); List<CheckItem> checkItems = checkItemDao.findAll(); List<Integer> checkItemIds = checkGroupDao.findCheckItemIdsByCheckGroupId(id); return CheckGroupVo.builder().checkGroup(checkGroup).checkItems(checkItems).checkItemIds(checkItemIds).build(); }
4.1.3 发送请求 在编辑窗口中修改完成后,点击确定按钮需要提交请求,所以需要为确定按钮绑定事件并提供处理函数handleEdit
1 <el-button type ="primary" @click ="handleEdit()" > 确定</el-button >
1 2 3 4 5 6 7 8 9 10 11 12 13 14 15 16 17 18 19 handleEdit ( axios.post ("/checkgroup/edit.do?checkitemIds=" +this .checkitemIds ,this .formData ). then ((response )=> { this .dialogFormVisible4Edit = false ; if (response.data .flag ){ this .$message({ message : response.data .message , type : 'success' }); }else { this .$message .error (response.data .message ); } }).finally (()=> { this .findPage (); }); }
4.2 后台代码 4.2.1 Controller 在CheckGroupController中增加方法
1 2 3 4 5 6 7 8 9 10 11 12 13 14 15 16 17 18 19 20 21 22 23 24 25 26 27 28 29 @RequestMapping("/findById") public Result findById (Integer id) { CheckGroup checkGroup = checkGroupService.findById(id); if (checkGroup != null ){ Result result = new Result (true , MessageConstant.QUERY_CHECKGROUP_SUCCESS); result.setData(checkGroup); return result; } return new Result (false ,MessageConstant.QUERY_CHECKGROUP_FAIL); } @RequestMapping("/findCheckItemIdsByCheckGroupId") public List<Integer> findCheckItemIdsByCheckGroupId (Integer id) { List<Integer> list = checkGroupService.findCheckItemIdsByCheckGroupId(id); return list; } @RequestMapping("/edit") public Result edit (@RequestBody CheckGroup checkGroup,Integer[] checkitemIds) { try { checkGroupService.edit(checkGroup,checkitemIds); }catch (Exception e){ return new Result (false ,MessageConstant.EDIT_CHECKGROUP_FAIL); } return new Result (true ,MessageConstant.EDIT_CHECKGROUP_SUCCESS); }
4.2.2 服务接口 在CheckGroupService服务接口中扩展方法
1 2 3 CheckGroup findById (Integer id) ; List<Integer> findCheckItemIdsByCheckGroupId (Integer id) ; public void edit (CheckGroup checkGroup,Integer[] checkitemIds) ;
4.2.3 服务实现类 在CheckGroupServiceImpl实现类中实现编辑方法
1 2 3 4 5 6 7 8 9 10 11 12 13 14 15 16 17 18 19 20 21 22 23 24 25 26 27 28 29 public CheckGroup findById (Integer id) { return checkGroupDao.findById(id); } public List<Integer> findCheckItemIdsByCheckGroupId (Integer id) { return checkGroupDao.findCheckItemIdsByCheckGroupId(id); } public void edit (CheckGroup checkGroup, Integer[] checkitemIds) { checkGroupDao.deleteAssociation(checkGroup.getId()); setCheckGroupAndCheckItem(checkGroup.getId(),checkitemIds); checkGroupDao.edit(checkGroup); } public void setCheckGroupAndCheckItem (Integer checkGroupId,Integer[] checkitemIds) { if (checkitemIds != null && checkitemIds.length > 0 ){ for (Integer checkitemId : checkitemIds) { Map<String,Integer> map = new HashMap <>(); map.put("checkgroup_id" ,checkGroupId); map.put("checkitem_id" ,checkitemId); checkGroupDao.setCheckGroupAndCheckItem(map); } } }
4.2.4 Dao接口 在CheckGroupDao接口中扩展方法
1 2 3 4 5 6 7 8 9 10 11 CheckGroup findById (Integer id) ; List<Integer> findCheckItemIdsByCheckGroupId (Integer id) ; void setCheckGroupAndCheckItem (Map map) ;void deleteAssociation (Integer id) ; void edit (CheckGroup checkGroup) ;
4.2.5 Mapper映射文件 在CheckGroupDao.xml中扩展SQL语句
1 2 3 4 5 6 7 8 9 10 11 12 13 14 15 16 17 18 19 20 21 22 23 24 25 26 27 28 29 30 31 32 33 34 35 36 37 38 39 40 41 <select id ="findById" parameterType ="int" resultType ="com.itheima.pojo.CheckGroup" > select * from t_checkgroup where id = #{id} </select > <select id ="findCheckItemIdsByCheckGroupId" parameterType ="int" resultType ="int" > select checkitem_id from t_checkgroup_checkitem where checkgroup_id = #{id} </select > <insert id ="setCheckGroupAndCheckItem" parameterType ="hashmap" > insert into t_checkgroup_checkitem(checkgroup_id,checkitem_id) values (#{checkgroup_id},#{checkitem_id}) </insert > <delete id ="deleteAssociation" parameterType ="int" > delete from t_checkgroup_checkitem where checkgroup_id = #{id} </delete > <update id ="edit" parameterType ="com.itheima.pojo.CheckGroup" > update t_checkgroup <set > <if test ="name != null" > name = #{name}, </if > <if test ="sex != null" > sex = #{sex}, </if > <if test ="code != null" > code = #{code}, </if > <if test ="helpCode != null" > helpCode = #{helpCode}, </if > <if test ="attention != null" > attention = #{attention}, </if > <if test ="remark != null" > remark = #{remark}, </if > </set > where id = #{id} </update >
第4章 预约管理-套餐管理 1. 图片存储方案 1.1 介绍 在实际开发中,我们会有很多处理不同功能的服务器。例如:
应用服务器:负责部署我们的应用
数据库服务器:运行我们的数据库
文件服务器:负责存储用户上传文件的服务器
分服务器处理的目的是让服务器各司其职,从而提高我们项目的运行效率。
常见的图片存储方案:
方案一:使用nginx搭建图片服务器
方案二:使用开源的分布式文件存储系统,例如Fastdfs、HDFS等
方案三:使用云存储,例如阿里云、七牛云等
1.2 七牛云存储 七牛云(隶属于上海七牛信息技术有限公司)是国内领先的以视觉智能和数据智能为核心的企业级云计算服务商,同时也是国内知名智能视频云服务商,累计为 70 多万家企业提供服务,覆盖了国内80%网民。围绕富媒体场景推出了对象存储、融合 CDN 加速、容器云、大数据平台、深度学习平台等产品、并提供一站式智能视频云解决方案。为各行业及应用提供可持续发展的智能视频云生态,帮助企业快速上云,创造更广阔的商业价值。
官网:https://www.qiniu.com/
通过七牛云官网介绍我们可以知道其提供了多种服务,我们主要使用的是七牛云提供的对象存储服务来存储图片。
1.2.1 注册、登录 要使用七牛云的服务,首先需要注册成为会员。地址:https://portal.qiniu.com/signup
注册完成后就可以使用刚刚注册的邮箱和密码登录到七牛云:
登录成功后点击页面右上角管理控制台:
注意:登录成功后还需要进行实名认证才能进行相关操作。
1.2.2 新建存储空间 要进行图片存储,我们需要在七牛云管理控制台新建存储空间。点击管理控制台首页对象存储下的立即添加按钮,页面跳转到新建存储空间页面:
可以创建多个存储空间,各个存储空间是相互独立的。
1.2.3 查看存储空间信息 存储空间创建后,会在左侧的存储空间列表菜单中展示创建的存储空间名称,点击存储空间名称可以查看当前存储空间的相关信息
1.2.4 开发者中心 可以通过七牛云提供的开发者中心学习如何操作七牛云服务,地址:https://developer.qiniu.com/
点击对象存储,跳转到对象存储开发页面,地址:https://developer.qiniu.com/kodo
七牛云提供了多种方式操作对象存储服务,本项目采用Java SDK方式,地址:https://developer.qiniu.com/kodo/sdk/1239/java
使用Java SDK操作七牛云需要导入如下maven坐标:
1 2 3 4 5 <dependency > <groupId > com.qiniu</groupId > <artifactId > qiniu-java-sdk</artifactId > <version > 7.2.0</version > </dependency >
1.2.5 鉴权 Java SDK的所有的功能,都需要合法的授权。授权凭证的签算需要七牛账号下的一对有效的Access Key和Secret Key,这对密钥可以在七牛云管理控制台的个人中心(https://portal.qiniu.com/user/key)获得,如下图:
1.2.6 Java SDK操作七牛云 本章节我们就需要使用七牛云提供的Java SDK完成图片上传和删除,我们可以参考官方提供的例子。
1 2 3 4 5 6 7 8 9 10 11 12 13 14 15 16 17 18 19 20 21 22 23 24 25 26 27 28 29 30 31 32 33 34 35 36 37 Configuration cfg = new Configuration (Zone.zone0());UploadManager uploadManager = new UploadManager (cfg);String accessKey = "your access key" ;String secretKey = "your secret key" ;String bucket = "your bucket name" ;String key = null ;try { byte [] uploadBytes = "hello qiniu cloud" .getBytes("utf-8" ); ByteArrayInputStream byteInputStream=new ByteArrayInputStream (uploadBytes); Auth auth = Auth.create(accessKey, secretKey); String upToken = auth.uploadToken(bucket); try { Response response = uploadManager.put(byteInputStream,key,upToken,null , null ); DefaultPutRet putRet = new Gson ().fromJson(response.bodyString(), DefaultPutRet.class); System.out.println(putRet.key); System.out.println(putRet.hash); } catch (QiniuException ex) { Response r = ex.response; System.err.println(r.toString()); try { System.err.println(r.bodyString()); } catch (QiniuException ex2) { } } } catch (UnsupportedEncodingException ex) { }
1 2 3 4 5 6 7 8 9 10 11 12 13 14 15 16 17 18 19 Configuration cfg = new Configuration (Zone.zone0());String accessKey = "your access key" ;String secretKey = "your secret key" ;String bucket = "your bucket name" ;String key = "your file key" ;Auth auth = Auth.create(accessKey, secretKey);BucketManager bucketManager = new BucketManager (auth, cfg);try { bucketManager.delete(bucket, key); } catch (QiniuException ex) { System.err.println(ex.code()); System.err.println(ex.response.toString()); }
1.2.7 封装工具类 为了方便操作七牛云存储服务,我们可以将官方提供的案例简单改造成一个工具类,在我们的项目中直接使用此工具类来操作就可以:
1 2 3 4 5 6 7 8 9 10 11 12 13 14 15 16 17 18 19 20 21 22 23 24 25 26 27 28 29 30 31 32 33 34 35 36 37 38 39 40 41 42 43 44 45 46 47 48 49 50 51 52 53 54 55 56 57 58 59 60 61 62 63 64 65 66 67 68 69 70 71 72 73 74 75 76 77 78 79 80 81 82 83 84 85 86 87 88 89 package com.itheima.utils;import com.google.gson.Gson;import com.qiniu.common.QiniuException;import com.qiniu.common.Zone;import com.qiniu.http.Response;import com.qiniu.storage.BucketManager;import com.qiniu.storage.Configuration;import com.qiniu.storage.UploadManager;import com.qiniu.storage.model.DefaultPutRet;import com.qiniu.util.Auth;import java.io.File;import java.io.FileInputStream;import java.io.InputStream;public class QiniuUtils { public static String accessKey = "dulF9Wze9bxujtuRvu3yyYb9JX1Sp23jzd3tO708" ; public static String secretKey = "vZkhW7iot3uWwcWz9vXfbaP4JepdWADFDHVLMZOe" ; public static String bucket = "qiniutest" ; public static void upload2Qiniu (String filePath,String fileName) { Configuration cfg = new Configuration (Zone.zone0()); UploadManager uploadManager = new UploadManager (cfg); Auth auth = Auth.create(accessKey, secretKey); String upToken = auth.uploadToken(bucket); try { Response response = uploadManager.put(filePath, fileName, upToken); DefaultPutRet putRet = new Gson ().fromJson(response.bodyString(), DefaultPutRet.class); } catch (QiniuException ex) { Response r = ex.response; try { System.err.println(r.bodyString()); } catch (QiniuException ex2) { } } } public static void upload2Qiniu (byte [] bytes, String fileName) { Configuration cfg = new Configuration (Zone.zone0()); UploadManager uploadManager = new UploadManager (cfg); String key = fileName; Auth auth = Auth.create(accessKey, secretKey); String upToken = auth.uploadToken(bucket); try { Response response = uploadManager.put(bytes, key, upToken); DefaultPutRet putRet = new Gson ().fromJson(response.bodyString(), DefaultPutRet.class); System.out.println(putRet.key); System.out.println(putRet.hash); } catch (QiniuException ex) { Response r = ex.response; System.err.println(r.toString()); try { System.err.println(r.bodyString()); } catch (QiniuException ex2) { } } } public static void deleteFileFromQiniu (String fileName) { Configuration cfg = new Configuration (Zone.zone0()); String key = fileName; Auth auth = Auth.create(accessKey, secretKey); BucketManager bucketManager = new BucketManager (auth, cfg); try { bucketManager.delete(bucket, key); } catch (QiniuException ex) { System.err.println(ex.code()); System.err.println(ex.response.toString()); } } }
将此工具类放在health_common工程中,后续会使用到。
1.2.8 绑定自己的域名 1 2 默认30天到期,如果想绑定自己的域名到七牛云 比如qiniu.域名(xx.com) 映射到 七牛云分配的域名
1 给空间绑定域名,注意绑定的是qiniu.域名(xx.com),二级域名
然后到腾讯云/阿里云后台解析域名,主机记录就是qiniu,记录值就是七牛生成的CNAME
然后就可以用qiniu.域名(xx.com)/1.jpg访问你的图片了
2. 新增套餐 2.1 需求分析 套餐其实就是检查组的集合,例如有一个套餐为“入职体检套餐”,这个检查组可以包括多个检查组:一般检查、血常规、尿常规、肝功三项等。所以在添加套餐时需要选择这个套餐包括的检查组。
套餐对应的实体类为Setmeal,对应的数据表为t_setmeal。套餐和检查组为多对多关系,所以需要中间表t_setmeal_checkgroup进行关联。
2.2 完善页面 套餐管理页面对应的是setmeal.html页面,根据产品设计的原型已经完成了页面基本结构的编写,现在需要完善页面动态效果。
2.2.1 弹出新增窗口 页面中已经提供了新增窗口,只是出于隐藏状态。只需要将控制展示状态的属性dialogFormVisible改为true接口显示出新增窗口。点击新建按钮时绑定的方法为handleCreate,所以在handleCreate方法中修改dialogFormVisible属性的值为true即可。同时为了增加用户体验度,需要每次点击新建按钮时清空表单输入项。
由于新增套餐时还需要选择此套餐包含的检查组,所以新增套餐窗口分为两部分信息:基本信息和检查组信息,如下图:
新建按钮绑定单击事件,对应的处理函数为handleCreate
1 <el-button type ="primary" class ="butT" @click ="handleCreate()" > 新建</el-button >
1 2 3 4 5 6 7 8 9 10 11 12 resetForm ( this .formData = {}; this .activeName ='first' ; this .checkgroupIds = []; this .imageUrl = null ; } handleCreate ( this .dialogFormVisible = true ; this .resetForm (); }
2.2.2 动态展示检查组列表 现在虽然已经完成了新增窗口的弹出,但是在检查组信息标签页中需要动态展示所有的检查组信息列表数据,并且可以进行勾选。具体操作步骤如下:
(1)定义模型数据
1 2 tableData :[],checkgroupIds :[],
(2)动态展示检查组列表数据,数据来源于上面定义的tableData模型数据
1 2 3 4 5 6 7 8 9 10 11 12 13 14 15 16 17 18 19 20 <table class ="datatable" > <thead > <tr > <th > 选择</th > <th > 项目编码</th > <th > 项目名称</th > <th > 项目说明</th > </tr > </thead > <tbody > <tr v-for ="c in tableData" > <td > <input :id ="c.id" v-model ="checkgroupIds" type ="checkbox" :value ="c.id" > </td > <td > <label :for ="c.id" > {{c.code}}</label > </td > <td > <label :for ="c.id" > {{c.name}}</label > </td > <td > <label :for ="c.id" > {{c.remark}}</label > </td > </tr > </tbody > </table >
(3)完善handleCreate方法,发送ajax请求查询所有检查组数据并将结果赋值给tableData模型数据用于页面表格展示
1 2 3 4 5 6 7 8 9 10 11 12 handleCreate ( this .dialogFormVisible = true ; this .resetForm (); axios.get ("/checkgroup/findAll.do" ).then ((res )=> { if (res.data .flag ){ this .tableData = res.data .data ; }else { this .$message .error (res.data .message ); } }); }
(4)分别在CheckGroupController、CheckGroupService、CheckGroupServiceImpl、CheckGroupDao、CheckGroupDao.xml中扩展方法查询所有检查组数据
CheckGroupController:
1 2 3 4 5 6 7 8 9 10 11 @RequestMapping("/findAll") public Result findAll () { List<CheckGroup> checkGroupList = checkGroupService.findAll(); if (checkGroupList != null && checkGroupList.size() > 0 ){ Result result = new Result (true , MessageConstant.QUERY_CHECKGROUP_SUCCESS); result.setData(checkGroupList); return result; } return new Result (false ,MessageConstant.QUERY_CHECKGROUP_FAIL); }
CheckGroupService:
1 List<CheckGroup> findAll () ;
CheckGroupServiceImpl:
1 2 3 public List<CheckGroup> findAll () { return checkGroupDao.findAll(); }
CheckGroupDao:
1 List<CheckGroup> findAll () ;
CheckGroupDao.xml:
1 2 3 <select id ="findAll" resultType ="com.itheima.pojo.CheckGroup" > select * from t_checkgroup </select >
2.2.3 图片上传并预览 此处使用的是ElementUI提供的上传组件el-upload,提供了多种不同的上传效果,上传成功后可以进行预览。
实现步骤:
(1)定义模型数据,用于后面上传文件的图片预览:
(2)定义上传组件:
1 2 3 4 5 6 7 8 9 10 11 12 13 14 15 16 17 18 19 20 21 22 <el-upload class ="avatar-uploader" action ="/setmeal/upload.do" :auto-upload ="autoUpload" name ="imgFile" :show-file-list ="false" :on-success ="handleAvatarSuccess" :before-upload ="beforeAvatarUpload" > <img v-if ="imageUrl" :src ="imageUrl" class ="avatar" > <i v-else class ="el-icon-plus avatar-uploader-icon" > </i > </el-upload >
(3)定义对应的钩子函数:
1 2 3 4 5 6 7 8 9 10 11 12 13 14 15 16 17 18 19 20 21 22 23 handleAvatarSuccess (response, file ) { this .imageUrl = "http://pqjroc654.bkt.clouddn.com/" +response.data ; this .$message({ message : response.message , type : response.flag ? 'success' : 'error' }); this .formData .img = response.data ; } beforeAvatarUpload (file ) { const isJPG = file.type === 'image/jpeg' ; const isLt2M = file.size / 1024 / 1024 < 2 ; if (!isJPG) { this .$message .error ('上传套餐图片只能是 JPG 格式!' ); } if (!isLt2M) { this .$message .error ('上传套餐图片大小不能超过 2MB!' ); } return isJPG && isLt2M; }
(4)创建SetmealController,接收上传的文件
1 2 3 4 5 6 7 8 9 10 11 12 13 14 15 16 17 18 19 20 21 22 23 24 25 26 27 28 29 30 31 32 33 34 35 36 37 38 39 40 41 42 43 44 45 46 47 48 49 50 51 52 53 54 package com.itheima.controller;import com.alibaba.dubbo.config.annotation.Reference;import com.itheima.constant.MessageConstant;import com.itheima.entity.PageResult;import com.itheima.entity.QueryPageBean;import com.itheima.entity.Result;import com.itheima.pojo.CheckGroup;import com.itheima.pojo.Setmeal;import com.itheima.service.CheckGroupService;import com.itheima.service.SetmealService;import com.itheima.utils.QiniuUtils;import org.springframework.web.bind.annotation.RequestBody;import org.springframework.web.bind.annotation.RequestMapping;import org.springframework.web.bind.annotation.RequestParam;import org.springframework.web.bind.annotation.RestController;import org.springframework.web.multipart.MultipartFile;import javax.servlet.ServletContext;import javax.servlet.http.HttpServletRequest;import java.io.File;import java.util.List;import java.util.UUID;@RestController @RequestMapping("/setmeal") public class SetmealController { @Reference private SetmealService setmealService; @RequestMapping("/upload") public Result upload (@RequestParam("imgFile") MultipartFile imgFile) { try { String originalFilename = imgFile.getOriginalFilename(); int lastIndexOf = originalFilename.lastIndexOf("." ); String suffix = originalFilename.substring(lastIndexOf); String fileName = UUID.randomUUID().toString() + suffix; QiniuUtils.upload2Qiniu(imgFile.getBytes(),fileName); Result result = new Result (true , MessageConstant.PIC_UPLOAD_SUCCESS); result.setData(fileName); return result; }catch (Exception e){ e.printStackTrace(); return new Result (false ,MessageConstant.PIC_UPLOAD_FAIL); } } }
注意:别忘了在spring配置文件中配置文件上传组件
1 2 3 4 5 6 7 <bean id ="multipartResolver" class ="org.springframework.web.multipart.commons.CommonsMultipartResolver" > <property name ="maxUploadSize" value ="104857600" /> <property name ="maxInMemorySize" value ="4096" /> <property name ="defaultEncoding" value ="UTF-8" /> </bean >
2.2.4 提交请求 当用户点击新增窗口中的确定按钮时发送ajax请求将数据提交到后台进行数据库操作。提交到后台的数据分为两部分:套餐基本信息(对应的模型数据为formData)和检查组id数组(对应的模型数据为checkgroupIds)。
为确定按钮绑定单击事件,对应的处理函数为handleAdd
1 <el-button type ="primary" @click ="handleAdd()" > 确定</el-button >
完善handleAdd方法
1 2 3 4 5 6 7 8 9 10 11 12 13 14 15 16 17 handleAdd () { axios.post ("/setmeal/add.do?checkgroupIds=" + this .checkgroupIds ,this .formData ). then ((response )=> { this .dialogFormVisible = false ; if (response.data .flag ){ this .$message({ message : response.data .message , type : 'success' }); }else { this .$message .error (response.data .message ); } }).finally (()=> { this .findPage (); }); }
2.3 后台代码 2.3.1 Controller 在SetmealController中增加方法
1 2 3 4 5 6 7 8 9 10 11 12 @RequestMapping("/add") public Result add (@RequestBody Setmeal setmeal, Integer[] checkgroupIds) { try { setmealService.add(setmeal,checkgroupIds); }catch (Exception e){ return new Result (false ,MessageConstant.ADD_SETMEAL_FAIL); } return new Result (true ,MessageConstant.ADD_SETMEAL_SUCCESS); }
2.3.2 服务接口 创建SetmealService接口并提供新增方法
1 2 3 4 5 6 7 8 9 10 11 12 package com.itheima.service;import com.itheima.entity.PageResult;import com.itheima.pojo.CheckGroup;import com.itheima.pojo.Setmeal;import java.util.List;public interface SetmealService { public void add (Setmeal setmeal, Integer[] checkgroupIds) ; }
2.3.3 服务实现类 创建SetmealServiceImpl服务实现类并实现新增方法
1 2 3 4 5 6 7 8 9 10 11 12 13 14 15 16 17 18 19 20 21 22 23 24 25 26 27 28 29 30 31 32 33 34 35 36 37 38 39 40 41 package com.itheima.service;import com.alibaba.dubbo.config.annotation.Service;import com.github.pagehelper.Page;import com.github.pagehelper.PageHelper;import com.itheima.dao.SetmealDao;import com.itheima.entity.PageResult;import com.itheima.pojo.Setmeal;import org.springframework.beans.factory.annotation.Autowired;import org.springframework.transaction.annotation.Transactional;import java.util.HashMap;import java.util.List;import java.util.Map;@Service(interfaceClass = SetmealService.class) @Transactional public class SetmealServiceImpl implements SetmealService { @Autowired private SetmealDao setmealDao; @Override public void add (Setmeal setmeal, Integer[] checkgroupIds) { setmealDao.add(setmeal); if (checkgroupIds != null && checkgroupIds.length > 0 ){ setSetmealAndCheckGroup(setmeal.getId(),checkgroupIds); } } private void setSetmealAndCheckGroup (Integer id, Integer[] checkgroupIds) { for (Integer checkgroupId : checkgroupIds) { Map<String,Integer> map = new HashMap <>(); map.put("setmeal_id" ,id); map.put("checkgroup_id" ,checkgroupId); setmealDao.setSetmealAndCheckGroup(map); } } }
2.3.4 Dao接口 创建SetmealDao接口并提供相关方法
1 2 3 4 5 6 7 8 9 package com.itheima.dao;import com.itheima.pojo.Setmeal;import java.util.Map;public interface SetmealDao { public void add (Setmeal setmeal) ; public void setSetmealAndCheckGroup (Map<String, Integer> map) ; }
2.3.5 Mapper映射文件 创建SetmealDao.xml文件并定义相关SQL语句
1 2 3 4 5 6 7 8 9 10 11 12 13 14 15 16 17 18 19 20 21 22 <?xml version="1.0" encoding="UTF-8" ?> <!DOCTYPE mapper PUBLIC "-//mybatis.org//DTD Mapper 3.0//EN" "http://mybatis.org/dtd/mybatis-3-mapper.dtd" > <mapper namespace ="com.itheima.dao.SetmealDao" > <insert id ="add" parameterType ="com.itheima.pojo.Setmeal" > <selectKey resultType ="java.lang.Integer" order ="AFTER" keyProperty ="id" > SELECT LAST_INSERT_ID() </selectKey > insert into t_setmeal (code,name,sex,age,helpCode,price,remark,attention,img) values (#{code},#{name},#{sex},#{age},#{helpCode},#{price},#{remark},#{attention},#{img}) </insert > <insert id ="setSetmealAndCheckGroup" parameterType ="hashmap" > insert into t_setmeal_checkgroup (setmeal_id,checkgroup_id) values (#{setmeal_id},#{checkgroup_id}) </insert > </mapper >
2.4 完善文件上传 前面我们已经完成了文件上传,将图片存储在了七牛云服务器中。但是这个过程存在一个问题,就是如果用户只上传了图片而没有最终保存套餐信息到我们的数据库,这时我们上传的图片就变为了垃圾图片。对于这些垃圾图片我们需要定时清理来释放磁盘空间。这就需要我们能够区分出来哪些是垃圾图片,哪些不是垃圾图片。如何实现呢?
方案就是利用redis来保存图片名称,具体做法为:
1、当用户上传图片后,将图片名称保存到redis的一个Set集合中,例如集合名称为setmealPicResources
2、当用户添加套餐后,将图片名称保存到redis的另一个Set集合中,例如集合名称为setmealPicDbResources
3、计算setmealPicResources集合与setmealPicDbResources集合的差值,结果就是垃圾图片的名称集合,清理这些图片即可
本小节我们先来完成前面2个环节,第3个环节(清理图片环节)在后面会通过定时任务再实现。
实现步骤:
(1)在health_web项目中提供Spring配置文件spring-redis.xml
1 2 3 4 5 6 7 8 9 10 11 12 13 14 15 16 17 18 19 20 21 22 23 24 25 26 27 28 29 30 31 32 33 34 <?xml version="1.0" encoding="UTF-8" ?> <beans xmlns ="http://www.springframework.org/schema/beans" xmlns:xsi ="http://www.w3.org/2001/XMLSchema-instance" xmlns:p ="http://www.springframework.org/schema/p" xmlns:context ="http://www.springframework.org/schema/context" xmlns:dubbo ="http://code.alibabatech.com/schema/dubbo" xmlns:mvc ="http://www.springframework.org/schema/mvc" xsi:schemaLocation ="http://www.springframework.org/schema/beans http://www.springframework.org/schema/beans/spring-beans.xsd http://www.springframework.org/schema/mvc http://www.springframework.org/schema/mvc/spring-mvc.xsd http://code.alibabatech.com/schema/dubbo http://code.alibabatech.com/schema/dubbo/dubbo.xsd http://www.springframework.org/schema/context http://www.springframework.org/schema/context/spring-context.xsd" > <bean id ="jedisPoolConfig" class ="redis.clients.jedis.JedisPoolConfig" > <property name ="maxTotal" > <value > 200</value > </property > <property name ="maxIdle" > <value > 50</value > </property > <property name ="testOnBorrow" value ="true" /> <property name ="testOnReturn" value ="true" /> </bean > <bean id ="jedisPool" class ="redis.clients.jedis.JedisPool" > <constructor-arg name ="poolConfig" ref ="jedisPoolConfig" /> <constructor-arg name ="host" value ="127.0.0.1" /> <constructor-arg name ="port" value ="6379" type ="int" /> <constructor-arg name ="timeout" value ="30000" type ="int" /> </bean > </beans >
(2)在health_common工程中提供Redis常量类
1 2 3 4 5 6 7 8 package com.itheima.constant;public class RedisConstant { public static final String SETMEAL_PIC_RESOURCES = "setmealPicResources" ; public static final String SETMEAL_PIC_DB_RESOURCES = "setmealPicDbResources" ; }
(3)完善SetmealController,在文件上传成功后将图片名称保存到redis集合中
1 2 3 4 5 6 7 8 9 10 11 12 13 14 15 16 17 18 19 20 21 22 23 24 25 26 @Autowired private JedisPool jedisPool;@RequestMapping("/upload") public Result upload (@RequestParam("imgFile") MultipartFile imgFile) { try { String originalFilename = imgFile.getOriginalFilename(); int lastIndexOf = originalFilename.lastIndexOf("." ); String suffix = originalFilename.substring(lastIndexOf - 1 ); String fileName = UUID.randomUUID().toString() + suffix; QiniuUtils.upload2Qiniu(imgFile.getBytes(),fileName); Result result = new Result (true , MessageConstant.PIC_UPLOAD_SUCCESS); result.setData(fileName); jedisPool.getResource().sadd(RedisConstant.SETMEAL_PIC_RESOURCES,fileName); return result; }catch (Exception e){ e.printStackTrace(); return new Result (false ,MessageConstant.PIC_UPLOAD_FAIL); } }
(4)在health_service项目中提供Spring配置文件applicationContext-redis.xml
1 2 3 4 5 6 7 8 9 10 11 12 13 14 15 16 17 18 19 20 21 22 23 24 25 26 27 28 29 30 31 32 33 34 <?xml version="1.0" encoding="UTF-8" ?> <beans xmlns ="http://www.springframework.org/schema/beans" xmlns:xsi ="http://www.w3.org/2001/XMLSchema-instance" xmlns:p ="http://www.springframework.org/schema/p" xmlns:context ="http://www.springframework.org/schema/context" xmlns:dubbo ="http://code.alibabatech.com/schema/dubbo" xmlns:mvc ="http://www.springframework.org/schema/mvc" xsi:schemaLocation ="http://www.springframework.org/schema/beans http://www.springframework.org/schema/beans/spring-beans.xsd http://www.springframework.org/schema/mvc http://www.springframework.org/schema/mvc/spring-mvc.xsd http://code.alibabatech.com/schema/dubbo http://code.alibabatech.com/schema/dubbo/dubbo.xsd http://www.springframework.org/schema/context http://www.springframework.org/schema/context/spring-context.xsd" > <bean id ="jedisPoolConfig" class ="redis.clients.jedis.JedisPoolConfig" > <property name ="maxTotal" > <value > 200</value > </property > <property name ="maxIdle" > <value > 50</value > </property > <property name ="testOnBorrow" value ="true" /> <property name ="testOnReturn" value ="true" /> </bean > <bean id ="jedisPool" class ="redis.clients.jedis.JedisPool" > <constructor-arg name ="poolConfig" ref ="jedisPoolConfig" /> <constructor-arg name ="host" value ="127.0.0.1" /> <constructor-arg name ="port" value ="6379" type ="int" /> <constructor-arg name ="timeout" value ="30000" type ="int" /> </bean > </beans >
(5)完善SetmealServiceImpl服务类,在保存完成套餐信息后将图片名称存储到redis集合中
1 2 3 4 5 6 7 8 9 10 11 12 13 14 15 @Autowired private JedisPool jedisPool;public void add (Setmeal setmeal, Integer[] checkgroupIds) { setmealDao.add(setmeal); if (checkgroupIds != null && checkgroupIds.length > 0 ){ setSetmealAndCheckGroup(setmeal.getId(),checkgroupIds); } savePic2Redis(setmeal.getImg()); } private void savePic2Redis (String pic) { jedisPool.getResource().sadd(RedisConstant.SETMEAL_PIC_DB_RESOURCES,pic); }
3. 体检套餐分页 3.1 完善页面 3.1.1 定义分页相关模型数据 1 2 3 4 5 6 7 pagination : { currentPage : 1 , pageSize :10 , total :0 , queryString :null }, dataList : [],
3.1.2 定义分页方法 在页面中提供了findPage方法用于分页查询,为了能够在setmeal.html页面加载后直接可以展示分页数据,可以在VUE提供的钩子函数created中调用findPage方法
1 2 3 4 created ( this .findPage (); }
1 2 3 4 5 6 7 8 9 10 11 12 13 14 15 findPage ( var param = { currentPage :this .pagination .currentPage , pageSize :this .pagination .pageSize , queryString :this .pagination .queryString }; axios.post ("/setmeal/findPage.do" ,param).then ((response )=> { this .dataList = response.data .rows ; this .pagination .total = response.data .total ; }); }
3.1.3 完善分页方法执行时机 除了在created钩子函数中调用findPage方法查询分页数据之外,当用户点击查询按钮或者点击分页条中的页码时也需要调用findPage方法重新发起查询请求。
为查询按钮绑定单击事件,调用findPage方法
1 <el-button @click ="findPage()" class ="dalfBut" > 查询</el-button >
为分页条组件绑定current-change事件,此事件是分页条组件自己定义的事件,当页码改变时触发,对应的处理函数为handleCurrentChange
1 2 3 4 5 6 7 8 <el-pagination class ="pagiantion" @current-change ="handleCurrentChange" :current-page ="pagination.currentPage" :page-size ="pagination.pageSize" layout ="total, prev, pager, next, jumper" :total ="pagination.total" > </el-pagination >
定义handleCurrentChange方法
1 2 3 4 5 6 handleCurrentChange (currentPage ) { this .pagination .currentPage = currentPage; this .findPage (); }
3.2 后台代码 3.2.1 Controller 在SetmealController中增加分页查询方法
1 2 3 4 5 6 7 8 9 10 @RequestMapping("/findPage") public PageResult findPage (@RequestBody QueryPageBean queryPageBean) { PageResult pageResult = setmealService.pageQuery( queryPageBean.getCurrentPage(), queryPageBean.getPageSize(), queryPageBean.getQueryString() ); return pageResult; }
3.2.2 服务接口 在SetmealService服务接口中扩展分页查询方法
1 public PageResult pageQuery (Integer currentPage, Integer pageSize, String queryString) ;
3.2.3 服务实现类 在SetmealServiceImpl服务实现类中实现分页查询方法,基于Mybatis分页助手插件实现分页
1 2 3 4 5 public PageResult pageQuery (Integer currentPage, Integer pageSize, String queryString) { PageHelper.startPage(currentPage,pageSize); Page<CheckItem> page = checkGroupDao.selectByCondition(queryString); return new PageResult (page.getTotal(),page.getResult()); }
3.2.4 Dao接口 在SetmealDao接口中扩展分页查询方法
1 public Page<Setmeal> selectByCondition (String queryString) ;
3.2.5 Mapper映射文件 在SetmealDao.xml文件中增加SQL定义
1 2 3 4 5 6 7 <select id ="selectByCondition" parameterType ="string" resultType ="com.itheima.pojo.Setmeal" > select * from t_setmeal <if test ="value != null and value.length > 0" > where code = #{value} or name = #{value} or helpCode = #{value} </if > </select >
4. 定时任务组件Quartz 4.1 Quartz介绍 1、信用卡还款提醒,花呗还款提醒
2、使用超时未付款订单变成超时取消
3、数据库备份
4、定时生成报表
Quartz是Job scheduling(作业调度)领域的一个开源项目,Quartz既可以单独使用也可以跟spring框架整合使用,在实际开发中一般会使用后者。使用Quartz可以开发一个或者多个定时任务,每个定时任务可以单独指定执行的时间,例如每隔1小时执行一次、每个月第一天上午10点执行一次、每个月最后一天下午5点执行一次等。
官网:http://www.quartz-scheduler.org/
maven坐标:
1 2 3 4 5 6 7 8 9 10 <dependency > <groupId > org.quartz-scheduler</groupId > <artifactId > quartz</artifactId > <version > 2.2.1</version > </dependency > <dependency > <groupId > org.quartz-scheduler</groupId > <artifactId > quartz-jobs</artifactId > <version > 2.2.1</version > </dependency >
4.2 Quartz入门案例 核心概念:
1、任务
2、触发器
3、调度器
本案例基于Quartz和spring整合的方式使用。具体步骤:
(1)创建maven工程quartzdemo,打包方式为war,导入Quartz和spring相关坐标,pom.xml文件如下
1 2 3 4 5 6 7 8 9 10 11 12 13 14 15 16 17 18 19 20 21 22 23 24 25 26 27 28 29 30 31 <?xml version="1.0" encoding="UTF-8" ?> <project xmlns ="http://maven.apache.org/POM/4.0.0" xmlns:xsi ="http://www.w3.org/2001/XMLSchema-instance" xsi:schemaLocation ="http://maven.apache.org/POM/4.0.0 http://maven.apache.org/xsd/maven-4.0.0.xsd" > <modelVersion > 4.0.0</modelVersion > <groupId > com.itheima</groupId > <artifactId > quartdemo</artifactId > <version > 1.0-SNAPSHOT</version > <dependencies > <dependency > <groupId > org.springframework</groupId > <artifactId > spring-context-support</artifactId > <version > 5.0.2.RELEASE</version > </dependency > <dependency > <groupId > org.springframework</groupId > <artifactId > spring-tx</artifactId > <version > 5.0.2.RELEASE</version > </dependency > <dependency > <groupId > org.quartz-scheduler</groupId > <artifactId > quartz</artifactId > <version > 2.2.1</version > </dependency > <dependency > <groupId > org.quartz-scheduler</groupId > <artifactId > quartz-jobs</artifactId > <version > 2.2.1</version > </dependency > </dependencies > </project >
(2)自定义一个Job
1 2 3 4 5 6 7 8 9 package com.itheima.jobs;public class JobDemo { public void run () { System.out.println("job execute..." ); } }
(3)提供Spring配置文件application-jobs.xml,配置自定义Job、任务描述、触发器、调度工厂等
1 2 3 4 5 6 7 8 9 10 11 12 13 14 15 16 17 18 19 20 21 22 23 24 25 26 27 28 29 30 31 32 33 34 35 <?xml version="1.0" encoding="UTF-8" ?> <beans xmlns ="http://www.springframework.org/schema/beans" xmlns:xsi ="http://www.w3.org/2001/XMLSchema-instance" xsi:schemaLocation ="http://www.springframework.org/schema/beans http://www.springframework.org/schema/beans/spring-beans.xsd " > <bean id ="jobDemo" class ="com.itheima.jobs.JobDemo" > </bean > <bean id ="jobDetail" class ="org.springframework.scheduling.quartz.MethodInvokingJobDetailFactoryBean" > <property name ="targetObject" ref ="jobDemo" /> <property name ="targetMethod" value ="run" /> </bean > <bean id ="myTrigger" class ="org.springframework.scheduling.quartz.CronTriggerFactoryBean" > <property name ="jobDetail" ref ="jobDetail" /> <property name ="cronExpression" > <value > 0/10 * * * * ?</value > </property > </bean > <bean id ="scheduler" class ="org.springframework.scheduling.quartz.SchedulerFactoryBean" > <property name ="triggers" > <list > <ref bean ="myTrigger" /> </list > </property > </bean > </beans >
(4)编写main方法进行测试
1 2 3 4 5 6 7 8 9 package com.itheima.jobs.com.itheima.app;import org.springframework.context.support.ClassPathXmlApplicationContext;public class App { public static void main (String[] args) { new ClassPathXmlApplicationContext ("spring.xml" ); } }
执行上面main方法观察控制台,可以发现每隔10秒会输出一次,说明每隔10秒自定义Job被调用一次。
4.3 cron表达式 上面的入门案例中我们指定了一个表达式:0/10 * * * * ?
这种表达式称为cron表达式,通过cron表达式可以灵活的定义出符合要求的程序执行的时间。本小节我们就来学习一下cron表达式的使用方法。如下图:
1 2 3 4 5 6 7 Monday Mon 周一 2 Tuesday Tue 周二 3 Wednesday Wed 周三 4 Thursday Thu 周四 5 Friday Fri 周五 6 Saturday Sat 周六 7 Sunday Sun 周日 1
cron表达式分为七个域,之间使用空格分隔。其中最后一个域(年)可以为空。每个域都有自己允许的值和一些特殊字符构成。使用这些特殊字符可以使我们定义的表达式更加灵活。
下面是对这些特殊字符的介绍:
逗号(**,**):指定一个值列表,例如使用在月域上1,4,5,7表示1月、4月、5月和7月
横杠(**-**):指定一个范围,例如在时域上3-6表示3点到6点(即3点、4点、5点、6点)
星号(*****):表示这个域上包含所有合法的值。例如,在月份域上使用星号意味着每个月都会触发
斜线(**/**):表示递增,例如使用在秒域上0/15表示每15秒
问号(**?):仅被用于 日和 周**两个子表达式,表示不指定值
1 2 3 每个月三号周二??? 0 10 12 ? * 3 每个月每周二的12点10分0秒执行 0 10 12 3 * ? 每个月3号的12点10分0秒执行
井号(**#):只能使用在 周**域上,用于指定月份中的第几周的哪一天,例如6#3,意思是某月的第三个周五 (6=星期五,3意味着月份中的第三周)
1 2 0 10 12 ? * 6#3 每个月的第三个周五的12点10分0秒执行 每年5月第2个星期日定为母亲节 ???
L :某域上允许的最后一个值。只能使用在日 和周 域上。当用在日域上,表示的是在月域上指定的月份的最后一天。用于周域上时,表示周的最后一天,就是星期六
1 2 3 4 0 10 12 L * ? 每个月的最后一天的12点10分0秒执行 0 10 12 ? * L 每个月每周最后一天的12点10分0秒执行 0 10 12 ? * 1L 每个月最后一个周日的12点10分0秒执行 0 10 12 ? * 2L 每个月最后一个周一的12点10分0秒执行
W :W 字符代表着工作日 (星期一到星期五),只能用在日域上,它用来指定离指定日的最近的一个工作日
1 2 3 0 15 10 LW * ? 每个月最后一个工作日的10点15分0秒执行 0 15 10 9W * ? 每个月第九个工作日的10点15分0秒执行 如果这个月第9天是周六,即周五触发;如果这个月第9天是周日,周一触发;如果这个月第9天是周二,那么就在触发器这天触发。注意一点:这个用法只会在当前月计算值,不会越过当前月。不能是一个范围或列表。也可以用“LW”来指定这个月的最后一个工作日。
课堂测试:
1 2 3 4 5 6 */5 * * * * ? 0 0 2 25 * ? 0 0 12 ? * WED 0 15 10 ? * 6L 0 * 14 * * ?
4.4 cron表达式在线生成器 前面介绍了cron表达式,但是自己编写表达式还是有一些困难的,我们可以借助一些cron表达式在线生成器来根据我们的需求生成表达式即可。
http://cron.qqe2.com/
5. 定时清理垃圾图片 前面我们已经完成了体检套餐的管理,在新增套餐时套餐的基本信息和图片是分两次提交到后台进行操作的。也就是用户首先将图片上传到七牛云服务器,然后再提交新增窗口中录入的其他信息。如果用户只是上传了图片而没有提交录入的其他信息,此时的图片就变为了垃圾图片,因为在数据库中并没有记录它的存在。此时我们要如何处理这些垃圾图片呢?
解决方案就是通过定时任务组件定时清理这些垃圾图片。为了能够区分出来哪些图片是垃圾图片,我们在文件上传成功后将图片保存到了一个redis集合中,当套餐数据插入到数据库后我们又将图片名称保存到了另一个redis集合中,通过计算这两个集合的差值就可以获得所有垃圾图片的名称。
本章节我们就会基于Quartz定时任务,通过计算redis两个集合的差值找出所有的垃圾图片,就可以将垃圾图片清理掉。
操作步骤:
(1)创建maven工程health_jobs,打包方式为war,导入Quartz等相关坐标
1 2 3 4 5 6 7 8 9 10 11 12 13 14 15 16 17 18 19 20 21 22 23 24 25 26 27 28 29 30 31 32 33 34 35 36 37 38 39 40 41 42 43 44 45 46 47 48 49 50 <?xml version="1.0" encoding="UTF-8" ?> <project xmlns ="http://maven.apache.org/POM/4.0.0" xmlns:xsi ="http://www.w3.org/2001/XMLSchema-instance" xsi:schemaLocation ="http://maven.apache.org/POM/4.0.0 http://maven.apache.org/xsd/maven-4.0.0.xsd" > <parent > <artifactId > health_parent</artifactId > <groupId > com.itheima</groupId > <version > 1.0-SNAPSHOT</version > </parent > <modelVersion > 4.0.0</modelVersion > <artifactId > health_jobs</artifactId > <packaging > war</packaging > <name > health_jobs Maven Webapp</name > <url > http://www.example.com</url > <properties > <project.build.sourceEncoding > UTF-8</project.build.sourceEncoding > <maven.compiler.source > 1.8</maven.compiler.source > <maven.compiler.target > 1.8</maven.compiler.target > </properties > <dependencies > <dependency > <groupId > com.itheima</groupId > <artifactId > health_interface</artifactId > <version > 1.0-SNAPSHOT</version > </dependency > <dependency > <groupId > org.quartz-scheduler</groupId > <artifactId > quartz</artifactId > </dependency > <dependency > <groupId > org.quartz-scheduler</groupId > <artifactId > quartz-jobs</artifactId > </dependency > </dependencies > <build > <plugins > <plugin > <groupId > org.apache.tomcat.maven</groupId > <artifactId > tomcat7-maven-plugin</artifactId > <configuration > <port > 83</port > <path > /</path > </configuration > </plugin > </plugins > </build > </project >
(2)配置web.xml
1 2 3 4 5 6 7 8 9 10 11 12 13 14 <!DOCTYPE web-app PUBLIC "-//Sun Microsystems, Inc.//DTD Web Application 2.3//EN" "http://java.sun.com/dtd/web-app_2_3.dtd" > <web-app > <display-name > Archetype Created Web Application</display-name > <context-param > <param-name > contextConfigLocation</param-name > <param-value > classpath*:applicationContext*.xml</param-value > </context-param > <listener > <listener-class > org.springframework.web.context.ContextLoaderListener</listener-class > </listener > </web-app >
(3)配置log4j.properties
1 2 3 4 5 6 7 8 9 10 11 12 13 14 15 log4j.appender.stdout =org.apache.log4j.ConsoleAppender log4j.appender.stdout.Target =System.err log4j.appender.stdout.layout =org.apache.log4j.PatternLayout log4j.appender.stdout.layout.ConversionPattern =%d{ABSOLUTE} %5p %c{1}:%L - %m%n log4j.appender.file =org.apache.log4j.FileAppender log4j.appender.file.File =c:\\mylog.log log4j.appender.file.layout =org.apache.log4j.PatternLayout log4j.appender.file.layout.ConversionPattern =%d{ABSOLUTE} %5p %c{1}:%L - %m%n log4j.rootLogger =info, stdout
(4)配置applicationContext-redis.xml
1 2 3 4 5 6 7 8 9 10 11 12 13 14 15 16 17 18 19 20 21 22 23 24 25 26 27 28 29 30 31 32 33 34 <?xml version="1.0" encoding="UTF-8" ?> <beans xmlns ="http://www.springframework.org/schema/beans" xmlns:xsi ="http://www.w3.org/2001/XMLSchema-instance" xmlns:p ="http://www.springframework.org/schema/p" xmlns:context ="http://www.springframework.org/schema/context" xmlns:dubbo ="http://code.alibabatech.com/schema/dubbo" xmlns:mvc ="http://www.springframework.org/schema/mvc" xsi:schemaLocation ="http://www.springframework.org/schema/beans http://www.springframework.org/schema/beans/spring-beans.xsd http://www.springframework.org/schema/mvc http://www.springframework.org/schema/mvc/spring-mvc.xsd http://code.alibabatech.com/schema/dubbo http://code.alibabatech.com/schema/dubbo/dubbo.xsd http://www.springframework.org/schema/context http://www.springframework.org/schema/context/spring-context.xsd" > <bean id ="jedisPoolConfig" class ="redis.clients.jedis.JedisPoolConfig" > <property name ="maxTotal" > <value > 200</value > </property > <property name ="maxIdle" > <value > 50</value > </property > <property name ="testOnBorrow" value ="true" /> <property name ="testOnReturn" value ="true" /> </bean > <bean id ="jedisPool" class ="redis.clients.jedis.JedisPool" > <constructor-arg name ="poolConfig" ref ="jedisPoolConfig" /> <constructor-arg name ="host" value ="127.0.0.1" /> <constructor-arg name ="port" value ="6379" type ="int" /> <constructor-arg name ="timeout" value ="30000" type ="int" /> </bean > </beans >
(5)配置applicationContext-jobs.xml
1 2 3 4 5 6 7 8 9 10 11 12 13 14 15 16 17 18 19 20 21 22 23 24 25 26 27 28 29 30 31 32 33 34 35 36 37 38 39 40 41 42 <?xml version="1.0" encoding="UTF-8" ?> <beans xmlns ="http://www.springframework.org/schema/beans" xmlns:xsi ="http://www.w3.org/2001/XMLSchema-instance" xmlns:context ="http://www.springframework.org/schema/context" xmlns:dubbo ="http://code.alibabatech.com/schema/dubbo" xmlns:mvc ="http://www.springframework.org/schema/mvc" xsi:schemaLocation ="http://www.springframework.org/schema/beans http://www.springframework.org/schema/beans/spring-beans.xsd http://www.springframework.org/schema/mvc http://www.springframework.org/schema/mvc/spring-mvc.xsd http://code.alibabatech.com/schema/dubbo http://code.alibabatech.com/schema/dubbo/dubbo.xsd http://www.springframework.org/schema/context http://www.springframework.org/schema/context/spring-context.xsd" > <context:annotation-config > </context:annotation-config > <bean id ="clearImgJob" class ="com.itheima.jobs.ClearImgJob" > </bean > <bean id ="jobDetail" class ="org.springframework.scheduling.quartz.MethodInvokingJobDetailFactoryBean" > <property name ="targetObject" ref ="clearImgJob" /> <property name ="targetMethod" value ="clearImg" /> </bean > <bean id ="myTrigger" class ="org.springframework.scheduling.quartz.CronTriggerFactoryBean" > <property name ="jobDetail" ref ="jobDetail" /> <property name ="cronExpression" > <value > 0 0 2 * * ?</value > </property > </bean > <bean id ="scheduler" class ="org.springframework.scheduling.quartz.SchedulerFactoryBean" > <property name ="triggers" > <list > <ref bean ="myTrigger" /> </list > </property > </bean > </beans >
(6)创建ClearImgJob定时任务类
1 2 3 4 5 6 7 8 9 10 11 12 13 14 15 16 17 18 19 20 21 22 23 24 25 26 27 28 29 30 31 package com.itheima.jobs;import com.itheima.constant.RedisConstant;import com.itheima.utils.QiniuUtils;import com.sun.jersey.api.client.Client;import org.springframework.beans.factory.annotation.Autowired;import redis.clients.jedis.JedisPool;import java.util.Iterator;import java.util.Set;public class ClearImgJob { @Autowired private JedisPool jedisPool; public void clearImg () { Set<String> set = jedisPool.getResource().sdiff( RedisConstant.SETMEAL_PIC_RESOURCES, RedisConstant.SETMEAL_PIC_DB_RESOURCES); Iterator<String> iterator = set.iterator(); while (iterator.hasNext()){ String pic = iterator.next(); QiniuUtils.deleteFileFromQiniu(pic); jedisPool.getResource().srem(RedisConstant.SETMEAL_PIC_RESOURCES,pic); } } }
第5章 预约管理-预约设置 0. 需求分析 前面我们已经完成了检查项管理、检查组管理、套餐管理等。接下来我们需要进行预约设置,其实就是设置每一天的体检预约最大数量。客户可以通过微信端在线预约,在线预约时需要选择体检的时间,如果客户选择的时间已经预约满则无法进行预约。
1. 基于日历实现预约设置 本章节要完成的功能为通过点击日历中的设置按钮来设置对应日期的可预约人数。效果如下:
1.1 完善页面 1.1.1 为设置按钮绑定事件 为日历中的设置按钮绑定单击事件,当前日期作为参数
1 2 <button v-if ="dayobject.day > today" @click ="handleOrderSet(dayobject.day)" class ="orderbtn" > 设置</button >
1 2 3 4 handleOrderSet (day ){ alert (day); }
1.1.2 弹出预约设置窗口并发送ajax请求 完善handleOrderSet方法,弹出预约设置窗口,用户点击确定按钮则发送ajax请求
1 2 3 4 5 6 7 8 9 10 11 12 13 14 15 16 17 18 19 20 21 22 23 24 25 26 27 28 29 30 handleOrderSet (day ){ this .$prompt('请输入可预约人数' , '预约设置' , { confirmButtonText : '确定' , cancelButtonText : '取消' , inputPattern : /^[0-9]*[1-9][0-9]*$/ , inputErrorMessage : '只能输入正整数' }).then (({ value } ) => { axios.post ("/ordersetting/editNumberByDate.do" ,{ orderDate :this .formatDate (day.getFullYear (),day.getMonth ()+1 ,day.getDate ()), number :value }).then ((response )=> { if (response.data .flag ){ this .initData (this .formatDate (day.getFullYear (), day.getMonth () + 1 , 1 )); this .$message({ type : 'success' , message : response.data .message }); }else { this .$message .error (response.data .message ); } }); }).catch (() => { this .$message({ type : 'info' , message : '已取消' }); }); }
1.2 后台代码 1.2.1 Controller 在OrderSettingController中提供方法editNumberByDate
1 2 3 4 5 6 7 8 9 10 11 12 13 14 15 16 17 @RequestMapping("/editNumberByDate") public Result editNumberByDate (@RequestBody OrderSetting orderSetting) { try { orderSettingService.editNumberByDate(orderSetting); return new Result (true ,MessageConstant.ORDERSETTING_SUCCESS); }catch (Exception e){ e.printStackTrace(); return new Result (false ,MessageConstant.ORDERSETTING_FAIL); } }
1.2.2 服务接口 在OrderSettingService服务接口中提供方法editNumberByDate
1 public void editNumberByDate (OrderSetting orderSetting) ;
1.2.3 服务实现类 在OrderSettingServiceImpl服务实现类中实现editNumberByDate
1 2 3 4 5 6 7 8 9 10 11 public void editNumberByDate (OrderSetting orderSetting) { long count = orderSettingDao.findCountByOrderDate(orderSetting.getOrderDate()); if (count > 0 ){ orderSettingDao.editNumberByOrderDate(orderSetting); }else { orderSettingDao.add(orderSetting); } }
1.2.4 Dao接口 在OrderSettingDao接口中提供方法
1 2 public void editNumberByOrderDate (OrderSetting orderSetting) ;public long findCountByOrderDate (Date orderDate) ;
1.2.5 Mapper映射文件 在OrderSettingDao.xml映射文件中提供SQL
1 2 3 4 5 6 7 8 <update id ="editNumberByOrderDate" parameterType ="com.itheima.pojo.OrderSetting" > update t_ordersetting set number = #{number} where orderDate = #{orderDate} </update > <select id ="findCountByOrderDate" parameterType ="java.util.Date" resultType ="long" > select count(*) from t_ordersetting where orderDate = #{orderDate} </select >
2. Apache POI 2.1 POI介绍 Apache POI是用Java编写的免费开源的跨平台的Java API,Apache POI提供API给Java程序对Microsoft Office格式档案读和写的功能,其中使用最多的就是使用POI操作Excel文件。
jxl:专门操作Excel
maven坐标:
1 2 3 4 5 6 7 8 9 10 <dependency > <groupId > org.apache.poi</groupId > <artifactId > poi</artifactId > <version > 3.14</version > </dependency > <dependency > <groupId > org.apache.poi</groupId > <artifactId > poi-ooxml</artifactId > <version > 3.14</version > </dependency >
POI结构:
1 2 3 4 5 6 7 HSSF - 提供读写Microsoft Excel XLS格式档案的功能 XSSF - 提供读写Microsoft Excel OOXML XLSX格式档案的功能 HWPF - 提供读写Microsoft Word DOC格式档案的功能 HSLF - 提供读写Microsoft PowerPoint格式档案的功能 HDGF - 提供读Microsoft Visio格式档案的功能 HPBF - 提供读Microsoft Publisher格式档案的功能 HSMF - 提供读Microsoft Outlook格式档案的功能
2.2 入门案例 2.2.1 从Excel文件读取数据 使用POI可以从一个已经存在的Excel文件中读取数据
1 2 3 4 5 6 7 8 9 10 11 12 13 14 XSSFWorkbook workbook = new XSSFWorkbook ("D:\\hello.xlsx" );XSSFSheet sheet = workbook.getSheetAt(0 );for (Row row : sheet) { for (Cell cell : row) { String value = cell.getStringCellValue(); System.out.println(value); } } workbook.close();
通过上面的入门案例可以看到,POI操作Excel表格封装了几个核心对象:
1 2 3 4 XSSFWorkbook:工作簿 XSSFSheet:工作表 Row:行 Cell:单元格
上面案例是通过遍历工作表获得行,遍历行获得单元格,最终获取单元格中的值。
还有一种方式就是获取工作表最后一个行号,从而根据行号获得行对象,通过行获取最后一个单元格索引,从而根据单元格索引获取每行的一个单元格对象,代码如下:
1 2 3 4 5 6 7 8 9 10 11 12 13 14 15 16 XSSFWorkbook workbook = new XSSFWorkbook ("D:\\hello.xlsx" );XSSFSheet sheet = workbook.getSheetAt(0 );int lastRowNum = sheet.getLastRowNum();for (int i=0 ;i<=lastRowNum;i++){ XSSFRow row = sheet.getRow(i); short lastCellNum = row.getLastCellNum(); for (short j=0 ;j<lastCellNum;j++){ String value = row.getCell(j).getStringCellValue(); System.out.println(value); } } workbook.close();
2.2.2 向Excel文件写入数据 使用POI可以在内存中创建一个Excel文件并将数据写入到这个文件,最后通过输出流将内存中的Excel文件下载到磁盘
1 2 3 4 5 6 7 8 9 10 11 12 13 14 15 16 17 18 19 20 21 22 23 24 25 26 27 28 XSSFWorkbook workbook = new XSSFWorkbook ();XSSFSheet sheet = workbook.createSheet("传智播客" );XSSFRow row = sheet.createRow(0 );row.createCell(0 ).setCellValue("编号" ); row.createCell(1 ).setCellValue("名称" ); row.createCell(2 ).setCellValue("年龄" ); XSSFRow row1 = sheet.createRow(1 );row1.createCell(0 ).setCellValue("1" ); row1.createCell(1 ).setCellValue("小明" ); row1.createCell(2 ).setCellValue("10" ); XSSFRow row2 = sheet.createRow(2 );row2.createCell(0 ).setCellValue("2" ); row2.createCell(1 ).setCellValue("小王" ); row2.createCell(2 ).setCellValue("20" ); FileOutputStream out = new FileOutputStream ("D:\\itcast.xlsx" );workbook.write(out); out.flush(); out.close(); workbook.close();
3. 批量导入预约设置信息 预约设置信息对应的数据表为t_ordersetting,预约设置操作对应的页面为ordersetting.html
t_ordersetting表结构:
orderDate:预约日期
number:可预约人数
reservations:已预约人数
批量导入预约设置信息操作过程:
1、点击模板下载按钮下载Excel模板文件
2、将预约设置信息录入到模板文件中
3、点击上传文件按钮将录入完信息的模板文件上传到服务器
4、通过POI读取上传文件的数据并保存到数据库
3.1 完善页面 3.1.1 提供模板文件 资料中已经提供了Excel模板文件ordersetting_template.xlsx,将文件放在health_web工程的template目录下
3.1.2 实现模板文件下载 为模板下载按钮绑定事件实现模板文件下载
1 2 <el-button style ="margin-bottom: 20px;margin-right: 20px" type ="primary" @click ="downloadTemplate()" > 模板下载</el-button >
1 2 3 4 downloadTemplate ( window .location .href ="../../template/ordersetting_template.xlsx" ; }
3.1.3 文件上传 使用ElementUI的上传组件实现文件上传并绑定相关事件
1 2 3 4 5 6 7 <el-upload action ="/ordersetting/upload.do" name ="excelFile" :show-file-list ="false" :on-success ="handleSuccess" :before-upload ="beforeUpload" > <el-button type ="primary" > 上传文件</el-button > </el-upload >
1 2 3 4 5 6 7 8 9 10 11 12 13 14 15 16 17 18 19 20 21 22 23 handleSuccess (response, file ) { if (response.flag ){ this .$message({ message : response.message , type : 'success' }); }else { this .$message .error (response.message ); } } beforeUpload (file ){ const isXLS = file.type === 'application/vnd.ms-excel' ; if (isXLS){ return true ; } const isXLSX = file.type === 'application/vnd.openxmlformats-officedocument.spreadsheetml.sheet' ; if (isXLSX) { return true ; } this .$message .error ('上传文件只能是xls或者xlsx格式!' ); return false ; }
1 2 3 4 5 6 7 8 9 10 11 12 13 14 15 16 17 18 19 20 21 22 23 24 25 26 27 28 29 30 31 32 33 34 35 36 37 38 39 40 41 42 43 44 45 46 47 48 49 50 51 52 53 54 55 56 57 58 59 60 61 62 63 64 65 66 67 {".3gp", "video/3gpp"}, {".apk", "application/vnd.android.package-archive"}, {".asf", "video/x-ms-asf"}, {".avi", "video/x-msvideo"}, {".bin", "application/octet-stream"}, {".bmp", "image/bmp"}, {".c", "text/plain"}, {".class", "application/octet-stream"}, {".conf", "text/plain"}, {".cpp", "text/plain"}, {".doc", "application/msword"}, {".docx", "application/vnd.openxmlformats-officedocument.wordprocessingml.document"}, {".xls", "application/vnd.ms-excel"}, {".xlsx", "application/vnd.openxmlformats-officedocument.spreadsheetml.sheet"}, {".exe", "application/octet-stream"}, {".gif", "image/gif"}, {".gtar", "application/x-gtar"}, {".gz", "application/x-gzip"}, {".h", "text/plain"}, {".htm", "text/html"}, {".html", "text/html"}, {".jar", "application/java-archive"}, {".java", "text/plain"}, {".jpeg", "image/jpeg"}, {".jpg", "image/jpeg"}, {".js", "application/x-javascript"}, {".log", "text/plain"}, {".m3u", "audio/x-mpegurl"}, {".m4a", "audio/mp4a-latm"}, {".m4b", "audio/mp4a-latm"}, {".m4p", "audio/mp4a-latm"}, {".m4u", "video/vnd.mpegurl"}, {".m4v", "video/x-m4v"}, {".mov", "video/quicktime"}, {".mp2", "audio/x-mpeg"}, {".mp3", "audio/x-mpeg"}, {".mp4", "video/mp4"}, {".mpc", "application/vnd.mpohun.certificate"}, {".mpe", "video/mpeg"}, {".mpeg", "video/mpeg"}, {".mpg", "video/mpeg"}, {".mpg4", "video/mp4"}, {".mpga", "audio/mpeg"}, {".msg", "application/vnd.ms-outlook"}, {".ogg", "audio/ogg"}, {".pdf", "application/pdf"}, {".png", "image/png"}, {".pps", "application/vnd.ms-powerpoint"}, {".ppt", "application/vnd.ms-powerpoint"}, {".pptx", "application/vnd.openxmlformats-officedocument.presentationml.presentation"}, {".prop", "text/plain"}, {".rc", "text/plain"}, {".rmvb", "audio/x-pn-realaudio"}, {".rtf", "application/rtf"}, {".sh", "text/plain"}, {".tar", "application/x-tar"}, {".tgz", "application/x-compressed"}, {".txt", "text/plain"}, {".wav", "audio/x-wav"}, {".wma", "audio/x-ms-wma"}, {".wmv", "audio/x-ms-wmv"}, {".wps", "application/vnd.ms-works"}, {".xml", "text/plain"}, {".z", "application/x-compress"}, {".zip", "application/x-zip-compressed"}, {"", "*/*"}
3.2 后台代码 3.2.1 Controller 将资料中的POIUtils工具类复制到health_common工程
在health_web工程创建OrderSettingController并提供upload方法
1 2 3 4 5 6 7 8 9 10 11 12 13 14 15 16 17 18 19 20 21 22 23 24 25 26 27 28 29 30 31 32 33 34 35 36 37 38 39 40 41 42 43 44 45 46 47 48 49 50 51 52 53 package com.itheima.controller;import com.alibaba.dubbo.config.annotation.Reference;import com.itheima.constant.MessageConstant;import com.itheima.entity.Result;import com.itheima.pojo.OrderSetting;import com.itheima.service.OrderSettingService;import com.itheima.utils.POIUtils;import org.springframework.web.bind.annotation.RequestBody;import org.springframework.web.bind.annotation.RequestMapping;import org.springframework.web.bind.annotation.RequestParam;import org.springframework.web.bind.annotation.RestController;import org.springframework.web.multipart.MultipartFile;import java.io.IOException;import java.util.ArrayList;import java.util.Date;import java.util.List;import java.util.Map;@RestController @RequestMapping("/ordersetting") public class OrderSettingController { @Reference private OrderSettingService orderSettingService; @RequestMapping("/upload") public Result upload (@RequestParam("excelFile") MultipartFile excelFile) { try { List<String[]> list = POIUtils.readExcel(excelFile); if (list != null && list.size() > 0 ){ List<OrderSetting> orderSettingList = new ArrayList <>(); for (String[] strings : list) { OrderSetting orderSetting = new OrderSetting (new Date (strings[0 ]), Integer.parseInt(strings[1 ])); orderSettingList.add(orderSetting); } orderSettingService.add(orderSettingList); } } catch (IOException e) { e.printStackTrace(); return new Result (false , MessageConstant.IMPORT_ORDERSETTING_FAIL); } return new Result (true ,MessageConstant.IMPORT_ORDERSETTING_SUCCESS); } }
3.2.2 服务接口 创建OrderSettingService服务接口并提供新增方法
1 2 3 4 5 6 7 8 9 package com.itheima.service;import com.itheima.pojo.OrderSetting;import java.util.List;import java.util.Map;public interface OrderSettingService { public void add (List<OrderSetting> list) ; }
3.2.3 服务实现类 创建服务实现类OrderSettingServiceImpl并实现新增方法
1 2 3 4 5 6 7 8 9 10 11 12 13 14 15 16 17 18 19 20 21 22 23 24 25 26 27 28 29 30 31 32 33 package com.itheima.service;import com.alibaba.dubbo.config.annotation.Service;import com.itheima.dao.OrderSettingDao;import com.itheima.pojo.OrderSetting;import org.springframework.beans.factory.annotation.Autowired;import org.springframework.transaction.annotation.Transactional;import java.util.*;@Service(interfaceClass = OrderSettingService.class) @Transactional public class OrderSettingServiceImpl implements OrderSettingService { @Autowired private OrderSettingDao orderSettingDao; public void add (List<OrderSetting> list) { if (list != null && list.size() > 0 ){ for (OrderSetting orderSetting : list) { long count = orderSettingDao.findCountByOrderDate(orderSetting.getOrderDate()); if (count > 0 ){ orderSettingDao.editNumberByOrderDate(orderSetting); }else { orderSettingDao.add(orderSetting); } } } } }
3.2.4 Dao接口 创建Dao接口OrderSettingDao并提供更新和新增方法
1 2 3 4 5 6 7 8 9 10 11 12 13 package com.itheima.dao;import com.itheima.pojo.OrderSetting;import java.util.Date;import java.util.HashMap;import java.util.List;import java.util.Map;public interface OrderSettingDao { public void add (OrderSetting orderSetting) ; public void editNumberByOrderDate (OrderSetting orderSetting) ; public long findCountByOrderDate (Date orderDate) ; }
3.2.5 Mapper映射文件 创建Mapper映射文件OrderSettingDao.xml并提供相关SQL
1 2 3 4 5 6 7 8 9 10 11 12 13 14 15 16 17 18 19 20 <?xml version="1.0" encoding="UTF-8" ?> <!DOCTYPE mapper PUBLIC "-//mybatis.org//DTD Mapper 3.0//EN" "http://mybatis.org/dtd/mybatis-3-mapper.dtd" > <mapper namespace ="com.itheima.dao.OrderSettingDao" > <insert id ="add" parameterType ="com.itheima.pojo.OrderSetting" > insert into t_ordersetting (orderDate,number,reservations) values (#{orderDate},#{number},#{reservations}) </insert > <update id ="editNumberByOrderDate" parameterType ="com.itheima.pojo.OrderSetting" > update t_ordersetting set number = #{number} where orderDate = #{orderDate} </update > <select id ="findCountByOrderDate" parameterType ="java.util.Date" resultType ="long" > select count(*) from t_ordersetting where orderDate = #{orderDate} </select > </mapper >
4. 日历展示预约设置信息 前面已经完成了预约设置功能,现在就需要通过日历的方式展示出来每天设置的预约人数。
在页面中已经完成了日历的动态展示,我们只需要查询当前月份的预约设置信息并展示到日历中即可,同时在日历中还需要展示已经预约的人数,效果如下:
4.1 完善页面 4.1.1 使用静态数据调试 为了能够快速看到效果,我们可以先使用静态数据模拟,然后再改为发送ajax请求查询数据库。
实现步骤:
(1)预约设置数据对应的模型数据为leftobj,在initData方法最后为leftobj模型数据赋值:
1 2 3 4 5 6 7 this .leftobj = [ { date : 1 , number : 120 , reservations : 1 }, { date : 3 , number : 120 , reservations : 1 }, { date : 4 , number : 120 , reservations : 120 }, { date : 6 , number : 120 , reservations : 1 }, { date : 8 , number : 120 , reservations : 1 } ];
其中date表示日期,number表示可预约人数,reservations表示已预约人数
(2)使用VUE的v-for标签遍历上面的leftobj模型数据,展示到日历上:
1 2 3 4 5 6 7 8 9 10 11 12 13 14 15 16 17 18 19 20 21 <template > <template v-for ="obj in leftobj" > <template v-if ="obj.date == dayobject.day.getDate()" > <template v-if ="obj.number > obj.reservations" > <div class ="usual" > <p > 可预约{{obj.number}}人</p > <p > 已预约{{obj.reservations}}人</p > </div > </template > <template v-else > <div class ="fulled" > <p > 可预约{{obj.number}}人</p > <p > 已预约{{obj.reservations}}人</p > <p > 已满</p > </div > </template > </template > </template > <button v-if ="dayobject.day > today" @click ="handleOrderSet(dayobject.day)" class ="orderbtn" > 设置</button > </template >
4.1.2 发送ajax获取动态数据 将上面的静态模拟数据去掉,改为发送ajax请求,根据当前页面对应的月份查询数据库获取预约设置信息,将查询结果赋值给leftobj模型数据
1 2 3 4 5 6 7 8 9 10 11 axios.post ( "/ordersetting/getOrderSettingByMonth.do?date=" +this .currentYear +'-' +this .currentMonth ).then ((response )=> { if (response.data .flag ){ this .leftobj = response.data .data ; }else { this .$message .error (response.data .message ); } });
4.2 后台代码 4.2.1 Controller 在OrderSettingController中提供getOrderSettingByMonth方法,根据月份查询预约设置信息
1 2 3 4 5 6 7 8 9 10 11 12 13 14 15 16 17 @RequestMapping("/getOrderSettingByMonth") public Result getOrderSettingByMonth (String date) { try { List<Map> list = orderSettingService.getOrderSettingByMonth(date); return new Result (true ,MessageConstant.GET_ORDERSETTING_SUCCESS,list); }catch (Exception e){ e.printStackTrace(); return new Result (false ,MessageConstant.GET_ORDERSETTING_FAIL); } }
4.2.2 服务接口 在OrderSettingService服务接口中扩展方法getOrderSettingByMonth
1 public List<Map> getOrderSettingByMonth (String date) ;
4.2.3 服务实现类 在OrderSettingServiceImpl服务实现类中实现方法getOrderSettingByMonth
1 2 3 4 5 6 7 8 9 10 11 12 13 14 15 16 17 18 public List<Map> getOrderSettingByMonth (String date) { String dateBegin = date + "-1" ; String dateEnd = date + "-31" ; Map map = new HashMap (); map.put("dateBegin" ,dateBegin); map.put("dateEnd" ,dateEnd); List<OrderSetting> list = orderSettingDao.getOrderSettingByMonth(map); List<Map> data = new ArrayList <>(); for (OrderSetting orderSetting : list) { Map orderSettingMap = new HashMap (); orderSettingMap.put("date" ,orderSetting.getOrderDate().getDate()); orderSettingMap.put("number" ,orderSetting.getNumber()); orderSettingMap.put("reservations" ,orderSetting.getReservations()); data.add(orderSettingMap); } return data; }
4.2.4 Dao接口 在OrderSettingDao接口中扩展方法getOrderSettingByMonth
1 public List<OrderSetting> getOrderSettingByMonth (Map date) ;
4.2.5 Mapper映射文件 在OrderSettingDao.xml文件中扩展SQL
1 2 3 4 5 6 <select id ="getOrderSettingByMonth" parameterType ="hashmap" resultType ="com.itheima.pojo.OrderSetting" > select * from t_ordersetting where orderDate between #{dateBegin} and #{dateEnd} </select >
第6章 移动端开发-体检预约 1. 需求分析和环境搭建 1.1 需求分析 用户在体检之前需要进行预约,可以通过电话方式进行预约,此时会由体检中心客服人员通过后台系统录入预约信息。用户也可以通过手机端自助预约。本章节开发的功能为用户通过手机自助预约。
预约流程如下:
1、访问移动端首页
2、点击体检预约进入体检套餐列表页面
3、在体检套餐列表页面点击具体套餐进入套餐详情页面
4、在套餐详情页面点击立即预约进入预约页面
5、在预约页面录入体检人相关信息点击提交预约
效果如下图:
1.2 搭建移动端工程 本项目是基于SOA架构进行开发,前面我们已经完成了后台系统的部分功能开发,在后台系统中都是通过Dubbo调用服务层发布的服务进行相关的操作。本章节我们开发移动端工程也是同样的模式,所以我们也需要在移动端工程中通过Dubbo调用服务层发布的服务,如下图:
1.2.1 导入maven坐标 在health_common工程的pom.xml文件中导入阿里短信发送的maven坐标
1 2 3 4 5 6 7 8 9 10 <dependency > <groupId > com.aliyun</groupId > <artifactId > aliyun-java-sdk-core</artifactId > <version > 3.3.1</version > </dependency > <dependency > <groupId > com.aliyun</groupId > <artifactId > aliyun-java-sdk-dysmsapi</artifactId > <version > 1.0.0</version > </dependency >
1.2.2 导入通用组件 在health_common工程中导入如下通用组件
ValidateCodeUtils工具类:
1 2 3 4 5 6 7 8 9 10 11 12 13 14 15 16 17 18 19 20 21 22 23 24 25 26 27 28 29 30 31 32 33 34 35 36 37 38 39 40 41 42 43 package com.itheima.utils;import java.util.Random;public class ValidateCodeUtils { public static Integer generateValidateCode (int length) { Integer code = null ; if (length == 4 ){ code = new Random ().nextInt(9999 ); if (code < 1000 ){ code = code + 1000 ; } }else if (length == 6 ){ code = new Random ().nextInt(999999 ); if (code < 100000 ){ code = code + 100000 ; } }else { throw new RuntimeException ("只能生成4位或6位数字验证码" ); } return code; } public static String generateValidateCode4String (int length) { Random rdm = new Random (); String hash1 = Integer.toHexString(rdm.nextInt()); String capstr = hash1.substring(0 , length); return capstr; } }
SMSUtils工具类:
1 2 3 4 5 6 7 8 9 10 11 12 13 14 15 16 17 18 19 20 21 22 23 24 25 26 27 28 29 30 31 32 33 34 35 36 37 38 39 40 41 42 43 44 45 46 47 48 49 50 51 52 53 54 55 56 57 58 59 60 61 62 63 package com.itheima.utils;import com.aliyuncs.DefaultAcsClient;import com.aliyuncs.IAcsClient;import com.aliyuncs.dysmsapi.model.v20170525.SendSmsRequest;import com.aliyuncs.dysmsapi.model.v20170525.SendSmsResponse;import com.aliyuncs.exceptions.ClientException;import com.aliyuncs.http.MethodType;import com.aliyuncs.profile.DefaultProfile;import com.aliyuncs.profile.IClientProfile;public class SMSUtils { public static final String VALIDATE_CODE = "SMS_159620392" ; public static final String ORDER_NOTICE = "SMS_159771588" ; public static void sendShortMessage (String templateCode,String phoneNumbers,String param) throws ClientException{ System.setProperty("sun.net.client.defaultConnectTimeout" , "10000" ); System.setProperty("sun.net.client.defaultReadTimeout" , "10000" ); final String product = "Dysmsapi" ; final String domain = "dysmsapi.aliyuncs.com" ; final String accessKeyId = "accessKeyId" ; final String accessKeySecret = "accessKeySecret" ; IClientProfile profile = DefaultProfile.getProfile("cn-hangzhou" , accessKeyId, accessKeySecret); DefaultProfile.addEndpoint("cn-hangzhou" , "cn-hangzhou" , product, domain); IAcsClient acsClient = new DefaultAcsClient (profile); SendSmsRequest request = new SendSmsRequest (); request.setMethod(MethodType.POST); request.setPhoneNumbers(phoneNumbers); request.setSignName("传智健康" ); request.setTemplateCode(templateCode); request.setTemplateParam("{\"code\":\"" +param+"\"}" ); SendSmsResponse sendSmsResponse = acsClient.getAcsResponse(request); if (sendSmsResponse.getCode() != null && sendSmsResponse.getCode().equals("OK" )) { System.out.println("请求成功" ); } } }
RedisMessageConstant常量类:
1 2 3 4 5 6 7 package com.itheima.constant;public class RedisMessageConstant { public static final String SENDTYPE_ORDER = "001" ; public static final String SENDTYPE_LOGIN = "002" ; public static final String SENDTYPE_GETPWD = "003" ; }
1.2.3 healthmobile_web 移动端工程,打包方式为war,用于存放Controller,在Controller中通过Dubbo可以远程访问服务层相关服务,所以需要依赖health_interface接口工程。
pom.xml:
1 2 3 4 5 6 7 8 9 10 11 12 13 14 15 16 17 18 19 20 21 22 23 24 25 26 27 28 29 30 31 32 33 34 35 36 37 38 39 40 41 42 43 <?xml version="1.0" encoding="UTF-8" ?> <project xmlns ="http://maven.apache.org/POM/4.0.0" xmlns:xsi ="http://www.w3.org/2001/XMLSchema-instance" xsi:schemaLocation ="http://maven.apache.org/POM/4.0.0 http://maven.apache.org/xsd/maven-4.0.0.xsd" > <parent > <artifactId > healthmobile_parent</artifactId > <groupId > com.itheima</groupId > <version > 1.0-SNAPSHOT</version > </parent > <modelVersion > 4.0.0</modelVersion > <artifactId > healthmobile_web</artifactId > <packaging > war</packaging > <name > healthmobile_web Maven Webapp</name > <url > http://www.example.com</url > <properties > <project.build.sourceEncoding > UTF-8</project.build.sourceEncoding > <maven.compiler.source > 1.8</maven.compiler.source > <maven.compiler.target > 1.8</maven.compiler.target > </properties > <dependencies > <dependency > <groupId > com.itheima</groupId > <artifactId > health_interface</artifactId > <version > 1.0-SNAPSHOT</version > </dependency > </dependencies > <build > <plugins > <plugin > <groupId > org.apache.tomcat.maven</groupId > <artifactId > tomcat7-maven-plugin</artifactId > <configuration > <port > 80</port > <path > /</path > </configuration > </plugin > </plugins > </build > </project >
静态资源(CSS、html、img等,详见资料):
web.xml:
1 2 3 4 5 6 7 8 9 10 11 12 13 14 15 16 17 18 19 20 21 22 23 24 25 26 27 28 29 30 31 32 33 34 35 36 37 38 39 40 <!DOCTYPE web-app PUBLIC "-//Sun Microsystems, Inc.//DTD Web Application 2.3//EN" "http://java.sun.com/dtd/web-app_2_3.dtd" > <web-app > <display-name > Archetype Created Web Application</display-name > <filter > <filter-name > CharacterEncodingFilter</filter-name > <filter-class > org.springframework.web.filter.CharacterEncodingFilter</filter-class > <init-param > <param-name > encoding</param-name > <param-value > utf-8</param-value > </init-param > <init-param > <param-name > forceEncoding</param-name > <param-value > true</param-value > </init-param > </filter > <filter-mapping > <filter-name > CharacterEncodingFilter</filter-name > <url-pattern > /*</url-pattern > </filter-mapping > <servlet > <servlet-name > springmvc</servlet-name > <servlet-class > org.springframework.web.servlet.DispatcherServlet</servlet-class > <init-param > <param-name > contextConfigLocation</param-name > <param-value > classpath:springmvc.xml</param-value > </init-param > <load-on-startup > 1</load-on-startup > </servlet > <servlet-mapping > <servlet-name > springmvc</servlet-name > <url-pattern > *.do</url-pattern > </servlet-mapping > <welcome-file-list > <welcome-file > /pages/index.html</welcome-file > </welcome-file-list > </web-app >
springmvc.xml:
1 2 3 4 5 6 7 8 9 10 11 12 13 14 15 16 17 18 19 20 21 22 23 24 25 26 27 28 29 30 31 32 33 34 35 36 37 38 39 40 41 42 43 <?xml version="1.0" encoding="UTF-8" ?> <beans xmlns ="http://www.springframework.org/schema/beans" xmlns:xsi ="http://www.w3.org/2001/XMLSchema-instance" xmlns:p ="http://www.springframework.org/schema/p" xmlns:context ="http://www.springframework.org/schema/context" xmlns:dubbo ="http://code.alibabatech.com/schema/dubbo" xmlns:mvc ="http://www.springframework.org/schema/mvc" xsi:schemaLocation ="http://www.springframework.org/schema/beans http://www.springframework.org/schema/beans/spring-beans.xsd http://www.springframework.org/schema/mvc http://www.springframework.org/schema/mvc/spring-mvc.xsd http://code.alibabatech.com/schema/dubbo http://code.alibabatech.com/schema/dubbo/dubbo.xsd http://www.springframework.org/schema/context http://www.springframework.org/schema/context/spring-context.xsd" > <mvc:annotation-driven > <mvc:message-converters register-defaults ="true" > <bean class ="com.alibaba.fastjson.support.spring.FastJsonHttpMessageConverter" > <property name ="supportedMediaTypes" value ="application/json" /> <property name ="features" > <list > <value > WriteMapNullValue</value > <value > WriteDateUseDateFormat</value > </list > </property > </bean > </mvc:message-converters > </mvc:annotation-driven > <dubbo:application name ="healthmobile_web" /> <dubbo:registry address ="zookeeper://127.0.0.1:2181" /> <dubbo:annotation package ="com.itheima.controller" /> <dubbo:consumer timeout ="600000" check ="false" /> <import resource ="spring-jedis.xml" > </import > </beans >
spring-jedis.xml:
1 2 3 4 5 6 7 8 9 10 11 12 13 14 15 16 17 18 19 20 21 22 23 24 25 26 27 28 29 30 31 32 33 34 35 36 37 <?xml version="1.0" encoding="UTF-8" ?> <beans xmlns ="http://www.springframework.org/schema/beans" xmlns:xsi ="http://www.w3.org/2001/XMLSchema-instance" xmlns:p ="http://www.springframework.org/schema/p" xmlns:context ="http://www.springframework.org/schema/context" xmlns:dubbo ="http://code.alibabatech.com/schema/dubbo" xmlns:mvc ="http://www.springframework.org/schema/mvc" xsi:schemaLocation ="http://www.springframework.org/schema/beans http://www.springframework.org/schema/beans/spring-beans.xsd http://www.springframework.org/schema/mvc http://www.springframework.org/schema/mvc/spring-mvc.xsd http://code.alibabatech.com/schema/dubbo http://code.alibabatech.com/schema/dubbo/dubbo.xsd http://www.springframework.org/schema/context http://www.springframework.org/schema/context/spring-context.xsd" > <context:property-placeholder location ="classpath:redis.properties" /> <bean id ="jedisPoolConfig" class ="redis.clients.jedis.JedisPoolConfig" > <property name ="maxTotal" > <value > ${redis.pool.maxActive}</value > </property > <property name ="maxIdle" > <value > ${redis.pool.maxIdle}</value > </property > <property name ="testOnBorrow" value ="true" /> <property name ="testOnReturn" value ="true" /> </bean > <bean id ="jedisPool" class ="redis.clients.jedis.JedisPool" > <constructor-arg name ="poolConfig" ref ="jedisPoolConfig" /> <constructor-arg name ="host" value ="${redis.host}" /> <constructor-arg name ="port" value ="${redis.port}" type ="int" /> <constructor-arg name ="timeout" value ="${redis.timeout}" type ="int" /> </bean > </beans >
redis.properties:
1 2 3 4 5 6 7 8 9 10 11 12 13 14 15 redis.pool.maxActive =200 redis.pool.maxIdle =50 redis.pool.minIdle =10 redis.pool.maxWaitMillis =20000 redis.pool.maxWait =300 redis.host = 127.0.0.1 redis.port = 6379 redis.timeout = 30000
log4j.properties:
1 2 3 4 5 6 7 8 9 10 11 12 13 14 15 log4j.appender.stdout =org.apache.log4j.ConsoleAppender log4j.appender.stdout.Target =System.err log4j.appender.stdout.layout =org.apache.log4j.PatternLayout log4j.appender.stdout.layout.ConversionPattern =%d{ABSOLUTE} %5p %c{1}:%L - %m%n log4j.appender.file =org.apache.log4j.FileAppender log4j.appender.file.File =c:\\mylog.log log4j.appender.file.layout =org.apache.log4j.PatternLayout log4j.appender.file.layout.ConversionPattern =%d{ABSOLUTE} %5p %c{1}:%L - %m%n log4j.rootLogger =info, stdout
2. 套餐列表页面动态展示 移动端首页为/pages/index.html,效果如下:
点击体检预约直接跳转到体检套餐列表页面(/pages/setmeal.html)
2.1 完善页面 2.1.1 展示套餐信息 1 2 3 4 5 6 7 8 9 10 11 12 13 14 15 16 <ul class ="list" > <li class ="list-item" v-for ="setmeal in setmealList" > <a class ="link-page" :href ="'setmeal_detail.html?id='+setmeal.id" > <img class ="img-object f-left" :src ="'http://pqjroc654.bkt.clouddn.com/'+setmeal.img" alt ="" > <div class ="item-body" > <h4 class ="ellipsis item-title" > {{setmeal.name}}</h4 > <p class ="ellipsis-more item-desc" > {{setmeal.remark}}</p > <p class ="item-keywords" > <span > {{setmeal.sex == '0' ? '性别不限' : setmeal.sex == '1' ? '男':'女'}}</span > <span > {{setmeal.age}}</span > </p > </div > </a > </li > </ul >
2.1.2 获取套餐列表数据 1 2 3 4 5 6 7 8 9 10 11 12 13 var vue = new Vue ({ el :'#app' , data :{ setmealList :[] }, mounted (){ axios.post ("/setmeal/getSetmeal.do" ).then ((response )=> { if (response.data .flag ){ this .setmealList = response.data .data ; } }); } });
2.2 后台代码 2.2.1 Controller 在healthmobile_web工程中创建SetmealController并提供getSetmeal方法,在此方法中通过Dubbo远程调用套餐服务获取套餐列表数据
1 2 3 4 5 6 7 8 9 10 11 12 13 14 15 16 17 18 19 20 21 22 23 24 25 26 27 28 package com.itheima.controller;import com.alibaba.dubbo.config.annotation.Reference;import com.itheima.constant.MessageConstant;import com.itheima.entity.Result;import com.itheima.pojo.Setmeal;import com.itheima.service.SetmealService;import org.springframework.web.bind.annotation.*;import java.util.List;@RestController @RequestMapping("/setmeal") public class SetmealController { @Reference private SetmealService setmealService; @RequestMapping("/getSetmeal") public Result getSetmeal () { try { List<Setmeal> list = setmealService.findAll(); return new Result (true , MessageConstant.GET_SETMEAL_LIST_SUCCESS,list); }catch (Exception e){ e.printStackTrace(); return new Result (true ,MessageConstant.GET_SETMEAL_LIST_FAIL); } } }
2.2.2 服务接口 在SetmealService服务接口中扩展findAll方法
1 public List<Setmeal> findAll();
2.2.3 服务实现类 在SetmealServiceImpl服务实现类中实现findAll方法
1 2 3 public List<Setmeal> findAll () { return setmealDao.findAll(); }
2.2.4 Dao接口 在SetmealDao接口中扩展findAll方法
1 public List<Setmeal> findAll () ;
2.2.5 Mapper映射文件 在SetmealDao.xml映射文件中扩展SQL语句
1 2 3 <select id ="findAll" resultType ="com.itheima.pojo.Setmeal" > select * from t_setmeal </select >
3. 套餐详情页面动态展示
前面我们已经完成了体检套餐列表页面动态展示,点击其中任意一个套餐则跳转到对应的套餐详情页面(/pages/setmeal_detail.html),并且会携带此套餐的id作为参数提交。
请求路径格式:http://localhost/pages/setmeal_detail.html?id=10
在套餐详情页面需要展示当前套餐的信息(包括图片、套餐名称、套餐介绍、适用性别、适用年龄)、此套餐包含的检查组信息、检查组包含的检查项信息等。
3.1 完善页面 3.1.1 获取请求参数中套餐id 在页面中已经引入了healthmobile.js文件,此文件中已经封装了getUrlParam方法可以根据URL请求路径中的参数名获取对应的值
1 2 3 4 5 6 7 8 9 10 11 12 13 14 15 16 17 18 19 function getUrlParam (paraName ) { var url = document .location .toString (); var arrObj = url.split ("?" ); if (arrObj.length > 1 ) { var arrPara = arrObj[1 ].split ("&" ); var arr; for (var i = 0 ; i < arrPara.length ; i++) { arr = arrPara[i].split ("=" ); if (arr != null && arr[0 ] == paraName) { return arr[1 ]; } } return "" ; } else { return "" ; } }
在setmeal_detail.html中调用上面定义的方法获取套餐id的值
1 2 3 <script> var id = getUrlParam ("id" ); </script>
3.1.2 获取套餐详细信息 1 2 3 4 5 6 7 8 9 10 11 12 13 14 15 16 17 <script> var vue = new Vue ({ el :'#app' , data :{ imgUrl :null , setmeal :{} }, mounted ( axios.post ("/setmeal/findById.do?id=" + id).then ((response ) => { if (response.data .flag ){ this .setmeal = response.data .data ; this .imgUrl = 'http://pqjroc654.bkt.clouddn.com/' + this .setmeal .img ; } }); } }); </script>
3.1.3 展示套餐信息 1 2 3 4 5 6 7 8 9 10 11 12 13 14 15 16 17 18 19 20 21 22 23 24 25 26 27 28 29 30 31 32 33 34 35 36 37 38 39 40 41 42 43 44 <div class ="contentBox" > <div class ="card" > <div class ="project-img" > <img :src ="imgUrl" width ="100%" height ="100%" /> </div > <div class ="project-text" > <h4 class ="tit" > {{setmeal.name}}</h4 > <p class ="subtit" > {{setmeal.remark}}</p > <p class ="keywords" > <span > {{setmeal.sex == '0' ? '性别不限' : setmeal.sex == '1' ? '男':'女'}}</span > <span > {{setmeal.age}}</span > </p > </div > </div > <div class ="table-listbox" > <div class ="box-title" > <i class ="icon-zhen" > <span class ="path1" > </span > <span class ="path2" > </span > </i > <span > 套餐详情</span > </div > <div class ="box-table" > <div class ="table-title" > <div class ="tit-item flex2" > 项目名称</div > <div class ="tit-item flex3" > 项目内容</div > <div class ="tit-item flex3" > 项目解读</div > </div > <div class ="table-content" > <ul class ="table-list" > <li class ="table-item" v-for ="checkgroup in setmeal.checkGroups" > <div class ="item flex2" > {{checkgroup.name}}</div > <div class ="item flex3" > <label v-for ="checkitem in checkgroup.checkItems" > {{checkitem.name}} </label > </div > <div class ="item flex3" > {{checkgroup.remark}}</div > </li > </ul > </div > <div class ="box-button" > <a @click ="toOrderInfo()" class ="order-btn" > 立即预约</a > </div > </div > </div > </div >
3.2 后台代码 3.2.1 Controller 在SetmealController中提供findById方法
1 2 3 4 5 6 7 8 9 10 11 @RequestMapping("/findById") public Result findById (int id) { try { Setmeal setmeal = setmealService.findById(id); return new Result (true ,MessageConstant.QUERY_SETMEAL_SUCCESS,setmeal); }catch (Exception e){ e.printStackTrace(); return new Result (false ,MessageConstant.QUERY_SETMEAL_FAIL); } }
3.2.2 服务接口 在SetmealService服务接口中提供findById方法
1 public Setmeal findById (int id) ;
3.2.3 服务实现类 在SetmealServiceImpl服务实现类中实现findById方法
1 2 3 4 5 6 7 8 9 10 11 12 13 14 15 16 17 18 public Setmeal findById (Integer id) { Setmeal setmeal = setmealDao.findById(id); if (null != setmeal){ Integer setmealId = setmeal.getId(); List<CheckGroup> checkGroups = setmealDao.findCheckGroupsBySetmealId(setmealId); if (CollectionUtil.isNotEmpty(checkGroups)){ for (CheckGroup checkGroup : checkGroups) { List<CheckItem> checkItems = setmealDao.findCheckItemByCheckGroupId(checkGroup.getId()); checkGroup.setCheckItems(checkItems); } } setmeal.setCheckGroups(checkGroups); } return setmeal; }
3.2.4 Dao接口 在SetmealDao接口中提供findById方法
1 2 3 4 5 Setmeal findById (Integer id) ; List<CheckGroup> findCheckGroupsBySetmealId (Integer setmealId) ; List<CheckItem> findCheckItemByCheckGroupId (Integer checkGroupId) ;
3.2.5 Mapper映射文件 此处会使用mybatis提供的关联查询,在根据id查询套餐时,同时将此套餐包含的检查组都查询出来,并且将检查组包含的检查项都查询出来。
SetmealDao.xml文件:
1 2 3 4 5 6 7 8 9 10 11 <select id ="findById" resultType ="com.itheima.pojo.Setmeal" > select * from t_setmeal where id = #{id} </select > <select id ="findCheckGroupsBySetmealId" resultType ="com.itheima.pojo.CheckGroup" > select * from t_checkgroup where id in (select checkgroup_id from t_setmeal_checkgroup where setmeal_id = #{setmealId}) </select > <select id ="findCheckItemByCheckGroupId" resultType ="com.itheima.pojo.CheckItem" > select * from t_checkitem where id in (select checkitem_id from t_checkgroup_checkitem where checkgroup_id = #{checkGroupId}) </select >
4. 移动端开发 4.1 移动端开发方式 随着移动互联网的兴起和手机的普及,目前移动端应用变得愈发重要,成为了各个商家的必争之地。例如,我们可以使用手机购物、支付、打车、玩游戏、订酒店、购票等,以前只能通过PC端完成的事情,现在通过手机都能够实现,而且更加方便,而这些都需要移动端开发进行支持,那如何进行移动端开发呢?
移动端开发主要有三种方式:
1、基于手机API开发(原生APP)
2、基于手机浏览器开发(移动web)
3、混合开发(混合APP)
4.1.1 基于手机API开发 手机端使用手机API,例如使用Android、ios 等进行开发,服务端只是一个数据提供者。手机端请求服务端获取数据(json、xml格式)并在界面进行展示。这种方式相当于传统开发中的C/S模式,即需要在手机上安装一个客户端软件。
这种方式需要针对不同的手机系统分别进行开发,目前主要有以下几个平台:
1、苹果ios系统版本,开发语言是Objective-C
2、安卓Android系统版本,开发语言是Java
3、微软Windows phone系统版本,开发语言是C#
4、塞班symbian系统版本,开发语言是C++
此种开发方式举例:手机淘宝、抖音、今日头条、大众点评
4.1.2 基于手机浏览器开发 生存在浏览器中的应用,基本上可以说是触屏版的网页应用。这种开发方式相当于传统开发中的B/S模式,也就是手机上不需要额外安装软件,直接基于手机上的浏览器进行访问。这就需要我们编写的html页面需要根据不同手机的尺寸进行自适应调节,目前比较流行的是html5开发。除了直接通过手机浏览器访问,还可以将页面内嵌到一些应用程序中,例如通过微信公众号访问html5页面。
这种开发方式不需要针对不同的手机系统分别进行开发,只需要开发一个版本,就可以在不同的手机上正常访问。
本项目会通过将我们开发的html5页面内嵌到微信公众号这种方式进行开发。
4.1.3 混合开发 是半原生半Web的混合类App。需要下载安装,看上去类似原生App,访问的内容是Web网页。其实就是把HTML5页面嵌入到一个原生容器里面。
4.2 微信公众号开发 要进行微信公众号开发,首先需要访问微信公众平台,官网:https://mp.weixin.qq.com/。
4.2.1 帐号分类 在微信公众平台可以看到,有四种帐号类型:服务号、订阅号、小程序、企业微信(原企业号)。
本项目会选择订阅号这种方式进行公众号开发。
4.2.2 注册帐号 要开发微信公众号,首先需要注册成为会员,然后就可以登录微信公众平台进行自定义菜单的设置。
注册页面:https://mp.weixin.qq.com/cgi-bin/registermidpage?action=index&lang=zh_CN&token=
选择订阅号进行注册:
输入邮箱、邮箱验证码、密码、确认密码等按照页面流程进行注册
4.2.3 自定义菜单 注册成功后就可以使用注册的邮箱和设置的密码进行登录,登录成功后点击左侧“自定义菜单”进入自定义菜单页面
在自定义菜单页面可以根据需求创建一级菜单和二级菜单,其中一级菜单最多可以创建3个,每个一级菜单下面最多可以创建5个二级菜单。每个菜单由菜单名称和菜单内容组成,其中菜单内容有3中形式:发送消息、跳转网页、跳转小程序。
4.2.4 上线要求 如果是个人用户身份注册的订阅号,则自定义菜单的菜单内容不能进行跳转网页,因为个人用户目前不支持微信认证,而跳转网页需要微信认证之后才有权限。
如果是企业用户,首先需要进行微信认证,通过后就可以进行跳转网页了,跳转网页的地址要求必须有域名并且域名需要备案通过。
第7章 移动端开发-体检预约 1. 体检预约流程 用户可以通过如下操作流程进行体检预约:
1、在移动端首页点击体检预约,页面跳转到套餐列表页面
2、在套餐列表页面点击要预约的套餐,页面跳转到套餐详情页面
3、在套餐详情页面点击立即预约,页面跳转到预约页面
4、在预约页面录入体检人信息,包括手机号,点击发送验证码
5、在预约页面录入收到的手机短信验证码,点击提交预约,完成体检预约
2. 短信发送 2.1 短信服务介绍 目前市面上有很多第三方提供的短信服务,这些第三方短信服务会和各个运营商(移动、联通、电信)对接,我们只需要注册成为会员并且按照提供的开发文档进行调用就可以发送短信。需要说明的是这些短信服务都是收费的服务。
本项目短信发送我们选择的是阿里云提供的短信服务。
短信服务(Short Message Service)是阿里云为用户提供的一种通信服务的能力,支持快速发送短信验证码、短信通知等。 三网合一专属通道,与工信部携号转网平台实时互联。电信级运维保障,实时监控自动切换,到达率高达99%。短信服务API提供短信发送、发送状态查询、短信批量发送等能力,在短信服务控制台上添加签名、模板并通过审核之后,可以调用短信服务API完成短信发送等操作。
2.2 注册阿里云账号 阿里云官网:https://www.aliyun.com/
点击官网首页免费注册跳转到如下注册页面:
2.3 设置短信签名 注册成功后,点击登录按钮进行登录。登录后进入短信服务管理页面,选择国内消息菜单:
点击添加签名按钮:
目前个人用户只能申请适用场景为验证码的签名
2.4 设置短信模板 在国内消息菜单页面中,点击模板管理标签页:
点击添加模板按钮:
2.5 设置access keys 在发送短信时需要进行身份认证,只有认证通过才能发送短信。本小节就是要设置用于发送短信时进行身份认证的key和密钥。鼠标放在页面右上角当前用户头像上,会出现下拉菜单:
点击accesskeys:
点击开始使用子用户AccessKey按钮:
创建成功,其中AccessKeyID为访问短信服务时使用的ID,AccessKeySecret为密钥。
可以在用户详情页面下禁用刚刚创建的AccessKey:
可以设置每日和每月短信发送上限:
由于短信服务是收费服务,所以还需要进行充值才能发送短信:
1 2 备注:由于阿里云短信通知类的短信签名需要企业营业执照认证,我们使用不了,我们可以使用这个 https://www.juhe.cn/sms
2.6 发送短信 2.6.1 导入maven坐标 1 2 3 4 5 6 7 8 9 10 <dependency > <groupId > com.aliyun</groupId > <artifactId > aliyun-java-sdk-core</artifactId > <version > 3.3.1</version > </dependency > <dependency > <groupId > com.aliyun</groupId > <artifactId > aliyun-java-sdk-dysmsapi</artifactId > <version > 1.0.0</version > </dependency >
2.6.2 封装工具类 1 2 3 4 5 6 7 8 9 10 11 12 13 14 15 16 17 18 19 20 21 22 23 24 25 26 27 28 29 30 31 32 33 34 35 36 37 38 39 40 41 42 43 44 45 46 47 48 49 50 51 52 53 54 55 56 57 58 59 60 61 62 63 package com.itheima.utils;import com.aliyuncs.DefaultAcsClient;import com.aliyuncs.IAcsClient;import com.aliyuncs.dysmsapi.model.v20170525.SendSmsRequest;import com.aliyuncs.dysmsapi.model.v20170525.SendSmsResponse;import com.aliyuncs.exceptions.ClientException;import com.aliyuncs.http.MethodType;import com.aliyuncs.profile.DefaultProfile;import com.aliyuncs.profile.IClientProfile;public class SMSUtils { public static final String VALIDATE_CODE = "SMS_159620392" ; public static final String ORDER_NOTICE = "SMS_159771588" ; public static void sendShortMessage (String templateCode,String phoneNumbers,String param) throws ClientException{ System.setProperty("sun.net.client.defaultConnectTimeout" , "10000" ); System.setProperty("sun.net.client.defaultReadTimeout" , "10000" ); final String product = "Dysmsapi" ; final String domain = "dysmsapi.aliyuncs.com" ; final String accessKeyId = "accessKeyId" ; final String accessKeySecret = "accessKeySecret" ; IClientProfile profile = DefaultProfile.getProfile("cn-hangzhou" , accessKeyId, accessKeySecret); DefaultProfile.addEndpoint("cn-hangzhou" , "cn-hangzhou" , product, domain); IAcsClient acsClient = new DefaultAcsClient (profile); SendSmsRequest request = new SendSmsRequest (); request.setMethod(MethodType.POST); request.setPhoneNumbers(phoneNumbers); request.setSignName("传智健康" ); request.setTemplateCode(templateCode); request.setTemplateParam("{\"code\":\"" +param+"\"}" ); SendSmsResponse sendSmsResponse = acsClient.getAcsResponse(request); if (sendSmsResponse.getCode() != null && sendSmsResponse.getCode().equals("OK" )) { System.out.println("请求成功" ); } } }
2.6.3 测试短信发送 1 2 3 public static void main (String[] args) throws Exception { SMSUtils.sendShortMessage("SMS_159620392" ,"13812345678" ,"1234" ); }
3. 体检预约 3.1 页面调整 在预约页面(/pages/orderInfo.html)进行调整
3.1.1 展示预约的套餐信息 第一步:从请求路径中获取当前套餐的id
1 2 3 <script> var id = getUrlParam ("id" ); </script>
第二步:定义模型数据setmeal,用于套餐数据展示
1 2 3 4 5 6 7 8 9 10 var vue = new Vue ({ el :'#app' , data :{ setmeal :{}, orderInfo :{ setmealId :id, sex :'1' } } });
1 2 3 4 5 6 7 8 9 10 11 12 13 14 15 16 17 <div class ="card" > <div class ="" > <img :src ="'http://pqjroc654.bkt.clouddn.com/'+setmeal.img" width ="100%" height ="100%" /> </div > <div class ="project-text" > <h4 class ="tit" > {{setmeal.name}}</h4 > <p class ="subtit" > {{setmeal.remark}}</p > <p class ="keywords" > <span > 女</span > <span > 20-70</span > </p > </div > <div class ="project-know" > <a href ="orderNotice.html" class ="link-page" > <i class ="icon-ask-circle" > <span class ="path1" > </span > <span class ="path2" > </span > </i > <span class ="word" > 预约须知</span > <span class ="arrow" > <i class ="icon-rit-arrow" > </i > </span > </a > </div > </div >
第三步:在VUE的钩子函数中发送ajax请求,根据id查询套餐信息
1 2 3 4 5 mounted ( axios.post ("/setmeal/findById.do?id=" + id).then ((response ) => { this .setmeal = response.data .data ; }); }
3.1.2 手机号校验 第一步:在页面导入的healthmobile.js文件中已经定义了校验手机号的方法
1 2 3 4 5 6 7 8 9 10 11 12 13 14 function checkTelephone (telephone ) { var reg=/^[1][3,4,5,7,8][0-9]{9}$/ ; if (!reg.test (telephone)) { return false ; } else { return true ; } }
第二步:为发送验证码按钮绑定事件sendValidateCode
1 2 3 4 5 6 7 <div class ="input-row" > <label > 手机号</label > <input v-model ="orderInfo.telephone" type ="text" class ="input-clear" placeholder ="请输入手机号" > <input style ="font-size: x-small;" id ="validateCodeButton" @click ="sendValidateCode()" type ="button" value ="发送验证码" > </div >
1 2 3 4 5 6 7 8 9 10 sendValidateCode ( var telephone = this .orderInfo .telephone ; if (!checkTelephone (telephone)) { this .$message .error ('请输入正确的手机号' ); return false ; } }
3.1.3 30秒倒计时效果 前面在sendValidateCode方法中进行了手机号校验,如果校验通过,需要显示30秒倒计时效果
1 2 3 4 5 6 7 8 9 10 11 12 sendValidateCode ( var telephone = this .orderInfo .telephone ; if (!checkTelephone (telephone)) { this .$message .error ('请输入正确的手机号' ); return false ; } validateCodeButton = $("#validateCodeButton" )[0 ]; clock = window .setInterval (doLoop, 1000 ); }
其中,validateCodeButton和clock是在healthmobile.js文件中定义的属性,doLoop是在healthmobile.js文件中定义的方法
1 2 3 4 5 6 7 8 9 10 11 12 13 14 15 16 var clock = '' ;var nums = 30 ;var validateCodeButton;function doLoop ( validateCodeButton.disabled = true ; nums--; if (nums > 0 ) { validateCodeButton.value = nums + '秒后重新获取' ; } else { clearInterval (clock); validateCodeButton.disabled = false ; validateCodeButton.value = '重新获取验证码' ; nums = 30 ; } }
3.1.4 发送ajax请求 1 2 3 4 5 6 7 8 9 10 11 12 13 14 15 16 17 18 sendValidateCode ( var telephone = this .orderInfo .telephone ; if (!checkTelephone (telephone)) { this .$message .error ('请输入正确的手机号' ); return false ; } validateCodeButton = $("#validateCodeButton" )[0 ]; clock = window .setInterval (doLoop, 1000 ); axios.post ("/validateCode/send4Order.do?telephone=" + telephone).then ((response ) => { if (!response.data .flag ){ this .$message .error ('验证码发送失败,请检查手机号输入是否正确' ); } }); }
创建ValidateCodeController,提供方法发送短信验证码,并将验证码保存到redis
1 2 3 4 5 6 7 8 9 10 11 12 13 14 15 16 17 18 19 20 21 22 23 24 25 26 27 28 29 30 31 32 33 34 35 36 37 38 39 40 41 42 43 44 45 46 package com.itheima.controller;import com.aliyuncs.exceptions.ClientException;import com.itheima.constant.MessageConstant;import com.itheima.constant.RedisConstant;import com.itheima.constant.RedisMessageConstant;import com.itheima.entity.Result;import com.itheima.utils.JedisUtils;import com.itheima.utils.SMSUtils;import com.itheima.utils.ValidateCodeUtils;import org.springframework.beans.factory.annotation.Autowired;import org.springframework.web.bind.annotation.RequestMapping;import org.springframework.web.bind.annotation.RestController;import redis.clients.jedis.Jedis;import redis.clients.jedis.JedisPool;import java.util.Random;@RestController @RequestMapping("/validateCode") public class ValidateCodeController { @Autowired private JedisPool jedisPool; @RequestMapping("/send4Order") public Result send4Order (String telephone) { Integer code = ValidateCodeUtils.generateValidateCode(4 ); try { SMSUtils.sendShortMessage(SMSUtils.VALIDATE_CODE,telephone,code.toString()); } catch (ClientException e) { e.printStackTrace(); return new Result (false , MessageConstant.SEND_VALIDATECODE_FAIL); } System.out.println("发送的手机验证码为:" + code); jedisPool.getResource().setex( telephone + RedisMessageConstant.SENDTYPE_ORDER,5 * 60 ,code.toString()); return new Result (true ,MessageConstant.SEND_VALIDATECODE_SUCCESS); } }
3.1.5 日历展示 页面中使用DatePicker控件来展示日历。根据需求,最多可以提前一个月进行体检预约,所以日历控件只展示未来一个月的日期
1 2 3 4 5 <div class ="date" > <label > 体检日期</label > <i class ="icon-date" class ="picktime" > </i > <input v-model ="orderInfo.orderDate" type ="text" class ="picktime" readonly > </div >
1 2 3 4 5 6 7 8 9 10 11 12 <script> var calendar = new datePicker (); calendar.init ({ 'trigger' : '.picktime' , 'type' : 'date' , 'minDate' : getSpecifiedDate (new Date (),1 ), 'maxDate' : getSpecifiedDate (new Date (),30 ), 'onSubmit' : function ( 'onClose' : function ( }); </script>
其中getSpecifiedDate方法定义在healthmobile.js文件中
1 2 3 4 5 6 7 8 function getSpecifiedDate (date,days ) { date.setDate (date.getDate () + days); var year = date.getFullYear (); var month = date.getMonth () + 1 ; var day = date.getDate (); return (year + "-" + month + "-" + day); }
3.1.6 提交预约请求 为提交预约按钮绑定事件
1 2 3 <div class ="box-button" > <button @click ="submitOrder()" type ="button" class ="btn order-btn" > 提交预约</button > </div >
1 2 3 4 5 6 7 8 9 10 11 12 13 14 15 16 17 submitOrder ( if (!checkIdCard (this .orderInfo .idCard )){ this .$message .error ('身份证号码输入错误,请重新输入' ); return ; } axios.post ("/order/submit.do" ,this .orderInfo ).then ((response ) => { if (response.data .flag ){ window .location .href ="orderSuccess.html?orderId=" + response.data .data .id ; }else { this .$message .error (response.data .message ); } }); }
其中checkIdCard方法是在healthmobile.js文件中定义的
1 2 3 4 5 6 7 8 9 10 11 12 function checkIdCard (idCard ){ var reg = /(^\d{15}$)|(^\d{18}$)|(^\d{17}(\d|X|x)$)/ ; if (reg.test (idCard)){ return true ; }else { return false ; } }
3.2 后台代码 3.2.1 Controller 在healthmobile_mobile工程中创建OrderController并提供submitOrder方法
1 2 3 4 5 6 7 8 9 10 11 12 13 14 15 16 17 18 19 20 21 22 23 24 25 26 27 28 29 30 31 32 33 34 35 36 37 38 39 40 41 42 43 44 45 46 47 48 49 50 51 52 53 54 55 56 57 58 59 60 61 62 63 64 65 66 67 68 69 70 71 package com.itheima.controller;import com.alibaba.dubbo.config.annotation.Reference;import com.aliyuncs.exceptions.ClientException;import com.itheima.constant.MessageConstant;import com.itheima.constant.RedisConstant;import com.itheima.constant.RedisMessageConstant;import com.itheima.entity.Result;import com.itheima.pojo.Member;import com.itheima.pojo.Order;import com.itheima.pojo.Setmeal;import com.itheima.service.OrderService;import com.itheima.utils.JedisUtils;import com.itheima.utils.SMSUtils;import org.springframework.beans.factory.annotation.Autowired;import org.springframework.web.bind.annotation.RequestBody;import org.springframework.web.bind.annotation.RequestMapping;import org.springframework.web.bind.annotation.RestController;import redis.clients.jedis.JedisPool;import java.util.HashMap;import java.util.Map;@RestController @RequestMapping("/order") public class OrderController { @Reference private OrderService orderService; @Autowired private JedisPool jedisPool; @RequestMapping("/submit") public Result submitOrder (@RequestBody Map map) { String telephone = (String) map.get("telephone" ); String codeInRedis = jedisPool.getResource().get( telephone + RedisMessageConstant.SENDTYPE_ORDER); String validateCode = (String) map.get("validateCode" ); if (codeInRedis == null || !codeInRedis.equals(validateCode)){ return new Result (false , MessageConstant.VALIDATECODE_ERROR); } Result result = null ; try { map.put("orderType" , Order.ORDERTYPE_WEIXIN); result = orderService.order(map); }catch (Exception e){ e.printStackTrace(); return result; } if (result.isFlag()){ String orderDate = (String) map.get("orderDate" ); try { SMSUtils.sendShortMessage(SMSUtils.ORDER_NOTICE,telephone,orderDate); } catch (ClientException e) { e.printStackTrace(); } } return result; } }
3.2.2 服务接口 在health_interface工程中创建体检预约服务接口OrderService并提供预约方法
1 2 3 4 5 6 7 8 9 10 11 package com.itheima.service;import com.itheima.entity.Result;import java.util.Map;public interface OrderService { public Result order (Map map) throws Exception; }
3.2.3 服务实现类 在health_service工程中创建体检预约服务实现类OrderServiceImpl并实现体检预约方法。
体检预约方法处理逻辑比较复杂,需要进行如下业务处理:
1、检查用户所选择的预约日期是否已经提前进行了预约设置,如果没有设置则无法进行预约
2、检查用户所选择的预约日期是否已经约满,如果已经约满则无法预约
3、检查用户是否重复预约(同一个用户在同一天预约了同一个套餐),如果是重复预约则无法完成再次预约
4、检查当前用户是否为会员,如果是会员则直接完成预约,如果不是会员则自动完成注册并进行预约
5、预约成功,更新当日的已预约人数
实现代码如下:
1 2 3 4 5 6 7 8 9 10 11 12 13 14 15 16 17 18 19 20 21 22 23 24 25 26 27 28 29 30 31 32 33 34 35 36 37 38 39 40 41 42 43 44 45 46 47 48 49 50 51 52 53 54 55 56 57 58 59 60 61 62 63 64 65 66 67 68 69 70 71 72 73 74 75 76 77 78 79 80 81 82 83 84 85 86 87 88 89 90 91 92 93 94 95 96 package com.itheima.service;import com.alibaba.dubbo.config.annotation.Service;import com.itheima.constant.MessageConstant;import com.itheima.dao.MemberDao;import com.itheima.dao.OrderDao;import com.itheima.dao.OrderSettingDao;import com.itheima.dao.SetmealDao;import com.itheima.entity.Result;import com.itheima.pojo.Member;import com.itheima.pojo.Order;import com.itheima.pojo.OrderSetting;import com.itheima.pojo.Setmeal;import com.itheima.utils.DateUtils;import org.apache.poi.ss.usermodel.DateUtil;import org.springframework.beans.factory.annotation.Autowired;import org.springframework.transaction.annotation.Transactional;import java.text.ParseException;import java.text.SimpleDateFormat;import java.util.Date;import java.util.HashMap;import java.util.List;import java.util.Map;@Service(interfaceClass = OrderService.class) @Transactional public class OrderServiceImpl implements OrderService { @Autowired private OrderSettingDao orderSettingDao; @Autowired private MemberDao memberDao; @Autowired private OrderDao orderDao; public Result order (Map map) throws Exception { String orderDate = (String) map.get("orderDate" ); Date date = DateUtils.parseString2Date(orderDate); OrderSetting orderSetting = orderSettingDao.findByOrderDate(date); if (orderSetting == null ){ return new Result (false , MessageConstant.SELECTED_DATE_CANNOT_ORDER); } int number = orderSetting.getNumber(); int reservations = orderSetting.getReservations(); if (reservations >= number){ return new Result (false ,MessageConstant.ORDER_FULL); } String telephone = (String) map.get("telephone" ); Member member = memberDao.findByTelephone(telephone); if (member != null ){ Integer memberId = member.getId(); int setmealId = Integer.parseInt((String) map.get("setmealId" )); Order order = new Order (memberId,date,null ,null ,setmealId); List<Order> list = orderDao.findByCondition(order); if (list != null && list.size() > 0 ){ return new Result (false ,MessageConstant.HAS_ORDERED); } } orderSetting.setReservations(orderSetting.getReservations()+1 ); orderSettingDao.editReservationsByOrderDate(orderSetting); if (member == null ){ member = new Member (); member.setName((String) map.get("name" )); member.setPhoneNumber(telephone); member.setIdCard((String) map.get("idCard" )); member.setSex((String) map.get("sex" )); member.setRegTime(new Date ()); memberDao.add(member); } Order order = new Order (member.getId(), date, (String)map.get("orderType" ), Order.ORDERSTATUS_NO, Integer.parseInt((String) map.get("setmealId" ))); orderDao.add(order); return new Result (true ,MessageConstant.ORDER_SUCCESS,order); } }
3.2.4 Dao接口 1 2 3 4 5 6 7 8 9 10 11 12 13 14 15 16 17 18 19 20 21 package com.itheima.dao;import com.itheima.pojo.OrderSetting;import java.util.Date;import java.util.HashMap;import java.util.List;import java.util.Map;public interface OrderSettingDao { public void add (OrderSetting orderSetting) ; public void editNumberByOrderDate (OrderSetting orderSetting) ; public void editReservationsByOrderDate (OrderSetting orderSetting) ; public long findCountByOrderDate (Date orderDate) ; public List<OrderSetting> getOrderSettingByMonth (Map date) ; public OrderSetting findByOrderDate (Date orderDate) ; }
1 2 3 4 5 6 7 8 9 10 11 12 13 14 15 16 17 18 19 package com.itheima.dao;import com.github.pagehelper.Page;import com.itheima.pojo.Member;import java.util.List;public interface MemberDao { public List<Member> findAll () ; public Page<Member> selectByCondition (String queryString) ; public void add (Member member) ; public void deleteById (Integer id) ; public Member findById (Integer id) ; public Member findByTelephone (String telephone) ; public void edit (Member member) ; public Integer findMemberCountBeforeDate (String date) ; public Integer findMemberCountByDate (String date) ; public Integer findMemberCountAfterDate (String date) ; public Integer findMemberTotalCount () ; }
1 2 3 4 5 6 7 8 9 10 11 package com.itheima.dao;import com.itheima.pojo.Order;import java.util.List;import java.util.Map;public interface OrderDao { public void add (Order order) ; public List<Order> findByCondition (Order order) ; }
3.2.5 Mapper映射文件 OrderSettingDao.xml
1 2 3 4 5 6 7 8 <select id ="findByOrderDate" parameterType ="date" resultType ="com.itheima.pojo.OrderSetting" > select * from t_ordersetting where orderDate = #{orderDate} </select > <update id ="editReservationsByOrderDate" parameterType ="com.itheima.pojo.OrderSetting" > update t_ordersetting set reservations = #{reservations} where orderDate = #{orderDate} </update >
MemberDao.xml
1 2 3 4 5 6 7 8 9 10 11 12 13 14 15 16 17 18 19 20 21 22 23 24 25 26 27 28 29 30 31 32 33 34 35 36 37 38 39 40 41 42 43 44 45 46 47 48 49 50 51 52 53 54 55 56 57 58 59 60 61 62 63 64 65 66 67 68 69 70 71 72 73 74 75 76 77 78 79 80 81 82 83 84 85 86 87 88 89 90 91 92 93 94 95 96 97 98 99 100 101 102 103 <?xml version="1.0" encoding="UTF-8" ?> <!DOCTYPE mapper PUBLIC "-//mybatis.org//DTD Mapper 3.0//EN" "http://mybatis.org/dtd/mybatis-3-mapper.dtd" > <mapper namespace ="com.itheima.dao.MemberDao" > <select id ="findAll" resultType ="com.itheima.pojo.Member" > select * from t_member </select > <select id ="selectByCondition" parameterType ="string" resultType ="com.itheima.pojo.Member" > select * from t_member <if test ="value != null and value.length > 0" > where fileNumber = #{value} or phoneNumber = #{value} or name = #{value} </if > </select > <insert id ="add" parameterType ="com.itheima.pojo.Member" > <selectKey resultType ="java.lang.Integer" order ="AFTER" keyProperty ="id" > SELECT LAST_INSERT_ID() </selectKey > insert into t_member (fileNumber,name,sex,idCard,phoneNumber, regTime,password,email,birthday,remark) values (#{fileNumber},#{name},#{sex},#{idCard},#{phoneNumber}, #{regTime},#{password},#{email},#{birthday},#{remark}) </insert > <delete id ="deleteById" parameterType ="int" > delete from t_member where id = #{id} </delete > <select id ="findById" parameterType ="int" resultType ="com.itheima.pojo.Member" > select * from t_member where id = #{id} </select > <select id ="findByTelephone" parameterType ="string" resultType ="com.itheima.pojo.Member" > select * from t_member where phoneNumber = #{phoneNumber} </select > <update id ="edit" parameterType ="com.itheima.pojo.Member" > update t_member <set > <if test ="fileNumber != null" > fileNumber = #{fileNumber}, </if > <if test ="name != null" > name = #{name}, </if > <if test ="sex != null" > sex = #{sex}, </if > <if test ="idCard != null" > idCard = #{idCard}, </if > <if test ="phoneNumber != null" > phoneNumber = #{phoneNumber}, </if > <if test ="regTime != null" > regTime = #{regTime}, </if > <if test ="password != null" > password = #{password}, </if > <if test ="email != null" > email = #{email}, </if > <if test ="birthday != null" > birthday = #{birthday}, </if > <if test ="remark != null" > remark = #{remark}, </if > </set > where id = #{id} </update > <select id ="findMemberCountBeforeDate" parameterType ="string" resultType ="int" > select count(id) from t_member where regTime < = #{value} </select > <select id ="findMemberCountByDate" parameterType ="string" resultType ="int" > select count(id) from t_member where regTime = #{value} </select > <select id ="findMemberCountAfterDate" parameterType ="string" resultType ="int" > select count(id) from t_member where regTime > = #{value} </select > <select id ="findMemberTotalCount" resultType ="int" > select count(id) from t_member </select > </mapper >
OrderDao.xml
1 2 3 4 5 6 7 8 9 10 11 12 13 14 15 16 17 18 19 20 21 22 23 24 25 26 27 28 29 30 31 32 33 34 35 36 37 38 39 40 41 42 43 44 45 46 47 48 49 50 <?xml version="1.0" encoding="UTF-8" ?> <!DOCTYPE mapper PUBLIC "-//mybatis.org//DTD Mapper 3.0//EN" "http://mybatis.org/dtd/mybatis-3-mapper.dtd" > <mapper namespace ="com.itheima.dao.OrderDao" > <resultMap id ="baseResultMap" type ="com.itheima.pojo.Order" > <id column ="id" property ="id" /> <result column ="member_id" property ="memberId" /> <result column ="orderDate" property ="orderDate" /> <result column ="orderType" property ="orderType" /> <result column ="orderStatus" property ="orderStatus" /> <result column ="setmeal_id" property ="setmealId" /> </resultMap > <insert id ="add" parameterType ="com.itheima.pojo.Order" > <selectKey resultType ="java.lang.Integer" order ="AFTER" keyProperty ="id" > SELECT LAST_INSERT_ID() </selectKey > insert into t_order (member_id,orderDate,orderType,orderStatus,setmeal_id) values (#{memberId},#{orderDate},#{orderType},#{orderStatus},#{setmealId}) </insert > <select id ="findByCondition" parameterType ="com.itheima.pojo.Order" resultMap ="baseResultMap" > select * from t_order <where > <if test ="id != null" > and id = #{id} </if > <if test ="memberId != null" > and member_id = #{memberId} </if > <if test ="orderDate != null" > and orderDate = #{orderDate} </if > <if test ="orderType != null" > and orderType = #{orderType} </if > <if test ="orderStatus != null" > and orderStatus = #{orderStatus} </if > <if test ="setmealId != null" > and setmeal_id = #{setmealId} </if > </where > </select > </mapper >
4. 预约成功页面展示 前面已经完成了体检预约,预约成功后页面会跳转到成功提示页面(orderSuccess.html)并展示预约的相关信息(体检人、体检套餐、体检时间等)。
4.1 页面调整 提供orderSuccess.html页面,展示预约成功后相关信息
1 2 3 4 5 6 7 8 9 10 11 12 <div class ="info-title" > <span class ="name" > 体检预约成功</span > </div > <div class ="notice-item" > <div class ="item-title" > 预约信息</div > <div class ="item-content" > <p > 体检人:{{orderInfo.member}}</p > <p > 体检套餐:{{orderInfo.setmeal}}</p > <p > 体检日期:{{orderInfo.orderDate}}</p > <p > 预约类型:{{orderInfo.orderType}}</p > </div > </div >
1 2 3 4 5 6 7 8 9 10 11 12 13 14 15 16 17 <script> var id = getUrlParam ("orderId" ); </script> <script > var vue = new Vue ({ el :'#app' , data :{ orderInfo :{} }, mounted ( axios.post ("/order/findById.do?id=" + id).then ((response ) => { this .orderInfo = response.data .data ; }); } }); </script >
4.2 后台代码 4.2.1 Controller 在OrderController中提供findById方法,根据预约id查询预约相关信息
1 2 3 4 5 6 7 8 9 10 11 12 13 14 15 16 17 18 @RequestMapping("/findById") public Result findById (Integer id) { Result result = null ; try { result = orderService.findById4Detail(id); return new Result (true ,MessageConstant.QUERY_ORDER_SUCCESS,result.getData()); }catch (Exception e){ e.printStackTrace(); return new Result (false ,MessageConstant.QUERY_ORDER_FAIL); } }
4.2.2 服务接口 在OrderService服务接口中扩展findById4Detail方法
1 2 public Result findById4Detail (Integer id) throws Exception;
4.2.3 服务实现类 在OrderServiceImpl服务实现类中实现findById4Detail方法
1 2 3 4 5 6 7 8 9 10 11 public Result findById4Detail (Integer id) throws Exception { Map map = orderDao.findById4Detail(id); if (map != null ){ Date orderDate = (Date) map.get("orderDate" ); map.put("orderDate" ,DateUtils.parseDate2String(orderDate)); return new Result (true ,MessageConstant.QUERY_ORDER_SUCCESS,map); } return new Result (false ,MessageConstant.QUERY_ORDER_FAIL); }
4.2.4 Dao接口 在OrderDao接口中扩展findById4Detail方法
1 public Map findById4Detail (Integer id) ;
4.2.5 Mapper映射文件 在OrderDao.xml映射文件中提供SQL语句
1 2 3 4 5 6 7 8 9 <select id ="findById4Detail" parameterType ="int" resultType ="map" > select m.name member ,s.name setmeal,o.orderDate orderDate,o.orderType orderType from t_order o, t_member m, t_setmeal s where o.member_id=m.id and o.setmeal_id=s.id and o.id=#{id} </select >
第8章 移动端开发-手机快速登录 1. 需求分析 手机快速登录功能,就是通过短信验证码的方式进行登录。这种方式相对于用户名密码登录方式,用户不需要记忆自己的密码,只需要通过输入手机号并获取验证码就可以完成登录,是目前比较流行的登录方式。
2. 手机快速登录 2.1 页面调整 登录页面为/pages/login.html
2.1.1 发送验证码 为获取验证码按钮绑定事件,并在事件对应的处理函数中校验手机号,如果手机号输入正确则显示30秒倒计时效果并发送ajax请求,发送短信验证码
1 2 3 4 5 6 7 8 <div class ="input-row" > <label > 手机号</label > <div class ="loginInput" > <input v-model ="loginInfo.telephone" id ='account' type ="text" placeholder ="请输入手机号" > <input id ="validateCodeButton" @click ="sendValidateCode()" type ="button" style ="font-size: 12px" value ="获取验证码" > </div > </div >
1 2 3 4 5 6 7 8 9 10 11 12 13 14 15 16 17 18 19 20 21 22 23 24 25 26 <script> var vue = new Vue ({ el :'#app' , data :{ loginInfo :{} }, methods :{ sendValidateCode ( var telephone = this .loginInfo .telephone ; if (!checkTelephone (telephone)) { this .$message .error ('请输入正确的手机号' ); return false ; } validateCodeButton = $("#validateCodeButton" )[0 ]; clock = window .setInterval (doLoop, 1000 ); axios.post ("/validateCode/send4Login.do?telephone=" + telephone).then ((response ) => { if (!response.data .flag ){ this .$message .error ('验证码发送失败,请检查手机号输入是否正确' ); } }); } } }); </script>
在ValidateCodeController中提供send4Login方法,调用短信服务发送验证码并将验证码保存到redis
1 2 3 4 5 6 7 8 9 10 11 12 13 14 15 16 17 18 19 20 @RequestMapping("/send4Login") public Result send4Login (String telephone) { Integer code = ValidateCodeUtils.generateValidateCode(6 ); try { SMSUtils.sendShortMessage(SMSUtils.VALIDATE_CODE,telephone,code.toString()); } catch (ClientException e) { e.printStackTrace(); return new Result (false , MessageConstant.SEND_VALIDATECODE_FAIL); } System.out.println("发送的手机验证码为:" + code); jedisPool.getResource().setex(telephone+RedisMessageConstant.SENDTYPE_LOGIN, 5 * 60 , code.toString()); return new Result (true ,MessageConstant.SEND_VALIDATECODE_SUCCESS); }
2.1.2 提交登录请求 为登录按钮绑定事件
1 <div class ="btn yes-btn" ><a @click ="login()" href ="#" > 登录</a >
1 2 3 4 5 6 7 8 9 10 11 12 13 14 15 16 17 login ( var telephone = this .loginInfo .telephone ; if (!checkTelephone (telephone)) { this .$message .error ('请输入正确的手机号' ); return false ; } axios.post ("/login/check.do" ,this .loginInfo ).then ((response ) => { if (response.data .flag ){ window .location .href ="index.html" ; }else { this .$message .error (response.data .message ); } }); }
2.2 后台代码 2.2.1 Controller 在healthmobile_web工程中创建LoginController并提供check方法进行登录检查,处理逻辑为:
1、校验用户输入的短信验证码是否正确,如果验证码错误则登录失败
2、如果验证码正确,则判断当前用户是否为会员,如果不是会员则自动完成会员注册
3、向客户端写入Cookie,内容为用户手机号
1 2 3 4 5 6 7 8 9 10 11 12 13 14 15 16 17 18 19 20 21 22 23 24 25 26 27 28 29 30 31 32 33 34 35 36 37 38 39 40 41 42 43 44 45 46 47 48 49 50 51 52 53 54 55 56 57 58 59 60 61 62 63 package com.itheima.controller;import com.alibaba.dubbo.config.annotation.Reference;import com.aliyuncs.exceptions.ClientException;import com.itheima.constant.MessageConstant;import com.itheima.constant.RedisConstant;import com.itheima.constant.RedisMessageConstant;import com.itheima.entity.Result;import com.itheima.pojo.Member;import com.itheima.service.MemberService;import com.itheima.utils.JedisUtils;import org.springframework.beans.factory.annotation.Autowired;import org.springframework.web.bind.annotation.RequestBody;import org.springframework.web.bind.annotation.RequestMapping;import org.springframework.web.bind.annotation.RestController;import redis.clients.jedis.JedisPool;import javax.servlet.http.Cookie;import javax.servlet.http.HttpServletResponse;import java.util.Date;import java.util.Map;@RestController @RequestMapping("/login") public class LoginController { @Reference private MemberService memberService; @Autowired private JedisPool jedisPool; @RequestMapping("/check") public Result check (HttpServletResponse response,@RequestBody Map map) { String telephone = (String) map.get("telephone" ); String validateCode = (String) map.get("validateCode" ); String codeInRedis = jedisPool.getResource().get( telephone + RedisMessageConstant.SENDTYPE_LOGIN); if (codeInRedis == null || !codeInRedis.equals(validateCode)){ return new Result (false ,MessageConstant.VALIDATECODE_ERROR); }else { Member member = memberService.findByTelephone(telephone); if (member == null ){ member = new Member (); member.setPhoneNumber(telephone); member.setRegTime(new Date ()); memberService.add(member); } Cookie cookie = new Cookie ("login_member_telephone" ,telephone); cookie.setPath("/" ); cookie.setMaxAge(60 *60 *24 *30 ); response.addCookie(cookie); return new Result (true ,MessageConstant.LOGIN_SUCCESS); } } }
2.2.2 服务接口 在MemberService服务接口中提供findByTelephone和add方法
1 2 public void add (Member member) ;public Member findByTelephone (String telephone) ;
2.2.3 服务实现类 在MemberServiceImpl服务实现类中实现findByTelephone和add方法
1 2 3 4 5 6 7 8 9 10 11 public Member findByTelephone (String telephone) { return memberDao.findByTelephone(telephone); } public void add (Member member) { if (member.getPassword() != null ){ member.setPassword(MD5Utils.md5(member.getPassword())); } memberDao.add(member); }
2.2.4 Dao接口 在MemberDao接口中声明findByTelephone和add方法
1 2 public Member findByTelephone (String telephone) ;public void add (Member member) ;
2.2.5 Mapper映射文件 在MemberDao.xml映射文件中定义SQL语句
1 2 3 4 5 6 7 8 9 10 11 12 13 14 <insert id ="add" parameterType ="com.itheima.pojo.Member" > <selectKey resultType ="java.lang.Integer" order ="AFTER" keyProperty ="id" > SELECT LAST_INSERT_ID() </selectKey > insert into t_member (fileNumber,name,sex,idCard,phoneNumber,regTime,password,email,birthday,remark) values (#{fileNumber},#{name},#{sex},#{idCard},#{phoneNumber},#{regTime},#{password},#{email},#{birthday},#{remark}) </insert > <select id ="findByTelephone" parameterType ="string" resultType ="com.itheima.pojo.Member" > select * from t_member where phoneNumber = #{phoneNumber} </select >
访问localhost/pages/login.html登录成功之后可以查看浏览器Cookie是否写入成功。
3. 权限控制 3.1 认证和授权概念 前面我们已经完成了传智健康后台管理系统的部分功能,例如检查项管理、检查组管理、套餐管理、预约设置等。接下来我们需要思考2个问题:
问题1:在生产环境下我们如果不登录后台系统就可以完成这些功能操作吗?
答案显然是否定的,要操作这些功能必须首先登录到系统才可以。
问题2:是不是所有用户,只要登录成功就都可以操作所有功能呢?
答案是否定的,并不是所有的用户都可以操作这些功能。不同的用户可能拥有不同的权限,这就需要进行授权了。
认证:系统提供的用于识别用户身份的功能,通常提供用户名和密码进行登录其实就是在进行认证,认证的目的是让系统知道你是谁。
授权:用户认证成功后,需要为用户授权,其实就是指定当前用户可以操作哪些功能。
本章节就是要对后台系统进行权限控制,其本质就是对用户进行认证和授权。
3.2 权限模块数据模型 前面已经分析了认证和授权的概念,要实现最终的权限控制,需要有一套表结构支撑:
1 2 上图的模型中的小垃圾不灵活,比如1000人,没人100个权限,就10W数据了.所以要把权限打包,给角色,角色赋给用户。然后用户和角色也搞成多对多.更灵活。 菜单也打包给角色,为了灵活要搞成父子结构,不然有几级菜单搞几张表也太傻了。
用户表t_user、权限表t_permission、角色表t_role、菜单表t_menu、用户角色关系表t_user_role、角色权限关系表t_role_permission、角色菜单关系表t_role_menu。
表之间关系如下图:
通过上图可以看到,权限模块共涉及到7张表。在这7张表中,角色表起到了至关重要的作用,其处于核心位置,因为用户、权限、菜单都和角色是多对多关系。
接下来我们可以分析一下在认证和授权过程中分别会使用到哪些表:
认证过程:只需要用户表就可以了,在用户登录时可以查询用户表t_user进行校验,判断用户输入的用户名和密码是否正确。
授权过程:用户必须完成认证之后才可以进行授权,首先可以根据用户查询其角色,再根据角色查询对应的菜单,这样就确定了用户能够看到哪些菜单。然后再根据用户的角色查询对应的权限,这样就确定了用户拥有哪些权限。所以授权过程会用到上面7张表。
3.3 Spring Security简介 Spring Security是 Spring提供的安全认证服务的框架。 使用Spring Security可以帮助我们来简化认证和授权的过程。官网:https://spring.io/projects/spring-security
常用的权限框架除了Spring Security,还有Apache的shiro框架。
对应的maven坐标:
1 2 3 4 5 6 7 8 9 10 <dependency > <groupId > org.springframework.security</groupId > <artifactId > spring-security-web</artifactId > <version > 5.0.5.RELEASE</version > </dependency > <dependency > <groupId > org.springframework.security</groupId > <artifactId > spring-security-config</artifactId > <version > 5.0.5.RELEASE</version > </dependency >
3.3.1 Spring Security学习步骤 由于spring security配置比较多所以给大家列了一个学习小步骤
1、配置一个最小化的spring security
3.4 Spring Security入门案例 3.4.1 工程搭建 创建maven工程,打包方式为war,为了方便起见我们可以让入门案例工程依赖health_interface,这样相关的依赖都继承过来了。
pom.xml
1 2 3 4 5 6 7 8 9 10 11 12 13 14 15 16 17 18 19 20 21 22 23 24 25 26 27 28 29 30 31 32 33 34 35 36 37 38 39 40 41 42 43 44 <?xml version="1.0" encoding="UTF-8" ?> <project xmlns ="http://maven.apache.org/POM/4.0.0" xmlns:xsi ="http://www.w3.org/2001/XMLSchema-instance" xsi:schemaLocation ="http://maven.apache.org/POM/4.0.0 http://maven.apache.org/xsd/maven-4.0.0.xsd" > <modelVersion > 4.0.0</modelVersion > <groupId > com.itheima</groupId > <artifactId > springsecuritydemo</artifactId > <version > 1.0-SNAPSHOT</version > <packaging > war</packaging > <name > springsecuritydemo Maven Webapp</name > <url > http://www.example.com</url > <properties > <project.build.sourceEncoding > UTF-8</project.build.sourceEncoding > <maven.compiler.source > 1.8</maven.compiler.source > <maven.compiler.target > 1.8</maven.compiler.target > </properties > <dependencies > <dependency > <groupId > com.itheima</groupId > <artifactId > health_interface</artifactId > <version > 1.0-SNAPSHOT</version > </dependency > </dependencies > <build > <plugins > <plugin > <groupId > org.apache.tomcat.maven</groupId > <artifactId > tomcat7-maven-plugin</artifactId > <configuration > <port > 85</port > <path > /</path > </configuration > </plugin > </plugins > </build > </project >
提供index.html页面,内容为hello Spring Security!!
3.4.2 配置web.xml 在web.xml中主要配置SpringMVC的DispatcherServlet和用于整合第三方框架的DelegatingFilterProxy,用于整合Spring Security。
1 2 3 4 5 6 7 8 9 10 11 12 13 14 15 16 17 18 19 20 21 22 23 24 25 26 27 28 29 30 31 32 33 34 35 <!DOCTYPE web-app PUBLIC "-//Sun Microsystems, Inc.//DTD Web Application 2.3//EN" "http://java.sun.com/dtd/web-app_2_3.dtd" > <web-app > <display-name > Archetype Created Web Application</display-name > <filter > <filter-name > springSecurityFilterChain</filter-name > <filter-class > org.springframework.web.filter.DelegatingFilterProxy</filter-class > </filter > <filter-mapping > <filter-name > springSecurityFilterChain</filter-name > <url-pattern > /*</url-pattern > </filter-mapping > <servlet > <servlet-name > springmvc</servlet-name > <servlet-class > org.springframework.web.servlet.DispatcherServlet</servlet-class > <init-param > <param-name > contextConfigLocation</param-name > <param-value > classpath:spring-security.xml</param-value > </init-param > <load-on-startup > 1</load-on-startup > </servlet > <servlet-mapping > <servlet-name > springmvc</servlet-name > <url-pattern > *.do</url-pattern > </servlet-mapping > </web-app >
3.4.3 配置spring-security.xml 在spring-security.xml中主要配置Spring Security的拦截规则和认证管理器。
1 2 3 4 5 6 7 8 9 10 11 12 13 14 15 16 17 18 19 20 21 22 23 24 25 26 27 28 29 30 31 32 33 34 35 36 37 38 39 40 41 42 43 44 45 46 47 48 49 50 51 52 53 54 55 56 57 <?xml version="1.0" encoding="UTF-8" ?> <beans xmlns ="http://www.springframework.org/schema/beans" xmlns:xsi ="http://www.w3.org/2001/XMLSchema-instance" xmlns:context ="http://www.springframework.org/schema/context" xmlns:dubbo ="http://code.alibabatech.com/schema/dubbo" xmlns:mvc ="http://www.springframework.org/schema/mvc" xmlns:security ="http://www.springframework.org/schema/security" xsi:schemaLocation ="http://www.springframework.org/schema/beans http://www.springframework.org/schema/beans/spring-beans.xsd http://www.springframework.org/schema/mvc http://www.springframework.org/schema/mvc/spring-mvc.xsd http://code.alibabatech.com/schema/dubbo http://code.alibabatech.com/schema/dubbo/dubbo.xsd http://www.springframework.org/schema/context http://www.springframework.org/schema/context/spring-context.xsd http://www.springframework.org/schema/security http://www.springframework.org/schema/security/spring-security.xsd" > <security:http auto-config ="true" use-expressions ="true" > <security:intercept-url pattern ="/**" access ="hasRole('ROLE_ADMIN')" /> </security:http > <security:authentication-manager > <security:authentication-provider > <security:user-service > <security:user name ="admin" password ="{noop}admin" authorities ="ROLE_ADMIN" > </security:user > </security:user-service > </security:authentication-provider > </security:authentication-manager > </beans >
3.5 对入门案例改进 前面我们已经完成了Spring Security的入门案例,通过入门案例我们可以看到,Spring Security将我们项目中的所有资源都保护了起来,要访问这些资源必须要完成认证而且需要具有ROLE_ADMIN角色。
但是入门案例中的使用方法离我们真实生产环境还差很远,还存在如下一些问题:
1、项目中我们将所有的资源(所有请求URL)都保护起来,实际环境下往往有一些资源不需要认证也可以访问,也就是可以匿名访问。
2、登录页面是由框架生成的,而我们的项目往往会使用自己的登录页面。
3、直接将用户名和密码配置在了配置文件中,而真实生产环境下的用户名和密码往往保存在数据库中。
4、在配置文件中配置的密码使用明文,这非常不安全,而真实生产环境下密码需要进行加密。
本章节需要对这些问题进行改进。
3.5.1 配置可匿名访问的资源 第一步:在项目中创建js、css目录并在两个目录下提供任意一些测试文件
第二步:在spring-security.xml文件中配置,指定哪些资源可以匿名访问
1 2 3 4 5 6 <security:http security ="none" pattern ="/js/**" /> <security:http security ="none" pattern ="/css/**" />
通过上面的配置可以发现,js和css目录下的文件可以在没有认证的情况下任意访问。
3.5.2 使用指定的登录页面 第一步:提供login.html作为项目的登录页面
1 2 3 4 5 6 7 8 9 10 11 12 <html > <head > <title > 登录</title > </head > <body > <form action ="/login.do" method ="post" > username:<input type ="text" name ="username" > <br > password:<input type ="password" name ="password" > <br > <input type ="submit" value ="submit" > </form > </body > </html >
第二步:修改spring-security.xml文件,指定login.html页面可以匿名访问
1 <security:http security ="none" pattern ="/login.html" />
第三步:修改spring-security.xml文件,加入表单登录信息的配置
1 2 3 4 5 6 7 8 9 10 11 <security:form-login login-page ="/login.html" username-parameter ="username" password-parameter ="password" login-processing-url ="/login.do" default-target-url ="/index.html" authentication-failure-url ="/login.html" /> 每次登录都条facvtion.ico错误页面解决: always-use-default-target="true"
第四步:修改spring-security.xml文件,关闭CsrfFilter过滤器
1 2 3 4 5 <security:csrf disabled ="true" > </security:csrf >
3.5.3 退出登录 用户完成登录后Spring Security框架会记录当前用户认证状态为已认证状态,即表示用户登录成功了。那用户如何退出登录呢?我们可以在spring-security.xml文件中进行如下配置:
1 2 3 4 5 6 7 8 <security:logout logout-url ="/logout.do" logout-success-url ="/login.html" invalidate-session ="true" />
通过上面的配置可以发现,如果用户要退出登录,只需要请求/logout.do这个URL地址就可以,同时会将当前session失效,最后页面会跳转到login.html页面。
3.5.4 配置多种校验规则 为了测试方便,首先在项目中创建add.html、del.html、index.html、d.html几个页面
修改spring-security.xml文件:
1 2 3 4 5 6 7 8 9 10 11 12 13 14 15 <security:intercept-url pattern ="/index.jsp" access ="isAuthenticated()" /> <security:intercept-url pattern ="/index.html" access ="isAuthenticated()" /> <security:intercept-url pattern ="/add.html" access ="hasAuthority('add')" /> <security:intercept-url pattern ="/del.html" access ="hasRole('ROLE_ADMIN')" /> <security:intercept-url pattern ="/d.html" access ="hasRole('ADMIN')" /> 没有权限错误页面难看解决,自定义页面:<security:asscess-denied-handler error-page ="/error.html" />
3.5.5 从数据库查询用户信息 如果我们要从数据库动态查询用户信息,就必须按照spring security框架的要求提供一个实现UserDetailsService接口的实现类,并按照框架的要求进行配置即可。框架会自动调用实现类中的方法并自动进行密码校验。
实现类代码:
1 2 3 4 5 6 7 8 9 10 11 12 13 14 15 16 17 18 19 20 21 22 23 24 25 26 27 28 29 30 31 32 33 34 35 36 37 38 39 40 41 42 43 44 45 46 47 48 49 50 51 52 53 54 55 package com.itheima.security;import org.springframework.security.core.GrantedAuthority;import org.springframework.security.core.authority.SimpleGrantedAuthority;import org.springframework.security.core.userdetails.User;import org.springframework.security.core.userdetails.UserDetails;import org.springframework.security.core.userdetails.UserDetailsService;import org.springframework.security.core.userdetails.UsernameNotFoundException;import java.util.ArrayList;import java.util.HashMap;import java.util.List;import java.util.Map;public class UserService implements UserDetailsService { public static Map<String, com.itheima.pojo.User> map = new HashMap <>(); static { com.itheima.pojo.User user1 = new com .itheima.pojo.User(); user1.setUsername("admin" ); user1.setPassword("admin" ); com.itheima.pojo.User user2 = new com .itheima.pojo.User(); user2.setUsername("xiaoming" ); user2.setPassword("1234" ); map.put(user1.getUsername(),user1); map.put(user2.getUsername(),user2); } public UserDetails loadUserByUsername (String username) throws UsernameNotFoundException { System.out.println("username:" + username); com.itheima.pojo.User userInDb = map.get(username); if (userInDb == null ){ return null ; } String passwordInDb = "{noop}" + userInDb.getPassword(); List<GrantedAuthority> list = new ArrayList <>(); list.add(new SimpleGrantedAuthority ("add" )); list.add(new SimpleGrantedAuthority ("delete" )); list.add(new SimpleGrantedAuthority ("ROLE_ADMIN" )); UserDetails user = new User (username,passwordInDb,list); return user; } }
spring-security.xml:
1 2 3 4 5 6 7 8 9 10 11 12 <security:authentication-manager > <security:authentication-provider user-service-ref ="userService" > </security:authentication-provider > </security:authentication-manager > <bean id ="userService" class ="com.itheima.security.UserService" > </bean >
本章节我们提供了UserService实现类,并且按照框架的要求实现了UserDetailsService接口。在spring配置文件中注册UserService,指定其作为认证过程中根据用户名查询用户信息的处理类。当我们进行登录操作时,spring security框架会调用UserService的loadUserByUsername方法查询用户信息,并根据此方法中提供的密码和用户页面输入的密码进行比对来实现认证操作。
3.5.6 对密码进行加密 前面我们使用的密码都是明文的,这是非常不安全的。一般情况下用户的密码需要进行加密后再保存到数据库中。
常见的密码加密方式有:
3DES、AES、DES:使用对称加密算法,可以通过解密来还原出原始密码
MD5、SHA1:使用单向HASH算法,无法通过计算还原出原始密码,但是可以建立彩虹表进行查表破解
bcrypt:将salt随机并混入最终加密后的密码,验证时也无需单独提供之前的salt,从而无需单独处理salt问题
加密后的格式一般为:
1 $2a$10$/bTVvqqlH9UiE0ZJZ7N2Me3RIgUCdgMheyTgV0B4cMCSokPa.6oCa
加密后字符串的长度为固定的60位。其中:$是分割符,无意义;2a是bcrypt加密版本号;10是cost的值;而后的前22位是salt值;再然后的字符串就是密码的密文了。
实现步骤:
第一步:在spring-security.xml文件中指定密码加密对象
1 2 3 4 5 6 7 8 9 10 11 12 13 14 15 16 <bean class ="com.itheima.security.UserService" id ="userService" > <property name ="passwordEncoder" ref ="passwordEncoder" /> </bean > <bean id ="passwordEncoder" class ="org.springframework.security.crypto.bcrypt.BCryptPasswordEncoder" /> <security:authentication-manager > <security:authentication-provider user-service-ref ="userService" > <security:password-encoder ref ="passwordEncoder" /> </security:authentication-provider > </security:authentication-manager >
第二步:修改UserService实现类
1 2 3 4 5 6 7 8 9 10 11 12 13 14 15 16 17 18 19 20 21 22 23 24 25 26 27 28 29 30 31 32 33 34 35 36 37 38 39 40 41 42 43 44 45 46 47 48 49 50 51 52 53 54 55 56 57 58 59 60 61 62 63 64 65 66 package com.itheima.security;import org.springframework.beans.factory.annotation.Autowired;import org.springframework.security.core.GrantedAuthority;import org.springframework.security.core.authority.SimpleGrantedAuthority;import org.springframework.security.core.userdetails.User;import org.springframework.security.core.userdetails.UserDetails;import org.springframework.security.core.userdetails.UserDetailsService;import org.springframework.security.core.userdetails.UsernameNotFoundException;import org.springframework.security.crypto.bcrypt.BCryptPasswordEncoder;import java.util.ArrayList;import java.util.HashMap;import java.util.List;import java.util.Map;public class UserService implements UserDetailsService { private BCryptPasswordEncoder passwordEncoder; public BCryptPasswordEncoder getPasswordEncoder () { return passwordEncoder; } public void setPasswordEncoder (BCryptPasswordEncoder passwordEncoder) { this .passwordEncoder = passwordEncoder; } public Map<String, com.itheima.pojo.User> map = new HashMap <>(); public void initData () { com.itheima.pojo.User user1 = new com .itheima.pojo.User(); user1.setUsername("admin" ); user1.setPassword(passwordEncoder.encode("admin" )); com.itheima.pojo.User user2 = new com .itheima.pojo.User(); user2.setUsername("xiaoming" ); user2.setPassword(passwordEncoder.encode("1234" )); map.put(user1.getUsername(),user1); map.put(user2.getUsername(),user2); } public UserDetails loadUserByUsername (String username) throws UsernameNotFoundException { initData(); System.out.println("username:" + username); com.itheima.pojo.User userInDb = map.get(username); if (userInDb == null ){ return null ; } String passwordInDb = userInDb.getPassword(); List<GrantedAuthority> list = new ArrayList <>(); list.add(new SimpleGrantedAuthority ("add" )); list.add(new SimpleGrantedAuthority ("delete" )); list.add(new SimpleGrantedAuthority ("ROLE_ADMIN" )); UserDetails user = new User (username,passwordInDb,list); return user; } }
3.5.7 注解方式权限控制 Spring Security除了可以在配置文件中配置权限校验规则,还可以使用注解方式控制类中方法的调用。例如Controller中的某个方法要求必须具有某个权限才可以访问,此时就可以使用Spring Security框架提供的注解方式进行控制。
实现步骤:
第一步:在spring-security.xml文件中配置组件扫描,用于扫描Controller
1 2 <mvc:annotation-driven > </mvc:annotation-driven > <context:component-scan base-package ="com.itheima.controller" > </context:component-scan >
第二步:在spring-security.xml文件中开启权限注解支持
1 2 <security:global-method-security pre-post-annotations ="enabled" />
第三步:创建Controller类并在Controller的方法上加入注解进行权限控制
1 2 3 4 5 6 7 8 9 10 11 12 13 14 15 16 17 18 19 20 21 22 23 package com.itheima.controller;import org.springframework.security.access.prepost.PreAuthorize;import org.springframework.stereotype.Controller;import org.springframework.web.bind.annotation.RequestMapping;@Controller @RequestMapping("/hello") public class HelloController { @RequestMapping("/add") @PreAuthorize("hasAuthority('add')") public String add () { System.out.println("add..." ); return "add" ; } @RequestMapping("/delete") @PreAuthorize("hasRole('ROLE_admin')") public String delete () { System.out.println("delete..." ); return "delete" ; } }
第9章 权限控制、图形报表 1. 在项目中使用Spring Security 前面我们已经学习了Spring Security框架的使用方法,本章节我们就需要将Spring Security框架应用到后台系统中进行权限控制,其本质就是认证和授权。
要进行认证和授权需要前面课程中提到的权限模型涉及的7张表支撑,因为用户信息、权限信息、菜单信息、角色信息、关联信息等都保存在这7张表中,也就是这些表中的数据是我们进行认证和授权的依据。所以在真正进行认证和授权之前需要对这些数据进行管理,即我们需要开发如下一些功能:
1、权限数据管理(增删改查)
2、菜单数据管理(增删改查)
3、角色数据管理(增删改查、角色关联权限、角色关联菜单)
4、用户数据管理(增删改查、用户关联角色)
鉴于时间关系,我们不再实现这些数据管理的代码开发。我们可以直接将数据导入到数据库中即可。
1.1 导入Spring Security环境 第一步:在health_parent父工程的pom.xml中导入Spring Security的maven坐标
1 2 3 4 5 6 7 8 9 10 <dependency > <groupId > org.springframework.security</groupId > <artifactId > spring-security-web</artifactId > <version > ${spring.security.version}</version > </dependency > <dependency > <groupId > org.springframework.security</groupId > <artifactId > spring-security-config</artifactId > <version > ${spring.security.version}</version > </dependency >
第二步:在health_web工程的web.xml文件中配置用于整合Spring Security框架的过滤器DelegatingFilterProxy
1 2 3 4 5 6 7 8 9 10 <filter > <filter-name > springSecurityFilterChain</filter-name > <filter-class > org.springframework.web.filter.DelegatingFilterProxy</filter-class > </filter > <filter-mapping > <filter-name > springSecurityFilterChain</filter-name > <url-pattern > /*</url-pattern > </filter-mapping >
1.2 实现认证和授权 第一步:在health_web工程中按照Spring Security框架要求提供SpringSecurityUserService,并且实现UserDetailsService接口
1 2 3 4 5 6 7 8 9 10 11 12 13 14 15 16 17 18 19 20 21 22 23 24 25 26 27 28 29 30 31 32 33 34 35 36 37 38 39 40 41 42 43 44 45 46 package com.itheima.security;import com.alibaba.dubbo.config.annotation.Reference;import com.itheima.pojo.CheckItem;import com.itheima.pojo.Permission;import com.itheima.pojo.Role;import com.itheima.service.CheckItemService;import com.itheima.service.UserService;import org.springframework.security.core.GrantedAuthority;import org.springframework.security.core.authority.SimpleGrantedAuthority;import org.springframework.security.core.userdetails.User;import org.springframework.security.core.userdetails.UserDetails;import org.springframework.security.core.userdetails.UserDetailsService;import org.springframework.security.core.userdetails.UsernameNotFoundException;import org.springframework.stereotype.Component;import java.util.ArrayList;import java.util.List;import java.util.Set;@Component public class SpringSecurityUserService implements UserDetailsService { @Reference private UserService userService; public UserDetails loadUserByUsername (String username) throws UsernameNotFoundException { com.itheima.pojo.User user = userService.findByUsername(username); if (user == null ){ return null ; } List<GrantedAuthority> list = new ArrayList <>(); Set<Role> roles = user.getRoles(); for (Role role : roles){ Set<Permission> permissions = role.getPermissions(); for (Permission permission : permissions){ list.add(new SimpleGrantedAuthority (permission.getKeyword())); } } UserDetails userDetails = new User (username,user.getPassword(),list); return userDetails; } }
第二步:创建UserService服务接口、服务实现类、Dao接口、Mapper映射文件等
1 2 3 4 5 6 7 8 9 package com.itheima.service;import com.itheima.pojo.User;public interface UserService { public User findByUsername (String username) ; }
1 2 3 4 5 6 7 8 9 10 11 12 13 14 15 16 17 18 19 20 21 22 23 24 25 26 27 28 29 30 31 32 33 34 35 36 37 38 39 40 41 42 43 package com.itheima.service;import com.alibaba.dubbo.config.annotation.Service;import com.itheima.dao.PermissionDao;import com.itheima.dao.RoleDao;import com.itheima.dao.UserDao;import com.itheima.pojo.Permission;import com.itheima.pojo.Role;import com.itheima.pojo.User;import org.springframework.beans.factory.annotation.Autowired;import org.springframework.transaction.annotation.Transactional;import java.util.Set;@Service(interfaceClass = UserService.class) @Transactional public class UserServiceImpl implements UserService { @Autowired private UserDao userDao; @Autowired private RoleDao roleDao; @Autowired private PermissionDao permissionDao; public User findByUsername (String username) { User user = userDao.findByUsername(username); if (user == null ){ return null ; } Integer userId = user.getId(); Set<Role> roles = roleDao.findByUserId(userId); if (roles != null && roles.size() > 0 ){ for (Role role : roles){ Integer roleId = role.getId(); Set<Permission> permissions = permissionDao.findByRoleId(roleId); if (permissions != null && permissions.size() > 0 ){ role.setPermissions(permissions); } } user.setRoles(roles); } return user; } }
1 2 3 4 5 6 7 package com.itheima.dao;import com.itheima.pojo.User;public interface UserDao { public User findByUsername (String username) ; }
1 2 3 4 5 6 7 8 package com.itheima.dao;import com.itheima.pojo.Role;import java.util.Set;public interface RoleDao { public Set<Role> findByUserId (int id) ; }
1 2 3 4 5 6 7 8 package com.itheima.dao;import com.itheima.pojo.Permission;import java.util.Set;public interface PermissionDao { public Set<Permission> findByRoleId (int roleId) ; }
1 2 3 4 5 6 7 8 <?xml version="1.0" encoding="UTF-8" ?> <!DOCTYPE mapper PUBLIC "-//mybatis.org//DTD Mapper 3.0//EN" "http://mybatis.org/dtd/mybatis-3-mapper.dtd" > <mapper namespace ="com.itheima.dao.UserDao" > <select id ="findByUsername" parameterType ="string" resultType ="com.itheima.pojo.User" > select * from t_user where username = #{username} </select > </mapper >
1 2 3 4 5 6 7 8 9 10 <?xml version="1.0" encoding="UTF-8" ?> <!DOCTYPE mapper PUBLIC "-//mybatis.org//DTD Mapper 3.0//EN" "http://mybatis.org/dtd/mybatis-3-mapper.dtd" > <mapper namespace ="com.itheima.dao.RoleDao" > <select id ="findByUserId" parameterType ="int" resultType ="com.itheima.pojo.Role" > select r.* from t_role r ,t_user_role ur where r.id = ur.role_id and ur.user_id = #{userId} </select > </mapper >
1 2 3 4 5 6 7 8 9 10 <?xml version="1.0" encoding="UTF-8" ?> <!DOCTYPE mapper PUBLIC "-//mybatis.org//DTD Mapper 3.0//EN" "http://mybatis.org/dtd/mybatis-3-mapper.dtd" > <mapper namespace ="com.itheima.dao.PermissionDao" > <select id ="findByRoleId" parameterType ="int" resultType ="com.itheima.pojo.Permission" > select p.* from t_permission p ,t_role_permission rp where p.id = rp.permission_id and rp.role_id = #{roleId} </select > </mapper >
第三步:修改health_web工程中的springmvc.xml文件,修改dubbo批量扫描的包路径
1 2 <dubbo:annotation package ="com.itheima" />
注意: 此处原来扫描的包为com.itheima.controller,现在改为com.itheima包的目的是需要将我们上面定义的SpringSecurityUserService也扫描到,因为在SpringSecurityUserService的loadUserByUsername方法中需要通过dubbo远程调用名称为UserService的服务。
第四步:在health_web工程中提供spring-security.xml配置文件
1 2 3 4 5 6 7 8 9 10 11 12 13 14 15 16 17 18 19 20 21 22 23 24 25 26 27 28 29 30 31 32 33 34 35 36 37 38 39 40 41 42 43 44 45 46 47 48 49 50 51 52 53 54 55 56 57 58 59 60 61 62 63 64 65 66 67 68 69 70 71 72 73 74 75 76 77 78 79 80 81 <?xml version="1.0" encoding="UTF-8" ?> <beans xmlns ="http://www.springframework.org/schema/beans" xmlns:xsi ="http://www.w3.org/2001/XMLSchema-instance" xmlns:context ="http://www.springframework.org/schema/context" xmlns:dubbo ="http://code.alibabatech.com/schema/dubbo" xmlns:mvc ="http://www.springframework.org/schema/mvc" xmlns:security ="http://www.springframework.org/schema/security" xsi:schemaLocation ="http://www.springframework.org/schema/beans http://www.springframework.org/schema/beans/spring-beans.xsd http://www.springframework.org/schema/mvc http://www.springframework.org/schema/mvc/spring-mvc.xsd http://code.alibabatech.com/schema/dubbo http://code.alibabatech.com/schema/dubbo/dubbo.xsd http://www.springframework.org/schema/context http://www.springframework.org/schema/context/spring-context.xsd http://www.springframework.org/schema/security http://www.springframework.org/schema/security/spring-security.xsd" > <security:http security ="none" pattern ="/js/**" /> <security:http security ="none" pattern ="/css/**" /> <security:http security ="none" pattern ="/img/**" /> <security:http security ="none" pattern ="/plugins/**" /> <security:http auto-config ="true" use-expressions ="true" > <security:headers > <security:frame-options policy ="SAMEORIGIN" > </security:frame-options > </security:headers > <security:intercept-url pattern ="/pages/**" access ="isAuthenticated()" /> <security:form-login login-page ="/login.html" username-parameter ="username" password-parameter ="password" login-processing-url ="/login.do" default-target-url ="/pages/main.html" always-use-default-target ="true" authentication-failure-url ="/login.html" /> <security:csrf disabled ="true" > </security:csrf > </security:http > <bean id ="passwordEncoder" class ="org.springframework.security.crypto.bcrypt.BCryptPasswordEncoder" /> <security:authentication-manager > <security:authentication-provider user-service-ref ="springSecurityUserService" > <security:password-encoder ref ="passwordEncoder" /> </security:authentication-provider > </security:authentication-manager > <security:global-method-security pre-post-annotations ="enabled" /> </beans >
第五步:在springmvc.xml文件中引入spring-security.xml文件
1 <import resource ="spring-security.xml" > </import >
第六步:在Controller的方法上加入权限控制注解,此处以CheckItemController为例
1 2 3 4 5 6 7 8 9 10 11 12 13 14 15 16 17 18 19 20 21 22 23 24 25 26 27 28 29 30 31 32 33 34 35 36 37 38 39 40 41 42 43 44 45 46 47 48 49 50 51 52 53 54 55 56 57 58 59 60 61 62 63 64 65 66 67 68 69 70 71 72 73 74 75 76 77 78 79 package com.itheima.controller;import com.alibaba.dubbo.config.annotation.Reference;import com.itheima.constant.MessageConstant;import com.itheima.constant.PermissionConstant;import com.itheima.entity.PageResult;import com.itheima.entity.QueryPageBean;import com.itheima.entity.Result;import com.itheima.exception.CustomException;import com.itheima.pojo.CheckItem;import com.itheima.pojo.Member;import com.itheima.service.CheckItemService;import org.springframework.security.access.annotation.Secured;import org.springframework.security.access.prepost.PreAuthorize;import org.springframework.web.bind.annotation.RequestBody;import org.springframework.web.bind.annotation.RequestMapping;import org.springframework.web.bind.annotation.RequestParam;import org.springframework.web.bind.annotation.RestController;import org.springframework.web.multipart.commons.CommonsMultipartFile;import java.util.List;@RestController @RequestMapping("/checkitem") public class CheckItemController { @Reference private CheckItemService checkItemService; @PreAuthorize("hasAuthority('CHECKITEM_QUERY')") @RequestMapping("/findPage") public PageResult findPage (@RequestBody QueryPageBean queryPageBean) { PageResult pageResult = checkItemService.pageQuery( queryPageBean.getCurrentPage(), queryPageBean.getPageSize(), queryPageBean.getQueryString()); return pageResult; } @PreAuthorize("hasAuthority('CHECKITEM_DELETE')") @RequestMapping("/delete") public Result delete (Integer id) { try { checkItemService.delete(id); }catch (RuntimeException e){ return new Result (false ,e.getMessage()); }catch (Exception e){ return new Result (false , MessageConstant.DELETE_CHECKITEM_FAIL); } return new Result (true ,MessageConstant.DELETE_CHECKITEM_SUCCESS); } @PreAuthorize("hasAuthority('CHECKITEM_ADD')") @RequestMapping("/add") public Result add (@RequestBody CheckItem checkItem) { try { checkItemService.add(checkItem); }catch (Exception e){ return new Result (false ,MessageConstant.ADD_CHECKITEM_FAIL); } return new Result (true ,MessageConstant.ADD_CHECKITEM_SUCCESS); } @PreAuthorize("hasAuthority('CHECKITEM_EDIT')") @RequestMapping("/edit") public Result edit (@RequestBody CheckItem checkItem) { try { checkItemService.edit(checkItem); }catch (Exception e){ return new Result (false ,MessageConstant.EDIT_CHECKITEM_FAIL); } return new Result (true ,MessageConstant.EDIT_CHECKITEM_SUCCESS); } }
第七步:修改页面,没有权限时提示信息设置,此处以checkitem.html中的handleDelete方法为例
1 2 3 4 5 6 7 8 9 10 11 showMessage (r ){ if (r == 'Error: Request failed with status code 403' ){ this .$message .error ('无访问权限' ); return ; }else { this .$message .error ('未知错误' ); return ; } }
1 2 3 4 5 6 7 8 9 10 11 12 13 14 15 16 17 18 19 20 21 22 23 24 25 26 handleDelete (row ) { this .$confirm('此操作将永久当前数据,是否继续?' , '提示' , { type : 'warning' }).then (()=> { axios.get ("/checkitem/delete.do?id=" + row.id ).then ((res )=> { if (!res.data .flag ){ this .$message .error (res.data .message ); }else { this .$message({ message : res.data .message , type : 'success' }); this .findPage (); } }).catch ((r )=> { this .showMessage (r); }); }).catch (()=> { this .$message('操作已取消' ); }); }
admin 1234 测试数据
1.3 显示用户名 前面我们已经完成了认证和授权操作,如果用户认证成功后需要在页面展示当前用户的用户名。Spring Security在认证成功后会将用户信息保存到框架提供的上下文对象中,所以此处我们就可以调用Spring Security框架提供的API获取当前用户的username并展示到页面上。
实现步骤:
第一步:在main.html页面中修改,定义username模型数据基于VUE的数据绑定展示用户名,发送ajax请求获取username
1 2 3 4 5 6 7 8 9 10 11 12 13 14 15 <script> new Vue ({ el : '#app' , data :{ username :null , menuList :[] }, created ( axios.get ('/user/getUsername.do' ).then ((response )=> { this .username = response.data .data ; }); } }); </script>
1 2 3 4 5 <div class ="avatar-wrapper" > <img src ="../img/user2-160x160.jpg" class ="user-avatar" > {{username}} </div >
第二步:创建UserController并提供getUsername方法
1 2 3 4 5 6 7 8 9 10 11 12 13 14 15 16 17 18 19 20 21 22 23 24 25 package com.itheima.controller;import com.itheima.constant.MessageConstant;import com.itheima.entity.Result;import org.springframework.security.core.context.SecurityContextHolder;import org.springframework.security.core.context.SecurityContextImpl;import org.springframework.web.bind.annotation.RequestMapping;import org.springframework.web.bind.annotation.RestController;@RestController @RequestMapping("/user") public class UserController { @RequestMapping("/getUsername") public Result getUsername () throws Exception{ try { org.springframework.security.core.userdetails.User user = (org.springframework.security.core.userdetails.User) SecurityContextHolder.getContext().getAuthentication().getPrincipal(); return new Result (true , MessageConstant.GET_USERNAME_SUCCESS,user.getUsername()); }catch (Exception e){ return new Result (false , MessageConstant.GET_USERNAME_FAIL); } } }
通过debug调试可以看到Spring Security框架在其上下文中保存的用户相关信息:
1.4 用户退出 第一步:在main.html中提供的退出菜单上加入超链接
1 2 3 <el-dropdown-item divided > <span style ="display:block;" > <a href ="/logout.do" > 退出</a > </span > </el-dropdown-item >
第二步:在spring-security.xml文件中配置
1 2 3 4 5 6 7 8 <security:logout logout-url ="/logout.do" logout-success-url ="/login.html" invalidate-session ="true" />
2. 图形报表ECharts 2.1 ECharts简介 ECharts缩写来自Enterprise Charts,商业级数据图表,是百度的一个开源的使用JavaScript实现的数据可视化工具,可以流畅的运行在 PC 和移动设备上,兼容当前绝大部分浏览器(IE8/9/10/11,Chrome,Firefox,Safari等),底层依赖轻量级的矢量图形库 ZRender ,提供直观、交互丰富、可高度个性化定制的数据可视化图表。
官网:https://echarts.baidu.com/
下载地址:https://echarts.baidu.com/download.html
下载完成可以得到如下文件:
解压上面的zip文件:
我们只需要将dist目录下的echarts.js文件引入到页面上就可以使用了
2.2 5分钟上手ECharts 我们可以参考官方提供的5分钟上手ECharts文档感受一下ECharts的使用方式,地址如下:
https://www.echartsjs.com/tutorial.html#5%20%E5%88%86%E9%92%9F%E4%B8%8A%E6%89%8B%20ECharts
第一步:创建html页面并引入echarts.js文件
1 2 3 4 5 6 7 8 <!DOCTYPE html > <html > <head > <meta charset ="utf-8" > <script src ="echarts.js" > </script > </head > </html >
第二步:在页面中准备一个具备宽高的DOM容器。
1 2 3 4 <body > <div id ="main" style ="width: 600px;height:400px;" > </div > </body >
第三步:通过echarts.init方法初始化一个 echarts 实例并通过setOption方法生成一个简单的柱状图
1 2 3 4 5 6 7 8 9 10 11 12 13 14 15 16 17 18 19 20 21 22 23 24 25 26 27 <script type="text/javascript" > var myChart = echarts.init (document .getElementById ('main' )); var option = { title : { text : 'ECharts 入门示例' }, tooltip : {}, legend : { data :['销量' ] }, xAxis : { data : ["衬衫" ,"羊毛衫" ,"雪纺衫" ,"裤子" ,"高跟鞋" ,"袜子" ] }, yAxis : {}, series : [{ name : '销量' , type : 'bar' , data : [5 , 20 , 36 , 10 , 10 , 20 ] }] }; myChart.setOption (option); </script>
效果如下:
2.3 查看ECharts官方实例 ECharts提供了很多官方实例,我们可以通过这些官方实例来查看展示效果和使用方法。
官方实例地址:https://www.echartsjs.com/examples/
可以点击具体的一个图形会跳转到编辑页面,编辑页面左侧展示源码(js部分源码),右侧展示图表效果,如下:
要查看完整代码可以点击右下角的Download按钮将完整页面下载到本地。
通过官方案例我们可以发现,使用ECharts展示图表效果,关键点在于确定此图表所需的数据格式,然后按照此数据格式提供数据就可以了,我们无须关注效果是如何渲染出来的。
在实际应用中,我们要展示的数据往往存储在数据库中,所以我们可以发送ajax请求获取数据库中的数据并转为图表所需的数据即可。
3. 会员数量折线图 3.1 需求分析 会员信息是体检机构的核心数据,其会员数量和增长数量可以反映出机构的部分运营情况。通过折线图可以直观的反映出会员数量的增长趋势。本章节我们需要展示过去一年时间内每个月的会员总数据量。展示效果如下图:
3.2 完善页面 会员数量折线图对应的页面为/pages/report_member.html。
3.2.1 导入ECharts库 第一步:将echarts.js文件复制到health_web工程中
第二步:在report_member.html页面引入echarts.js文件
1 <script src ="../plugins/echarts/echarts.js" > </script >
3.2.2 参照官方实例导入折线图 1 2 3 4 <div class ="box" > <div id ="chart1" style ="height:600px;" > </div > </div >
1 2 3 4 5 6 7 8 9 10 11 12 13 14 15 16 17 18 19 20 21 22 23 24 25 26 27 28 <script type="text/javascript" > var myChart1 = echarts.init (document .getElementById ('chart1' )); axios.get ("/report/getMemberReport.do" ).then ((res )=> { myChart1.setOption ( { title : { text : '会员数量' }, tooltip : {}, legend : { data :['会员数量' ] }, xAxis : { data : res.data .data .months }, yAxis : { type :'value' }, series : [{ name : '会员数量' , type : 'line' , data : res.data .data .memberCount }] }); }); </script>
根据折现图对数据格式的要求,我们发送ajax请求,服务端需要返回如下格式的数据:
1 2 3 4 5 6 7 8 { "data" : { "months" : [ "2019.01" , "2019.02" , "2019.03" , "2019.04" ] , "memberCount" : [ 3 , 4 , 8 , 10 ] } , "flag" : true , "message" : "获取会员统计数据成功" }
3.3 后台代码 3.3.1 Controller 在health_web工程中创建ReportController并提供getMemberReport方法
1 2 3 4 5 6 7 8 9 10 11 12 13 14 15 16 17 18 19 20 21 22 23 24 25 26 27 28 29 30 31 32 33 34 35 36 37 38 39 40 41 42 43 44 45 46 47 48 49 50 51 52 53 54 55 56 57 58 package com.itheima.controller;import com.alibaba.dubbo.config.annotation.Reference;import com.itheima.constant.MessageConstant;import com.itheima.entity.Result;import com.itheima.pojo.Setmeal;import com.itheima.service.MemberService;import com.itheima.service.ReportService;import com.itheima.service.SetmealService;import com.itheima.utils.DateUtils;import org.apache.poi.xssf.usermodel.XSSFRow;import org.apache.poi.xssf.usermodel.XSSFSheet;import org.apache.poi.xssf.usermodel.XSSFWorkbook;import org.springframework.beans.factory.annotation.Autowired;import org.springframework.web.bind.annotation.RequestMapping;import org.springframework.web.bind.annotation.RestController;import javax.servlet.ServletOutputStream;import javax.servlet.http.HttpServletRequest;import javax.servlet.http.HttpServletResponse;import java.io.File;import java.io.FileInputStream;import java.io.FileOutputStream;import java.math.BigDecimal;import java.text.SimpleDateFormat;import java.util.*;@RestController @RequestMapping("/report") public class ReportController { @Reference private MemberService memberService; @RequestMapping("/getMemberReport") public Result getMemberReport () { Calendar calendar = Calendar.getInstance(); calendar.add(Calendar.MONTH,-12 ); List<String> list = new ArrayList <>(); for (int i=0 ;i<12 ;i++){ calendar.add(Calendar.MONTH,1 ); list.add(new SimpleDateFormat ("yyyy.MM" ).format(calendar.getTime())); } Map<String,Object> map = new HashMap <>(); map.put("months" ,list); List<Integer> memberCount = memberService.findMemberCountByMonth(list); map.put("memberCount" ,memberCount); return new Result (true , MessageConstant.GET_MEMBER_NUMBER_REPORT_SUCCESS,map); } }
3.3.2 服务接口 在MemberService服务接口中扩展方法findMemberCountByMonth
1 public List<Integer> findMemberCountByMonth (List<String> month) ;
3.2.3 服务实现类 在MemberServiceImpl服务实现类中实现findMemberCountByMonth方法
1 2 3 4 5 6 7 8 9 10 public List<Integer> findMemberCountByMonth (List<String> month) { List<Integer> list = new ArrayList <>(); for (String m : month){ m = m + ".31" ; Integer count = memberDao.findMemberCountBeforeDate(m); list.add(count); } return list; }
3.3.4 Dao接口 在MemberDao接口中扩展方法findMemberCountBeforeDate
1 public Integer findMemberCountBeforeDate (String date) ;
3.3.5 Mapper映射文件 在MemberDao.xml映射文件中提供SQL语句
1 2 3 4 <select id ="findMemberCountBeforeDate" parameterType ="string" resultType ="int" > select count(id) from t_member where regTime < = #{value} </select >
第10章 图形报表、POI报表 1. 套餐预约占比饼形图 1.1 需求分析 会员可以通过移动端自助进行体检预约,在预约时需要选择预约的体检套餐。本章节我们需要通过饼形图直观的展示出会员预约的各个套餐占比情况。展示效果如下图:
1.2 完善页面 套餐预约占比饼形图对应的页面为/pages/report_setmeal.html。
1.2.1 导入ECharts库 1 <script src ="../plugins/echarts/echarts.js" > </script >
1.2.2 参照官方实例导入饼形图 1 2 3 4 <div class ="box" > <div id ="chart1" style ="height:600px;" > </div > </div >
1 2 3 4 5 6 7 8 9 10 11 12 13 14 15 16 17 18 19 20 21 22 23 24 25 26 27 28 29 30 31 32 33 34 35 36 37 38 39 <script type="text/javascript" > var myChart1 = echarts.init (document .getElementById ('chart1' )); axios.get ("/report/getSetmealReport.do" ).then ((res )=> { myChart1.setOption ({ title : { text : '套餐预约占比' , subtext : '' , x :'center' }, tooltip : { trigger : 'item' , formatter : "{a} <br/>{b} : {c} ({d}%)" }, legend : { orient : 'vertical' , left : 'left' , data : res.data .data .setmealNames }, series : [ { name : '套餐预约占比' , type : 'pie' , radius : '55%' , center : ['50%' , '60%' ], data :res.data .data .setmealCount , itemStyle : { emphasis : { shadowBlur : 10 , shadowOffsetX : 0 , shadowColor : 'rgba(0, 0, 0, 0.5)' } } } ] }); }); </script>
根据饼形图对数据格式的要求,我们发送ajax请求,服务端需要返回如下格式的数据:
1 2 3 4 5 6 7 8 9 10 11 12 { "data" : { "setmealNames" : [ "套餐1" , "套餐2" , "套餐3" ] , "setmealCount" : [ { "name" : "套餐1" , "value" : 10 } , { "name" : "套餐2" , "value" : 30 } , { "name" : "套餐3" , "value" : 25 } ] } , "flag" : true , "message" : "获取套餐统计数据成功" }
1.3 后台代码 1.3.1 Controller 在health_web工程的ReportController中提供getSetmealReport方法
1 2 3 4 5 6 7 8 9 10 11 12 13 14 15 16 17 18 19 20 21 22 @Reference private SetmealService setmealService;@RequestMapping("/getSetmealReport") public Result getSetmealReport () { List<Map<String, Object>> list = setmealService.findSetmealCount(); Map<String,Object> map = new HashMap <>(); map.put("setmealCount" ,list); List<String> setmealNames = new ArrayList <>(); for (Map<String,Object> m : list){ String name = (String) m.get("name" ); setmealNames.add(name); } map.put("setmealNames" ,setmealNames); return new Result (true , MessageConstant.GET_SETMEAL_COUNT_REPORT_SUCCESS,map); }
1.3.2 服务接口 在SetmealService服务接口中扩展方法findSetmealCount
1 public List<Map<String,Object>> findSetmealCount () ;
1.3.3 服务实现类 在SetmealServiceImpl服务实现类中实现findSetmealCount方法
1 2 3 public List<Map<String, Object>> findSetmealCount () { return setmealDao.findSetmealCount(); }
1.3.4 Dao接口 在SetmealDao接口中扩展方法findSetmealCount
1 public List<Map<String,Object>> findSetmealCount () ;
1.3.5 Mapper映射文件 在SetmealDao.xml映射文件中提供SQL语句
1 2 3 4 5 6 <select id ="findSetmealCount" resultType ="map" > select s.name,count(o.id) as value from t_order o ,t_setmeal s where o.setmeal_id = s.id group by s.name </select >
2. 运营数据统计 2.1 需求分析 通过运营数据统计可以展示出体检机构的运营情况,包括会员数据、预约到诊数据、热门套餐等信息。本章节就是要通过一个表格的形式来展示这些运营数据。效果如下图:
2.2 完善页面 运营数据统计对应的页面为/pages/report_business.html。
2.2.1 定义模型数据 定义数据模型,通过VUE的数据绑定展示数据
1 2 3 4 5 6 7 8 9 10 11 12 13 14 15 16 17 18 19 20 21 <script> var vue = new Vue ({ el : '#app' , data :{ reportData :{ reportDate :null , todayNewMember :0 , totalMember :0 , thisWeekNewMember :0 , thisMonthNewMember :0 , todayOrderNumber :0 , todayVisitsNumber :0 , thisWeekOrderNumber :0 , thisWeekVisitsNumber :0 , thisMonthOrderNumber :0 , thisMonthVisitsNumber :0 , hotSetmeal :[] } } }) </script>
1 2 3 4 5 6 7 8 9 10 11 12 13 14 15 16 17 18 19 20 21 22 23 24 25 26 27 28 29 30 31 32 33 34 35 36 37 38 39 40 41 42 43 44 45 46 47 48 49 50 51 52 53 54 55 56 57 58 59 <div class ="box" style ="height: 900px" > <div class ="excelTitle" > <el-button @click ="exportExcel" > 导出Excel</el-button > 运营数据统计 </div > <div class ="excelTime" > 日期:{{reportData.reportDate}}</div > <table class ="exceTable" cellspacing ="0" cellpadding ="0" > <tr > <td colspan ="4" class ="headBody" > 会员数据统计</td > </tr > <tr > <td width ='20%' class ="tabletrBg" > 新增会员数</td > <td width ='30%' > {{reportData.todayNewMember}}</td > <td width ='20%' class ="tabletrBg" > 总会员数</td > <td width ='30%' > {{reportData.totalMember}}</td > </tr > <tr > <td class ="tabletrBg" > 本周新增会员数</td > <td > {{reportData.thisWeekNewMember}}</td > <td class ="tabletrBg" > 本月新增会员数</td > <td > {{reportData.thisMonthNewMember}}</td > </tr > <tr > <td colspan ="4" class ="headBody" > 预约到诊数据统计</td > </tr > <tr > <td class ="tabletrBg" > 今日预约数</td > <td > {{reportData.todayOrderNumber}}</td > <td class ="tabletrBg" > 今日到诊数</td > <td > {{reportData.todayVisitsNumber}}</td > </tr > <tr > <td class ="tabletrBg" > 本周预约数</td > <td > {{reportData.thisWeekOrderNumber}}</td > <td class ="tabletrBg" > 本周到诊数</td > <td > {{reportData.thisWeekVisitsNumber}}</td > </tr > <tr > <td class ="tabletrBg" > 本月预约数</td > <td > {{reportData.thisMonthOrderNumber}}</td > <td class ="tabletrBg" > 本月到诊数</td > <td > {{reportData.thisMonthVisitsNumber}}</td > </tr > <tr > <td colspan ="4" class ="headBody" > 热门套餐</td > </tr > <tr class ="tabletrBg textCenter" > <td > 套餐名称</td > <td > 预约数量</td > <td > 占比</td > <td > 备注</td > </tr > <tr v-for ="s in reportData.hotSetmeal" > <td > {{s.name}}</td > <td > {{s.setmeal_count}}</td > <td > {{s.proportion}}</td > <td > </td > </tr > </table > </div >
2.2.2 发送请求获取动态数据 在VUE的钩子函数中发送ajax请求获取动态数据,通过VUE的数据绑定将数据展示到页面
1 2 3 4 5 6 7 8 9 10 11 12 13 14 15 16 17 18 19 20 21 22 23 24 25 26 27 <script> var vue = new Vue ({ el : '#app' , data :{ reportData :{ reportDate :null , todayNewMember :0 , totalMember :0 , thisWeekNewMember :0 , thisMonthNewMember :0 , todayOrderNumber :0 , todayVisitsNumber :0 , thisWeekOrderNumber :0 , thisWeekVisitsNumber :0 , thisMonthOrderNumber :0 , thisMonthVisitsNumber :0 , hotSetmeal :[] } }, created ( axios.get ("/report/getBusinessReportData.do" ).then ((res )=> { this .reportData = res.data .data ; }); } }) </script>
根据页面对数据格式的要求,我们发送ajax请求,服务端需要返回如下格式的数据:
1 2 3 4 5 6 7 8 9 10 11 12 13 14 15 16 17 18 19 20 21 22 23 { "data" : { "todayVisitsNumber" : 0 , "reportDate" : "2019-04-25" , "todayNewMember" : 0 , "thisWeekVisitsNumber" : 0 , "thisMonthNewMember" : 2 , "thisWeekNewMember" : 0 , "totalMember" : 10 , "thisMonthOrderNumber" : 2 , "thisMonthVisitsNumber" : 0 , "todayOrderNumber" : 0 , "thisWeekOrderNumber" : 0 , "hotSetmeal" : [ { "proportion" : 0.4545 , "name" : "粉红珍爱(女)升级TM12项筛查体检套餐" , "setmeal_count" : 5 } , { "proportion" : 0.1818 , "name" : "阳光爸妈升级肿瘤12项筛查体检套餐" , "setmeal_count" : 2 } , { "proportion" : 0.1818 , "name" : "珍爱高端升级肿瘤12项筛查" , "setmeal_count" : 2 } , { "proportion" : 0.0909 , "name" : "孕前检查套餐" , "setmeal_count" : 1 } ] , } , "flag" : true , "message" : "获取运营统计数据成功" }
2.3 后台代码 2.3.1 Controller 在ReportController中提供getBusinessReportData方法
1 2 3 4 5 6 7 8 9 10 11 12 13 14 15 16 17 @Reference private ReportService reportService;@RequestMapping("/getBusinessReportData") public Result getBusinessReportData () { try { Map<String, Object> result = reportService.getBusinessReport(); return new Result (true ,MessageConstant.GET_BUSINESS_REPORT_SUCCESS,result); } catch (Exception e) { e.printStackTrace(); return new Result (true ,MessageConstant.GET_BUSINESS_REPORT_FAIL); } }
2.3.2 服务接口 在health_interface工程中创建ReportService服务接口并声明getBusinessReport方法
1 2 3 4 5 6 7 8 9 10 11 12 13 14 15 16 17 18 19 20 21 22 package com.itheima.service;import java.util.Map;public interface ReportService { public Map<String,Object> getBusinessReport () throws Exception; }
2.3.3 服务实现类 在health_service工程中创建服务实现类ReportServiceImpl并实现ReportService接口
1 2 3 4 5 6 7 8 9 10 11 12 13 14 15 16 17 18 19 20 21 22 23 24 25 26 27 28 29 30 31 32 33 34 35 36 37 38 39 40 41 42 43 44 45 46 47 48 49 50 51 52 53 54 55 56 57 58 59 60 61 62 63 64 65 66 67 68 69 70 71 72 73 74 75 76 77 78 79 80 81 82 83 84 85 86 87 88 89 90 91 92 93 94 95 96 97 98 package com.itheima.service;import com.alibaba.dubbo.config.annotation.Service;import com.itheima.dao.MemberDao;import com.itheima.dao.OrderDao;import com.itheima.utils.DateUtils;import org.springframework.beans.factory.annotation.Autowired;import org.springframework.transaction.annotation.Transactional;import java.util.Date;import java.util.HashMap;import java.util.List;import java.util.Map;@Service(interfaceClass = ReportService.class) @Transactional public class ReportServiceImpl implements ReportService { @Autowired private MemberDao memberDao; @Autowired private OrderDao orderDao; public Map<String, Object> getBusinessReport () throws Exception{ String today = DateUtils.parseDate2String(DateUtils.getToday()); String thisWeekMonday = DateUtils.parseDate2String(DateUtils.getThisWeekMonday()); String firstDay4ThisMonth = DateUtils.parseDate2String(DateUtils.getFirstDay4ThisMonth()); Integer todayNewMember = memberDao.findMemberCountByDate(today); Integer totalMember = memberDao.findMemberTotalCount(); Integer thisWeekNewMember = memberDao.findMemberCountAfterDate(thisWeekMonday); Integer thisMonthNewMember = memberDao.findMemberCountAfterDate(firstDay4ThisMonth); Integer todayOrderNumber = orderDao.findOrderCountByDate(today); Integer thisWeekOrderNumber = orderDao.findOrderCountAfterDate(thisWeekMonday); Integer thisMonthOrderNumber = orderDao.findOrderCountAfterDate(firstDay4ThisMonth); Integer todayVisitsNumber = orderDao.findVisitsCountByDate(today); Integer thisWeekVisitsNumber = orderDao.findVisitsCountAfterDate(thisWeekMonday); Integer thisMonthVisitsNumber = orderDao.findVisitsCountAfterDate(firstDay4ThisMonth); List<Map> hotSetmeal = orderDao.findHotSetmeal(); Map<String,Object> result = new HashMap <>(); result.put("reportDate" ,today); result.put("todayNewMember" ,todayNewMember); result.put("totalMember" ,totalMember); result.put("thisWeekNewMember" ,thisWeekNewMember); result.put("thisMonthNewMember" ,thisMonthNewMember); result.put("todayOrderNumber" ,todayOrderNumber); result.put("thisWeekOrderNumber" ,thisWeekOrderNumber); result.put("thisMonthOrderNumber" ,thisMonthOrderNumber); result.put("todayVisitsNumber" ,todayVisitsNumber); result.put("thisWeekVisitsNumber" ,thisWeekVisitsNumber); result.put("thisMonthVisitsNumber" ,thisMonthVisitsNumber); result.put("hotSetmeal" ,hotSetmeal); return result; } }
2.3.4 Dao接口 在OrderDao和MemberDao中声明相关统计查询方法
1 2 3 4 5 6 7 8 9 10 11 12 13 14 15 16 package com.itheima.dao;import com.itheima.pojo.Order;import java.util.List;import java.util.Map;public interface OrderDao { public void add (Order order) ; public List<Order> findByCondition (Order order) ; public Map findById4Detail (Integer id) ; public Integer findOrderCountByDate (String date) ; public Integer findOrderCountAfterDate (String date) ; public Integer findVisitsCountByDate (String date) ; public Integer findVisitsCountAfterDate (String date) ; public List<Map> findHotSetmeal () ; }
1 2 3 4 5 6 7 8 9 10 11 12 13 14 15 16 17 18 19 package com.itheima.dao;import com.github.pagehelper.Page;import com.itheima.pojo.Member;import java.util.List;public interface MemberDao { public List<Member> findAll () ; public Page<Member> selectByCondition (String queryString) ; public void add (Member member) ; public void deleteById (Integer id) ; public Member findById (Integer id) ; public Member findByTelephone (String telephone) ; public void edit (Member member) ; public Integer findMemberCountBeforeDate (String date) ; public Integer findMemberCountByDate (String date) ; public Integer findMemberCountAfterDate (String date) ; public Integer findMemberTotalCount () ; }
2.3.5 Mapper映射文件 在OrderDao.xml和MemberDao.xml中定义SQL语句
OrderDao.xml:
1 2 3 4 5 6 7 8 9 10 11 12 13 14 15 16 17 18 19 20 21 22 23 24 25 26 27 28 29 30 31 <select id ="findOrderCountByDate" parameterType ="string" resultType ="int" > select count(id) from t_order where orderDate = #{value} </select > <select id ="findOrderCountAfterDate" parameterType ="string" resultType ="int" > select count(id) from t_order where orderDate > = #{value} </select > <select id ="findVisitsCountByDate" parameterType ="string" resultType ="int" > select count(id) from t_order where orderDate = #{value} and orderStatus = '已到诊' </select > <select id ="findVisitsCountAfterDate" parameterType ="string" resultType ="int" > select count(id) from t_order where orderDate > = #{value} and orderStatus = '已到诊' </select > <select id ="findHotSetmeal" resultType ="map" > select s.name, count(o.id) setmeal_count , count(o.id)/(select count(id) from t_order) proportion from t_order o inner join t_setmeal s on s.id = o.setmeal_id group by o.setmeal_id order by setmeal_count desc limit 0,4 </select >
MemberDao.xml:
1 2 3 4 5 6 7 8 9 10 11 12 13 14 15 16 17 18 19 <select id ="findMemberCountBeforeDate" parameterType ="string" resultType ="int" > select count(id) from t_member where regTime < = #{value} </select > <select id ="findMemberCountByDate" parameterType ="string" resultType ="int" > select count(id) from t_member where regTime = #{value} </select > <select id ="findMemberCountAfterDate" parameterType ="string" resultType ="int" > select count(id) from t_member where regTime > = #{value} </select > <select id ="findMemberTotalCount" resultType ="int" > select count(id) from t_member </select >
3. 运营数据统计报表导出 3.1 需求分析 运营数据统计报表导出就是将统计数据写入到Excel并提供给客户端浏览器进行下载,以便体检机构管理人员对运营数据的查看和存档。
3.2 提供模板文件 本章节我们需要将运营统计数据通过POI写入到Excel文件,对应的Excel效果如下:
通过上面的Excel效果可以看到,表格比较复杂,涉及到合并单元格、字体、字号、字体加粗、对齐方式等的设置。如果我们通过POI编程的方式来设置这些效果代码会非常繁琐。
在企业实际开发中,对于这种比较复杂的表格导出一般我们会提前设计一个Excel模板文件,在这个模板文件中提前将表格的结构和样式设置好,我们的程序只需要读取这个文件并在文件中的相应位置写入具体的值就可以了。
在本章节资料中已经提供了一个名为report_template.xlsx的模板文件,需要将这个文件复制到health_web工程中
3.3 完善页面 在report_business.html页面提供导出按钮并绑定事件
1 2 3 <div class ="excelTitle" > <el-button @click ="exportExcel" > 导出Excel</el-button > 运营数据统计 </div >
1 2 3 4 5 6 methods :{ exportExcel ( window .location .href = '/report/exportBusinessReport.do' ; } }
3.4 后台代码 在ReportController中提供exportBusinessReport方法,基于POI将数据写入到Excel中并通过输出流下载到客户端
1 2 3 4 5 6 7 8 9 10 11 12 13 14 15 16 17 18 19 20 21 22 23 24 25 26 27 28 29 30 31 32 33 34 35 36 37 38 39 40 41 42 43 44 45 46 47 48 49 50 51 52 53 54 55 56 57 58 59 60 61 62 63 64 65 66 67 68 69 70 71 72 73 74 75 76 77 78 79 80 81 82 @RequestMapping("/exportBusinessReport") public Result exportBusinessReport (HttpServletRequest request, HttpServletResponse response) { try { Map<String, Object> result = reportService.getBusinessReport(); String reportDate = (String) result.get("reportDate" ); Integer todayNewMember = (Integer) result.get("todayNewMember" ); Integer totalMember = (Integer) result.get("totalMember" ); Integer thisWeekNewMember = (Integer) result.get("thisWeekNewMember" ); Integer thisMonthNewMember = (Integer) result.get("thisMonthNewMember" ); Integer todayOrderNumber = (Integer) result.get("todayOrderNumber" ); Integer thisWeekOrderNumber = (Integer) result.get("thisWeekOrderNumber" ); Integer thisMonthOrderNumber = (Integer) result.get("thisMonthOrderNumber" ); Integer todayVisitsNumber = (Integer) result.get("todayVisitsNumber" ); Integer thisWeekVisitsNumber = (Integer) result.get("thisWeekVisitsNumber" ); Integer thisMonthVisitsNumber = (Integer) result.get("thisMonthVisitsNumber" ); List<Map> hotSetmeal = (List<Map>) result.get("hotSetmeal" ); String temlateRealPath = request.getSession().getServletContext().getRealPath("template" ) + File.separator + "report_template.xlsx" ; XSSFWorkbook workbook = new XSSFWorkbook (new FileInputStream (new File (temlateRealPath))); XSSFSheet sheet = workbook.getSheetAt(0 ); XSSFRow row = sheet.getRow(2 ); row.getCell(5 ).setCellValue(reportDate); row = sheet.getRow(4 ); row.getCell(5 ).setCellValue(todayNewMember); row.getCell(7 ).setCellValue(totalMember); row = sheet.getRow(5 ); row.getCell(5 ).setCellValue(thisWeekNewMember); row.getCell(7 ).setCellValue(thisMonthNewMember); row = sheet.getRow(7 ); row.getCell(5 ).setCellValue(todayOrderNumber); row.getCell(7 ).setCellValue(todayVisitsNumber); row = sheet.getRow(8 ); row.getCell(5 ).setCellValue(thisWeekOrderNumber); row.getCell(7 ).setCellValue(thisWeekVisitsNumber); row = sheet.getRow(9 ); row.getCell(5 ).setCellValue(thisMonthOrderNumber); row.getCell(7 ).setCellValue(thisMonthVisitsNumber); int rowNum = 12 ; for (Map map : hotSetmeal){ String name = (String) map.get("name" ); Long setmeal_count = (Long) map.get("setmeal_count" ); BigDecimal proportion = (BigDecimal) map.get("proportion" ); row = sheet.getRow(rowNum ++); row.getCell(4 ).setCellValue(name); row.getCell(5 ).setCellValue(setmeal_count); row.getCell(6 ).setCellValue(proportion.doubleValue()); } ServletOutputStream out = response.getOutputStream(); response.setContentType("application/vnd.ms-excel" ); response.setHeader("content-Disposition" , "attachment;filename=report.xlsx" ); response.setHeader("Content-Disposition" , "attachment;filename=" + java.net.URLEncoder.encode("逾期的订单数据" , "UTF-8" )+".xls" workbook.write(out); out.flush(); out.close(); workbook.close(); return null ; }catch (Exception e){ return new Result (false , MessageConstant.GET_BUSINESS_REPORT_FAIL,null ); } }
功能进阶优化 jemeter准备 设置线程组
设置http请求
设置请求头
设置监听器并执行
体检预约-并发优化
并发问题:同一个人出现多个同样的订单
1.页面防重 2.接口防重
详细代码:
每次请求签发token
1 2 3 4 5 6 7 @RequestMapping("/getToken") public Result getToken () { String token = UUID.randomUUID().toString(); jedisPool.getResource().set(token,token); return Result.success("" ,token); }
每次请求携带token
每次预约接口校验token(redis扛得住这点请求的)
1 2 3 4 5 6 7 8 9 10 11 12 13 14 15 16 17 18 19 20 21 22 23 24 25 26 27 28 29 30 31 32 33 34 35 36 37 38 39 40 41 42 43 44 45 46 47 48 @RequestMapping("/submit") public Result submitOrder (@RequestBody OrderInfoVo orderInfoVo) { String token = orderInfoVo.getToken(); if (StringUtils.isEmpty(token)) { return Result.error(MessageConstant.ORDER_ILLEGAL_REQUEST); } String redisToken = jedisPool.getResource().get(token); if (StringUtils.isEmpty(redisToken)) { return Result.error(MessageConstant.ORDER_INVALID_REQUEST); } else { jedisPool.getResource().del(redisToken); } String telephone = orderInfoVo.getTelephone(); String codeInRedis = jedisPool.getResource().get( telephone + RedisMessageConstant.SENDTYPE_ORDER); String validateCode = orderInfoVo.getValidateCode(); if (codeInRedis == null || !codeInRedis.equals(validateCode)){ return Result.error(MessageConstant.VALIDATECODE_ERROR); } Result result = null ; try { orderInfoVo.setOrderType(Order.ORDERTYPE_WEIXIN); result = orderService.order(orderInfoVo); }catch (Exception e){ e.printStackTrace(); return result; } if (result.isFlag()){ try { String orderDate = DateUtils.parseDate2String(orderInfoVo.getOrderDate()); } catch (ClientException e) { e.printStackTrace(); } catch (Exception e) { e.printStackTrace(); } System.out.println("发送预约成功短信..." ); } return result; }
3.乐观锁 数据库增加乐观锁字段
根据乐观锁修改
详细代码
1 2 3 4 5 6 7 8 9 10 11 12 13 14 15 16 17 18 19 20 21 22 23 24 25 26 27 28 29 30 31 32 33 34 35 36 37 38 39 40 41 42 43 44 45 46 47 48 49 50 51 52 53 54 55 56 57 58 59 60 61 62 63 64 65 66 67 68 69 @Override public Result order (OrderInfoVo orderInfoVo) throws Exception { Date date = orderInfoVo.getOrderDate(); OrderSetting orderSetting = orderSettingDao.findByOrderDate(date); if (orderSetting == null ){ return Result.error(MessageConstant.SELECTED_DATE_CANNOT_ORDER); } int number = orderSetting.getNumber(); int reservations = orderSetting.getReservations(); if (reservations >= number){ return Result.error(MessageConstant.ORDER_FULL); } String telephone = orderInfoVo.getTelephone(); Member member = memberDao.findByTelephone(telephone); if (member != null ){ Integer memberId = member.getId(); int setmealId = orderInfoVo.getSetmealId(); Order order = new Order (memberId,date,null ,null ,setmealId); List<Order> list = orderDao.findByCondition(order); if (list != null && list.size() > 0 ){ return Result.error(MessageConstant.HAS_ORDERED); } } int i = orderSettingDao.editReservationsByOrderDate(orderSetting); if (i != 1 ) { throw new RuntimeException (MessageConstant.ORDER_FAIL); } if (member == null ){ member = new Member (); member.setName(orderInfoVo.getName()); member.setPhoneNumber(telephone); member.setIdCard(orderInfoVo.getIdCard()); member.setSex(String.valueOf(orderInfoVo.getSex())); member.setRegTime(new Date ()); memberDao.add(member); } Order order = new Order (member.getId(), date, orderInfoVo.getOrderType(), Order.ORDERSTATUS_NO, orderInfoVo.getSetmealId()); orderDao.add(order); return Result.success(MessageConstant.ORDER_SUCCESS,order); } <!--更新已预约人数--> <update id="editReservationsByOrderDate" parameterType="com.nbchen.health.pojo.OrderSetting" > update t_ordersetting set reservations = reservations+1 ,version=version+1 where orderDate = #{orderDate,jdbcType=DATE} and version=#{version} </update>
接入支付宝支付平台
1 2 3 4 5 6 <dependency > <groupId > com.alipay.sdk</groupId > <artifactId > alipay-sdk-java</artifactId > <version > 3.7.110.ALL</version > </dependency >
研发服务中的沙箱设置一下公钥
生成公钥
拿到支付宝根据你上传的公钥生成的支付公钥
根据接口文档写代码
natapp 内网穿透
使用:https://blog.csdn.net/baby901019/article/details/79157867
使用买家账号支付
分布式session
前面我们登录后存入信息到cookie,如果我们拦截请求是否携带cookie,没有的话到登录页.这样如果有多台服务器.这样就会每台服务器都要登录。
所以引入redis,做分布式session,就是在某台登录成功的信息存入redis,并且将token返回给用户,下次登录携带token,从redis读取登录信息,如果有就放行,不用再转到登录页。
1 2 3 4 5 6 7 8 9 10 11 12 13 14 15 16 17 18 19 20 21 22 23 24 25 26 27 28 29 30 31 32 33 34 @RequestMapping("/check") public Result check (HttpServletResponse response, @RequestBody LoginInfoVo loginInfoVo) { String telephone = loginInfoVo.getTelephone(); String validateCode = loginInfoVo.getValidateCode(); String codeInRedis = jedisPool.getResource().get(telephone + RedisMessageConstant.SENDTYPE_LOGIN); if (codeInRedis == null || !codeInRedis.equals(validateCode)){ return Result.error(MessageConstant.VALIDATECODE_ERROR); }else { Member member = memberService.findByTelephone(telephone); if (member == null ){ member = new Member (); member.setPhoneNumber(telephone); member.setRegTime(new Date ()); memberService.add(member); } String token = UUID.randomUUID().toString(); jedisPool.getResource().setex(token,60 *60 *24 *30 , JSON.toJSONString(member)); return Result.success(MessageConstant.LOGIN_SUCCESS,token); } }
登录页拿到token
1 2 3 4 5 6 7 8 9 10 11 12 13 14 15 16 17 18 19 20 21 22 23 24 25 26 27 28 29 30 31 32 33 34 35 36 37 38 39 40 41 42 43 var vue = new Vue ({ el :'#app' , data :{ loginInfo :{} }, methods :{ sendValidateCode ( var telephone = this .loginInfo .telephone ; if (!checkTelephone (telephone)) { this .$message .error ('请输入正确的手机号' ); return false ; } validateCodeButton = $("#validateCodeButton" )[0 ]; clock = window .setInterval (doLoop, 1000 ); axios.post ("/validateCode/send4Login.do?telephone=" + telephone).then ((response ) => { if (!response.data .flag ){ this .$message .error ('验证码发送失败,请检查手机号输入是否正确' ); } }); }, login ( var telephone = this .loginInfo .telephone ; if (!checkTelephone (telephone)) { this .$message .error ('请输入正确的手机号' ); return false ; } axios.post ("/login/check.do" ,this .loginInfo ).then ((res ) => { if (res.data .flag ){ localStorage .setItem ("login_token" ,res.data .data ) window .location .href ="index.html" ; }else { this .$message .error (res.data .message ); } }); } } });
后续请求的时候携带token
1 2 3 4 5 axios.post ("/setmeal/getSetmeal.do?token=" +localStorage .getItem ("login_token" )).then ((response )=> { if (response.data .flag ){ this .setmealList = response.data .data ; } });
项目实战 实战内容 1、用户、菜单、权限、角色数据动态维护
说明:可以参照项目中已经实现的页面(检查项、检查组等)进行改造,需要完成:
权限数据动态维护(增删改查)
菜单数据动态维护(增删改查)
角色数据动态维护(增删改查,注意维护角色数据时需要动态关联权限和菜单数据)
用户数据动态维护(增删改查,注意维护用户数据时需要动态关联角色数据)
2、动态展示系统菜单
说明:目前我们的系统菜单是在页面固定写死的,现在需要改为用户认证通过后,在系统首页根据当前登录人动态展示菜单
3、会员数量报表指定时间段展示
说明:目前我们项目中的会员数量折线图是固定展示的过去一年的会员数量,现在需要改为在页面中通过两个日历控件来选择时间段,根据所选的时间段来动态展示此时间段内的每个月会员数量
4、会员数量组成饼形图(按照性别分、按照年龄段分)
说明:需要实现如下两个饼形图:
按照会员的性别来展示男女会员的占比,通过饼形图来展示
按照会员的年龄段(可以指定几个年龄段,例如0-18、18-30、30-45、45以上)来展示各个年龄段的占比,通过饼形图来展示
5、移动端页面使用redis缓存套餐数据
说明:目前移动端的套餐列表页面和套餐详情页面每次展示都需要查询数据库,现在需要将这些套餐信息放入redis缓存来提高查询性能
6、定时清理预约设置历史数据
说明:预约设置(OrderSetting)数据是用来设置未来每天的可预约人数,随着时间的推移预约设置表的数据会越来越多,而对于已经过去的历史数据可以定时来进行清理,例如每月最后一天凌晨2点执行一次清理任务
7、预约可以选择家庭联系人
8、预约加上乐观锁
9、短信验证码接口加上图形验证码
10、后台电话预约功能
11、移动端登录加上AOP
12、后台加上操作日志(日志)
实战要求 1、按照班级已有分组进行分组实战,每组完成实战全部内容,具体分工由组长进行任务分配
2、分组实战过程需要使用Git进行代码管理,组长负责创建Git远程仓库并将基础工程推送至远程仓库,其他组员直接从Git远程仓库克隆到本地进行开发
3、组员每天下课前需要向组长汇报开发进度
